ANOMALOUS MUSHROOM
I continue to produce samples for the Chanterelle pattern. This one is in a narrow self-striper – the kind of sock yarn that when knit up, makes socks with stripes of two or at most three rounds.

And for reference, what the ball looked like before it was consumed:

This scarf is another oddity. It has the same gauge and width as all of the others. The Steinback Aktiv Effekt yarn is marked as being 421 meters (460 yards) – comparable to the others.
BUT.
I was only able to knit up nine full trumpet sections, plus the beginning and end section. I did have a bit of yarn left over, but only enough for about a third of a trumpet. So based on what I’ve seen so far, here’s the scarf length to yardage result. As you can see, it doesn’t quite make sense.
|
Maker/Yarn |
Description |
Labeled length |
Number of Full Trumpet Segments and Length |
| Steinback Wolle Aktiv Effekt |
Self-striper Narrow stripes with one faux Fair Isle inclusion |
460 yards 421 meters |
9 segments |
| Schoeller + Stahl Fortissima Colori Socka Color |
Self-striper Combo of narrow red and white stripes with one medium length blue/white stripe |
459.3 yards 420 meters |
10 segments |
| Zwerger Garn Opal 4 fach |
Self-striper Half medium, half narrow stripes. One faux Fair Isle inclusion |
465 yards 425.2 meters |
10 segments |
| Schoppel-Wolle Zauberball Crazy |
Gradient with two independently shading plies | 459 yards 419.7 meters |
11 segments |
| Schoppel-Wolle Zauberball Crazy |
Gradient with two independently shading plies | 459 yards 419.7 meters |
10 segments |
The saving grace of the pattern is that the trumpet segment and the final section are identical until one is half-way through the trumpet sequence. At that point the knitter can look at the remaining yarn and decide on whether or not to risk finishing out the last trumpet and then going on to the final segment (which would require about 36 yards remaining), or punting and just finishing off the segment at hand according to the instructions for the final section.
FLAG WAVING
I didn’t expect this. I’ve finished the Chanterelle knit from the Schoeller and Stahl’s Fortisimma Socka Color, # 1776, “Stars and Stripes.” In the ball it looked like it would present as medium width stripes, narrower than the ones in the ocean-wave blue sample scarf, but not particularly special in any way. In my standard socks, I would guess that each stripe would be about three or four rounds, with the blue areas about four or five rounds.

BUT
In the directional world of this pattern, look what happened!

In a serendipity I seldom achieve, the directionality of the Chanterelle pattern, coupled with the narrow width sections make a flags-in-the breeze effect. And see that little butterfly at the right, containing about 18 inches of yarn? That’s ALL I had left. A squeaker, for sure.
Although I can’t bring myself to sport this, I have the perfect family to give this to – friends with a son in international competitions. It will be the perfect thing for them to wear as they cheer him on.
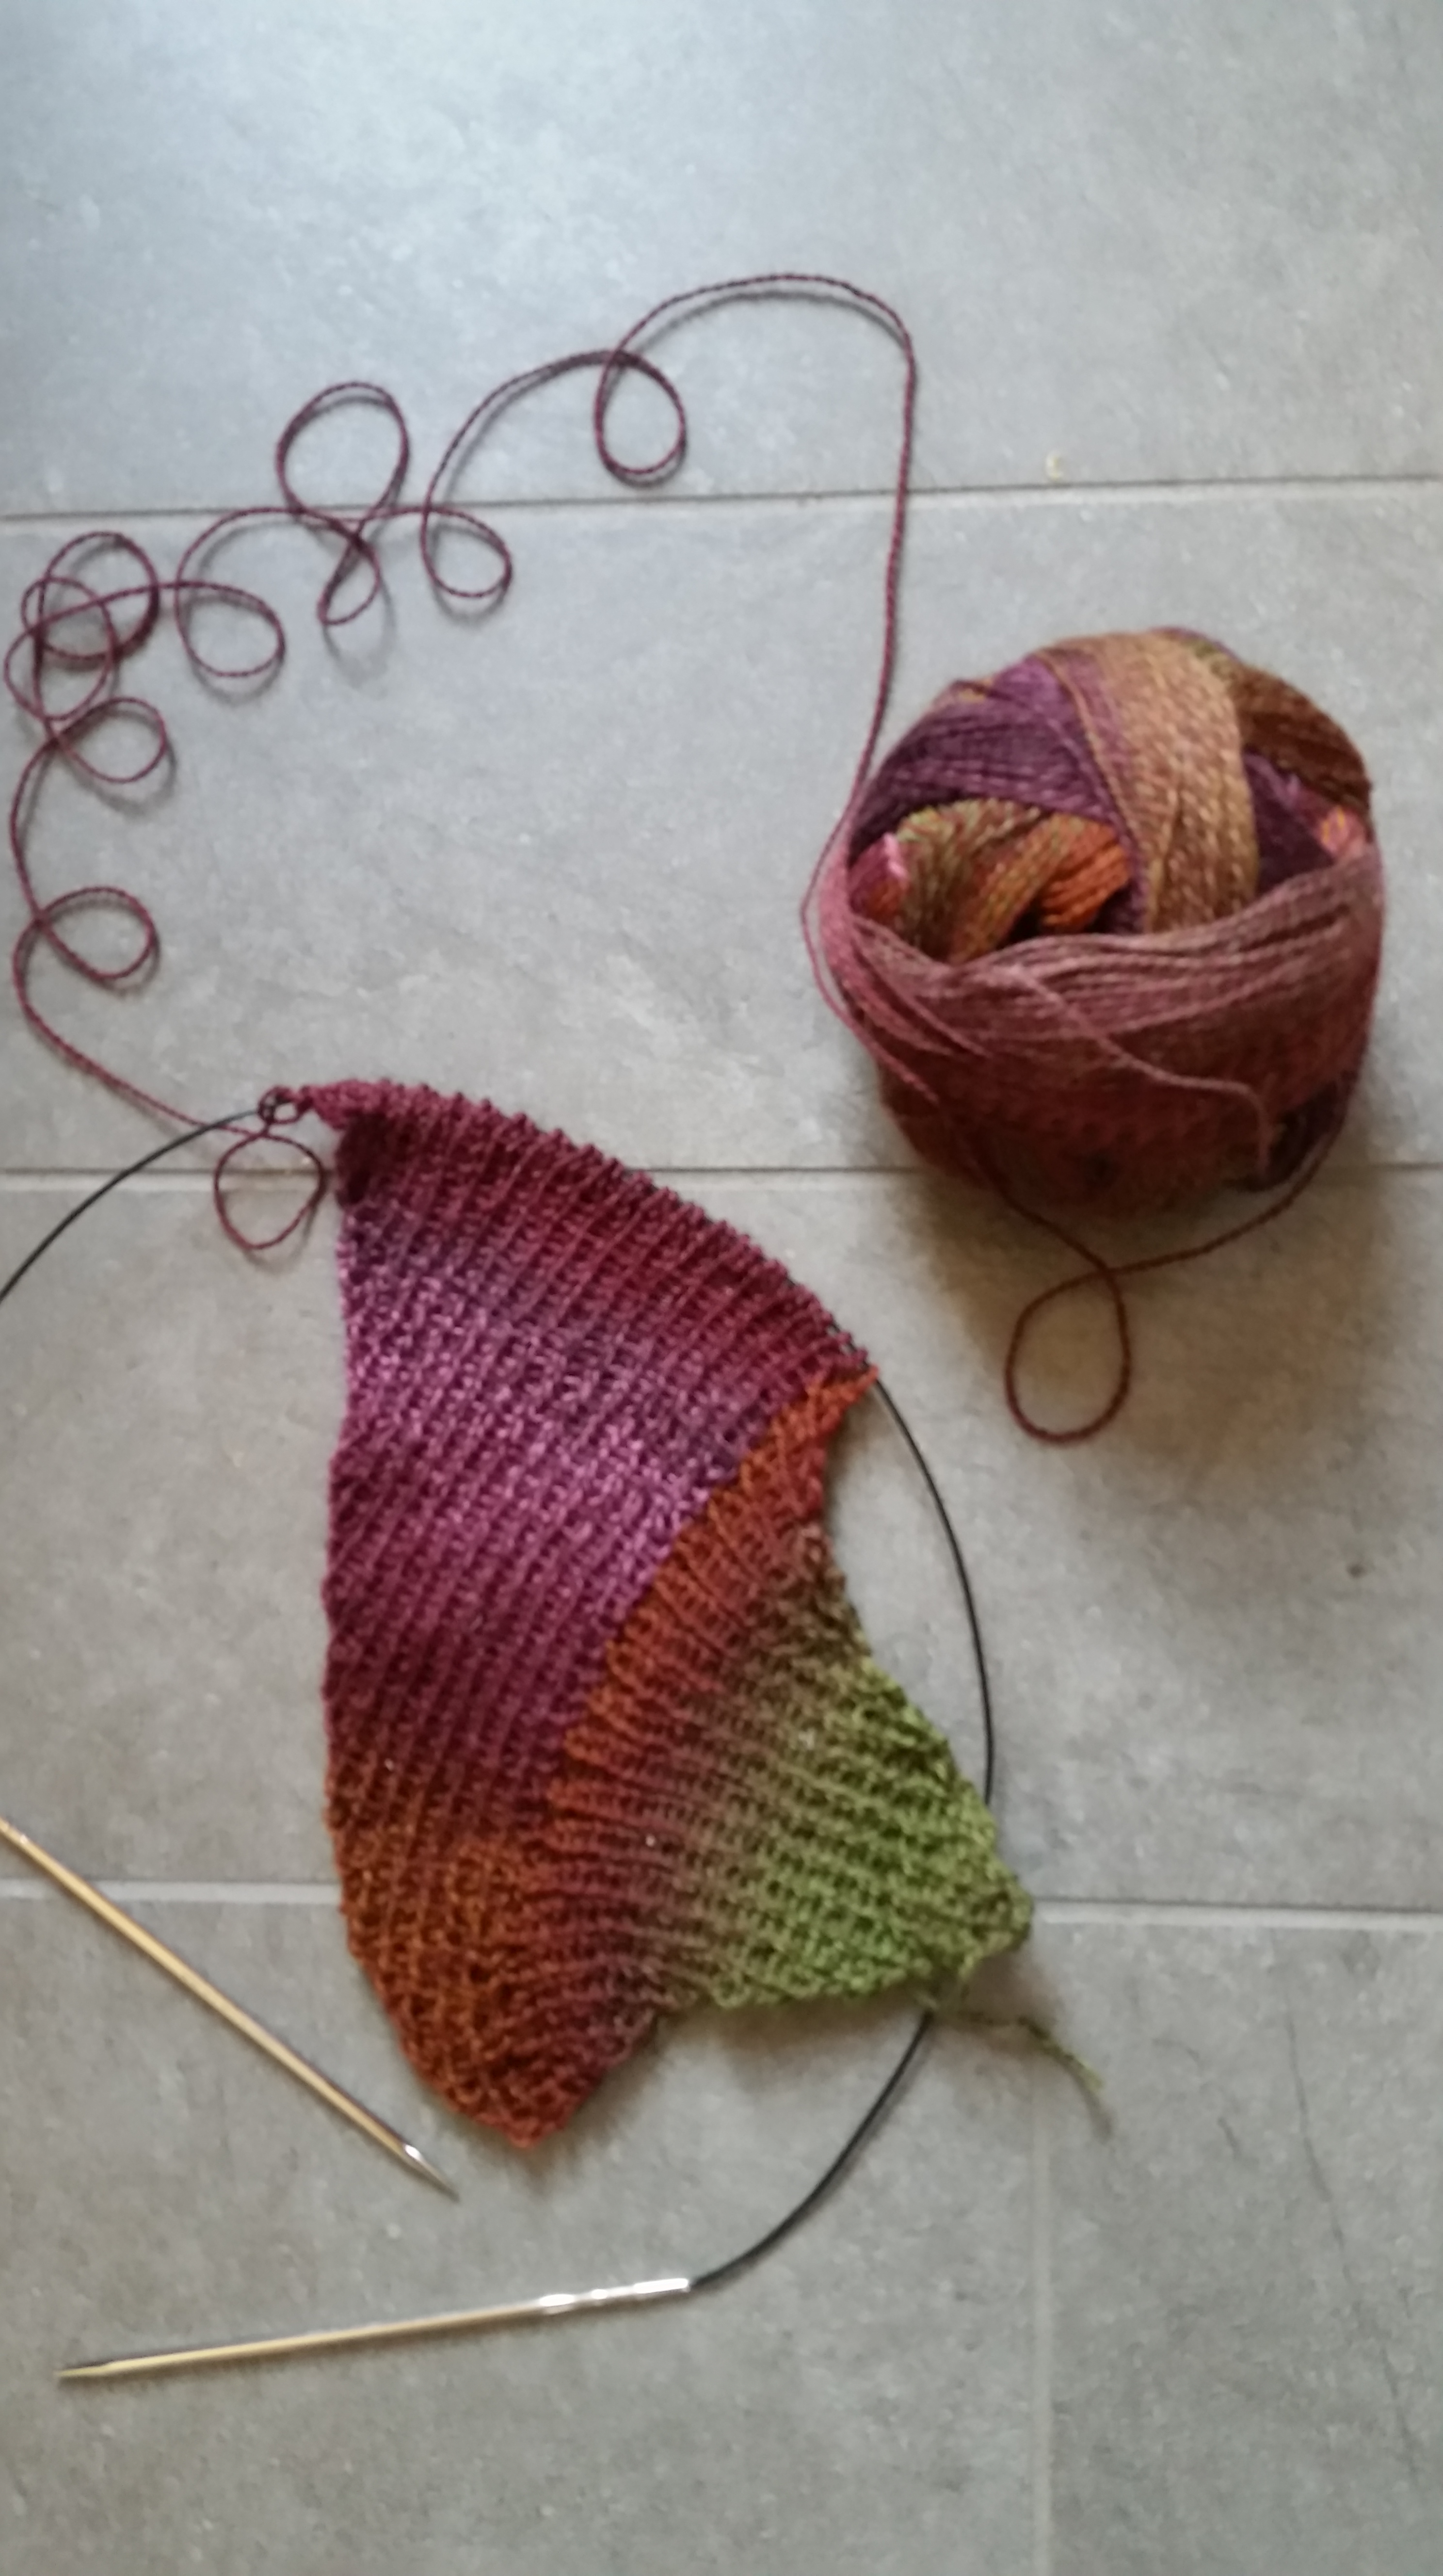
Now on to yet another. My goal is to show off a wide variety of self-stripers and variegateds, so folks can gauge what their own yarn might look like. Digging down into the stash, I come up with another Nancy-Gift Yarn (it was a very generous gift). This is Steinbach Wolle Aktiv Effect sock yarn, and as you can see from the 100g skein promises to have narrow stripes – probably manifesting as only two rounds each in a standard sock.

As always, you can find the Chanterelle pattern for free at the Knitting Patterns tab at the top of this page.
And in other news, because there can always be other news, I’ve been asked to do a quickie set of fingerless mittens, from the leftover screaming yellow shawl yarn. I’ll be casting on for that over the weekend.
CHANTERELLE – EVERYTHING OLD IS NEW AGAIN
UPDATE: THE DOWNLOADABLE PDF PATTERN FOR CHANTERELLE HAS BEEN ADDED TO MY KNITTING PATTERNS PAGE, AT THE TAB ABOVE.
A bit more mindless knitting this week past. I have two balls of Zauberball Crazy, a wildly variegated (and expensive) fingering weight yarn. Both balls had minor damages to them, and I wanted to work them up quickly. But I didn’t want to make socks. This stuff’s colors are so over the top that I wanted to make something that would be seen. Scarves are ideal. I’ve done several before using Wingspan and its variants, or other designs calculated to display the gradients to their best effect. But I wanted to do something different. I cast on for a couple of designs I found on Ravelry, but wasn’t particularly pleased.
What to do….
Ah. Thinking back, my most popular pattern of all time is Kureopatora’s Snake. That was written for a DK weight variegated, and was the result of happy experiment. It’s basically Entrelac, but slimmed down to just the two edge triangles, and worked over a large number of stitches. The result is a graceful interlock of trumpet shapes, with the trumpet’s spread accentuated by working a purl into (not just slipping) the K2tog join stitch at the end of each partial row before the turn.
Why not make that one up in fingering weight, and publish the pattern adaptations that make it work?
So I present the first of the two test pieces. I’ll be starting the second tonight:

First off, I’ve renamed the thing. Now that it’s independent of the original yarn, I re-dub this one “Chanterelle.” Yes, there are ends (the initial cast-on, bind off, plus a couple of damages). A personal quirk – I don’t darn in the ends until I am ready to give my knit gift to the recipient. This will sit un-darned until then.
I will be writing up the full design again under the new name, but for now, start with the Kureopatora’s Snake pattern, available for free at the Knitting Patterns tab at the top of this page.
CHANTERELLE:
A FINGERING-WEIGHT VARIATION OF KUREOPATORA’S SNAKE
Grab your ball of fingering weight variegated yarn. ONE ball of Zauberball Crazy made this scarf, with only about 3 yards of yarn left over. It’s about 5 inches wide (a bit under 8 cm), and 66 inches long (a bit under 168 cm). Gauge is pretty much unimportant. I recommend a MUCH looser gauge than one would use for socks. I used a US #5 needle (3.5mm) for this project.
Follow the Kureopatora pattern as written for the initial section, but instead of stopping when you have 30 stitches on the needle, keep going until you have 46.
Work the entire scarf as-written, until you have completed ten full trumpet sections (not counting the partial trumpet done to initiate the project).
Follow the directions for the final finishing section, EXCEPT that instead of working the final section as normal until there are 15 stitches on each needle, keep going until you have 23 stitches on each needle. Then on every row that begins on the edge of the scarf after that, work a SSK instead of the increase you have been doing throughout the prior sections.
DO NOT STRETCH-BLOCK this piece. If you feel it’s lumpy, moisten it and pat it flat, but do not use wires or pins to stretch it out. You want to preserve those graceful curves.
SCREAMING TO ANOTHER FINISH
And here’s another finish!
This was a super quick project, barely a week from cast-on to final block. Even though I still have a couple of ends to tuck in, I consider it done.

Younger Daughter bespoke this, having noted the popularity of screaming yellow this Fall season, and a similar trend towards heavier, highly textured knits.
This shoulder/mini shawl is done in machine washable Merino sport weight, from Gems. I used the May Day Shawl pattern by Zabeth Loisel-Weiner, available for free on Ravelry. It took about 2.3 skeins of the yellow. I consider it a very simple project – the instructions and charts were spot on, and very clear. Lots of “bang-for-the-buck” here in terms of visual complexity vs. effort invested. If you are looking for a first serious lacy knitting project, this is not a bad place to start.
That being said, I have to say I detest knitting bobbles and nupps. These are bobbles. I tamed them somewhat by knitting backwards – that is learning to work the back-again bit of each bobble working off of my right hand needle, so I didn’t have to flip the work over to purl back in the middle of each little bump. If you haven’t tried this yet, it’s well worth the learning curve investment for little back-and-forth scraps like bobbles and Entrelac.
A quick word on blocking if I may. Lacy knitting needs to be blocked to within an inch of its life – as tightly as you can. Here’s the before photo, and the mid-block photo:


If you count the 2×2-inch squares of the checked sheet I block on, you can see that pinned out (right), the thing is almost twice as big as it was before pinning (left).
How do I block? I admit I’m not the most precise or assiduous, but I do try, at least a bit to keep things neat and square. The black and white sheet, although an eye-popping Peter Max background is very helpful in estimating and meeting target measurements, and keeping 90-degree angles true. I bought it at a discount/close-out store years ago when shopping for inexpensive bedding for the girls to take to summer camp. I knew that if the sheets survived, they would be perfect for this use. (Plaids, Tattersall checks, and ginghams would also work).
I dampened the knitting, and spread my sheet over an area rug to provide anchorage for my pins. Then I threaded blocking wires across the top of the piece, slipping them into every edge “purl bump.” Then I inserted additional wires along the join line between the edging and the center triangle. I pinned the top wire down first, spreading the work along its length, then stretched the piece down the spine, pinning the pointed junction of the two side wires. Then I pinned the side wires out as far as I could manage, making sure to keep the angles (as measures vs. the checks) true. I had to jockey and adjust them a few times, but eventually I was satisfied. Then and only then did I place a single pin at each of the edging’s points. If I had started with the edging points, the center triangle would have been deformed. Using the wires keep the piece from developing internal “scallops” corresponding to the pins placed in the edging.
No lie – it is tedious. But it’s worth it.

Now on to other things.
I say goodbye to this tiny little embroidered scrap. It’s the finest gauge I ever worked – over 38 stitches per inch on 80-ish or so count muslin, using standard black sewing thread:


It started out as an experiment, to see if I could do a coif at that gauge. Soon after I got started it met with an accident, and was never finished. That was about 35 years ago, easily. Why goodbye? I’ve mailed it off to become part of A Larger Project. The East Kingdom doll project was on display at the 50th anniversary, and still lives. About the only thing people remember me for is that I embroidered, so I am sending this snippet to the curators/creators to be a prop for the doll that represents me. Maybe they’ll make a tiny flat frame for it. That would be sweet. Pix if I get some, I promise.
And finally, another start. I have two balls of precious multi-color yarn – rather pricey Schoppel Zauberball Crazy fingering weight. I adore just looking at them. But it was time to put at least one to good use. So I began casting around for something fun to do with the very long repeat. I’ve tried a lot of the popular projects that use Zauberball. And I didn’t feel like working on some of the others. But then I remembered that I HAD a design of my own. I did up Kureopatora’s Snake in that yarn – a DK weight variegated with a long repeat. It has always been the most popular original pattern on any of my websites. So why not try it with a smaller gauge yarn and explore the possibilities?
Here I am. Following the pattern as written, with three exceptions:
- Using the Zauberball Crazy fingering weight instead of the Noro Kureopatora DK.
- Using size 5 US (3.75mm) instead of 6 US (4.0mm) to make the thing more airy
- Working across 40 stitches instead of the 30 specified.
You can see that both the color progression and shaping are beginning to present themselves. I think that if I had a chance to rename this now established pattern, I’d call it Chanterelle, instead. More on this one as it grows…
STARTS AND FINISHES
A couple starts and finishes here at String Central.
First – a scarf for Elder Daughter. She favors autumn colors, and the last scarf I made her about five years ago was due for a replacement. I had a ball of Zauberball Crazy in my stash, that was way too nice to waste on socks that won’t be seen. Something that demonstrative is better out in the open rather than hidden away in shoes. But she wanted a strip-style classic scarf, not an abbreviated shawl or wing-shaped piece, so one ball of fingering weight yarn wasn’t going to be enough unless the chosen stitch was very lacy. But it’s hard to make the color gradations pop in a lace design…
The most obvious thing to do is to eke out the fancy multicolor yarn using a solid – either a component color of the multi, or something contrasting. So I went stash-diving. And I came up with another problematic yarn that fits the mission envelope. Lister Lavenda fingering weight 100% wool, circa the late ‘60s.

How do I come by such a superannuated yarn? Easy. I stole it from my mom.
To be fair, “stole” is a bit of exaggeration. She let me have it, from her own stash. My mom has been a prolific and talented knitter as long as I can remember. She tried many times to teach me when I was a kid, but I didn’t actually pick up needles until after I was out of my own. BUT I did crochet quite a bit as a kid and teen. Mom let me stash dive on occasion. This particular mustard color wool was part of a vest project she began for my dad, long, long ago. I’m not sure why it was never completed, but mom had a huge bag of the stuff, well over a dozen little one-ounce pull skeins. I adopted them and have used them slowly over the years. Pretty much any gold/mustard yellow accent in anything I’ve knit from fingering weight has been mom’s Lavenda.
The yarn itself is quite nice, a bouncy, spongy 100% wool,, but fragile. It fulls if you so much as look at it with damp, warm eyes. It rubs through in socks all too quickly, even when reinforced. So scarves and hats are the best use. I had four skeins left, a bit over 100g, all told. About the same amount as the one Zauberball.
I used a free pattern on Ravelry, Christy Kamm’s ZickZack Scarf. I used 3.0mm needles (about a US 2.5), and did the recommended eight repeats of the 12-stitch garter stitch pattern. swapping the multicolor and mustard yarns every other row (each garter stripe). Every row was the same – as such it was the perfect totally mindless piece to work in the evenings, even while watching subtitled movies.
Here are the front and back:


Note that they are close, and both are pleasing, but they are not identical. Nor could they be. Garter stitch produces identical TEXTURES on front and back, but when you change colors, the appearance of the row is different front to back. If I had knit 3 rows of multi, then 3 rows of solid, the two sides would look more alike, BUT I’d end up having a lot of long floats up or ends to work in because my other-color yarn would always be on the wrong edge of the work when I went looking for it to change.
And the finished piece:

Lessons learned: If I had to do it all over again, I’d only do six or seven repeats across, to make the thing just a bit narrower, but longer. The recipient loves it, but I prefer narrower scarves. Also, the design benefits from not being worked loosely. If you attempt this one and are a loose knitter, go down a needle size or two for best effect. All in all though, I’m quite happy with the piece, and offer thanks to pattern source Christy for thinking of adapting this traditional heavy-knit blanket zig-zag to a light weight scarf.
And the other start – Bumblebee Socks for Younger Daughter
This project also started off with the yarn. Long time pal Wendy has embarked on a yarn dyeing venture. She brews and experiments, and when she’s accumulated enough inventory, offers it up on line or at knitting festivals, via Facebook or her Etsy page, under the “Strings N’’Strands” imprint. As such it’s sporadically available but worth waiting for.
Last month she posted that she’d just finished dyeing a black/yellow combo, and posted pix. It sang to me:

Younger Daughter has a thing for bees. She adores them, and advocates for bee-preservation causes. This yarn would be perfect for a pair of socks for her.
So, a new conundrum. How to use a variegated to best advantage in socks? Not every hand-dyed variegated works out well in-project. Sometimes the colors flash in an inopportune way. Sometimes they don’t flash at all, and end up muddy. And how to work in the bee theme….
After some experimentation, here’s the end result:

Entrelac! The little entrelac segments are like a scrum of fuzzy, striped bumblebees. And the periodicity Wendy dyed in worked out perfectly, making a nice, even self-stripe on my toe-up foot.
For the record, this is improvised as I go. I’ve knit several entrelac projects at this point, both in the round and flat, so I’m pretty comfortable with the base concept. It does tend to be less stretchy than flat stockinette, so some fudging of count was required, but it all worked out.
This particular pair of toe-up socks uses a Figure-8 toe, and short-rowed heel. I am knitting on five relatively large US 0 needles (four in the work, one in hand) – on 72 stitches around (18 stitches per needle). I worked my standard no-think sock until I was two rounds past the heel, then broke into entrelac on 6-stitch groups. Although the math works out perfectly to have six entrelac pattern units , doing so makes a tight ankle (see above), so I fudged my start-up triangles to end up with 7. That’s working out quite nicely, to make a comfortable, not quite slouchy sock.
I’ll continue on this ankle part until the sock, when folded in half along the heel diagonal that part is equal to the length of the foot, then I’ll do 20 rounds of K2P2 rib to finish.
Thanks Wendy! Your yarn made this project, and will go on to make Younger Daughter buzz with joy.
SOME MORE SAMOSA
The Samosa Vest is marching along quite nicely. I’ve done it entirely ad hoc – no advance planning, no writing anything down (which is refreshingly liberating, for a change). It’s been sort of sculptural, with problems worked out on the fly. Still – there weren’t many. Here are the front and back views:


You can see that I’ve finished the body strips, wrapping the three primary ones around the front. I did some minor shaping on the fourth, to add a bit of of a bust dart to the general shape. Then I filled in two little patches under each arm. After that the front was substantively done. The next step was to pick up and knit the next strip, which outlined the upper back. I continued on from there, until the space in the center became too small for two mitered corners. At that point, I winged it – filling in the center back with a smaller shape, partially contoured with short rows, and a center-back join. The result is rather like a racer back, and is quite flattering on Younger Daughter (modeled pix when done).
I grafted off or picked up and knit the shoulders. Finally I worked an i-cord edging around the entire outer edge to give the body a bit more firmness, and for a more professional finish. It’s much nicer than the flabby chain selvedge edge that was there before.
Now I’ve got one last problem – there’s a Romulan (or Fire Kingdom) point at the top of each armhole. I picked out one side and re-knitted it, but the point remains. Time for some more noodling on possible fixes. Once I’ve got that repair done, it’s i-cord around the armhole edges, and I’m finished.
Suggestions for possible fixes would be most graciously accepted!
SAMOSA VEST PROGRESS
As you can see, I’m making quick progress on my Samosa Vest. Right now it’s just a single confusing strip of garter stitch knitting, with a couple of mitered corners and some angles thrown in. But when you pat it into shape, the concept emerges:

Ignoring the confusing letters for the moment, you can see the basic outline – the vee-neck, and the bottom edge that defines the width of the finished piece.
I cast on 13 stitches at A. I knit a garter diagonal band, increasing on one side of the strip and decreasing on the other every other row to achieve the angle. When my neckline was deep enough (B), I switched to working straight – a plain old 13-stitch strip until I was about 2 inches shy of my desired length. Then I worked a wrapped short-row miter, making the corner at C. I then knit across the bottom edge of the front, across the entire back (unseen, from D to E), then back across the front to the center point. Again, about two inches shy of the center point, I did another miter (F). After that I worked straight up to point G. I reversed the shaping of my initial angled strip to create its mirror image, from G to H.
Then exactly as I did in my Motley blanket, I cast off 12 stitches, added 12 and proceeded to work the second strip, knitting it onto the established edge strip as I went along. I worked miters again at points K and N. You can see I’m past O, headed back up to the shoulder where I initially cast on.
I will continue in this manner for one more strip. That will make the shoulders of the piece about as wide as the shoulders of the target tee-shirt I am using as my size model. At that point I’ll have to figure out how to fill in extra bits on the sides and in the center of the back. But so far the thing has come together exactly as I envisioned. And quickly, too!
