CHARTING SOFTWARE FOR DOUBLE RUNNING STITCH (AND KNITTING) – PART 3
Continuing my exploration of dedicated and general purpose software for use with my two great needlework passions – charted patterns suitable for counted thread embroidery (in specific – double running stitch) and knitting. Again I’m not testing one main feature of these programs – the ability to turn images including photos into needle-painted ready-to-stitch images. I don’t care about that feature, although it’s clearly the hook on which most of these programs hang their hat.
PC Stitch Pro v 9.01 by M&R Technologies
PROS: Standard features that one would expect – cross stitch, floss palette tied to major manufacturers offerings (in this case, in a companion program that allows color editing, but does not appear to allow one to mix across makers lines without direct finagling, or to blend colors – two features that Pattern Maker had). Includes back stitch, but not a separate straight stitch). Includes standard flipping/rotating/mirroring manipulations. Allows back stitch to be displayed in color. Allows printing pages with a selectable number of overlap columns so that navigation among multiple pages is easer. Allows auto-outlining of blocks of contiguous cross stitch with back stitch.
CONS: Selection is limited to rectangular areas (no free-form lasso), oddly called “select all” on the edit menu. The selection area can be resized as needed, and does select back stitches along with block units. Back stitch cannot be displayed with voids between individual stitches or by symbols that otherwise indicate beginning and ending of individual units. Back stitches can’t be right-click erased like cross stitches or erased using the eraser tool, they need to be individually clicked on and removed using a pop-up window.

KNITTING AND CROCHET SPECIFIC USE: Can be used for standard colorwork mappings, and true type fonts (including the same knitting font mentioned yesterday) can be substituted for the symbol set. Symbols can be displayed on a color background and more than one symbol can be assigned to the same color. You can also override the program to assign more than one color to the same symbol. Like all graphing solutions not specific to knitting, there is no artificial intelligenge programmed in that would prevent building impossible to knit stitch configurations (this is rare even in the knitting world). Could handle block unit diagrams for linear filet or multi-color tapestry crochet, but even if one had a pre-made font for crochet symbols, this isn’t well suited for stitch graphing.
VERDICT: Handy for cross stitch but unremarkable for my intended uses. I don’t like the interface with the separate floss management program, or the way selection is handled.
PROGRESS AND USING STITCHING CHART PROGRAMS FOR GRAPHING KNITTING
In the middle of this charting program exploration I have had time to do a bit on my Clarke’s Law sampler. But first to answer a question. Aileen read my last couple of posts and wondered what I would consider a complex double running stitch pattern. I answer with pix of my current piece, plus a snippet of this pattern done up using Pattern Maker Pro, from yesterday’s review.


The nickel shows scale (click for better size shots of each). This strip is stitched using one strand of DMC floss, color #498 on 32 count linen (16 spi). Not particularly fine, but fine enough to show the patterns. The entire stitched area is about 15.75 inches across. From the top of the dark red twining strip to the bottom of the the D of ADVANCED is about 8.6 inches.

The top strip and the cross stitch words were all done using two floss strands. The outlining of the motif in the wide grape strip was done using two strands, and the squared background was done using one. (I’ve since found historical precedent for the squared background treatment).
All of the strips between the words will be relatively light in value, done in some combo of plain or voided double running stitch, but they won’t be as wide as the grapes (well, maybe the last one will be just to balance). I won’t do another dark band in long armed cross stitch (either foreground or voided) until after the entire quotation is done. I think it will take another three bands of text before the whole quotation is complete. Then I’ll fill out the cloth with a mix of styles, perhaps doing some in two-tone. It’s all fly by night here. I’ll also figure out something to eke out the line ends where the lettering comes up short. I think that NOT centering each line of text works better for my purposes, especially because I’m breaking text between lines in an unorthodox manner.
Now back to writing up the results of my stitch charting program explorations. Which for my knitting and crocheting readers, will have value. Either of the programs I described yesterday can be used to graph out colorwork repeats, or linear crochet (filet and tapestry styles). Pattern Maker Professional also allows you to assign a True Type knitting font (like the one from Aire River) to the symbol palette, and then using the program in symbols-on-graph mode, to compose knitting charts. Here’s a sample from PM showing a simple double 1×1 twist cable:

Where this falls apart though for knitting is if you try to display both colors and textures at the same time. The purl symbol will always be associated with one chosen color, the knit symbol with another. Although you can override the program and display more than one symbol per color, this program links symbol and color in a way that you can’t have multiple colors per symbol. Numbering rows is also problematic.
As I write up the rest of the sampled programs I’ll include their potential for use by knitters.
CHARTING SOFTWARE FOR DOUBLE RUNNING STITCH – PART 2
O.k. Let’s start looking at the various available charting packages, two at a time. Again, I’m not doing a full-on evaluation and comparison of every available capability. In particular I’m ignoring the import/translate capability that people use to turn standard graphics and photos into cross stitch designs. I’m looking at just one aspect of these tools – charting complex double running stitch patterns.
KG Chart LE for Cross Stitch by iktsoft v 1.09.06
PROS: First off, you can’t beat the price for this one. It’s freeware, no registration required. It presents output in both graphed and stitch simulated formats, and includes a DMC-based thread palette. The program is optimized for cross stitch, but it does contain a back stitch option that allows drawing straight stitches. Standard ouput in in-program composition mode appears to max out at 73×73 per printed page but mesh size can be manipulated to present more units per page (reducing down as far as legibility will permit and then some. Prints to paper (and PDF if a PDF writer is installed) and exports to JPG, PNG, TIFF, TGA, PCX, JPG-2000 and as pixel only to make icons.
CONS: Backstitch doesn’t present on screen in either mode as a series of countable, identifiable units. Yes, you can count the boxes over which the stitches travel, but that can be difficult, especially in low light or in dense patterns. While back stitch clusters can be selected and moved, inverting or mirroring them introduces errors – the replicated units don’t look like the original (plus transformation). Multiple page works are presented without repeats/overlaps for cross page orientation. Zoom is constrained to 8 set levels.


VERDICT: An excellent value for the casual cross-stitch user who wants to create multicolor block unit patterns and who may want to use the occasional outline or straight stitch unit. Not very useful to anyone composing entirely in double running.
Pattern Maker for Cross Stitch (Professional) by HobbyWare, Version 4
PROS: Back stitch and straight stitch have symbol sets that can be manipulated to display individual stitches (see settings in screen shot below). Units can be selected as part of a rectangular block or “lassoed” as a non-standard shape (Pro version only) and the selected or pasted bit can be mirrored/flipped/rotated with no loss of relationship among constituent units. Stitches can be represented on screen in floss-strand equivalent thickness units, and different stitches can use different thicknesses of thread. The thickness backstitch and straight stitch symbol representations can exist independent of floss thickness Output can be printed to hard copy, and mesh size can be manipulated to present as many per page as are legible. A dizzying array of available colors from most major floss and thread makers is included.
CONS: To show stitches as individual units, back and straight stitches need to be drawn one at a time. You can’t paint a line of them across multiple chart blocks and have each one neatly display as a separate unit. I can’t figure out how to display both cross stitch and line stitch symbols on the same view (I’d like to be able to show the line stitch units from the left hand picture and the color x units from the center pix on the same final image. Freehand “lasso” selection and export to JPG, TFF and other standard graphics formats are only available on the Pro version (JPG export shown in right image). The Pro version costs $120. US. The four day trial is a pain (those of us with careers may not have four linear days in which to make an adequate assessment of both versions).


VERDICT: A possibility, but pricey. Need to test it on a really complex bit of charting.
I’d appreciate hearing from others who are using any of these (or other) dedicated charting programs or who may be bending general purpose graphics programs to this need. Love a program? Have problems with one? Have hints/clues/insight into features/limitations? I’m sure that others would love to know, too.
CHARTING SOFTWARE FOR DOUBLE RUNNING STITCH – PART 1
I’ve got enough patterns now on tap that I should start thinking of how the follow on to The New Carolingian Modelbook should be composed. It’s been notional for a long time, with the tentative name of Ensamplio Atlantaea in honor of the other SCA region that took me in during my self-imposed absence from Carolingia.
Aside from having no publisher for this one, the biggest impediment is that I haven’t figured out how best to graph the patterns for publication. At this moment, I’m still bound to paper and pencil. The graphs in TNCM were made using my late, lamented Macintosh computers (a II and a IIcx); and Aldus Superpaint drawing/drafting software. We shifted over to the PC world long ago in response to the strain of keeping two parallel suites of hardware and software functional, and in response to the PC-centric nature of employment in this house.
To date, I’ve not found Windows based general graphics software that does as good a job for charting as the vintage-1990 stuff I used for my first book.
I’m still looking. I have an interim solution using MS Visio. It’s cumbersome, and time-consuming compared to my Superpaint method. In Superpaint I was able to establish a bitmap based graph as a separate field, then paint on lines set up with voids to correspond (in negative) with the dots of my background. So instead of painstakingly noting each individual stitch, I could run a length of stitches in one stroke and have those stitches neatly separated by voids to mark the length of each. For example, instead of a solid line four units long, I was able to paint a line that looked like it was broken up into four exact stitch length units, and do it on vertical, horizontal and diagonal planes. But in Visio I can’t do that. The best I can do is create several blocks, each with a line segment corresponding to a stitch (one side, two parallel side, two sides meeting at one corner, one diagonal, two diagonals, one diagonal and one side, etc.); then stack and rotate my blocks into my finished pattern. Although this method works well enough for block unit patterns it is excruciatingly slow for line unit designs, and compared to my old method is too tedious to use for a whole book.
So it’s back to exploring the world of commercially available charting software. There are several programs created expressly for needleworkers. However they’re not aimed at my needs, they’re all targeted at multicolor tapestry style cross stitchers, who are interested in styles that look more like needlepainting (creating multi-color pictures with stitch units corresponding roughly to the pixels in a raster display image) than in the linear and mostly monochrome styles I prefer.
To date I’ve looked at several programs including:
- Cross Stitch Professional, DPSoftware
- PC Stitch 9, M&R Technologies
- PatternMaker for Cross Stitch, HobbyWare
- Easy Cross, Fulford Software Solutions
- KG Chart LE for Cross Stitch, iktsoft
Mind you – remember I’m not looking at the features that most of the world wants in these cross stitch packages, notably the ability to turn JPGs or photos into cross stitch graphs, fidelity to a dizzying array of potential thread/color choices, or final output targeted at publishing complete patterns (with thread consumption and stitch symbol charts). I want something that will graph out double running stitch in a manner that enables stitchers to clearly discern the number of units in a long run, that allows easy selection/inversion/mirroring of pattern subunits or areas, and that otherwise eases production and use of of high complexity charts for double running or other similar linear stitching styles.
In mainstream graphics programs, I’ve been playing with Visio (described here) and Open Office Draw. I’m thinking of exploring the world of contemporary raster based Windows graphics programs next, but there has to be a better solution.
I’ll post detailed observations of these programs this week. Stay tuned. And if you have any suggestions for other Windows-based software that might suit my purpose, please let me know.
THE OLD CASTLE
UPDATE: THE OLD CASTLE GRAPH IS NOW AVAILABLE AS AN EASY TO PRINT PDF AT THE EMBROIDERY PATTERNS LINK, ABOVE.
Wandering around looking for designs to add to my growing Clarke’s Law sampler I stumbled across the needlework photo collection oft the State Hermitage Museum in St. Petersburg, Russia.
They have all sorts of fabulous things there including several items that may provide fodder for more bands on my current work.
But as I leafed through the collection one item in particular struck me. It’s no secret that I’ve had a long association with the Society for Creative Anachronism. Among my long time and dear friends I count many members of Clan Oldcastle. Their device (shamelessly borrowed from their website) is:

I was amazed to find a historical embroidery oh-so similar to that device. The original is a fragment of a larger piece, done in drawn thread embroidery. The museum’s accession info dates it to the late 16th/early 17th century, and gives it an Italian provenance. There’s a companion piece, too, with a boat, some rather blocky lions.
But it was the castle that excited me. Here’s a graph adapted from the museum artifact. Click on the thumbnail below to print a useful size.

I’ve made some minor changes but kept most of the imperfections of the original. My count is the same. The original looks a bit taller because its constituent units are not square. I’ve kept the not-quite symmetrical center tower, with the ornaments below the tower’s embattled top offered up skew to the rest of the count. I’ve substituted stars for the crosses on the original flags, and added two more of them for good measure. (Estoiles being of special heraldic importance in conjunction with the Oldcastle edifice). I’ve left the one at the top of the left hand tower closer to the original in shape for those who prefer them accurate, but added a bit of twinkle to the others. I also took the liberty of mentally fixing a bit of wear on the original on the open portcullis. But the rest is spot on.
I’d love to see anything made up from this pattern. It would be especially nifty in any of a dozen styles of counted thread embroidery, in Lacis, Burrato, or Filet Crochet; or in knit or tapestry crochet. Other non-textile applications include mosaic work and marquetry. And if you do use this pattern, please consider visiting the Clan Oldcastle link above, and using the address there to make a donation to the American Diabetes Association.
This one is going into Ensamplio Atlantaea (my growing sequel to The New Carolingian Modelbook) for sure, but I share it here first.
UPDATE, 6 APRIL 2020:
Spotted in the wild, another example of the Old Castle. This one is on a piece in the collection of the St. Gallen Textilmuseum, Accession 00671. Their listing cites it as being from Sicily, dated 1590-1610.

Technorati : crochet, embroidery, knitting
STITCHING STORIES
More babbling on here today.
Faithful Reader TexAnne noted my mention yesterday of the “print to transparency” cheat for flipping charted patterns and added another that I had forgotten. Some printer drivers and photocopiers allow you to mirror-image their output. This option is most accessible in the Mac world. I remember my late, lamented Macs having a prominent command in the print dialog that allowed mirror-image printing, something that came in handy for printing out driving directions. I’d print them out in a large font in mirror image and lay them on the dashboard of my car. They were just visible as a right-side reflection on the windshield in front of me, and acted as a “heads-up” display.
Since TexAnne’s note I’ve tinkered with the print dialogs of several PC world printers from HP and others, plus some large office photocopiers, and in most of them I’ve found a buried “Print Mirror Image” command. It’s usually on an “Advanced Commands” tab that summarizes the state of all available printer options, but it’s not often displayed as an easy to get to setting. But it’s usually there somewhere. Scan to print or printing mirror image is a matter of finding and setting this hidden command. It’s another useful way to use technology do do a mirror image chart flip.
Long Time Needlework Pal Kathryn reminded me of a story connected with the pattern I’m stitching now.
![]()
![]()
Back when I was working it voided on the Think sampler (lower band, shown flipped to the same orientation as the current work for comparison) I did lots of stitching (and knitting) in public. I worked in the Washington, D.C. area, and would take my projects outside at lunch and do them on park benches. I wrote to Kathryn that one day an elderly lady and her granddaughter approached me. They were of Hmong ancestry, a Southeast Asian people with a rich heritage of traditional counted cross stitch embroidery. With the granddaughter translating, the lady admired the work and asked if the pattern was traditional to my home village or family. I thanked them for their compliments and said that sadly, Brooklyn, NY did not have its own embroidery tradition, and that I’d found the pattern in a book. Kathryn says she’s thought of this particular design as “the Brooklyn Pattern” ever since.
LONG REPEATS, OTHER USES
Not much progress for this week, but my time has not been my own.
![]()
This strip will continue marching on to the right, ending approximately at the green stripe. The horizontal blue stripe shows the approximate length of the graph for the repeat as it appears in my book. More on that below…
First, thank you to those who have left comments or sent notes of support. I know that lots of knitting readers are disappointed that I’ve been stitching lately. The huge drop off in visitors is a clue, but some of that is due to other factors. Ravelry for instance has just about killed all but the most popular independent knitting sites. So it goes.
Back to stitching. I’ve got three comments I’d like to address here. The first one is of interest to knitters. Faithful Reader TexAnne points out that long block unit repeats like the one I’m working now would adapt very nicely for double sided double knit scarves. An excellent observation, thank you! I add that anything worked in strips, like a large lap throw, an edging around a circularly knit skirt hem would also show this pattern (and its kin) quite well. I’ve done double knitting from these before. My oven head hat is knit up from an outtake that didn’t make it into TNCM. You can see the negative/positive effect in the flipped up brim:
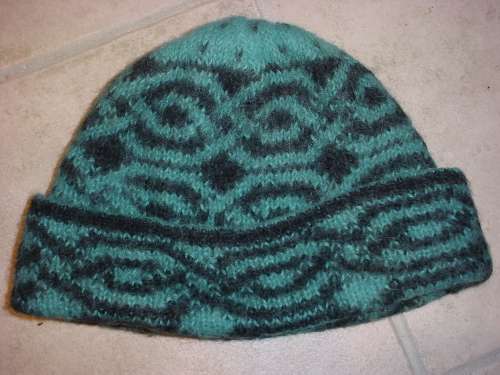
The chart for this hat appears in a follow-on post to the hat description. And, although not double sided, my Knot A Hat earwarmer band (which appears to have lost its picture link, although the chart link works) uses another historical knotwork strip for knitting:

Charts for both these repeats can be found by following the links above.
The second comment contains questions from Ellen R. She asks if I’ve ever worked these patterns before, and if they can be done in voided (Assisi) style. Here’s an answer to both:

I did “Think” in 1989 and gave it to my husband to hang in his office. At the time he was working for a company that used the Scots lion as its logo. All of these patterns are in TNCM, and you can see the one I’m working on now across the bottom of the piece. It’s upside down compared to the strip I’m working now, and is worked voided – with the background instead of the foreground stitched. The effect is a bit different. To my eye, it’s more formal done this way. You can also see more of the repeat, although even this strip doesn’t capture one full cycle. I’ve worked quite a few of these many times, although even I haven’t done every pattern in TNCM (darn near close, though).
The last comment comes from Anne in Atenveldt, (an SCA region that includes parts of California and Utah). She’s got a copy of my book and notes that the chart for the current strip shows the two interlaces and the segment between, but is much shorter than the length of the strip I’m working now (or for that matter, what’s in the Think sampler). She wants to know how I do the additional segments.
I attempt to answer. The extra length is a mirror image of the section presented in the book. I work along as shown for the center point interlace and then the area between it and the next interlace as shown. On the far side of the second interlace, enough of the established pattern is shown to keep the stitcher on target, but after that point a bit of mental gymnastics is required. The stitcher has to continue on by inverting the graphed segment, mirror image style until the next mirror reflection point is reached. Again, I do show some of the area on both sides of that second bounce point to assist in navigation (and because in this case the interlaces are eccentric), but space prohibits showing a full cycle of the repeat.
Now this doesn’t present a problem for me, but as you can see, I’ve been flogging myself with this sort of thing for a long time. And it’s no shame to say that doing this in-mind reflection is difficult for you. It’s a matter of wiring, and not everyone can do this with ease, no more than can everyone use a map or read music.
If chart flipping presents problems, I do know of one easy shortcut. Office supply stores still carry transparency sheets for overhead projectors. They’re far less common in these days of Powerpoint and projectors, but many schools still use them so they’re kept in stock. They come in several flavors for various types of photocopier or printer, so be sure you’ve got the right kind for your machine. (Hot process laser printers and photocopiers for example use a melt resistant plastic, and can be fouled by using something not designed for them). Copy your chart onto the transparent sheet. Put it in a page protector sleeve with a piece of plain white paper. Work off it as usual. When time comes to do the flip, turn it over inside the page protector. Instant mirror image. The only caveat is that on pattens with eccentric interlaces as the flip point (like the one I’m working now), you’ll need to finish the interlace as charted before flipping to work the “in-between” portion.
In all, thanks to all who continue to read here. I do hope that my prattling on is useful to someone.
VINES AND TWISTS
My own progress on the Clarke’s Law sampler? A bit:

I’ve got the full segment from one bounce point (the column down the center of the trefoil interlace) to the other bounce point (the column down the center of the heavy stem interlace at the left). To be fair, this pattern’s bounce points aren’t exact. The interlaces themselves don’t mirror perfectly left and right, but they’re close if one makes allowances for the minor perturbations caused by the stem elements twisting and weaving over and under each other.
The rest of this strip is a (more or less) mirror image of what I’ve already stitched. As you can see, a full cycle of this repeat is very long, making it difficult to use for clothing, but ideal for household linens, curtains and the like.
I happen to like long repeats though. They’re far more interesting to stitch than shorter ones. But I’m ready for the next panel. Got to finish out this one first, then it’s back to the area below the lower band of the motto. I’m not sure what I’ll put there, but it won’t be long-armed cross stitch. Back to double running for the next panel. And it will probably be something from my design notebooks, rather than from TNCM. If so, I may consider posting it here. Stay tuned.
DOUBLE RUNING STITCH LOGIC
I really like double running stitch. The more complex the pattern, the better. Best of all are the amazingly detailed ones from the late 1500s/early to mid 1600s that are an explosion of vegetal forms. Some are inhabited by natural or mythical creatures. Here’s an example:

StitchPuppy, a stitcher new to double running stitch (aka Spanish Stitch, Holbein Stitch) asked me about the logic and method of working double running. She’s familiar with the working method – that the final effect of a solid line is achieved by two passes of the needle. On the first trip every other stitch unit is made, and on the return trip, the “in betweeners” are filled in:


(Pix above are from TNCM). She understands that with careful stitching, pieces in double running stitch can be made to look exactly the same on the back and the front – a plus for cuffs, collars, napkins and other applications where both sides of the work are likely to be seen. Where StitchPuppy has problems is on understanding how the method can be applied to complex patterns. She wants to know where I start when I tackle a complicated double running pattern, and whether or not I use a logic that helps keep me from running into dead ends, or that helps ensure that I do end up with a front/back reversible end product.
I’ll try to answer.
First – not everything that’s graphed out for double running can be done easily totally two-sided. Any design with an isolated bit of stitching that’s not connected to the main pattern presents a problem. The small dolphin just below the mermaid in the stitched panel above is not connected to the rest of the design. It’s a stand-alone element. To work this particular piece double sided, one would need to both begin and end off a separate strand of thread, just for that dolphin, or connect it on one or both sides to the main motif by one or more bridging stitches. Either way, the dolphin presents only a small problem. A larger one is posed by the mermaids’ facial features. The eyes, nose and mouth are isolated from the main stitching areas, and are too small to be worked double sided and have enough area to finish off the ends.
The rest of the mermaid pattern can be worked double sided. There are no other logical impediments to completion. But how to work a complex design? Not hard. Any design without a discontinuity (like the orphan dolphin) can be envisioned as a single baseline, with detours to fill out the details or as a series of areas. Let’s look at the phoenix I posted here a couple months ago:

(By the way – see that border? The octagonal interlaces are not connected to the little “Vs” filling out the border north and south. Lots of discontinuities there, and if you saw the back of that work you’d notice the bridging stitches I used to connect the design elements).
Back to the phoenix. It’s pretty easy to identify a baseline around the phoenix’s perimeter:

Sometimes I stitch this way – working a long every-other-stitch outline around the entire motif, then going back and doing the “detours” from that line. The advantage of working this way is that it’s quick to block in the major design elements and to make sure they’re properly aligned to each other before investing time and thread in filling in the rest of the design. The primary disadvantage is that it’s hard to keep count during long straight runs. This is the working logic described in most blackwork books. This piece shows another example of the conventional baseline-first attack method:

You can see that I’ve outlined the blossom’s main elements, and am now following along to work the individual petals.
However, I’m far more likely though to work my pattern in a more compartmentalized manner, either identifying the baseline but instead of following it and filling in detail later, starting on the baseline and taking every detour that presents itself. I’m using the baseline identified above, but instead of following around the bird, I immediately zip down to do that first little feather slice, returning to the baseline when that’s done.

Worked this way, the design gets filled in early on, moving down the baseline and accomplishing the detours, and returning to the baseline after each one. All that’s filled in on the second pass is the every-other-stitch segment of the baseline. .I find this method much easier to use for complex charts. It’s quite easy to count little completed feather units in the bird’s wingtips as I finish them. The flower strip above also shows the second method. I used it for the acorn sprigs. I stitched along the baseline, but every time I got to a branch, I finished the branch before returning to the baseline. The second pass is a straight run along the baseline itself.
Where to start? It depends on your work, the style of frame you are using, and your own preferences. In general it’s better to minimize handling of the stitched area. Working from the center out is an accepted practice because it tends to keep sweaty hands away from finished stitching. But there are times when working that way isn’t logical. I began the phoenix with its head, having matched the center of the pattern with the center of my to-be-embroidered area. The phoenix was also at the rough center of my finished project and was one of the early elements I completed on it. The strip below though was done bottom up. And the patterns I’m working on my current piece were begun at the cloth’s center. It’s all situational.
Where is the baseline in an all-over pattern? Wherever it’s convenient. Here you can see that I’m using two baselines for the twisted frame element, and not worrying about completing the entire interlace in one gulp:

Is there any way to determine which method was used on historical pieces? Scholars may have made figured it out but I haven’t run across word of it in popular stitching literature. The most reliable way to figure out historical stitching logic would be to pick apart an artifact. NOT something anyone sane would do.
One word of caution to those who want to work something two-sided. Resist the temptation to use veeerrryyyy loooonnnnnggggg strands of thread to minimize the number of ends. They WILL tangle and abrade as they are stitched. You will curse the day you started the project. (Trust me on this.) I do have a trick to share, though. If I use a very long strand I start from the middle of it. I pull the thread half-way through my work, then in an inconspicuous spot, I wind the excess thread around a straight pin. I stitch away with the free end until it’s ready to be terminated. Then I go back and free the other end of the thread from the pin, and use that. Since I am stitching with a sane length each time I avoid tangles and thread wear, but I minimize total ends. Of course this presents its own logic problem – how do you know where to start the next mega-thread, but that’s a conundrum for another day.
I hope that this is helpful to StitchPuppy and with luck others, too. If anyone has questions about identifying baselines or stitching logic in double running, please feel free to post them here.
MORE LEAVES AND VINES
I’m just a bit tired this morning, but I’ve made enough progress to post. I do prefer working long armed cross stitch to regular even-armed cross stitch, but I like neither one as much as double running:

Even so, I’m plugging along. I’ve got the bounce repeat center of my strip done (the trefoil interlace at the right), plus about half of the infilling between there and the complementing bounce repeat that will be further left. This particular pattern is a bit unusual because the two bounce repeats are not symmetrical. They’re both different, which you will see as progress accrues. This is one of the things I like about Domenico da Sera, my favorite modelbook author. His repeats are more imaginative and less stiff than many others, with a vegetal formalism that I find most charming.
