LESSONS LEARNED
It’s the last day of the year, and like everyone else I should be looking back over the year past, and ahead to the year future.
Lessons Learned for 2004
First and foremost – blogging is fun and (I hope) less of an imposition on people than is?writing interminable posts to the knitting-related mailing lists. At least the audience here is self-selected. Plus I’ve never kept a knitting-specific journal before. I find myself going back and looking up what I’ve written before to see how or why I did something in a specific way. Who knew?
I learned a lot this year about the periodicity and use of variegated or hand/dyed yarns. Although the projects on which I employed them aren’t completed yet (Crazy Raglan, Entre deux Lacs Tee, and Birds Eye Shawl), I did spend lots of time figuring out how to get the color effects I wanted given the color cycle repeat lengths. This remains a fascinating topic for me, and as each skein of hand-dyed offers up new challenges, won’t be an area that becomes boring any time soon.

Filet crochet. I’ve done piddly little things in crochet before. Even blankets count as "piddly little" because they are generally very simple in motif and technique. Snowflake ornaments, a table-topper round cloth of simple design, several blouse yokes in the ’70s, a couple of ill-conceived faux Aran style kids’ sweaters, but nothing as complex as the filet dragon curtain. It turned out to be an even bigger project than I thought, and consumed the better part of five months. Lessons learned include the fact that no two companies’ crochet hooks are the same size (even if so marked); the effect that near imperceptible differences in hook size can make on gauge; how to do a near-invisible join on adjacent strips of filet crochet; and how well the old graphed patterns for Lacis and other Renaissance needle arts can look in filet.

Along the way to the filet crochet project I learned that none of the methods of filet knitting I tried worked particularly well, nor were they fine enough in gauge to handle the complexity of the dragon graph. I’m not through with this subject yet. I did do some experiments in alternate techniques that were less cumbersome than the methods I had read about. I’ll probably revisit this in the future.

Entrelac is much faster if you can force your fingers to knit backwards. I’m still no speed demon at left-to-right knitting, but I’m faster at it than I am at knitting and flipping at the end of each mini-row. Especially when those rows are only six stitches across.

I also learned (via my Suede Tee) that novelty yarns can bring a world of interest to a simple, well-drafted pattern, but at the same time can be a *(#@ to knit. Side note:? I am also not that pleased on how the Suede is wearing. The microfibers do tend to be grabby, and catch on even the slightest roughness.

I learned several methods of knitting a lace edging directly onto a piece, rather than making it as a strip and sewing it on later. The most fiddly but most satisfying came via the Forest Path Stole. I used it again on my Spring Lightning Scarf:

Under "miscellaneous," I learned a nifty I-cord trick that applies a band of cord to both sides of a strip of knitting (apologies for the blurry photo):

I also used?a highly trendy but extremely boring to knit kiddie poncho to experiment with double width I-cord treatments to help tame edge curl in large stockinette pieces.
And finally, I learned an important lesson about something to avoid in the future. If any of you have ever looked at a loosely plied yarn like the Paternayan’s normally sold for needlepoint, and thought about how nice only one or two of those plies might be for lace knitting – take heed. Spare yourself. The yarn for the Larger Kid’s simple drop-stitch rectangle poncho took longer to de-ply than it did to knit up. For this one, I still bear the scars…

Next year?
Who knows. If you’ve been reading along, you’ll have noted that I’m more of a whimsy knitter than a planner. Projects leap up and seize my interest. Sometimes that interest wanders before I finish, but I (almost always) go back and work to completion. Eventually.
I’m finishing up a couple more unanticipated last minute gifts right now – more socks, and a pair of quickie Coronet hats from Knitty (one hat = one evening). Then it’s back to the Birds Eye shawl and the Crazy Raglan. While I don’t as a rule knit to deadline, the Raglan is for The Small One, and the one thing certain about 6-year olds is that they’re a moving target growthwise. The shawl is a present that I really should finish by the summer. Unless another killer project like the dragon curtain ambushes and drags me off first…
PROJECT: WORMING HARLEKIN CARDIGAN
Here’s yet another cautionary tale. This one is about worming.
I’ve seen lots of questions about worming – what is it, why does it happen, how to avoid it. The what question is easy to answer. Here’s a quick little cotton/chenille cardigan I whipped up for The Smallest One this past spring:
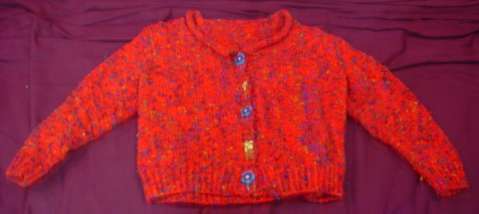
It’s knit from Stahl Wolle’s Harlekin Color, a rather plain generic raglan in stockinette, with a rolled collar and cropped waist. I did up the pattern (such as it is) using Sweater Wizard. That part and the knittingwent well, although the yarn split like crazy and was a *($# to knit. The thing is bright and cheerful.The Smallest One had fun picking out the pansy and bee buttons. I even went back and got more of this yarn with a navy base color and knit a raglanpullover for the larger daughter.
Things however began to go wrong shortly after completion of both projects. Both sweaters began to worm. The little chenille strands separated themselves from the cotton yarn and began poking up here and there. Hand washing however caused all restraint on worming to break. In spite of the lousy photo, the result can be seen here:
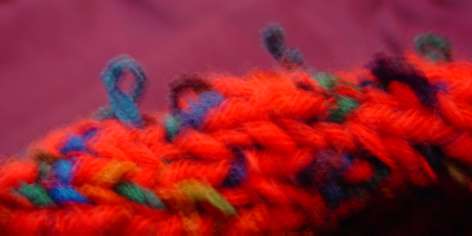
No I didn’t tease these loopies up, nor did I pick a particularly bad part of the piece. The entire surface is like this now – a ratty, trashy looking mess. The kidlet still likes her bee sweater because it’s soft, but it catches on everything it comes near and I shudder each time I look at it.
Moral of the story. Chenille isn’t worth the effort. That’s four for four projects I’ve attempted using chenille or chenille mix yarns that have ended up looking like hell within a fortnight of completion. It’s pretty andthe colors are great, plus Iknow some people love the stuff and swear that they can control the worming. I’ve tried knitting it more tightly than label gauge. I’ve tried knitting it in combo with something else. I’ve tried chenilles of different fiber compositions, but I’ve never had decent results. Buyer beware. This buyer will never purchase nor work with chenille in any of its forms ever again.
More Mags to Trade
Courtesy of a very generouspal, I find myself with duplicates of two Interweave Knits back issues: Fall, 2003 and Winter 2002/2003. I’ve got both in my library, and useful info shouldn’ sit idle.

If you’re looking for these and would like to engineer a trade, please let me know. Preference will be given to folks outside the USA. I know that people In Other Countries often don’t get a chance to get these mags, and we here in the US often don’t get the treat of seeing needlework publications from other countries. I’d love to trade one or both of these for one or more knitting, embroidery, crochet, or other specialty needlework magazines published elsewhere in the world – language doesn’t matter. If you’re interested, please let me know.
WORKING REPORT – WATERSPUN PONCHO
UPDATE: THIS WORKING DISCUSSION (INCLUDING HINTS FROM PRIOR PROJECT POSTS) IS NOW AVAILABLE AS AN EASY DOWNLOAD AT THE KNITTING PATTERNS LINK, ABOVE.
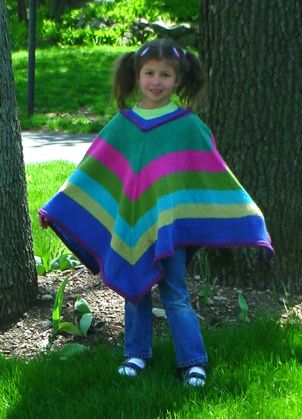
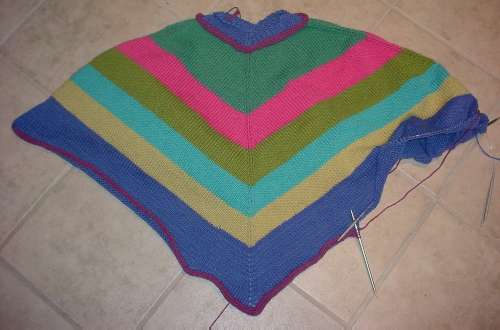
My Classic Elite Waterspun poncho isdone! Here it is mid-block:

I am really loving the improvised blocking wires I got to finish my Forest Path stole. I threaded them through the I-cord edges, two per side, then spread the poncho out on some towels to dry. The edges are straight, the corners are perfect, and dreaded curl-up has been eliminated. And I didn’t even need pins!
And here’s a shot of it on the happy recipient:
For those of you who wrote to ask for the pattern, here it is.
- Make swatches until you get a fabric that you like.
- Figure out your gauge.
- Measure how big a neckline you need to go over your head.
- Multiply that measurement by your gauge, and round it up to the next multiple of four.
- Cast on that number of stitches, placing 4 markers evenly spaced.
- Knit 6 rounds.
- On the 7th round, K1,make one, knit to one stitch before the next marker,make one, K1. Repeat this three times.
- On the 8th round – knit
- Repeat steps 7 and 8 until your poncho is as long/wide as you like it.
- Bind off, or work one or more rounds of attached I-cord to finish.
- If the neck is too wide, pick up purl bump stitches at the base of the rolled collar. You should have the same number as you cast on. Put 4 markers in your work evenly spaced. Then work one round starting with k2 tog, (k1, p1) until you have two stitches left before the next marker, ssk. Repeat between the other markers. Then work a K1, P1 round continuig ribbing as established. Continue this way, alternating decrease rounds and plain ribbed rounds for about 6-8 rows. Bind off VERY LOOSELY, making sure you can still get your head through the hole.
As to what yarns are suitable, what number to cast on given a particular gauge, what size needles to use, how much yarn you’ll need – this is all up to you. Experiment! Here are some thoughts to keep in mind:
What yarn is suitable? Look at it. Will it feel good when worn? Is it hand-wash only, otherwise hard to clean, or a light color? If so – are you prepared to care for it when it gets dirty? Is it loosely or tightly spun? Loosely spun yarns are more prone to pilling, catching and looking “used.” On the other hand, they’re often softer with a more luxurious drape and sheen. Is it heavy? A poncho is a big thing – larger than a lap blanket. Lift about 10 skeins worth. Can you envision yourself dragging around that much weight (or more)? Will the yarn stretch under its own weight when used in a large quantity? Cottons are heavy yard for yard and are infamous for this. Wool is less weighty per yard or meter. Wool/acrylic blends are lighter still. Is the color/texturenot only attractiveon its own, but will it look good on you? A puffy or furry yarn will add bulk andincrease the size of your sillouhette. A giant-gauge or shiny yarn willmake a garment look larger than it really is. Some colors and textureslook fantastic as accents, but applied over an entire garmentmay not be as appealing on every wearer.Decide what’s important to you and choose accordingly. Remember, you can always buy one skein to try out before you commit for the whole project. If that yarndoesn’t work out for a poncho,one skeinmight make a nifty hat or scarf.
What needle size to use? When swatching with a new yarn, start with the needle size recommended by the yarn maker. Do up a good size swatch in your chosen texture stitch or colorwork design. Do you like the feel and drape? If so, measure your gauge – you’re good to go. Swatch feel too stiff and tight? Try again on a size larger needle. Swatch too drapey and holey? Go down a needle size and try again. You’ll know when you’ve hit the best combo. If you’re combining several yarns of different weights or textures, be sure to swatch them as you will use them, using the stitch and needles you intend for the final project, even if that means making a VERY large swatch with multiple stripes. Once you do get the look/feel you like, make a note of your needle size and FINISH YOUR SWATCH. You’ll need it to do both gauge measurements and yarn consumption estimates. (I’m not good at keeping paper notes, so Imake knots in my dangling tail end to help me remember what needle size I used to makemyswatch. For example, four knots = US #4 needles.)
How many to cast on? Simple math. If your gauge is 4.5 stitches per inch, and you’ve decided that a 24 inch neckline is big enough, you start with 4.5 x 24 = 108 stitches. That lucks out because 108 is a multiple of 4, and you don’t need to round up.
How much yarn will you need? You can figure out roughly how much yarn your gauge square took for that number of square inches or centimeters. Draw out a diagram of your project (in this case – a big square), and estimate how big you want the thing to be when it’s done. Figure out its total area and divide that area by the area of your swatch. Got a 6-inch square swatch? Want to make a peice that’s 4 feet on a side? 4 feet x 4 feet = 48 inches x 48 inches = 2304 square inches. 6 inches x 6 inches = 36 square inches. 2304/36 = 64. It will take you about 64 times as much yarn to knit your 4-foot square piece than it took to knit your six inch square. Ravel back your swatch and measure, or weigh itto determine the amout of yarn you used. Now do the math.
Shortcut: If you like a slimmer poncho than this super-easy square one, there’s a poncho pattern generation utility available elsewhere on-line.
WORKING REPORT – PONCHO WITH ATTACHED I-CORD
Messing around with the edging on the Waterspun poncho, I realized that I was using two different methods of attaching I-cord, and that "How do I work attached I-cord?" is a common question.
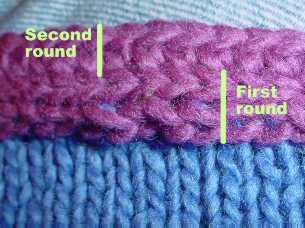
Recap: The first round of I-cord edging was applied to live stitches. Instead of binding off my last row of the poncho body, I left its stitches on the circs. Using a DPN and a half-hitch cast on, I cast on four stitches and knit one row of I-cord. On the second row, I knit three stitches, then did an SSK, working the last stitch of the I-cord together with one stitch of the poncho body. I worked this way, doing three rows of attached I-cord, followed by one round of "free" I-cord. This 3:4 ratio of attached rows:total rows kept the edging from being either gathered or ruffled. When I got all the way around my piece and had incorporated all of the body stitches, I grafted the live stitches at the end of my I-cord to its beginning.
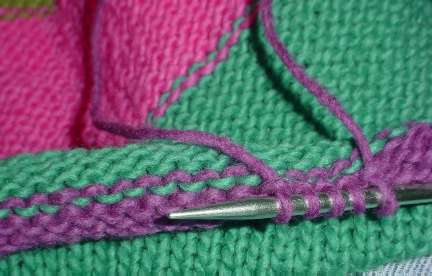
On the second round of I-cord I was not working with live stitches. Instead, I was picking up stitches along the outer edge of an established row of 4-stitch I-cord. On the previous round of cord one stitch was "eaten" by the attachment row. That left three to form the rounded edge. I used the centermost of these three as my line of attachment. To do this round of edging, I again cast on four stitches using half-hitches, and knit one row of unattached I-cord. Then I began working it onto the established round of edging. On the next row I knit two stitches, then did a SSK and picked up a stitch under both legs of the designated spot on the previouslyfinished I-cord. In this shot you can see the knit two, the SSK (under my thumb), and the needle thrust under the stitch of the existing I-cord, ready to do the pick-up.
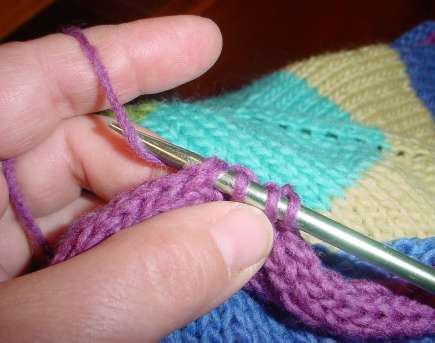
The reason why I didn’t use this method to attach the first round of I-cord is that theattachment rows of each method look different. Pre-block waviness aside, you can see that the first round of I-cord has a smooth chain-stitch like appearance to its bottom edge. The secondmethod produces an attachment row thatlooks rather like crochet, although you can’t see the non-crochet look rounded multi-stitch upper edge from this angle:
I prefer the speed of the second round’s style of attachment (less fumbling and shifting stitches between needles), but I like the look of the first round’s style of attachment. Note that the reverse of the second round’s style is a bit smoother and less leggy. Sometimes I work it around something clockwise instead of counterclockwise, so that the I-cord’s other side presents itself on the public side of my piece.
There’s another nifty use for this second method of attachment. You can use it along with I-cord or a lace edging to make a decorative seam, or you can use it for counterpanes or pieced blankets,multi-directional or domino-style knitting to joinmotifs or sectionstogether without sewing. More on using this for decorative seaming tomorrow.
WORKING REPORT – WATERSPUN PONCHO
I’m still nibbling away at the The Small One’s Waterspun poncho. To recap – I had seven colors to start, but only about 80% of a skein of each. I decided I really had to have at least one more skein of yarn, so I went out looking throughthe myriad local yarn stores for Waterspun.
How many local yarn stores make up a myriad? An amazing number. I live in the Boston metro area – a yarn paradise compared to most of the rest of the USA. Here’s just a sampling of the shops within an hour’s drive of my home, and most of these are reachable within a half-hour. This list doesn’t include the "big box" hobby shops sellingmostly mass-market yarns:
| Places I’ve been: Wild & Woolly, Lexington (favorite & "home base" LYS) Woolcott, Cambridge Minds Eye Yarns, Cambridge Hub Mills/Classic Elite Outlet, Lowell Fabric Place, Woburn and Newton The Knitting Room, Arlington |
Places I’ve never been: |
Please don’t be jealous. The cost of living in this yarn heaven is very steep, and the economy ofeastern Massachusetts is still hit hard by the Great Tech Crash. Those things make up quite a bit for having so many knitting sources nearby.
In any case, I quickly found that even with a ton of local yarn shops, very fewstock Waterspun during the summer season. Even fewer had a range of colors on hand. I could place a special order formy yarnjust about anywhere, but doing so would mean taking a full single-color bag – much more than I needed. Since I know with absolute dead certaintythat Waterspun is NOT about to disappear, I decided on trekking the 45 minutes up to the Hub Mills/Classic Elite outlet. I had a lunch date aboutten minutes away from the place anyway, so I was able to piggyback my errand and save some gas.
Hub Mills is two small, dusty rooms in the same 19th century brick mill building that houses the Classic Elite manufacture/distribution facility and design offices. Think crumblingblock in an industrial New England mill town, complete with a silted-in canalacross the street. Aside from the usual suspects from the standard set of makers in their full-price inventory, they stock cone-ends and "out-takes" of Classic Elite’s various lines. Fantastic bargains can be had, but like every mill-end shop, it’s hit or miss.People who head for the yarn first and are able to figure out what to do with limited quantities or variant dye lots are the best suited tothis type of shopping. I head up there maybe once every 18 months or so,butI’ve found some interesting bits over the years including samples of a heavier version of Sand that never madeit into distribution, odd cones of Montera and Provence, and assorted Fox Fiber natural-color cottons in non-standard weights, all for bargain-basement per-pound prices. I’ve also made the trip but returned empty-handed because the discount shelves were empty.
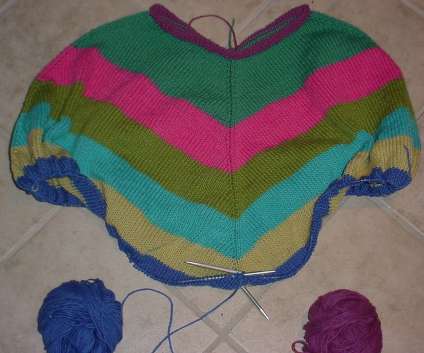
This time I found my Waterspun, even though the outlet store didn’t have much either. I found one more skein of the plum, plus a remnant cone of the blue that weighed out to the equivalent of about a skein and three-quarters. The plum’s dyelot looks quite close to my yarn. The blue was off a bit. Here’s what I did with them:
First using the method I described earlier. size US #6 (4mm) needles and my new blue yarn, I picked up 100 stitches around the inside of the neck edge. I placed a marker at the point corresponding toeach corner in theponcho body. I worked nine rows in K1, P1 ribbing. Every other row I started each between-marker section with a SSK, and ended with a K2tog. Because I was decreasing 8 stitches every other row I ended up binding off 68 stitches.
Then I went back to the bottom edge. I had already knit the final blue stripe, but I ripped it back because I wanted to alternate rounds between the new and old blue yarns in order to make the different dye lots less evident. (You can still see some minor striping thanks to the wonders of flash photography. In person the difference is less noticeable). I kept going, alternating yarns until I ran out of my old yarn. I finished up using every scrap of the new yarn.One interesting effect I got from using more or less the same quantity of each color (until the blue) was that with the increasing circumference of the piece, the width of the color stripes changed. I didn’t have more teal than pink, more pink than green and so on. That’s just the way the piece worked out. Had I used only the blue I had on hand, the final stripe would have been proportionally smaller. Adding the yarn I did is why it breaks the established progression of diminution. I’m pleased though. I ended up having a blue strip that’s about twice the width of the previous one. Although it is wider, the proporations aren’t all that bad.
The last step is adding an four-stitch I-cord edging in plum onto the live blue stitches. I’m using US #9(5.5mm) needles, the same size employed for the body. I’m attaching the edging by working the last stitch of the I-cord row as a SSK along with a live blue stitch. I’m doing this at a 3:4 ratio – three attached rows of I-cord, followed by one "free" unattached row. This is keeping the I-cord from bunching up the poncho into a gathered edge. (I could make a ruffled bottom by increasing the number of free I-cord rows.) I’m handling the points by working four unattached I-cord rows at the corner tips.
So far I’ve used less than a quarter of my remaining original ball of plum, and have completed more than a quarter of my I-cord. I should have enough to go around the entire piece once. But as you can see, I’ve got the classic stockinette edgeroll problem. I need more weight to stabilize the thing and tame the roll. Iplan toadd another round of the I-cord on top of the one that’s already there. I’ll document how I attach one row of I-cord to an existing row of I-cord in my next progress report.
WORKING REPORT – WATERSPUN PONCHO
The Tiny One’s poncho continues apace. I only have had about an hour or so to knit each evening, and as you can see, I’m almost done. Dark blue is the last body stripe. The remaining plum is reserved for edging and mistake-fixing.
It does turn out that the neckline is way too wide. 100 stitches as cast-on would have worked for an adult, but for a tall Kindergartener (size 8), it’s too big. If I were to begin again, I’d probably go with 80 stitches, tops. Instead of ripping everything back and starting again, or unpicking the top and knitting in the opposite direction, I’m going to fudge it and in doing so produce a detail that (I hope) will look planned.
My goal is to preservethe currentrolledcollar as a welt detail,but fillin the loose-fitting neckline with a contrasting texture. Using plum, I’m going to pick up stitches in the purl bumps of the last row of thecurrent rolled collar, just before I switched from plum to the teal and began the body increases:
Using these stitches, I’ll work at least six rows of K1, P1 ribbing. Where the "corners" of the piece happen, I’ll use a double decrease, keeping the centermost stitch of the decrease on top: slip two together as if to knit, return both slipped stitches to left hand needle, k3 tog.
With luck, I’ll have just enough of the plum left over to do an I-cord edging. If not, I’ll rip back any completed I-cord and buy another skein. Even if the dye lots don’t match (which they probably won’t as I got the plum months ago), between the striping and the large visual distance between bits of the same color at neck and hem any differences will not be noticeable.
The moral of the story is – if you decide perfection isn’t a prime goal, make sure you have coping strategies on hand that turn any shortcomings into design features.
WORKING REPORT – WATERSPUN PONCHO + SHEEPSHEARING DAY
In an effort to use up leftovers, reduce the stash, and find something mindless to do, I’ve hit upon doing a quick poncho for The Tiny One (age two below, but now in Kindergarten):

TheClassic Elite Waterspun I’m using is left over from a swatching/pattern design exercise I did earlier this year. I’ve got seven colors, but onlyabout 80% of a skein of each. It should be enough for a little kid’s poncho. If not, I’ll pick up an additional skein in another color and add another stripe. Before starting thisproject I swatched out my remnantson a US#9 (5.5mm) at 18 st/26rounds = 4 inches (10cm).
I decided to minimize thinking, so I cast on around 100 stitches in the round, did eight rows of stockinette to make a rolled collar, then placed four markers evenly spaced around the piece. I did a M1 increase just after the first stitch and just before the last stitch in each marked group, alternating these increase rounds with plain stockinette rounds. I’m planning on doing just plain old stockinette, using up each color in turn, saving out the plum for last. I’m not taking special care to always end my colors at an increase corner, I’m just knitting until I run out of the old color, then starting a new one. Depending on how big the thing gets, I’ll use the remaining plum to do some kind of simple edging, one or more rows of applied I-cord, or maybe just some rounds of seed stitch to finish. Any of those treatments should tame the bottom edge enough to minimize rolling. No fringes though. Small children, woolen fringes, twigs and leaves can meld themselves into an inseparable glob that I’d rather not deal with come wash day.

I’m doing this poncho using the two-circs method popularized recently for socks. In the photo above, you are seeing the thing sideways, because the needles meet at the shoulders, not the center front and back. The poncho is identical in all dimensions though, so these points are arbitrary, and don’t really matter. Here’s the logic of the thing:
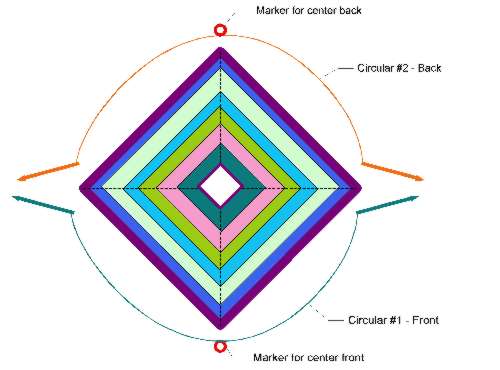
The two ends of Circular #1, shown in teal above,are used to knit the front. #1 **always** stays on the front of the work. The two ends of Circular #2, shown in orange above,are used to knit the back. #2 **always** stays on the back. At no time does the entire piece end up on one circular needle, nor at any time am I working with an end of Circ #1 in one hand andan end of Circ #2 in the other.
One advantage of this method is that the stitches are nice and spread out instead of being jammed onto one needle. I can call the Target Kid over and try the piece on without having to transfer stitches to a piece of string. I can also add another needle or two if the poncho grows too wide to handle with only two needles. While I don’t find this method of special advantage for socks (immodestly, I’d say I’m wicked fast with standard DPNs), I do like it for large pieces knit in the round, and for sleeves.
I’m still not sure if the neck hole is too big or not. It looks o.k. for now, and fits well over my daughter’s head, but I’ve seen ponchos stretch out due to their weight. When the piece is done I’ll check back. I might haveadd a few rounds of K1, P1 rib (with mitered decreases) to tighten up the neckline. If I decide to do so I’ll pick up stitches on the inside at the base of the rolled collar and knit them up from there, leaving the rolled outer edge as a trim detail.
GORE PLACE SHEEPSHEARING FESTIVAL
Hello to everyone I bumped into yesterday at the Sheepshearing festival in Waltham, Massachusetts. Please excuse me for not naming everyone I met, but I am afraid if I try todo so I’ll leave someone out. The sun was bright,andthe air was cool – perfectwool weather. My daughters and I were there from around 10:15 or so to 3:00. If you saw someone in a crayon-bright flash sweater, followed around by a little girl in vertical orange/yellow stripes and a larger pre-teen in blue, that was us. Also apologies that there will be nophotos of the eventhere. I’m not of the pix-as-part-of-the-experience crowd. I never quite remember to stop what I’m doing at the time in order to document it. I had the camera in the backpack, but somehow it never tunneled out from under my day’s purchases, and never saw the light of day.
In spite of the perfect sweater weatherI was disappointed (as usual) to see how greatly Polarfleece wearers outnumbered wool wearers, there were quite a few notable hand knits in the crowd. I saw a couple of really nice mosaic knit cardigans and coats, several hand-done Arans, a couple of Fair Isle style stranded sweaters plus twoScandanavian-style sweaters(one was a Dale Nagano, the otherpossibly from Norsk Strikkedesign), a whole flock of little kid cardigans, hats and pullovers,several very nicely done Intarsia pieces,a long-length coat done entirely in cables, a Surprise-style vest. I also ran into someone buying yarn for a Rogue at one of the yarn booths. There were other great looking hand-knits around (including quite a few pairs of socks). Please forgive me if I neglected to mention yours.
As far as yarn/fiber vendors – there were about eight, including some animal-to-skein outfits outside the main fiber tent and a booth from Minds Eye Yarns, a local Cambridge, MA store catering to spinners, dyers and knitters in with the sheep and llama farm yarn people. One outfit was selling whole fleeces (apparently you could also bid on the fleeces from the Gore Place sheep if you were there at the right time). I got a couple of skeins of rustic styleAran-weight from the At Nick’s Meadow Farm booth. They’ll end up as a felted pillow, similar to the one I described before. I’ve used their wool before, and found it an excellent value for the type. Joie de Vivre Farm,was there too, with some of their Mostly Merino, in fingering, sport, worsted and chunky weights. I did get a little bit of hand-spun fingering weight Merino from the Greenwood Hill booth. I’ve just added the basic info for their yarns to the collection, no reviews yet, though. I’m thinking it may be enough for a couple of simple lace scarves to be lagered away as future gifts.
Verdict? A grand day out in the only glorious day of spring weather we’ll probably get here this year (we don’t usually have many). Meet me there next year!
