Messing around with the edging on the Waterspun poncho, I realized that I was using two different methods of attaching I-cord, and that "How do I work attached I-cord?" is a common question.
Recap: The first round of I-cord edging was applied to live stitches. Instead of binding off my last row of the poncho body, I left its stitches on the circs. Using a DPN and a half-hitch cast on, I cast on four stitches and knit one row of I-cord. On the second row, I knit three stitches, then did an SSK, working the last stitch of the I-cord together with one stitch of the poncho body. I worked this way, doing three rows of attached I-cord, followed by one round of "free" I-cord. This 3:4 ratio of attached rows:total rows kept the edging from being either gathered or ruffled. When I got all the way around my piece and had incorporated all of the body stitches, I grafted the live stitches at the end of my I-cord to its beginning.
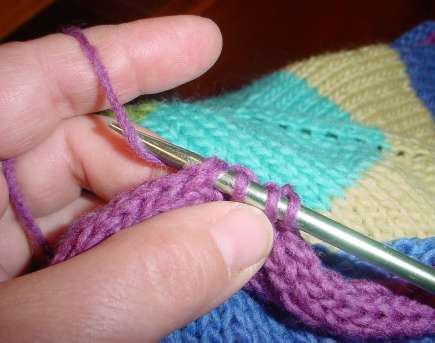
On the second round of I-cord I was not working with live stitches. Instead, I was picking up stitches along the outer edge of an established row of 4-stitch I-cord. On the previous round of cord one stitch was "eaten" by the attachment row. That left three to form the rounded edge. I used the centermost of these three as my line of attachment. To do this round of edging, I again cast on four stitches using half-hitches, and knit one row of unattached I-cord. Then I began working it onto the established round of edging. On the next row I knit two stitches, then did a SSK and picked up a stitch under both legs of the designated spot on the previouslyfinished I-cord. In this shot you can see the knit two, the SSK (under my thumb), and the needle thrust under the stitch of the existing I-cord, ready to do the pick-up.
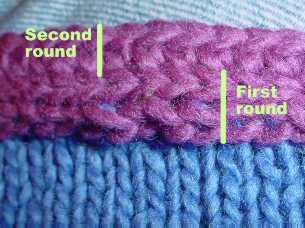
The reason why I didn’t use this method to attach the first round of I-cord is that theattachment rows of each method look different. Pre-block waviness aside, you can see that the first round of I-cord has a smooth chain-stitch like appearance to its bottom edge. The secondmethod produces an attachment row thatlooks rather like crochet, although you can’t see the non-crochet look rounded multi-stitch upper edge from this angle:
I prefer the speed of the second round’s style of attachment (less fumbling and shifting stitches between needles), but I like the look of the first round’s style of attachment. Note that the reverse of the second round’s style is a bit smoother and less leggy. Sometimes I work it around something clockwise instead of counterclockwise, so that the I-cord’s other side presents itself on the public side of my piece.
There’s another nifty use for this second method of attachment. You can use it along with I-cord or a lace edging to make a decorative seam, or you can use it for counterpanes or pieced blankets,multi-directional or domino-style knitting to joinmotifs or sectionstogether without sewing. More on using this for decorative seaming tomorrow.

[…] with the attachment stitch on the “outwards” rows. This is slightly different than the method I’ve described before for adding I-Cord to an edge, because it moves the attachment point one stitch away from the I-Cord itself, and makes a neater […]