TEN DAYS OF PROGRESS – KNIT METHOD COMPARISON
Coming to the end of our recuperative sojourn out in North Truro. I had hoped to post pix of the aurora from here, but sadly last night was heavily clouded, and windy. So I maintain my record of weather-related disappointment in relation to notable sky events.
But that doesn’t mean that nothing has been accomplished in the past week and a half. I’ve been knitting, stitching, and working on various book-related projects.

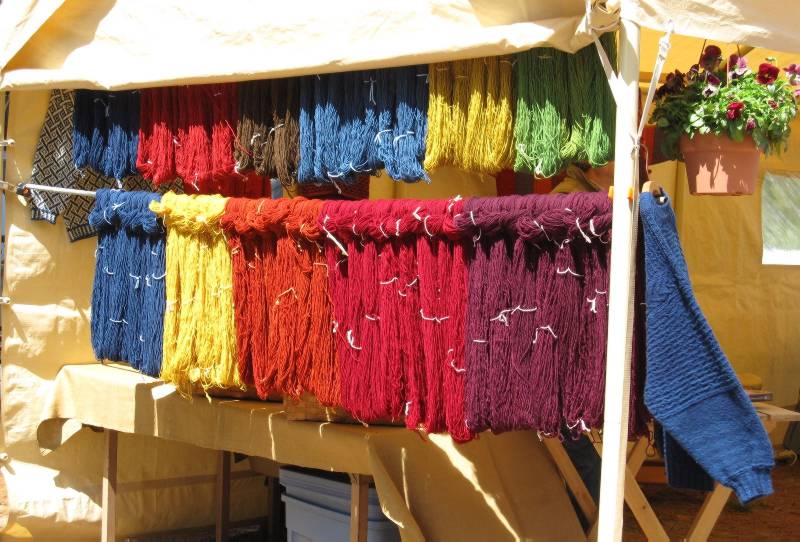
That’s four of the hat bodies for the frog hats done, with another about 40% done. That leaves only a couple more to go, then I will begin the army of eyeballs for them all.
One large skein of THE Herschnerr’s afghan yarn makes about four hats. I am not any more pleased with it for knitting than I was with it for crocheting (it’s leftover from the Eyeball Bolster). It squeaks and splits. And being mid-range acrylic, is not “heirloom quality.” But for a topical hat whose topicality won’t last long, and being on hand rather than a new purchase, it is good enough.
One thing I’ve done is to check my speed and uniformity across a range of knit-in-the-round methods. Counting from the upper right, Hat #1 was done using the Magic Loop method. That employs one overly long circular needle. The excess cable length is drawn out into a loop between two stitches roughly on the opposite side of the piece from the point where one is knitting. One works to that loop, then pulls the excess out to make a new loop 180-degrees from the loop that has just been encountered. For the record, I find it quite awkward, an annoying break in the rhythm of production, and prone to distending stitches.
Hat #2 was done using just one circular needle of as close a size to the circumference of the hat as I had in my collection. Round and round, yanking the stitches across the joins as I went. I didn’t enjoy this one either. I find that circs of that small size have needle parts that are not long enough for my overly large paws. My fingers might not be pianist long, but my hands are quite wide. I wear men’s size golf gloves because women’s gloves are too narrow. Hand size plus the way I hold my needles for Continental style work means that my ring and pinky fingers support the weight of the needles and the piece. Using a circular this short makes me grasp cable, not the sturdy needle parts. Harder to hold, harder to maintain unform stitches, and harder to form them at speed.
Hat #3 was worked entirely on DPNs. Now I’m more in my comfort zone. But being out here on the Cape I only brought my set of mismatched but brightly colored Boye aluminum DPNs. They are seven inches long (about 17.78cm). I much prefer my vintage European DPNs from Inox, which were 8 inches long (20cm). I should have grabbed them, but didn’t. The short Boyes worked well enough for the K2P2 ribbing, and I flew through that section, but when I changed to stockinette, the extra width of the knit fabric without the draw-in of the ribbing made keeping all the stitches on the needles a bit difficult. I had to stop to retrieve dropped stitches more often than I anticipated. That slowed me down and affected uniformity of stitches, even though I’m a proven DPN warrior.
Hat #4 was worked with two circulars. This is a hybrid method. Each circular holds half of the stitches. Using both ends of the first needle, you work the stitches across the front of the piece, then you switch to the other circular, and use both ends of it to work the stitches of the back. Unlike with DPNs where the needles travel around the work, with each DPN advancing to the next position as it is freed then employed for the next segment, the two circulars in this method NEVER change places. Yes, there is a bit of awkwardness as one fishes for the correct end to use and then moves stitches up into working position, but it is not as fiddly as Magic Loop. And unlike Magic Loop, there is no distortion between stitches because there is no spot where the cable loop has to be drawn out. I also found that the in between needle bits did not ladder, but that may be because as an experienced DPN jockey, I tensioned across the gap in the same way that I do where two DPNs meet. All in all this worked quite nicely, especially for the stockinette part.
Hat #5 (in process) will be the “best of both worlds” piece. I started it on DPNs for the ribbing – proven faster for me than the other methods, and moved to two circulars for the stockinette tube section – the best for maintaining sanity and uniformity given the needle assortment I have with me here on the road. I will probably continue on two circs for a while and then when it’s convenient, switch back to the DPNs for at least half of the crown. That will minimize the needle ends flailing around part when the decreases begin to make a major dent in total stitch count. In all probability I’ll keep working this mixed method way for the remaining few hats.
For the record, the eyeballs will all be done on DPNs in a smaller size than the hat bodies. I want them to be nice, tight spheres, suitable for stuffing. So instead of these 3.5mm needles I’ll be moving down to 2mms, or possibly even smaller. Much experimentation is anticipated.
Also in the photo is the latest progress on my Italian multicolor stitched piece. I’m well into the third corner, having done the math correctly (thank goodness). No need to improvise a new corner. I know the museum original had four different corners, but in this case I’m glad to have to do only one.
The long stretch across is next. I have confidence that I am not off in count, so everything should align when I get to corner #4 and the the shorter march to rejoin my point of origin, but in case it doesn’t that last corner is where any fudging will occur. In the mean time I will work with my usual mix of confidence and suspenseful apprehension, plotting out just-in-case strategies so I have them if needed.
And they say that needlework as a hobby has no drama… If only folk knew.
YARN WEIGHTS – YET ANOTHER RANT
Although I’ve mostly been stitching of late, and my old yarn review/knitters’ advice board/pattern website WiseNeedle that lasted for 13 years is but a distant memory, I have not given up knitting. I keep a sock project or two going at all times, and consult for my mom as her remote “knitting lady.” The patterns from WiseNeedle can all be found here, as can some of my advice, hints, and rants from the past, although the WiseNeedle question-answer board is gone. But of late I’ve seen quite a few complaints on knitting forums about yarn weights – confusion, botched projects, and misapprehension. I chime in and try to help.
First of all, the universal yarn weight system introduced by the Craft Yarn Council around 2004 continues to sow havoc. It’s misguided, untrustworthy, and has destroyed many knitters hopes and aspirations. To recap, this was the system that divided all yarns into numbered groups, initially 6, now expanded to 8:

The yarns within these groups are not instantly substitutable for each other because the definitions are overly broad. Here’s a breakdown:
| Group 0 | Group 1 | Group 2 | Group 3 | Group 4 | Group 5 | Group 6 | Group 7 | |
| Type of Yarns in Category | Fingering, 10 count crochet thread | Sock, Fingering, Baby | Sport, Baby | DK, Light Worsted | Worsted, Afghan, Aran | Chunky, Craft, Rug | Bulky, Roving | Jumbo, Roving |
| Knit Gauge Range* in Stockinette Stitch to 4 inches | 33-40 sts | 27-32 sts | 23-26 sts | 21-24 sts | 16-20 sts | 12-15 sts | 6-11 sts | 6 sts and fewer |
| Recommended Needle in Metric Size Range | 1.5-2.25 mm | 2.25-3.25 mm | 3.25-3.75 mm | 3.75-4.5 mm | 4.5-5.5 mm | 5.5-8 mm | 8-12.75 mm | 12.75 mm and larger |
| Recommended Needle U.S. Size Range | 000-1 | 1-3 | 3-5 | 5-7 | 7-9 | 9-11 | 11-17 | 17 and larger |
| Crochet Gauge Ranges in Single Crochet to 4 inch | 32-42 double crochets | 21-32 sts | 16-20 sts | 12-17 sts | 11-14 sts | 8-11 sts | 5-9 sts | 6 sts and fewer |
| Recommended Hook in Metric Size Range | Steel 1.6-1.4mm; Regular hook 2.25mm | 2.25-3.5 mm | 3.5-4.5 mm | 4.5-5.5 mm | 5.5-6.5 mm | 6.5-9 mm | 9-15 mm | 15 mm and larger |
| Recommended Hook U.S. Size Range | Steel 6,7,8; Regular hook B-1 | B-1 to E-4 | E-4 to 7 | 7 to I-9 | I-?9 to K-10 1⁄2 | K-10 1⁄2 to M-13 | M-13 to Q | Q and larger |
(source: Craft Yarn Council’s http://www.yarnstandards.com/weight-system.html)
To be fair, there are all sorts of caveats on this chart at the original site that include “Guidelines only,” “…always follow the gauge in your pattern,” and more. Even so, it’s wildly misleading.
The core of it (Groups 1-6) were created at the time that the industry thought that busy women had less time to knit and appreciated projects that finished up quickly. To compensate the “gauge creep” move was led by big craft yarn makers. Yarns that were formerly labeled Aran or Light Bulky were rebranded as Worsted, with the idea that fewer stitches per inch would make the projects zip along, This was especially evident among makers of mass market acrylics, and the heritage of that movement is seen in the groupings above. In fact it’s hard today to find a true worsted weight Worsted because most yarns labeled “Worsted” knit up to Aran gauge.
Now in a reversal because fiber of all types is getting more expensive, many makers are “slimming down” their yarns to keep project price points more attractive – less fiber = lower per skein price; and thinner yarns are now creeping into designations formerly reserved for heavier ones. This has resulted in a new round of confusion, once again long loved patterns no longer produce the same results as they did with yarn of prior years.
Regardless of yarn size fluctuations the basic flaw of this chart, however footnoted and expanded, remains. The yarn categories cover wide ranges of gauges, and are unsuitable as type descriptors or as guides for determining suitability for interchange.
Now. What is more useful?
Easy. The ancient Ply System.
Now note this as absolutely nothing to do with the actual number of plies a yarn contains. You can have a fat single, or a multi-ply extremely fine yarn. The ply system is based on comparison of the strand thickness of the yarn being described to a canonical batch of yarns that can be made by combining one or more strands of a mythical standard thickness yarn. That system has far more specificity to the standard gauges on yarn labels, and along with those gauges plus yarn fiber and loft (how airy or tightly twisted/dense the yarn is), is far more likely to result in good substitution choices. It also is a good guide for what happens when you double your yarn. In fact, the popular yarn weight “Double Knitting” (DK) refers to a yarn that is twice what used to be called “Knitting.” Knitting was the equivalent of today’s fingering or sock yarns. Two strands of fingering are still roughly the equivalent of today’s DK.
| Ply System Number | Traditional Name | Standard Knitting Gauge over Stockinette (4 inches/10 cm) | Comments | Typical Examples (off the top of my head) |
| 1 | Cobweb | No consistent close knit gauge – used with variety of larger needles to maximize airy look. | Jamieson & Smith 1ply Cobweb | |
| 2 | Lace | No consistent close knit gauge – used with variety of larger needles to maximize airy look. | Lopi Einband; Rowan Fine Lace; Jamieson & Smith 2ply Lace Weight | |
| 3 | Light Fingering/Baby | 32-36 | “Baby” on the label is now near meaningless because in modern use it designates yarns in pastel colors and easy care fibers, regardless of gauge. | Brown Sheep Wildfoote; Peter Pan 3 Ply Baby; Red Heart Its a Wrap; |
| 4 | Fingering/Sock | 28-32 | Cascade Heritage Sock; Regia sock yarns; Opal sock yarns; Lang sock yarns | |
| 5 | Gansey | 26-28 | Frangipani 5 Ply; Upton Guernsey Wool; | |
| 6 | Sport | 24-26 | KnitPicks High Desert Sport; Herrschners 2 Ply; Lion Dotted Line | |
| 7 | Not used | |||
| 8 | Double Knitting | 22 | Rowan Felted Tweed DK; Berroco Comfort DK; Wendy Supreme DK; Lion Ice Cream; Herrshners Baby Yarn | |
| 9 | Not used | |||
| 10 | Worsted | 20 | Cascade 220; Plymouth Encore; Germantown Worsted; Plymouth Pima Rino; Sirdar Country Classic Worsted | |
| 11 | Not used | |||
| 12 | Aran/Triple Knitting | 18 | KnitPicks Muse. Herrschners Worsted 8; Red Heart Roly Poly; Lion Crayola; Caron Simply Soft; Tahki Donegal Tweed | |
| 13 | Not used | |||
| 14 | Bulky/ | 12-16 | Plymouth Encore Chunky; Cascade 128; Lamb’s Pride Bulky; Lion Re-Tweed | |
| 15 | Not used | |||
| 16 | Super Bulky | 8-12 | Malabrigo Rasta; Plymouth Encore Mega |
Now again – caveats on density, fiber choice, and construction. Some examples:
- When worked, a tightly plied and twisted yarn will have a different drape than a fat single ply yarn, even if the fiber composition is the same.
- A 90% wool/10% acrylic blend will have a different feel than a 10% wool/90% acrylic blend. For best equivalency try to match fiber composition/mix proportions.
- And a cotton yarn and a wool yarn of equal weight will behave differently – enough differently to generally not sub one for the other without taking the extra mass and lack of elasticity of the cotton when compared to wool of equivalent size.
- In a delightful bit of industry internal obfuscation the term “worsted” in addition to being a yarn weight category also is used to describe a style of spinning. But not everything that’s labeled Worsted conforms to that specification.
- Some yarns can be knit down or up in gauge. For example a lofty 100% wool Aran with a “native gauge” of 18 st = 4 inches/10cm might also be able to be knit at worsted gauge 20 stitches = 4 inches/10cm. The drape will be different but it may be satisfactory for some purposes. Note that NOT ALL YARN can be manipulated this way, and lumping many adjacent weights into broad and misleading groups is just asking for trouble.
To sum up, please people, look beyond the CYC Yarn Group designation. Look at gauge, fiber, and density. And take guidance from these older systems. They were created by people who knew their wool and fiber, and there still is a lot of wisdom in them.
ALTERNATIVE ALPHABET RESOURCES FOR INCLUSIVE STITCHERY
Lately I’ve seen a couple of resources for embroiderers who wish to make samplers or other stitchings to honor friends or family who are differently-abled. I post them here for general reference. [NOTE – THE LINKS BELOW WERE EDITED ON 22 AUGUST 2022, AFTER I LEARNED THAT MR. TAKAHASHI’S WEBSITE IS DOWN.]
First is this alphabet from type designer Kosuke Takahashi. It takes a linear construction alphabet, and overlays Braille dots on it, to form a construction that can be read by those familiar with both type forms.

Sadly, Mr. Takahashi’s website appears to be down, but the article about his invention along with a better visual of the material above can be found here, on Colossal. The author’s old site noted that his workis free for personal use. If you want to compose an item or design for sale, you would need to contact the designer to license the font.
Second is a linear stitch interpretation of the sign language alphabet.
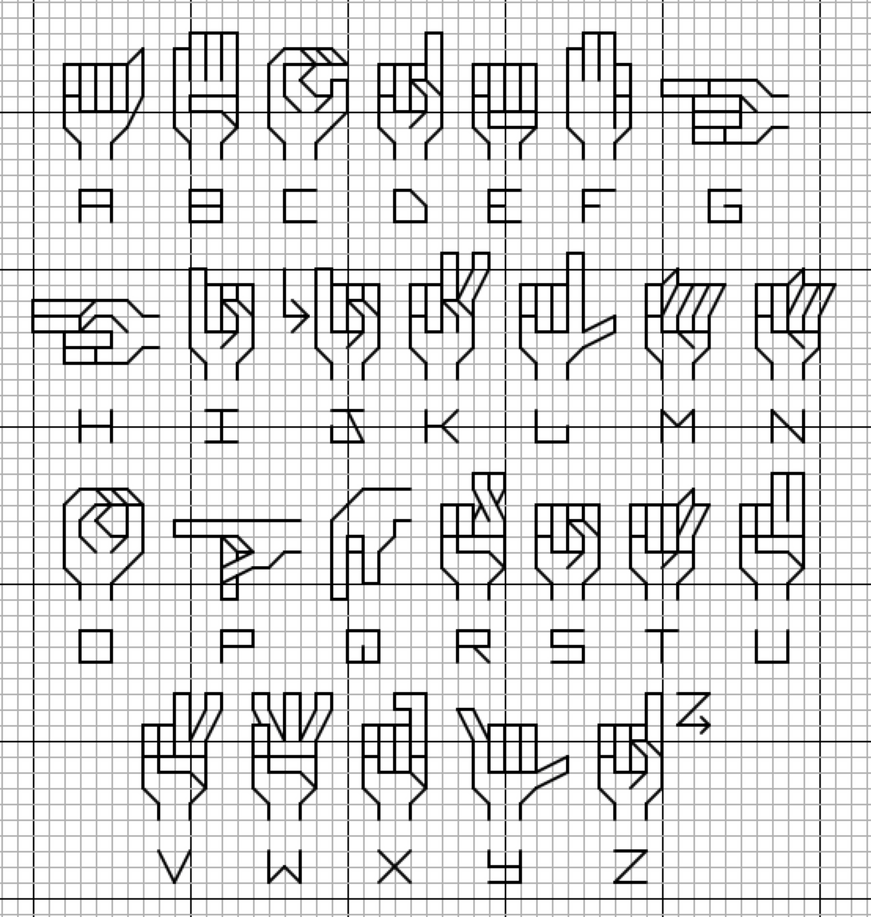
The source is Deviant Art board poster and cross stitch designer lpanne, and is under her copyright. Again, if you create anything from this for sale, please take the time to contact the artist and ask for permission.
Although this last item presents text in a non-standard way, for most of us it makes it less rather than more comprehensible. But it’s a nifty idea for the nerdy-minded among us. Artist Sam Meech knits up scarves using ASCII coding, represented by two colors (one for 1 and the other for 0). He’s able to include entire quotations and text passages in his Binary Scarves. He sells them at his site below.

(photo shamelessly lifted from Sam’s site)
You can read more about Sam’s scarves here.
If you want to create your own binary string, tons of text-encoders abound. I used this one to translate
STRING-OR-NOTHING
into
01010011 01110100 01110010 01101001 01101110 01100111 00101101 01101111 01110010 00101101 01001110 01101111 01110100 01101000 01101001 01101110 01100111 00001101 00001010
If this is new to you – each eight digit “word” is in fact a letter. “N” for example is 01101110. The binary scarves work like early paper punch tape, stacking each octet one above another. So the word “STRING” would come out like this:
01010011 = S
01110100 = T
01110010 = R
01101001 = I
01101110 = N
01100111 = G
There was a time in my distant past that I used paper tape, and could recognize and read the octet patterns by sight. But that was long ago, in a technology forgotten by time…
MARBLE ROLLED, EDGE TREATMENTS EXPLAINED
Yaay! The lap blanket knit from Marble is finished. Well, mostly. I do have to finish off the ends and block the thing. But all of the knitting is complete, and I grafted the edging’s last four stitches to its beginning, so that the seam is unnoticeable.

Aileen in Springfield asked me how I was filling in the half-motifs, because she’s working on a modular square piece, and prefers the look of the units tipped to present as diamonds. I’ll attempt to explain, but I won’t be publishing this as a full up pattern because of general lack of interest.
My treatment includes a nifty self I-Cord edging, worked as the piece progresses. It’s a nice, robust “hem” that stands up to wear and tear nicely. Here’s how.
I started on the REVERSE of the piece, so that any ridges formed by knitting the edging on would happen on the front, the same side as the native diagonal and vertical lines of the modular squares. I needn’t have bothered with this refinement, because as you can see in the photo above, the join lines are quite indistinct. Also note the slight ruffling of the edge triangles. That should steam-block out (mostly).
Starting at Point A – the rightmost corner point of the motif at the bottom right of the blanket.

Increase progression:
Row 1: Cast on three stitches, then pick up one in the rightmost corner of the first motif.
Row 2: Slide all stitches to the right end of the needle, I-Cord style. Knit 4, and pick up one stitch in the next available selvedge stitch of the diamond motif. There should be 5 stitches on the needle.
Row 3: Flip the work over so you are working away from the main blanket. Slip the first stitch purlwise. Knit the second stitch. Slip the final three stitches one at a time, all purlwise.
Row 4: Flip the work over so you are working in from the edge, toward the main blanket. Knit the first three stitches VERY FIRMLY, pulling the yarn tight in classic I-Cord style. Knit the remaining stitches on the needle. Then pick up another stitch in the next available selvedge stitch of the diamond motif. There should be 6 stitches on the needle.
Row 5: Flip the work over again so you are working away from the main blanket. Slip the first stitch purlwise. Knit the second and third stitch. Slip the final three stitches one at a time, all purlwise.
Continue working rows 4 and 5, adding one stitch on every even row, until you have “used up” all of the available attachment points along the edge of your motif. The actual number of stitches will depend on the size of your motif. Mine was a 15×15 stitch square, so I had 14 attachment points along each diamond’s edge. After working your last Row 5 equivalent you will be ready to decrease
Decrease progression:
Row 1: Starting at the edge, working towards the main blanket. Knit the first three stitches very firmly, I-Cord style. Continue knitting across the row until only three stitches remain. Knit those three stitches together. Pick up one stitch in the first available selvedge stitch on the next motif.
Row 2: Working from the main body of the blanket back out to the edge. Slip the first stitch purlwise, knit until three stitches remain. Slip these three stitches one at a time, all purlwise.
Continue working Rows 1 and 2 of the decrease progression until you are back at the tip of Motif #2. At that point you should be down to four stitches. In the event that you have five when you reach the motif tip (which happened to me a couple of times, and I didn’t take the time to figure out why), on the last iteration of Row 2, just knit the first two stitches together instead of slipping. Fudging this way is invisible – the goal is to make sure that by the time you start down the increase section of the next motif, you begin at the point with only four stitches on the needle.
Now. How to use this same edge I-Cord idea on a straight edge? You can do it one of two ways, depending on whether you are working this at the same time as the main body, or adding it as a supplemental feature on a finished edge.
First, if you’re working a flat piece in garter stitch or stockinette and you want to add this at the same time as you are working the main body, just set aside the first three or four stitches at either end for the I-Cord curl. Or if you like, add some stitches for the treatment to your total count, but be aware that this will use more yarn and if you are working from a set pattern with a set amount, adding even six total to each row (3 left and 3 right) you will risk running out of yarn.
Once you have figured out how many to set aside or add, work each row as you usually do, BUT at the end of every row, slip your I-Cord designated stitches, and at the beginning of each row, KNIT them. You’ll notice that this edging is the same front and back, so if you are trimming both sides of your scarf or blanket, the left and right edges of your piece will look the same. This is pretty much the same thing I described as being useful for making straps for bags back in 2004, but with a whole blanket in between the I-Cord edges rather than just a couple of stitches.
If you want to add this I-Cord edge to a finished piece, it will be easier if you have worked a slip-stitch selvedge, so that the edge loops are crisply defined. But with fiddling this will also work on non-slip-stitch edges, and on cast on or bind off rows. Cast your desired number of stitches onto your needle, pick up one stitch in the body of the work to be trimmed. Flip the work over and heading back out from the body, knit the first two stitches together, then slip the rest purlwise, one at a time. Now working back from the edge towards the main body, knit the designated I-Cord stitches firmly, knit the attachment stitch, and then pick up another stitch in the main body. Continue in this manner, adding one stitch every “inwards” row, and knitting it together with the attachment stitch on the “outwards” rows. This is slightly different than the method I’ve described before for adding I-Cord to an edge, because it moves the attachment point one stitch away from the I-Cord itself, and makes a neater presentation with both sides looking more like each other.
AND BACK TO KNITTING
Now that the hustle of getting ready for our return is over, I have time in the evenings to sit and knit a bit.
I had planned to finish the large red throw prior to the trip, but I ran out of time. Luckily, I didn’t run out of luggage space, and I was able to take it with me:

As you can see, I have completed the center area of modular diamonds, and am now working around the edging. Or I was… More on that below.
I am trimming the thing out into a full rectangle, filling in the missing edge half-diamonds and completing it with an edging. I’m winging it, but have some notes if the world thinks it really needs yet another free pattern for a modular diamond throw. If you are part of that world, please let me know.
One thing of special note – the edging. I’ve used this before. It’s an “un-vention” – something I worked out on my own, but that I’m sure others have discovered before me. I am not a big fan of plain edges on stockinette or garter stitch. To me they look flabby and unfinished. When I do a scarf or blanket, I always try to include a lacy, hemmed or otherwise finished edge. This particular treatment is similar to an edge casing, sort of like a seam binding in sewing. It wraps the edge with I-cord, and is totally reversible (same on both sides). It’s worked at the same time as the body:

It’s particularly useful to create a “Chanel-look” professional detail on the fronts of cardigans. Buttonholes can be introduced between the edge and the main body, too. Or it can be used to create a casing for a drawstring or elastic, on the tops of bags or skirts. It can also be used on both sides of a narrow strip to create a firm strap, either to use as-is, or after fulling. (I posted about this almost 10 years ago).
How to work this edging? Very simple. Decide how many stitches wide you want it to be. Three or four is optimal, but up to six can be managed. Add that number to your total project width count. Let’s use four here for demonstration purposes:
Four-Stitch I-Cord Style Rolled Casing
- Row 1 (wrong side row): Work your project as usual until you get to the last four stitches. Bring the yarn to the front of the work. Leaving the yarn alone, slip the next four stitches as if to purl, transferring them one at a time from the left to the right needle.
- Row 2 (right side row): Just like when working I-cord, knit the first four stitches, making sure to pull the yarn very tightly to create the rolled edge effect. Then work the rest of the row as usual.
Now, what’s this about not quite working the edging on this project?
I had started it by adding five extra stitches of width on top of eking out my edge triangles, supplemented by a four-stitch rolled casing. That’s nine stitches per row extra. I got all the way around the corner, having worked that out, too, using short rows. Then I looked at how much yarn I have left – a little over 1.3 balls. It was highly probable that I’d run out before getting all the way around the blanket. With no way of getting more Marble here in India, I had to rethink.
I ripped out the whole completed edge section (two nights’ work), and began again. This time I’m using only one stitch of extra width, and I’ve cut back the casing from four to three stitches, for a total per row add of only four instead of nine:

We’ll see how far I get. To be fair, I prefer the proportion of the last attempt, but it is no longer a valid option. So it goes…
If I still don’t have enough yarn, the next possibility is to rip back some of the center diamonds and make the total piece smaller. But because that’s worked on the diagonal, doing so will be a major pain.
Here’s hoping my quick fix is enough.
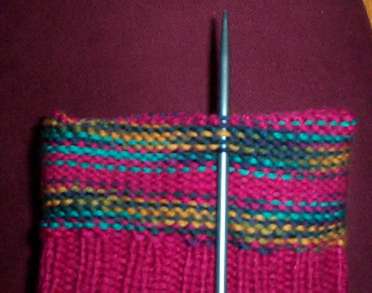
FRAMED
More progress on Motley. I am almost three quarters of the way done with the framing element. In this case, a Regia sock yarn in a deep charcoal grey.

I’m still on the first 50g ball of Regia, and you can just make out what has not yet been knit in the upper right of the photo (click on it to enlarge).
After this comes the multicolor edging, probably a plain saw-tooth, about as deep as the strips are wide. I’ll have to play around and see what looks best.
I’m flying by the seat of my pants here, and explaining exactly how I’m working the corners and filling in the edge triangles will be a challenge. When I post the final write-up of this project it will be more of a method description than a finished full pattern with explicit directions, quantities and the like.
Questions from the Mailbag
Nili asked a couple of thought provoking questions on my post about the difference blocking made in my Lattice Wingspan project. First she asked:
I bought some inexpensive acrylic yarn to play around with and am knitting a good sized sample of feather and fan stitch. If I keep going it could be a scarf. My question is, is there any value to blocking synthetic yarn? Will it respond to the blocking?
I attempt to answer.
There are as many answers to the question of blocking acrylic as there are types of acrylic yarns, multiplied by the uses to which it is put, and squared by the number of knitters, worldwide.
First, on fiber types:
Wools and high-wool-content blends have the memory/bounce-back property. The fibers have a natural elasticity and respond to changes in tensile stress and to a lesser extent, humidity. They return to their cozy, unstretched state upon washing (more or less). This is also what keeps the elasticity longer in ribbings knit from high content wool. Other protein fibers also display the stretch and bounce back property, although many are not as elastic as wool. Silk is the exception in that it doesn’t stretch very well.
Most acrylics on the other hand, do not have the same stretch and bounce back properties as wool and high-wool content blends. They can be stretched, but once set that way under heat and tension (aka “killed”), they will never return to their original shape. There are exceptions. High tech man made fibers are invented every day, and many acrylics contain a modicum of something elastic to keep ribbings true and offer a more “wool-like” experience.
Cottons, linens, ramie and other plant-derived fibers behave differently, with different shrinkage properties and performance characteristics under blocking.
Next, on blocking methods:
There are a zillion ways to block. Wet, dry, under tension vs. gentle pat out, with and without steam, and so on. Different methods are better suited for different fibers, or different uses. For example, the wet-block high tension set up used for lace to spread it out is not appropriate for a dense, cable knit sweater. A pat to measurements and non-contact steaming to relax it might be perfect for that Aran knit in wool.
What blocking does:
It evens out stitches, reduces (but does not totally eliminate) curl. It makes edges lay flatter and seaming easier. It coaxes the piece into the shape desired, although it cannot correct major size or proportion problems.
If a wash/wet block method is used, it removes hand grime any residual spinning oils from the yarn, and casual dirt from the piece. In general, it yields a more professional final appearance, and removes some of that “loving hands at home” look.
To answer in specific – blocking a lace scarf knit from acrylic:
How I’d proceed would depend on the acrylic I was using. You’re lucky because a lace scarf doesn’t need to end up being the exact dimensions that a garment body might require.
The best advice is to knit a small swatch that uses both the cast-on and cast off of your final project, and test out your method. You may find that damp block with blocking wires and pins, using non-contact steaming (an iron set to low heat) spreads out the lace and fixes it in that shape. Or you may find that doing so stretches the lace body a tremendous amount relative to the cast-on and cast-off edges, which end up looking cupped and puckered.
I’d probably attempt some sort of blocking on the thing, knowing that even if the ends puckered oddly, there are fall back positions. The most aggressive (and for knitters, controversial) way to fix that problem would be to toss the thing on a sewing machine and run three or four lines of machine stitching across the end, just before the cast-on or cast-off row. Then (horror of horrors) cut off the puckered end. The raw edge will be secured by the stitching, and can be made neater with a row of encapsulating crochet, or used as a base for fringe, or a knit-on edging.
Also what type of cast on creates a soft, loose base? I’ve found stretchy ones suitable for ribbing but I’m looking for one suitable for lace. I tried long tail with a larger needle as well as spacing the stitches out wider on the needle. It’s still pretty firm. What can I use instead?
I attempt to answer Nila’s second question without resorting to another indeterminate diatribe.
Lace cast-ons can be problematic. As you note many are too tight or are not stretchy enough for the wide spread of lace, or for the aggressive blocking that makes it look best. There are many simple and exotic cast-ons that can be used for knit from end to end lace. There’s another bunch that are great for center-out motif lace, but that’s for another post.
In general, for lace garments, the stretchy cast-ons are usually enough, especially when they are worked with a needle two or three sizes larger than the needle size that will be used for the bulk of the lace. But for things like shawls and scarves which are blocked until they scream, even a stretchy start is often not enough.
Simple lace cast-ons:
I won’t get into the really exotic methods, because most of the time the simple ones outlined here work well enough for me and my projects.
I usually work some sort of provisional cast-on because most of my scarf and shawl pieces are finished with an applied edging, which is quite easy to knit onto the loops that result when the initial edge is released from its provisional mooring. My favorite provisional start is crocheting on, which is easy to zip out for remounting the stitches on a new needle.
On the rare occasion when I want the edge to stand alone, and I need extra stretch, I will work the same crochet-on cast-cast on, but using a hook closer in size to my working knitting needle, AND working a crochet chain stitch BETWEEN each stitch mounted onto my knitting needle.
Another method I use is a variant of the cable cast-on. For this one I also use a knitting needle two sizes larger than my lace needle. Put a slip knot on the left hand needle. Insert the right hand needle into that stitch and draw a loop through it. Slide the new loop onto the end of the needle and before you snick the yarn up tight, insert the right hand needle into the new loop. Repeat drawing a new loop through the new stitch until you have enough stitches on the needle. If you were to insert the needle tip in between the old stitch and the new stitch, you’d be doing the classic cable cast-on – aka “knitting on”, but by making the new stitch in the loop of the previous one, you make a more airy and more stretchy edge.
Finally, on occasion the most convenient method for starting narrow lace pieces is the simplest one of all – the half hitch cast-on (aka “Looping On” or “Backward Loop Cast-On”). It’s the stretchiest of all, and can be made even more so by using a larger needle. It does however produce a very flimsy edge. I use it when I cast on stitches for a lace edging, when I intend on working the edging completely around something (scarf, baby blanket, etc.), and plan on joining my final row to my first row via grafting. Yes, I could use a provisional cast-on for this and end up grafting onto live stitches, but there are usually very few stitches at the start point of a narrow band of edging, and doing so wouldn’t be worth the effort. One caution on this – the stitches in the next row coming back HAVE to be regular knits or if they are purls, they need to be worked through the back of the loop. Otherwise the half hitches will collapse.
To sum up:
Lace cast-ons are largely a matter of personal preference. There is no one perfect method for every piece in every yarn. Knitters being passionate people, will each advocate their own favorite, and armed as they are with pointy objects – can be formidable in their discourse. The answer here is the same as every other answer in knitting. Give it a try, make a swatch and abuse it. See how you like the method for the piece at hand, with your chosen material. Preferences are as situational as they are personal, and there is no single correct answer.
BLOCKING MAKES ALL THE DIFFERENCE
Compare.


This is the same scarf. At the left, it’s fresh off the needles. On the right, it’s been through this torture:

All lace benefits from a savage blocking. Is your Wingspan looking flabby? It’s probably not your knitting technique. Try blocking it and see.
For the record, I used my visually horrific checked sheet and damp-blocked my finished Lattice Wingspan. First I dampened the thing and squeezed it out gently (no wringing). I patted the center curve into shape and pinned it first. Then I used a minimal number of pins – just one at each point – to pull the points out from the center. Finally, I let it dry overnight.
The ends? I don’t darn in ends until after I’ve blocked. Especially on lace. Finishing off the end may introduce a small area that does not stretch like the rest of the piece. Better to let them hang, then deal with them after blocking is over.
LOG CABIN MODULAR BLANKET WORKING METHOD AND CROCHETING ON
First, in answer to a question about how to draw up a loop, I do a normal pick-up one into one chain selvage (or bind off, or cast on) stitch, then I grab it and pull more yarn through, distending the newly made stitch until I’ve pulled a foot or more of yarn through. Once I’ve got the giant loop, I use it to knit the next two rows. When I’ve finished the two rows I grab the strand leading back to the ball and give it a firm tug to pull any left-over yarn back out of the loop, and to snick the newly knit piece up closely to the existing work. Here you see the loop being pulled through prior to knitting with it:

After much trial and error, I’ve hit on the best way to cast on for the strips in my modular knit Log Cabin Baby Blanket. (Wish I’d looked at yesterday’s comments before all that fiddling and seen Karen’s suggestion). Crocheting onto a knitting needle, like I do when I start off the waste chain for a provisional cast on, works nicely. It produces an even chain type edge, analogous to the strip’s bind off and chain selvage edges. I’ve described crocheting on before, but here’s another swag at it.
In the snap below I’ve stuck my crochet hook into the final stitch remaining after I’ve cast off the stitches on the last strip. I’m holding the working yarn BEHIND the target knitting needle, and I’m reaching OVER the needle with the crochet hook

I’m grabbing the working strand with the crochet hook and am about to pull the just-grabbed strand through the existing stitch (in effect, I’m making a crochet slip stitch).

Ignoring the errant strand of Smaller Daughter’s hair in the shot above, what we wind up with is a stitch on the knitting needle. I’ve moved the working strand to the back of the knitting needle again, and am poised to make another.

Crocheting on works especially nicely for provisional cast-ons. Instead of crocheting a long chain THEN fiddling with the bumps on the back of the chain, trying to pick them up, this method produces the chain edge and mounts the stitches in one step. It’s one of the core techniques I teach in my occasional “Crocheting for Knitters” workshop.
As you can see, my blanket is growing. According to the logic diagram, I’m in the middle of unit #7:


Finally, here’s the working method. It’s not a pattern because I am not giving yardage estimates, gauge or dimension. These log cabin blocks can be made to any size and assembled like a standard patchwork quilt, or the working logic can be used to make a larger object as a single square. For the record, I’m using Austermann Batika Color, a bulky weight yarn with a native gauge of 4 stitches per inch in stockinette, on 6mm needles. I’m getting roughly 4 stitches per inch and four garter ridges per inch in garter stitch on US #9s (5.25mm). My initial square was about 3×3 inches (roughly 7.6cm), and all my subsequent strips are about 3 inches wide.
The best way to join ends of Batkia when starting a new ball is to thread the new strand into a standard tapestry needle and stitch it through the center of the chainette for about 2 inches, like feeding an one eel to another. Once the doubled length has been knit, any flapping ends can be trimmed back without fear of raveling.
Working Method for Modular Log Cabin Square
First square:
Cast on 12 using crocheting on.
Row 1: Slip the first stitch purlwise, knit 10, k1b.
Repeat Row 1 until you form a square of garter stitch. In all probability there will be 12 chain selvage edge loops running up both sides of the square. Cast off 11. One stitch should remain. Do not break yarn.
Strips:
Using the last remaining loop, crochet on 12 stitches.
Row 1: Slip the first stitch purlwise, knit 10, k1b. Draw a loop through the first available chain selvage stitch on the previous square or strip (it will be the edge to the left of the new strip’s attachment point). Enlarge this loop until it’s big enough to knit with. Turn the work over.
Row 2: Pulling the loop tight and making sure you’re knitting with the anchored side rather than the side that runs free back to your ball of yarn, knit 11, k1b. Turn the work over.
Row 3: Slip the first stitch purlwise, knit 10, k1b.
Repeat Rows 2 and 3 until your new strip runs the whole width of your piece. The first time you do this, it will be a square of 12 stitches x 12 garter ridges. The second strip will be a rectangle of 12 stitches x 24 garter ridges and will run across the top of the first two squares.
Next row: Cast off 11. One stitch should remain. Do not break yarn.
Repeat the strip directions, always adding strips counterclockwise around the perimeter of the piece, with each strip running the full length of the available side.
ON BUYING AND USING MULTICOLOR YARN
I got a private note yesterday from a knitter who seeing the fuzzy entrelac blanket posted yesterday, wanted to know how I knew the spotty yarn would work well for it. I reply.
Frankly, I wasn’t sure what I was going to do with my spotted yarn. But multicolors come in several flavors. While there are no hard and fast rules in knitting, there are some general principles I use to help figure out what to do with multicolors, especially because I’m one of the yarn-first folk. I rarely have a specific project in mind when I purchase yarn, and usually have to find or invent something to do with my new treasures. Also, as long time readers here have seen – I don’t always hit on the best use right away. Sometimes it takes me a couple of starts before things work out. I don’t mind ripping back. To me it’s part of the process of exploration and discovery. Now these thoughts are things that work for me. Your taste is probably different from mine, and there’s nothing wrong with that, so please don’t think these are put forward as rules for everyone.
For me, first comes yarn choice. Multicolors come in all sorts of types and color combos. I have to like the color set and mix proportions as a whole. I like to look at my target yarn from a distance – 10 feet at least, to see if the skeins “read” well as an aggregate. Lots of times one or more of the colors pops out strangely from a more harmonious background. I tend to avoid those mixes. I do however like multicolors that are composed of different colors but similar intensities.
Once a color combo has caught my eye, I look at the length of the repeat. On skeined yarn, this is relatively easy, especially if the yarn shop allows customers to untwist a skein. Never do this unless you have asked permission and you know you can return the yarn to the original twist, neat enough to be indistinguishable from the on-shelf stock. Then do so once you’ve made your evaluation. Or ask the yarn shop staff if they can untwist/retwist for you.
On DK and worsted gauge, I figure about 1.5 stitches per linear inch of yarn. On sport and fingering, figure 2.5-3.5 stitches per inch of yarn. A run of a single color as wide as my palm on a DK is probably a bit over 5 stitches when knit up – just under an inch worth of knitting in DK gauge. Shorter areas of color end up looking like little spots. Longer ones produce broken stripes. Really long segments produce larger stripes (depending on the circumference of the piece being knit and the gauge).
What to do if the yarn comes in a ball rather than a skein? You’ve got to guess and estimate. Look at the put-up. Estimate about how long one circumference wrap of the ball is. For example, if you look at the Noro Kureyon Sock below you can see that the wrap goes diagonally around the ball, and that there are about four or five wraps before the color changes.

The ball is approximately 7 inches long (the spread from my index tip to small finger tip with my hand splayed – it’s good to know some standard biometrics of your own hand for guesstimation), so a rough estimate is that one wrap around the ball would be about 15-16 inches. The individual color patches on this yarn are probably on the order of 65-75 inches long, probably something like 24-30 linear inches of knitting at an approximate sock gauge. (My socks are about 11.5 inches in circumference on the ankle, so for socks one color segment would probably make a stripe a bit over two or three rows deep).
A yarn with lots of rapid color changes will read very differently from a yarn that’s mostly background color with scattered spots. The rapid color change yarn will, from a distance, almost seem to do an impressionist’s blend, and appear as a hue median to all the colors being represented. That means that a yarn with a zillion little spots of color, each individually quite clear will end up looking like a muted blend of all of them from a distance. Tweeds and multi-strand ragg style yarns (two or more plies of different, sometimes variegated color twisted together) are good examples of this effect. My Impossible Socks uses a ragg-twist multicolor tweed in combo with solid blue. The overall effect of the tweedy yarn is much darker and muddier than its constituent bits, even without the navy stripes.

Colors that blend one to the next can also present problems. Sometimes the nondescript areas between vivid colors predominate if evaluated as a general proportion of total skein length. A lovely multicolor on the shelf may actually knit up rather muddy, with only small flashes of the marquee hues. Conversely, colors that shift abruptly from one to the next can produce a rather motley and jarring effect, with each jostling against its neighbors. In longer repeats, I tend to favor yarns that have few or no blended transitions. I also prefer that any transition areas make up less than 10% of the total color cycle.
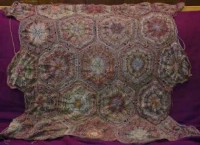
Because of the “tweens” challenge with shading multicolors and the perceived meld problem in general, I tend to stay away from yarns with wildly disparate color combos, and stick mostly to multicolors with either a well established and pleasing uniting background color; to yarns that present either multiple variants of the same color (like a continuum from light blue to navy); or to yarns that offer up two or at the most three closely allied colors (like red to yellow, with side trips to orange). The Paisley shawl illustrates this visual mind meld. It’s a raspberry to blueberry blend. The detail shows the color spots clearly, but the big picture blends both into a medium purply garnet.


In terms of color repeat length, I try to match projects to the repeat length. I’ve found in general that unless I can engineer repeats to deliberately and predictably flash, I am not wildly fond of large areas of multicolor yarns knit flat. They’re just not very interesting to me worked that way. I much prefer trying to introduce movement or to break up the large-field effect. Entrelac works nicely. The color repeats in the strip below (from my Chest of Knitting Horrors graveyard of unfinished projects) uses Entrelac to make the most of a short color repeat. Each square is only about an inch across.

If the repeat is long, you can engineer something fun like my Snake scarf, displaying the long repeat’s gradations to maximum advantage, or working center-out medallions that radiate from one color to another (the brown throw is all knit from the same color number Blauband sock yarn).

If the color bits are extremely short, the diagonal movement introduced by the Entrelac patches combined with the narrow “bounce area” of the patch width evens out the distribution of the spots, and makes them look like ice cream sprinkles (jimmies to my fellow Bostonians).

Sometimes I’ve broken the rules and used directional-distortion texture patterns with self stripers to break up the march of concentric rings of color by zigging the texture this way and that. My SeeSaw socks, published in KnitNet ages ago are a good example. These are in fact my original SeeSaws, still in service after all these years:

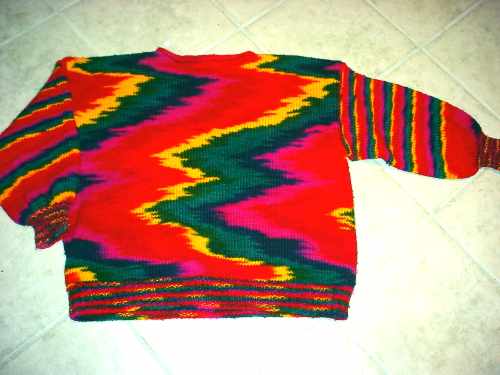
If I can engineer it, I really like making yarns flash – knitting them in the round so that patches of the same color align on top of each other to create an almost painterly effect. The wildly jarring colors of my Rainbow Mills Matisse sweater would not have worked well together if the piece hadn’t been designed to flash. Look at the cuffs and waist ribbing to see how muddy and non-descript the blend is without color stacking. You can also see the difference in the flash pattern produced by the difference in body and sleeve circumference.
An alternative approach is to limit the width of the strip so that colors bounce back and forth across a narrower strip of ground. That can make the individual stripes deeper, and add interest by adding the “collision lines” where the repeats abut. The piece below was interesting because it was made from four skeins of hand-dyed from the same batch. They were close, but different enough to each present its own periodicity of repeat when knit into strips of equal width.

Sometimes I’m faced with multicolors that just can’t be tamed by stitch direction, calculating garment widths to make them flash, or working them in narrow strips. My favorite solution for those yarns is to find another yarn that coordinates – either by picking up a color from the repeat itself, or by adding another color in contrast. Then I work my solid along with the variegated in stripes or other patterning, in a proportion that tames the wild mix, in effect forcing an new uniting background color into the repeat. In the sock top below, the solid is the magenta. The variegated was turquoise, yellow and hunter green. An unlikely and loud combo, but one that worked.
So to sum up, there’s a use for almost every multicolor yarn. Things that make using multicolors easier include harmonious, balanced color sets (even if they’re bright), and a minimum of muddy areas. Introducing movement by stitch direction or by narrowing the strip being knit can be more interesting than the same yarn knit totally flat in stockinette. It IS possible to use texture patterns with multicolors, and even the most savage multicolor can usually be tamed by introducing a background or contrasting solid.
Hope someone finds this useful, so that a skein that’s been languishing in stash somewhere finally meets inspiration.
MORE ON EDGINGS AND CORNERS
More on corners. Using the same principles as the knit-from-center-out framing area on my cashmere shawl, I’ve done a mitered corner on my baby blanket. I do envision a problem now that I’ve finished a credible Corner #1, but I’ll deal with it when I get there.
The first step was to make sure that I had a multiple of my halved row count available as live stitches along each edge of the project (small alerts should be going off in your head right now, but back to this later). That’s because using my chosen attachment method, two rows of edging are attached to each live stitch.
Edging right side row: S1, work pattern to end
Edging wrong side row: Work pattern to penultimate stitch, SSK last stitch together with a live stitch of the body.
I can modify this scheme by doing an occasional SSSK on that wrong side row, in which one edging stitch is knit together with two live stitches from the body. This can be periodic and eat a specific number of stitches over a given number of repeats (eating one on every Edging Row 1, or every third row of the edging, for example); or it can be ad-hoc – performed when the thing looks like it’s getting too ruffly. Being a precise person, I prefer the former, but I’m not above sneaking one in using the latter should it be necessary. You’ve probably already figured out that working an edging onto a top or bottom of live knit stitches (or stitches rescued after unzipping a provisional cast on) will require a different rate of attachment than would knitting them onto stitches picked up off a side edge formed when the body was knit, via a standard slip stitch edge.
The second step was to identify a clear diagonal on the existing pattern, and use that as an alignment point on which to build my mitered corner. In this case, the edge of the eyelet diamonds makes a good divider.
So having stated the obvious, I violate it all. To create the live stitches all the way around my perimeter, I picked up, putting all the new stitches on a large circ. I started at the end of a knit-side row of stockinette, placed a marker and picked up a stitch in every slip stitch selvage on my left side edge. Then – not having done a provisional cast-on because I was on vacation and was lazy – I placed a marker and picked up the same number of stitches as I had stockinette stitches across the bottom of my half-hitch cast-on row. Then it was a march back to the origin point, placing a marker then picking up stitches along the remaining selvage.
It so happened that my picked up stitch count on each side is pretty close to a multiple of my edging row count-halved. So I started knitting my edging a couple of stitches in from my corner, commencing with good old Edging Row #1. (Hearing that ding-ding alert again? You should be.)
All is well and good (sort of). I’ve now marched around three of my four corners, and am in the home stretch, working my last straight side. Then it’s on to the final corner and graft.
Now. Why all those alerts?
Because my corner as graphed works best when I commence it on the tallest row of my point – not on Row #1, which is the shortest row. I didn’t figure that out until I was well along. Not wanting to rip it all back a THIRD time, I’m going to see if I can somehow cheat on Corner #4.
Here’s a graph for my modified edging and corner, with attachment instructions (done to the best of my ability).

