CHARTING
I’ve gotten some recent feedback about the way I chart my designs – both positive and negative. However, the oddest feedback was from a couple of people who couldn’t put their finger on what I was doing different, or why. I attempt to explain
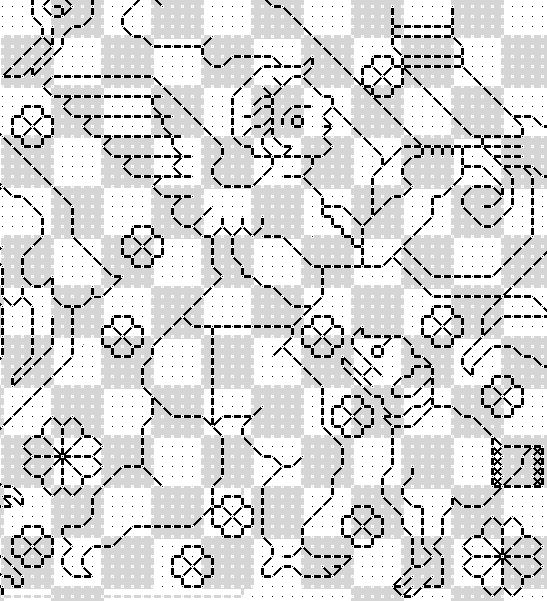
First off, I thank long-time Needlework Pal Kathryn for letting me use a snippet of her recently released redaction of a Lipperheide design. Because this design is so difficult to work out, I am using her stellar rendition as a “poster child” for a complex design drafted out using standard tools. Kathryn uses Pattern Maker by Hobbyware to chart. It produces a standard grid, and is largely intended for cross stitch. But with a a bit of work its outlining feature can be used to depict linear stitching (back stitch or double running). With even more tweaking those outlines can be made thicker so they read better against the background grid. Here’s a snippet from a chart she recently released.

In the chart above, each little gridded square represents one “unit” for the stitcher. That unit is most properly worked as a single stitch, and depending on the chosen ground cloth can cover one prominent square of Aida or Monk’s cloth, or a count of anywhere from one to four threads of an evenweave (or near evenweave) simple tabby ground. Work over 2×2 threads of evenweave is the most common.
By contrast, here’s the same snippet, more or less, in my own drafting method:

In my method, instead of showing the background grid, I show dots – the “holes” of the ground cloth. If one is working with Aida or Monks Cloth, each hole corresponds to a hole on the fabric. If working with evenweave, the dots represent the spots where a needle would plunge (every 2×2 threads, 3×3 threads, whatever the stitcher chooses to work). I eliminate the grid entirely. The lines that make up the pattern are broken into direct representations of the individual stitches to be taken. I also have the option of flood-filling the background to indicate an area to be overstitched if a voided effect is desired, without obscuring the “counting dots” of the ground (the grey area on the left).
Quick aside: Here are the three types of grounds, but the samples are not to scale since Monks Cloth usually has fewer stitches per inch or cm than does Aida. Note though that both purpose-woven grounds have very prominent holes, and on each stitches are generally worked over 1×1 unit. Evenweave by contrast is undifferentiated, and stitches can be taken over any number of threads.
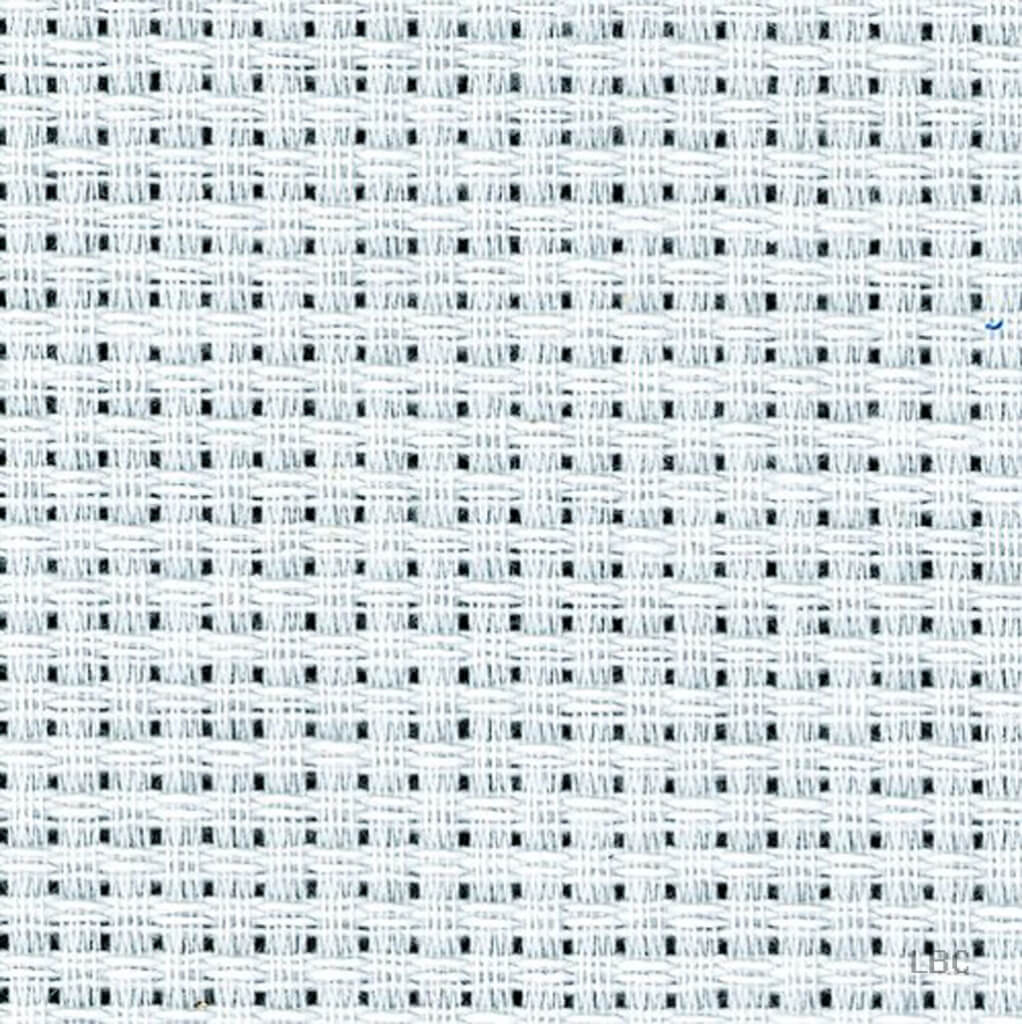 Aida |
 Monks Cloth |
 Evenweave |
As far as I know, I’m the only one who uses the dot/line method of charting. I devised it initially in 1990 for The New Carolingian Modelbook, (released in ’95) and I’ve stuck to it ever since. Yes, it’s different. And for people who are VERY used to the standard grid – my method may be difficult to get used to. But I do think it is an improvement on legibility and a reduction in visual clutter.
One thing I’ve toyed with is instead of using shading to indicate areas to be covered in voiding, using it instead with a color to emphasize the count, for the folks who like to baste guide lines onto their ground, to assist in keeping their place. That would look something like this:
I don’t particularly care for the checkerboard look though – I find it busy and distracting. I think that if anyone is tied to guidelines they are probably better served by printing out the pattern and taking a highlight marker to it, rather than my trying to add that info for everyone.
On my full page graphs, I do indicate the centermost point, and provide margin hashmarks, major ones every 10 units, with minor ones between on the 5s. 5 10 15 20 25 and so on, with the longer major ones on the bold numbers, and the minor smaller ones on the ones in between. But I do not provide the numerals themselves.
How do I go about using my aberrant method? Sadly, it’s not supported by any commercial needlework charting program at either the consumer or professional level. Instead I use a standard open source drafting program – GIMP, and a system of templates and predetermined settings to match those templates. I offer those templates here free on String, along with a detailed tutorial on setting up GIMP and using them (read up from the bottom – the blogging software arranges my lessons in reverse chronological order). One warning – GIMP works on the same layering principle as other advanced drafting programs, assembling finished images from a stack of transparent or semitransparent layers, much the way that cartoon animators build up their on-screen images from stacks of cels. If you’ve used Adobe Illustrator or PhotoShop you will be familiar with that paradigm. If you’ve only used standard needlework charting software you may need to take some time to get used to the concept. But it’s worth it. I may not be able to estimate total thread consumption by color used from my charts (a handy feature of needlework-specific programs), but I have far greater legibility, and no limit to page size or chart scale.
And progress on the current project? I’m about 40% of the way thorough the second side of the first mask. I’ve done a mental flip of the design, too. Not quite mirrored, but enough to complement across the center seam. Thinking of overstitching that center seam with one of the Elizabethan raised plaited stitches, too.
BOOKMAKING 110: THE GRAND FINALE
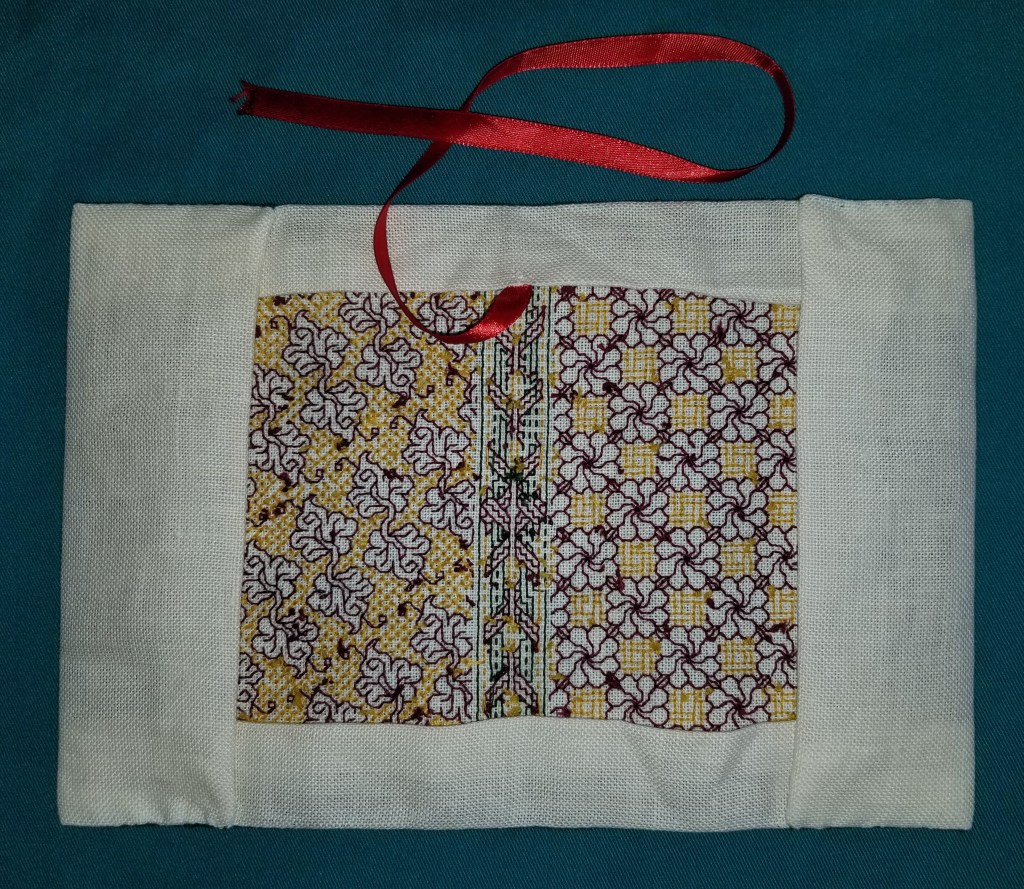
And just like that, the cover is finished and mounted on the target book:

And pix of the thing off the book, Here’s the outside, with everything finished off and sewn flat:

And the inside (with my reverse in all its messy splendor):
To clarify what was done:

- As shown above, first I folded in the top and bottom flaps, but I didn’t bother to hem them – I just made sure that the raw edges were covered. There will be no wear and tear on these flaps, so there was no need to protect them further.
- Then I folded in the left and right flaps. BUT in this case, because the book covers may slide in and out of the stitched jacket (if the recipient decides to feature the other side as the front cover, or ever replaces the book itself) – I did hem them for stability.
- The next step was to stitch the placeholder ribbon to the underside of the top flap. I left it extra long, so that it could be fished out and used, no matter which of the two sides of the embroidered jacket were deemed to be the official front.
- After all four flaps were prepped I stitched the edges of the left and right flaps to the top and bottom edges of the book cover’s front.
Now that last step can be done in several ways. The easiest is a simple whip stitch or invisible hem. But I never take the easy way out. Instead, I went back and extended the green double running line that defines the top and bottom edge of my stitched area out along my fold. I couldn’t put the thing back into the frame, so I did it in hand. Then having two green lines established, I used the same green embroidery floss to work them together, following (more or less) the logic that people who make biscornu use to seam together the two squares that form their curious little pincushions. A good tutorial for that is here.

The image above shows my wobbly last minute double running stitches, and how I united them front and back to make a heavier edge seam.
Finally, having done all of the finishing work, I slid the book’s own covers into the flaps of my stitched jacket. Here you see them in place, with the handy help of a large corkscrew, since I was running out of hands to hold everything in place.
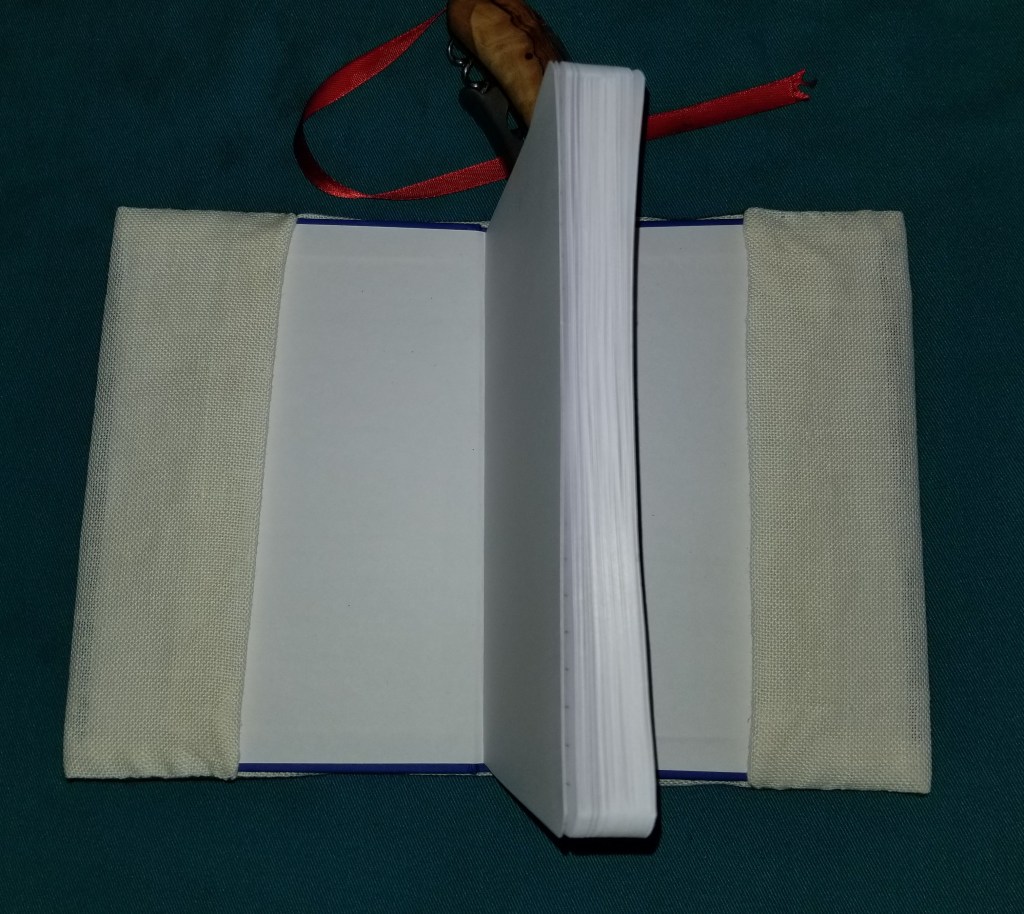
And so, taaa daah! A small book with a nifty cover. A stitched project that doesn’t take up wall space, that can be adapted to any size book you have on hand. Embellish a devotional book that means a lot to you; or at the other end of the spectrum, disguise a racy novel for discrete subway reading. Use any pattern that tickles your fancy. Or several if that’s what speaks to you. But whatever you do – enjoy, be creative, and feel the pride in coming up with something that’s specifically and personally meaningful to you.
This concludes my stitched book jacket tutorial. Please post questions if you have them – I’ll do my best to answer.
BOOKMAKING 108: RIPPING OUT AND RECOVERY
The last post of mea culpa probably left people wondering how it was going to all turn out. Here’s the result:

I only needed to tease out one straight line of stitching – the former rightmost edge of the previous side. Now the two borders join to make one larger mirrored strip that takes up the spine area and wraps around to be visible on the front and back. Not as I originally planned, but acceptable.
And I have been able to keep going on the second side, working my double leaves in red, and the diamond fill ground in yellow. Again, not as originally planned – the repeats will not be neatly centered left/right, but because this particular fill is eccentric, I bet it won’t be noticed by anyone who isn’t aware of the problem in the first place. (Mom, avert your eyes).
Now on to today’s submitted question:
How do you rip back?
With great care.
It’s very easy to inadvertently snip the ground cloth, and that’s a tragedy when it happens. But I have some tools that help.
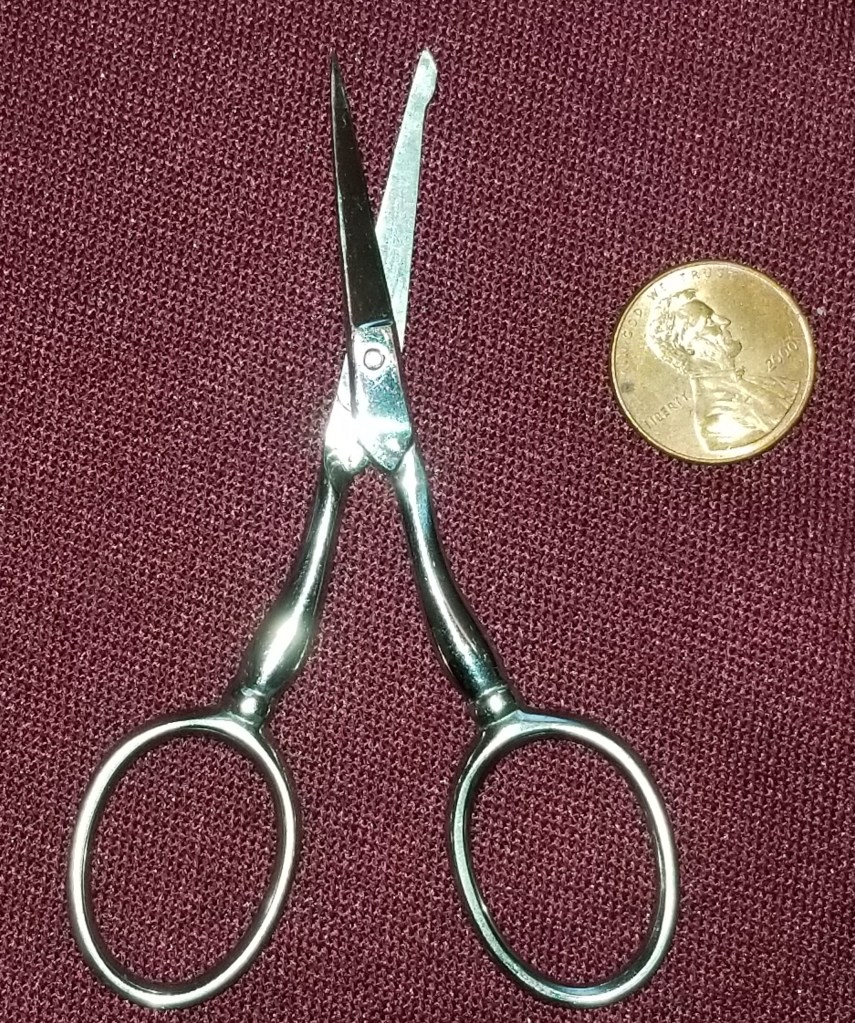
The first thing is a pair of small embroidery scissors with a blunted tip. These are the latest addition to my ever growing Scissors Stable, and a recent holiday gift from The Resident Male. Note that one leg has a bump on it at the tip. That’s the side that is slid under the errant stitch being removed, to make the first snip. Although these are sharp all the way to the tip, the bump helps prevent accidentally scooping up and nipping the ground cloth threads.
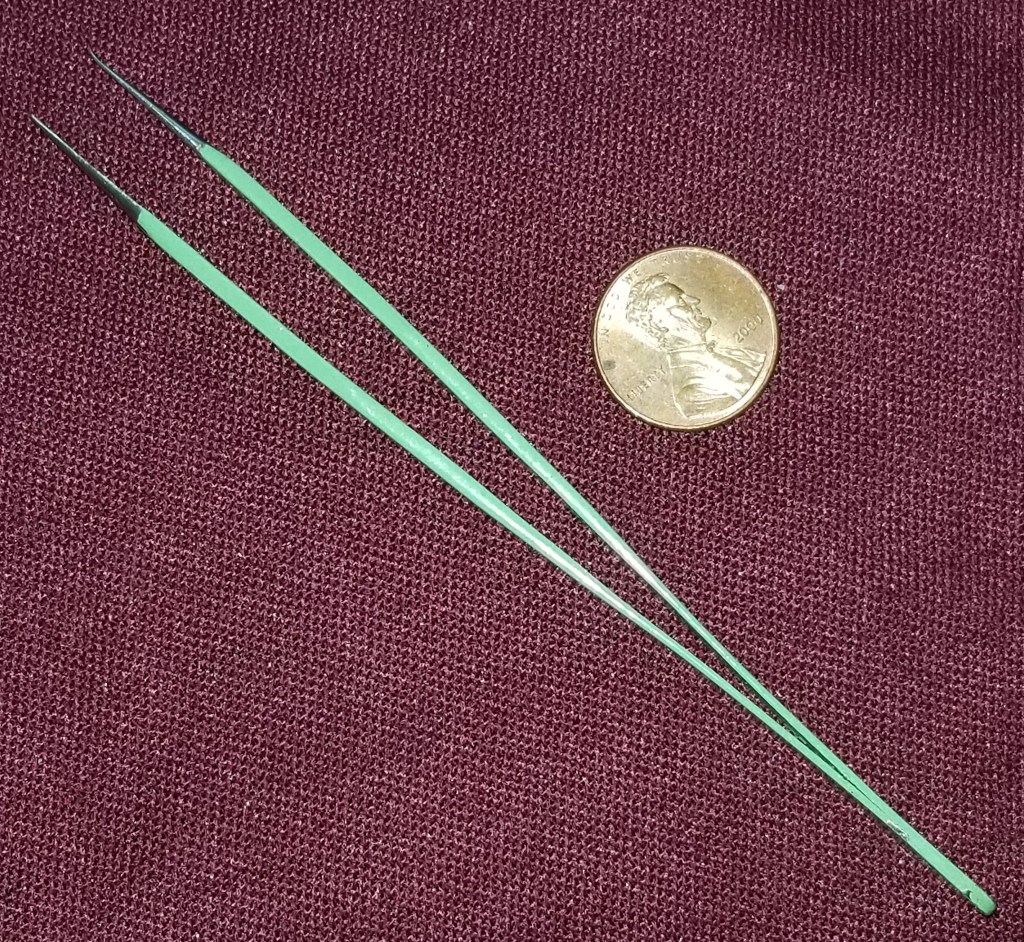
To rip back taking all due care, I snip a couple of stitches on the FRONT of the work. Then I employ a laying tool and a pair of fine point tweezers for thread removal. The laying tool was also a gift from The Resident Male, and replaces a procession of thick yarn needles I used before I had it. My tool is about 3 inches long (about 7.6 cm).

My pair of tweezers is one intended for use in an electronics lab. I found it in the parking lot of a former job, probably dropped by someone testing robots in the back lot. I tried to return it, flogging it around to likely techfolk for several months, but had no takers. Seeing it was to remain an orphan, I adopted it into a new fiber-filled life. I love it. It’s wicked pointy, and even with the dented end (probably damaged when it fell off the test cart onto pavement), does a great job of removing tiny thread bits.
Having snipped the threads on the front, I use the laying tool’s point (augmented by the tweezers) to tease out the stitches in the reverse order they were worked, doing it from the back. Luckily this style of work has a logical order and it’s usually pretty easy to figure that out. But in some cases it gets harder. When that happens, it’s another judicious snip on the front, followed by use of the tweezers from behind to remove the thread ends for discard. (While I can sometimes recover/reuse a live thread after I catch a mistake of a few stitches, in general if the run is long, or I’ve ended off the strand there’s little point in trying to save it and stitch with the now-used and damaged/fuzzy piece of thread.)
If the color is in the least bit friable and liable to crock on the ground fabric, I cut more and pull less – making sure to remove all threads from the back rather than pull them forward to the front. This minimizes color/fuzz shed on the front, public side of the work.
If any snipping needs to be done on the back, flat and parallel to the ground, I pull out another resident of my Scissors Stable – a pair of snips I bought at the SCA Birka marketplace event, two years ago. They look like this:
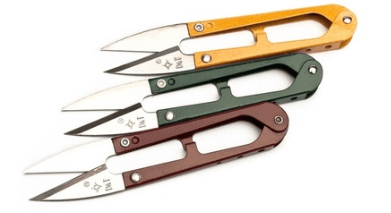
These were a great buy. Inexpensive, super-sharp (I think the snipping action helps keep them sharp), and because they are not held like finger-hole scissors, very easy to manipulate to snip close and flat to a surface.
And what to do if there are fuzzy bits or surface discolorations that remain on the front? Here’s my last resort. I wrote about it before:

Yes. Silly Putty. I have found that a couple of gentle blots will pick up fuzz and shed bits of color. The trick is NOT to scrub, just support the cloth from the back (I use the top of the stuff’s eggshell container), and press the putty gently onto the affected area – then remove it vertically and quickly. Make sure not to let it dwell on the surface.
I will caution that there is risk doing this. I have no way of knowing if anything exuded by Silly Putty will be a life-limiting factor for the threads or ground in 50 years – if discoloration or other complications might ensue. But the Materials Safety Data Sheet for it doesn’t turn up anything particularly evil, and I am willing to risk it. You will have to make that decision for yourself on your own. Having warned you I take no responsibility if it ends up doing so.
BOOKMAKING 104 – QUESTIONS ON LAYOUT AND DESIGN
On to the rest of the border and filling out the field…
I’ve gotten a few questions and feedback notes on this project. I’ll try to answer.
How do you know where to put the centers and corners?
It’s hard to make out on the in process pix because I snip away/tease out the bits as I encroach upon them, but I have basted guidelines showing me the exact center of my piece both north/south and east/west. They are in light blue thread. I’ve also marked the borders of my stitching area in lilac thread. You can just make out the guideline remnants on the photo below.
Also, if you page back in this tutorial series, you’ll see that I started in the center, then worked out to the right, leaving room for my as-yet-unchosen border. Then I picked one and started stitching. When I neared the corner I looked at what I’d done and doodled up a corner, then worked it. I repeated the process, stitching back to the center and doodling up the center bit, working it on the exact center of my marked stitching area. Then I worked the other side of the center bit mirror image of the established stitching.

How did you get the second top corner to line up perfectly with your basted edge?
It’s counted. The center line of my stitching area is at the exact center of the area to be stitched. That means if there are (picking a number at random) 43 stitches to the right of it, there will be 43 to the left. If my pattern is symmetrical, it’s easy to see when you’ve gotten to the same point on the left as you ended off on the right.
What would you have done if you were one thread off?
It happens. Sometimes for every bit of measuring, exact folding, and counting (and especially on even weave) that center line ends up being one thread or even one full stitch off. In this case – no big deal. I would work my repeat totally symmetrical as I have above, and “push” that tiny bit of overage into the spine of the book.
How do you keep track of where you are with all those colors?
I admit it’s a challenge, and this design would be a lot easier in monochrome. I don’t like to leave long skips on the back, so for the most part, there are a lot of starts and stops. The longest leap I will take is three stitches, and I prefer not even to do that. This means that in the main field of flowers, while I can keep a baseline double running logic chaining flower after flower together, those little crosshatched interlaces of yellow between them are “islands” – each one begun and ended off separately.
You can see in the photo at the top of the page that there are two green threads dangling off the right side of the hoop. Those are the strands I am using for the border outlines. Rather then ending them off at the edge of my hoop, I’ve chosen to keep them “alive.” Pretty soon I’ll be advancing the hoop to finish off the bottom of the stitched area, and I’ll use them up as the border area progresses. Sometimes I’ll take a pin and insert it in the waste edge of my design (or another spot where any perturbing of the ground cloth weave will not matter), then wind the excess thread around it to keep it up and out of the way while I stitch nearby.
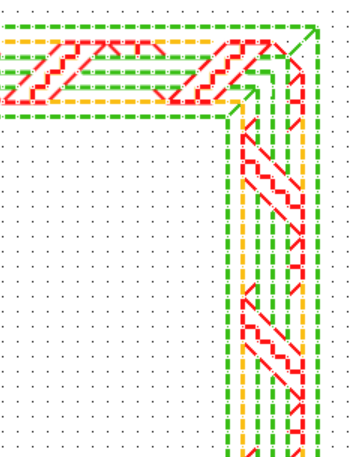
And in the border area at the top – I just did some of the green striped “column” that runs down the center of my border. I know that the red ribbon that wraps it is three stitches wide. I started at the edge of the existing red ribbon and worked “heresy style” across the first line, then hopped down and worked standard double running for the center one, and again for the one after that. That meant my working thread was now positioned at the left side of that block of three stripes, and ready to hop over three again to begin the next block of three stripes. I kept going in this manner until I used up my green working thread. Next I will go back and fill in the red ribbon, and finish up with the short spurts of yellow. And yes, that does mean a lot of ends. I would never attempt a multicolor piece that was totally double-sided.
It’s hard enough to pick a pattern, now you want me to design centers and corners, too?
Perhaps I did get a bit ahead of myself and I could have chosen a simpler border. One that isn’t directional like this one with its wrapping is. And mirroring around the center can look a bit daunting, as can doodling up a custom join. But there’s no reason to be intimidated.
I noodled up #1 in the set below. But I didn’t have to. My treatment could have been much simpler.
#3 for example ignores mirroring, directionality, centers, and corners. It just starts at a random point of the repeat, goes across the area to be covered, and arbitrarily ends at the edge of the desired space. Then it starts up again, butted against the bit already stitched. And it doesn’t matter if it’s centered or truncated. (By the way, plain butted pieces with truncated rather than an elegantly ended or mitered repeat is the most represented treatment for corners in museum collections of historical stitching)
In #2 and #4, I’ve kept the mirroring (but I didn’t have to) and inserted small simple shapes to fill the contested areas. #2 uses plain old squares. Nothing fancy. #4 reserves those spots for personalization. Initials, dates, small stars, whatever. What I’m trying to show here is that there is no one right way, and all treatments look good. Go simple, go complex. It doesn’t matter, your piece will be beautiful, and best of all – it will be uniquely yours.

More questions?
Idly curious or wanting to do you own book cover? All is good. Happy to help. Got a question? Send it in.
BOOKMAKING 103 – BORDERS
We go on with the removable book slipcover project.
Step 9: Laying Out and Choosing a Border
Last time I had begun working the field pattern for the first cover. I centered it on the center point of the available area, and began working left, right, up and down. Since the total area isn’t very large compared to the span of the repeat, pretty soon I got close enough to my first edge to begin considering what I wanted to do with the border. I stopped well shy of the basting line that indicates the edge of my territory:
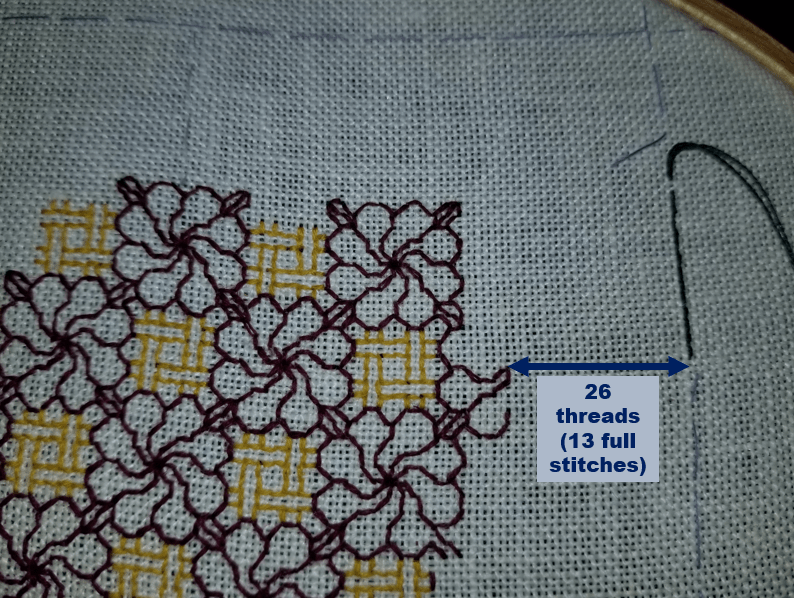
In the photo above you can see there’s lots of room to go, but I need to determine exactly how much room there is, so I can select, adapt, or draft up my border design. I’ve decided that whatever I do, it will be bounded both inside and out by a single line of deep green (DMC #890). (I like the contrast with the red and yellow). So taking care to make sure that I have FULL STITCH UNITS between the basted guide line and my stitching area – meaning even multiples of two threads – I start working my outermost solid green line.
Lucky me – it turns out that my basted edge falls exactly 13 stitch units (26 threads) from my established work. Had there been an odd number of threads I would have established my line one thread to the outside of my basted line. Better a tiny bit too large than a tiny bit too small. And yes, I counted the number of threads between the top basted line and the established work, too. It’s even bigger, so I am safe.
My border can be anything up to 13 stitches. But I don’t want one that wide. About half that is enough. So I went thumbing through my various stitch collections. I wanted one that would contrast nicely with the field and not fight with it, and would accommodate using up to three colors, including the newly introduced green.
I didn’t find a pre-drafted, complete border that I liked in this application, but I did come up with this all-over design, presented in Ensamplario Atlantio, my first freebie, in Part 3, Plate 16:91.

It looks complex, but it’s just a simple ribbon-wrapped column, repeated multiple times. If you abstract just one of the columns and add a line of framing stitches both left and right, it spans only 6 stitches across. A perfect size, and there are several color-use possibilities as well.
Based on the design above, I drafted this out and started stitching. Note that I began by making a nice, neat corner.
For the record, these and all charts for linear stitching on this blog have been produced using the open source drafting software package GIMP. Here’s a free tutorial for how I do it (read up from the bottom for best logic).
Step 10: Stitching the Border
Just go for it!

The observant will note that I started stitching from the corner and worked the border down, then went back and filled in my field pattern, stopping one unit away from the border’s inner line. I don’t care at all that my field pattern is truncated. I COULD have stopped at the last whole or half-repeat, but to me, for this particular work, it doesn’t matter.
I am also not in the least bit concerned about how to make the design fit either the length or width of my book. I intend to work from the corner out towards the center of each side, approaching but not connecting at the center. Yet.
The next steps will fill work more of the border across the top of the piece, then fill in a bit more of the field. But I will stop the border and leave a gap in the center. It’s my intent to work the other corners similarly, but in mirror image to this one. Since everything is done on the count and is exactly even, I will be able to draw up a “join” or top/bottom/left/right border center kludge of some type to unify the border as a whole. And I bet that had I not confessed this here, you would have never known I got this far without planning it all out in advance.
Bonus Bit: The Back
For the folks who have asked to see the back, here it is flipped over. You can see the wrapped inner hoop of my frame and its attached support stick.

As stated, I tend to work in double running, using (mostly) reversible logic, but I am not a slave to it on pieces that are not intended to be seen on both sides. There are lots of knots. And you can see that I’ve used heresy stitch in laying down my initial border outlines, and in advancing the border in general. The short length color runs necessitated by its rather fiddly color changes make it much easier to plot out than the double-pass of double running.
BOOKMAKING 102
This is the second piece in the series on making an embroidered book jacket, based on the general instructions I presented earlier this month. The first piece dealt with drafting up a simple pattern to construct the book cover, preparing the piece of cloth I am using, and transferring the guide lines from the pattern to the ground cloth.
In this session I discuss laying out the design for the embroidery itself. While I encourage folks to play along at home, starting their own book project and working with me, I will not be presenting a “Stitch-Along.” There will be no full project graphs presented here. Instead I encourage people to pick their own designs, and I hope that by describing my own thought processes, I will enable others to think outside the box.
Let’s start where we left off. We have our ground cloth prepared and ready to stitch:

The stitching areas – the front, the spine and the back – are all defined by basting lines at their edges. There are also basting lines marking the horizontal center (spanning all three areas), and the vertical center of the front and back. The spine is so narrow that it’s easy to count to determine its exact vertical center.
Step 5. Stitch Design Layout
I chose a medium count even weave fabric for this. It’s is about 30-32 threads per inch, which means I’ll get 15 to 16 stitches per inch. There’s no reason why Aida or other purpose-woven grounds intended for cross stitch cannot be used. However the fineness of the cloth will influence what counted patterns are used.
As a “bungee-jump” stitcher, at this point I am just starting to think about my layout. Possibilities abound, and I try not to close any out until I am absolutely sure. For example, even before I get to the choice of the fill pattern(s) these general layout options exist:
- Work a single design to cover the entire piece, ignoring the divisions between the spine, front and back covers.
- Work the front and back covers separately, each with its own design, with or without some sort of stripe or divider running up the spine.
- I could work a border around the front and back cover, either meeting along the spine, or leaving space between for yet another fill.
- I could divide the front and back into subsections, and work each of them in a different fill (again, with our without borders)
- I could draw a freehand shape or other motif on the piece, then fill it with one or more fills (a la the inhabited blackwork style).
Here are general representations of some of the possibilities above:

Decisions, decisions. Best not to back myself up a tree. Not just yet. But right now I’m leaning to the version in the lower right. Front and back covers, each a single field pattern, but different; some sort of border around the edges of the front and back cover (same border front and back to unify the design). Something on the spine, possibly a third design, Possibly words. No clue.
Step 6. Stitch Design Selection
Since I am planning for 15 or so stitches per inch, my cover is about 3.5″ wide and 5.5″ tall. If I do a single repeat on each cover I will have room for play. My total field is about 52 stitches across x 82 stitches tall. Even if I subtract some for a border, there’s room for one of the larger repeats from Ensamplario Atlantio, or Ensamplario Atlantio II.
While I’ve stitched up some of these before, I haven’t play tested them all. This is a fun opportunity to do some I haven’t worked up yet. Plus I rarely do multiple colors, so maybe I’ll think of that, too. Paging through the books I come up with a few possibilities. Number 110 from Ens Atl II hits me for one of the covers, but just about every design in both books is a good candidate:
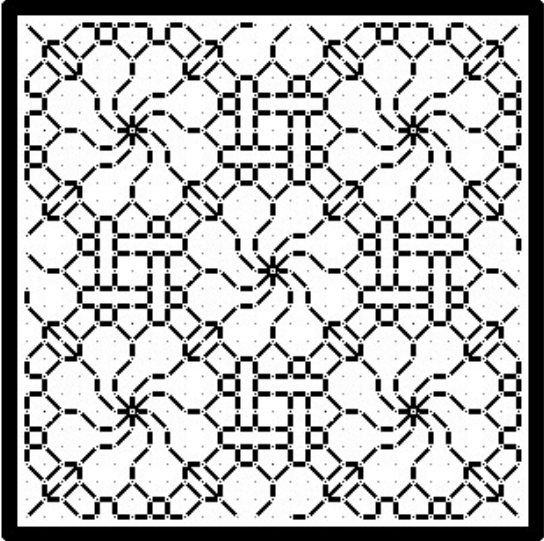
This is an intermediate complexity 16-stitch square repeat (the count from the center of one flower to the next is 16 stitches). A simple square repeat with a half-drop, I should be able to get at least 2.5 repeats across – that would be about 40 stitches across out of my available 52. That would leave 12 stitches (6 per side) for a border. And there’s nothing to say I can’t just truncate the design anywhere I like – there’s no reason to worry about completing the edge repeats across.
Now, if I had selected a coarser ground – say 11 count Aida, my stitching field would be smaller because there are fewer stitches per inch available. In that case my field would be about 38 stitches across. Two repeats would be all I could fit. I could still use this design to good advantage, but designs with a wider repeat, like this more complex panel of pears (28 stitch square), would be harder to squeeze in Just one full repeat would fit across, with a bit extra for a partial, or for a border. (Come to think of it, pears may be in order for the other cover… Hmmm. Not decided yet, but maybe…)

Why do I say “other cover” and not front or back. Simple. Both of these designs are totally symmetrical and at this point either one could serve as front or back, depending on which way the book is held.
Now on to placement. I have a couple of options. I could deliberately center my design at the centerpoints I established by basting, or I could skew them left/right/up/down, to produce an asymmetrical composition. Both are valid, and asymmetry can be quite dramatic. But I think I’ll stick to the easiest way out here. Instead of skewing the repeat, I will place the center of one flower exactly at the center of my cover area, and I will begin stitching there.
By beginning in the center I get to establish my design. I will work out left and right, and when I get close to the edge, I’ll stop and decide whether or not I still want a border, and if I do – I’ll pick it or design it to fit the available space. My guess is that I’ll probably work to within 6 – 8 stitches of the basted edge line. We’ll see…
Step 7. Thread/Color Selection
OK. I’ve got my lattice-and-rose picked out. What threads and colors to use… Again this is just my thoughts and preferences. For your project pick whatever you enjoy using that’s suitable for your chosen ground.
First, this is a removable book cover. It will get dirty. It may end up on another book after the target one is filled up. Chances are that it will need to be washed at some point in its life. Therefore I am opting for plain old cotton thread over silk or rayon. DMC will serve quite nicely.
I do a lot of monochrome, much of it modeled on historical pieces. I don’t get to play with multiple colors very often. I’m not a big fan of variegated threads for this type of work. I think the color gradations unless very carefully handled distract from the delicate structure of the stitching, so I’ll stick to solids. And nice, deep, contrasting solids. Two, possibly three colors.
Pawing through my stash I come up with the first two. If I use a third color, I will employ it on the border – not in the field patterns. I’ve chosen two regal colors – DMC 814, a deep red, and more burgundy/less crimson than the red I usually stitch with; plus DMC 3820, a goldenrod yellow – a color I rarely use.

Step 8. Start Stitching
Now for the fun part. Finally. After all of this planning and prep, I get to start stitching. I reserve the right at any time to decide I don’t like the result and pick everything out, but off I go, none the less.

On the piece above you can see the remnants of my light blue basting threads that marked my centerpoint. The center of one of the first flower I worked is exactly where those two lines intersected. Note that I clip back the basted centering threads to keep them out of my way as I go along. I find it’s better to remove them bit by bit, rather than stitch over them and try to pull them out later.
I am using one strand of floss, doubled. I cut a length twice as long as I need, extract one strand, and fold it in half, taking care to match the cut ends. Then I wax it lightly EXCEPT FOR the last inch, leaving the loop open. I thread the now adhered-together cut ends through my needle. Without making any knots, I make my first stitch, pulling my thread up from underneath and plunging back down from the top. I take care not to pull my thread all the way through and on the plunge back down, I catch the loop at the end of the thread with my needle. Then I gently draw up tension until the loop on the back looks like a normal running stitch. In effect, I’ve started off my double running with a noose instead of a knot.
I continue along in double running, plotting out my course to keep “leapfrogging” on. A lot of people trip up by thinking they have to stitch in one direction until half of their thread is used, then turn around and retrace their steps. For something like this, it’s better to head off in one direction until your strand is used up, taking detours as they arise but always returning back to your main path (if you don’t have enough thread to complete a detour and return, end off before you start the branch).
Then you take a second strand and fill in the every-other stitch on that main path. Any thread that remains after that second pass on established stitching is complete is used to go on further in the design. It’s kind of like a game of hop-scotch, one thread advancing, the other filling in then continuing the design, and the thread after that starting at the point the first one ended, but filling in the skipped stitches left behind by the second. Black is the first thread, red is the second, and blue is the third in this example. Each dangling leaf is a detour that’s started and finished on the baseline:
On my stitching you can see around the edges of the red flowers where I have left attachment points for future journeys, and in a couple of spots, the partially worked lines of departure for those branchings. I find the path planning to avoid painting myself into a corner to be mildly challenging, and quite relaxing. And yes – sometimes I do trap myself. So it goes. Sometimes I can use unidirectional heresy stitch to get myself out of a bind, sometimes I just have to knot off and go on. (I do knot unless there is a compelling reason to work entirely double-sided, but it’s got to be a darn good reason because I hate working in the ends.)
You’ve also noticed how I’ve employed my colors. The red for the connected flowers, and the gold for the background lattice. It’s just one way of doing it. I do end off each gold lattice segment separately, opting not to leave long connector stitches on the back.
I’ll be working on this for a bit longer before I make decisions about the border. If for nothing else, just to keep everyone in suspense.
In the mean time, if I’ve been a Bad Influence and led you astray, please feel free to comment, critique, send pix of your book cover in progress, or otherwise kibbitz. All input/feedback is welcome.
BOOKMAKING 101
After I wrote the last post which gave general directions on how to make a fabric slipcover for a small notebook, I decided I could do one better, and go step by step with pointers. Eventually this will join the tutorial series posted at the tab, above. But that will take a while since I’ll be doing this in real time. Please feel free to join along and work your own book project with me.
Step 1. Making the Book Jacket Pattern
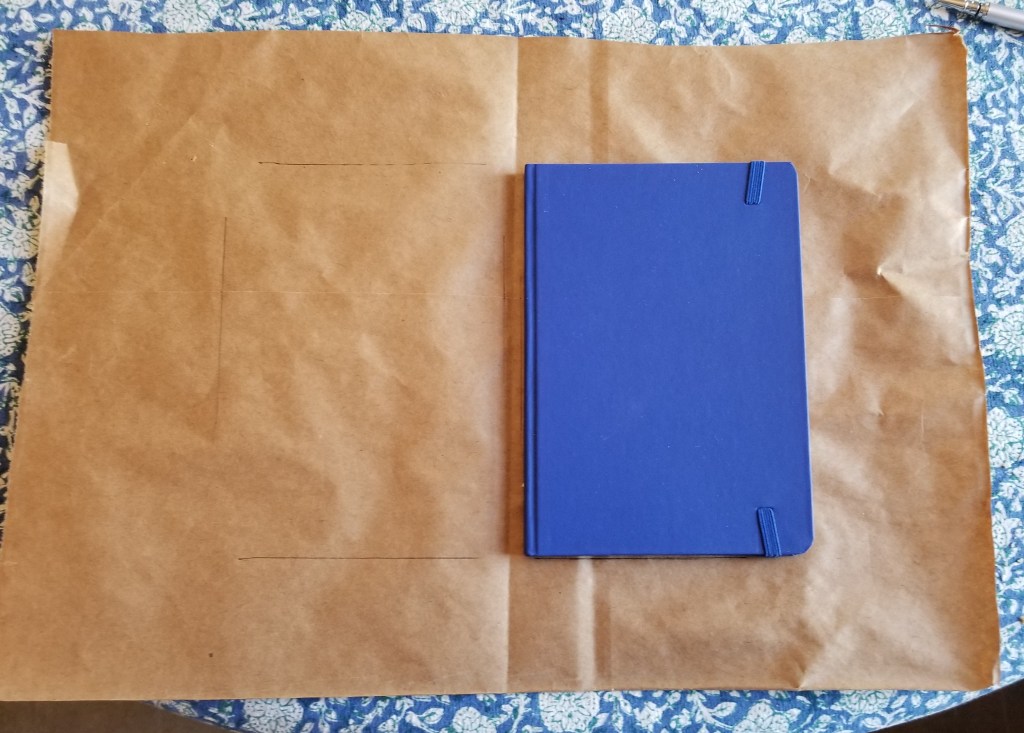
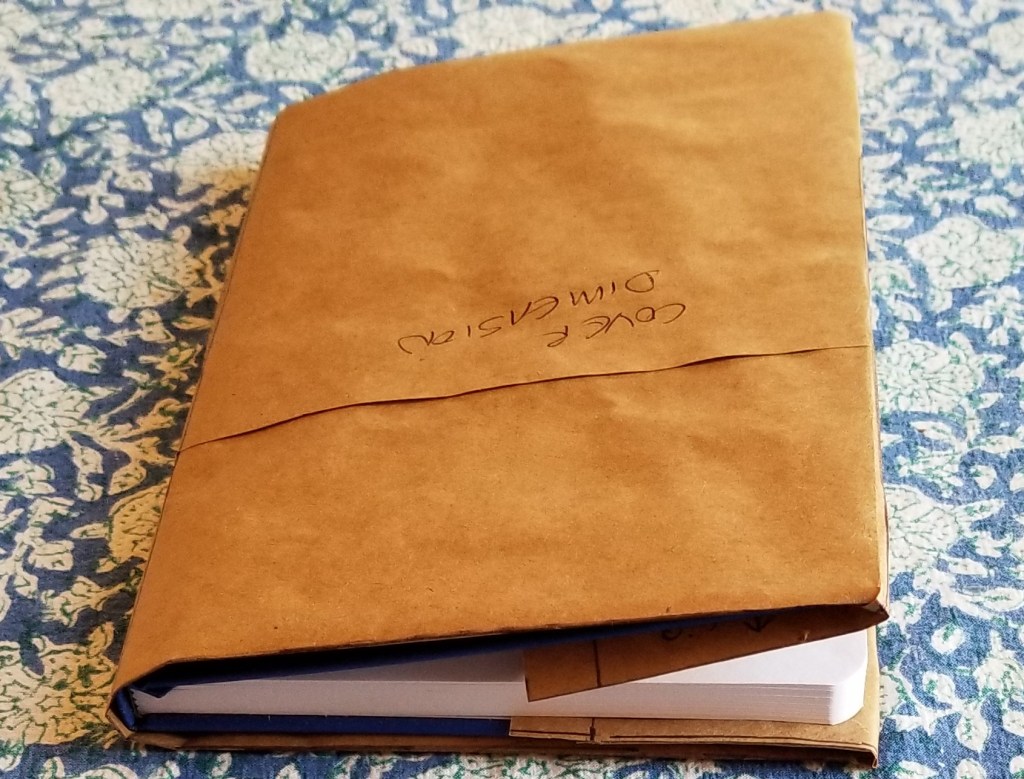
Using a piece of brown paper cut from a grocery bag, I made a pattern/mock-up of my book jacket. This is based on the protective covers we (of a certain age) made to guard school-issued textbooks.
I started by tracing the size of my cover – front, spine, and back – on the brown paper, then I added the extra bits for the fold-ins front and back, plus a small turned in edge across the top. It really doesn’t matter what your book’s dimensions are – just trace it and add the flaps as shown below.
Tracing the book
The layout
Note that I added some turn-over/hem allowances to the basic diagram above:

Try it on for a perfect fit
I cut my finished pattern out, folded it and fit it on my target book. Hooray! It fit and the book actually closed. The cloth version will be more stretchy and supple than brown paper, so I have no doubt that the thing will close more completely when it’s final. (HINT: If your book won’t get within inches of closing, redraft, adding a touch more width to the spine).


Step 2. Select and square the cloth.
I dug through my stash and found a piece of even weave that’s slightly larger than my brown paper mock-up/pattern. It’s about 30-32 threads per inch (estimated roughly), which would make it the equivalent of something between 14 and 16 count Aida. One drawback though, the edges do fray if left unhemmed or bound.

Whether you buy a pre-cut piece of even weave or snip your own from yard goods, chances are that the edges aren’t totally even on the grain of the weave. I like to square it off to make sure that my edges are true. I do this by pulling out the short threads that are snipped off at an angle, so that all remaining threads in both directions run the full length of my piece.

In the photo above, with the nasty bits unraveled, you can see that the piece of even weave I bought was not cut true. But now it is.
Why do this? To make sure your piece is neatly aligned on the cloth. It’s less vital on this project than on a sampler or other item you wish to frame, but it’s a good habit to get into, and will save you headaches down the road.
Step 3. Hemming
If you are using a less fray-prone ground like Aida, or just wish to skip this step, feel free. Be aware though that some loss may happen especially if you use and hoop and tug on your cloth to make it sufficiently taut for easy stitching. If you skip hemming, make sure you have an extra half-inch or so all the way around to compensate for any loss.
Were this intended to be a long term project, I’d trim off all of those little mini-fringes, and do a nice double-folded hem all the way around. But this is a quick and dirty project, and one that will finish with (gasp) cutting the ground cloth and discarding all of the existing edges. So I cheated. I just folded down the edges along the weave’s lines and pinched to set the crease and then used the threads I had pulled off the edges during Step 1 to do a plain running stitch, fixing the fold in place. And I didn’t bother trimming off the fuzzy fringes.

Step 4, Pattern Transfer
OK. I’ve got my cloth all prepped, and my pattern constructed. How to get those nice rectangular lines onto our nice, neatly aligned and properly squared/hemmed piece of ground?
I suppose I could trace them. But better than tracing is basting. If I baste using a neutral tone plain sewing thread that doesn’t shed color, I have non-smudge, non-erasable lines that are easy to remove without a trace. But where to put them?
I could take measurements of my cloth and my pattern then do math, and center the thing to within an inch of its life. Or I can cheat, and rely on the fact that I’ve squared my cloth (see!). All I need are a few pins.
I set my pattern down on my ground cloth and eyeball its placement. Then I insert pins to mark the edges of my to-be-stitched areas. In this case, although it’s optional, I also pinned out the location of the flap edges. Then I basted along the even weave grain, along the lines described by the pins. Note that I needed only ONE pin to denote each line:

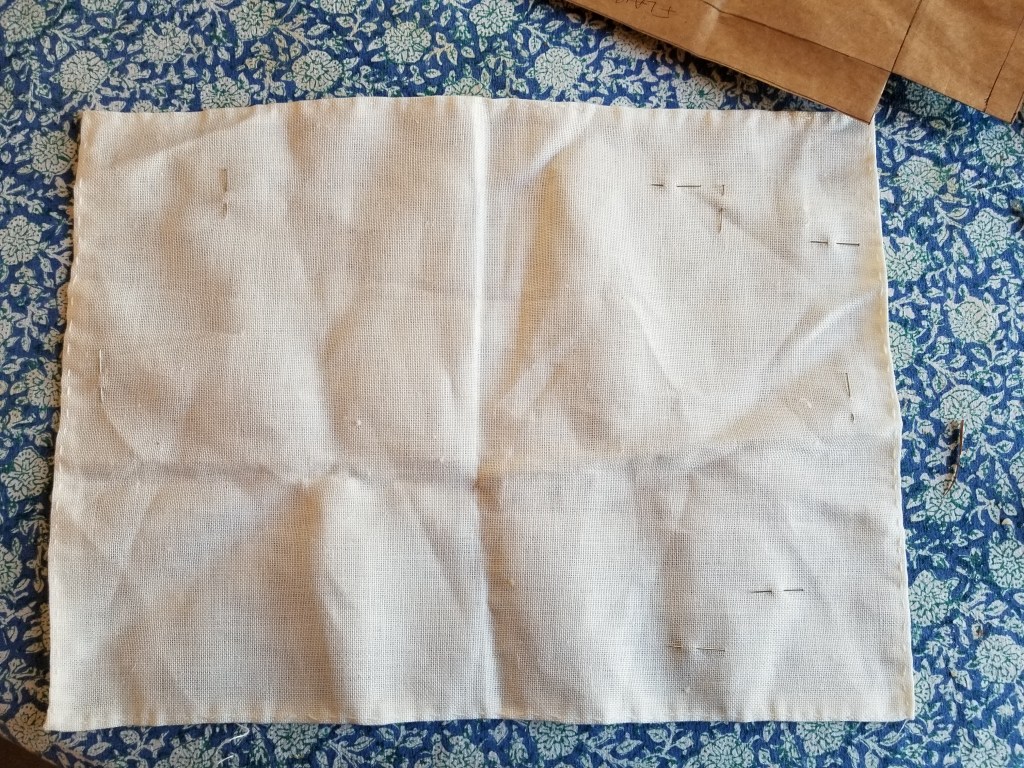

And the final result:
All of my main pattern lines (sans hems) are indicated by lilac basted lines, absolutely on grain north/south/ and east/west with my ground cloth’s weave. It’s hard to see, but I’ve added three more guidelines, in pale bridesmaid’s blue. The mark the vertical centers of the front and back panels, and the horizontal center of the entire piece.
And now I’m ready to think about what stitch designs I will use, what design layout I might attempt, what colors/threads to select, and get started.
Stay tuned…
MAKING BOOK
OK. Now that I’ve armed a whole bunch of people with a wealth of counted all-over designs – what to do with them?
Pretty much anything you want. While samplers are the most common, there are lots and lots of things you can make that don’t involve using up precious wall space. Pincushions (either plain square or rectangular pillows, or fancy biscornu); pillow or cushion covers; napkins, doilies, and tablecloths; kerchiefs (aka for the historically-minded – forehead cloths); tray or coaster inserts (using pre-made items intended to showcase a piece of stitching or painting); zip or tied pouches or folios of various types – jewelry or lingerie rolls are examples; slip-in cases for sunglasses, phones, or tablet devices; small rice or lentil-filled handwarmers or heating pad pillows (warmed in the microwave, for gentle comfort or cold fingers); greeting cards or festive ornaments; all are examples of things that might sport your stitching.
But I want to revisit one project in particular – the book cover.
Making a Slip Cover for a Small Notebook

This is a general logic recipe for making a reusable slip cover in for a small notebook, using the same method as the standard brown-paper-bag covers kids of earlier eras employed to protect school-issued textbooks. The basic logic can be adapted to cover any size book. I’ve written this with special steps for counted embroidery project, but any fabric or stitching style can be used.
In this particular case I covered two small pocket notebooks, roughly equivalent in size to Moleskines, but of a far less expensive make. They are about 3.5 inches wide, by 5.5 inches tall, and roughly 0.5 inches thick across the spine (about 8.9 x 13.4 x 1.3 cm). They came with an elastic cord to keep them closed/mark one’s place, and were about half as expensive as the fancy name brand ones.
Layout
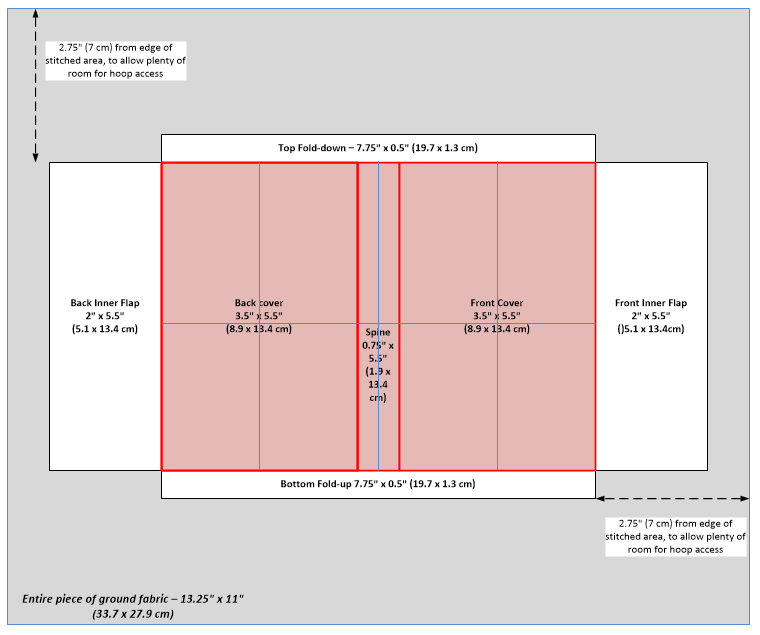
I wanted to know how big a piece of fabric I would need. Having measured a notebook, I did a mockup of the cover, drawing the shapes to size on a piece of paper to make my pattern. I used a brown paper grocery bag to do my layout and mockup (fitting it onto my target notebook to make sure it all worked. That pattern is now long gone, but here’s the logic I used. I strongly suggest making a mock-up and “dry fitting” it before you begin the project, just to make sure that the dimensions work. Note that some books have thicker cardboard covers or heavier spines than others, and may require a bit more “wiggle room” to be added to the measurements below – even if the books have the same general dimensions as the ones I used. If your book is significantly larger than mine you may want to increase the depth of the flaps all the way around. But you should not need to add more than the indicated amount beyond the stitching area (the red rectangle below). The overage of the grey area is just there to provide purchase for a hoop or frame.
Note that I’ve allowed a little bit of extra width for the spine, so that there is enough slack for the book to open and close properly. I’ve also allowed lots of extra room around the stitching area, to accommodate use of my hoop or snap frame. You can use a smaller piece of cloth closer to the dimensions of the book cover itself if you like, but be aware that frequent repositioning of the hoop to get close to the edges is a pain in the neck, and all of that tugging and yanking isn’t good for your threads or ground either. And if you’re mounting this on a flat or scrolling frame, tensioning the sides and ends very close to the stitching area can lead to distortion, so having a bit of extra room for the stress to even out is also good.
For my standard size pocket mini-notebook, I’ll need a piece of ground fabric that’s about 13.25 x 11 inches (33.7 x 27.9 cm – all metric measurements are rounded off). If I intended to hem my edges of my entire ground cloth prior to starting (as opposed to whipping or serging), I’d add a half inch all the way around to this measurement.
Selecting the Fabric
What type of fabric? Well, whatever you enjoy working. This project will be a tiny bit easier to lay out on even weave, but not overly so. You can use Aida, Monk’s Cloth, Fiddler’s Cloth, Hardanger, in whatever count is most comfortable. But the count you select will also be key for what design you select. The lower the count (fewer stitches per inch), the larger your finished iteration of the design will be and the fewer repeats of it will fit in these designated spaces. If for example you want to stitch 11 count Aida, our front cover – only 3.5 inches wide would mean your total stitching area is about 38 stitches wide (rounding down). A repeat of say 8 stitches across would appear 4 full times plus some fragment at left and right (more on this later). A repeat that’s 14 stitches across would show in full only twice, with a fragment at the left and right sides.
Why would layout be easier to do on even weave as opposed to Aida or one of the others? Because you can determine the center point more accurately on even weave. In one of the purpose woven grounds with their well established holes (and especially in the fewer-stitches-per-inch sizes), the centermost line of holes may be off the exact center of the piece just a teensy bit, and may be enough to annoy you.
One last suggestion – whip, or serge your edges after you cut your fabric to size. Some people use tape. I don’t recommend it because of the adhesive residue.
Marking the Fabric
In this type of project, where we don’t intend to graph out every single stitch beforehand, knowing where the edges and center lines are is very important. Some people use water soluble markers or pencils for this. I’m old fashioned. I would baste. Some people are very specific in technique, taking each basting stitch over 4 or 5 stitch equivalents to aid in counting, but I’m pretty haphazard. I just establish my lines and don’t try to make my basting stitches even.
To transfer the dimensions of the diagram above to my cloth, I’d start more or less in the center and measure out from there, basting in lines, probably in a couple of colors. I use plain old sewing thread; spools of thread inherited from my grandmother – 100% cotton, in pale pastels, too fragile for use in seaming, but perfect for this. I’d outline my stitching fields using one color (the heavy red lines on the diagram). Then I’d mark the center lines both north/south and east/west (the thin blue lines). You may find that you have either a line of holes or a full stitch at the very center of your front cover, back cover, and spine. Decide now if you are a perfectionist or not, and if your purpose woven cloth forces you to mark at one side or the other of any center column/row of stitches, which side of the center you have marked. More on this below.
There’s no strong reason to mark the no-sew flap areas at this point, but they are on the diagram so you know they exist, and their width should not be forgotten.
Choosing your Design
Elsewhere on the site you’ll find books and books of fills and other patterns. Thumb through. Pick something that appeals to you, that’s a good fit for your chosen ground fabric’s count. BUT also be aware of the Center Problem.
Some patterns have a specific center line. They have even repeats – 4 stitches, 8 stitches, 22 stitches – whatever. Each repeat is an EVEN number of stitches. These repeats mirror evenly left and right of an line. Other designs have ODD numbers of stitches in one repeat – 5 stitches, 9 stitches, 11 stitches – again any number but an ODD one. That means that there is a center stitch in these designs. Here are examples:

The wavy plumes (shown in two variants) are an EVEN 14-stitch repeat with a specific center line. The framed pears is an ODD 15-stitch repeat. It’s center is the X unit where the four pear stems meet.
Why does this matter? If you are a perfectionist using Aida (see above) and the center of your area to be stitched is in the middle in between two columns of holes, look for an ODD stitch repeat. If the center of those areas work out neatly to align with a column of holes pick an EVEN stitch repeat.
Now you know why I mentioned that layout on even weave is easier. Not being forced into using specific hole locations makes fudging that center line easier and if your heart is drawn to either an odd or even repeat, any finagling you might do to make placement will be less obvious.
Choosing Thread and Stitching
Here I am of less help, especially for folk using Aida. I can tell you that on 32-38 count linen (16-19 stitches per inch) I usually use one or two plies of silk or cotton floss. 40-50 count linen (20-25 stitches per inch), I use one ply. And that I run the thread through beeswax prior to stitching. If you are using a lower count ground I’m afraid you’ll have to experiment to see whether you like 1, 2 or 3 plies the best.
In any case, no matter what your ground is, your basted lines will tell you exactly where the center of your area to be stitched is. Find the center of your chosen pattern, and start from there. Double running or back stitch – even heresy stitch – it doesn’t matter. Start in the center and work your way out. You can choose to work the ENTIRE stitched area – front cover, spine and back cover as one unit, and start in the center of the spine. Or you can work the front and back covers either identically or different; and leave the spine unworked, or treat it in another manner (perhaps a narrow border, solidly covered with cross stitches, or anything else you dream up). There is no wrong here.
When you get close to the basting line that describes the edge of the section you are working on pause. Decide whether you want to continue the design right up to the edge, or if you want to stop (possibly at the natural edge of your repeat, or at some unobtrusive place in it) and save the remaining area to do a border. That’s what I decided to do on my two sample books above. Any narrow geometric band – even just parallel straight lines – can be used to frame the center design and draw the eye away from truncation of the center design.
Finishing the Piece and Assembly
Once everything is all stitched, you can do a gentle wash and iron (nothing with big agitation, harsh detergent, or high heat). Or not. It’s up to you. Now is the time to draw or baste-mark those extra flaps. If you are going to serge them you can mark them and cut to exact size. Note that the ONLY places where secure edge treatment is mandatory are shown in green below. I strongly recommend hemming for those, although serging will work in a pinch. The other edges can be fray check secured or even left plain (they’ll never see the light of day again). Personally, I mark the flaps, and cut leaving a quarter inch seam allowance for the green bits that I turn back and hem, doing a veeerrrryyyy careful diagonal cut at the corner where the front and back inner flaps meet the top and bottom flaps. When I turn back the outer points of the front and back inner flaps and hem them down, I cut off the triangular excess to reduce bulk.
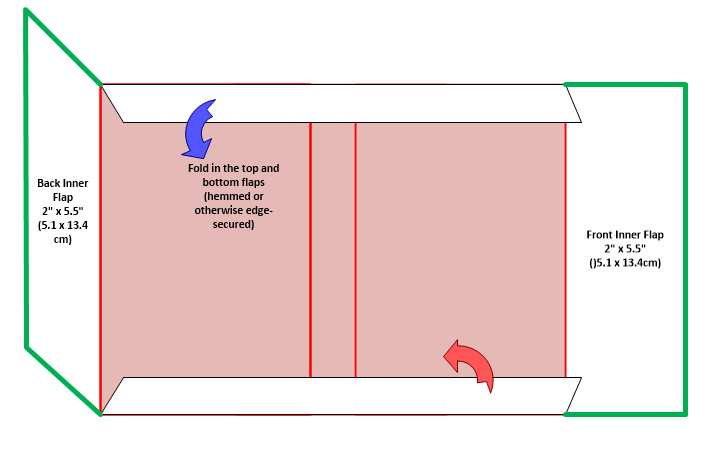
The top and bottom flaps do not need to be stitched down. Ironing them flat is enough. The final step is folding in the back and front inner flaps and stitching them to the front and back, along the edges of the book. This leaves a neatly edged pocket that will slide over the book cover. If the book cover doesn’t fit, feel free to snip it just a bit so that it slides in nicely. No one will ever know.
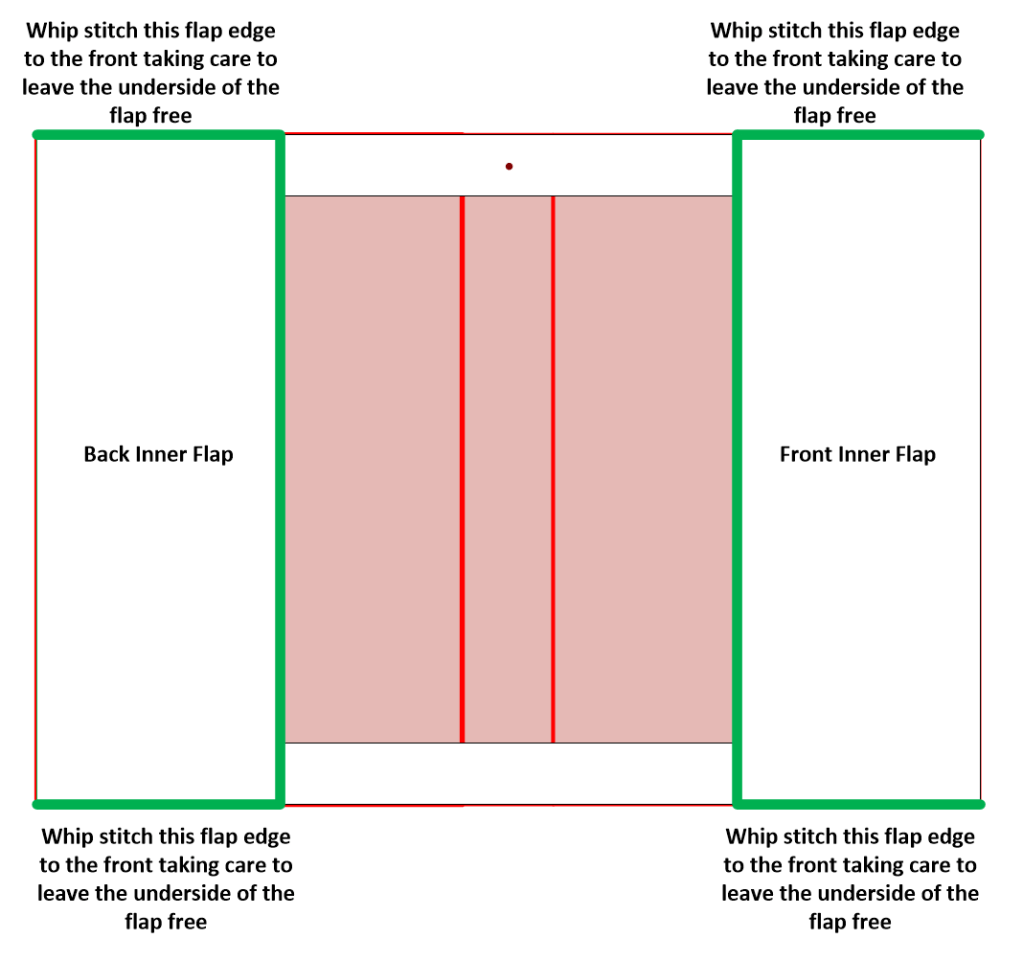
One last refinement. Many of these books come with an elastic loop that can be used to hold the book closed or mark a page. It’s useless in this application. I snip it off the book prior to fitting the cover. Instead, to serve as a bookmark, I stitch on a length of narrow ribbon, attaching it at the little red dot marked on the diagram above.
OK. Now armed with the basic how-to. Let’s see what you can come up with yourself!
DOUBLE RUNNING STITCH LOGIC 104 – A REVIEW
Based on private notes of inquiry and discussions on various historical needlework-related boards and forums of late, I see that people are still confused about the working logic of linear stitching. In specific, how to determine if a design can be worked entirely two-sided.
First off – the two most popular historical methods for working thin linear designs are double running stitch and back stitch. The big difference between the two is the appearance of the reverse. Done meticulously, with care paid to invisibly terminating threads, double running stitch is almost indistinguishable front and back. Almost because a few people do produce a slight difference due to differential thread tension on each of the two passes required to produce a unbroken line, but that difference mostly settles out over time. Back stitch on the other hand produces a public side very much like double running, but the reverse of the work is heaver, and depending on the stitcher can look like outline or stem stitch, or even like a split or chain stitch if the needle pierces the previous stitch as a new one is made. Of necessity in back stitch there is twice as much thread on the back of the work as there is on the front.
 |
 |
|
Double Running. |
Back Stitch. |
Double running stitch takes two passes to accomplish because it first lays down a dashed line, with the spaces between the dashes being filled in on the second pass. A back stitch line is completed in one pass, with no need to revisit areas previously stitched to complete the line.
Many people prefer back stitch because there IS no going back. They like the certainty of knowing exactly where they are at all times, over the pretzel logic of calculating how not to be caught in a cul de sac while retracing steps in double running. Personally, I prefer double running, and follow double running logic even if the piece I am working will not be seen on both sides. I find that path planning to be fun, and I appreciate thread economy, especially when working with more costly or difficult to source hand-dyed silks.
But for some one challenge of double running is knowing which designs can be worked in that stitch such that both sides can be made totally identical.
It’s easy. Any design that has no “floating elements” is a prime candidate. If true double sided is a total goal (including invisible termination of thread ends), any piece that has a floating element large enough to allow that burial is also a possibility. It doesn’t matter how complex a design is, so long as elements are all branches and detours off of one or more main baselines, they can be stitched double sided. And yes – there CAN be more than one baseline in a design. More on baseline identification is here. The logic of following detours and returning to the baseline is here. How to break up a large design into several smaller baselines is here.
Identifying floating elements
That’s easy. They are any ornament or detail that is discontinuous from the main line of the design.
Here are several that I’ve done in double running, based on one or more continuous baselines, with no floating element deviations. In these designs every part of every work is attached to every other part, at one or more points.


The last one has additional embellishment in long-armed cross stitch, and the final one includes two edge borders, each done as their own “line” separate from the main motif.
By contrast, here are several that have those “floating elements” called out.


The knot element in the all-over at left is not attached to the main pomegranate frame. It is however just large enough manage thread-end-hiding. So while its presence makes this a tedious and difficult pattern for double-sided double running stitch, it is not a deal breaker. However those little accent diamonds are deal breakers. Too small to hide the ends, and detached from the main design. The ladder element in the arms of the repeat at right is broken from the main design, and is too small for end-camouflage.
There are often short lines or sneaky little floating accents hidden in both simple and more complex repeats. Strawberry pips are notorious for this, although I haven’t any stitched examples to hand:

My dragonbeast, however lovely, has quite a few floating elements, making him a problematic choice for a fully double-sided work. (Eyes and faces are almost always difficult).

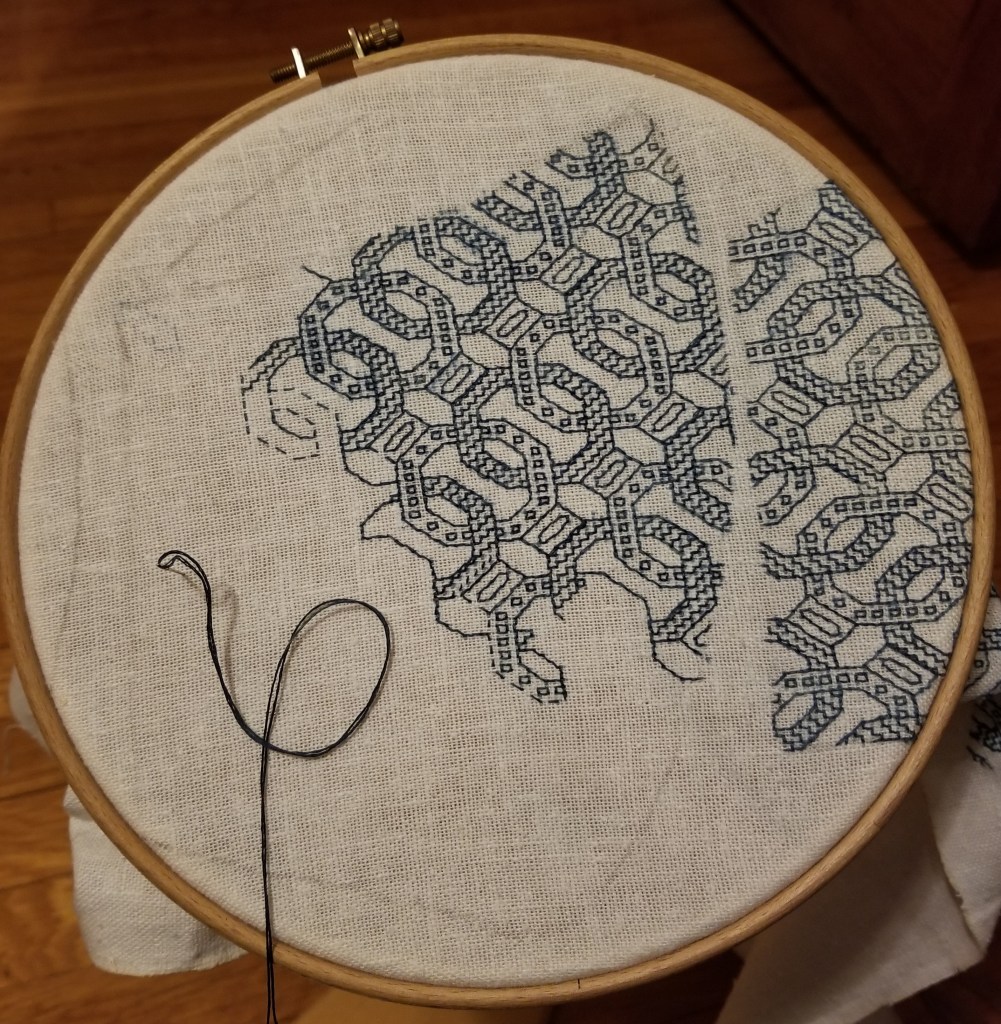
And this bit, stitched from a Lipperheide book, is the absolute poster child for discontinuity. I didn’t mark them all, but you get the idea. The spaniel and possibly that center bundle thing are the only bits large enough in which to bury the ends, if a fully two-sided result is desired.

Here’s a tricky one. Look closely at the bit on the left.


It looks continuous, but it’s not. There are in fact FOUR separate double-running baselines, AND a discontinuous element in the motif. He’s in the red circle on the right. Like the round knot in the first example this might be done double sided, provided that the stitcher was willing to terminate separate ends for that relatively large floating element.
So in short – it doesn’t matter how complex a design is, so long as all elements are continuous it CAN be stitched fully double sided, in double running stitch.
FINISHING OFF A HANGING SAMPLER
OK, I promised I’d write this up, and it has taken me a while, but here it is.
My thought here was to create a quick and easy way to finish off a hanging sampler, using a method that did no harm to the stitched piece, that was inexpensive to do, and required no special equipment or components that can’t be found in most crafts stores.
Why “no harm?” Because many inexpensive framing solutions do exactly that. They place fabric under stress, encase it in moisture-trapping glass, matt it or line it with acidic materials that over time discolor or eat away at the ground cloth, or place the fabric up against wood or metal that can corrode or mark the cloth.
This solution is far from ideal, but it manages tension to avoid stretch or strain in hanging, isolates the stitched piece from any wooden or metal framing elements, can be quickly picked out without harm to the original work, and is very inexpensive.
Here are several examples (the center one is mid-process):
")


In all cases, a larger piece of backing fabric has been used to encapsulate the stitched item. The hanging bar (wood or metal) and bottom-weighting only touches the backing fabric. All are totally sewn by hand – no machine stitching.
Note that you don’t need to have actually stitched a sampler to do this. It would be useful to finish off a decorative tea-towel, heirloom doily, cloth map, or small pieced patchwork as a hanging, or (for my SCA pals) to mount a painted or printed banner for display.
To do this you need:
- Your display piece.
- Backing fabric. I used plain old quilting cotton. Any fabric will do, although for the “no harm” bit, I suggest washed cotton or linen rather than polyester or other synthetic. Size needed calcs below.
- Plain old cotton sewing thread that matches the backing fabric.
- A hand-sewing needle – a sharp with a small eye is recommended.
- A metal bar or wooden dowel for a top support (fancy finials are optional, but can be handy for fixing hanging strings or chains in place so that the hanging mechanism doesn’t compress the top edge of the hanging).
- The aforementioned hanging string or chain.
- An iron and ironing surface.
- A pair of scissors
- Straight pins
- A ruler and a tape measure
- Standard office stapler
- Optional weights for the bottom edge. I have used a length of brass chain, threaded onto an old ribbon, and small zinc drapery weights (small bars of zinc enclosed in a synthetic fabric envelope). These are sold in packs of two or six, in the curtain-notions department. Avoid the lead ones just on principle – the world does not need more free-range lead. In a pinch, coins sewn into little fabric pockets will do. If you are using drapery weights or coins, you only need two.
I found the backing fabric, dowel, wooden finials, the drapery weights, and the chain all in my local JoAnne’s fabric/crafts store.
First, decide how you want to frame your piece. A large area top and bottom, with narrower areas on the sides? Equal frame all the way around? The general size will inform your fabric purchase, although one yard of most quilting fabrics will be MORE than enough for all but the very largest samplers.
For the Permissions sampler, I decided I wanted a blue frame about 3.5 inches all the way around, and to preserve about 1 inch of unworked ground between the stitching and the edging I put pins in my sampler to mark that distance from my stitching, and measured the “to be shown” dimensions of my piece. About a half inch of my sampler, all the way around, will be hidden inside the backing.
Let’s call my display width 20 inches, and my display height 16 inches (to be truthful, I didn’t write down the real numbers). I know I want 3.5 inches of framing edge to show on all sides. Plus I need a hem allowance, let’s call that 0.5 inch. Here’s the logic:
| Hem |
Edge |
Display Area |
Edge |
Hem |
|
|
Width |
0.5” |
3.5” x 2 |
20” |
3.5” x 2 |
0.5” |
|
Height |
0.5” |
3.5” x 2 |
16” |
3.5” x 2 |
0.5” |
So, by doing the addition, I need to cut my backing cloth to be 35” wide, and 31” high, which is what you see is half-way done here (I’ve cut the width but not the height yet):

The next thing to do is iron in the 0.5” hem all the way around. Note that the “right side” of the backing fabric (such as it is, is DOWN). I chose to iron in mitered corners for tasty neatness, but that’s optional, and there are a ton of video tutorials on doing that.


Then I positioned my stitched piece on top of my backing fabric, making sure that it was correctly placed (the edge of my stitching was 8 inches from the now-folded edge of the backing – I should have left in my dimension measurement pins but I forgot, and took them out.)
Once the stitched piece was correctly positioned. I folded the left and right edges in, carefully aligning them (measuring the distance from my embroidery), and finger pressing them down and pinning. Because I stitched on even weave, I was able to use the count of my ground fabric for **perfect** alignment without having to mark the fold-to line on my sampler.

Those two little white tabs? Those are the drapery weights – note that they have little tab ends that are handy for stitching. That’s where they will go, encapsulated in the edging/backing, far away from the stitching. Next I folded in the top and bottom and pinned them, too. Once all edges were pinned, I lightly touched up the folds with my iron, to make them slightly crisper. Then I slid those drapery weights in and pinned them into place.
Here’s the thing, ready for hand stitching.

You’ll notice that there are simple lapped corners – I didn’t miter them. By doing this I can use the flap-over on the top as my hanging pocket. I do not need to engineer a separate hanging method for attaching the bar or dowel.
Now for the hand-sewing. Yes, I could have done this by machine, but hand stitching is easier to pick out in the future, and easier for me anyway to keep neat and aligned. There’s no real reason (other than speed) to do this by machine. And yes – I probably should have basted, but hey, what’s the fun without a tiny bit of risk. 🙂
Starting at the lower corner where the bottom and side flaps meet, and working first completely around the stitched sampler part, ignoring the flapped areas at the corners, I worked a simple hand appliqué stitch, catching a tiny bit of the edging, passing through the ground cloth but not the ultimate backing – at a diagonal, ready to make my next stitch. Here’s a tutorial on the appliqué stitch.

Note that I used the even weave’s threads to keep my hem nice and straight.
After I had worked the appliqué stitch around the entire visible area of my sampler, I used the same stitch to affix the two lower corners – the places where the bottom folded edge lapped up and over the folded-in sides. As I did each of these two corners, I worked from the visible sampler area back out to the edge. When I got to the side, I turned the corner and used a tiny whip stitch to seam together the front and back edges. When I got to the place where the weight was pinned, I wiggled it up so that I could just nip its flapped edge in as I was whip stitching:

I worked the top two corners similarly, but instead of working all the way down to the tip of the corner as I whipped the front to the back, I stopped about 0.5” from the top on both the left and the right. This left an opening through which I could pass my dowel. A small bit of finesse was needed to thread it through (I used another scrap of dowel to nose the hem allowance out of the way on the inside).
To make the hanging stick, I used a 1/4 inch dowel. I probably should have used a metal rod or a thicker dowel, but that’s what they had in the store. I bought a little pack of finials, and ended up having to shave down the ends of my dowel just a tiny bit so that they fit into the holes on the finials. I also bought a length of inexpensive craft chain, intended for chunky necklaces, with links large enough to fit around the dowel.
I cut the dowel to the width of my finished piece, plus about 0.5”. Using a regular office stapler, I stapled the chain to my dowel, about a quarter of an inch from the end. I dotted the inside of the first finial with wood glue and forced it onto the dowel and over a bit of the staple, so that the chain was butted up against it. Then I threaded the dowel through the top of the hanging, squishing up the hanging a bit to keep it away from my working end, I stapled the other end of the chain to the dowel, then forced on the second finial.
Taa daah!

