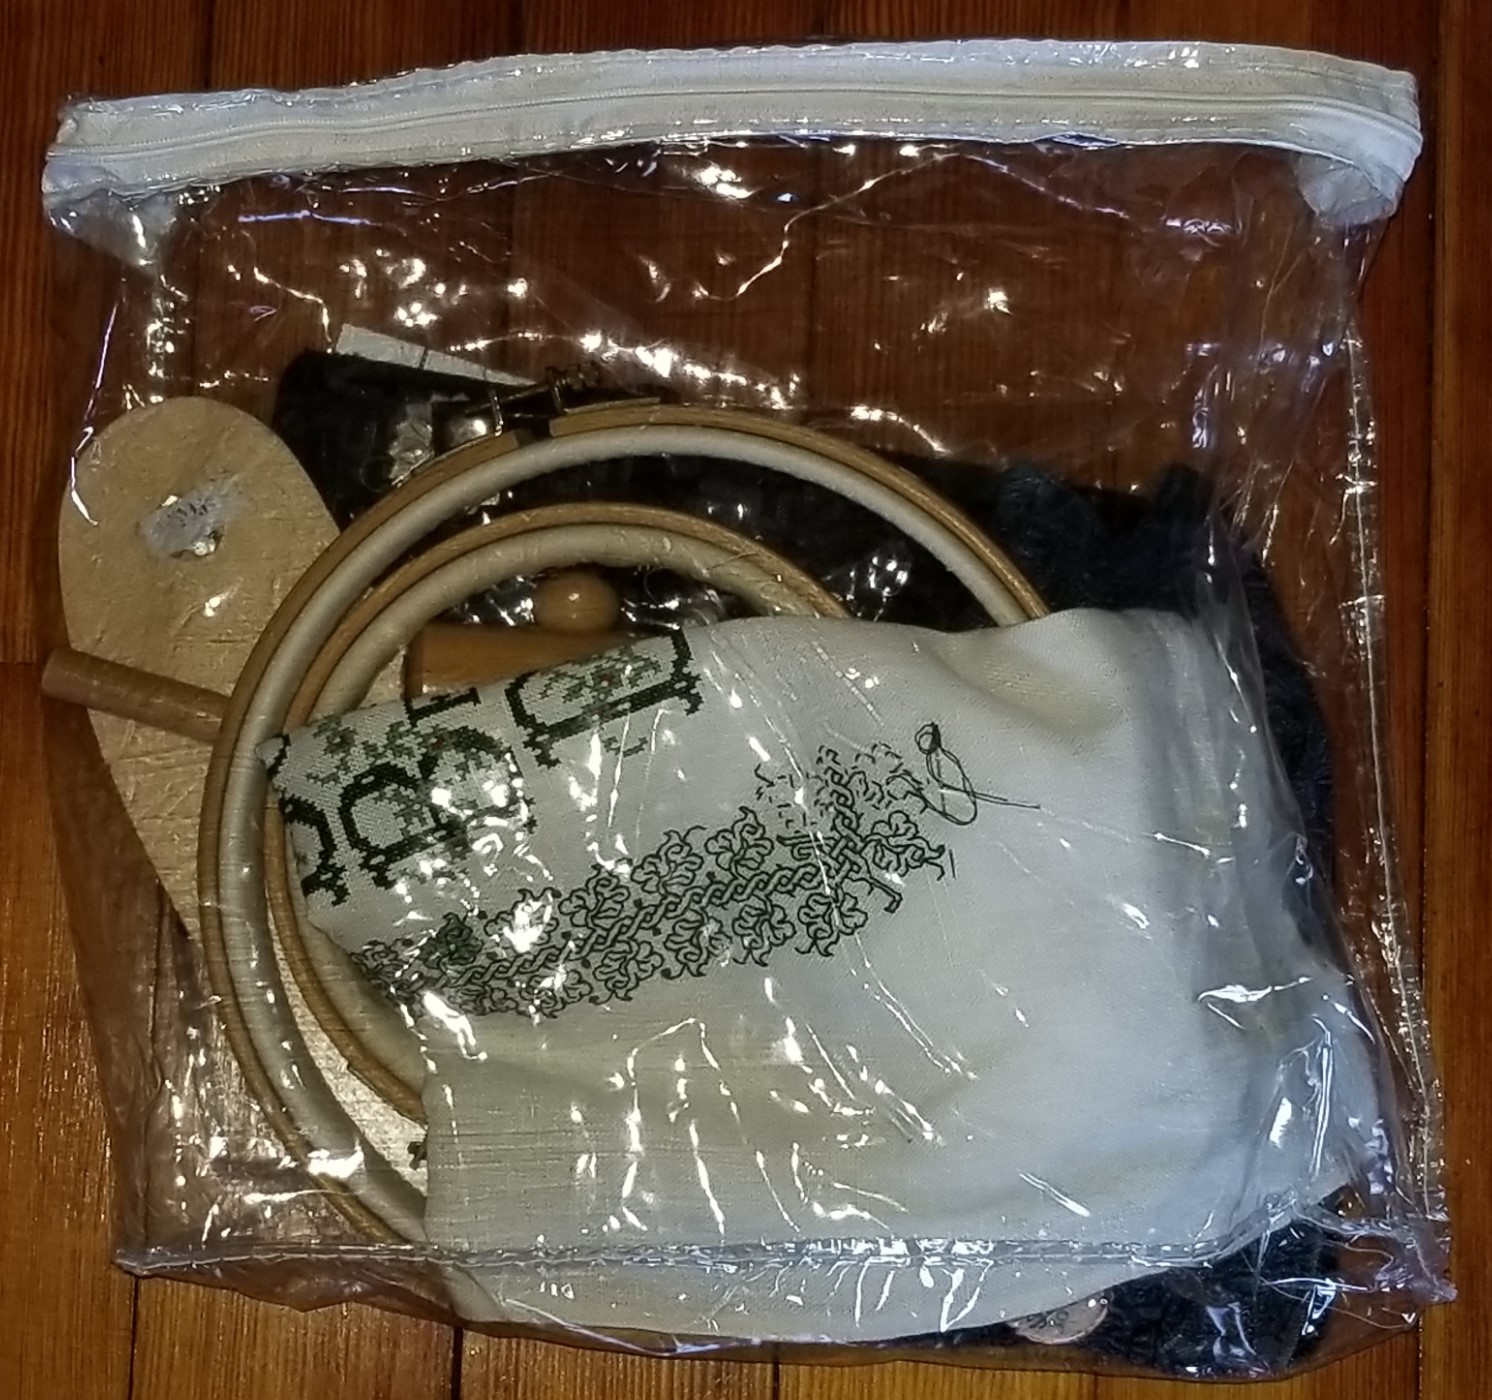
MORE GOODIES FOR THE CHATELAINE
The second half of my 2025 Toy Allowance has arrived! I bought more pieces for the stitcher’s chatelaine Younger Spawn gave me for the holiday in 2023.

Here’s a roundup of all of the components.
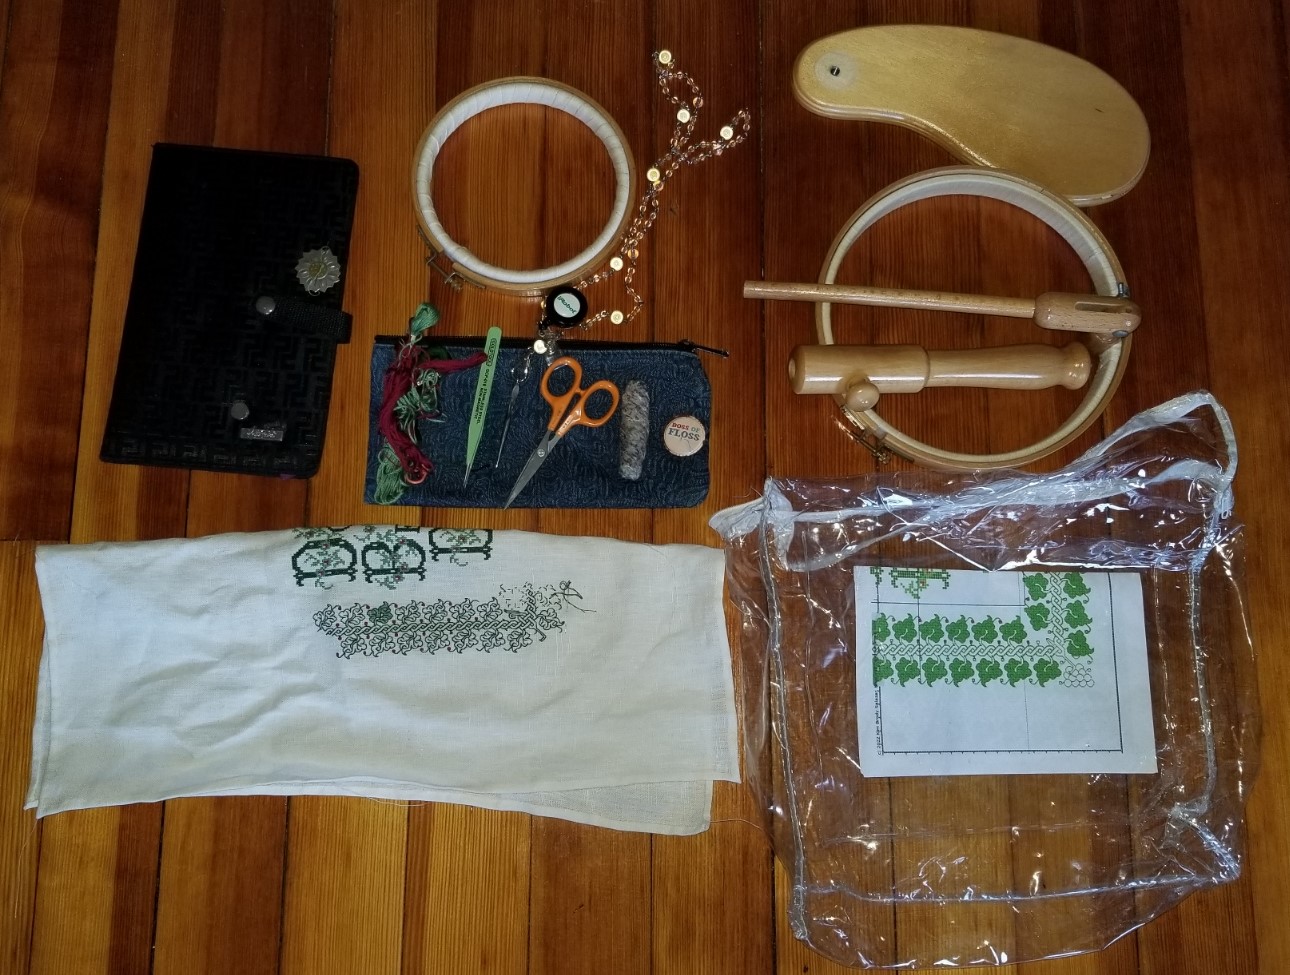
First, rose pin and majority of chains. Not sure where the Offspring picked that up. I noted several vendors selling near identical unpopulated chatelaines last year, but this year the rose design isn’t popping up.
First on left – the laying tool. This is a standard steel laying tool, not a fancy one made for display wearing. The Resident Male gave it to me about 5 years ago, along with the super-precise sharp scissors that are also on this chain.
Next, up by the rose is a needle threader. It’s a fine wire style threader encased in fancy findings. This is a new purchase from Beaddoodads, an Etsy shop based in Australia. It’s lovely and works quite well. A much welcome addition. I have a note in to the seller to find out if the threader can be replaced when it eventually and inevitably breaks (those skinny wire ones are only good for a year or so). In the mean time I’m literally keeping it on a short leash and will look to see if there is some sort of protective sheath I can devise for the working end.
On the long dangle next to the threader is my spool cage. This is also new, and as you can see, is home-made. I twisted it from the protective cage or bail that holds champagne corks in place before the bottle is opened. I may go back and do another. This one is from our New Years Eve bottle. Our anniversary bottle was silver tone instead of brass color. It’s just big enough to hold a full spool of the Corticelli silk I’m using now, and snug enough to keep it from unsupervised unreeling.
Back up we find a needle case, also new, and also from Beaddoodads. It has three small rubber or silicon gaskets that keep the slip on top securely in place, even while hanging.
Next over the the little purse accessory that Offspring included with the original gift. I softened some beeswax generously shared with me by a hyper-local beekeeper (Hi, Kevin, who lives around the corner!), and then molded it into one side of the snap enclosure holder.
Up again towards the rose is the last of the three new bits from Beaddoodads – the bobbin reel. It’s the long pin-like object holding the bobbin of plum color thread. In theory it is long enough to hold three metal bobbins. I only had one empty one to hand. I’ll probably replace it with three inexpensive generic metal bobbins. This one is for my ancient Elna SU sewing machine. Klaatu is very finicky about bobbins, and Elna ones of the correct vintage are hard to come by. It’s also worth noting that the bobbin reel is long enough to use with one of the little wooden Corticelli spools. Once one of those is empty, I’ll probably be using it instead of metal bobbins.
And last on the right is the pair of embroidery scissors that I got from the Resident Male along with my laying tool. Notice how it is chained. If I attach the lanyard clasp to just one of the scissor’s finger holes, gravity and movement eventually open the scissors. Those blades are stabby, plus I don’t want to damage them. By threading the chain through both loops, the scissors stay closed after use. And doing so is no impediment to ease of use.
Finally we have the ribbon to which this weighty seven-armed octopus is pinned. Together with all of its parts, my chatelaine is quite heavy. The needle case is surprisingly weighty, and the little purse is no feather, either. I find pinning the thing to a waistband to be uncomfortable, and don’t want to tear holes in my tshirts, blouses, flannel workshirts or sweaters (I’m usually in one of those). So I took a length of evenweave fabric ribbon I bought at Sajou during our Paris trip, designed a custom pattern and stitched up an alternate solution.
I doubt I will add other bits. I have a very elegant silver framed mini-magnifying glass. But it’s way too good and way to fragile to add to the rest. Plus I I don’t reach for it every time I sit down to work. I’d like to add the electronics tweezers I use when picking out, but there’s no easy way to modify them with a metal chain loop or bail for hanging. And I feel that the weight of the thing as is now is pretty much maxed out.
As to the utility of this portable toolset – I really like it. No more setting bits down on the table or chair arm beside me, then sweeping it off as I get up. I will still use my pirate lunchbox to carry the larger kit (more backup needles, my lint-trapping wad of silly putty, the magnifying glass, tweezers, more thread beyond the current skein-at-use, and the like), but for wandering around the house, sitting out on the porch or on the beach at the Cape, the chatelaine is all I need.
I even used it while we attended panels and readings at the Arisia science fiction convention in Cambridge, MA last weekend. And I don’t mind jingling like a belled cat as I wander around, although at Arisia I did wear a two-pocket workshirt, and stuffed the pin and its dangles into one of the pockets when we were in motion, mostly to keep the noise down, and to prevent anything from snagging on passers-by.
ANOTHER NEW TOY
If you’ve been reading here over the past month, you’ll have seen me working the current project in a hand held hoop. I love hoops, especially their portability and versatility. But I vastly prefer the “real estate,” tautness, and ability to use two hands that using a scrolling frame gives. I’ve had two sizes of the Needle Needs Millennium frame for quite a while. I tend to pull those out for the big projects, especially those with metal threads, or that feature easily crushed or disarranged stitches (satin stitch, knot stitches). I also have a sit-upon hoop. I do use that extensively for the smaller pieces with less fragile work on them. It has some of the advantages of the other two types, but as a compromise, with less ability to place the piece in exactly the optimal spot and angle for visual acuity and best lighting. The hands down most efficient way for me to stitch is the big Millennium on my Lowery stand.
After months of hoop-in-hand, I was yearning for the scroll frame experience. I heard that Needle Needs had a new junior size frame, and was also offering smaller roller bar and side extension pieces for the Millennium system. So I sat down and weighed price, stitched area size, and the fact that pieces from the new junior frame are not compatible with its larger brother, then splurged on a pair of new extenders and roller bars.

I have two sets of the older 8-10″ side stretchers. I got that relatively small size because I realized that the bigger ones would produce a stitching area that would be difficult to reach. That bore out when I was working the coif using the 24″ roller bars and the 8-10″ extenders. My behind-the-work left arm could reach only 60% of the available area with it set at full extension – barely making it to the top edge of my piece, and I had to flip the frame over to work the remaining spaces. But while I might have gotten the even smaller 5-7″ sides this time around, I had the feeling that a space that small in combo with the Lowery frame extender arm would be less than optimal.
Obviously the new components arrived yesterday and were immediately deployed:
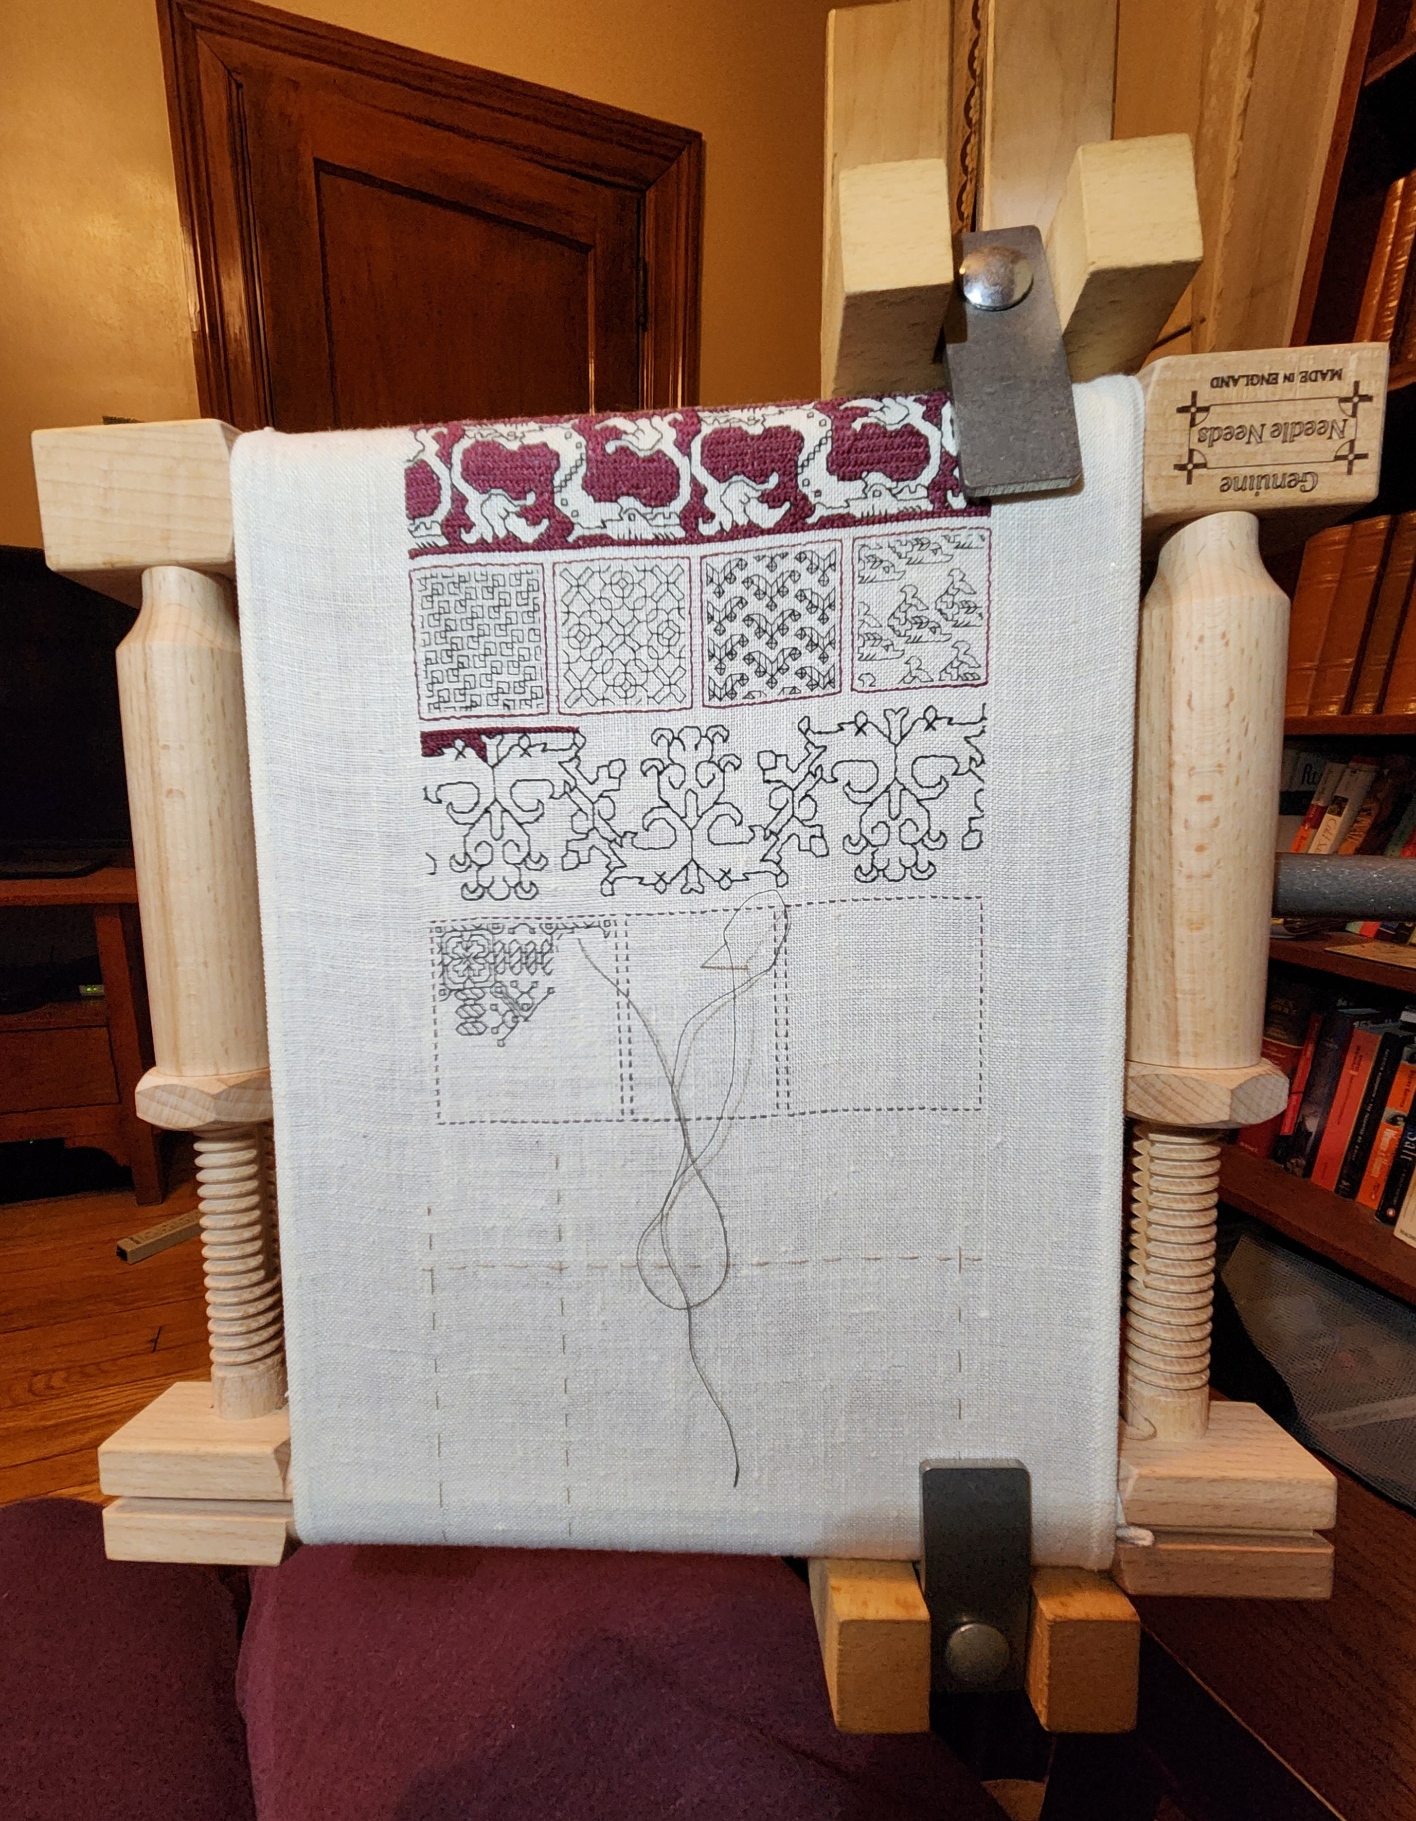
And I was right. You can see how much of the available area is “eaten” by the width of the gripping Large Frame Extender. Even if I position the frame so that the clamp is grasping the corners of the roller bars, it’s awkward to work right up against the Extender’s upright. But just like with the larger set-up for the Coif, I can flip the frame upside down to work that side of the piece.
I know that not all my new projects will be narrow band samplers, but between the new short roller, and the new short side stretchers, plus the pieces I have on hand used in new size mix combos, my toolkit has valuable extended capability.
As for more on the design on this sampler, the types of symmetry often seen in fills and how to best center them depending on the type of symmetry, that will have to wait until the next post. For some reason the blogging software is having indigestion, and I’ll have to cut today’s intended post into two. Will finish that one out and get it up by the end of the week.
TALKING HOOPS AROUND THE SUBJECT
Yesterday was a needlework housekeeping day. I put away the supplies from my last project, neatened up my stitching-on-the-go box, and cast an eye over my kit in advance of whatever project I will do next. And there WILL be a next – it’s just a matter of getting a couple of holiday obligations finished first.
Among the reassessments I made was an evaluation of my hoops. I have several. My best ones are three in-hand hoops, and one sit-upon hoop on a stick. All are hardwood wood and better quality, with sturdy brass hardware – not the bamboo ones with fragile clasps. Three of them are shown in the family photo below. The other one is an unwrapped duplicate of the smallest, shallowest hoop. I haven’t wrapped it because it happens to have much better tension than the one I did wrap, and there might be call for me to use an unwrapped hoop for a specific purpose. Since I don’t leave my projects hooped when dormant, there’s no call for me to have two absolutely identical ones, both prepped and ready.

The in-hand hoops are all 6 inches (15.24 cm) in diameter measured across the inner hoop. I find that the most convenient size both for maintaining tension and for use in tight places. The sit-upon is 8.75 inches (22.22 cm) across the inner hoop. I note that a 6 inch diameter hoop/stick part is now available from the maker. I might pop for that someday.
The ring of one of the in-hand hoops is 1/4 inch (0.63 cm) deep, and the other hand held one is 5/8 inch (1.59 cm) deep. The hoop on a stick is even wider – 7/8 inch (2.22 cm).

I also have a selection of both plastic and wooden quilting size hoops, a foot in diameter or more that I’ve gotten as hand-me-downs, or as part of “take the lot” yard sale/jumble sale needlework bundles. I rarely use them because I find they are cumbersome, and they don’t provide the drum-tight tension I prefer. None of those have been promoted to my on-deck group, and aren’t shown.
But why so many of the smaller diameter? Well, it happens I do have several larger scrolling frames, and use them when needed – mostly for things that have fragile threads, metallic threads, or other raised embellishments; or that employ crush-prone stitches that a hoop could injure when it is repositioned. But for smaller pieces, non-fragile pieces, and in some cases REALLY big projects like tablecloths, I prefer the hoops. These days I mostly use the sit-upon, but for sitting on the beach and stitching, the sit-upon is useless. You can’t sit upon a hard paddle seat in a soft fabric sling chair – so hand hoop it is.
Why both the deep and the shallow? The deep ones (including the hoop on the stick here) work better with thinner fabrics – the 38 and over count linens and blends I usually use. The shallower ones work better for thicker fabrics, especially heavy 28 to 36 count evenweave, denim, and other sturdier fabrics. If I used most Aida I’d probably employ the shallower hoop for that, too. Do you have a standard deeper hoop and you are struggling to get it over your Aida? Try a thinner wall hoop. It will be easier, even if you wrap the hoop.
Wrap the hoop?
Yup. Makes a world of difference. Wrapping the inner hoop with 100% cotton twill tape vastly improves the grip of the thing, and makes the fabric much easier to mount and to tension. It also cushions the work a bit, cutting down on stitches being crushed. I will probably wrap the outer hoops, too, to prevent those shiny areas that happen when densely packed stitching meets hoop tension. But so far I haven’t bothered.
How to do it. Note that the deeper hand-held hoop is wound with wider twill tape than the other two. That was the first one I wrapped. I have to say it was significantly harder to do it with the 3/4 inch (1.9 cm) tape than it was to do with the 3/8ths inch (0.95 cm) tape. The narrower stuff is easier to stretch to conform to the circle of the hoop, without lumping and gapping.
Lumping and gapping on the outer edge of the inner hoop is to be strenuously avoided. That leads to high and low spots with suboptimal tension. The inner surface can be less “policed” but it shouldn’t present gaps or kinks that might work their way around to the top, or catch needles during stitching.
I find the best way to achieve as uniform a contact surface as possible is to overlap the tape by 50%, row on row, and wrap as tightly as possible, maintaining the established angle and stretching the tape as I go. Yes, it can take me a couple of tries before I hit on the angle that produces the most even results.


I don’t use glue or tacks to hold the end, I just wrap, gripping the tape and hoop very tightly, placing each successive course with special attention. Here you see the start and the midway point. Eventually the origin end will work itself a tiny bit loose as I go, but I keep it folded flush against the inner surface of the ring, and take care to wrap over it. Eventually I get back to the start. I cut the tape, tuck the ends under to prevent fraying and firmly sew it to the inside surface of the ring, back where it meets the beginning. That spot is indicated by the arrow, below.

The only caveat on this whole thing is that wrapping may add so much diameter to the inside hoop that the little thumb screw holding the clasp together becomes too short. This happens mostly on the less expensive/mass market type hoops. If that happens, a quick stop at an old fashioned hardware store can help you land a longer replacement. And by that I mean a store with actual people who know the inventory, not a big box/self-serve hardware department store that sells everything in quantity, entombed in blister packs. Bring the hoop and screw in and explain the problem at a non-busy time. The staff will be able to size it and find **just** the right thing.
And that’s how it’s done. If done with proper care, wrapping a hoop of this size takes me about a half hour. And a half hour well spent.
Other Recent Projects
The multicolor headscarf I was stitching has finally been made up into its finished form – a lined triangle with ties. The ties are also 3/8 inch twill tape, but a heavier/denser and whiter one than that used on these hoops. I folded it in half longitudinally and stitched it to make robust tie strings. But I didn’t remember to take a finished item photo, and then decided to give it as a present to a dear old friend who married over the weekend past. I forgot to ask permission to use a photo of her wearing it. But I am happy that she loves it enough to tie it on immediately after the ceremony.
And the Fractured Symmetry sampler joins the rest of the to-be-framed or finished works on my Wall of Shame.

He is tucked in next to the underskirt panel at the far left, just below Stone by Stone. In addition to some of my perpetual unfinished objects (UFOs), there are now six pieces there, stitch complete, waiting for framing or other finishing. I suppose I should get on that.
BUT in the mean time I have seasonal obligations to meet. I promised a stocking with a wolf on it before the holidays hit. I’m on it. The recipient’s name with be duplicate stitched into the white band at the top. I’m afraid that the distortion inherent in translating squared graphs to rectangular knitted stitches (wider than they are tall) has stretched poor Wolfie a bit. I am hoping that additional embroidery – maybe an eye and some ornaments on that tree, will make him both more identifiable and more festive.

The pattern is one I’ve done twice before, once for each of the spawn. But the last time I knit it was 25 years ago. I found one of the pattern pages, but not the others. I’m extrapolating from the other two extant stockings. An interesting exercise, for sure.

LOWERY STAND HACK
In one of those “this never happens” moments, I ran across a Lowery stand being offered on my local freecycle exchange. Of course I leapt on the opportunity. Although I have one I now have a second to use in another room, or to leave at our Cape hideaway, so I have less to schlep when we visit.
This one is a bit older than the one I bought several years ago. It came with two attachments – a plastic tray in daisy form meant to hold stitchers’ oddments, and a bar with a pincushion, plus a crosspiece of unknown purpose. I took off the tray because it was very awkward and space-inefficient.
Some digging led me to the answer for the crosspiece bar – originally it held a plastic comb-like attachment, over which waiting threads were to be draped. But this re-homed stand has seen some hard use, and the plastic comb insert was long gone. And for me – not missed. I generally do monochrome or limited color set pieces, and have no need for an extra set of fingers to hold my rainbow of threads.

But the crossbar did suggest something to me. I have always wanted to display a design page alongside my work. Using my big scrolling frame mounted on the Lowery large frame extension, this wasn’t a problem. I could easily affix a page to my working surface or to a little magnet mounted on the end of the frame’s stretcher bars, using a magnetic needle minder. But if I plan on employing the Lowery to hold a smaller hoop, there isn’t enough real estate for that.
I have a flat metal magnet board of the type commonly sold for stitching. But the angle and aperture of the crossbar’s slit were wrong. The board didn’t sit well, nor was it at a useful angle. And it wobbled in the stand. So I went looking for something that might help.
More serendipity. This is the plastic “zipper style” cutting slider strip that comes with large boxes of Stretch-Tite brand plastic wrap. I find them pretty useless for their intended function, but being a packrat, I tend to keep the slider bar in the drawer with the box of wrap until the wrap is used up and the box is consigned to recycling. Here you see it clipped onto the leading edge of the crossbar. I haven’t pushed it all the way on so you can see how they engage.

Obviously I will eventually cut the plastic to length and discard the blue thumb slider. But here is the magnet bar, mounted behind the now-thicker/plastic covered front edge of the crossbar, wedged between it and the crossbar’s back. Nice and secure. At a useful angle, and ready for pattern page deployment.

Oh. That thing I’m stitching? A very small piece of linen I rescued from yet another estate sale. It came neatly hand-hemmed. It’s too small even for my hoop-on-a-stick sit-upon, so I had to pull out my hand-hoop for it. It’s exceptionally nice fabric, with evenly spaced, easy to count warp and weft. There’s a couple of minor stains on it, but once it’s stitched they won’t be noticeable. I’m looking forward to working a hoop on my hand-me-down Lowery. It will be a first, since I usually only pull it out for larger pieces.


The count on this is roughly 33.25 threads per inch in each direction (penny count method – 25 threads covered x 1.33). I’m using this doodle piece to test if I like using Sulky 30 as a single, and to beta some of the designs that will be in Ensamplario Atlantio Volume III, which I’m composing right now.
You can see my basted guidelines marking the center, and on two sides, marking about a half-inch in from the edges. That’s all I need. Gridding for this isn’t necessary. I will stitch out from the center to the right edge, and note where in the pattern I am when I reach my edge-mark guideline. Then I’ll go back and stitch to the same point at the right. For the strips symmetrical to a center line that will be the same point left and right. For strips that are centered on a box unit instead of a line, that will be within one box unit further than the iteration on the right (assuming I center the left edge of the central box on my based centerline). And for non-symmetrical or unidirectional borders like the one I’ve established on top, I’ll just work in the general direction left/right but wait until I’ve established an edge with the symmetrical strips, then I’ll “catch up” to them and make the edges even.
Do I have any idea what strips I will be using? What the overall design will be? What motto or word (if any) this will bear? To what use I will put so fully an embroidered small cloth?
Nope.
No clue as to any of those things. But that hasn’t stopped me before. Like I said – this is an experimental doodle, a portable bit of amusement to eke out the summer’s migrations. Not a deathless Project For The Ages, or an incipient family heirloom. Stay tuned to see how this one evolves. If nothing else, it will be a bit of bungee-jump stitching fun.
BUSY END TO THE YEAR
No doubt it has been a hectic end of year, what with the standard end of year activities plus the finish on the coif project, and the lightning trip to the UK to view the final exhibit. But that doesn’t mean that other things have languished.
First, because the holiday can’t happen without cookies, even if I am not around to make them all, I present our 2023 cookie plate. Some slimmed down to lower carb versions (with varying levels of success), and some expertly baked by Younger Spawn, whose oven-acumen now far exceeds my own. Luckily Spawn’s job is work-from-anywhere remote and allowed early arrival the week before Christmas. While we were in Sheffield we had a happy house-sitter, tree waterer, and master baker in residence. And said HHS/TW/MBIR had run of the place, its kitchen, library, and media without clumsy parents cluttering available time and space. A win all the way around.

Starting from around 11:00 and spiraling into the center we have:
- Brown butter chocolate chunk cookies. A specialty of Younger Offspring, with grated chocolate bits, chunks and dust instead of commercial chips. To die for.
- Low carb peanut butter cookies. After all sorts of failures trying customized Keto recipes I fell back on the old reliable Joy of Cooking one, but subbed in King Arthur Keto flour and monkfruit-based sweeteners. I have always used Teddy no-sugar peanut butter, too. A slightly stickier dough than usual because the KA Keto flour and it isn’t as absorbent as regular all purpose flour. A bit more oil release on the baking pan, but this time the cookies turned out pretty close to usual – not dry and crumbly, although I couldn’t get the cookie stamp I usually use to work well and fell back to the traditional fork-tine checkerboard. They were pronounced acceptable by my core audience.
- Earthquakes (our name for chocolate crinkles). Full octane. These were made by Younger Offspring, and are especially luscious this year because the batter became the receiving point for ganache left over from another recipe. Not to many fault lines in them this year, but oh so good.
- Mexican Wedding Cakes. Another old family favorite done perfectly by Younger Offspring. Lots of pecans in a buttery shortbread base.
- Lower carb Buffalo Bourbon Balls. This is a family recipe that usually starts with a box of Nilla wafers or other similar vanilla or chocolate flavor plain commercial cookies buzzed to fine crumbs. But commercial low carb cookies are hard to find and maddeningly expensive. So I improvised my own, making large blobby plain cocoa cookies using the Keto flour and fake sugar, plus butter and Dutch process cocoa. Then the next day I ground them up and made the usual, but rolled them in a mix of the cocoa and granulated fake sugar instead of the confectioner’s version of the same monkfruit sweetener. (I wanted to save the powdered stuff for other baking because it works better for most of it than the standard). I used agave syrup in place of corn syrup for these. Plus bourbon this year instead of rum, mostly because that was what we had on hand. These actually turned out to be the best lower-carb cookie I’ve made so far. I will have to do it again so I can write up the recipe because it’s worth sharing and replicating in the future.
- Jam thumbprints. Another winner from Younger Offspring, who has sneaky ways of setting the raspberry jam in the shortbread base so that it is a neat, non messy, intensely fruity bite.
- Slimmed down Oysters. A take on my own invention, using my usual recipe but subbing in the King Arthur Keto flour and monkfruit sweetener into the standard along with the usual avalanche of ground hazelnuts. Those were hard to come by this year, but luckily I had some in the freezer, left over from last year. I was very happy at how the batter worked with the cookie press. And these were a collaborative effort. I did the cookies, but Spawn did the ganache and filled the sandwiches. The ganache is full octane.
- Lemon macarons with lemon curd. All Younger Span, all the way. These are classic, intensely lemony, and lighter than air. An accomplishment far beyond me. Again, to die for.
- Lower carb triple gingers. Obviously the white chocolate chips in the cookies are not slimmed and there is minced candied ginger in there, but the rest of the cookie is my usual recipe, subbing in the low carb flour and sugars. I’m a bit disappointed in these because as a drop cookie they are supposed to spread. These didn’t, remaining the rocky shapes in which they were spooned onto the baking sheet.
- Lower carb chocolate chip with cocoa nibs. This is new this year. I started with a keto shortbread cookie recipe, and added keto chocolate chips, plus no-sugar cocoa nibs (left over from last year). The result is pleasing but also a bit disappointing. The texture and taste of the cookie part is too much like a store-bought Chips Ahoy. I had hoped for something more like a home-baked Tollhouse. But they are not too sweet (a common problem with keto baking because the fake sugars are more intense than their standard counterpart). Good enough, but not great.
- Unseen – a keto lemon cheesecake in place of our standard Panforte, which could not by any means known to man or woman, be slimmed down. In fact, if I went on a forced march through Middle Earth and could pick only one food substance to sustain me, the Panforte, packed with nuts, dried fruit, and carbs would be a space/weight efficient substitute for Lembas.
Obviously for cookies to happen we also had to hit Max Festivity. Again Younger Spawn leapt in and took over the orchestration of the tree, and deployment of the M&M Man Army:

And to round it out, presents were exchanged. I was well prepared with gift socks, mostly knit since I mailed the coif. This photo omits the two last pairs, along with a nifty folding basket that was a present last year, and has been adopted as my knitting bowl for sock production.

Not to brag, but I am delighted that my family knows me so well. Among the puzzles, wearables, and adornments they gave me this year, were stitching things: a quarter yard of 40 count cream linen, a sweet little tabletop caddy box for needles and pins (I will use it for needles and orts), a small cigarette box that is a perfect traveling needle and thread safe, and a chatelaine.

As you can see I’ve already put my favorite laying tool, fine needle threader, and scissors on the chatelaine. I put a slice of beeswax in that little snap purse.
The rose header for it has a sturdy pin on the back. But since I am usually found in T-shirts these days, the weight of the thing might be problematic. This gave me an excellent reason to go stash diving and retrieve a length of evenweave stitching ribbon that I bought at Sajou in Paris when we visited there about seven years ago. A quick trip to the computer to doodle up a new pattern for it, and I’m off and running. It will be an award-ribbon style around the neck piece, with a 90 degree angle in front where the ends overlap. The chatelaine will be pinned to that triple layer of sturdy linen, and the loop will go around my neck. Problem solved. Or it will be as soon as I’m done with the stitching and assembly.
BADGE TETHERS AND MORE METHOD DESCRIPTION
In the last post I started a method description on working a large project without having to do a full chart of the entire design. I’ve now finished the first end and am starting on the second, so I continue the discussion.

I worked both the top and bottom borders to the same logical stopping point. Since I had begun both of them aligned to the exact center of my piece and was careful to follow the design exactly, the ends of both lined up. More or less. There’s actually one FEWER unit one one end of the top of the end strip than there is at the bottom. But I also bet that without knowing it was there, zooming in and looking for it, you would never have noticed. Again, a variance but not a fatal error, and far less egregious than the errors I’ve spotted on historical pieces.
There’s a lot of “white space” to the right of the stitching, but bear in mind that the opposite side is the one with the wonky end has less free space to play around in (it’s not just photo foreshortening, it’s really not parallel to the edge line I based on the true grain of the fabric). So in order to leave enough room even at the narrowest point, I have allowed for more “waste ground” on the more generous edges. I also am not sure exactly what I will be doing for the border yet. I was thinking a simple hem and some needle lace (picking up something I haven’t done in decades), but there’s also the temptation of a withdrawn element Italian style hemmed edge. And I may just leave all such elaborations off for a bit, to mull it over some more and possibly rehearse those very rusty techniques.
Anyway, back to the stitching at hand. Note also that in the shot above, I was working the bottom border out to the left, to the exact same stopping point as the edge on the right. I continued and finished both long side borders. So it was on to the second short side.
In the photo below the piece has been flipped so that the bottom in the shot below is now at the top. But where to place that second border?

Since the left and right ends of both long side strips end in exactly the same place, it’s easy. I went over to the finished work, determined that the “collision line” where the border meets the field pattern aligns with the curly end of one of the little sprigs that grows up from it. So I found the corresponding point on the second side and began the first pass of double running down it. I didn’t do the whole side, because I know I’ll be working those curls and sprigs eventually, and rather than risk a massive miscount due to the long run between those sets, I would prefer to work the larger floral border, then fill in the little secondary one once that’s been finished. But I DO need to know where the collision line is so I can fill out the truncated edges of my main field design.
I will probably begin the large border again from the center, although since the end points of my other short side border are known, I could just mirror those. We will see where whim and fancy take me. At this point, all of the known issues have been worked out, mitigated, or blissfully ignored. It’s just dogged completion of the motifs and borders from now on.
GADGETS – THE BADGE TETHER
Last year I mentioned using a retractable badge holder to help corral my scissors at the beach.

I clipped it onto the straps of the drink holder of my beach chair. That worked so well, I’ve been looking for ways to do something similar at home. I tried clipping the things to me or wearing my old work lanyards. Too fussy. My favorite stitching chair is wood and leather, with no good clipping spots on it. But I’ve been working this current project on my Hardwicke Manor sit-upon hoop/stand combo. It has a nice, long screw clamp. The clip jaws of one of my badge holders fits exactly on the exposed screw.

While I’m showing the thing holding my favorite scissors and laying tool, with both lapped in front of the work, in actual play the angle of the badge head suspends them behind and away from the fabric, so catching isn’t a hazard. I love the convenience of not fishing around for often-used tools, and the fun of repurposing these tiny work albatrosses for greater ease.
Oh, and on my big flat scrolling frame, remember those penny size strong magnets I glued to the uprights? They hold the badge leashes quite securely, too. So I have the advantage of tools-to-hand on my flat frames, too.

STITCHING ON THE GO
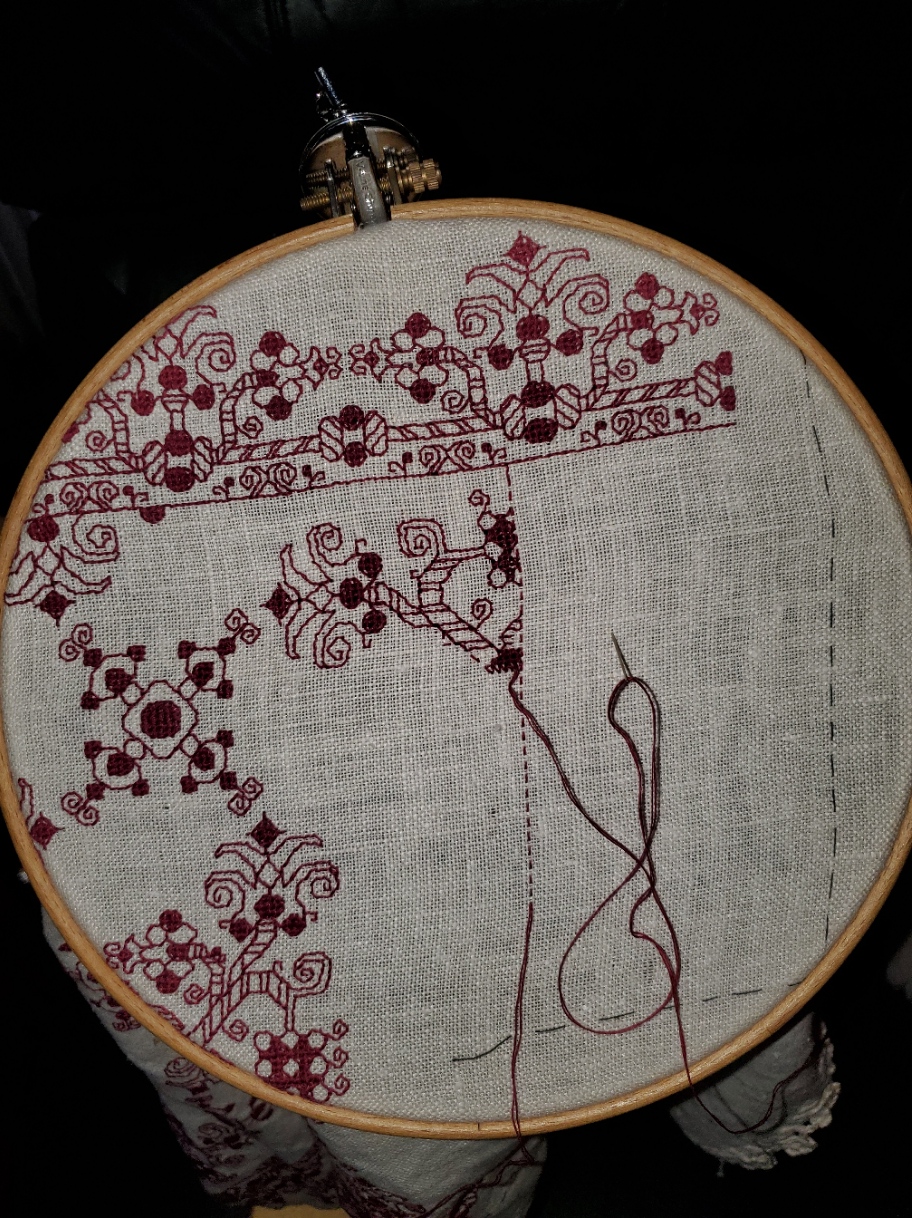
I’m moving right along on the Don’t Be sampler. The cross stitched letters zoomed by. And over the past three days I’ve gotten a good start on the border, as well. Whole piece photo so you can see the overage I’m leaving to facilitate both stitching and final framing, plus the quick hem job.
Note that my observation on the skew weave was correct. Those first couple of leaves on the return under the letters are differently proportioned than the leaves in the edge’s vertical part to the left of the motto. That will become more evident as I march along. I don’t remember exactly where I got this piece of pre-packaged ground, or how long it has sat in stash – possibly purchased, possibly as part of a supply salvage gift from a friend who passed it on to me, but certainly not recently. As it is, I will not use anything from defunct company “MCG Textiles” again. Ground sold as evenweave should be exactly that (ok, plus or minus a smidge I will forgive), but a 16% difference between the number of threads in warp and weft is flat out misrepresentation.
The corner is incomplete. I forgot to pack the correct shade of my garnet floss, so the little berries/grapes in the corner will be done later tonight. On the one green leaf, I’m still deciding whether or not to fill in all or some of the leaves. I used plain old cross stitch with one strand of DMC floss for that, flat out skipping partials, and only working full cross stitch X-units. It’s passable. It’s also tedious. When I am done with the double running I’ll make the grand decision. Every leaf, alternating leaves, or none at all.
Now. Where was I that I was working “on the go”?
We ran away to our place on Cape Cod for a last weekend before the renters descend. We went with some long time friends, so it was doubly fun. And I brought this project with me. Folk have asked before how I pack and bring projects, so here’s a thumbnail. Note that I didn’t do it perfectly this time – after all, I ran out of garnet. 🙂
First, the container. The plastic zip bag below (shown both sides) is something I saved the last time we bought a full set of queen size sheets for our bed. It’s rectangular, with an interior pocket, and a zip all the way around one end. It’s also a very tough plastic.

Here you see the main components of my travel kit – the three pieces that make up my sit-upon frame, the project itself, a zip pouch containing essentials (threads, beeswax; my third-best pair of scissors on a retractable spool and a laying tool, both attached to a beaded badge holder; my needle nose electrical assembly tweezers); a little magnetic stand/folder (with magnetic needle minder attached); and a spare in-hand hoop.
Note that the stand itself is an easy assemble/dissemble, and fits in the pouch with the project. I bring the spare hoop because it’s not always comfortable or possible to use the sit-upon, and because the sit-upon features a fixed hoop-on-stick, it’s cumbersome to use without full assembly.
When I stitch on the beach I leave the magnetic stand folded in the interior pocket of the see-through plastic pouch, with the pattern page on top. If necessary I have a place-keeping magnetic strip that can grip the board through both the plastic and the paper pattern. That way I can keep my pattern safe from dampness and wind on the beach. The supplies/tools zip stays safe in the transparent plastic bag, too, although I do either wear the beaded “chatelaine” around my neck, or clip the retractable badge holder that minds my scissors to my beach chair.

PRESENT TENSE, BUT RELAXED
I have been a very lucky recipient this year, with several fun things to share here.
First was a holiday present from The Resident Male. Noting our stellar lack of success growing a kitchen garden outdoors; our constant consumption rate for of parseley, thyme, dill, cilantro, and other herbs; and the fact that our house has a rather dark interior, he gave me an indoor, self-illuminated hydroponic garden. Which being terminally nerdy, I promptly named “Keiko” after the Star Trek xenobotanist and long suffering wife of Chief Miles O’Brien.

As you can see, Keiko is nearly foolproof. This is a photo of growth at three weeks. Dill is the tall boi. Basil is in the right hand rear grow pod, with Thai basil in front of it. I will report back when we begin to harvest. But so far, so good…
Far less technological but of equal and long lasting delight was a surprise present from Sytske, my Long Distance Needlework Pal (of Antique Pattern Library fame), who lives in The Netherlands. The mail carrier trotted up to my door with the box and rang the bell because it was an International Delivery and he didn’t want to just leave it on the steps. He’s a sweetie who goes above and beyond.
Sytske and I had an email pen pal chat a while ago about an inlaid backgammon board I had bought in Jerusalem while I was in Israel on a summer-long archaeology program between high school and college. She said she had a collection of various items of similar style. We also discussed old needlework tools, and a zillion other things. I was totally surprised at the goodie box I received. And overwhelmingly grateful as well.
First, there was a splendid backgammon board. The one I bought in the summer of 1974 is the smaller of the two. It was the least expensive in the shop, and even so being on a student budget, I bargained for it for the better part of week.
The larger, more ornate and resplendent one is from Sytske. Both are obviously of the same regional and iconic style, very common and extremely popular throughout the whole Middle East region.


The workmanship on Sytske’s board is far more elaborate, with finer inlaid decorations on every surface. Even top edges inside the box and the pieces are embellished. Mine is heavier and thicker, with fewer colors and less detail, and my pieces are plain olive wood rounds.
Now for holiday gatherings, should the yen to play strike us, we can run two games at once. And I think I’ll take some good furniture oil to mine. It’s looking a bit dry and upstaged by the new magnificence.
Wrapped inside the game was a mystery bundle. I unwrapped it carefully and found an entire collection of antique needlework tools!
First there were several bone crochet hooks, three long enough for Tunisian crochet. The tiny hook at the end, even though it’s extremely fine (think crocheting hand-sewing thread fine), I do believe is for crochet and not tambour embroidery because its point is quit rounded.
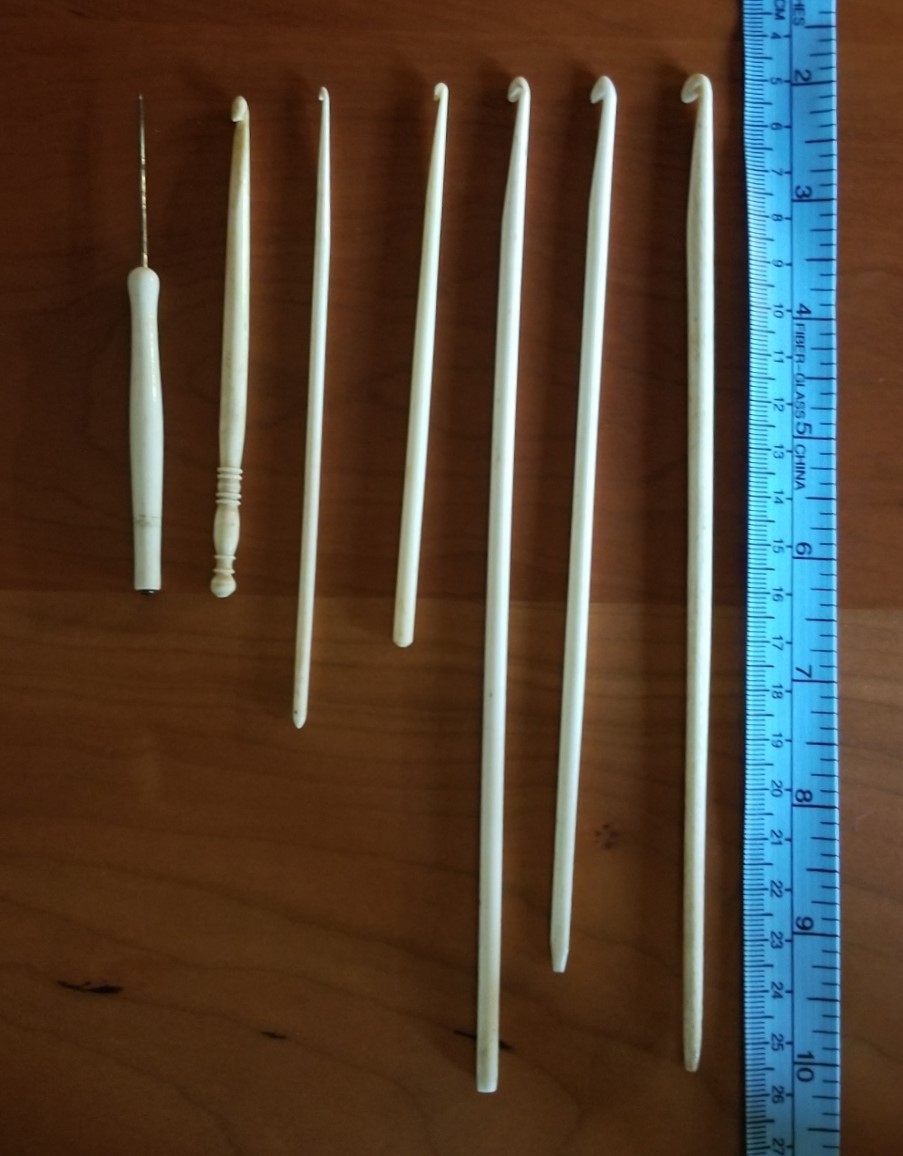
In addition to hooks, I now have a collection of small needlework assist tools. From the top, a laying tool that by its graduated thickness might also do double duty for enlarging lacing holes or forming thread circles to over-crochet; another smaller laying tool; one with a hole in the end that might have had a secondary use as a bodkin to assist in passing a drawstring cord through its casing; and two laying tools/sewing awls with metal points. Below the measuring tape are two other items – a flat “needle” that could also be used as a bodkin for a round or flat tape, but that is going to become my naalbinding needle; and a sweet little bone needle case, probably from the late 1920s/1930s. It’s the only item I can date, and I do so by its Art Deco shape and proportions. It still has a couple of well worn long plain sewing needles in it.

I’m not done yet. There is more! This is a collection of handles that were probably for tambour embroidery needles (aka aari) or for thread crochet hooks. These are truly impressive because (at least here in the US) they are rather uncommon. A couple of the metal ones may be silver, but they are too small for hallmarks or stamps.
The ones above the measuring tape all have little screw-on ends, hiding a storage compartment where the hooks or needles would have been kept. The top one – the white agate also has a screw-on stone finial protecting the attachment’s “business end”. The ones below the measuring tape do not have a storage compartment. The tiny clamp keys on all of them except the red agate one are still functional and turn easily. I need to fetch out my modern tambour hook set and see if I can use the points in any of these.

One other observation – a couple of these antique implements may in fact be ivory and not bone. There is a marked difference in weight and texture in some of them. For example, the dotted tambour holder, the most ornate of the crochet hooks, the largest laying tool and the laying tool with the hole in the end are all much heavier and finer textured by comparison than other items of similar size. If they are ivory, they would be subject to restrictions in sale without firm documentation proving their age. Which is for me at least a moot consideration, since I do not plan on parting with any of these.
Color me gobsmacked. And grateful. Thank you again Sytske! I am totally thrilled to take on duties as curator of this awesome collection!
MESHY DONE, PLUS KITTING OUT THE FRAME
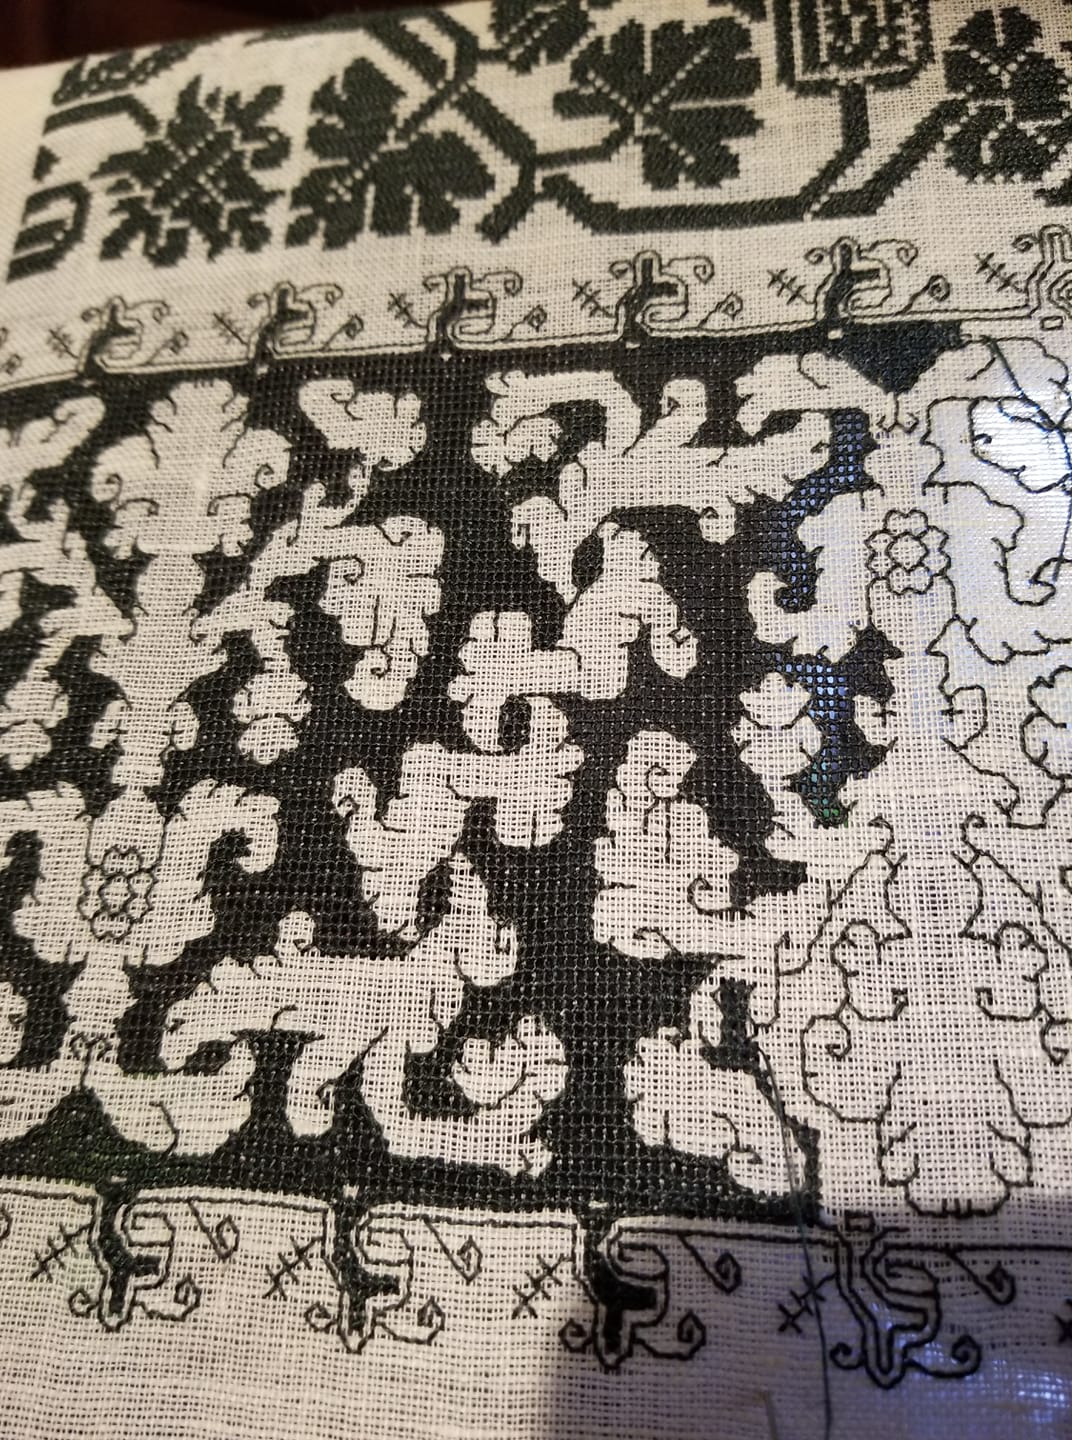
Yaay! A bit of self discipline imposed, and the forever voiding on the meshy lettuce pattern panel is complete. I have to admit that while I adore the look, I am not wildly fond of the hard-pulling needed to achieve it. I might try it again if I ever find a linen that’s the right combo of threads-per-inch plus nice soft and lofty constituent threads, instead of skinny hard-spun ones.

How does this strip fit into the growing project? After all – it has been about 8 years since we’ve seen the whole thing laid out. For the record, I’ve filled about 45% of the available real estate – there’s a lot more to go.

Now for the next. I don’t think I’ve play-tested these dolphins before (another design in the ever-forthcoming T2CM). The original showed them with a squared fill background in voided style, but I wanted something lighter to follow the dark band I just finished. I left off the voiding, but then decided that the bit looked rather spare. My dolphins needed something to play with, so I added the round elements, and am now pleased. A quickie, this bit took just Saturday and Sunday evenings:
I will add the roundels to the dolphin at right of center, but I left it off so you can see the rather unfinished look it had without something there.
After this one? Probably another narrow strip, possibly a bit wider than this one, and possibly darker for contrast. Then after that I have a double running stunner queued, but it’s rather wide and needs a bit more spacer ground between it and the giant meshy lettuce panel.
In the mean time, as I get up close and personal with the frame I am making little improvements to my set-up. For example, the jaw of the Lowery is steel, and well loved by magnets. But it’s not exactly accessible with the large frame extender unit. BUT when I flip the thing over to terminate a thread, it is. Add a strong classic U-shaped magnet, and I’ve got a handy place to park my snips (the red magnet is just behind the red snipper).

My needle minder works quite well, and sometimes I use it to park my threader. It often does double-duty as a holder for my pattern page. But that can get in the way of the stitching area. So I glued a magnet to the flat side of one of my Millennium frame scroll bars – on the flat side (yes, I tested it to make sure the correct side was up – that’s the one that attracts rather than repels the other magnetic goodies I wanted to use):
I can use this as a rather plain needle minder all by itself, or I can park my fancy one there instead of in the hidden spot where you see it now. Or I can use another magnet with it to hold my pattern page. But best of all, I can use it in conjunction with this page holder I picked up years ago (it used to stick on my fridge door, to hold tickets, recipes, coupons, or whatever).


By just gluing on a magnet, I’ve left the door open for all sorts of other magnet-enabled organizers. There are other styles of clips. Hooks and loops with magnetic bases could accommodate scissors, for example. Finally, I’m still looking for it to test out, but because the rare-earth magnet I used is so strong, I’m betting it can hold my smaller flat metal magnet board. That would allow me to use placeholder magnets on my pattern page while the page is displayed right on my work area.
And where to find inexpensive strong-hold magnets? I recommend the geeky source, American Science & Surplus. They are a clearing house for engineering tidbits, science gear, weird surplus items, kids’ educational toys, and other miscellanea. They are especially good for containers, magnifiers, bags, precision scales and measurers, cutting implements, office supplies, and magnets. Like any surplus store, their inventory turns over quickly, so if you don’t see what you want there today, visit again next week.
REACTIVATION AND SPOILING
I admit it. I was horribly spoiled this holiday past.
My family has fitted me out with all sorts of stitching goodies for the new year. There were silk threads and linen grounds from my mom and the Elder Offspring – enough to keep me going for quite a while. In addition, The Resident Male drew inspiration from a recent Facebook post (plus the general state of the stitching supply midden next to my favorite chair), and gave me a mercer’s chest from Sajou in which to store my embroidery supplies and tools. A princely gift. And yes. It’s already full.
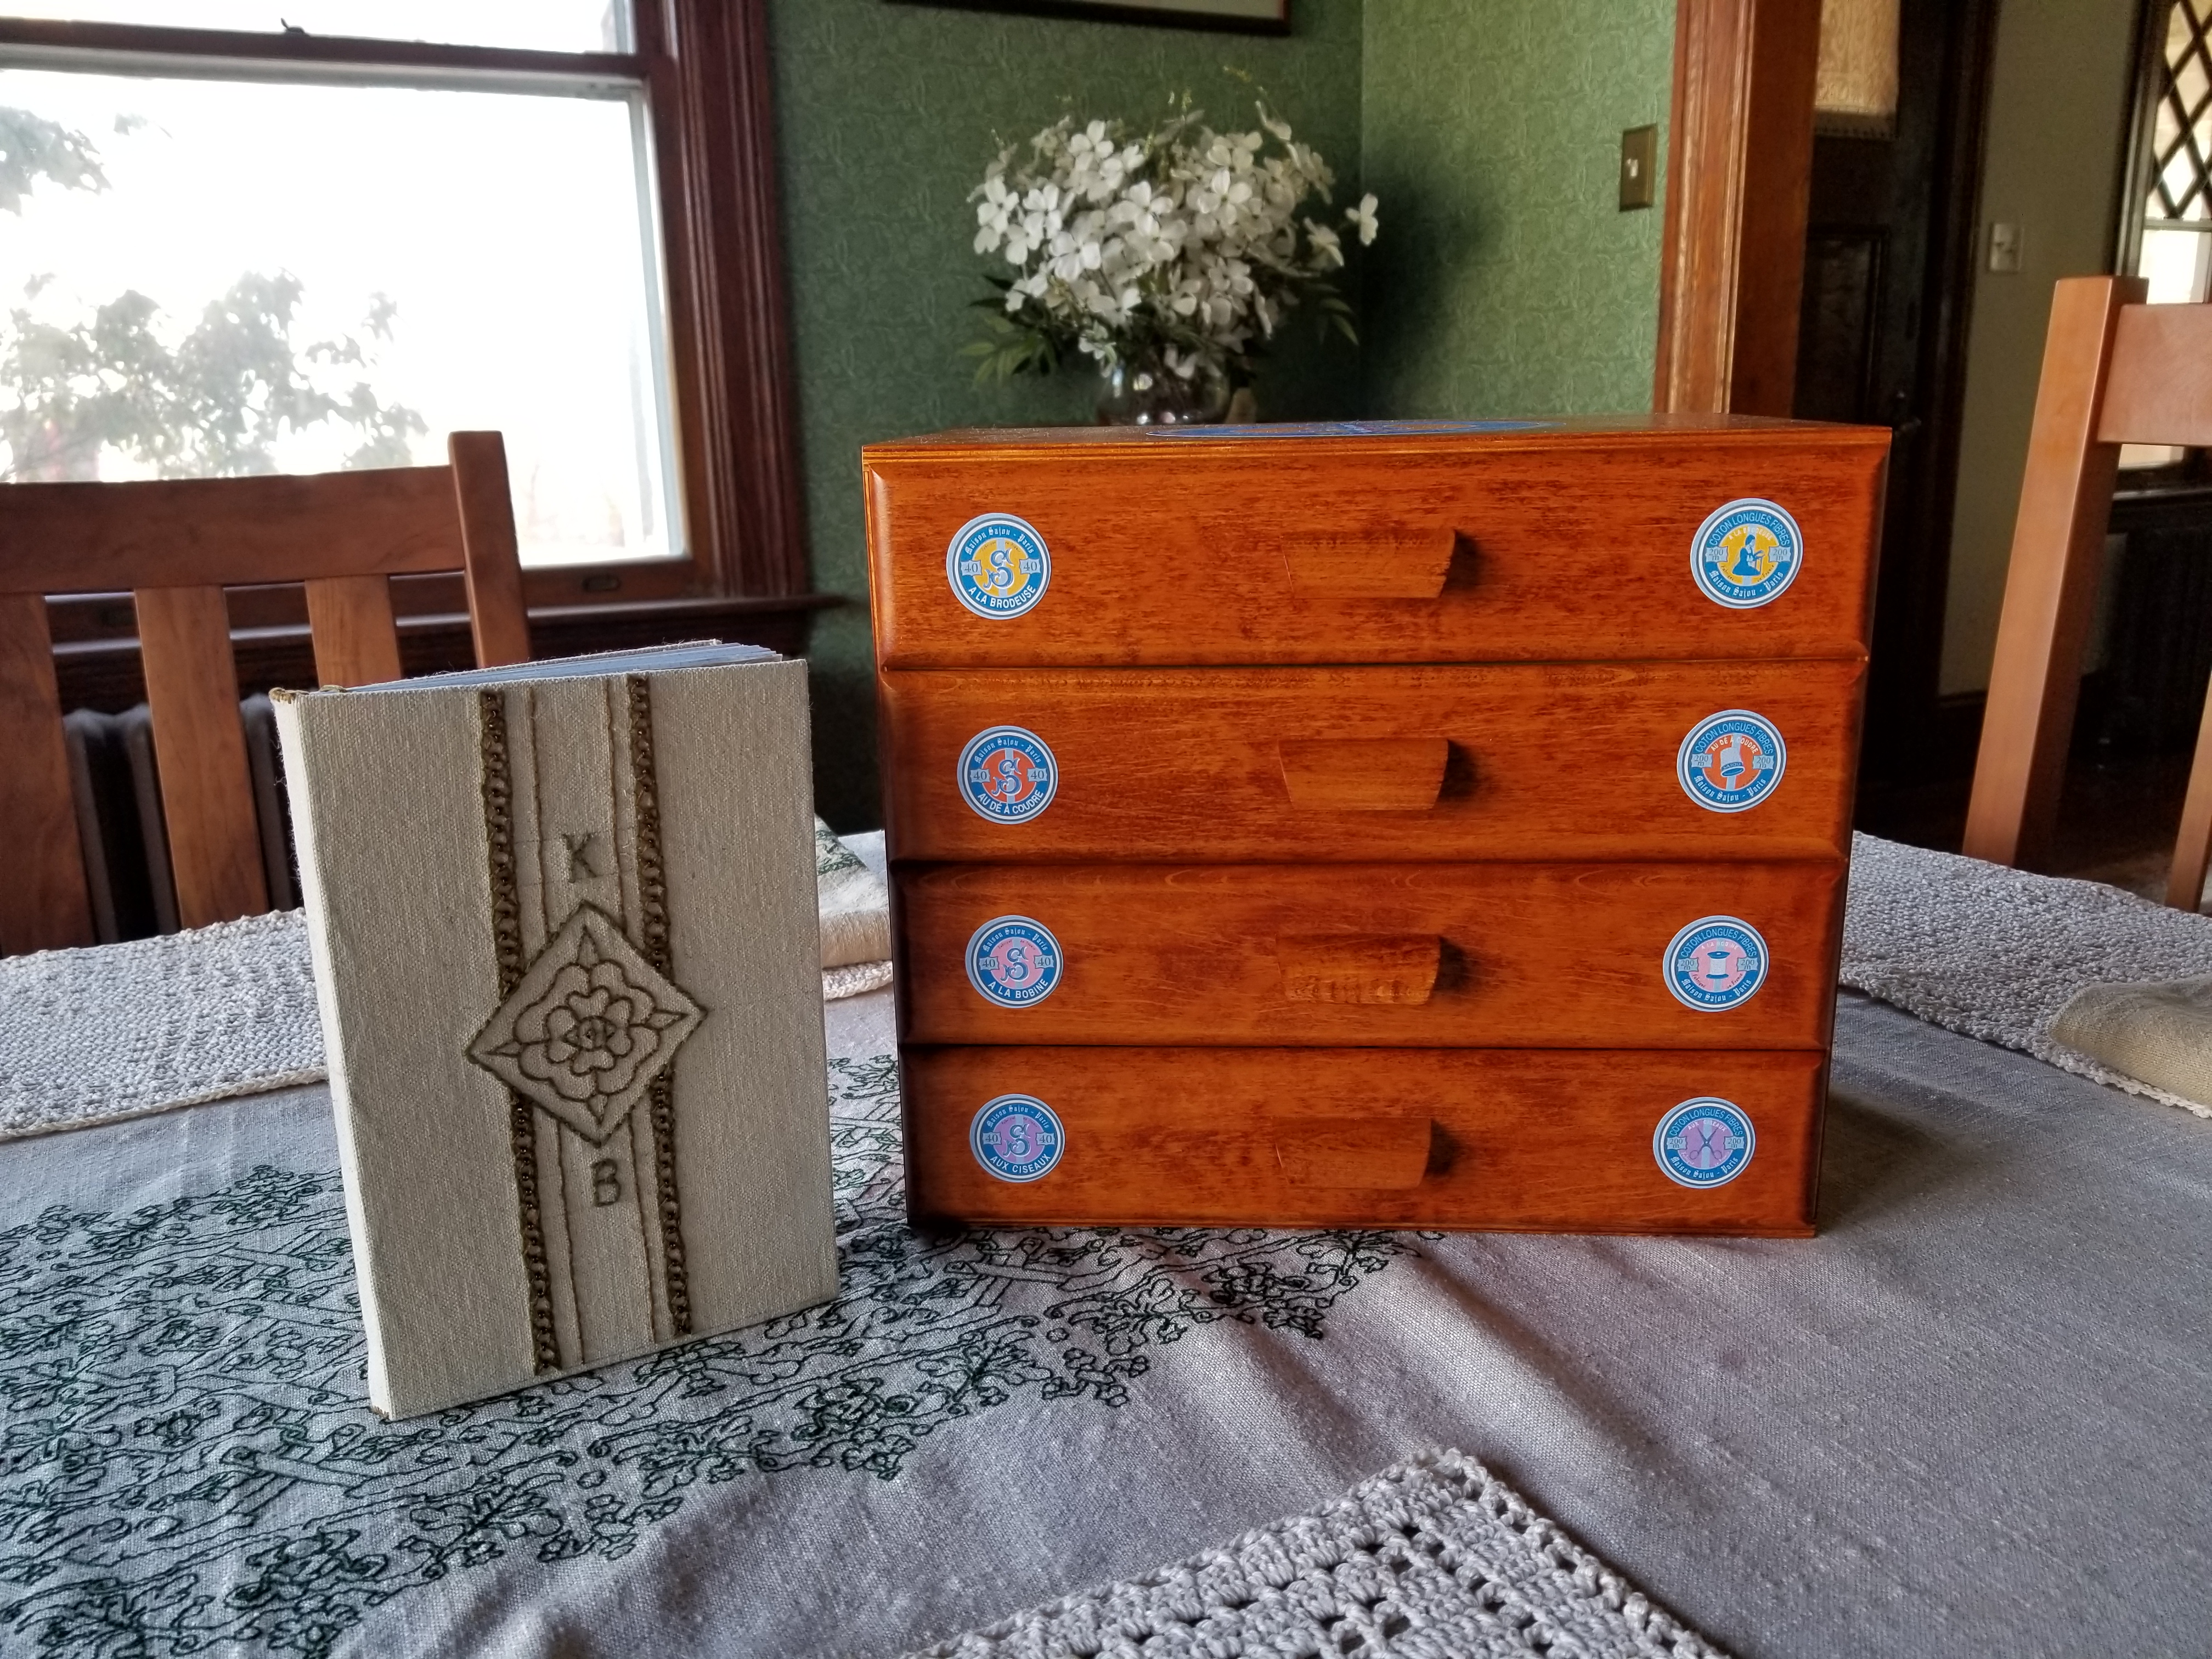
Younger Offspring hand crafted me a Special Object. That book next to the chest – assembled and bound, with an embroidered and beaded cover all of their own devising, it’s full of graph paper pages – perfect for stitch design and doodling. I think my family knows me very, very well.
During the supply sort and consolidation to populate my new tiny chest, I stumbled across the thread I had been using for my Long Green Sampler. That’s a project from about six years ago. I was working on it just before we departed for our expat stay in India. I brought it with me but had no well lit comfortable place in which to work on it, so it languished. I poked at it a couple of times in the years since, but I hadn’t set it up for reactivation. I remounted it and set in again yesterday evening.

No, that’s not a real cat. I would love to have one, but I am very allergic to them. It’s a stuffed toy, liberated from the Spawns’ menagerie. It usually does duty as a very conveniently sized elbow rest, but here he’s blocking sun glare. He can be both obliging and versatile, although (sadly) not very affectionate.
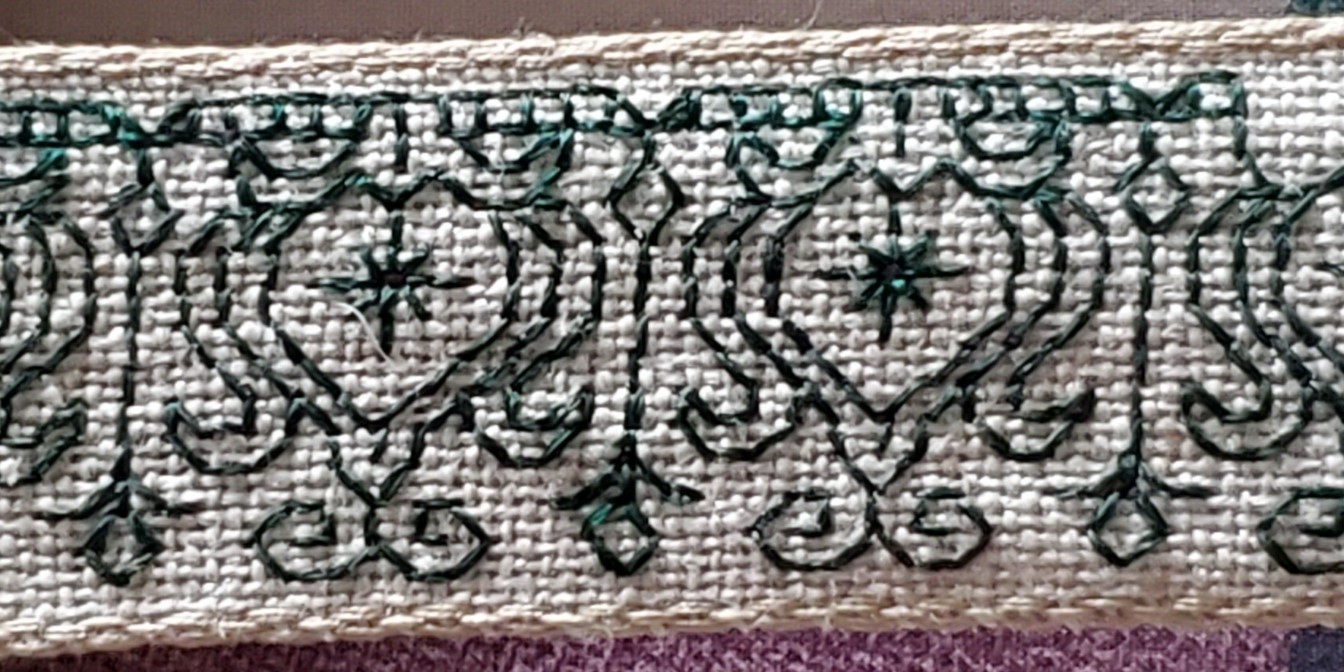
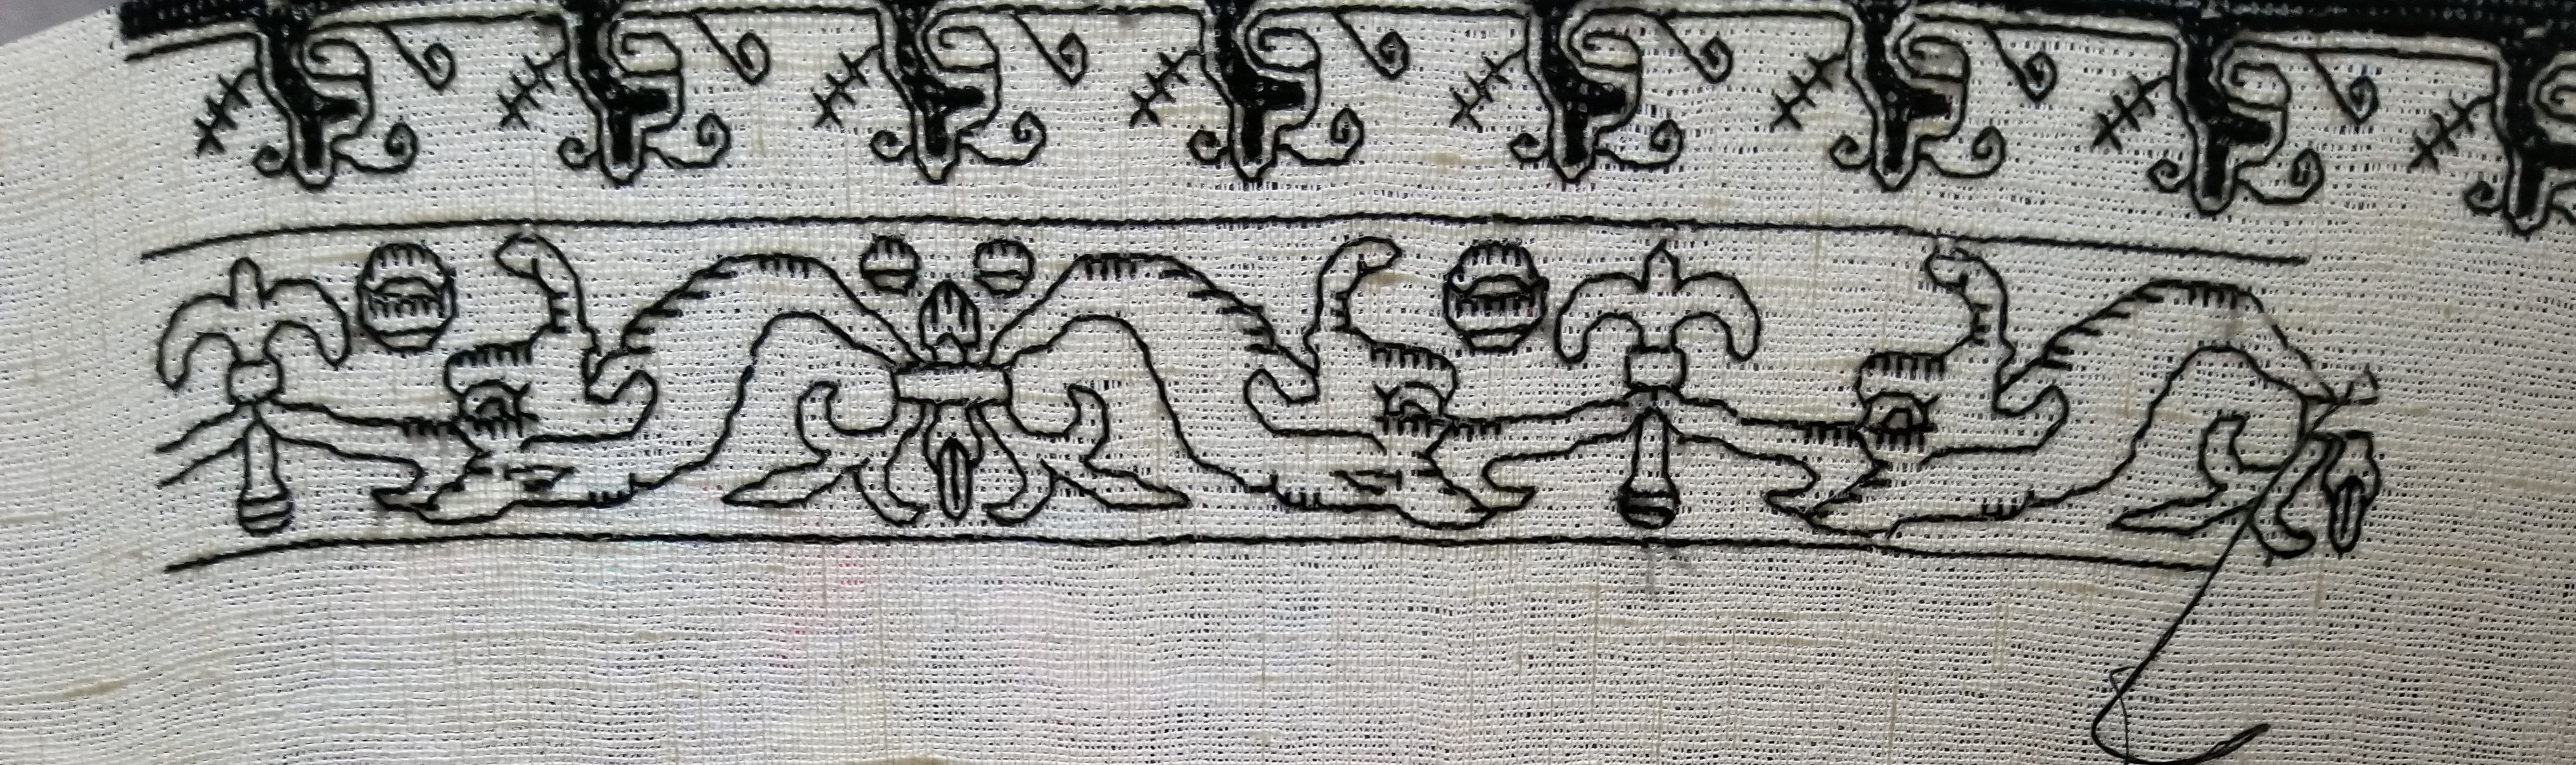
To reprise, Long Green is a long strip sampler, done in Au Ver a Soie’s Soie d’Alger, in color #1846 on 40 count linen (20 stitches per inch). I am picking my strip patterns on the fly, mostly from my ever forthcoming book, The Second Carolingian Modelbook. This particular strip features my attempt at the tightly pulled and totally overstitched meshy background found on so many historical artifacts worked in the voided style. The design is one that appears in museum collections, and that exists in several clearly related versions. I’ve nicknamed this one “The Lettuce Pattern” for obvious reasons.
My redaction with its curious Y-spring companion edging is largely based on this version in the Boston Museum of Fine Arts collection, Accession 99.176:

The date attribution has wandered forward a bit over the years, but is now listed as probably 17th century, possibly being of Spanish or Sicilian origin. Here is another example of Lettuce, also from the MFA, now cited as being Spanish and 17th century, Accession 95.1116 :

Although this one shows quite a bit more in-motif detail than the one above, it is still clearly a closely related pattern, and not a slice off the same original artifact. Both of these have meshy grounds, worked by tightly stitching and displacing the warp and weft, bundling them tightly together – NOT by cutting and withdrawing threads, then stitching over the remaining scaffolding. That’s another technique but distinctly different from the one employed here.
Here’s another example of the Lettuce family. This one features a simple boxed ground (no drawn meshy work here). The original is in the Brussels Museum of Art and History, Accession 20048516. The description cites it as being stitched in red silk, and dates it to the 1500s, but does not include a geographical provenance.

The Brussels example has another special spot in my heart. You can’t see more than a sliver from my clip, but it pairs Lettuce up with another favorite design, proving them to be contemporaries.
As you can see from the photos of my green piece, I’m about half-way done with this band. Here are the others above it, a photo montage shot and composed by fellow India Expat, artist, and friend Tamar Alsberg. I’m a bit greyer now, but so are we all in these salon-challenged days.
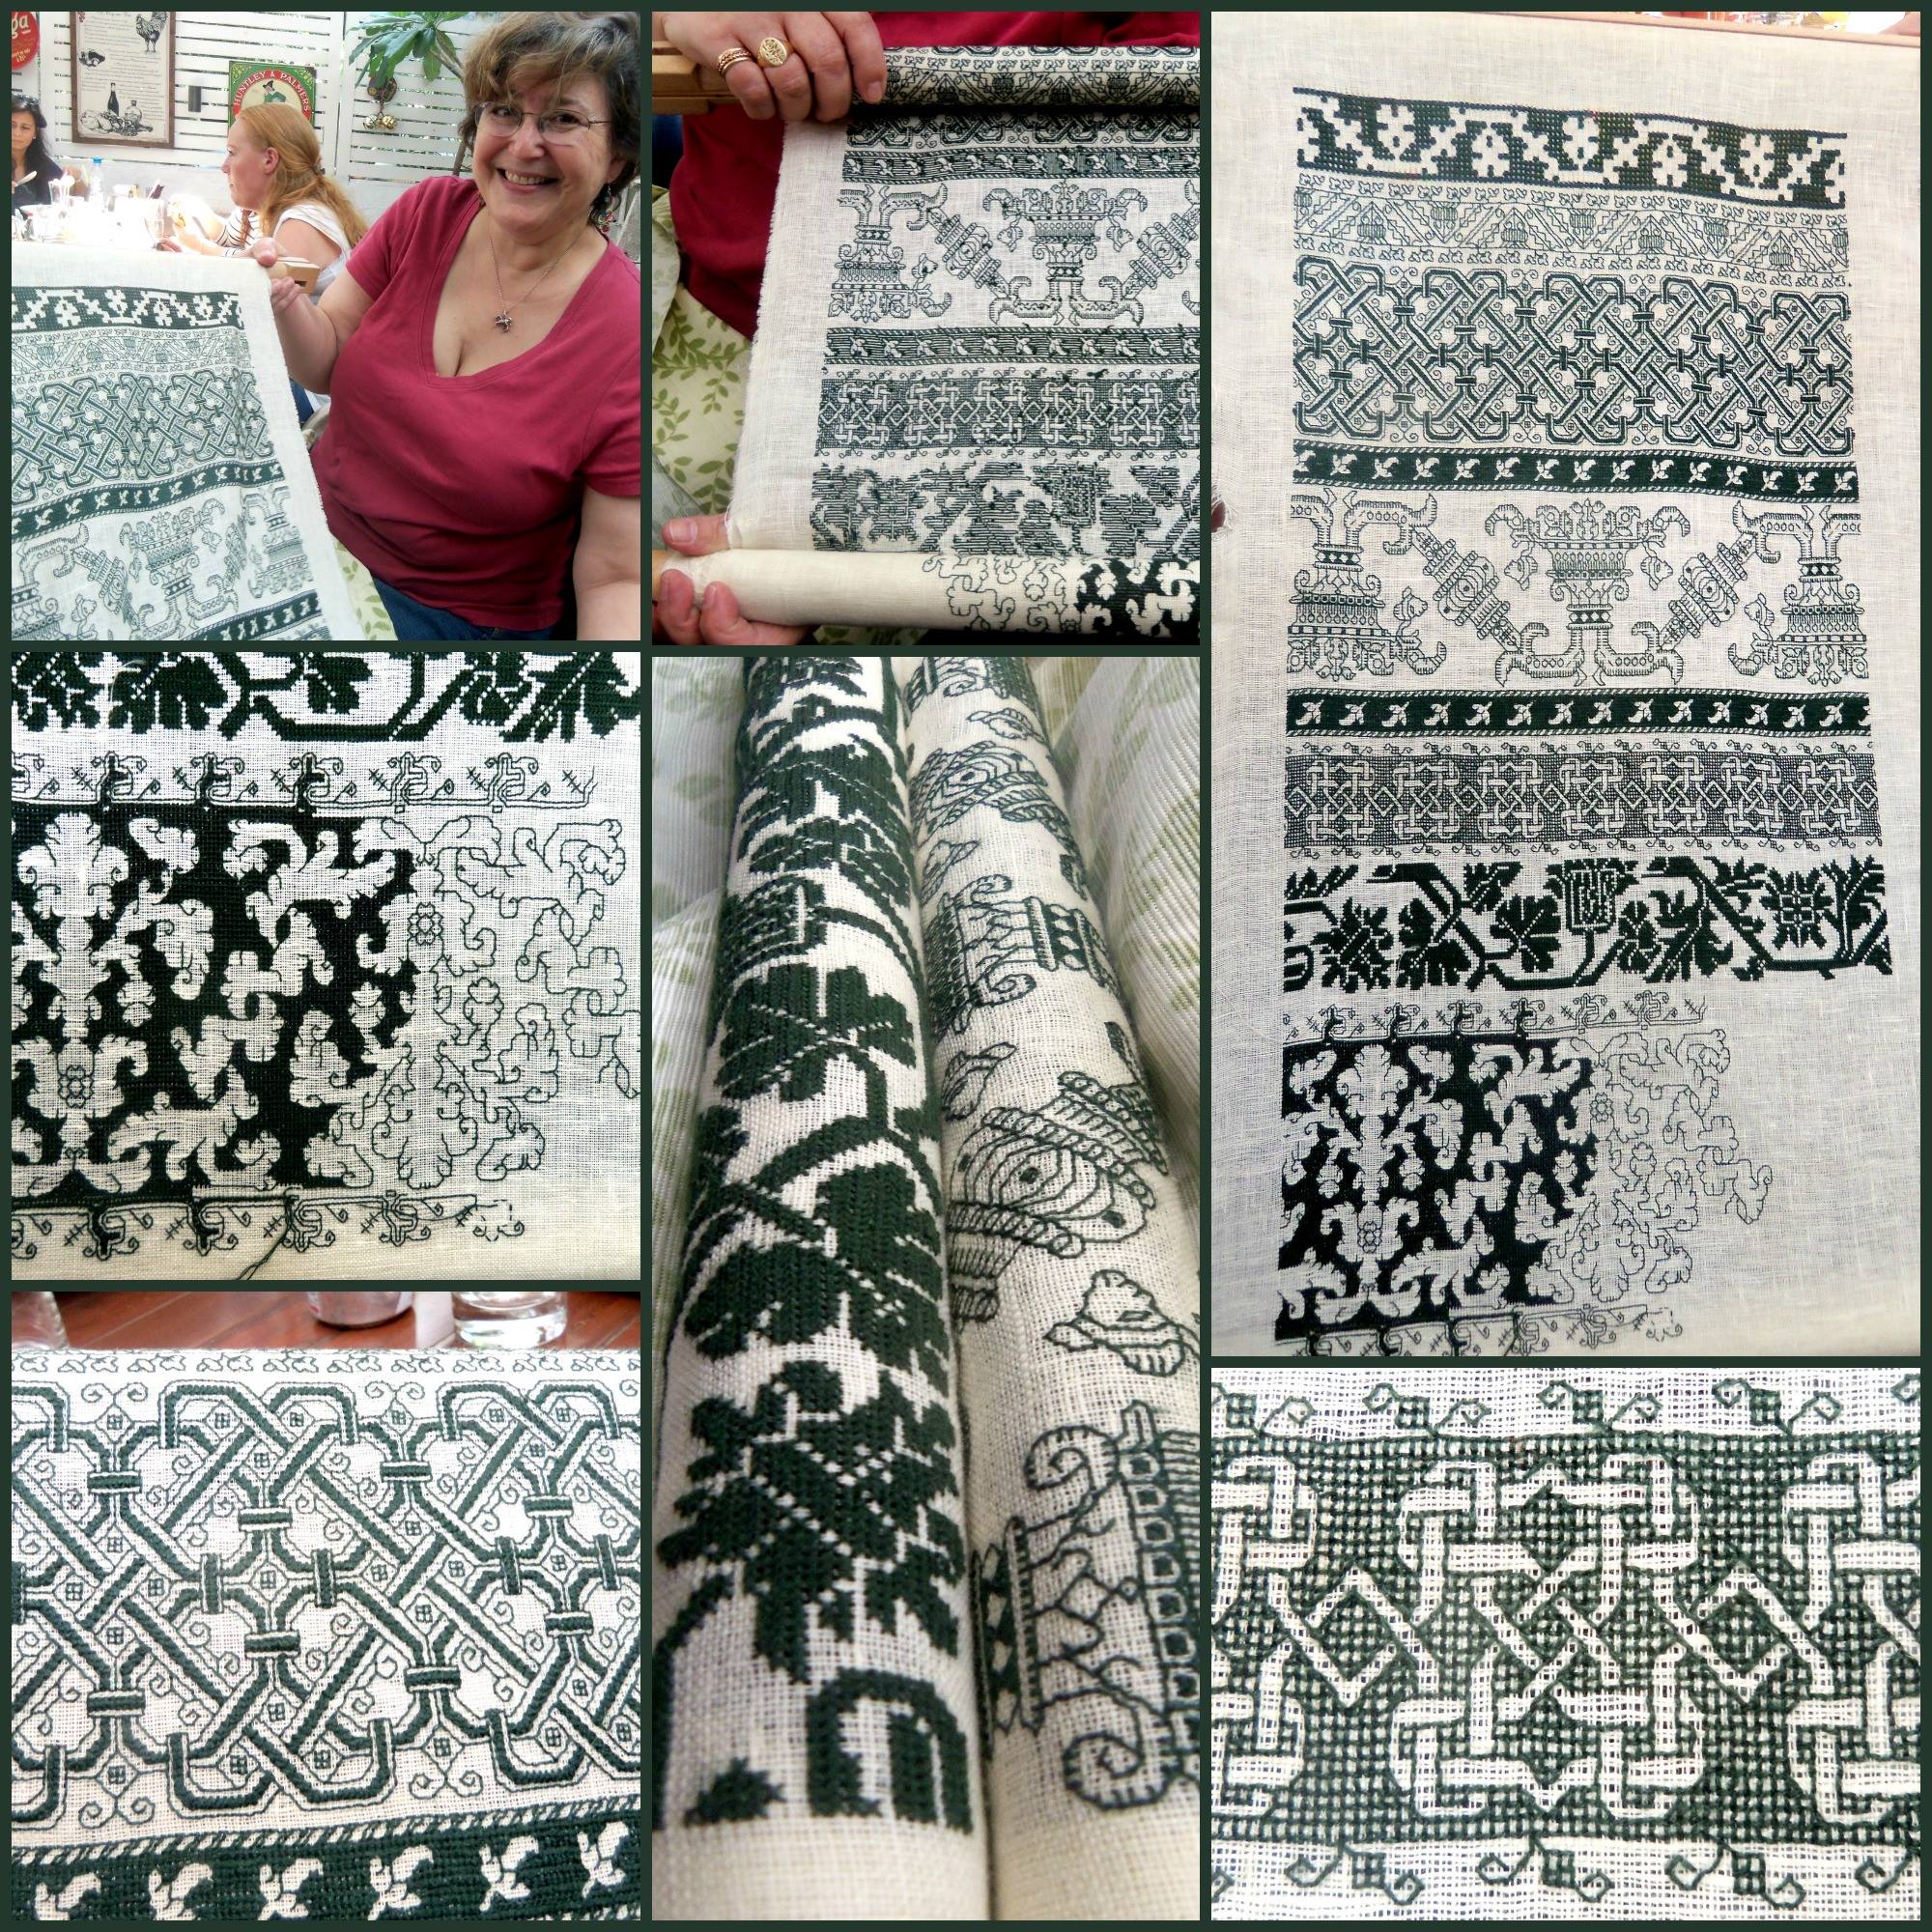
Some highlights – bit of braiding in the lower left was a ton of fun – the solid stripes are done in Montenegrin Stitch, and the bit between my hands in the center top – that’s the back. Double running rules!
If you still want more info on these individual bands, you can call up the whole project (in reverse chronological order) here.
