DRAGONFLY MITTENS – FINISHED PATTERN
UPDATE: THIS PATTERN IS NOW AVAILABLE AS AN EASY TO PRINT PDF, AT THE KNITTING PATTERNS LINK, ABOVE.
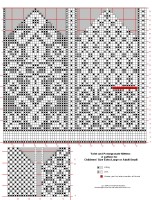
My mis-matched mittens are done. Today I present pix plus a write-up and more reliable graphs. I changed the placement of the decreases on the graph. They’re now shown along the side strips rather than on the triangle that forms the mitten top. This eliminates any confusion caused by the double // notation inherited from the original inspiring mitten blank. I’ve also fixed the pattern alignment on them so that they integrate better with their palms and graphed my thumbs out to be a stitch wider than the hole provided for it in the mitten body. I found that I needed to pick up a stitch at the left and right corners of the slit formed when the provisional stitches were removed. If I didn’t do that, I ended up with a hole at either side of the base of my thumb.
First, proof that the mittens are done, courtesy of overly dramatic Smaller Daughter (code name Sarah Heartburn).
She does have very large hands and feet for an 8-year old, a sign that she’ll probably inherit my family’s height (at 5’8″ I’m the shortest female in my immediate family). But the mittens are a bit large on her. I’d call them kids’ extra-large, or teen/small woman size.
Dragonfly/Pomegranate and Knot Mittens
a knitting pattern,
(c) 2007, Kim Brody Salazar, http://www.wiseneedle.com
Materials:
Approximately 1.5 ounces total of lofty Shetland style sport weight yarn, with a native stockinette gauge of about 6 stitches per inch. (This will be knit down to a much tighter gauge to make a warmer mitten). Four colors were used:
- Color A: About 50% of the total – Navy blue
- Color B: About 35% of the total – Light green
- Color C: About 10% of the total – Cranberry
- Color D: About 5% of the total – Light blue.
Size 3.25mm double pointed needles (Two circs or one-circ “magic loop” methods can be substituted). DPNs highly recommended for the thumb.
Scrap of contrasting color yarn or string for thumb “place holder”
Gauge:
8 stitches = 1 inch
Finished measurements:
Mittens measure approximately 4″ across the palm and 9″ from tip to cuff
Instructions:
Using the predominant color and a tubular cast-on, cast on 64 stitches. Work in two-color K1 P1 corrugated ribbing for 2 inches, using Color A for the purl columns and Color C for the knit stitches. Using Color A, knit one row and then purl one row. Using Color D, knit four rows. Using Color A, knit one row and then purl one row.
Using the chart of your choice (below) for stranded knitting, work as shown. The creative will note that given four different and interchangeable mitten sides, any combo thereof would make perfectly suitable mittens – all four as presented needn’t be used. Regardless of the mitten graph chosen, introduce a small bit of waste yarn or string for the stitches indicated in red. Make sure that you mirror that placement for your left and right mittens, as shown in my charts. Alert: On the pomegranate and knot mitten chart, I call for decreases done in Color A. I’ve introduced a separate symbol for those decreases. It’s noted on the chart. End off the mitten at the top by grafting together the last 8 stitches.
Thumb:
Returning to the waste yarn introduced for the thumb, carefully remove it, slipping the live stitches above and below the newly formed slit onto DPNs. Using a third DPN start at the side of the thumb to the right of the newly created hole. Looking at the thumb chart for the visible side of the thumb (the one with the pattern that matches the palm), pick up one stitch in the right side of the newly created thumb slit. Do this in the color indicated for the first stitch of the thumb chart. Note that the thumb pattern should seamlessly integrate with the palm pattern, although each of these mittens does that in a different way. Work across row 1 of the visible side thumb chart. Switch to the inside-the-thumb chart (the one with single stitch checks), again starting with the first charted stitch, pick up one stitch in the side of the thumb slit prior to working across the rest of the thumb chart. Follow chart as shown, grafting the final stitches at the tip of the thumb. Darn in all ends.
AND WHEN IS A PAIR NOT A PAIR?
When they only sort-of match. Kind of.
Here are my 1.4 mittens. As you can see, they’re very quick. Even faster to do than socks. Now I can see how girls of long ago had the goal of knitting an absurdly large number of mittens to stow away in their hope chests against the needs of their future family. At my almost half a mitten a night rate (in about 1.5 hours of knitting time), I could do a pair a week and still have time left over for other knitting.
Too much fun, especially since I have no hope chest deadline. I think I’ll have to do another pair for me. Another chance to graph, and to do so on a larger field (at least 35×69 boxes to the mitten tip, instead of 28×61, perhaps a few more). Now, what to put on mine… Sprites from old computer games? Cute, but hardly original at this point. Words? I would have to find some pithy piece I could endure reading day after day. Some other graphed pattern from my book? Perhaps the bunny I shared here before? Something from my out-take notes – the patterns that weren’t documented well enough to make it into the book, or proved out to be from after 1600? Perhaps. Some doodle with no prior precedent? Also not unlikely. One caveat though, I may be delayed in my start on my sequel mittens. I’ve gotten a begging/pleading/groveling request for another Klein Bottle hat.
Two quick cheats – Got a mitten or other strong left/right directional chart on your computer and want a quick and foolproof way to swap that left/right thumb placement without sitting down and taking the two tedious minutes to transcribe it on the hard copy? Most printer drivers in both the Windows and Macintosh worlds have a “print mirror image” setting buried way down on their Advanced Features page, accessible off the printer set-up or print controls dialog page. Use that to print a new copy of your graph. Instant left/right swap.
Or if your printer driver doesn’t have that setting, get a sheet of clear viewgraph transparency plastic that’s meant to go through your printer (the stuff that’s used on overhead projectors). Print on that. Put the result in a page protector with a sheet of white paper behind it. When time comes to do that second mitten, flip it over. Overhead transparencies are becoming rare in this day of cheap full screen projectors, but many teachers still use them and they’re still in the office supply stores.
EVEN MORE MITTENS
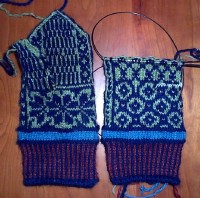
This Norwegian mitten thing is entirely too addictive to stop. And who says that lefts and rights have to be identical? I’m just about done with the body of Mitten #1, and am about to start the thumb.
My mittens are about 8 inches around, and 9 inches from the bottom of the cuff to the tip of the fingers. My gauge is approximately 8 stitches and 9 rows per inch. I can wear them – just barely. They’re a bit tight. I’ll probably give this pair to someone with slightly smaller paws – probably to someone who wears a women’s size medium glove. If I were knitting another pair for myself, I’d graph up something that has about eight stitches wider around total, and about six rows longer.
It’s been a long time since I’ve doodled with colorwork or embroidery charts, and I’m having too much fun to stop. Therefore, Mitten #2 will use the same yarns, have the same red and blue corrugated ribbing and light blue racing stripe as Mitten #1, but the upper green and blue patterned part will be different:
Again, totally untested and untried. The motifs on #2 are inspired by (but not directly taken from) the group of 16th century charted designs in The New Carolingian Modelbook. Cautions are therefore given against using this chart before I make a final version.
One observation on the mitten template provided by Hello Yarn: it appears to use \ to mean one ssk decrease or // to mean one k2tog – not two. I’m not sure if I’ll use the same notation in my final chart because it’s confusing.
Finally, on the Modelbook – I’m thinking of investigating coming out with a new edition via one of the self-publishing/publish on demand services. The book divides evenly into square unit graphed patterns useful for knitting, crochet, and embroidery, and line unit patterns, mostly of use to stitchers but not knitters. I have a feeling there is far more demand for the former than the latter, and am considering issuing the two parts separately. Any feedback on this idea?
DRAGONFLY MITTENS
I have absolutely no idea if the pattern I just doodled up (shown below) is going to work.
I made some blind and totally unswatched assumptions about gauge, took inspiration (but not stitch counts) from the Hello Yarn generic Norwegian Mitten template, and ran with it. I’ve used my dragonfly pattern posted here before, plus idle chicken scratches.
I suppose the next step is to see if I can get about 7.5 spi, figure out which colors I want to use, and try to knit this totally untested pattern.
Heck. Risk can be fun if taken in small doses.
UPDATE: Please don’t try knitting from this graph yet. The JPG filter appears to have cut off a column of stitches (there are 64, not 63 on the cast-on row). I’ll repost a final, corrected graph when I’m further into the project. For the time being, I can report that gauge is working out o.k. for the corrugated two-tone ribbing (two inches, done before row 1 of the chart), using my lofty ancient Britania Shetland on 2.5mm needles. Dense pack, but good for a nice, wind-proof and cushy mitten.
Note that the two-tone ribbing curls up a bit. That’s normal. Corrugated ribbing is not as curl-proof as regular K1, P1 ribbing.


