UPDATE: THE ENTIRE CONTENT OF THIS EXTREMELY LONG WEEK-BY WEEK ACCUMULATION IS NOW AVAILABLE FOR DOWNLOAD AS A SINGLE FREE PDF DOCUMENT.
PLEASE CLICK HERE,
OR VISIT THE MY BOOKS PAGE HERE ON STRING-OR NOTHING.
Epic Fandom Blackwork Sampler
Intro, Part 1
It’s here at last. To help tame the excitement, here are some details to help you get ready.
First, after the intro material the individual bands of this project will debut in The Enablers group on Facebook, and be echoed here on two-week delay.
The total stitched area for all 19 bands together is 134 x 449 stitches including narrow buffers between the bands, but the pattern will be released band by band over a period of many weeks. If you want to do just some of the bands or all of them, that’s up to you. Make sure to leave space for framing, a 2-3 inch margin around the edges is recommended both for ease of stitching and for later mounting. I suggest you use a fabric calculator to determine the size of the piece you will need based on your chosen fabric type and its count, like this one.
Thread requirements: The options are limitless here and we cannot wait to see your creativity come to life! You can choose to work the entire SAL in one color, start to finish; pick one color per band; work each band in multiple colors to highlight interesting elements; or bravely use variegated thread. There are even bands that can be done with a voided background if you so choose. Voiding is optional, and we’ll explain this in more detail when we get to those areas. Just be warned that voiding eats thread, and you may want to pick a different, perhaps lighter color for the voiding (the background fill) than you use for the straight stitch outlines. Since fabric size will change your total thread usage, here are very rough estimates for the amount of standard yardage 6-strand embroidery floss needed based on fabric counts. Please note that this assumes the use of just ONE color for the WHOLE 19-band project, in back stitch WITHOUT voiding. Use of double running stitch, or more (or fewer) plies will also change your consumption. Note that if you are planning on using a hard-to-get thread please plan on having leftovers by buying at the top end of the estimate. We do not want to see anyone run out and be unable to complete:
- 11 Count Aida (2 plies) – uses at least 21.5 skeins, suggested purchase 22-26
- 14 Count Aida (2 plies) – uses at least 17 skeins, suggested purchase 18-21
- 16 Count Aida (1 ply) – uses at least 14.75 skeins, suggested purchase 15-19
- 18 Count Aida (1 ply) – uses at least 13.25 skeins, suggested purchase 14-16
- 20 Count Aida (1 ply) – uses at least 12 skeins, suggested purchase 12-15
- 22 Count Hardanger (1 ply) – uses at least 10.75 skeins, suggested purchase 11-14
- 28 Count Evenweave (1 ply) – uses at least 8.75 skeins, suggested purchase 9-12
- 32 Count Evenweave (1 ply) – uses at least 7.75 skeins, suggested purchase 8-11
A caveat on the numbers above – they are based on the beta testers consumption, but those figures varied widely. I HOPE they are accurate but cannot swear to to-the-inch veracity. People do stitch differently, bridging areas, using multiple colors or otherwise doing things that introduce variation in the amount of thread they use. Please forgive me if we miss the exact mark, but these estimates should be in the ballpark. And having leftover thread is just the seed of the next project, right? 😊
Schedule: The first band of this beast, the Giant Robot and Kaiju strip, will be released on Tuesday, 3 August on The Enablers forum. It will be echoed here on Tuesday 17 August. The remaining bands will follow over the ensuing months, with the project proceeding well into 2022. Because some of the strips are wider or more complex than others, we will schedule for four weeks to complete them, and tighten up a bit on the less complex, narrower strips, slotting them in for two weeks.
More on this including a roster of all the bands and the counts for each tomorrow. I leave you with a preview of the goodies to come.

Epic Fandom Blackwork Sampler
Intro Part 2
We inch up on the release of the first band here, which will be on 17 August, two weeks after its debut on The Enablers group on Facebook. Here is more background and information that may come in handy as you prepare.
Color Recommendations:
I’m afraid you are largely on your own here. I am not going to issue a dogmatic proclamation of what colors go where. Possible approaches include:
- All bands done the same color, no voiding on any strips.
- All bands done in the same color, those with voiding with backgrounds worked in a second, lighter color (If you do work the voiding I recommend it being in a second color because there is straight stitch detail that would be lost if the background were done in the same color as the foreground stitching.)
- Each strip worked in a different color, but only one color used per strip (with or without voiding in a second color).
- Limited color set (colors repeat), or
- 19 different colors (plus optional voiding)
- Each strip worked in multiple colors, picking out the various design elements. For example, working the giant robot in the first one in a different color than the dead dragon-monsters. Again, limited color set, or wild abandon in choice on a strip-by-strip basis.
- Using variegated threads on some or all of the strips (this would require using back stitch rather than double running, to best present color gradations).
Go where your inner nerdy heart leads you, and make this your own.
How much thread you will use will depend on what size and stitch count ground you are using, whether you are working the piece in double-running (the most economical), or back stitch. Other factors include the number of colors and their placement, and whether or not you are opting to work one or more of the strips voided. Working that background eats a lot of thread.
Whatever you decide, I suggest you use easily available mass-market threads for most of this project. As lovely as custom-dyed variegated threads are you may not like their effects in the larger, more complex strips, and you might run the risk of not being able to get more of the same dye lot over the course of this adventure if you need additional materials to finish.
Beta Testers’ Thread Consumption Estimates:
Here is the list of all bands, with their widths and heights and some notes on thread consumption for each, courtesy of our intrepid beta stitchers, who plunged in and kept notes as they went along. We don’t have complete thread use info, but maybe this little bit will be helpful. Note that the counts below DO NOT include the two unstitched rows between each band that I recommend, and that are factored into the whole-project height count of 449 units. Unless otherwise stated, consumption below is for one ply of standard 6 ply embroidery floss, worked in back stitch. This list is subject to update as more data rolls in.
- Band 1 – Kaiju and Giant Robots – 134 x 47 units
18 count Aida – less than 1 yard
28 count evenweave – about 2.5 yards
28 count evenweave in double running, 2 plies – less than 1 yard of green, less than 1 yard of blue, less than 0.5 yards of red - Band 2 – Tulips and Raspberries – 134 x 13 units
18 count Aida – Less than 1 yard
28 count evenweave in double running, 2 plies – about 0.75 yards each of red and light red - Band 3 – Pirates (voided option) – 134 x 20 units
18 count Aida outlines only – about 3 yards (includes lots of frogging)
28 count evenweave – outlines , about 2 yards; voiding about 3.5 yards
28 count evenweave outlines in double running, 2 plies, less than 0.5 yards each of blue and green, less than 0.25 yards of yellow, remnants of red. Voiding not yet completed. - Band 4 – Palm Cluster – 134 x 7 units
28 count evenweave – less than 1 yard
28 count evenweave in double running, 2 plies – about 1 yard of light green, remnants of red - Band 5 – Game Room – 134 x 28 units
18 count Aida – about 3 yards
28 count evenweave in double running, 2 plies – about 1 yard of blue, 0.5 yard of red, and 0.25 each of light green and light blue - Band 6 – Grape Balloons – 134 x 16 units
18 count Aida – about 3 yards
28 count evenweave – about 2 yards
28 count eveweave in double running, 2 plies – about 1.5 yards of light blue and 0.5 yards of light red, plus remnants of red. - Band 7 – So Sue Me! (voided option) – 134 x 30 units
28 count evenweave – outlines, about 3 yards. Voiding in cross stitch 5.25 yards
28 count evenweave, outlines in double running, 2 plies – 1.5 yards of blue, 1 yard of green, and 0.25 yards of red. Voiding not stitched yet. - Band 8 – Snakes. And They’re Plain – 134 x 16 units
28 count evenweave – about 2 yards
28 count evenweave in double running, 2 plies – about 1.5 yards each of light red and light green, plus about 0.75 yards each of light blue and yellow - Band 9 – Invasion! – 134 x 18 units
28 count evenweave – about 2 yards
28 count evenweave in double running, 2 plies – about 1 yard each of red and green, .75 yards of blue, plus remnants of yellow. - Band 10 – Portal to Nowhere – 134 x 17 units
28 count evenweave in double running, 2 plies – about 1.5 yards of light red, about .25 yards of light green. - Band 11 – Where No Stitcher Has Gone Before – 134 x 26 units
28 count evenweave – no data for outlines, about 4 yards for voiding in long arm cross stitch
28 count evenweave in double running, 2 plies for outline, 1 ply for open crosshatch voiding – about 1.25 yards of dark blue, .25 yards each of yellow and red. 2 yards of light green. - Band 12 – Dragon’s Hoard – 134 x 8 units
18 count Aida – less than 1 yard of metallic thread, plus 1 yard of standard floss total (various colors together)
28 count evenweave in double running, plus cross stitch in between the “gems” and their borders, 2 plies for all – .75 yards of yellow, .5 yards of dark red, dark green, and light blue, plus 1 yard of light yellow for the cross stitching. - Band 13 – Where’s My Flying Car? – 134 x 15 units
28 count evenweave – Less than 1 yard
28 count evenweave in double running, 2 plies – about .75 yards of light blue, less than .25 yards of dark blue, dark red, dark green. Remnants of yellow and light red. - Band 14 – Pretzel Twist – 134 x8 units
28 count evenweave – Less than 1 yard - Band 15 – May the Floss Be With You (customizing option) – 134 x 17 units
[no data due to large amount of customization] - Band 16 – Mercy – 134 x 5 units
28 count evenweave – Less than 1 yard - Band 17 – Jurassic Jumble – 134 x 22 units
[no data] - Band 18 – Mutual Support – 134 x 30 units
[no data] - Band 19 – Whovian Nightmare – 134 x 68 units
28 count evenweave – about 4.5 yards
In order to spark your creativity, when we share the individual charts for each band we will also share detail shots of the various beta-tester versions. As I wrote before, I am really looking forward to seeing what folk do with these designs.
Other Materials:
Optional Seed Beads. Band 5- Game Room includes a few dot-type details on the depicted dice. Those can be worked as French knots, or tiny scattered stitches. Beads or very tiny sequins might also be used (you will only need 14). One beta tester used seed beads for the eyes of the snakes in Band 8. Again – this is yet another way you can make the piece your own, and is totally up to you.
Optional Beeswax: I highly recommend having a small lump or two of REAL beeswax (not standard candles or candlewax and not beeswax candles – these often have other ingredients in them), not the “beeswax” sold in honeycomb sheets for rolled candles, and not lip balm with beeswax in it.
I run my threads lightly over it before stitching. Our stitches in this style are very short so the thread’s sheen doesn’t show up very much, and the wax won’t interfere with it. It does make the thread easier to maneuver through the needle’s eye, lets it slide more smoothly through the ground cloth, reduces surface fuzzies and crocking (dye migration onto fingers and cloth), helps defeat differential feed (when you are using two or more plies, and they seem to be eaten at different rates as you work), and enables sharper corners and cleaner lines. I usually keep two small two lumps going at any one time – one for lighter colors and one for darker colors to avoid any possible contamination of the lighter ones by fibers or dye left behind in the wax by the darker ones. One one-ounce bar is more than enough for years of work, even broken into two to use for light/darker threads.
Stitching Set-Up: I also recommend you have a comfy chair, a frame or hoop depending on which is more comfortable and practical for you, a strong light source, sharp scissors and a pair of tweezers (in case you have to pick out mistakes), and a good sense of humor if that does happen. Not a one of us is perfect – the nasty secret is that we all make mistakes. Sometimes we rip back, but sometimes we decide to live with them. There is no race to perfection here, just a shared journey presented to entertain and delight.
On Stitching:
On Charting, Alignment, and Gridding or Basting Guidelines
My charts include an indicated vertical center line (the black triangles), and hash marks all the way around to help you count. Hash marks are 5 stitches apart, with the ones marking 10s being larger. Please note that all but two of these designs mirror or have a repeat point on that center line. (The two that don’t are explained in detail). I did not include horizontal center lines for each strip. Although the actual repeat-count of those strips that do repeat all differ, as stitched on this piece, all bands will be worked to the same width from the center point, and will truncate at our project’s maximum width, regardless of the point in the repeat where that cut-off falls.
Working an alignment grid is entirely up to you. I know some people swear by them. I work without, but I would baste a single vertical center line. That line corresponds with the point marked by a black triangle on all of the project charts. I usually use some light color regular sewing cotton for this – something that won’t mark the fabric or mar the weave. As I work, I snip and tease out bits of my basting line, so that I am never stitching over it. That way I minimize the chance of catching it as I work my design, or having a difficult time removing it after the stitching done.
Outlines
For the most part these are outline-type designs that can be worked mostly in double-running stitch. Back stitch can also be used and is perfectly satisfactory. Some people find it easier to keep their place when using back stitch, and don’t mind the increased thread consumption.
Chain stitch can also be used (one chain stitch per illustrated line segment – a line that continues for three units would be three chain stitches). I do warn that diagonals being longer units than the up/down stitches present as visibly longer in chain, and the line itself is heavier than the other methods. If you chose to work in chain stitch, I recommend using only one ply. The choice is yours.
Please note that I include NO “knights’ move” stitches (1×2 chart units), and NO half or partial stitches. Every unit is intended to be one full stitch, and these designs are entirely composed of straight lines, right angles, and 45-degree angles. Nothing else.
Every strip includes some stitches marked in red at the top or bottom edge (mostly on both). These are orientation/alignment aids – and represent the stitches of the band above or below the current one. They are just there to help you keep your place, and are NOT intended to be stitched as part of the current band being worked.
Voiding
Several of the strips are presented with the option to stitch their backgrounds in voided style (aka “reserva”) – similar in effect to modern Assisi-type work. Those bands have the background areas of their right-hand sides shaded. I have left the left-hand sides of those strips plain as an aid to navigation, but at all instances I do suggest that if voiding is chosen the entire panel be done that way, not just the right-hand half.
To work the voided areas you can use the same method used in modern Assisi – plain old simple cross stitch; or you can work the grounds in any of the methods common in pre-1700s voided pieces. One of the simplest of those is long-armed cross stitch (LACS). Personally, I prefer LACS – the coverage is better, and if the stitcher works alternate rows back and forth, the ground takes on a very appealing, almost plaited appearance.
Any voided areas can be worked in the same color as the foreground outlining, or in another color. I would suggest a second, lighter color because most of the voided panels are complex, and details would be lost if they were done entirely in monochrome.
Please note that voiding need not be worked solid in LACS or plain old cross stitch. It can also be done as a grid of four stitches (think making a box instead of a cross stitch, and covering the ground with what looks like a grid of empty boxes), step-wise (zig zag stair stitches), diagonal or horizontal lines, or a grid worked on the diagonal – lozenge shaped diamonds made of four stitches like the empty grid box, but predicated on diagonals instead of squares. More on various voiding treatments can be found here: https://string-or-nothing.com/2020/01/06/voided-grounds/
Finally, note that if you do choose to work some of the panels with voiding, although I have not used any partial stitches in the patterns themselves, partials are unavoidable if you are working a solid background right up to the established lines of stitching. Diagonals in the design are especially tricky. The historical way to deal with this is either to fudge as best as possible, working partial stitches to eke out the fills where they meet problematic parts of the outline, or to ignore them all together, either stopping the voiding at the last complete background stitch, OR leaving a one-unit halo around ALL established stitching (stitching until there is one blank unit outside the outline, and leaving that unit unworked). Any of these three approaches will work, but I do caution that they look best if they are applied consistently within the same strip. Pick a method that makes you happy and stick with it. At least until the current strip is complete.
Band 15
One band is set up with two customizable areas in it intended to allow you to include your initials and a date, or one or two short mottoes or dedications, or a couple of small motifs – as-supplied, or your own original creations. Or any combo of the above. That band is presented with a page that’s a print-me worksheet complete with alphabets and available-space templates, to allow you to doodle away and personalize your piece.
Copyright and Fair Use
I am sharing this set of charts gratis, through The Enablers Facebook group as part of their Stitch-Along program; and (with a short time delay) on my website. I will be delighted to see these designs pop up all over the craft-i-verse, either alone, in combo with others from this collection, or as part of other works. Please feel free to play with them, adding your own touches, borders, or other embellishments; or use them on non-Stitch-Along projects.
However, please note that I am releasing these for your own PERSONAL use. Please do not republish them. Please do not excerpt/reprint them without my source attribution. Printing out a copy for your own reference is not a problem however, you may not include them in them in other collections, or post the charts or host them on other websites. Finally, please do not include them in designs published for sale, or use them on articles you intend to sell – either for personal profit or charitable sale/donation – without seeking my permission first. You can reach me via http://string-or-nothing.com. Contact info is on the About page. And I’m not draconian – I usually say yes, but I do track these things, and appreciate the courtesy of being asked.
Copious Thanks
Finally, my most sincere thanks to the team that made this possible:
- The Enablers Fearless Leaders: Roz MFer, Kristin Selleck
- Modmin Team: Kelsey Liaw
- Beta Testers: Callie Farr, Danielle Morgan, Heather Glasgow, and Robert Himmelsbach
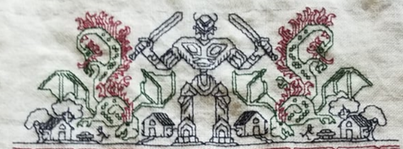
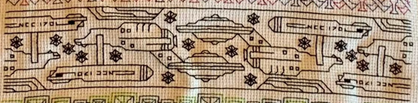
Band 1: Giant Robot and Kaiju
Time Factor 5 for size. We’ll wait four weeks before the next release.
For all the Voltron, Transformers, giant mech-suit anime, and Pacific Rim fans out there, our first strip. Destruction not included.
| Samples | Fabric used | Stitch used | Estimated thread consumption (Yards of standard 6-ply cotton embroidery floss) |
 | 28 count even weave | Back stitch, 1 ply | Less than 1 yard of floss |
 | 28 count even weave | Back stitch, 1 ply | About 2.5 yards of floss |
 | 18 count Aida | Back stitch, 1 ply | Less than 1 yard of floss |
 | 28 count even weave | Double running, 2 plies | Less than 1 yard of blue. Less than 1 yard of green, and less than ½ yard of red |
132 stitches wide x 47 stitches tall. 2 blank rows left between this and the following strip. One full panel if worked as stand-alone (not intended to be a repeat).
Giant Robot and Kaiku was released on 3 Aug 2021 on The Enablers Facebook Group and is being posted here on String today, 17 August 2021.
Click here to download a PDF that includes the chart for this band
plus all of the general project info that precedes it.
Hints:
- Start in the center with the robot’s head, then work down its body to the baseline. Once Robot is established, move out left and right – house then Kaiju (starting with their inner facing wings), and the rest.
- The back frills on the Kaiju are savage, but can be tamed if you work their outermost edge, taking detours back to the body as they are encountered.
- No shame in skips or lots of knots on the back. There are many elements that are little “islands” (bits that don’t connect to the rest of the work) and tons others that work into dead ends if using back stitch. Spare yourself agony – if you are happy with the front, the piece is perfect.
The next band in this piece will be released on Tuesday, 31 August on The Enablers Facebook group, and posted here on Tuesday, 14 September. Feel free to post questions there or here. And stay tuned for further Epic adventures in String!
Band 2: Tulips and Raspberries
Time Factor 2. We will wait two weeks before the next release.
Every other block in this piece will be more traditional and simpler in aspect, as a respite between the more challenging ones.
This one is an up/down meander and would make nifty cuffs, napkin borders, or bookmarks if done independent of this project. The samples show a several different approaches – solid color monochrome, a variegated thread, and a two-color treatment, where design elements are picked out to highlight.
| Samples | Fabric used | Stitch | Thread consumption |
 | 28 count evenweave | Back stitch 2 plies | |
 | 18 count Aida | Back stitch 1 ply | Less than one yard of variegated floss |
 | 28 count evenweave | Back stitch 1 ply | |
 | 28 count evenweave | Double running 2 plies | Less than 1/2 yard each of red and light red |
134 stitches wide x 47 stitches tall. 2 blank rows left between this and the following strip. If worked as a stand-alone continuous band, one full repeat in 30 stitches.
Time Factor 2 this one’s simple up/down meander repeat looks far more complex than it is. Because it’s not killer like Band 1, we are allowing only two weeks hiatus before releasing Band 3.
Remember that in the chart the red stitches above and below the target band are those of the designs appearing above and below this one, and are there solely as alignment aids.
CLICK HERE TO DOWNLOAD A PDF THAT INCLUDES THE CHART FOR THIS BAND.
Band 3: Pirates!
Time factor 3 for just outlines, Time Factor 4 for voided (working the background, too)
We sail the seas for plunder – a special for the fans of everything from Peter Pan, to Pirates of the Caribbean, with side trips through Penzance, old adventure movies, and hundreds of books. I’ve included a discussion on various types of voiding for those who wish to work the background. Note that it’s highly optional – this band works well both as outline-only and voided.
This strip is 134 stitches wide x 20 stitches tall. 2 blank rows are left between this and the following band.
| Samples | Fabric used | Stitch | Thread consumption |
 | 28 count evenweave | Back stitch 2 plies | |
 | 18 count Aida | Back stitch 1 ply | About 3 yards of floss, including three major froggings |
 | 28 count evenweave | Back stitch 1 ply Voiding in LACS, 2 ply | Back stitch 1 ply Voiding in LACS, 2 ply |
 | 28 count evenweave | Double running 2 plies Voiding in LACS, 1 ply | Less than ½ yard of green, less than ½ yard of blue, less than ¼ yard of yellow, remnants of red. Voiding 2.25 yards of light blue. |
Top to bottom: Renditions by Beta Testers Heather, Danielle, and Callie. Plus Kim.
Hints:
- Note that the center of this design runs right down the middle of the two-unit-wide trunk of the centermost tree. The coconut in the foliage is NOT centered. If you start this at the center (which I recommend) use the red stitches at the top of the graph that show the final two rows of Band 2 to align yourself.
- The birds and stars are “islands” unto themselves. There is no shame in skipping over from the nearest larger bits to work them, leaving a strand on the back. Or if you wish (or if your color choices so declare), start a new thread and end it off for them, as you see fit. There are no embroidery police – your back is as private as your underwear. No need to let others see it up close and personal, without your specific invitation and clearly expressed consent. 😊
- VOIDING IS HIGHLY OPTIONAL, and as you can see, this strip is dramatic both with and without it. There is no mandate to do it, in any method.
- If you do chose to work the voiding note that there is a fair amount of fudging where the background stitches butt up against the foreground outlines. Depending on the voiding method chosen you may need to work half, quarter or other partial stitches if you want the color to wash up directly against the outlines.
Voiding
Voiding or reserve work is a family of techniques used to create a piece that has a background that’s solidly (or evenly but not solidly) stitched, and foreground images that are left either totally unworked, or sometimes slightly embellished or detailed. It was wildly popular during the Renaissance, and experienced a big revival in the late 1800s. Modern Assisi work is the descendent of the simplified forms and techniques used in that revival. There are many ways to do a filled in background. Here are some.
Plain old cross stitch. Yes, the cross-stitcher’s friend. This is the stitch that is used in Assisi work. I have never seen it in a sample of voided stitching produced before the 1800s, but I will stop short of saying it was never done. Just that after extensive research, I have not turned up any evidence that it was. That being said, it’s one of the easiest to do. For this particular design it is probably best to work it in a contrasting color to the foreground outlines, otherwise the stars and slender birds will be lost against the background. I apologize for not having a sample of plain cross stitch ground to show off. I don’t use it myself.
Long arm cross stitch (LACS). Common in Renaissance era works, LACS is a denser form of cross stitch. When worked back and forth across a piece it produces a distinctive almost plaited appearance. Or if all rows are worked in the same direction, it looks like a procession of bands. Because it is heavier than plain cross stitch it does have an even greater tendency to overwhelm details like the stars. Again, a contrasting color is suggested. Samples from my work (in monochrome):


Other easy to work fills
| Diagonal fill | Zig-zag fill | Diamond fill | Grid fill | Straight line fill |
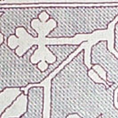 |  |   |  |  |
Meshy fill. Included here only for sake of completeness, this is a pulled thread technique that produces a totally overstitched net-like background, and is extremely common in surviving museum pieces. I do not advise it for this project. It’s unsuitable for Aida and for cotton floss. It requires the tensile strength of silk thread and a 100% linen ground, preferably at 38 threads per inch or finer. Another sample from my prior work:

Whichever you chose, note that if you run the fill all the way up to the outlines and want to leave no ground showing at all you will have to fudge with partial stitches where the fills meet diagonal lines. One way around this problem is to NOT work the partials, but to leave a “halo” around the foreground motifs. Here’s an example, charted out so you can see what I mean. The red is the foreground outlining stitches. The yellow is the partially worked background voiding:

If you are interested in learning more about voided grounds and finding links to museum examples of it, here are two web articles I’ve written about it:
https://string-or-nothing.com/2020/01/06/voided-grounds/
https://string-or-nothing.com/2021/04/06/voided-pieces-and-outlines/
CLICK HERE TO DOWNLOAD A CHART FOR PIRATES, PLUS ALL OF THE VOIDING INFO, ABOVE.
Band 4: Palm Cluster
Time Factor 1
The second traditional strip. Very traditional in fact, derived from several historical sources, but changed a bit to make it new again. This strip should be a quick bit to complete after the torture of the previous three.
If worked as a stand-alone continuous band, one full repeat occurs over 36 units. Note that the narrow border beneath it, shown in red, is actually the “companion edging” of the next band and should not be stitched until next week. But if you are using this palm cluster as a stand-alone strip there’s no reason why you couldn’t adopt that line as a nifty finishing touch for your bookmark, collar, cuffs, or other trim, echoing it both above and below the palm cluster strip.
Time Factor 1 because as I mentioned above, you deserve a break. This is a very simple up/down meander, that’s totally symmetrical. It has no long or difficult to count runs, no “dead ends,” and no tricky bits.
This strip is 134 stitches wide x 28 stitches tall. Two blank rows are left between this and the following strip.
| Samples | Fabric used | Stitch | Thread consumption |
| 28 count evenweave | Back stitch 1 ply | ||
| 18 count Aida | Back stitch 1 ply | Variegated floss | |
| 28 count evenweave | Back stitch 1 ply | Less than 1 yard | |
 | 28 count evenweave | Double running 2 plies | Less than 3/4 yard of light green, scraps of light red |
Hints:
- The center of this new strip aligns to the center of the little “patch of grass” at the middle of the centermost Pirate island. Very easy to start there, then work right and left to complete.
- After the last three, this one should be quite easy. The repeats are regular, with no surprises.
- For the record, Beta Testers Heather and Callie completed this strip in solid color floss. Callie used a variegated, and I – never one to shy from gilding the lily – used two colors, even though I’m working in double running. Yes, there are knots on the back. Each of those little light red collars at the base of the palm plumes is done separately. I did not strand between them.
- If you’ve fallen in love with voiding, but are hesitant to try it on one of the wider panels, Palm Cluster with its simple shapes would be a lovely first design for experimentation, either as part of this project, or on a separate smaller bit.
CLICK HERE TO DOWNLOAD A CHART FOR PALM CLUSTER
BAND #5: Game Room
Time Factor 3, mostly for lack of repeat, plus long straight runs that can be difficult to count.
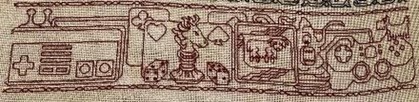
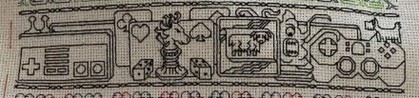
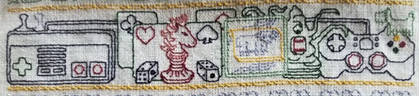
The latest installment revisits things (some of us) used to do – like going to SF, fantasy, and gaming conventions. There were costumes, there were things to see and buy, there were presentations and panels, and there were also game rooms, where anything from hand-helds to console games, to video games, tablet games, and board and tabletop games were played for fun and sometimes prizes. If you squint carefully, you’ll find the little terrier from Monopoly, a tribute to Settlers of Catan, a D&D figurine, and more hiding out in this one.
This strip is about the only place I’ve deliberately used a different stitch. Feel free to work the pips on the dice as French Knots, tiny little 1×1 thread cross stitches (if you are working on evenweave), or use seed beads or tiny sequins/paillettes if you like. There are seven pips per die, so you’d need 14 beads or paillettes, total if you wanted to use one for each pip.
Because Game Room has several very long straight runs which can be easy to miscount, I provide the narrow companion border. Work the top one first, then use it to help “proof” those annoying long runs to keep you from miscounting.
.And sincere apologies to our stalwart Beta Stitchers. I discovered an error, and also inadvertently made an addition when I stitched mine up. That’s why on the last provided sample, the hand-held unit on the left in mine actually has a left edge, and the mane of the chess knight is a bit more elaborate. The chart has been updated to include those fixes.
This strip is 134 stitches wide x 28 stitches tall, including the narrow companion border at top and bottom. 2 blank rows are left between this and the following strip.
| Samples | Fabric Used | Stitch | Thread Consumption/ Notes |
 | 28 count evenweave | Back stitch, 1 ply | Pips are French knots |
 | 18 count Aida | Back stitch, 1 ply | About 3 yards. Pips are French knots |
 | 28 count evenweave | Back stitch, 1 ply | Pips are French knots |
 | 28 count evenweave | Double running, 2 plies | About 1 yard of blue, 1/2 yard of yellow, 1/4 yard of red, 1/4 yard of light blue. The snake eyes pips are each 2mm paillettes. Other pips are tiny 1×1 cross stitches |
Hints:
- Centering this one is tricky. There’s no clear centermost axis, everything is offset. As mentioned before, the narrow band above is VERY useful for determining starts and stops, and for proofing positioning of the individual elements as you go along.
- On the last example, I did the large round “one pip” sides of the dice using a tiny 2mm black paillette (flat center hole sequin). I happened to have a few, shed from a knitting yarn I used in a recent project. They are too big to use for every pip, but there are lots of dice that emphasize that singlet side. The other pips I worked as tiny 1×1 thread cross stitches, done carefully so they don’t slide into the ground cloth’s weave. If I hadn’t had the paillettes to hand I would have used a seed bead in exactly the same way.
- If you choose to use seed beads, you will need EXTREMELY tiny ones. Probably size 14 or 15. Note that with only 14 needed, it’s probably not worth the expense unless you happen to have some in your stash. Which knowing the creative types who pick up projects like this, might not be unlikely.
CLICK HERE TO DOWNLOAD A CHART FOR GAME ROOM
BAND #6 : GRAPE BALLOONS
Time Factor 2.
This one is another original, loosely based on a historical pattern family. Bands or horizontal columns with lozenges and/or striations are pretty common in strapwork of the late 1500s to 1600s, as are grape clusters. But sprigging them together this way is something I doodled up.
This one should be comparatively easy to stitch, especially after the last no-repeat panel. All you need to do is remember that the slanting bands on the center rod mirror – everything else is a simple flip, either up/down or left/right – no tricky half-drops, or meanders.
134 stitches wide x 16 stitches tall. 2 blank rows left between this and the following strip. If worked as a stand-alone continuous band, one full repeat in 17 units.
| Samples | Fabric Used | Stitch | Thread Consumption/ Notes |
 | 28 count evenweave | Back stitch, 1 ply | About 2 yards of floss |
 | 18 count Aida | Back stitch, 1 ply | About 3 yards of variegated thread (not floss) |
 | 28 count evenweave | Back stitch, 1 ply | |
 | 28 count evenweave | Double running, 2 plies | About 1.25 yards of light blue, 0.5 yards of light red, scraps of red. |
Hints:
- The merry band of Beta Stitchers is now familiar with the design’s charting method, and jaded by some of the challenges already thrown their way, so they all report that this one was pretty easy, and a good rest after the last strip. No particular difficulties were noted, other than remembering to mirror the “peppermint stripes” on the center horizontal band.
- Variegated in back stitch plays nicely in this one.
- I chose multiple colors, and did the balloons/berries/grapes all in the same color, but if someone were to be VERY adventurous, they could mix colors on those bunches or work a quick change gradient on them while using a solid color for the more architectural center band with its stripes and knots.
CLICK HERE TO DOWNLOAD A CHART FOR GRAPE BALLOONS
BAND #7 : SO SUE ME!
Time Factor 3 for height and mirror flip complexity, Time Factor 4 if voiding is chosen.
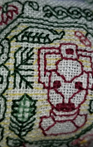
Every movie with a ravenous T-Rex in it looms in front of us now. Let’s see, aside from the obvious, there’s the original King Kong, Lost World, Fantasia, Prehistoric Beast, Land Before Time, Night at the Museum, Land Before Time, Dino Riders, several Dr. Who episodes, and many, many more. How could we continue without including an iconic dinosaur?
If desired this band, like the Pirates band can be worked voided – with the background filled in using long-armed cross stitch or plain old cross stitch, squared or stepped filling, diagonal filling, or another fill as desired. This is highly optional – no pressure here because the T-Rex strip would look good either way.
If voiding is chosen I think the design would show to best advantage if the background fill was done in a different color than the outlining, because if both were worked in the same thread the slender stems of the flowers curled in the tail would disappear. Remember – voiding eats both time and floss in direct proportion.
Oh. And the title? Named after Sue, a very famous Tyrannosaurus Rex specimen now on display at the Field Museum in Chicago, Illinois.
134 stitches wide x 30 stitches tall. 2 blank rows left between this and the following strip. If worked as a continuous band, one full repeat in 57 units.
| Samples | Fabric Used | Stitch | Thread Consumption/ Notes |
 | 28 count evenweave | Back stitch, 1 ply | |
 | 18 count Aida | Back stitch, 1 ply | |
 | 28 count evenweave | Back stitch, 1 ply | About 8 yards for outlines, 6.5 yards for voiding |
 | 26 count evenweave | Double running, 1 ply | |
 | 28 count evenweave | Double running, 2 plies | 1.5 yards blue, 1 yard green 0.25 yards red, 2 yards light red for the voiding |
Hints:
Voiding is HIGHLY optional.
- Because of all of the diagonals on this design, especially around tail; plus there being lots of very narrow irregular bits to fill in with voiding; if you choose cross stitch or long-armed cross stitch be aware that there will be lots of fudging to fit your stitches around the nooks and crannies.
- If you do choose to work the background, the squared fill I used in the last sample is far more user-friendly for working the fiddly bits. You can do it stepwise in double running like I did, or work it in back or running as straight lines with one unit “sprigs” to attach the new line to the one previously worked. Both methods work just fine.
- Guest Beta Tester Robert (known to some of my friends as Master Geoffrey d’Ayr of Montalban) has proven the point that some of these repeats can be successfully worked as long strips independent of this sampler project. His is part of a set to trim the cuffs and collar of a late 1500s style man’s shirt.
CLICK HERE TO DOWNLOAD THE CHART FOR STRIP 7, SO SUE ME!
BAND #8 : SNAKES! AND THEY’RE PLAIN!
Time Factor 1. Sweet and easy, with two rows of a simple progression repeat.
OK. So, this one is a bit more creepy-crawly than it is classic-blackwork-floral-ordinary. My excuse is that I drew it in the run-up to the 2019 Halloween season, adapting it from a design in Ensamplario Atlantio II, one of my free books of blackwork fills and borders. Plus, we should only ignore those who adore campy horror movies at our own peril.
Time Factor 1 for height and the ultra-simple straight repeat. Our scaly friends are all identical, with the second row flipped and travelling the opposite direction. Feel free to work all the right-bound crawlies in one pass, and then all the left bound ones, or hop back and forth as you please. Use one color, multiple colors, or variegated threads, as you prefer. There are no rules or must-do approaches here. One of the beta testers used beads for the eyes – a charming enhancement shown in more detail in the Hints section, below.
134 stitches wide x 16 stitches tall. 2 blank rows left between this and the following strip. If worked as a continuous band, one full repeat in 23 units.
| Samples | Fabric Used | Stitch | Thread Consumption/ Notes |
 | 28 count evenweave | Back stitch, 1 ply | |
 | 18 count Aida | Back stitch, 1 ply | |
 | 28 count evenweave | Back stitch, 1 ply | About 2 yards, plus 20 beads |
 | 28 count evenweave | Double running, 2 plies | About 1.5 yards each of light red and light green, about 0.75 yards of light blue and yellow each |
Hints:
- Callie added small beads for eyes after the official Beta Test photo was taken. Her snakes are doubly adorable:

- Because of the long body that gives color runs a chance to play, variegated threads work particularly well for this strip.
- Folk have been asking about the stitches shown in red on the chart. Those illustrate the nearest block of stitches above or below the current strip and include the two blank spacer rows between the strips. While I always start in the center and work left, then right, I know not everyone does, and I hoped that having the earlier (or later) rows as reference guides would help people align the new sections with work previously completed.
CLICK HERE TO DOWNLOAD THE CHART FOR STRIP 8, SNAKES! AND THEY’RE PLAIN!
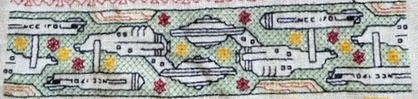
BAND #9 : INVASION!
Time Factor 2.
Bug eyed monsters waving ray guns in their tentacles! Mid-century era finned spaceships! Coming and going! Run! Hide! It’s an invasion, for sure and cheesy peril abounds. Or capture them for all time, frozen in your stitching. I recommend the latter. It’s far more relaxing to sit and embroider than it is to bolt away in terror.
Time Factor 2 – not particularly complex nor wide as the featured odd number strips go, but there is one small tricky bit. Note that the rockets flip and are symmetrical. BUT the little monsters mirror, alternating orientations where they are firing ray guns to the left or right.
134 stitches wide x 16 stitches tall. 2 blank rows left between this and the following strip. If worked as a continuous band, one full repeat in 23 units.
| Samples | Fabric Used | Stitch | Thread Consumption/ Notes |
 | 28 count evenweave | Back stitch, 1 ply | |
 | 18 count Aida | Back stitch, 1 ply | |
 | 28 count evenweave | Back stitch, 1 ply | About 2 yards |
 | 28 count evenweave | Double running, 2 plies | About 1 yard of red, 1 yard of green, .75 yard of blue, remnants of yellow |
Hints:
- Use one color, multiple colors, or variegated threads, as you prefer. As with the rest of Epic, there are no rules or must-do approaches.
- As noted above, watch out for the alternating directions of the bug-eyed monsters.
- The rocket ships and the monsters between them are not connected. You can jump between them, or if you want to work them all continuously with no jumps, it can be done if you connect the tips of the rocket’s landing fins to the bottom most bud of the fine growing from the monster’s toe. That’s just one stitch.
- Yes, I chose a ton of colors, picking out the rockets, the rayguns and their emergent energy zaps, the eyeball and the buds. I rarely have the opportunity to play with multiple colors, and I’m having fun. But also the reverse of this one shows the challenges of trying to stick to double running logic on a very discontinuous piece. While I use the caught-loop beginning, I do knot off terminal ends. And I have a lot of them on this strip:

CLICK HERE TO DOWNLOAD THE CHART FOR STRIP 9, INVASION!
BAND #10 : PORTAL TO NOWHERE
Time Factor 2.
Yes, I know this was supposed to be a plain and boring strip. It started out as a simple geometric with some interlaced bits to make it interesting. After I finished drawing, I noted the vague echo of a Portal Cube in its center motif. Subconscious channeling from other dimensions? Probably just coincidence. Yes, that’s right. Coincidence.
Time Factor 2 for height and the overlapping flanges on the motifs (Without those layered bits I’d consider this a Time Factor 1.) Use one color, multiple colors, or variegated threads, as you prefer. As with the rest of Epic, there are no rules or must-do approaches
134 stitches wide x 18 stitches tall. 2 blank rows left between this and the following strip. If worked as a continuous band, one full repeat in 12 units.
| Samples | Fabric Used | Stitch | Thread Consumption/ Notes |
 | 28 count evenweave | Back stitch, 1 ply | About 1 yard each of black and red |
 | 18 count Aida | Back stitch, 1 ply | Variegated floss |
 | 28 count evenweave | Back stitch, 1 ply | |
 | 28 count evenweave | Double running, 2 plies | About 1.75 yards of light red, remnants of light green |
Hints:
- Use one color, multiple colors, or variegated threads, as you prefer. As with the rest of Epic, there are no rules or must-do approaches.
- This one is tricky only in the overlap of the “legs” of the main motif.
- If you are working in double running, note that the centers (green on mine) are detached from the main flow of the stitching. This could be made totally double-sided if you were to connect that little globe to its framing shell at one or more points. But even though I mostly work in double running, I don’t bother with making things double-sided unless I have an overwhelming reason to do it – terminating the ends is always problematic. Obviously on mine, with the tiny free floating green centers, I didn’t bother.
CLICK HERE TO DOWNLOAD THE CHART FOR STRIP 10, PORTAL TO NOWHERE
BAND #11: WHERE NO STITCHER HAS GONE BEFORE
Time Factor 4 (plain) or 5 (voided).
I know you’ve been waiting for this one. Our voyage continues. To seek out new worlds, new civ… Well, to possibly to try new techniques and have fun along the way.
This is another chance to attempt voiding – filing in the background for dramatic effect (in this case, The Final Frontier). I suggest long-armed cross stitch, plain old cross stitch, but you can see in the examples that one of the more open fills also works nicely. The stars really pop against any of the backgrounds. But even without voiding the piece presents well, so if you prefer not to do it, don’t feel pressured.
Time Factor 4 for height and complexity. Time Factor 5 if you choose to work the background, too. Use one color, multiple colors, or variegated threads, as you prefer. As with the rest of Epic, there are no rules or must-do approaches
134 stitches wide x 26 stitches tall. 2 blank rows left between this and the following strip. If worked as a continuous band, one full repeat in 93 units.
| Samples | Fabric Used | Stitch | Thread Consumption/ Notes |
 | 28 count evenweave | Back stitch, 1 ply | |
 | 28 count evenweave | Back stitch, 1 ply | About 4 yards of floss just for the voiding |
 | 28 count evenweave | Mostly double running 2 plies for outlines but 1 ply for green voiding | About 1.5 yards of blue, 0.25 yards of red and yellow, 2 yards of light green |
Hints:
- Watch that alignment around the center line. The two Enterprises that meet in the middle are offset around it.
- While a really dark and heavy voided ground can make the stars and ships pop (like in Callie’s example above), they also run the risk of obscuring the stars. One way to layer the stars on top of the void (if you choose long armed cross stitch or plain old cross stitch for the voiding) is to first work the stars with just one strand of floss, then doing the ground, and finishing up by overstitching the stars again, with one or two strands of floss.
- My sample (the bottom) uses a diamond fill for voiding. Although I worked all of the outlines in two ply (including the stars), when I went back and did the background I only used one strand.
- Band 3, Pirates! contains a long write-up of voiding methods and techniques. All that info is also applicable here.
- And yes – that strange mass beneath (or above) the belly of each ship is supposed to be that ubiquitous (and often identical) hazy planet that the ship always seems to be orbiting around, regardless of which planet the episode’s adventures actually involve. Lovingly reproduced here with great respect for the technical limitations of the era that spawned the original series.
CLICK HERE TO DOWNLOAD THE CHART FOR STRIP 11 – WHERE NO STITCHER HAS GONE BEFORE
BAND #12: DRAGON’S HOARD
Time Factor 1.
Rest and relaxation again after the last band. Think of the fabled treasures sought in so many books, movies, and series: the sparkling gems, items of destiny, and priceless bric-a-brac. You don’t need to be a dragon to have your own hoard. Just stitch this up.
Time Factor 1 – it’s very simple. The only big challenge here would be all those ends if you succumb to my temptation to do this in multicolor
In plan monochrome it would make fabulous trim, and would be even more special if worked in several jewel tones. I’m tempted to try underside couching in gold metallic for the outside border, and ruby, emerald, amethyst, and sapphire threads for the faceted bits.
Use one color, multiple colors, or variegated threads, as you prefer. As with the rest of Epic, there are no rules or must-do approaches.
134 stitches wide x 8 stitches tall. 2 blank rows left between this and the following strip. If worked as a stand-alone continuous band, one full repeat in 28 units. However, if you want to work just one unit of graduated stones, starting and ending on either side with one complete smallest gem element, the count would be 32 units.
| Samples | Fabric Used | Stitch | Thread Consumption/ Notes |
| 18 count Aida | Back stitch, 1 ply | ||
| 28 count evenweave | Back stitch, 1 ply | ||
| 28 count evenweave | Mostly double running, but strip between edge and inner gem in cross stitch | About 0.5 yards of light yellow, 1 yard of dark yellow, less than 0.25 yard of light blue, scraps of red and dark green |
Hints:
- Super easy – the exact center of the big gem in the middle aligns with the whole sampler’s center line.
- After I worked the whole thing in double running including “settings” – those done in my lighter shade of yellow, I decided to fill in the area of each gem’s “setting” and the gem itself with my darker yellow, because the strip looked a bit pale against the splashy colors of my other strips. It’s hard to see in the photo, but this added punch and just a bit of an illusion of dimensionality.
- This would be sweet on a bookmark, cuff, napkin edge, an embroidered bracelet, or as a border on another sampler. If I were to use it as a border, I’d try to use what on my sample is the big red gem in each corner, then proceeding with the repeat as shown. But it can also be used with any of the gems used as a corner, and the smallest can be repeated between each of its larger brothers instead of framing one nested repeat of the sizes.
CLICK HERE TO DOWNLOAD THE CHART FOR STRIP 12 – DRAGON’S HOARD
BAND #13: WHERE’S MY FLYING CAR?
Time Factor 2.
Our salute to Retro-Futurism! Slap wings on that SUV and take to the skies. I am dating myself, but I can confess that we kids of the late 1950s/early 1960s were convinced we’d have flying cars by the time we had our own kids, and would be vacationing in orbit or on the moon. But the whole personal computer and Internet revolution, and the phone-in-every-pocket transformation weren’t even on our radar. Just as well. Computer/phone crashes are far less painful than having one’s flying car fall out of the sky.
Time Factor 2, mostly for height and discontinuity (the motifs are separated, and the wind/speed lines present lots of annoying little “orphan islands” to stitch)
Use one color, multiple colors, or variegated threads, as you prefer. As with the rest of Epic, there are no rules or must-do approaches.
134 stitches wide x 15 stitches tall. 2 blank rows left between this and the following strip. If worked as a stand-alone continuous band, one full repeat in 28 units. Note that this strip isn’t exactly centered. I moved the placement in order to squeeze three whole autos into our allotted area.
| Samples | Fabric Used | Stitch | Thread Consumption/ Notes |
 | 18 count Aida | Back stitch, 1 ply | |
| 28 count evenweave | Back stitch, 1 ply | Less than one yard of variegated floss | |
 | 28 count evenweave | Double running 2 plies | Less than 0.25 yard each of dark blue, light blue, and red. Remnants of light red and yellow. |
Hints:
- As mentioned before the middle car is not centered. But the large triangle indicator on the chart edge is. Use that and the red “hints” on the chart that show the edge of the previous strip to figure out exact placement.
- I know there’s not much room in the windows to put passengers, but if you want to kill the center line in the window and play with the idea, go for it!
CLICK HERE TO DOWNLOAD THE CHART FOR STRIP 13 – WHERE’S MY FLYING CAR?
BAND #14: SNACK BREAK
Time Factor 1.
Another respite from evil. We take a snack break, complete with pretzels. Or a twist that makes me hungry for them. Think of this as a seventh inning stretch. There’s a lot more game to come, and quite a bit of excitement left. When you see Band 15, you’ll appreciate coming off this bit of rest..
Time Factor 1, but stay awake! There are twists and overlaps to keep sorted out. But through it all, I promise – NO partial stitches.
Use one color, multiple colors, or variegated threads, as you prefer. As with the rest of Epic, there are no rules or must-do approaches.
134 stitches wide x 15 stitches tall. 2 blank rows left between this and the following strip. If worked as a stand-alone continuous band, one full repeat in 15 units.
| Samples | Fabric Used | Stitch | Thread Consumption/ Notes |
| 18 count Aida | Back stitch, 1 ply | ||
| 28 count evenweave | Back stitch, 1 ply | Less than one yard of variegated floss | |
| 28 count evenweave | Double running 2 plies | Less than one yard of dark blue. Remnants of red |
Hints:
- This twist only has one tricky bit. Note that the loops that bear the vertical twist have only TWO stitches across their top and bottom edges, while the larger figure-8 twist with the little center rectangles (in light red in my sample) have THREE stitches across each top and bottom. Once you are on to that little bit of abberance, the rest should fall into place quite quickly.
- This design would make sweet, simple trim for collars, cuffs, or hems. It would also work nicely as a framing motif or area divider for a larger sampler.
CLICK HERE TO DOWNLOAD THE CHART FOR STRIP 14 – SNACK BREAK
BAND #15: MAY THE FLOSS BE WITH YOU
Time Factor 5+.
The tribute here should be obvious. But there’s always room to insert yourself into the action, and this band is designed specifically for that. Obviously, the chart bears my initials over a ribbon, but it’s easy to modify to include yours there instead. Or instead of big initials, you can include a smaller set, bracketed by tiny AT-ST walkers. Or you could draft up a short saying, dedication, or motto to fit the spaces left and right of the center helmets. Or you could either doodle something else entirely to put in those spaces, or use the extra motifs I provide.
The whole idea of this strip is to help to make the piece uniquely yours, either through selection of the provided elements, or by taking that step into modifying a design or even drawing up your own bits for those two spaces. To that end there’s a worksheet on the last page of this band leaflet. I offer the layout, two sample alphabets (one large, one small); a panel with spaces to draw in your final design, plus a few “rehearsal” slots below with the corners of the available space drawn in, and those extra motifs.
Note that because the helmets are done over an odd number of stitches (no evenly divided center pivot point), by necessity, the empty monogram/motto space to their right is ONE UNIT less wide than is the one on the left (templates are provided for both left and right areas). Therefore the center of the space on the left is a line, and the center of the space on the right is a square unit. The skewed presentation can’t be helped unless you are on even weave and work just the the helmets skew to the rest of the count – moved one thread to the left.
This is not intended to be worked as a continuous strip, but since it’s a simple 134 stitch panel, a series of them can easily be placed end to end, leaving a blank unit in between so that the light sabers hilts are not touching. Stitching note – the dark areas of the porgs and the helmets are drawn in Italian four-sided stitch – basically a cross stitch inside a four-sided box. If you prefer, work them as plain old cross stitch. I wanted a dense fill and did not think that long-armed cross stitch would play effectively in these little spaces.
Time Factor 5+ entirely for the accompanying layout and design task, plus the long straight stitch runs. (I can hardly wait to see what people dream up).
Use one color, multiple colors, or variegated threads, as you prefer. As with the rest of Epic, there are no rules or must-do approaches.
134 stitches wide x 17 stitches tall. 2 blank rows left between this and the following strip. If worked as a stand-alone continuous band, one full repeat in 134 units, plus one blank unit in between the full iterations.
| Samples | Fabric Used | Stitch | Thread Consumption/ Notes |
 | 18 count Aida | Back stitch, 1 ply | |
 | 28 count evenweave | Back stitch, 1 ply | Less than one yard of variegated floss |
 | 28 count evenweave | Double running 2 plies | About 1 yard of dark blue. Less than ¼ yard of dark red. Remnants of dark green, light green, dark yellow, and light red. |
Hints:
- Don’t panic, this is easier than it looks. Print out a copy or two the worksheet on the final page of the download. The spaces to the left and right of the center three helmets are outlined and give you ample pencil, eraser, and paper room to figure out what you want to put there. The ones marked with the little center line are sized to go to the left of the helmets. The ones with the center box are sized to go to the right of the helmets.
- Originally I thought folk might like to have a planned spot to sign, dedicate, or otherwise personalize Epic. But you don’t need to sign or initial the piece in this strip (I didn’t), but if you wish to do so, go for it. Use the alphabets provided (with our without the center ribbon), or find others you like better. My own beta sample will give you a good idea of how long a motto you can cram into the available space. However If you want, skip lettering and mottoes altogether, and use the provided mini-motif strips, or doodle up your own.
- Note that just the helmets would make a nifty trim or bookmark, as would any of the other mini-motifs provided for the personalization spaces.
CLICK HERE TO DOWNLOAD THE CHART FOR STRIP 15 – MAY THE FLOSS BE WITH YOU
BAND #16: MERCY
Time Factor 1.
After the last band, everyone who is still sticking with this project deserves something simple. Very simple. This would also be a useful learning exercise for someone wanting to try a first strip in double running or back stitch. There are no surprises here at all.
Time Factor 1 for a nice, quiet, symmetrical repeat that returns us to alignment with the indicated project center line.
Use one color, multiple colors, or variegated threads, as you prefer. As with the rest of Epic, there are no rules or must-do approaches.
134 stitches wide x 5 stitches tall. 2 blank rows left between this and the following strip. If worked as a stand-alone continuous band, one full repeat (center of upright flower to center of upright flower) in 18 units.
| Samples | Fabric Used | Stitch | Thread Consumption/ Notes |
| 18 count Aida | Back stitch, 1 ply | Variegated floss | |
| 28 count evenweave | Back stitch, 1 ply | Less than one yard of floss | |
| 28 count evenweave | Double running 2 plies | Less than ½ yard of light blue and light green |
Hints:
- The samples above show this simple strip in variegated floss, single color, and two colors. All approaches work nicely.
- This design would make a simple and pleasing frame around a saying, an elegant cuff or neckband treatment, a pleasing edging for a napkin or placemat, or a quick-stitch bookmark.
CLICK HERE TO DOWNLOAD THE CHART FOR STRIP 16 – MERCY
BAND #17: JURASSIC JUMBLE
Time Factor 4.
Oh, heavens. More dinosaurs. I couldn’t help it. I love dinos. This set is for the fans of the bumpy and finned back beasts. There are attempts at a pair each of a Stegosaurus and Spinosaurus variant hiding in the foliage.
134 stitches wide x 22 stitches tall. 2 blank rows left between this and the following strip. If worked as a stand-alone continuous band, one full repeat in 184 units Although we only see the center bit of the long repeat on the Epic sampler, if you are interested in working this design as a longer piece I do provide the entire long repeat and It’s a VERY long meandering repeat.
In addition to the 134-unit wide snippet that appears verbatim on Epic Fandom, the downloadable below contains a second strip with the flippings and reversals required to achieve that 184 unit full repeat, to spare you the chore of mentally flipping the image, or printing it out on acetate and flipping that. The parts that are the same on both charts are shaded on the second one (in this case, shading is NOT used to indicate voiding).
Time Factor 4, for needless and wanton complexity, a very long repeat that’s not easy to remember; and for having to do more dinos.
Use one color, multiple colors, or variegated threads, as you prefer. As with the rest of Epic, there are no rules or must-do approaches.
| Samples | Fabric Used | Stitch | Thread Consumption/ Notes |
 | 18 count Aida | Back stitch, 1 ply | |
 | 28 count evenweave | Back stitch, 1 ply | |
 | 28 count evenweave | Double running 2 plies. Voiding in plain old cross stitch, 1 ply | About a half yard each of dark blue, dark green and dark red. About 1.25 yards of light green. |
Hints:
- Although I didn’t mark this strip for voiding I chose to work the background of my sample in plain old cross stitch. In truth I much prefer Danielle’s and Callie’s treatment. The design is too dense to show well with the ground filled in, or to pick out each of the bit players in it using separate colors.
- Remember that the top chart of the two presented on the previous page corresponds exactly to the strip as worked by the beta testers. The additional second chart is ONLY there for folk who want to take this band and use it as a longer piece.
- Watch the crossings in the tail interlaces at the design’s center.
All general project information can be found in download that includes Band #1
CLICK HERE TO DOWNLOAD THE CHART FOR STRIP 17 – JURASSIC JUMBLE
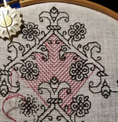
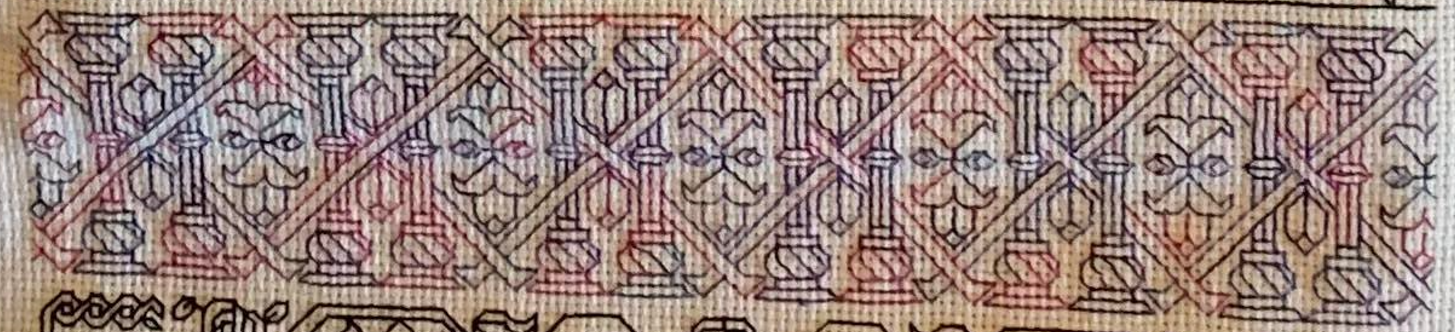
BAND #18: PILLARS OF MUTUAL SUPPORT
Time Factor 3.
You’ve stuck with this for a good long while now, and we’re almost done. Just one more strip after this. So please excuse me for inserting a bit of serious into all this silly.
Greater Fandom as a whole depends on the output of creative professionals. These range from big-money movie studios, highly paid actors and other high-impact performers/public personalities and well known/successful writers; to small one-person artisan shops selling on Etsy and other venues, authors struggling to get a toehold in the market, and independent musicians/artists/ designers/costumers/craftspeople and artisans. Times have been tough for us all, and things have been especially hard for the creative community who depend on in-person consumption of their content, either in theaters or arenas, on screen, or interaction with their books or other publications. Many creative folk have just barely eked by for the past two years, and are hoping against hope that this year is an improvement.
If you have the means, please consider paying forward the time and attention invested in this group project by purchasing something – it could be something as small as a 99-cent short story on Kindle – or otherwise offering support and acknowledgement. If you are hurting, too, consider leaving an honest review for a maker/writer/performer whose wares you might have bought and enjoyed in better times. The arts, especially those that feed the imagination, are what keep us human when all else conspires to strip back mutual respect, compassion, and empathy. Let’s work together to preserve them.
134 stitches wide x 30 stitches tall. 2 blank rows left between this and the following strip. If worked as a stand-alone continuous band, one full repeat in 22 units.
Time Factor 3, mostly for size. The over/under crosses can be a bit tricky, however, the repeat isn’t very long, and being quite symmetrical is quick to memorize, and is an easy field in which to spot errors.
| Samples | Fabric Used | Stitch | Thread Consumption/ Notes |
 | 18 count Aida | Back stitch, 1 ply | Variegated floss |
 | 28 count evenweave | Back stitch, 1 ply | One strand of Sulky 12 weight worked well (consumption not tracked) |
 | 28 count evenweave | Double running 2 plies. | About 1.25 yards of light blue, 0.75 yards of light green, 0.5 yards of light red, and remnants of dark yellow. |
Hints:
- As noted, the various crossings can trip you up. It always alternates over then under, regardless of whether the ribbons (done in green in my sample) are crossing other ribbons or pillars. But if this is too much of a headache, just pick a layering, for example, all pillars in the front, and stick with it throughout.
- I went a bit “off script” for the yellow bud tips of my flowers. Instead of working them as a plain, empty diamond, I took an extra stitch from each corner point to the center of that diamond. That’s why they are so prominent in mine.
- Yes, the pillar bases and crowns kiss. That’s deliberate
- This pattern also appears in my free book Ensamplario Atlantio, Volume II. That work is available from my blog (link at the bottom of this page).
All general project information can be found in download that includes Band #1
CLICK HERE TO DOWNLOAD THE CHART FOR STRIP 18 – PILLARS OF MUTUAL SUPPORT
BAND #19: WHOVIAN NIGHTMARE
Time Factor 5, 5++ for voided.
Too late. You peeked.
After more than a year since Band 1 was debuted, we go out in style. And I know that a lot of you were waiting for this one in particular. In this design you never know what’s lurking in the interlaces, waiting to trip you up.
Like the other panels that feature shading, this one can be worked voided if you so desire and the grey area on the chart indicates the logical areas for that background’s inclusion. However the design is a bit full, so if you do opt for voided, I suggest something that’s quite open, or is done with thinner threads than the main outlines, so that the foreground motifs, sprigs, and twigs are not obscured.
134 stitches wide x 68 stitches tall. It’s the end, so there are no added blank rows after this one. Whovian Nightmare is intended to be a stand-alone single 134-stitch wide panel. But it could be repeated verbatim (no flips or turns) to make a semi-scalloped ultra-border. Because this band is so tall, it merits a whole page to itself, so the download is three rather than two pages long. Apologies for making you print out an extra one.
Time Factor 5, mostly for size. Time factor 5++ if you choose to work this voided with a background fill, but by now you are old pros at this and nothing I say will daunt you.
| Samples | Fabric Used | Stitch | Thread Consumption/ Notes |
 | 18 count Aida | Back stitch, 1 ply | 4.5 yards |
 | 28 count evenweave | Back stitch, 1 ply | |
 | 28 count evenweave | Double running 2 plies. Voiding done in cross stitch with 1 ply. | About 1.75 yards of dark blue and dark green. About .75 yards of dark red. Scraps of light blue and light green. About 1.25 yards of light yellow for voiding. |
Hints:
- If you have used the customizable Star Wars strip (#15) to include a motto instead of your signature, my beta sample shows another inconspicuous way to add that information.
- Again, the design is busy. For my voided beta sample, I chose to work cross stitch in a light color, with only one strand of floss. Coverage is very sparse, and is more a subtle shading than a solid fil, but as you can see that doesn’t matter. The lighter treatment allowed the darker and heavier double running stitch foreground to stand out.
- The faces and dark helmet dot of the cybermen and Cassandra’s eyes are done in boxed cross stitch (think cross stitch, but with each individual cross stitch boxed on all four sides with a small straight stitch).
All general project information can be found in download that includes Band #1
CLICK HERE TO DOWNLOAD THE CHART FOR STRIP 19 – WHOVIAN NIGHTMARE
Final Thanks
Eternal thanks to the moderators of The Enablers group on Facebook who encouraged me to pull together these random Pandemic-generated thoughts into a project and then have the courage to share the result. Thanks also to the Enablers’ intrepid team of Beta Stitchers, who worked through the project at their own pace. I imagine them sometimes manically giggling as they thought about the fun others would have with a particular design; and I’m sure sometimes cursing me for devising the flames, spikes, interlaces, not-quite-mirrored bits and other tricky parts they found along the way. And especially for their patience with me, and their valuable feedback on mistakes, challenges, and thread consumption.
Finally, if there is anyone out there still stitching this – thank you for taking up the challenge. I hope it was a grand journey for you – that you enjoyed the trip, and possibly even learned something along the way.

No Irwin Allen fandom? LOL.
We do have dinosaur strips coming up, so we can dedicate at least one of them in part to The Lost World. And I am taking nominations for Return to Epic (a possible sequel.) 🙂
Wish Allen had followed Conan Doyle’s book more closely, but that’s Hollywood. Must have the Seaview and the Robot from Lost in Space. LOL!
I duly note your nominations of the Seaview and the Lost in Space robot for Return of Epic. No guarantees but I will give them due consideration if interest in Epic is enough to warrant the follow-on.
Sue is wonderful and MUST be stitched! I like both the voided and non-voided versions – the non-voided because you have to look twice.
Thank you so very much for offering this amazing project. I love it so very much!!! Bravo on designing all of these❤️❤️❤️
I love this design!!!
Total Awesomeness
You absolute maniac. Thank you for sharing these!