ALCAZAR DONE
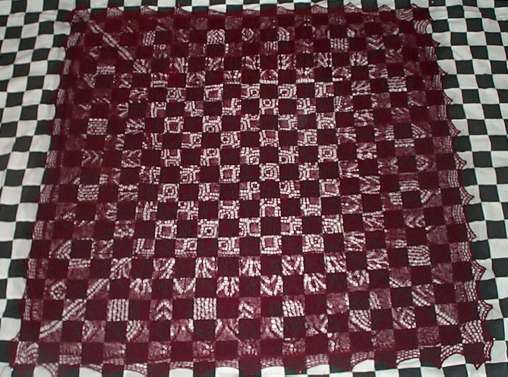
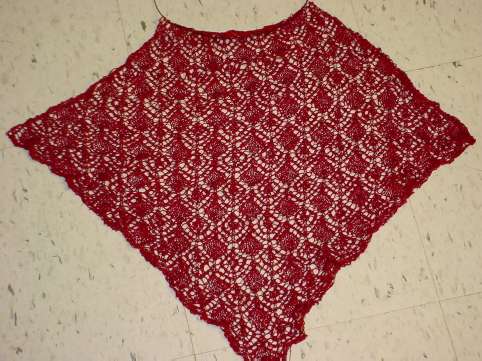
At last – my Hazel Carter Alcazar finished, blocked, dried, and
unpinned – placed on a plain white sheet so you can see it better:

My Alcazar (post block) is about 41 inches (104.14 cm) square measured from picot point to picot point across the center. All in all, I found this pattern to be easier than Hazel Carter’s Spider Queen:

Working Alcazar without the diagonal seams in the corners helped. The
charts are a bit easier to follow than SQ’s. Alcazar’s charts are presented in both half-width
(mirror repeat) and full width formats. SQ’s are done in with significant mirror repeats. SQ is significantly larger, and in general
Alcazar’s consitutent lace patterning is less complicated than SQ’s as the patterns are more repetitious and there are fewer of them. Still, I didn’t have any problems
with Queen either, and rate both as excellent projects for those who
are comfortable working from charts.
I touched on my biggest lesson learned yesterday – fiber choice.
My piece is supple and soft, and a wonderful arterial red, but being
rayon was not optimal for this particular pattern. Look at this
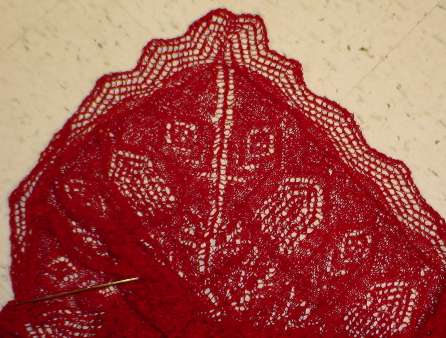
corner:

See that cupping just inside the edging? The pattern was good,
but the piece did not block out flat. That’s my fault. A
lace weight wool would have stretched to accommodate working around the
corner. I should have anticipated the no-stretch factor and
changed the rate of attachment along the entire border, perhaps adding
as much as one or two entire points per side. That would have given
enough ease for the piece to block out flat. A minor
disappointment to be sure, and an object lesson in fiber choice.
So it goes…
Postscript
And proof that I’m not the geekiest stitcher out there. While this proof is not quite as elegant as June Oshiro’s DNA cable scarf, in certain circles it would be intensely appreciated.
ALCAZAR – BLOCKING AT LAST
At long last, here it is. My Alcazar, knit in red faux-silk rayon – blocking out on my makeshift blocking board, all thanks to the Columbus Day holiday.
What I’ve got here is a kids’ area rug, topped by some bath towels with a checkerboard flat sheet thrown on top. Over that goes the shawl, pinned out by the points. The checks are nice, even 2" (5cm) squares, and make keeping things even much easier.
I had wanted to do this bit of blocking the Curmudgeonly Way – using my blocking wires to stretch out the central square, then pinning the points out from there. What a brilliant idea! Unfortunately, the stretch coefficient of this rayon is not very high, and I ran into all sorts of problems at the corners trying to even things out. So I winged it, pinning out just the points. (Memo to self – if most lace is knit using soft, supple, and elastic fibers, there’s probably a reason why people are doing it that way.)
In any case, here’s the piece. Dripping a bit red, no surprise there as red runs and red rayon is infamous for running even more than other reds. But it’s mostly rinsed out. I still like it, flawed fiber choice and all. Now to decide whether I keep my Alcazar; or give it as a gift, or donate it to an upcoming charity auction and make myself something else.
Pix tomorrow of it nice and flat and dry, without the eye-popping Peter Max background.
ALCAZAR – FINISHED. LESSONS LEARNED
That’s it! I grafted the final row of the edging to the first row to
make an invisible seam. I’m done except for blocking. That will have to
wait a bit as I am swamped right now, with no prospect for a large
block of free time with a floor to hand in order to play with the thing
before the latter part of July. Still, I’m done. Here’s a shot of my
Alcazar in all its rumpled, squished edge, pre-block glory that we can
use for comparison to the (eventual) post-block photo I promise to
plaster up here as soon as it is available.
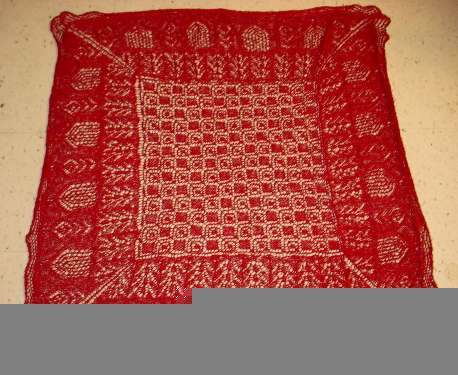
Unblocked
it measures about 40 inches across. If worked in the suggested needle
size with the suggested yarn, this shawl is supposed to block out to be
56 or so inches across. I’ll probably make it to 48 or so, tops because
both my yarn and needle were smaller than those recommended.
Lessons learned:
- Read the pattern and make sure you understand it before embarking on a project.
- Faux
silk (rayon) is a very unforgiving and unstretchy material from which
to knit lace. Care must be taken with gauge because it’s very easy to
knit too tightly. - Did I mention the "read your pattern" thing?
- There
are some minor quibbles in the pivot charts. Occasional one or two
stitch fudging is necessary to make the edging and corners come out
right. While I’d rate the majority of this pattern as "quite
straightforward and quick to knit if you’re comfortable with charts"
and "a challenge mostly because of size, not because of complexity"
those little problems might be enough to set a beginner off his or her
feed. But even a lace knitting beginner, armed with the knowledge of
where those little nuisances might be and the courage to work through
them, could complete this project.
Now what?
I have
the opportunity for some serious knitting time over the next week. I
had hoped that I’d still be working on this shawl, but wonder of
wonders – I finished early. I might pick up the Rogue again, but it’s
not particularly convenient for my target window (why will become
evident in ten days).
To be truthful, I haven’t quite licked
the lace/non-wool knitting bug yet. There are lots of options. I’ve got
some lace-weight linen in the stash. I’ve got a Rachel Schelling
pattern collection here somewhere. I could play with them together. Or
now that I’ve got the cotton to knit my North Truro Counterpane, I could restart that project. Other possibilities are the doilies on Yarn Over.
I have as little use for doilies as I have for shawls. They look fun to
knit, but I haven’t the inclination to use them. I could use a table
runner though. Hmmm.
Round-up – Needle sizes and Kitchener Stitch
Finally,
for those that are asking – I will return to the needle summary as soon
as I have time. Those data notes take a bit of research to write up, and
time hasn’t exactly been plentiful.
And on the Kitchener
Stitch documentation project, I’ve been in touch with a couple of
people active in historical British military kit research. They’re
branching out to their own networks, and have recommended some sources
that might confirm (or debunk) the notion that Kitchener’s revised
clothing specifications included seamless toe socks. No one has offered
up any other citations. So I’m still looking…
ALCAZAR – CORNER
I’m in the home stretch on my Alcazar. I’m about three quarters of the
way through edging the second side. That means I’ve worked one corner
and am about to work the second. I have to say that how to work the
corners wasn’t intuitively obvious in my first read through of the
pattern, and the original photo was of little help. It’s almost
impossible to see exactly
what’s going on with the edging in the photo because in the sample it
was knit in a
darker color which cannot be seen against the high contrast black
background used to display the rest of the shawl.
The pattern itself wasn’t too tough. It’s a plain variant of a
classic wave edging. It took me a couple of times through before
I realized that Carter was describing wrapped short rows for her corner
treatments. Now conceptual interference might have been in play thanks
to the glass of wine I had just before embarking on the corner, but
confusion remained even upon revisiting the instructions in the sober
light of morning. I admit I got the gist of the thing from the chart
and written accompaniment, and then (mostly) winged it. I’m not 100% pleased with Corner #1, but not so unpleased that I feel like tinking back and doing it again.
The
first step is to pause roughly one repeat away from the corner. Count
the number of live stitches remaining between your stopping point and
the absolute corner. There should be 25. Work that final repeat. If
there are too few or too many, adjust your rate of attachment by either
working one or more attachment points as sl 1, K1, psso instead of sl
1, K2tog, psso; or as sl 1, K3 tog, psso. The former should be done if
you’ve got fewer than 25 stitches remaining; the latter if you have
more than 25.
With luck and planning you’ll reach the absolute
corner stitch on the last row of the pattern repeat – the last row in
the first segment of Chart 4. You then work the plain return row, and
embark upon the next segment of the edging chart. Work across all the
stitches as directed. You’ll end up with one more stitch than is
accounted for in the chart. Wrap it short row style. Flip the work over
and slip this just-wrapped stitch, then finish off the plain return
row. On the next row work the stitches as directed. There will be two
left over. Wrap the first one, ignore the one further away from the
point of your left hand needle, flip the work, slip the just-wrapped
stitch and complete out your plain row. Do the same thing on the
remaining rows of the chart, only on each row the number of "sleeping"
stitches dormant at the end of the needle will be incremented by one.
Finish out this second segment of the chart. That last row will have
only two live stitches on it, plus a whole load of sleeping stitches
waiting for the next step.
And that next step is to begin the
next chart segment. Again work the stitches as directed. This first row
is two knits. The next stitch will be one that you had wrapped and set
dormant before. Knit it along with the loop around its base, then flip
the work over, slip this just-woken-up stitch and finish off the plain
side row. Keep doing this – following the chart, waking up the stitch
after the current row is completed, flipping the work over, slipping
that first newly woken stitch and finishing out the plain side row.
With
more luck, by the time you get to the last row of this chart segment
you will have woken up all of the formerly dormant stitches, and you’ll
be ready to march along Side #2 working the main edging repeat.
I
have to confess to one major error. Those plain side return rows? I
worked them as purls, yielding a stockinette-based edging. It wasn’t
until I was all the way around the corner and well into Side #2 that I
noticed that the directions said to knit them. A garter-based edging
would be a tad less curl-prone. I sat there and thought about ripping
back, but I decided to keep going as-is.
The flogging will commence in the morning…
ALCAZAR – EDGING BEGUN
In spite of the massive amounts of prose here over the last week or so,
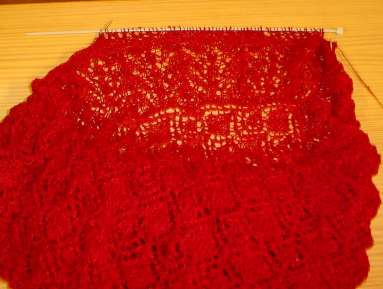
I have been knitting away at Alcazar. Here you see progress to
date:

In spite of my blurry photo, you can see the fountain area at the
bottom of the outer band, surmounted by the alternating pierced and
flower-bearing arcade layer. The final edging is knit
horizontally across the top. The edging itself is very simple – a
wave edging that appears in many variants, both stockinette and garter
based (it’s stockinette here).
One caveat. If you have never started an edging that’s attached
across a needle full of live stitches, the instructions in Alcazar
might leave you a bit baffled. Here’s what happens.
First, you finish out the final row of the outer band but do not break
off the yarn. Set it aside. Then taking a DPN of the same
diameter as your circ, you cast on the requisite number of stitches
using waste string and some sort of provisional cast on (the choice is
up to you, but I crocheted mine directly onto my DPN).
Now you’ve got a DPN with a bunch of waste yarn stitches on it.
Break off the waste yarn leaving a small tail so the rest of it stays
out of your way.
Take the main piece, with the right side facing you (vast areas of this
one are in stockinette, so identifying the right side is easy).
Put some sort of needle tip cap, rubber band or other plug at the end
of what would have been the right hand needle of your original
circ. Trust me on this as leaving this end free is a recipe for
disaster.
Holding the DPN VERY close to the shawl and using what would have been
the left hand needle end of your circ, purl across the provisional
cast-on stitches using the main yarn. Now work the first row of
the edging chart using the DPN. At the end of it you’ll be back
at the side where the edging is being attached to the main body.
The last stitch of the edging is worked together with the next two live
stitches of the shawl body by slipping it, then knitting the two body
stitches together and passing the slipped edging stitch over the
just-completed K2tog.
You’ll find that most patterns that work an edging on like this direct
that every so often the rate of attachment be increased, to make up for
the fact that knit rows and knit stitches are rarely the same
height. In this particular pattern, the final row of the repeat
is attached by slipping the last two edging stitches, knitting two body
stitches together, then passing BOTH edging stitches over the just-made
K2tog.
Keep working the edging back and forth following the chart.
You’ll find that once you’ve finished the first repeat you can ditch
the DPN and use the two ends of your original circ if you prefer.
In my case, my only 3.0mm DPN was a non-slippy aluminum one that was
driving me crazy. As soon as I could I went back to using both
ends of my nice, shiny, ultra-slick Inox circ.
Although this method is most commonly seen in attaching lace edgings to
live edges, you can use it to knit any horizontally-worked strip to the
live stitches of vertically knit edge. You’ll need to play a bit
with the rate of attachment to make sure your edging lies as you like –
either ruffled (increase the number of edging rows per body stitches),
flat, or a bit cupped (decreasing the number of edging rows to body
stitches) – but not having a seam to work is always very much
appreciated.
ALCAZAR – STILL PLUGGING
I took the time this morning to slip some stitches onto an extra needle so you can see more progress than the usual red lump photo would show.
The clear patch of diamonds is part of the center panel. Above it is a row of "fountains" – a texture pattern also appearing in Barbara Walker’s Second Treasury of Knitting Patterns (p. 272). After that comes some garter stitch, and then six or so rows of the arches I spoke about yesterday. It’s hard to see them because the rows are bunched up against the needle.
But in taking this picture, there was a bit of heartbreak experienced:

See those blurry stitches still on the temporary needle?? They’ve laddered back between one and four rows – in the middle of one of the more complex sections of the pattern (the knitting equivalent of the bread always hitting the floor jam-side down.)? Obviously some reconstruction here is needed, as I have no intention of ripping back six 700-stitch rows on behalf of a measly five stitches. That possibility still exists if I can’t rescue them, but I always try before I punt and rip.
Needless to say, this is the last time I try photographic grandstanding with a lace project in process.
ALCAZAR – MORE PROGRESS
Still humming along on Alcazar. I’m almost through Chart #2, the fountain section. Again, one very minor (and absolutely obvious) glitch on the half chart. In row 21 there’s a blank box. That should be read as a knit stitch. The problem looks like it was caught and fixed by hand on the full-chart version.

I’m enjoying this one. It’s going much faster than I expected. One thing that makes the Carter patterns fun is the patter that accompanies them. Yes, some people just want the pattern. I happen to enjoy the way she fills out her instructions with an accompanying folk tale, or takes valuable space to explain the symbolism of or thought process behind cher design element choices. For example, this pattern is inspired by the buildings and gardens of the Alcazar, a palace in Seville, Spain. Parts of the palace are Moorish in origin, parts were added by various later rulers, including Pedro the Cruel and most recently – Franco.
If you look at Carter’s design and then at the palace pix above, you can see the tiled mosaic floors, fountains, cobblestone paths, and arched doors and pierced screens that inspired her. Very nifty.
ALCAZAR – EDGE PICK-UP AND PROGRESS
Alcazar continues. As mentioned before, progress will be slower now that rounds are more than 500 stitches. As you can see though, I’m averaging four or so per evening:

This blurry photo was taken by stuffing my bag-like Alcazar over the corner of one of my sofa pillows. The area below the horizontal line of meshes is the side edge of the center square. The area above is the new part added on around that square’s perimeter. You can see what I meant by picking up in the side meshes – each one of those big openings had one stitch picked up in it, with YOs in between pick-ups.
No problems with Chart 2 so far, and the pattern (once established) contains enough internal clues so that it’s easy to proof as I go along. For example, there are central double decreases that always line up in a particular stitch column. If one is off alignment it’s pretty clear that something odd happened between the current spot and the last one. As a result I haven’t deployed my usual swarm of stitch markers to mark the repeats.
My opinion so far on difficulty is that I probably wouldn’t recommend Alcazar as a first lace project to someone who has never knit from a chart before. BUT I think that anyone who CAN follow a chart and who has the patience to do so for 500 stitch rounds should have no problems at all – whether or not they’ve ever attempted a lace project before.
ALCAZAR – BACK TO SNOOD STAGE
I’ve finished the center square of Alcazar, and have successfully picked up the requisite number of stitches around its perimeter. This was relatively painless as picking up sessions go because of the highly sane way in which the pick-ups were structured. If you go back to Friday’s picture, you’ll see that there are mesh-like spaces along all four edges. The directions say to achieve the correct number, all you have to do is pick up one stitch in the first mesh, do a YO, pick up a stitch in the next mesh, do a YO, and so on. And it worked! I managed to get the correct number on the first pass on each side.
So now my Alcazar is totally on one circ, and I’m in the midst of the several rounds of plain knitting that precede the next chart. Which explains this enigmatic sack-like object:

There’s one bit of advice in the pattern that will be a bit of a pain. When working this piece in the round instead of doing the sides flat as trapezoids to be corner-seamed later, Carter suggests twisting the last and first stitch of each side together (doing a left twist or right twist, it shouldn’t matter) on every odd numbered row, in order to give the corners a bit more stability. That’s fine with me, except that I’ve got markers at each corner. I’ll either have to take them off and replace them (a fumbling around style pain); or move them one stitch to either the left or the right so that they aren’t mid-twist. If I do the latter, I’ll have to remember that every subsequent chart of the piece is going to be off by one stitch (a different but entirely mental?pain).
Happy Birthday to Me
It’s that time again. Last year the kids asked what I wanted for my birthday. I said "Good children." And the younger one piped up "Covered in chocolate!" Which led to the older one drafting up my all time fave birthday card:

To be truthful, at this point just I celebrate anniversaries of my 21st birthday. How many has it been? The stock answer is "Several."
ALCAZAR – ROLLING ALONG
As you can see from this photo, Alcazar is on a roll. I’m almost done with the center square. If you’ve ever knit a shawl of this type, you’ll know that the center square usually goes quite quickly in comparison to the wave upon wave of outer design elements as they present themselves across an ever-increasing circumference.
Unblocked and unstretched, my center is about 17 inches (43.2cm) square. Although the stuff I’m using isn’t very stretchy, I think it will block out to between 19 and 20 inches (48.2 to 50.8cm) square. A rough eyeballing of the pattern’s finished item photo gives me the estimate that the width of the finished center is approximately a third of the width of the entire finished piece. That makes me more or less on target to make a shawl that’s about 60 inches (152.4cm) across, tops. The pattern specifies a finished dimension of about 56 inches (142.3cm), so I’m in the ballpark, even though I’m using a very different yarn and a needle three sizes smaller than the one specified.
I did find one minor typo in the pivot format half-charts. On row 155, there’s a stitch marked as a SSK the first time you encounter it in the row’s repeat, S1-K2tog-PSSO through most of the rest of the row, and a K2tog the last time it appears on that row. It should be just S1-K2-tog-PSSO EVERY time it’s hit on that row. The full format chart doesn’t have this mistake. (I can’t comment on the rest of the full format chart, as I haven’t been following it.)?
