STRIP KNITTING LOGIC – TRANSFORMING A SCHEMATIC
My strip knit Sempre pullover continues to grow. A couple of people have asked about how I’m taking the generic pattern for set-in sleeves and transforming it for working in strips. It’s pretty simple. Here’s the basic logic (click on the image to see it larger):

I used Sweater Wizard to produce a simple pattern for a flat knit saddle shoulder V-n`eck pullover. The directions include a schematic, and describe a front and back each worked separately. I divided my total stitch count into 8 equal “slices” for the back and 8 equal slices for the front.
I started with strip #1 at the rightmost side of the back, using waste yarn and a provisional crochet-on cast-on I cast on my designated slice aliquot (plus one for the raised, visible seam ridge), and began working it from bottom to top using my Sempre yarn. I followed my pattern’s directions when I got to the armhole shaping, casting off the specified number of stitches to form the bottom of the armhole, then proceeding with the armhole shaping decreases. Since my strip is slightly narrower than my armhole, I didn’t get to finish my armhole decreases in strip #1. But that was o.k. I wrote down where I was in the decrease progression so I wouldn’t forget, and let the strip end most of the way through those decreases.
After I finished strip #1, I did another little bit of provisional cast-on for strip #2. I worked it at full width until I was at the spot even with the last stitch of strip #1. Then I began working the remaining armhole decreases as directed by the pattern. When they were done, I continued working #2 until I had reached the length specified at which the shoulder shaping was to commence. Just like the armhole shaping in strip #1, I worked it as written, letting strip #2 end when all its stitches were used up, and writing down how many decreases were “left over” and would need to be done in the next strip.
Strip #3 was more of the same – working until even with strip #2, then working the remaining shoulder decreases. Strips #4 and #5 were easy – there was no shaping required on either one.
Strip #6 is the mirror image of strip #3. Knowing how many “left over” decreases I did on strip #3, I knit strip #6 until I got to the same point where I began the strip #3 decreases, then working the same number of decreases but on the reverse (purl) side of my strip, made my mirror image. Strips #7 and #8 were done in the same way – working them even to their counterparts, then performing the decreases on each strip’s reverse.
I could have set aside the piece after strip #8, but I chose to keep going and to eliminate the side seam. The front begins with #9. It and strip #10 are duplicates of #1 and #2 on the back. No problems with either one.
#11 and #12 however present a challenge. I’ve got a V-neck. While it’s easy to center the V on the seam between strips #12 and #13, half of the V opening is wider than one strip. That means that strip #11 will have to bear some of the neckline decreases. But where to start them? I suppose I could have done the math and figured out on exactly which row to begin, and how many decreases to work, but I was lazy. Instead I cheated. I worked #11 until it was the length of the area below the V-neck opening (a dimension marked on my original pattern). I put a safety pin into its edge to mark that point and knit on for about another inch. Then I put #11’s stitches on a spare needle, and using another ball of yarn, began strip #12. I knit along on #12 until I reached my safety pin, then began my V center decreases, which I worked on the reverse. Every few rows when it looked like I’d catch up to strip #11, I hopped back to that strip and worked a couple more rows. Eventually I finished as many of the neckline decreases as the width of strip #12 allowed. It was easy to accomplish the remainder on strip #11 and finish it off, too.
I’ve just finished strips #13 and #14. Both were easier than the #11/#12 pair. I decreased at the neck edge on the public (knit) side of my strip until I ran out of strip width, then made up the difference when I go to the same length point on strip #14. After this it’s a simple matter of finishing off my last two mirror image strips to complete my back/front unit.
My only remaining challenge on the body (besides chugging through to the end) will be to figure out how to make the least bulky visible ridge seam I can at the underarm join between #16 and #1. Right now I’m not sure if I will use an inside out mattress stitch variant to make that seam or if I will try to knit my piece into a tube using a pick up/ssk pair similar to one of the joining methods used when edgings are knit on.
Then it’s on to the saddle shoulder sleeves, where new difficulties in twisted logic await. In the mean time, here’s a blurrier than normal photo documenting my progress:

Better photos will have to wait for me to finish restoring all of my software (a major household hardware upgrade has left me both improved and degraded in capabilities. I’m thankful, but not quite all the way back at steady state yet).
AMBITIOUS FOR A MOTLEY COAT
My Sempre pullover is shaping up quite nicely. This traditionally blurry String or Nothing photo of the growing back really does not do it justice.
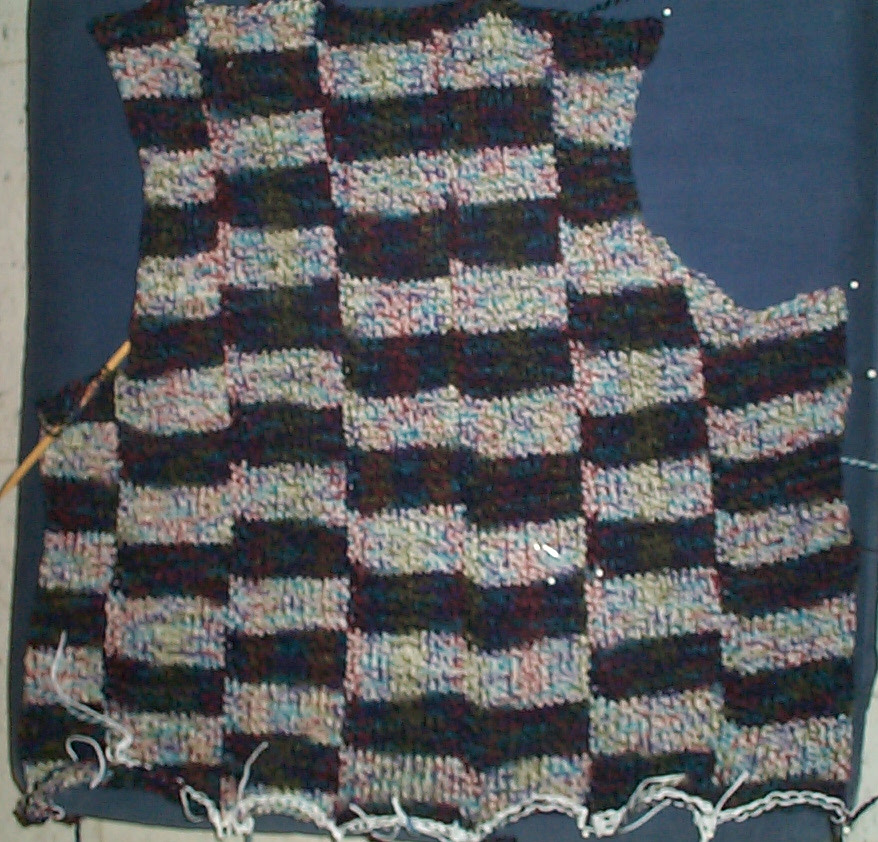
I like the haphazard arrangement of stripelets – that some almost align and others are flat mismatches with their neighbors. Working this yarn in strips is very quick. The fabric is quite nice, too – very light yet opaque. I’m on my third ball, and as you can see, am about 80% done with the back. At this rate I should have just enough yarn to finish the main pieces, although I may still need a contrasting yarn for the ribbings.
Working this has also been not as difficult as I feared. I’ve got my Sweater Wizard print out of the directions, including a nice thumbnail schematic. I’m working the strips to the schematic, using the program’s output to guide shaping. If you do this remember that the print out is for shaping a piece that’s knit horizon to horizon, and is symmetrical on both sides. If directions say something like “bind off 5 stitches at the end of the next 4 rows” know that working one strip at at time you’ll need to bind off 5 stitches at the beginning of the next two right side rows on the first strip (counted across the back, from right to left), and 5 stitches at the beginning of the next two WRONG side rows on the final strip. Sounds confusing, but taking it one strip at a time it has been relatively easy to get my tiny brain around the shaping.
I am planning on continuing around, joining the first strip of the front to the final strip of the back, producing a body tube that’s not joined at the shoulders. When I get to the shoulder strips (the saddle part of the saddle shoulders), I’ll work them back and forth as a strip that starts at the neck edge and continues to the cuff, starting out by ping-ponging between the upper edge of the front and back. Once that’s done I’ll work the rest of the arms off the sides of the now-established center strip. But the sleeves are a ways off yet. First I have to do the front and its deep V-neck.
SEMPRE STRIPE SADDLE PULLOVER
Now for something different. I suppose I should be going back and working on a previously started project but what the heck. Yarn is calling to me and it’s cold in my cubicle at the office. I’d like another sweater to add to my work wear collection. Luckily where I work a certain degree of sartorial eccentricity is accepted, so I can wear even my strangest sweaters without attracting approbation.
I picked up a discounted bag of Filatura di Crosa Sempre at Wild & Woolly‘s annual midwinter clearance sale. (My favorite time to shop at my favorite yarn store). 12 balls of a bulky weight self striper with good yardage. It’s a nice, soft and lofty wool, with a touch of nylon in a binding strand. 104 yards for 50g in a bulky is an excellent yield. I’m not petite, so 1248 yards for a pullover for me is going to be an iffy proposition. I’ll probably end up eking it out with coordinated color ribbings at cuff, waist and neck.
What to make from this demonstrative yarn? Swatching shows me that the thing veers between black and white background color segments, with each taking about 96 stitches before changing. That means that if I knit across my chosen diameter, each color stripe would last for about a row plus or minus. Interesting but too busy. And I don’t want pencil stripes around my entire perimeter. Instead I’m thinking of working on the principles I played with on the Modular Baby Blanket. Not in Log Cabin layout, but in narrow vertical strips, so that the colors stack into better defined segments. I also like the Kente Cloth like effect of narrow bands of un-aligned stripes next to each other. A possibility, indeed.
Now, how to squeeze this orange. Set in sleeves consume less yarn than do drop shoulder designs. Saddle shoulders even less. Although raglans are even more yarn-economical, I tend to avoid them for myself because they make me look like a strutting pigeon. While the differences among these styles aren’t huge, they can add up to about 50 yards – roughly half a ball of my chosen yarn. I like the way fitted saddle shoulders look on me, so I’ll go with them. Unfortunately, they present the most complex shaping challenge, complicated by this knit strip idea.
Having the right tools helps. I’ve got Sweater Wizard. I did up a gauge swatch and plugged in my values, fit, garment shape and size, and selected the saddle shoulder, V-neck knit sleeves from top options. It tells me that I’ll need 1196 yards with ribbing. VERY close indeed, I usually like to have a larger margin for error on a self-designed sweater. But I’ll go with it. As insurance, I’ll start on a provisional cast on and go back to add my ribbing later – in Sempre if I have enough left over, in that posited but as-yet-unpurchased coordinating solid if I don’t.
On to the strips. How to do them? I could work flat across the width of the entire piece, using 8 balls across and an Intarsia method to twist yarns around each other where the strips meet. That would work just fine. I’ve done that before on my Typeset Tee. That worked nicely. But I’m interested in introducing a vertical texture element on this project. I’m thinking of making the “seams” between the strips visible. In effect making the flaw of the visible join on the reverse of the Modular Baby Blanket, and making it into a design feature. To do that I’ll work in stockinette, but use the pulled loop method to knit each strip onto its neighbor.
Now for the fun part – with my instructions for how to knit the piece written (with software assistance) for a regular seam to seam working logic, but with a squirrelly knit method, how do I get there from here? Like usual. I’m going to wing it, aided mightily by the schematic, and guided by the pattern’s prose. I’ve got my stitch count set. I’ll mentally divide the schematic into strips and work each one starting with a provisional cast-on. I’ll do the required shaping as I encounter it. For example, if I start with the edge-most strip under the arm at the side seam, I’ll hit the armhole shaping. I’ll work those decreases as I come to them, and as true to the pattern as I can. Then I’ll break off the yarn, do another provisional cast on and work the next adjacent strip. In this quick-knit yarn the results shouldn’t take long to achieve. I’ve even played a bit with the idea a bit last night:

