MUSINGS
Again sorry there are no pix of the mid-block Paisley Shawl. Last night was a blur of my own take-home assignments, kid homework, and general domesticity. I didn’t have time to pin the thing out.
I did however have time to take up the Rogue again. I’m several rows further along, but not enough to merit a new photo. But it’s been about a month since I showed it, so here’s the last picture:
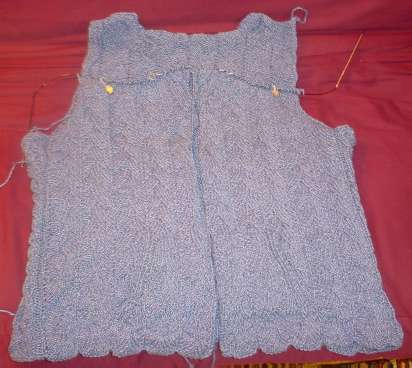
It continues to be a satisfying piece on which to work. Aided by my bargain basement improvised magnet board, I was able to pick up exactly where I left off. Which is a good thing because one of the leading causes of projects languishing un-done around here is that I put them down to work on another more pressing need, and forget what I was doing when I have time to resume work on them again.
In a way, this blog has been very helpful, too. I never thought to keep a knitting journal – too much work and too much time that could be spend actually knitting. But I’ve found myself going back a couple of times to look at previously posted entries on String, in an effort to figure out where my logic went wrong, or to see details of a past effort.
On the new project – you guys are a pack of evil enablers. I received quite a few notes telling me to toss rationality and obligation to the winds, and knit whatever would be fun. I might do that, or I might advance the "two summer tops for me" line item up the must-do list.
I’m finding myself in need of some wardrobe augmentations for my new job. A couple of three-season tops would be A Good Thing right now. Plus, I just received the Sweater Wizard 3.0 upgrade. I think it needs to be stress-tested. I’m thinking 3/4 sleeve pullovers, with something interesting going on, but not too lacy to wear without a camisole; maybe some waist shaping or bust darts in there somewhere to make them less boxy. Just the sort of thing to wear with chinos or black slacks in the back room cubes of a relaxed dress, high-tech company, in the work pod underneath the air conditioning vents. (Aren’t all cubes underneath air conditioning vents?)? My Taco Coat – The Sweater That Thinks It’s an Afghan – is already there, helping to fight this year’s unseasonal Spring chill.
As for yarns, I’ve got a couple of lots sitting in stash waiting patiently for attention. Among them are some particularly vibrant deep burgundy worsted weight cotton, and some light violet hand-dyed beaded cotton – also a worsted, leaning towards Aran weight. I wish I had more sport-weight cottons as I find them more comfy for multi-season layering, but not enough to make me go out and buy some.
ROGUE – PROGRESS; ALSO WHILE THE CAT’S AWAY
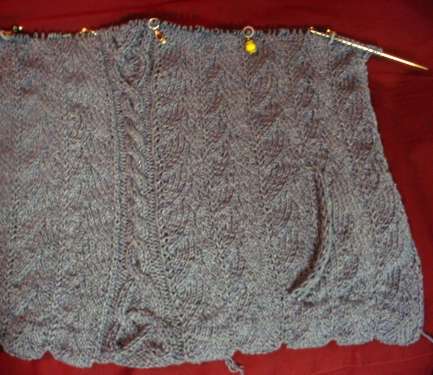
More progress to report on Rogue. I’m well into the fronts now, about 26 rows or so into Chart B. As you can see, the hood yoke pattern is working out nicely:
My next worry will be whether or not the shoulder areas meet up properly, but I’m assuming that if not, I can wing it. I’m also assuming that I’ll be able to tinker with the hood depth a bit if I need to compensate for my different gauge. I’ve already started the hood motif a bit later than called for in the pattern to balance out my smaller row gauge.
What’s happening to String or Nothing?
My guess is that you’ll be popping back a couple of times over the next week or so to see what I’m up to. But you’ll find this page still current. Life is going to intrude in my life big time over the next two weeks. I will try to provide updates, but I can’t guarantee them. In the mean time, feel free to browse the archives. To be immodest, here are some of the more interesting bits here:
Reference shelf – articles that contain knitting advice that I hope is useful. Of particular note under this category:
- Yarn Labels 101 – a basic round-up of what’s on yarn label and how to read them.
- Yarn Labels 102 – a continuation of yarn label info deciphering
- Skeins 101– What are the common ways yarn is sold. How to prepare them for actual knitting.
- Skeins 102 – a continuation of the previous, with more on how to get started
- Gauge 101 – Basic hints on making and measuring gauge
- Why Toe-Ups? – The case for toe-up socks
- One Circ/Two Circ Sock Knitting – Using the one giant circ (aka Magic Loop) and two-circ methods for knitting in the round
- Self striping sock yarn repeats – Lengths of pattern cycle repeats for some common self-stripers
- Twisted stitches – What is stitch mounting and why does it make a difference?
- Attaching I-Cord – A couple of ways to knit the stuff onto the edge of your piece
Gadgets – tools used by knitters. Most useful posts include:
- World’s cheapest magnetic board
- Making your own stitch holders
- Strickfingerhuts – Those twisted wire and plastic molded yarn holding gizmos used by Continental style knitters for stranding.
- Stupid Stitch Marker Tricks – They’re useful for lots more besides skittering behind the sofa.
- Strickmuhles – I-cord mills – waste of money or nifty gizmos?
- Needle gauges
- WPI tool
Knitting Patterns – Mostly quick and easy stuff I haven’t gotten around to adding to wiseNeedle yet:
- Simple fingering weight wrist warmers/fingerless mittens
- Fingerless Whatevers – fingering weight wristlet/fingerless mitten with shaped thumb gusset
- Lacy scarf in Berroco Zen or other medium-weight ribbony yarn
- Center-out poncho
- Teeny sock for Red Sox fans
- Paw Warmers – Ultra-easy kids’ bulky yarn wristlets/fingerless mittens
- Lemonade hooded shawl with pockets schematic
Stitch or color pattern graphs:
- Interlace repeat
- Bunny from TNCM
- Dragonflies from TNCM
- Texture patterns – 16 stitch wide mock cable, lace panel
- Texture pattern – Serpentine Rib
- Texture pattern – Broken Rib Check
- Texture pattern – ultrasimple six row feather and fan variant
- Texture pattern – points
- Texture patterns – Dragon Skin and variant
- Fleur de Lys
Embroidery – My other life. This stuff is mostly show and tell.
- Forever coif – blackwork coif in progress. Still.
- Underskirt – what the coif is supposed to go with
- Blackwork sampler – doodling with the patterns from TNCM
- Counted thread dress yoke
- Heretical modern multicolor sampler, plus reverse of the yoke, above
- How to drive your roomates nuts with stitching
Food – Man and woman do not live by needlework alone:
- Cassoulet
- Latkes
- Buffalo Rum Ball Cookies
- Oysters – a chocolate hazelnut cookie
- Cinnamon nut elephant ears for the cookie-challenged
- Nadia’s Yassa Chicken
There are more categories over on the side. Happy browsing!
ROGUE – GOT IT!
As predicted, in those half-sentient moments between putting down the book, taking off the glasses, turning off the light and finally falling asleep all became crystal clear. I am not really sure what my problem was with the first few rows of the hood surround, but it’s fixed now. I’m busily bumbling along, about two inches into the chart. Perhaps was brain dearth brought about by lingering flu. Perhaps it was too much stress-itis. Or perhaps it was a touch of seasonal stupidity. Whatever it was, all is humming now, although I might rip back one last time because I’m not too happy with the look of some of the earliest increases. But that’s another story of another disorder.
While I await enough Rogue progress to make an interesting photograph, I present an odd little chance acquisition. I’ve written about Balich’s before. It’s an artifact from another time – an old fashioned general merchandise store several blocks from my house. They stock piles of inexpensive things you didn’t know you could live without, all tumbled together with minimal regard for organization. They happen to have a stock of Boye knitting needles and crochet hooks, plus Red Heart yarn, some crochet thread and vintage 1960s pattern leaflets. (Want a truly authentic ’60s era crocheted poncho? This is the place to find the original instructions.)
I went in to get some keys made, and while I was there I leafed through the pile of dusty patterns. There in the middle of the stack I found one and only one of these:

What is this?
It’s a 78-page yarn yardage/gauge comparison chart in purse-size format, put out by Northern Needlecraft, copyright 1980. It’s divided by yarn weight, and presents info for about 1,000+ or so yarns current in (and discontinued by) 1980. While some of the more widely distributed products by still extant or recently deceased/merged/otherwise gone yarn makers are also present in Valuable Yarn Guide, many of the yarns and makers in this little booklet aren’t. Even more interesting, for some yarns it offers up multiple gauges. Already it has come in handy, helping me decipher a vintage pattern calling for Columbia Minerva Calibar. Which turns out to be a 100% wool bulky, knitting at 16 st = 4 inches on US #10s, 2 oz., 75 yards.
A fantastic find! Especially for the princely sum of $1.25.
ROGUE – MORE PROGRESS
I continue to plug away at Rogue. I haven’t had much free time to knit lately, so I’m not zipping along as others might. The latest modification I’ve made has had to do with the smaller gauge of my chosen yarn, plus the texture pattern I’m using.
After getting to Direction #5 (split for back), it was obvious that I had more stitches than the pattern calls for. No surprise there. I cast on more than required (that gauge thing again). So I adjusted the number to be decreased. I’ve got more stitches than are called for even for the largest size, but my back armhole decreases are proportional to the original. I’m now in the work even for 38 or so rows. I’m upping that to 40 because it takes me to the beginning of my next repeat.
I can see that the step after this is going to be especially problematic. Rogue forms its shoulder decreases using short rows. A very clever technique. I’m not quite sure how or even if I will be able to integrate the short row shaping with my texture pattern. I may have to un-engineer that particular bit of cleverness, graphing out the shape of the decreases and moving them back to the ends of the rows. More on this after another two or so inches of work.

You are looking at the back of the piece, folded along the nifty side cables. You can see somewhat of the shaping made by the cables; the bound off underarm; the decreases that form the bottom of the armscye; and part of the work flat bit just before the shoulder shaping. Things look a bit curly because I’m a lousy photographer, and didn’t pin this piece out before attempting the shot.
Several people have written to ask me to go back to Webs with them. While it might be fun, I’m afraid I’m rather short of time, plus my yarn budget and available storage space are now stretched to the max. Please note I wasn’t theinstigator of this trip. I was pulled along not-so-reluctantly by the other members of an informal (and anonymous)Tuesday knitting group. They were kind enough to adopt me earlier this year, and I’ve had great fun watching their projects grow.
BACK ON TRACK – ROGUE
Things are finally back to almost-normal around here. That includes getting back on track with my own knitting. I’m almost done with Chart A. In two more rows I’ll reach the point where I am supposed to divide for the back and front:
So far I’m quite pleased. The little dragon skin texture is working out well; the side cable has been lots of fun to knit. The next challenge will be to play with the texture pattern and any shaping decreases that will be happening around the armhole. I’m not worried though. I worked out the logic of trimming this particular repeat on the pocket. Shaping around the armhole should be more of the same.
The piece is weighty, and the yarn is a killer splitter but that’s to be expected working in a multistrand cotton of this type. Target Child is also quite pleased that I’m back working on the thing.
In other news, ten days of above 40oF plus savage rain has revealed the muddy glory that is Massachusetts in the spring. That means that sometime in the next three weekends our next major sweat-equity house project will commence – the removal of The Ugly White Picket Fence. I leave you with an archive photo from last year, so you can see Ugly Fence in action (plus the giant pine tree that used to lean on the house):
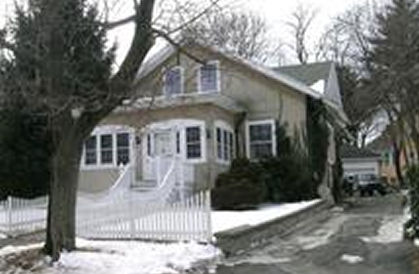
Why do I think my fence is worthy of destruction?
- It has nothing to do with the architecture or style of the house
- It’s the wrong size/proportion for the lot
- It’s not on the lot line, and shrinks the visual footprint of the house
- It’s discontinuous, and serves no purpose of containment or security
- Walking down the chute path to the front door makes me feel like a sheep about to be dipped
- It’s a pain to rake around, shovel over, and mow around. The snow dunes it formed this past winter completely covered it and required major excavation to move.
- For some reason, the previous owners included a massive sign post as part of the fence, as if they were going to be hanging out a doctor’s shingle or a permanent "for sale" sign (you can see it near the front door). I hate it.
- It needs a severe scraping, sanding, and repainting. A problem since it’s probably covered in lead paint.
- We know someone who wants it (lead paint and all), and who will help us take it down for the privilege of hauling it away and re-using it.
MORE ROGUE; WEB TOOLS
Here’s about 11 inches or so of Rogue. In the continuing cascade of mods made necessary by my shifting to a thinner yarn and smaller gauge, I’ve worked six of the side cable repeats before branching back to complete the side panel chart. No problem there.
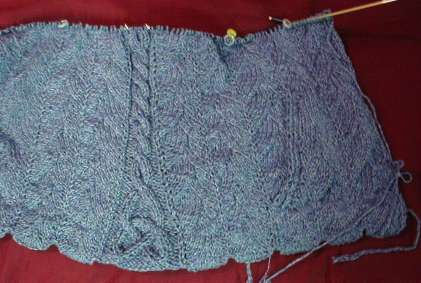
I do note however that as expected – this is going to be a weighty object in cotton. Cotton weighs more per yard than wool. 50 grams of cotton yarn will contain fewer yards than 50 grams of a comparable thickness wool. So far I’ve used about 300 grams of cotton. That’s roughly 2/3 of a pound. My finished piece may end up weighing as much as 2 or 3 pounds!
Useful tools and toys:
I’ve gotten quite a few notes lately asking for help with metric conversions, needle sizes, fabric care, garment sizes and yarn weights; confusion about how to figure out repeats given a set stitch count; and requests for descriptions of basic knitting techniques. Here’s a raft of tools that I find useful for these purposes, plus some other useful or interesting (or amusing) things tossed in.
Knitting needle size equivalencies (FiberGypsy):
http://www.fibergypsy.com/common/needles.shtml
Metric/Imperial unit conversion calculators:
http://www.sciencemadesimple.com/conversions.html
http://www.mcnichols.com/products/productsupportfiles/conv.calc.htm
Factor generators (good for finding possible pattern repeats from a stitch count total)
http://www.markhorrell.com/tools/factors.asp
http://www.counton.org/explorer/primes/primecalc.shtml
Descriptions of the count (X/X) systems of yarn weight and yardage used by machine knitters:
http://www.cara4webshopping.com/cara_free/yarn-wts.htm
http://www.yarns-and.com/yarnto.htm
How-to videos or animations showing basic knitting techiques:
http://www.knittinghelp.com
http://www.dnt-inc.com/barhtmls/knittech.html
Tutorial on reading lace knitting charts (Heirloom Knitting):
http://www.heirloom-knitting.co.uk/pages/beginners_guide2.html
Fabric care label symbols:
http://ohioline.osu.edu/hyg-fact/5000/5556.html
Heel stitch count chart (dead link retrieved using Wayback Machine)
http://web.archive.org/web/20021016042840/http://www.magma.ca/~vanmac/heels.htm
Garment size charts:
http://www.yarnstandards.com/sizing.html
http://www.fibergypsy.com/Charts_and_Other_Helpful_Resources/Size_and_Measurement_Charts/
Sock size survey results:
http://www.needletrax.com/SockSizeAnalysis.html#
Jaya’s round-up of knitting software availble for Palm handhelds:
http://www.palmsource.com/interests/knitting//
Back neck shaping for the Math-Aware:
http://www.hillcrestknitwear.com/knitting%20info/ff%20back%20neck%20formula.html
Toys
Sockman
http://www.renfro.com/consumer/Renfro/funstuff/sockcalculator/
Assorted esoteric Google time-wasters (Google Blogoscoped):
http://blog.outer-court.com/archive/2005-01-29-n34.html
DEMO SOCKS; STITCH FACTORY – MAKE ONES
I’m split among several different knitting foci right now. First, there’s the upcoming class. I’ve finished the hand-outs I’ll be distributing covering both two circ and one giant circ production;? the practice pair of socks; and the sample mini-sock we’ll be making during the workshop. I’m as ready as I’ll ever be. I’ve also gotten word of a potential design commission. If and when that occurs and I’m permitted to bruit about the details, I’ll report them here. In the mean time, here are my practice socks, dutifully completed one with the one giant circular technique, and the other using the two-circ method:

Nothing special. Just plain old Regia 6-ply Crazy Color stockinette socks, with Dutch heels, and standard toes grafted to finish. On the pair with the turquoise toe I took care to finish out the color repeat such that the line of grafting ended up being a contrasting color, so the class can see where it is.
Having put the class socks to be, I’ve picked up Rogue again. A couple of people have asked if I’m doing mirror image Make Ones on either side of the verticals that run up the design. The answer is "Yes."? I don’t usually stoop to this level of ultra-refinement, but for this project because the two Make Ones are separated by only one stitch, using them does make a visual difference. Here’s how I do them:
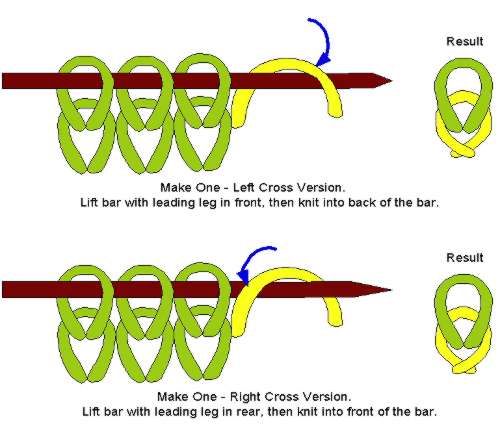
To get a make one with a top leg that crosses lower right to upper left (S-style), I lift the running bar between two stitches, mounting it such that the leading leg of the bar is in the front of the needle (standard stitch orientation). Then I knit into the
back of that bar.
To produce a make one with a top leg that crosses lower left to upper right (Z-style), I lift the running bar between two stitches, mounting it such that the leading leg of the bar is in the back of the needle (opposite of standard stitch orientation). Then I knit into the FRONT of that bar.
As to which to deploy in what situation – most of the time I doesn’t matter. My standard issue default Make One is S-style. If a pattern just calls for one, that’s the one I do. In cases where mirrored ones are needed, I’ll experiment. Sometimes the final result looks better if the S-style Make One is deployed on the left of a visual unit, with its sister Z-style deployed on the right. Sometimes it’s the other way around. On my Little Dragon Skin I’m working the Z-style on the left of the center spine, and the S-unit on the right.
Rogue photos later this week. I promise.
KNITTING FROM GRAPHS; ROGUE; SOCK CLASS
Answer to a quick question:
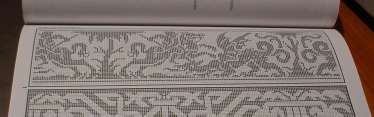
Can the Fleur de Lys motif shown yesterday be used for knitting?
Sure. Like anything graphed, the fleur can be knit, but with a caveat. In cross stitch, the individual units that build a motif are square. They have a 1:1 aspect ratio, as wide as they are tall. Likewise, needlepoint units are (mostly) square. They’re worked on a square grid, but if they’re in tent stitch the stitches themselves are a diagonal spanning that square. Therefore the edges of color areas don’t always appear as neat and trim as in cross stitch. This graph is composed of square units, and is intended mostly (but not exclusively) for stitchers.
Knitting presents a different challenge. It’s rare for a knitting stitch to have a 1:1 aspect ratio. Knitting stitches are usually wider than they are tall. It’s not uncommon to have a stitch gauge of 22 stitches = 4 inches, but a row gauge of 30 rows = 4 inches (that’s the standard for a classic DK weight yarn). That works out to an aspect ratio of 22:30 or 5.5/7.5 if you simplify the representation. That’s NOT square. If you knit up a graph that’s been drawn out on a square ratio grid in this aspect ratio, you’ll end up with a motif that’s somewhat squished looking north/south direction.
There are several ways around this. First is to choose designs that have a bit of north/south spread in them to begin with. They’ll look different when compressed, but if they’re elongated enough to begin with, they’ll end up with a reasonable set of visual proportions. My lion graph, shared eons ago for people who wanted to do lion sweaters as described in the Harry Potter books is this kind of design. It’s got enough "natural" height so that it looks o.k. if worked verbatim in a somewhat squashed aspect ratio.
The second is to graph out your design on a grid that has an aspect ratio that matches your knitted gauge. If you want to do this, the English language Japanese website ABCs of Knitting features a very nice graph paper generator. It’s listed among the tools on the page’s lower right.
A third way to get around this problem is to blow up the design. Very simple motifs can sometimes be made quite dramatic by reading a unit of two knit stitches by three rows for every square on the grid. Not practical for larger gauge knits, as even a small motif could outgrow the area intended for display, but occasionally useful none the less.
A fourth fix is more of a fudge. Depending on the complexity of the motif you want to knit, you can take a plain old square unit graph and by repeating every third or fourth row (depending on your gauge), you can stretch it out to compensate for aspect ratio squish. Obviously, this works best for simple motifs rather than complex ones, and at finer gauges. I’ve done it in sport weight yarn or finer, and it has worked well enough, with the duplication fading into the overall look and not being evident. This method can be problematic though for things like graphed letters adopted from cross stitch samplers, and for ultra-small geometrics whose motifs are built on single square units. For the latter, I might be tempted to use the third method, above.
Of course one can always ignore the problem all together, placing the borrowed motif so that the stretched dimension becomes a design feature and not a bug. This is what I did with last year’s crocheted dragon curtain. I worked across the narrow dimension of the curtain rather than starting along the bottom edge, in part because the non-square nature of my filet crochet blocks would distort the motif too much if worked in the latter direction. You can see the original proportions of the graph, and the finished piece.

If you look the knight, you’ll see that in my crochet he’s taller and a bit squashed east/west compared to the original. But if I hadn’t called out the difference, I’d bet you’d not have noticed.
Rogue
Rogue progresses. I’m another two inches or so into the body. Not much more to show beyond yet another blurry photo of a slightly larger blue object, so I’ll hold off until I can post pix with more content. I can say that in spite of competing demands on my time reducing the total amount I can spend on the thing, now that I’m past the pockets and my multiple mistakes, it is fairly flying along. I am looking ahead to the next set of complications – alterations to the armhole area and beginning of the hood’s frame that might be necessary due to my gauge re-computation.
Sock Class
I’m beginning my prep for my upcoming sock knitting class, reading up on and trying out the Magic Loop technique. It may be heresy to admit, especially for someone who is going to be teaching a workshop on this method, but I find it to be fiddly and (for me) much slower than using DPNs. But I realize that there is a legion of DPN-haters out there who view this method as being their ticket to finally making socks. So I’ll persevere for their sake.
The plan is for a three-hour workshop, during which I’ll hand out an original pattern for a very abbreviated small cuff-down sock – roughly baby size, but with sadly truncated ankle and foot parts to save time. The idea is to walk the class through that ENTIRE sock in the given time, from the cast on, through the heel, and finally down to the toe. A normal size sock would be too time-consuming to get far enough for a meaningful experience, especially around the heel, so I’ll cut back on the plain old stockinette areas, leaving in just enough to get familiar with the manipulations of the needle(s). I’ll also hand out an original pattern for a normal size sock that the class can take home and use for practice.
One further complication – I prefer to teach on socks knit at DK or worsted gauge – again, fewer yet larger and easier to see stitches. But the extra-long circs for the Magic Loop method are in short supply, and are quite expensive. Likewise for the two circs needed for that method. I don’t think it’s fair to ask the class to come equipped with needles in a size that they (probably) won’t be using for their regular sock knitting, so I’m going to do the thing using standard issue sock weight yarn.
I’ve taught knitting classes before, mostly on toe-up socks, basic crochet, and on beginning knitting. I’ve been told I pack too much detail into the time alloted. In this case I will have to agree. Ideally I’d do either single oversized circ or two circ socks, not both. I do intend the choice to be either-or, as the methods are largely compatible. Learners will get their choice of working one or the other, and except for needle manipulation the basic sock-making steps should be the same for both. Obviously more thought on this is in order. If any blinding insights of clarity and nuance suggest themselves to me, I’ll post them here. Otherwise, it’s just more socks.
ROGUE – PROGRESS; SOCK CLASS
UPDATE: FLEUR DE LYS DESIGN BELOW HAS BEEN ADDED TO THE PDF COLLECTION UNDER THE EMBROIDERY PATTERNS LINK, ABOVE.
Well, I did make some progress on Rogue over the past several days. I’ve finally gotten past the grief of the pocket (my fault); finished the equivalent depth of the body behind the pocket, and fused the two together.

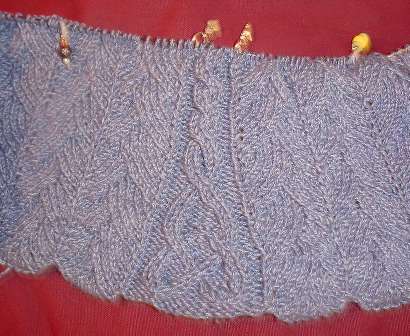
Here you see the area adjacent to the nifty pretzel-terminated side panel, showing off the contrast between that knotwork design and the Little Dragon Skin patterning.
The pocket fusing step went off without a hitch. I remembered to bind off four stitches of the body at either side of the pocket fusing row, again to leave a notch inside which the zipper will be installed. Here’s a process shot, with the pocket stitches held on the pink needle, and the body on the silver circ. Because my right-side rows have so much shaping, I made sure to do the fusing on a wrong-side row – all purls in the patterned part.

Progress however has been somewhat less than it might have been because I’ve gotten two new needlework assignments since Thursday.
First, my mother has asked me to design a needlepoint pillow top for her that incorporates multiple Fleur de Lys motifs in wine, an off white background, and some sort of framing mechanism. She’s looking to make a piece on 16-count canvas. This is pretty much a “bring me a rock” assignment (one of those in which your efforts are greeted by the response “Wrong rock. Try again.”) Here’s my first attempt at just a single motif:

The second was a last-minute request from Wild & Woolly in Lexington, MA to cover a class in sock making. They has a workshop scheduled for March 20th that covers cuff-down socks on two circs and one oversized circ (aka “Magic Loop”), and the original instructor has had a last-minute conflict. I’m the designated hitter for this one. Which means that because my own favored method for socks is toe-up on DPNs, I have to do a bit of brushing up before I can demo and explain those methods to others. If you’ve signed up for this class, please don’t worry. I guarantee that in two weeks I’ll be fully confident in the material to be covered.
ROGUE – WHEN IS A POCKET NOT A POCKET?
When it exists as a flap, to be made into a pocket later.
Here’s my admittedly limited progress. While there’s not a lot on the needles, what you see here is the third iteration of my larval front pocket(s). Why third?
Because as usual I outsmarted myself.
I was trying to play elegant with the texture pattern, working it in as unperturbed as possible, in spite of the march of the ever-narrowing pocket edge. I was also trying to watch a movie with subtitles. Not a good combo, as I ended up losing track of which decrease/increase pairs had been eliminated, and which still existed. Twice. So after ample ripping back, some extreme driveway shoveling, yet another snow day with kids at home, I present the pocket flaps:

I really like the twisted rib edge as opposed to the garter stitch edge on these.
The problem I had is a common one. Faced with a texture stitch repeat and edge decreases, how does one go about reconciling them? For patterns that depend on increases and decreases to form the texture, this can be especially painful. It’s less painful though if you take the time to look and examine the pattern.
Most (but not all) textures maintain stitch count row to row. For those that do, and build their structure with increases and decreases there are usually equal numbers of each in each row. Yes, a minority of patterns (especially older patterns) alternate rows where increases and decreases happen, but for the most part, easy to knit texture patterns conform to this rule. If yours does, subtracting along an edge for a sloped pocket or armhole isn’t too tricky.
First, identify the pairs of increases and decreases. They should be near each other, although there is no requirement that they are adjacent. My chosen texture pattern is a 20 stitch bounce repeat, mirrored around the center column (stitch 11, and the first/last stitch). Each side of the symmetrical piece incorporates two increase/decrease pairs.
It’s relatively easy (or so I say now) to pare this down by five-stitch units. As my edge decreases infringe into my pattern repeat space, I eliminate the increase/decrease pair in the affected five-stitch unit, replacing any pattern shaping in it with plain old stockinette. I do need to keep track of where my repeats begin and end, then count back from the last full repeat to determine what needs to be happening on any partial slices between that full repeat and my rapidly encroaching pocket edge.
This sounds much harder than it actually is. Let’s say I was working in Little Dragon Skin and my garment pattern called for me to eliminate the stitches shown in yellow:

Instead of working the texture design’s increases and decreases as usual, I’d substitute plain old knits for the ones shown in blue. I’d eliminate the base pair on Row 2 because I know I’ll be trimming above it, and the directional distortion in starts will soon be lost. Then I’d kill the ssk decreases on rows #4, 6, 8, and 10 because I was also eliminating the make ones that offset the loss of those stitches.
There are other ways to do this. I tried to get cute, and leave the decreases in on the theory that I could move the stitches eliminated by the slope of the pocket edge over to those points by working them as normal but without their companion increases. What slipped me up is that the rate of decrease does not remain the same over the entire pocket edge. It speeds up a bit part way through, making a graceful curve. Computing in that curve, my texture pattern, drinking a glass of wine, and reading subtitles all at the same time didn’t mesh, and resulted in my re-workings and the object lesson here.
I repeat what I can see is becoming my knitting mantra:
"If you go about making life difficult for yourself, things ain’t gonna be easy."
