THE DOODLES CONTINUE
The idle moments bit that’s taking place on the ground cloth area NOT used up by my two forehead cloths has taken on a life of its own. Frankly, it started out as a delaying tactic – stitching was too much fun to stop and tend to finishing the two now-completed kerchiefs. But it has become more than that.
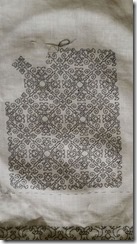
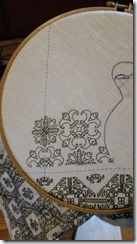
I started out with another large-fill design, of the scale that rarely gets used in inhabited blackwork work. The motifs are just too big to fit into any but the absolute largest areas in a standard dark outline, fancy fill project. But they are on the scale of the regular fills shown in rectangular areas at the bottom of the famous Jane Bostocke sampler. So why not?
This top fill (for the time being) is quasi-original. I drafted it up, based on this linear design, appearing on another oft-cited sampler, the V&A’s T.14-1931.
I’ve used that design as a teaching piece for years. It’s in TNCM, and a tutorial on double running stitch logic featuring this design, complete with a chart for it is here. For this piece I used the center motif, rotating it fourfold, and elongating the “stems” into a grid with a secondary motif. I stitched it using two plies of the four-ply hand-dyed silk floss I am using.
The next bit was the motto, described in the last post, so I won’t reiterate here.
Just below the motto is another motif that will be featured in the sequels to TNCM – a scrolling grapevine, with very angular, striated branches sprouting off more organic and woody trunks. I wrote about it here before. The space for it was too small to show the entire repeat, so I focused on the center bit, which left the gnarled fat branches off. Again, this is stitched using two strands of the silk.
Below the grapes is a curious design, also from the TNCM sequels. Although it’s shown in the book without a fill, I chose to execute it with one here. The design is entirely mine (one of the few totally unsourced pieces in the collection). On this one I experimented with thread thickness. All of the stitching is double-running, but the heavy outlines are worked with the full four-strand thickness of the floss. The flowers are done in two strands, and the radial symmetry stepped fill is done in one strand.
After this comes another narrow strip pattern across the top (I can’t abide wasted space); plus a narrow border to frame the entire area. The border and possibly the narrow top strip will be done with thread from a second batch of black silk, also hand-dyed with a historically appropriate dye by my Stealth Apprentice. The goal is for me to “beta test” her output, and report back on the stitching qualities of each of the slightly different recipes.
As for the sequel(s) to TNCM – yes. I am working on them. Yes, it’s going slowly. It’s intensive, and having finished the whole book, having to rip it apart and remake it as two or three smaller volumes is proving more problematic than I thought. Some pattern pages need to be re-composed, patterns with cross-references in their historical profiles have to be sorted and kept together to avoid jumping between volumes; the intro material needs to be re-written so that it appears in balanced (and relevant) quantities across the volumes. Indices and referenced bibliographies entries have to be properly assigned to appear in the same volume as the patterns to which they are linked. This is taking time, and frankly, after a whole day of heavy editing for my professional job, sitting down and doing the same thing at night is slow going.
Why am I re-editing and cutting the thing apart? Affordability. Right now at a heavily illustrated 184 pages, including historical essays, how-to material, 75 plates with over 200 individual designs, research discussions, the bibliographies and indexes, for electronic publication, the break even point would put the per-copy cost in the neighborhood of $175, and even more for on-demand paper copy printing. That’s flat out too much. I am hoping to offer smaller books at a more accessible price point.
So apologies. They are coming. Slowly.
CLOTH #2 – FINISHED, PLUS BONUS DOODLE
Waaayyy behind on my blogging, I’m now not only finished with the stitching on the first Forehead Cloth, I’m finished with the second one, too.
Because I have only a limited supply of the excellent hand-dyed thread, and the first triangle had a voracious appetite, I decided to work the second both smaller in size, and with only two plies of the four-ply silk floss. I am not sure that the thread maker intended it to be used stripped into plies, but with patience and gentle encouragement, I was able to do so with minimal tangling and no losses. Gentle finger spinning counter to the direction that the plies were assembled helped, as did tension on the strand while separating. And it worked! I have more than enough to finish, as you will see below.
On the design – I went through a couple of iterations. I started with one from my forthcoming book:
I liked the larger motif, but not the smaller one. It has a very prominent cross, and while it might not have been so apparent when a large area was worked, I noticed it. I am not comfortable wearing crosses, so I drafted up a new companion motif to use in its place. You can see the old one just peeking out at the top of the photo below, for comparison.
I liked the visual balance of this one better. While I lost some of the light/dark checkerboard effect of the original, I gained an interesting play of curves and frames. Considering that this pattern conforms to the 45-deg/90-deg/180-deg composition rule found in just about every historical piece of linear stitch count-work (“Knight’s Move” two-over-one up stitches are exceedingly rare), seeing curves at all is almost an optical illusion.
Here is the final, plus a bonus doodle on top, which I’ll discuss in a bit:
After I finish the bonus bit on top, I will remove the basted guidelines, gently clean my stitching, and draft out the lining and strings. I’ve got some pre-shrunk muslin I’ll use as the lining. I may use a length of this even weave, folded or rolled into a quarter-inch strip for the ties. That appears to be the treatment most like the extant historical pieces. The other option is using some purchased woven tape, which I think would look clunky and mismatched, by comparison. In any case, there is no needle lace trim, adornments on the tie strands, or other embellishments for these. I suppose I could add paillettes to this one, but I’ll save that bit of effort for a future matched coif-cloth set.
On to questions from my inboxes:
You said you proof against established work. What do you mean by that?
I cue my work off established, stitched areas. Unless there’s no way around it, I rarely establish a very long outline or outlying branch teetering off into as yet unstitched territory. I tend to bend my working logic so that I am usually stitching relatively close to finished bits. That way I can easily confirm that I am still on-count and parallel to the rest of the piece. If I am off, it’s almost invariably because I missed count on a diagonal, going over or up an extra thread (sometimes both). I can reduce the chance of error if I do that diagonal by eyeballing a one-stitch horizontal or vertical displacement from an established grid point, rather than making the diagonal with no point of nearby reference. In this way I am constantly checking my work for “true.”
Another way to proof off established work is to work attachment point stitches when they are encountered, if I intend on finishing up that divergent design segment and making that meeting later on from another direction. It’s much easier to see and meet up with a little “twig,” and to spot potential deviations early on, than it is to meet up with a solid line of stitching, where identifying the individual stitches can be tricky, later on.
What thread are you using/Where did you get it?
I got it at Birka – four ply filament silk hand dyed using iron and tannin (full disclaimer here) by my Stealth Apprentice. She is launching a small venture producing historically inspired Roman jewelry, plus embroidery threads and ribbons dyed with historically accurate materials and methods. I am helping by being an early customer, sponsor, and “beta tester” for the threads.
Now on to the doodle.
That little lump in the hand-held frame above the two triangle-shaped forehead cloths… What the heck is that?
It’s a doodle. I had thread and ground fabric left over after I finished the two cloths, so I decided to just aimlessly stitch away, trying out some of the larger fills or smaller all-overs that rarely have scope to come out and play (like those on the forehead cloths themselves). This particular design is from my free collection of fills, Ensamplario Atlantio. No plan here, just idle stitching while the ground is still in one easy-to-handle piece. Along the way over the past week or so, my doodle has decided it wanted to bear a motto and become a mini-sampler. So here is progress to date:
I’m not sure what will be below the motto, but whatever it is will keep me doodling for another week or two. For those who want more info, the alphabet I used is here.


