FILE FOLDER ARCHAEOLOGY
It happens that this week a couple of people have stumbled upon this old unfinished sampler that now hangs on my Wall of Shame.

It’s unfinished because I had started it as a wedding present for a friend. Sadly her engagement ended before the wedding. I never felt like finishing it off after that, although I still have it. It’s also the only piece I have ever done on Aida. I didn’t enjoy working that ground, which is probably another reason why it has languished since the early 1980s.
The reason these folks found it was that they were looking for a charted Hebrew alphabet. I knew I had one. Somewhere.
I had drafted one up, and it had gone through several iterations. The first was for a contemplated but never started service project for my family’s congregation – a Torah cover, to be exact. But I never had the time to follow through, so the scrap of graph paper was stowed in my doodle notebooks. About 8 or so years later I began this gift. I rescued the earlier scrap, played with the letter forms a bit based on the Macintosh pixel based Hebrew font. I added back a bit more of the pen and ink serifs, and messed with proportions a bit. After this project went into dormancy that doodle joined the earlier one. And I went looking for both this morning. Needless to say I didn’t find either. But I still have the sampler, so I re-graphed the alphabet based on how I stitched it (and tinkered a bit, again).

Click here for an easy to save PDF of the Hebrew alphabet chart above.
The first two lines at the upper right are the full alphabet. The five characters immediately below them are special. A few of the letters are written differently when they appear at the end of a word. You can’t write without them, so I offer them, too.
In addition to just a plain alphabet, I have charted up some of the most commonly stitched words.
Shalom – Peace
Mazel – Luck
Matzah (also spelled Matzoh) – The unleavened bread eaten at Passover. Some families have special linen napkins to cover the matzah for their Seder celebration.
Lechem – Bread. Like the Matzah cover for Passover, some families have a special napkin to cover the bread for holiday meals and for Shabbat.
Mizrach – East. In Europe it was the custom long ago to mark the Eastern wall of a place of worship or learning as a reminder of Jerusalem. It’s not done as often now as it used to be, but Mizrach embroideries do pop up on Judaica collections.
Now please don’t go asking me for translations or interpretations. I’m pretty much a late entrant to Hebrew School and I continued to struggle with the language in college. So much so that I ended up dropping back to French for my language credit to graduate.
The Hebrew chart will also join the others on my Embroidery Patterns tab.
Another Artifact of the Past
While I was hunting around for the alphabet doodles, I stumbled across the original of the handout I used to use when teaching basic sock knitting. It contains an abbreviated sock that we would work through together in the workshop, plus some of the other sock patterns available here on String. Also, it includes the pattern for the famous “You’re Putting Me On” Socks by express permission of Judy Gibson, that pattern’s author. Judy was major inspiration for sock knitters in the early days of the Internet, and merrily led hundreds of us astray into projects we wouldn’t have dared without her support. The 15 page booklet ends with some other useful references, including a chart of standard sock sizes and measurements, some (mostly dead) links to sock resources on the ‘net, and a visual on Kitchener grafting.

Click here for a free download of my Sock Knitting Workshop handout.
I’ll probably add it to my books page. Eventually.
BY POPULAR REQUEST – FAUX WEAVE TOE-UP SOCKS
It’s been a long time since I added a sock knitting pattern. But I had so many requests for this one after I posted about it on FaceBook, that I had to write it up and add it to the collection. Like all the rest it’s toe-up, with a short row heel. It’s written for DPNs, but it’s very easy to adapt to work on a circular needle, or use with the two-circular method.

So to that end, my pattern for the Faux Weave Toe-Up Socks can now be found on the sock section of my knitting patterns page.
As for the ongoing work on the eyeball bolster cushion, I’m up to hand-sewing on the second side of the zipper on the end flap. Inside out the thing looks quite menacing. Like an gigantic and omnivorous sea cucumber. It’s slow going but I’m getting there. I hope to post final pix of the thing stuffed with its interior cushion quite soon.

HORN TOOTING
We’re now in the run-up to the holiday gift-giving season. New folk reading here may not realize that in addition to stitching I also knit. And I have dabbled in knitwear design in addition to embroidery design. I didn’t pursue knit design intensely because selling patterns to publications and yarn houses requires adherence to deadline, production of the photographic model, working up a wide range of sizes, and use of yarns/colors I did not always favor. But I have released some patterns over the years that make excellent, quickly made gifts. Many of those are here on String-or-Nothing, and are free downloads. Here’s a round-up of them.
Chanterelle
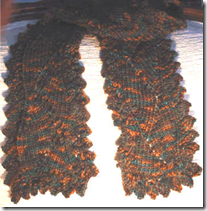
Chanterelle is a scarf requiring just one skein of variegated or self-striping fingering weight or sock yarn (aka 4-ply). For me it’s like potato chips, hard to make just one because every ball produces a different and unexpected result.
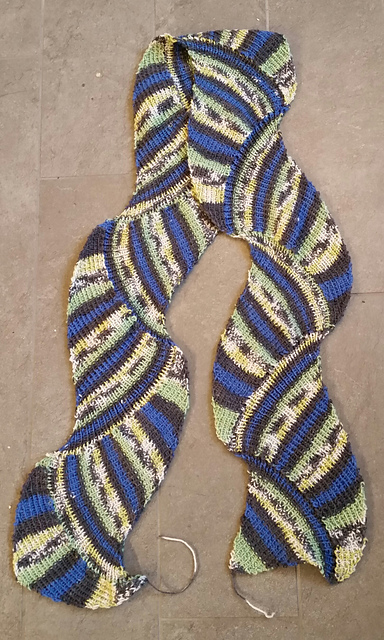


The flag scarf was especially surprising. That one was from a stash-aged ball of Schoeller and Stahl’s Fortisimma Socka Color, #1776. I gave it to a friend who wore it to cheer on her kid in an international sports competition. By contrast the glowing purples creams and blues next to it was worked up from a single ball of Schoppel Zauberball Crazy Colors.
Other notes on knitting this one up include that it uses US #5s, making it less dense than the same yarn knit into socks, and that blocking is NOT recommended. You want to preserve those gentle curves.
You can download the pattern PDF directly here, and also find it under the Knitting Patterns tab, at the top of every page here on String. It also has a Ravelry page so you can see what others have done with the thing.
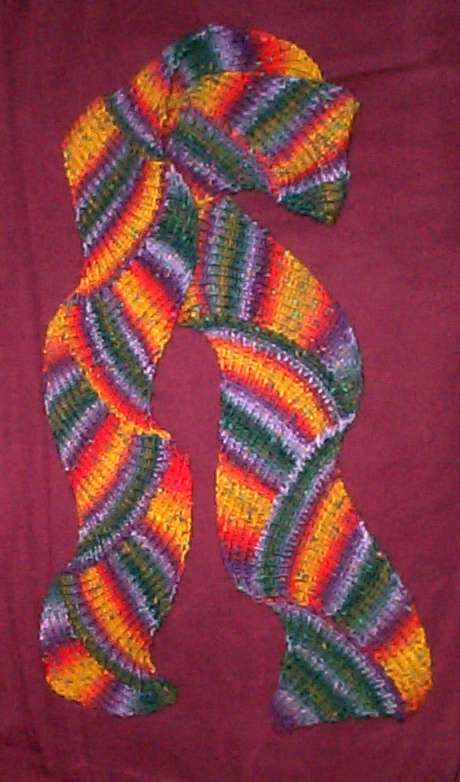
Kureopatora’s Snake
Not everyone loves working with fine yarns. Here’s an alternative.
This was the original expression of the idea I adapted into Chanterelle. It’s exactly the same pattern, but designed for a heavier yarn. Noro Kureopatora was a DK, and one of the first wildly variegated yarns I ran into and this one evolved from idle play with some leftovers from another project. This pattern works well for DK, Worsted, and Aran weight (native label gauges of 22 to 18 stitches over 4 inches or 10 cm). At DK gauge on a US #6 one scarf needs about 250 yards of yarn. A bit more for the heavier gauges or for a wider scarf.
Kureopatora’s Snake can be downloaded here, or found under the knitting patterns tab I mentioned before, and a Ravelry page.
Kombu
Kombu, named after the Japanese name for Kelp, also features gentle undulations, but it’s a lace patterned piece that starts with a small bit of edging. The main body is picked up from the edging and knit up from there. The same edging is used left and right – worked simultaneously with the scarf body. When the desired length is achieved, the same edging is worked across the live stitches of the top. I’ve done it several times in DK, sport, and worsted weight. It’s dreamy in luxury fibers, and just as nice in inexpensive yarns and even cotton. Pick something that’s not too fuzzy for this one though, the drama is best seen in a yarn that shows crisp stitch definition.
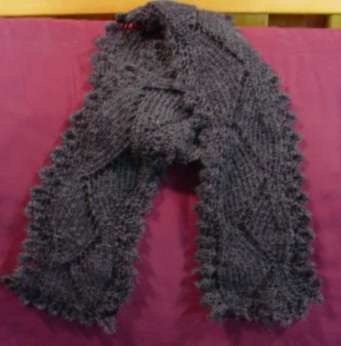


The blue one is in Marks and Kattens Indigo Jeansgarn, a guaranteed to shrink and mellow DK weight 100% cotton. The grey is in a cashmere blend. The red is a stash-aged nubbly worsted weight cotton/wool blend – possibly a mill end from Classic Elite circa 1997. It even looks good in a variegated, although truthfully I prefer the solids for this one.
Click here to download Kombu. Like the others it’s on the Patterns tab, although that page also has a link to a German language translation of the thing. Kombu also has its own Ravelry page.
Spring Lightning Lacy Scarf
This one is a bit more of an involved knit that the ones above. It’s more open, worked in lace weight yarn and like all lace requires savage blocking. I’ve done it in white and black. I don’t recommend the black sequin bearing mohair, but the white alpaca/wool blend from a small farm boutique producer was a delight to knit.

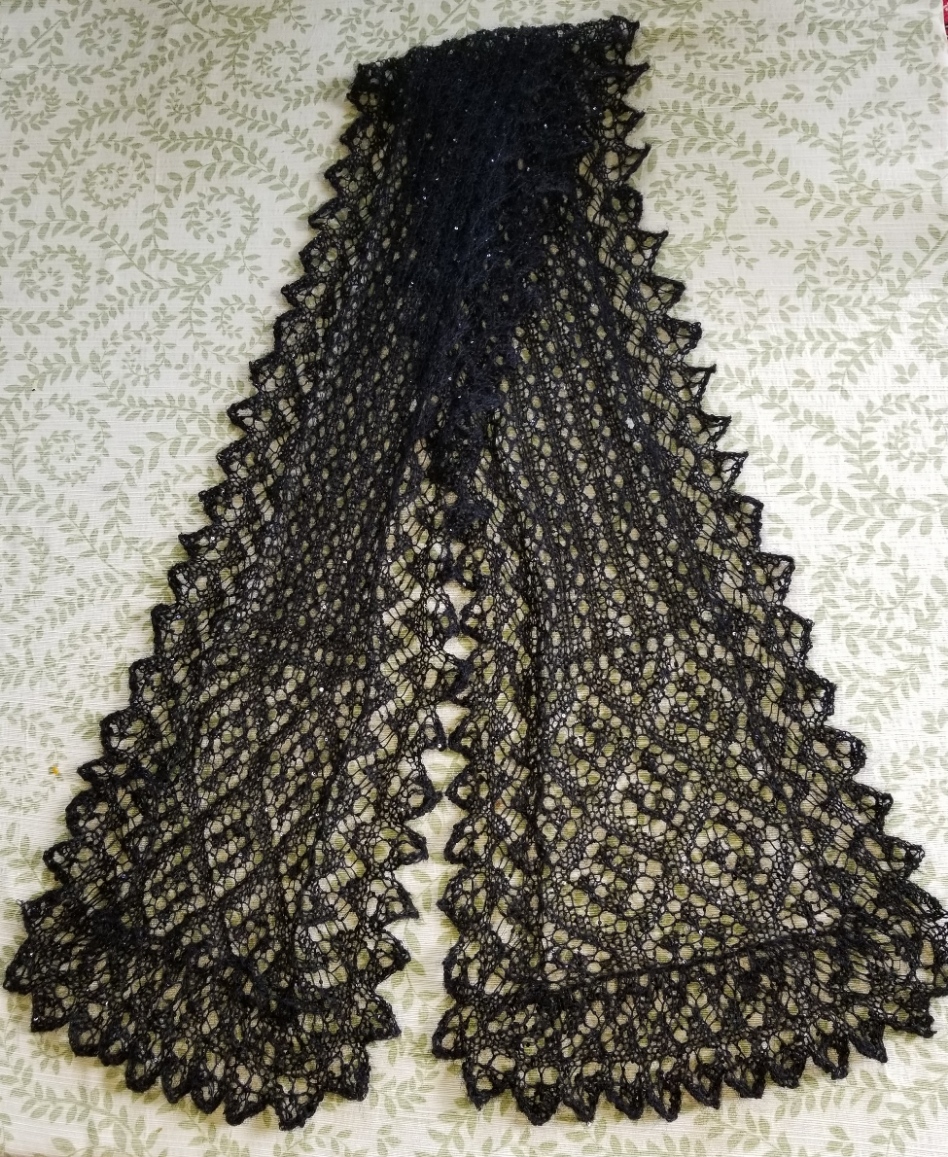
For this one the center panel was completed first, and then the edging was knit along the ends and sides after the center was complete.
Spring Lightning is here for direct download, and is also on the Patterns tab. It too has a Ravelry page, although so far I’ve been the only one to attempt it.
Darth Scarf
Back when the Resident Male was running every day he asked for a scarf that wouldn’t flop around. I took a really soft alpaca wool blend, a worsted weight, and using a simple Shaker rib, knit him a deeply corrugated tube to wear as a gaiter or cowl-style scarf. He named it because in black the ribbing pulled up over the nose and mouth looked vaguely Vader-like. This one is a very quick knit and uses about 300g of yarn.

Sadly, I really don’t have a good photo of it. Think of a deep, thick turtleneck, divorced from the rest of the sweater.
You can download Darth Scarf here, and on the Patterns tab. Its Ravelry page is here.
Knot A Hat Earwarmer Band
This one is still a favorite of mine. It’s my go-to for heavy outdoor labor in the winter, being warm enough on the ears, but not a sweat-inducing box for one’s head. It has however inspired quite a bit of creativity, with folk adapting it to be a dome-shaped hat or cornered toque by continuing to work a solid color crown after completing the stranded colorwork section. My own is double sided, but not double knit. After I finished the knotwork pattern, I did a couple of turning rows in purl, then did the same width in simple stripes of the two colors. When I was finished I turned the striped section inside and seamed it to the cast-on row.
The knotwork design isn’t Celtic – it’s adapted from “Opera Noua composta per dominco da Sera detto il Francoisino,” by Matteo Pagan and Guliemo da Fontaneto, a modelbook published as a resource for embroiderers, printed in Venice in 1546. The same design appears in several other similar works from that general timeframe (pattern sharing and pattern piracy are not new phenomena).

Knot a Hat is written for a 4-ply yarn. Something a bit loftier than standard hard-spun classic sock yarn would work best. It would be an excellent vehicle to show off the gorgeous hand-dyed fingering weight yarns produced by smaller, independent dyers.
Download Knot a Hat here. Or grab it from the Patterns tab, above. The range of adaptations into a true hat are on the Ravelry page. To see them go to the sidebar “About This Pattern” box, and click on the line “19 Projects in 110 queues”.
Socks
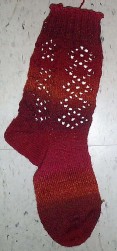
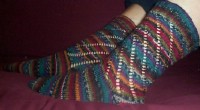
Socks, I got. Lots of socks. In everything from light fingering (3-ply) through Aran weight (12 ply). I even have a sock lapel pin knit from reinforcement thread. But I do specialize. My socks are all done the same way though – toe up with a figure-8 toe, a plain foot, and a short rowed heel. Then Something Happens for the ankle part (lace, ribbing, textured stitches, stripes, stranding, whatever tickles my fancy), and ended off with simple ribbing at the top. I usually try to use K2P2 ribbing for the cuff, but I enjoy trying to mate it organically with the texture pattern below, so it’s occasionally eccentric, with bits of K1P1 in there.
I know folk are hesitant about the figure-8 toe, but I don’t find it a burden. Use any toe you prefer. Also note that while I write for DPNs, it’s easy to do all of these patterns on two circular needles, or using the Magic Loop method. And since the heel is totally symmetrical, you COULD start and knit cuff down, and end with a traditional toe. In any case, these patterns are VERY easy to modify and adapt to use your choice of ankle treatment.


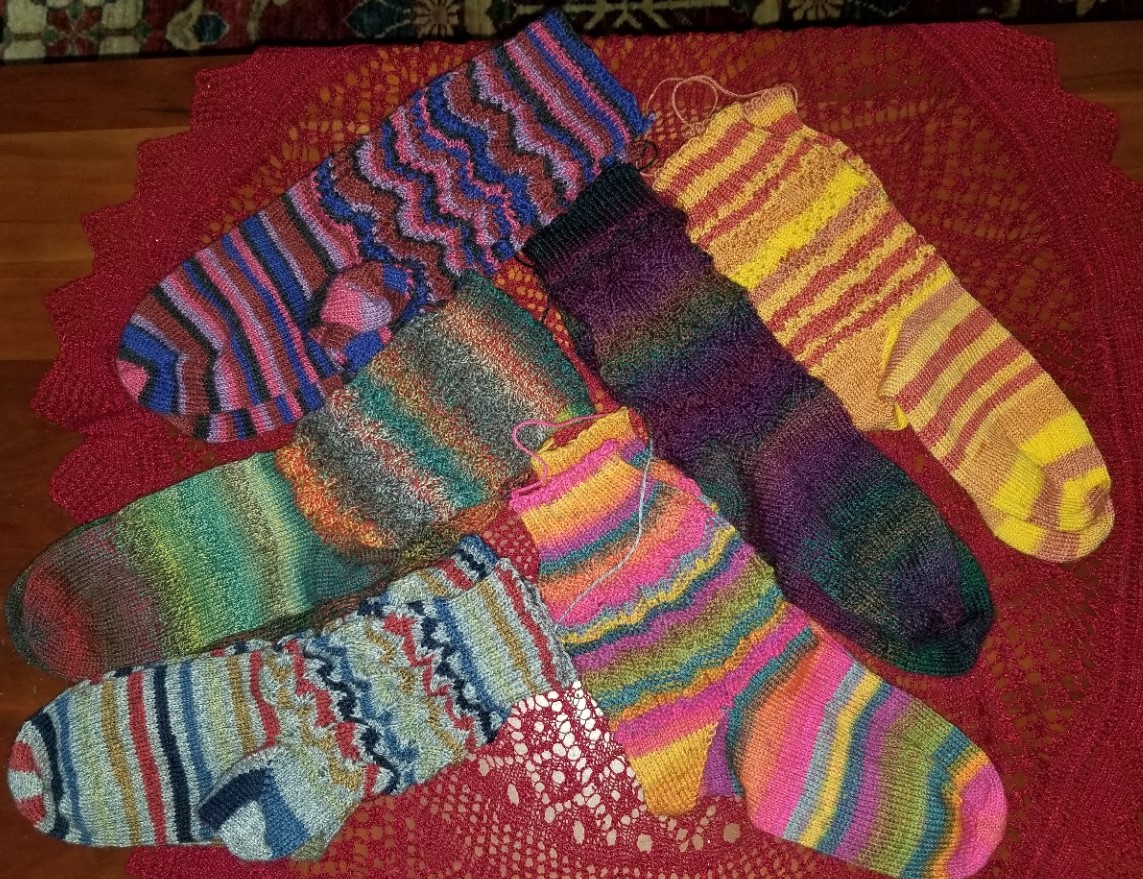

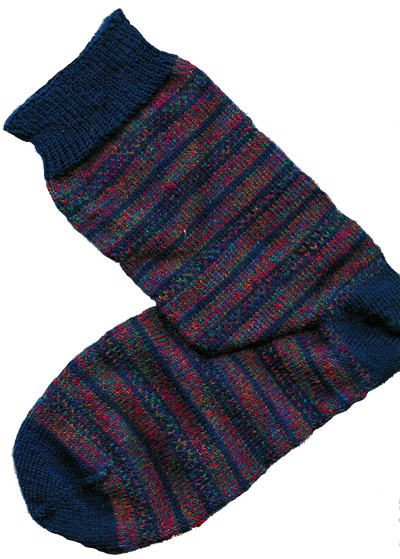
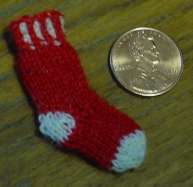


These are all representative of my production, and not all of them are drafted out in specific. They all follow the logic of the posted patterns, though. Firefighters Socks are done in heavy worsted/Aran weight yarn. Simple Toe Up Socks are in DK/light worsted. Jelly Bean, See Saw, and Pine Tree are in standard sock yarn. Impossible Socks are also in standard sock yarn in spite of the very fine gauge. And the Teeny Red Sox Sock is in reinforcement yarn. Instead of posting direct links to each of these sock patterns, I will just send you to the Sock section of the Pattern page. There are also several eyelet or texture patterns in the last section of that page that I’ve used on those socks. Most of the sock patterns also have Ravelry pages, but listing them all would also be confusing.
And More
There are lots more things to play with on the knitting patterns tab. If you are a quicker knitter and looking for a larger gift, there’s a kid’s poncho, a child-size faux chain mail outfit, several blankets – some knit in motifs and seamed together, others knit in one piece, several hats including one for Revolutionary War era re-enactors, and a backwards-engineered Bolivian Ch’ullu, a lace blouse and a knit jacket, plus mittens, wrist warmers, and texture/lace stitches. And my full Ravelry Designer Page is here.
So happy Holiday Gift Knitting! May neither time nor yarn run out before your chosen day of gift giving.
CHANTERELLE – EVERYTHING OLD IS NEW AGAIN
UPDATE: THE DOWNLOADABLE PDF PATTERN FOR CHANTERELLE HAS BEEN ADDED TO MY KNITTING PATTERNS PAGE, AT THE TAB ABOVE.
A bit more mindless knitting this week past. I have two balls of Zauberball Crazy, a wildly variegated (and expensive) fingering weight yarn. Both balls had minor damages to them, and I wanted to work them up quickly. But I didn’t want to make socks. This stuff’s colors are so over the top that I wanted to make something that would be seen. Scarves are ideal. I’ve done several before using Wingspan and its variants, or other designs calculated to display the gradients to their best effect. But I wanted to do something different. I cast on for a couple of designs I found on Ravelry, but wasn’t particularly pleased.
What to do….
Ah. Thinking back, my most popular pattern of all time is Kureopatora’s Snake. That was written for a DK weight variegated, and was the result of happy experiment. It’s basically Entrelac, but slimmed down to just the two edge triangles, and worked over a large number of stitches. The result is a graceful interlock of trumpet shapes, with the trumpet’s spread accentuated by working a purl into (not just slipping) the K2tog join stitch at the end of each partial row before the turn.
Why not make that one up in fingering weight, and publish the pattern adaptations that make it work?
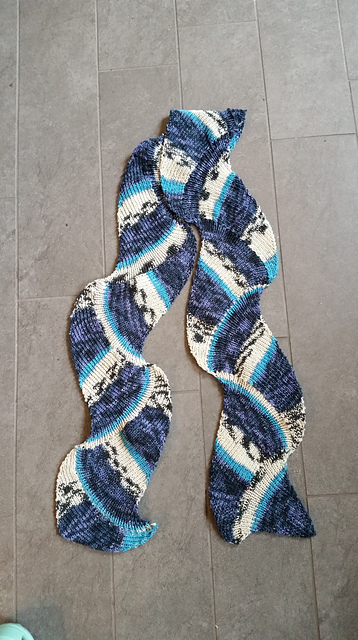
So I present the first of the two test pieces. I’ll be starting the second tonight:
First off, I’ve renamed the thing. Now that it’s independent of the original yarn, I re-dub this one “Chanterelle.” Yes, there are ends (the initial cast-on, bind off, plus a couple of damages). A personal quirk – I don’t darn in the ends until I am ready to give my knit gift to the recipient. This will sit un-darned until then.
I will be writing up the full design again under the new name, but for now, start with the Kureopatora’s Snake pattern, available for free at the Knitting Patterns tab at the top of this page.
CHANTERELLE:
A FINGERING-WEIGHT VARIATION OF KUREOPATORA’S SNAKE
Grab your ball of fingering weight variegated yarn. ONE ball of Zauberball Crazy made this scarf, with only about 3 yards of yarn left over. It’s about 5 inches wide (a bit under 8 cm), and 66 inches long (a bit under 168 cm). Gauge is pretty much unimportant. I recommend a MUCH looser gauge than one would use for socks. I used a US #5 needle (3.5mm) for this project.
Follow the Kureopatora pattern as written for the initial section, but instead of stopping when you have 30 stitches on the needle, keep going until you have 46.
Work the entire scarf as-written, until you have completed ten full trumpet sections (not counting the partial trumpet done to initiate the project).
Follow the directions for the final finishing section, EXCEPT that instead of working the final section as normal until there are 15 stitches on each needle, keep going until you have 23 stitches on each needle. Then on every row that begins on the edge of the scarf after that, work a SSK instead of the increase you have been doing throughout the prior sections.
DO NOT STRETCH-BLOCK this piece. If you feel it’s lumpy, moisten it and pat it flat, but do not use wires or pins to stretch it out. You want to preserve those graceful curves.
WITHOUT A NET
I’ve finished the no-pattern/no-gauge pullover I started the last week of September, at the beach:

It’s a short but not cropped front-pocket/baggy-fit raglan pullover, knit in rustic New England style two ply Aran weight wool. The only seaming was grafting the top of the front pocket to the body. The thing is knit top down. Had I decided to add a pocket when I got to that point, I’d have worked it in, and knit the bottom edge into the body, and obviated any need to sew at all.
Younger Daughter has first dibs on the thing. It should fit her nicely, and if not – I’m sure I’ll find another family member or friend to wear it.
Here’s a working-method summary. I hesitate to call it a fully developed pattern because I haven’t calculated sizes, made exact measurements, or estimated exact quantities.
Wesley Crusher Unisex Pullover – A Method Description
Fits size 44 chest
Gauge: approx 18 stitches = 4 inches (10 cm) in stockinette
Recommended needle size: US #10 (6mm) circular for body, or size to get gauge; US #8 (5mm) circular for ribbing. You may wish to start the neck and finish the cuffs using DPNs of the same size.
If working the optional hand-warming pocket, either an additional US #10 (6mm) circ, or a pair of US #10 (6mm) straight needles, and a piece of contrasting color string, preferably a cotton in fingering weight or thinner, that will be used to baste the row to which the pocket is grafted, for better visibility in keeping that seam straight..
Materials: One skein of Bartlett Yarns 2-Ply Aran weight rustic wool (about 210 yards/192 meters) in shoulder color. 3.5 skeins of the same yarn in a contrasting color (about 735 yards/672 meters) for the body.
Other tools: 5 stitch markers, two large stitch holders or spare circular needles (any size) to hold the sleeve stitches while the body is being completed. Yarn sewing needle to darn in ends.
Neckline:
Using smaller needle, cast on 100 stitches, join in the round and work in stockinette for approximately 2 inches (a bit over 5cm). Switch to larger size needle.
Raglan Increases:
Place marker, knit 35 stitches (front); place marker, knit 15 stitches (sleeve top); place marker, knit 35 stitches (back); place marker, knit 15 stitches (other sleeve top). Knit one round. The four markers indicate the center point of the raglan increases. There will be one marker left over. We’ll use it later.
Increase round #1: *K1, YO, knit until one stitch remains before the next marker, YO, K1, move marker*. Repeat this three more times.
Increase rounds #2 and #3: Knit.
Continue working increase rounds 1-3 until you have enough depth on the shoulders so that the under arm area ends about under the arm (don’t worry if there isn’t enough depth for the front and back raglan “seams” to meet. We’ll be adding stitches under the arm, and working them into gussets. I did my raglan increase set 18 times (making 18 holes in a rows down my raglan “seam,” and ending up with 71 stitches between my front markers, and 51 stitches across each sleeve). Be sure to finish after round 3.
Separate out the sleeves:
Knit 36 stitches. Place the fifth marker. Continue knitting across the front to the first raglan marker. Set it aside. Take a stitch holder or spare circular needle (or a piece of string threaded onto a yarn needle) and slide the 51 stitches of the sleeve onto it. We’ll revisit them later. Set aside the next raglan marker.
Returning to your working needle and replace the marker. Holding the sleeve stitches out of the way, cast on 16 stitches, preferably with a half-hitch cast-on to minimize bulk. Place marker. Continue in stockinette, knitting to the next marker. Set it aside.
Set aside the stitches for the second sleeve in the same way, sliding them onto a storage device, replacing the marker, casting on 16 stitches, and placing the remaining marker after the cast-on stitches.
You should now have a marker indicating the center front, plus four markers – two at either side, isolating the cast-on stitches. Continue in stockinette to the center front marker. We are going to use that marker at the center front as the “begin round” point from here on.
Work the body:
Knit one round in stockinette.
Gusset Decrease Round #1. Knit to the side marker, move marker, SSK. Knit until two stitches before the other side marker, K2 tog. move marker. Knit across the back of the piece until you reach the other side marker. Move it, SSK, knit until two stitches before the next marker, K2tog, move marker, knit to the center front marker.
Gusset Decrease Rounds #2 and #3: Knit.
Repeat Gussett Decrease Rounds until only two stitches remain between them. On the next row, knit to the marker, take it off, knit one stitch, put it back; knit one stitch and set the second side marker aside. Repeat this for the back. You should now have a tube with about 176 stitches in total – 88 for the front and 88 for the back.
Continue knitting the body tube until it is as long as you want, minus 2 inches (about 5 cm) for the ribbing.
Optional hand warming pocket:
You will need a second ball of your body yarn at this point, or you will need to work from both ends of your current skein. I’ll call this secondary source the “pocket yarn.”
Using your original body yarn, knit all the way around your piece until you reach the marker for the second side. Move it and knit 19. 25 stitches should remain before the center marker. Holding your original yarn and your pocket yarn together, knit to the marker, then knit 25 stitches after the marker. Drop the pocket yarn and continue around with your original yarn (don’t worry if you’ve mixed them up – it makes no difference). Make sure that the pocket yarn emerges from the PUBLIC side (the knit side) of the work after you drop it, before you continue around with the original yarn. Stop when you get to the start of the doubled stitches.
Take your second #10 needle (straight, circ, whatever). Working carefully with your original needle, knit one stitch of each doubled pair and slide its brother onto your second needle. When you are done you should have 50 stitches on the pocket needle, and the same original 88 for the front (plus 88 for the back) on your original body needle.
Knit one round on the body, just to make sure everything is snug and safe.
At this point you can either finish the body or continue on to the pocket. Your choice. If you opt to finish the body first, skip below to Ribbing, then return to this point.
For the pocket – you will be knitting flat, back and forth. This means that to achieve stockinette, you will be knitting on the right side of the work, but purling on the journey back.
Turn the sweater upside down. We will be working from the bottom back to the shoulders for the pocket.
Pocket Row #1: Knit 5. Place marker. Knit 40. Place marker. Knit 5.
Pocket Row #2: Knit 5, move marker. Purl 40, move marker. Knit 5.
Pocket Row #3: Knit 5. Move marker. SSK. Knit to 2 stitches before the next marker. K2tog. K5.
Pocket Row #4: Knit 5. Move marker. Purl to next marker. Move marker. K5.
Pocket Row #5: K5. Move marker. Knit to next marker. Move marker. K5
Pocket Row #6: Knit 5. Move marker. Purl to next marker. Move marker. K5.
Pocket Row #7: K5. Move marker. Knit to next marker. Move marker. K5
Pocket Row #8: Knit 5. Move marker. Purl to next marker. Move marker. K5.
Repeat Pocket Rows #4 through 8 until 38 stitches remain on the pocket needles, or the pocket is deep enough. If you want it deeper, work remaining rows without decreasing. When done, DO NOT bind off the stitches. Instead, break the yarn leaving about 2.5 feet for seaming.
Keeping the pocket stitches on the needle, smooth it out against the front of the sweater. Note the row where the pocket should be grafted. On the row ABOVE that, take your piece of marking string, thread it onto your yarn sewing needle and run it through that row for the width of the pocket. This will make identifying the row for seaming easier. If you are confident in being able to graft a straight seam, you can skip this step.
Using your extra long tail end left over from the pocket, graft the pocket stitches to the row immediately below the one you have carefully marked with basting. Invisible horizontal seaming works nicely for this, uniting the live stitches off the working needle with the body stitches.
Ribbing:
Return to the original needle holding all of your body stitches. Take your smaller ribbing needle and working from the original needle onto the new smaller needle, start from the center front marker, and work K1, P2,* K2, P2* ending with K1 for the stitch immediately before the marker. Discard the larger needle and using the smaller one, continue in this K2P2 ribbing until you’ve worked 2 inches (about 5 cm) or the ribbing is long enough for you. Bind off in pattern.
Sleeves:
Take your #10 needle and transfer the stitches for your sleeve to it. Take your body yarn and starting at the left point of the stitches you cast on underneath the arm, place marker, pick up 8 stitches place the center sleeve marker (suggest this be a different color), pick up another 8 stitches to finish filling in the gap, place the third marker, and knit around the sleeve. Knit around until you have returned to the center sleeve marker. NOTE: As you continue the sleeve from this point you may find that it gets uncomfortable to use a larger diameter circular, even if you “loop out” the excess cable as you go. Feel free to switch to DPNs or a two-circ method at any time during completion of the sleeve.
Sleeve Gusset Decrease Row #1: Knit to 2 stitches before the next marker, K2tog, move marker. Knit around the sleeve until you reach the other sleeve gusset maker. Move it. SSK, knit to the center sleeve marker.
Sleeve Gusset Decrease Row #2 and #3: Knit
Repeat Sleeve Gusset Decrease Rows #1 to 3 until only two stitches remain between them (one on either side of the centermost marker). At this point you should have 53 stitches. You can remove the two sleeve gusset markers and continue working until you sleeve is long enough (minus 2 inches for ribbing). On the final row before starting the sleeve ribbing, start the row with a K2 tog, so that you have 52 stitches. Switch to the smaller needle(s) and starting at the center sleeve marker, K1, P2, (K2, P2)*, ending with a K1. Work this K2P2 ribbing for about 2 inches (5 cm). Bind off in pattern.
Darn in your ends, and you’re done.
NIECE, SLIGHTLY DAMAGED
As happens to so many, my gymnast niece Veronica had a disagreement with gravity, momentum, torque, and a body part; and has landed in cast. She’s on the mend, but disappointed to miss out on the remaining Spring competitions, and (living in Buffalo) regrets her now chilly, exposed toes.

Knitting to the rescue!
To cheer her up and warm those toes, I whipped up a quick set of tie-on toe socks. I used worsted weight washable acrylic or superwash wool blends, all leftovers from prior projects, and US #5 needles, playing with simple stranding, eyelet patterns, or no design at all, as whimsy manifested. I think that the pale blue is in fact left over from a Fishy Hat I knit for Veronica years ago…


The toe is my standard Figure-8 no-sew toe cast-on, but rendered wide enough to go over the end of the cast. After that I worked about three inches of foot, and ended with 20 rows of ribbing. I made crocheted strings to tie the things on. Apparently I didn’t make them long enough (being several hundred miles from the recipient), and they are not quite adequate to tie behind the heel. The directions below are modified to add the extra, needed tie-string length.
BASIC TIE-ON TOE SOCKIES FOR THE CAST-BOUND
Washable worsted weight yarn with native gauge of 5 stitches = 1 inch. I recommend an acrylic or a washable wool.
Set of five US #5 double pointed needles (can also be done Magic Loop or two-circ style)
US size G crochet hook for ties (ties can also be done using I-cord, braiding, or any other method you desire)
Tapestry needle for ending off ends.
Gauge
Roughly 5.25 stitches = 1 inch. You want these socks knit tightly for warmth and durability.
Directions
No-Sew Toe Cast-On
Take two of the needles and wrap the yarn around them, figure-eight style. The yarn should loop around the bottom needle and cross to the opposite side of the top needle. Loop over it and then return between the two. The result should look something like this:

Continue wrapping the yarn this way until you have 12 loops on each needle. Let the end dangle free with no knots or other securings – you’ll need to work looseness in the first row out towards the end later. Knots will interfere with this in-flight adjustment. Take a third dpn and knit across the top needle. Take the fourth dpn and knit across the bottom needle. Be careful not to twist stitches – one needle’s loops will be “backward” with the leading edge of the loop on the rear side of the needle. Make sure you knit into the rear side of these “backward” loops. You now have a very narrow and slightly awkward strip of knitting suspended between two needles. There should be 12 stitches on each needle. Don’t worry if the stitches running down the center are loose, in a couple of rows you can tighten them up by carefully working the excess down towards the dangling tail end.
Toe Shaping
Row 1: k1, M1, k5. Using another dpn, k5, M1, k1. Using a third dpn, k1, M1, K5. Using the fourth dpn – K5, M1, K1. You should now have 4 live needles in your work, each with 7 stitches on it.
Row 2: Knit all stitches
Row 3: *k1, M1, k6 [Note – this is the end of first needle, remainder on second needle] K6, M1, K1* repeat
Row 4: Knit all stitches
Row 5 and subsequent odd rows: Continue adding one stitch after the first stitch of the first and third needles, and one stitch just before the last stitch of the second and fourth needles.
Row 6 and subsequent even rows: Knit. When you have 14 stitches on each needle (56 stitches total) the toe is done.
Foot
The foot is just a cylinder worked on all 56 stitches, for about 3 inches after completion of the toe. You can work this in plain stockinette, or go wild here, working simple stranding or eyelet lace patterning. Repeats of 4, 7, 8, 14 or 28 stitches are all possible. For example, my wide eyelet ladder is
Row 1: *K2tog YO2, SSK*
Row 2: *K1, K1P1 into double YO, K1*
Ribbing
When the foot part is complete, it’s time for 20 rows of ribbing. I tend to use K2, P2 ribbing because it pulls in more than K1P1 ribbing, but feel free to use anything that’s comfortable for you. Bind off and darn in all ends.
Ties
I crocheted my tie strings for speed. I located the “side welts” – the stitch column that corresponded to the beginning of needle #1 and the end of needle #4, and the stitch column that corresponded to the end of needle #2 and the beginning of needle #3. It will be very visible on the side of your toe. I walked those points up to the ribbing for my designated side attachment points – one on each side of the sockie.
Using the crochet hook and my yarn, I worked a two-stitch column of single crochet.
Row 1: Single crochet 2, chain 1 (this is the turning chain)
Row 2 and subsequent rows: Skip turning chain, single crochet 2.
I made my strings about a foot long, but I strongly suggest making yours about 18 inches long. Darn in ends, and you are finished.
I report that the sockies work, mostly (they need longer ties), and the recipient is warmer and happier. Heal quick, Veronica! We all want to see you dancing (and tumbling) real soon.
SQUIDLEY REDUX
It’s been brought to my attention that the Squidley squid hat pattern I posted in December, 2011 has disappeared from this blog site. Although lots of links broke – understandably – when we ported the site from the old hosting service to WordPress, I have noticed that things go AWOL. Especially older blog pages, for no apparent reason.
So I repeat myself. Eventually I’ll redraft this and add it to my pattern archive, reachable at the links above. But for the time being, here’s a blast from the past.
__________________________
SQUIDLEY – A METHOD DESCRIPTION
A brief foray back into knitting. A long-deserving, cephalopod-loving pal of mine bespoke a hat. Not just any hat, a hat in the shape of a squid. How could I turn down a challenge like that? So this weekend past, finishing up last night I made one.

There are several squid hat patterns on the Web, but I didn’t want to make any of them. I wanted to make a more hat-shaped hat, but with fully-rounded tentacles. I thought about knitting the tentacles first, then working up from there. While there are glove patens that start fingertip and work down, I dismissed the idea as being too fiddly. And seaming the tentacles onto a brim-up cap – even with mattress stitch onto a provisional cast-on row wouldn’t give the “bodily integrity” I wanted. So I decided to work top down with a double-knit ear band, with tentacles worked in the round.
The following post-mortem can’t properly be called a pattern, but the adventurous might be able to work up their own hat from it.

I used approximately 150g of a DK-weight rustic wool, and US #6 (4.0mm) 10-inch long double pointed needles. I also used 12 stitch markers (four of one color, eight of another), plus a double pointed needle of indeterminate size as a large stitch holder later on. I used small scraps of white felt to make the eyes, and sewed them on. Large sparkly buttons or commercial googly-eyes could also be used. Duplicate stitch in a day-glow yarn would be suitably squid-like.
My gauge ended up being a very stretchy 5.25 stitches per inch, with the double knit section being looser.
I violated every rule of knitting, making no gauge swatch, and planning nothing out before hand. I can’t speak to quantity or yarn name – this being a coned Classic Elite remnant from their old back room, well aged in my stash.
I started at the top, with a standard figure-8 cast on, the same one I use on all my socks, putting six stitches each onto two needles (12 total). From there I increased standard-sock toe style (at both sides of the toe, every other row) until I had 40 stitches total. Then I decreased at the same points I increased, but upped the rate to every row, until I had 20 stitches total. I worked a couple more rows plain to finish off the little squid-wing nerdle at the top.
After that I designated five evenly spaced increase points and began shaping the top of my hat, working make-one invisible increases at each marker, working them every other round. About 2 inches down from where I began the hat body increases, I added an additional five increase points to broaden out the shape a bit and make it more full. I worked those in the same every other row progression as the other five until I had 88 stitches, and the hat body was wide enough to sit comfortably on my head. From there I continued in stockinette for about 4 inches, until I had reached the top of my ear (more or less). At this point things become interesting.
On the next round, I took a second strand of yarn and holding it with my main strand, knit all the way around with both strands. This was the set-up row for the double knitting section and doubled the number of loops on my needles. From here to the point where the tentacles start, the hat was worked double-knit style. I do this using a strickfingerhut (knitting strand manager thingy), to hold my strands side by side, but some people prefer to work double knitting in two passes. In either case, what you end up with is two layers of knitting, “back to back.” Remember – I worked the set-up row using two strands of yarn. As I work the next row I will tease the double loops I just made apart, and treat each one as a stitch. I will also use the two strands of yarn separately (this is where the strickfingerhut comes in handy to manage them).
Using Strand A, I knit one of the two loops that make up the first of my set-up row stitches. Using Strand B I purled the other loop of that first set-up row stitch. Taking care not to cross the strands, I continued this way all the way around, alternating knit-with-A stitches and purled-with-B stitches. I ended up with 88 knits interleaved with 88 purls, for a total of 176 stitches. NOT TO WORRY – the hat will NOT grow twice as wide. My own gauge for double knitting is slightly looser than plain one-strand stockinette I worked this way for about two inches to make a nice, cushy, warm earband (which is not a bad idea on any top down knit hat). At this point the hat-part of Squidley was done and it was time to make tentacles!
Squids are decapods. They have eight shorter tentacles plus two longer ones with little pad-like sucker-bearing ends. The two longer ones are often skinnier than the other eight. This worked out well for me as you will see.
Taking care to begin on the stitch column that aligned with the center of the squid-nerdle at the top of the hat, so that the two long tentacles would be properly lined up with the sides of the hat, I began moving my stitches to my spare circ. As I moved them I placed tentacle defining stitch markers, like this. I used two colors of marker (marker and Xmarker) to make life easier.
8 – Xmarker – 18 – marker – 18 – marker – 18 – marker -18 – Xmarker – 16 -X marker – 18 – marker – 18 – marker – 18 – marker -18 – Xmarker – 8
Then I shuffled the stitches around the circ so that I was at one of the Xmarkers that designate the smaller tentacle. I took two of my DPNs and moved the stitches onto them BUT I held my two receiving needles in one hand and put knit stitches onto one and purls onto the other. I ended up with two needles held parallel, with the stitches assorted around them, ready to knit in the round in stockinette like the finger of a glove. You might like to use more and shorter DPNs, but all I had in this size was a set of 3, so I was stuck.. All of the tentacles begin this way, shuffling stitches from the long circ onto DPNs for working in the round. I worked the two long tentacles first, shuffling stitches around the DPN to get to the second one, so that the memory of working the first one would be fresh (remember, I was working on the fly with no written directions).
To make a long tentacle – Starting with 16 stitches, Work in stockinette for 10 rounds. K2 tog, k6, k2tog, k6. Work in stockinette for 10 rounds. K2 tog, k5, k2tog, k5. Work in stockinette for 10 rounds. K2tog, k4, k2tog, k4. Continue this way until only 6 stitches remain. At this point I moved the stitches to one needle and worked another 2 inches I-cord style, then I divided my stitches back onto two DPNs to make the sucker pad. Make 1 (invisible increase), K3, M1, K3, knit one round. M1, K4, M1, K4. Knit one round. Continue working this way until you have 16 stitches total. On next round K2tog, k4, SSK, K2tog, K4, SSK. Then K2tog, k2, SSK, K2 tog, K2, SSK. Then K1, K2 tog, K2, K2 tog, K1. The final row is S1-k2tog-PSSO, S1-k2tog-PSSO. Break the yarn leaving an ending tail, and thread the tail through the final two stitches to end off.
To make a short tentacle – Starting with 18 stitches. Work in stockinette for 5 rounds. K2tog, k7, k2tog, k7, work in stockinette for 5 rounds. K2tog, k6, k2tog, k6. Work in stockinette for 5 rounds. Continue this way until you reach the row that leaves you a total of six stitches. Knit only one row of stockinette instead of five at this point. Then S1-k2tog-PSSO twice, break the yarn leaving an ending tail and thread the tail through the final two stitches to end off.
Finish off all ends, and sew on eyes of your choosing!
HIPPOCAMPI AND UNDINE
Progress on several fronts here. Slow, for sure – but progress.
First, my MMarioKKnits Dragon Stole continues to grow:

Both Long Time Needlework Pal Kathryn and I were convinced we’d seen this beastie before.
Sure enough, blessed by the local resource fairy, and well versed in Siebmacher’s oeuvre, Kathryn managed to dig up the original, from the 1603 edition of Siebmacher’s Shon Neues Modelbuch. I got in touch with MMarioKKnits himself to ask if he used the Siebmacher when he drew up his pattern, or if he remembered some other secondary source that was his inspiration. Many of these designs were re-collected in the mid 1800s, when counted work went through a major renaissance, some of which was inspired by actual Renaissance pattern books. I suspected that one of these mid 1800s collections was the source in question.
MMario confirmed that he indeed started with a mid 1800s work, but he didn’t remember which one. He pointed me at the Antique Pattern Library (more on this below). I’m pretty familiar with their inventory, but wasn’t able to find his secondary source either.
There are some differences between the MMario version and the one from 1603 – as one would expect in a multi-century game of garbled pattern transmission telephone – but the main motif, a hippocampus (not a dragon) is spot on count for count the same. Why do I think it’s a hippocampus? Because these designs were highly thematic, and a mermaid would be more likely to keep company with a mythical sea-steed than a dragon.
I’ve got official permission from MMario to post some quotes from his graph in order to put the changes in context. The black squares are the same in his rendition and the 1603 Siebmacher version. The red squares are from 1603, and are different from his design. The majority of the beastie is the same in both.

This center panel – a dual tailed undine similar to the one used by Starbucks in its logo – can be used as a drop in, inserted right into the MMario piece to make a wider stole.
The other modification is in the tail. MMario’s beast has an elongated tail swirl with a nifty trifoliate tail. But in the original we see instead a smaller, tighter spiral sweep, a large quaternary flower, and the implication of a bridged mirroring putting two hippocampi tail to tail, centered around a second “bounce line.” Please note that I’ve not included the whole dragon repeat in order to keep from stepping on MMario’s pattern toes. You’ll have to visit his design to get the rest of it.

I’m going to attempt to introduce the center mermaid into my Dragon Stole. Wish me luck!
Aside on Antique Pattern Library – this is a non-profit, volunteer effort to scan and preserve out of print documents and ephemera related to needle and domestic arts. They have a huge collection of public domain embroidery, knitting, crochet, tatting, sewing and crafts books and leaflets dating from before 1920. A large proportion are from 1860 through 1910 or so. They even have a couple of early Modelbooks thrown in! As a reference, its invaluable. As an archive of women’s history, even more so. I strongly urge everyone to visit, to sample some of the freely available resources there, and most important – to donate to sustain the collection. It’s no secret that they live hand to mouth. I’d truly love to see them do so a bit longer.
MOTLEY DONE!
And it’s snuggly!

Not only is Motley officially finished:

I’ve also posted a full pattern for it in the Knitting Patterns section, above. The pattern also includes directions for Hollow Point Edging – a new, quasi-original finish. Complete with a short-rowed turned corner, in both chart and prose.

How did the end of this project go? Quickly and not very quickly at the same time. Knitting this was a breeze. I cast on the week before Thanksgiving, and finished on Friday last, minus a week spent knitting fingerless gloves. That’s a rather large sofa throw in fingering weight in three weeks of evenings. BUT the last two days were a slog:

That’s one evening’s worth of orts from the Dreaded Darning In The Ends phase. No doubt about it – Motley had a lot of ends. I looked into various knit-in as you go methods, but I wasn’t convinced of their durability in a blanket, so I did it the hard way. Still, I had nowhere near as many ends as the look of the blanket presents. Remember, most of my yarns were leftovers from self-stripers. That means color changes without ends. A joy!
One last note – although I usually block my finished pieces, I did NOT block Motley. The reason I didn’t is because of the wide variety of yarn densities and gauges used. I was afraid that while everything is nice and flat now, if I were to block the thing, each fragment would behave differently, leading to cupping, sagging, or differential stretch. So I punted and let it it sit, as is.
I do hope that someone else attempts this one. It’s fast, it’s fun, and if you use up that dratted bag of leftovers that’s taking up space in the back of your closet – it’s practically free.
LATTICE WINGSPAN VARIANT
LATE BREAKING UPDATE: The Lattice Wingspan Variant instructions are now available as an easy-to-download PDF, at the Knitting Patterns link, above.
Another Wingspan. I’m trying to codify what I have been doing because I wanted to post it as yet another enhancement to the pattern, hence the multiple iterations. UPDATE: Test knitting complete, pattern corrections are now in!
Before and After (pre-blocking):


This one was knit from Marks & Kattens Fame Trend. Its labeled as a heavy sock yarn to be knit on 3mm needles, at 26 stitches = 10 cm, but it’s really somewhere between sport and DK, with some thick-thin variability. What drew me to it was the very long repeat – evident in the skein. I like the way extra long color gradations play out in this project, and the slow progression from green through olive, warm chocolate and tans played well. Because this yarn is heavier than the original recommended yarns, I used a 5mm needle, instead of the recommended 3.5mm.
I knit my Fame Trend Wingspan starting with a cast-on row of 75 because I wanted my piece longer and more scarf-like than Maylin’s Tri’Coterie shoulderette mini-shawl original. Here are my mods. I was inspired by Lenora’s Angel Wingspan variant, and decided to take the eyelet idea to the extreme, using larger eyelets and lots more of them, plus adjusting stitch count to work better with the project’s natural tendency to “clump” into three-stitch units. I also transposed this to all garter stitch because I liked the way the welts framed the double eyelets.
Again, the basic concept and shape here is Maylin’s. Click on the link above to retrieve her free pattern (free Ravelry sign-in required). You’ll need it to use my supplement, below. And the idea of piercing it with holes came from Lenora. I just took their concepts and ran with them.
LATTICE WINGSPAN
If you are using standard fingering weight yarn, use a needle larger than the 3.5mm needle recommended for the original, in order to increase laciness and yield a softer more fluid drape. For my Zauberball Crazy edition of this variant (true fingering weight), I used a US #5 (3.75mm). For the Marks & Kattens Fame Trend I had to go up to a US #8 (5mm) before I got the result I liked.
Triangle 1:
Rows 1-4: Work as per original instructions, rows 1-4
Row 5: Sl1p, K2, YO, *SS-K1-PSSsO, YO2*, until 6 stitches remain before the marker. Finish last 6 stitches by SS-K1-PSSsO, YO, k3, remove marker. Turn. (If you like any other double decrease may be used instead of the slip-slip-knit one-pass-both-slipped-stitches-over, I’ve experimented with K3tog and SSSK, and both look fine)
Rows 6 and 7: Work as per original instructions, row 3-4, but knit instead of purl – working a K,P in each double yarn over and a K in each single yarn over when you encounter them. Advance the traveling marker as described in the original on each wrong side row, until you work a final wrong side row with only 3 stitches, and have no place to put it.
Triangle 2:
Row 1: Sl1p, YO, *SS-K1-PSSsO, YO2*, until 6 stitches remain before the marker. Finish last 6 stitches by SS-K1-PSSsO, YO, K3. Turn
Row 2: Sl1p, K2, place non-traveling marker. K3, place traveling marker, knit to end, working a K,P in each double YO, and a single K in each single YO. Cast on 18 stitches.
Row 3 and 5: Work as per triangle 2, row 3 of the original.
Row 4 and 6: Work as per triangle 2, row 4 of the original, but do it in all knit rather than purling.
Repeat rows 1-6 until the traveling marker walks all the way back to the starting edge.
Triangle 3 and all subsequent triangles:
Row 1: Work as per Triangle 2, Row 1 above, until 24 stitches remain before the marker. Finish last 6 stitches by SS-K1-PSSsO, YO, K3. Place a new non-traveling marker, and turn. After you place the non-traveling marker, there should be 18 stitches between it and the previous non-traveling marker.
Row 2: Work as per Triangle 2, Row 2 above.
Continue working Triangle 3 (and subsequent triangles) in the method established for Triangle 2, following the original pattern’s logic. Because my version of the Tri’Coterie pattern is narrower and uses big eyelets, you should get 9-10 triangles out of a 420+ meter skein of fingering weight or sport weight yarn, instead of the pattern’s described eight.
Finishing:
After the completion of a triangle, when you decide your piece is long enough, and you still have about a third of a triangle’s worth of yarn left, it’s time to finish.
Row 1: Repeat Triangle 1, Row 5 above across the entire backbone of the piece, removing all markers as you encounter them.
Rows 2-4: Sl1p, knit to end. AT THE END OF EACH ROW OF GARTER STITCH REASSESS YOUR REMAINING YARN. Depending on available yardage, needle size and gauge, I’ve been able to knit at least one row of garter stitch prior to the bind-off row. You will need approximately 4 times total project width for that final bind-off row. The Marks & Kattens had enough for me to work four rows of garter prior to bind-off. Noro Taiyo had enough for two rows of garter prior to binding off.
Bind off loosely. Because of the big eyelets, damp block this piece to within an inch of its life to make them spread. Try to do it following the design’s natural helix for best effect.
Hope someone else is tempted by this project in my variant or in the original. It’s dramatic, quick, and not as difficult as all those abbreviations make it look. It’s a great one-skein holiday gift project that uses yarns that are tempting/beautiful in the ball, but are a true challenge to use effectively. And like the best of those, is as addictive as potato chips.
Next post will muse on the changing nature of the on-line knitting community, with sincere appreciation to some old coteries who helped me think it through, and who wrote to me to express support. Stay tuned!
