CRAWLING ALONG, WITH SNAIL AND BEE
Satin stitch (for me at least) is sllloooowwwww. Especially compared with double running. Even though I am not working the satin stitch on count, the degree of precision needed to do the gold, cranberry, and white bits is even greater than the counted green outlines.
That said, progress is being made:

This is the center of the piece. I’m not entirely happy with every leaf or bud part done in satin, but I am not at this point going to go back and take anything out. What is, is. And for the record, as wobbly and multi-directional as my stitching is, that on the historical piece I have used as my inspiration is about as weak as mine.


But am learning as I go, and things are evening out a mite.
First was finding a better needle. It was pretty clear that the blunt tip/small eyed needles I favor for the outlines are not optimal for satin stitch. First, the eye that’s good for two strands of well-waxed floss is too small for three strands of unwaxed. And that rounded point, so well suited for slipping between threads for double running, is useless for piercing ground cloth threads to make nice, neat satin edges – even if those edges are partially “buried” underneath the outlines. I am not sure what size needle I am using (I pulled it from among a bunch of loose ones in my needle case), but it’s a standard larger eye embroidery sharp – not a tapestry needle.
Second was better threading. I am spoiled by waxing the living daylights out of my double running threads. Even if the two strands I use for the outlines require a tiny snip to get a good “point”, waxing guarantees a stiff, thin, easy to mount threading end. Not so the loose flossy strands of this ultra skinny silky stuff, used in threes or fours unwaxed for the satin stitching. They are unruly, prone to separating, fluffing out at the cut end, and otherwise uncooperative. Sometimes in a fit of desperation, I do wax the last half inch, but I prefer not to do that because the wax does drag off and mat down the rest of the strand. So I went looking for needle threaders to help. Thanks to Mary Corbet’s blog, I found some nifty tools, one of which I didn’t know I needed.
To start with, prior to making any purchases, I wanted to corral my needles, because for the first time ever, I was using multiple needle types on the same piece, and the pincushion at my elbow kept skittering off. I rummaged through my box of Useful Things, and came up with two flat rare earth magnets – formerly the insides of two heavy duty magnetic hooks. I’d saved them when the hook parts died. I glued them onto the verticals of my Millenium, in the corners. That worked nicely to keep my needles at hand, yet out of the way.
Now came threading. Obviously a needle threader would be required to cut down on my swearing and frustration. Mary had recommended some from Puffin. I liked the look of them from the structural standpoint, with flat hook style business ends, and not wire loops. So I ordered two in whimsical shapes vaguely reminiscent of Elizabethan coif motifs. One regular size, one small.
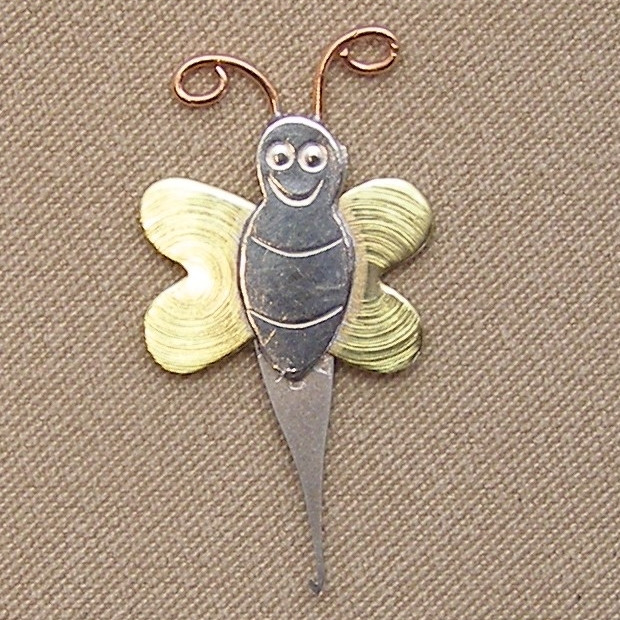

The snail with the larger hook works like a dream with the standard larger-eye embroidery needle. The bee with the little stinger surprised me by actually working with my tiny-eye ball-tip needles. Both are magnet-enabled, and now perch on the magnet I glued onto my frame.
And the needles they displaced? This is the thing I didn’t know I needed. Looking back, I could have done something similar with my two plain recycled magnets, but I never thought of it…
I got one of the Puffin needle-keepers.
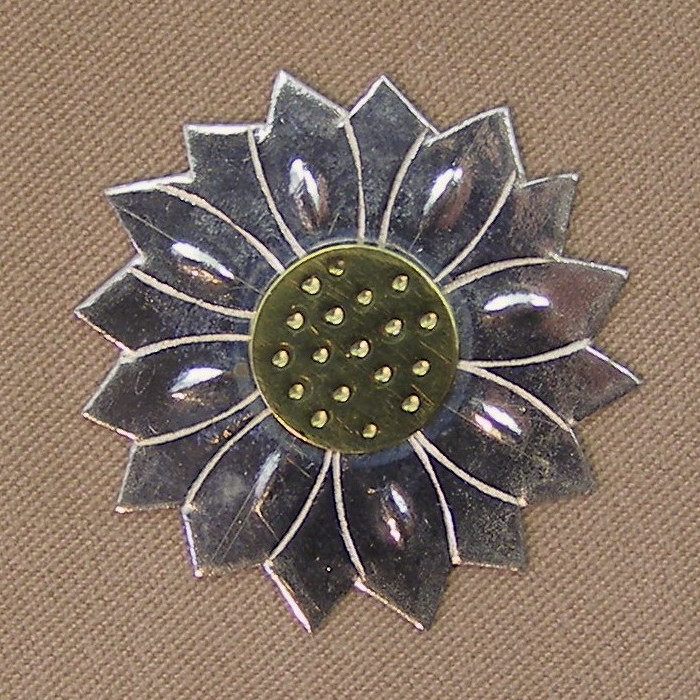
This is the pretty side of the thing. It is also magnet-enabled, and the two magnets are quite strong. So strong in fact that they grasp and hold together not only through my cloth, but also through multiple folds of my pattern page printouts. So my design pages now sit neatly next to the area being stitched – not on a separate stand, or balanced awkwardly on a cushion nearby. My alternate needles are firmly fixed in place on the flower’s center, while my needle minder does its double-duty holding the pattern.
Here you see the corner of my frame in its stand-clamp, showing off the needle minder (left), and the glued-on magnet with both threaders (right). Everything to hand.

Please note I accept no freebies and make no endorsement deals. And since I don’t indulge myself often, tiny advances in kit are really special.
I’m a happy camper, even in the face of all that satin stitching. Bravo, Puffin! Useful tools, nicely made.
QUESTIONS ON THE LEAVES
Questions about my current project are popping in. I’ll try to answer the ones so far. Feel free to send more.
First, a progress shot:

As you can see, I’ve established the border on the second long side of the piece. I still have not decided on whether or not there will be wide borders along the short sides. That decision probably won’t occur until I have to advance the piece on the rollers of my roller frame. Right now the ground cloth’s center is (more or less) at the center of the exposed working area.
On to the questions.
How do you get the design onto the fabric?
I don’t. This is a counted style. I have a paper pattern that shows my repeat, graphed up into a grid. I look at that, then replicate the design on my cloth, using each group of 2×2 threads as my graph grid. It’s just a matter of looking left, seeing “Five stitches in line straight, then one diagonal to the left, then three straight left,” and stitching it.
As I work I constantly check back and forth to make sure that the newly stitched pieces are on target – true to the count of the design. To do that I tend not to work out on a long lead. I try to work adjacent areas so I can check them against each other as I go. For example on this design, I’ll confirm that the ed
My teacher told me that I always need to baste in an even grid before I start a large charted project. Why haven’t you done that?
Because I don’t need to. I do have basted lines that indicate the edges and center point of the area I will be stitching, but I tease them out and clip them as I go along to keep them out of my way. I’ve never used a fully gridded ground with guidelines basted in every ten or twenty stitches apart. I’m comfortable working that way, although I know that others need more alignment aids than I do.
Will you be making this available as a chart or kit?
Not as such. This leafy design will be included in my (ever) forthcoming book, The Second Carolingian Modelbook. (News of that book’s publication will be here on String first). But I won’t be issuing a project chart or kit for this piece.
What thread are you using?
I’m using the vintage “art silk” floss I bought in India. I wish it were real silk, but we do with what we have. One nice thing about it – it’s very fine, and presents much like finger spun if stitched closely.
For the green double-running stitch, I am using two strands of this floss, heavily waxed. For the satin stitch, I am using three strands, unwaxed. The stuff is a bit unruly, and keeping the satin stitch even and smooth is much harder than establishing the design in double running.

What’s the count of your ground?
It’s an 40-count evenweave 100% linen, stash aged. I’m not sure where/when I got it, but I dug it out from the bottom of the pile, so it wasn’t a recent purchase. I’m working over 2×2 threads, so that works out to about 20 stitches per inch. But I think there’s a minute variance in count north-south vs. east-west, so it’s probably more like 20 spi x 19.5 spi.
What will this be when you are done?
A monument to the time it took to stitch.
Seriously, while I had originally thought it would make a nifty pillow for our sofa, complementing the room’s colors and being a different finishing treatment from yet-another-wall-hanging. However, I’ve decided against that. The art silk in satin stitch is too friable, prone to snags and catches. The thought of throwing myself on the sofa and having the rivets of my jeans play havoc with those shiny, smooth bits is a harsh reality check. This will probably end up on my walls, like so many of my other pieces.
FALLING LEAVES
I did not plan to stitch this piece of crimson and gold leaves as a tribute to Fall, but it’s starting to look that way.
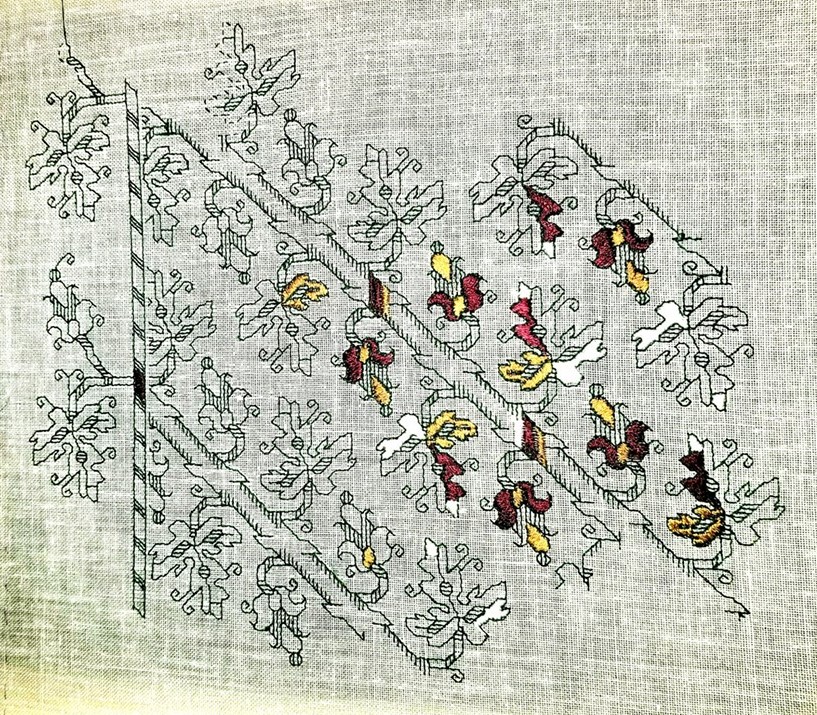
I’m munching along on both the repeat and the border. But being a tad lazy, I’ve been concentrating on the easy-to-do double running, and not on the high-concentration-to-achieve satin stitch. (I envy those who walk through satin stitch and make it look so simple).
This segment is about 65% as wide as the finished piece will be. The center diagonal branches will stretch a bit further to the left, possibly one or one and a half more iterations of the repeat. There will also be a companion border on that edge. I am still deciding whether or not I will add borders to the ends now captive on my frame’s rollers, or whether I will just finish out the design either truncated, or with the narrow diagonal trim, but without the accompanying outer leaves. Lots depends on what this will end up being. That decision is also still up in the air. Pillow? Framed piece? Soft-finished scroll hanging? I haven’t a clue. Not yet, anyway.
In any case, the double running is not presenting a problem. The design is pretty straightforward. Each side of the branch is its own baseline. The only tricky bit is placing the branch sides at the right spot. To do that, I have been using a point where the leaves approach each other closest. That’s the spot with the little “thumb” that sticks out and waves at its counterpart.

I work the next branch side by counting over from the established bit, then proofing my work as I go against other previously stitched areas. Yes, I do make mistakes, but by and large, once I have the pattern down – in this case mostly memorized after so many repeats, counting mistakes are rare.
Much more common is an annoyance of working with one hand in front and the other behind, and blind. Try as I may, I still catch and stitch through my working thread as I push the needle back up from the unseen side to the front. While waxing does help a bit for the double running sections, I still have to stop and de-tangle my stitching thread, often sacrificing a bit to the resulting fray. And it’s worse for the satin stitch areas because those can’t be waxed at all. Not and preserve that lovely sheen.
Since I have only a limited quantity of the thread I am using – more of the vintage “art silk” I bought in India – every inch lost to fraying is heartbreaking. In fact I am working compartmentalized so that I can terminate early, just in case running out of thread becomes all too real.
TAKING ON A LIFE OF ITS OWN
I continue on the Italian Renaissance leafy multicolor piece.

The skewed weave you may see is an artifact of image compression, and is not indicative of the appearance of the ground cloth.
Originally I had thought to do yet another sampler cloth, with lots of designs grouped rather willy-nilly, but I have changed my mind. The look of this particular ground is so striking that I want to do a larger example of it. I also have a companion edging for this all-over that I’m itching to apply. Right now I’m leaning towards a large rectangular piece, surrounded by that edging, possibly using some surface work in gold thread for added bling. I’m not sure what the finish will be, but I am considering making this into a pillow, which is one of the possible original uses for a design of this type.
Along the way I am re-learning the delights of Satin Stitch. It never was one of my faves, but the play of light using the faux silk thread can’t be beat. The deep green I’m using for the counted outlines in double running is waxed, but the satin stitch in-fillings are not in order to maximize sheen. And no – I’m not going to stitch every area in every leaf. I’m going to leave the piece partially filled in as it is above. That’s more or less along the lines of the original, but possibly leaving a bit more unfilled. The decision on working the red on the other half of each large leaf is still being made. On one hand it would look interesting, but on the other hand, so much red would overpower the rest of the stitching. Opinions are solicited here.
I’ve also learned the hard way how NOT to handle the multicolor fill on the branch. Originally I had done it as multiple rows of one-unit tall satin stitch, vertically. That broke up the color too much, so I picked that out and re-did it wider, but with the color broken up by the little bits of cross hatching on the sides of the stem. I am not entirely pleased, in part due to clumsy execution of the first. Working that bit horizontally is right out, both for fidelity to the original reasons, and due to the breadth and spread of those areas. I may need to explore threading my satin stitches underneath some of the crosshatches. Or just learning to do them more neatly…
The current plan is to work up the rest of the area inside this hoop, and then transfer the piece to my big flat frame. The thought of hooping over all that satin stitch brings the visceral feel of fingernails on a chalk board.
ANOTHER OPENING, ANOTHER SHOW
OK. Fresh off Cupids, I begin another haphazardly planned piece. As I start this write-up, I have no clear idea as to what I might be doing. But I do know how to start.
I’ve taken a piece of linen from my stash – it’s probably around 40 tpi – and I’ve hemmed it on three sides. The last side is selvedge and I am lazy.
I have also used regular sewing thread to mark out my absolute edges, and the centerlines. I hesitate to say horizontal and vertical because at this point I am not sure which orientation I will use. Note that I have not gridded the entire piece, nor are my basted guidelines done on any sort of regular count (other than following a specific line across the entire cloth).
Now on to think about threads. I’m tired of the DMC cotton I’ve been using. I still have some significant quantities of the faux silk I bought in India. My color selection is more limited, but there are several that remain in multi skein hanks. I’ve picked out some of these in deep forest, a burgundy, a gold, and an off-white/silvery. Polychrome!
Now on to the design itself. And observations on a design cluster.
I’m basing this one (at least in part) on an artifact on the Philadelphia Museum of Art, Accession 1894-30-114. The image below is cribbed from their site.

It’s a curious piece, not only because of the use of multicolors, but also because of the clearly counted linear outlines plus the satin stitch fills. Here’s my color-change start:

I haven’t done one of these multicolor, filled pieces yet, and I’m interested to see how I can gild this particular lily. In true bungee-jump stitching style I am not sure if I will fill out the entire cloth with this design, or if I will just do it as a center, then edge it around with other concoctions. Time (and thread availability) will tell.
Now as to why I think this one is part of a design cluster.
While I note that the dating for the Philadelphia Museum snippet is a bit odd (they claim 14th century, which to me is way too early), this piece has significant family resemblance to several other artifacts. One is the center panel of my Stupid Cupid sampler. Both it and the one I’m working now will be in The Second Carolingian Modelbook.

The original of this piece is in the Jewish Museum in New York, Accession F-4927.
Here’s another sample of a similar design. This bit is from the Metropolitan Museum of Art, Accession 79.1.14, along with my stitched rendition of the a very similar design as presented in Pauline Johnstone’s Three Hundred Years of Embroidery, Wakefield Press, 1986, on page 17. My bit is in red at the right. I included the chart for my version in The New Carolingian Modelbook.


UPDATE: The sample in Ms. Johnstone’s book (shown below) is a holding of the Embroiderer’s Guild, #5376. It looks like it and the Met fragments are more long-lost siblings. It’s stitch for stitch identical in every detail to the Met piece.

We have a clear provenance with the Jewish Museum’s piece. It’s dated with a reference to the Jewish calendar year 5343, which puts it at 1582/1583 on the standard Western calendar, and it’s from a congregation in Rome. The lady Honorata Foa either commissioned it or made it herself for donation to that congregation. I’ve written about it before.
The Met’s sample is “Italian, 16th century” (The Embroider’s Guild pegs their piece as 17th century); and the Philadelphia Museum of Art’s sample is also pegged as Italian, but bears rather that rather specious early date.
Now these three designs are not the same pattern. BUT they are quite similar in composition, aesthetic, and motif. All three use semi-realistic gnarled limbs in combo of stylized leaves and crosshatched branches. Two employ grape or berry clusters, and two use those odd multi-tier bell like flowers along with the leaves. All decorate leaves either all or in part with parallel lines, or segment them with some areas accented with parallel lines. And all use large leaves of similar form. Two employ similar sprig companion edgings, and all refer back to the crosshatched branch form for a small dividing border between the main field and the companion edging.
I have not yet found a modelbook example of a pattern in this style.
So…
Are these all examples of a regional substyle – a design vocabulary popular in Rome in the late 1500s? Are they products of a specific professional family of embroiders, or a commissioned workshop/atelier? Were these motifs in general circulation – copied from household to household either from printed pages or from previous stitcheries? Were they done by or associated with other members of Honorata Foa’s congregation?
We can only speculate, and acknowledge that these designs are in fact visual cousins, and in all probability present a snapshot of a specific style, from a specific place, and a specific point of time.
UPDATE UPDATE:
Oooh oooh! What should I find in the Uffuzi Museum’s on line taste of their current “Colors of Judiasm” exhibit, but another 17th century piece with stylistic ties to the items above! It’s beginning to look like this particular group has very close ties to the Italian Jewish community of the 1600s-1700s!

