UNSTITCHED COIF PROJECT DEVELOPMENTS – NEEDLES AND OFFICIAL SITE
Your periodic Unstitched Coif project update post!
First some progress on my own rendition. Having established my vocabulary, I’m gaining momentum, aided in part by The Right Tool.

The Right Tool? My size #12 rounded point beading needles finally arrived! What’s the difference? In the photo below, a standard John James brand size #28 gold finish tapestry needle is above, and a #12 blunt point beading needle from the same maker is below.

The beading needle is less than half the thickness of the tapestry needle, and it has a much smaller eye and more pronounced end taper. While that does make it harder to thread, it also makes the thread less likely to fall out of the eye while stitching. And that thin shaft and point are small enough to slip between the threads of the 70+ count linen I am using without distorting them. I said before that shoving the (comparatively) large point of the #28 through this weave was like passing a pencil through the mesh of a screen window, and I wasn’t kidding. The very rounded point and larger diameter made it hard to “stay on target” and hit the exact between-thread spot that needs to be pierced, and the thicker shaft, especially at the eye distorts the weave as it moves through, making subsequent counts close by all the more difficult.
So if you are working this project, or in fact any project on an extremely fine count ground, spare yourself, your eyes, and your fingers grief, and grab a #12. You will be happier, and more speedy for it.
Now the big news here isn’t my new needles or my minor progress. It’s that the official website for the group, blackworkembroidery.org has gone live! Right now it’s still pretty sparse, with a lovely selection of artifact links to blackwork pieces in the V&A’s collection, and some graphed fill stitches. I suspect that the content will blossom over time. But the best part is that it includes a link to a Discord chat group, dedicated to the Unstitched Coif project! I’ll be taking advantage of that under the user name Rotangus (the name I use on Discord for gaming forums), but I will wait to post until Toni Buckby, our Fearless Leader, posts. But I hope to be part of the conversations there.
STITCHING ON THE GO
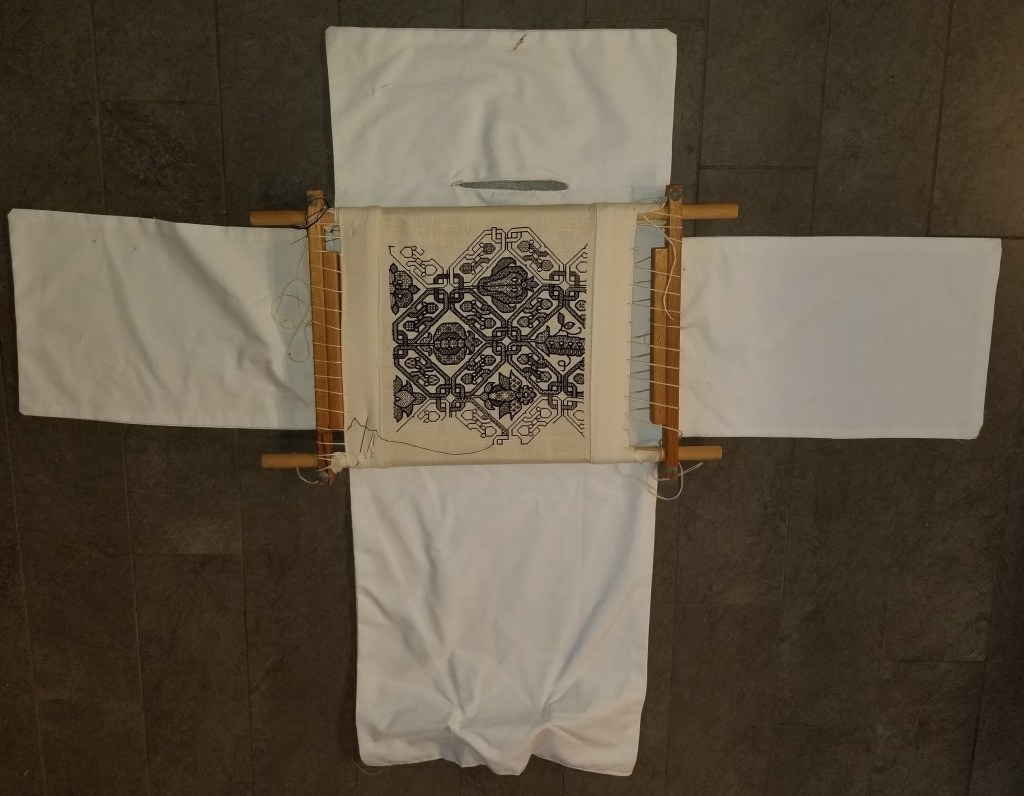
I’m moving right along on the Don’t Be sampler. The cross stitched letters zoomed by. And over the past three days I’ve gotten a good start on the border, as well. Whole piece photo so you can see the overage I’m leaving to facilitate both stitching and final framing, plus the quick hem job.
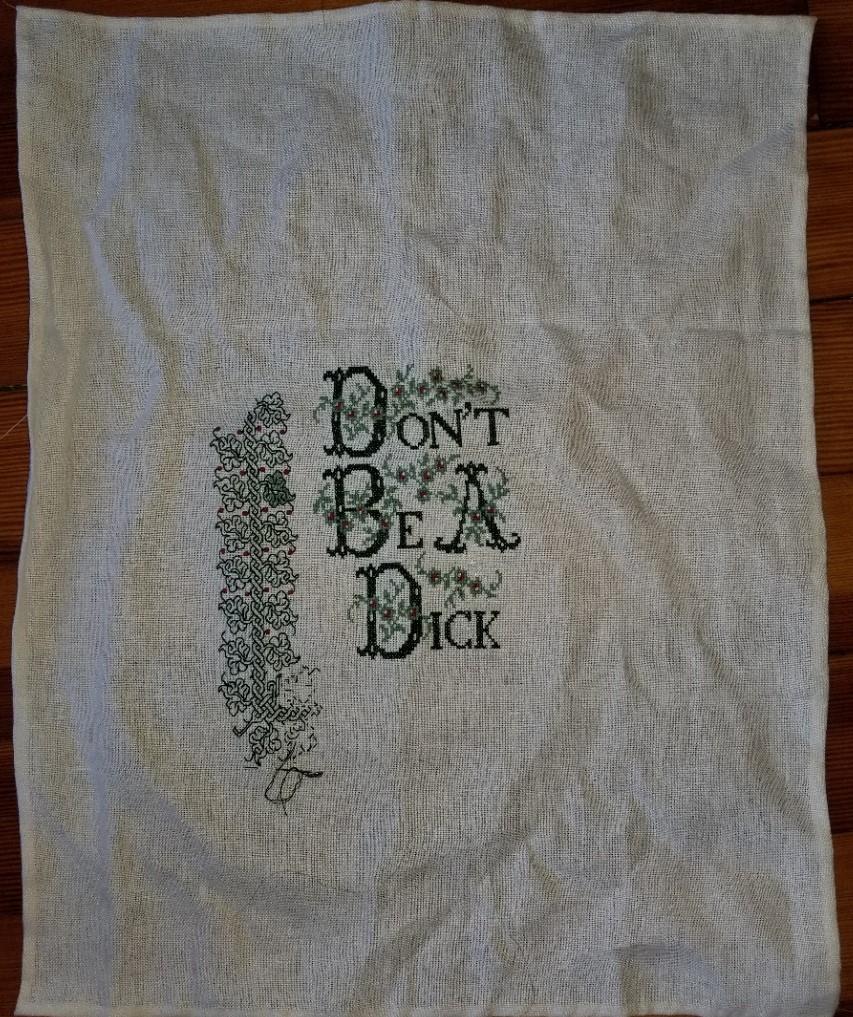
Note that my observation on the skew weave was correct. Those first couple of leaves on the return under the letters are differently proportioned than the leaves in the edge’s vertical part to the left of the motto. That will become more evident as I march along. I don’t remember exactly where I got this piece of pre-packaged ground, or how long it has sat in stash – possibly purchased, possibly as part of a supply salvage gift from a friend who passed it on to me, but certainly not recently. As it is, I will not use anything from defunct company “MCG Textiles” again. Ground sold as evenweave should be exactly that (ok, plus or minus a smidge I will forgive), but a 16% difference between the number of threads in warp and weft is flat out misrepresentation.
The corner is incomplete. I forgot to pack the correct shade of my garnet floss, so the little berries/grapes in the corner will be done later tonight. On the one green leaf, I’m still deciding whether or not to fill in all or some of the leaves. I used plain old cross stitch with one strand of DMC floss for that, flat out skipping partials, and only working full cross stitch X-units. It’s passable. It’s also tedious. When I am done with the double running I’ll make the grand decision. Every leaf, alternating leaves, or none at all.
Now. Where was I that I was working “on the go”?
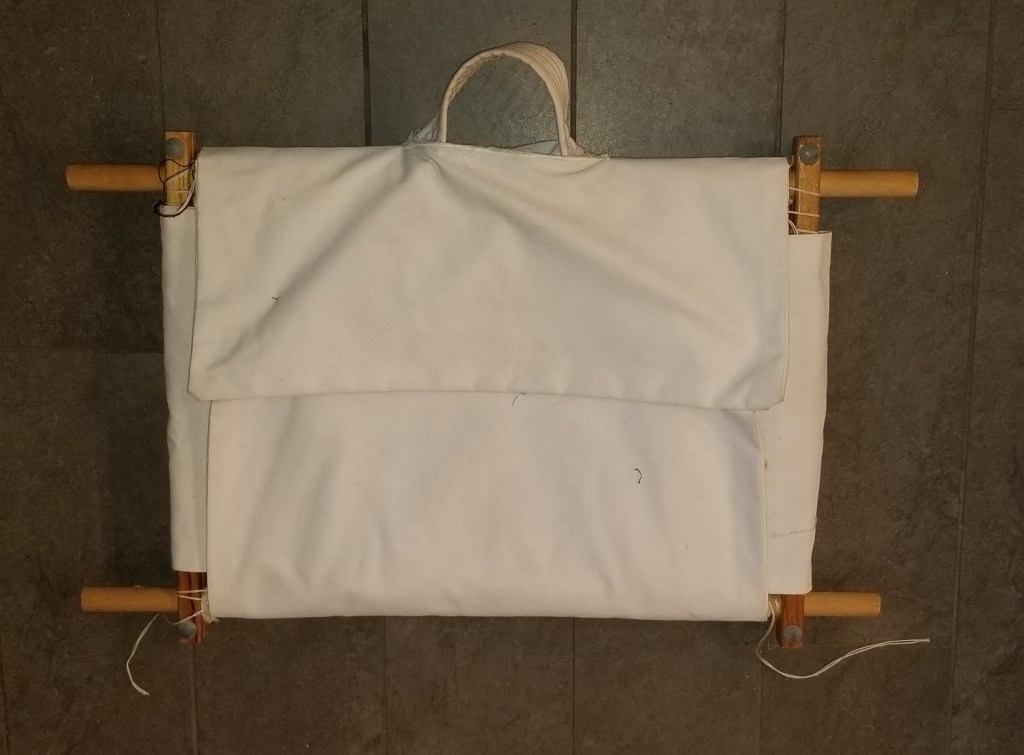
We ran away to our place on Cape Cod for a last weekend before the renters descend. We went with some long time friends, so it was doubly fun. And I brought this project with me. Folk have asked before how I pack and bring projects, so here’s a thumbnail. Note that I didn’t do it perfectly this time – after all, I ran out of garnet. 🙂
First, the container. The plastic zip bag below (shown both sides) is something I saved the last time we bought a full set of queen size sheets for our bed. It’s rectangular, with an interior pocket, and a zip all the way around one end. It’s also a very tough plastic.
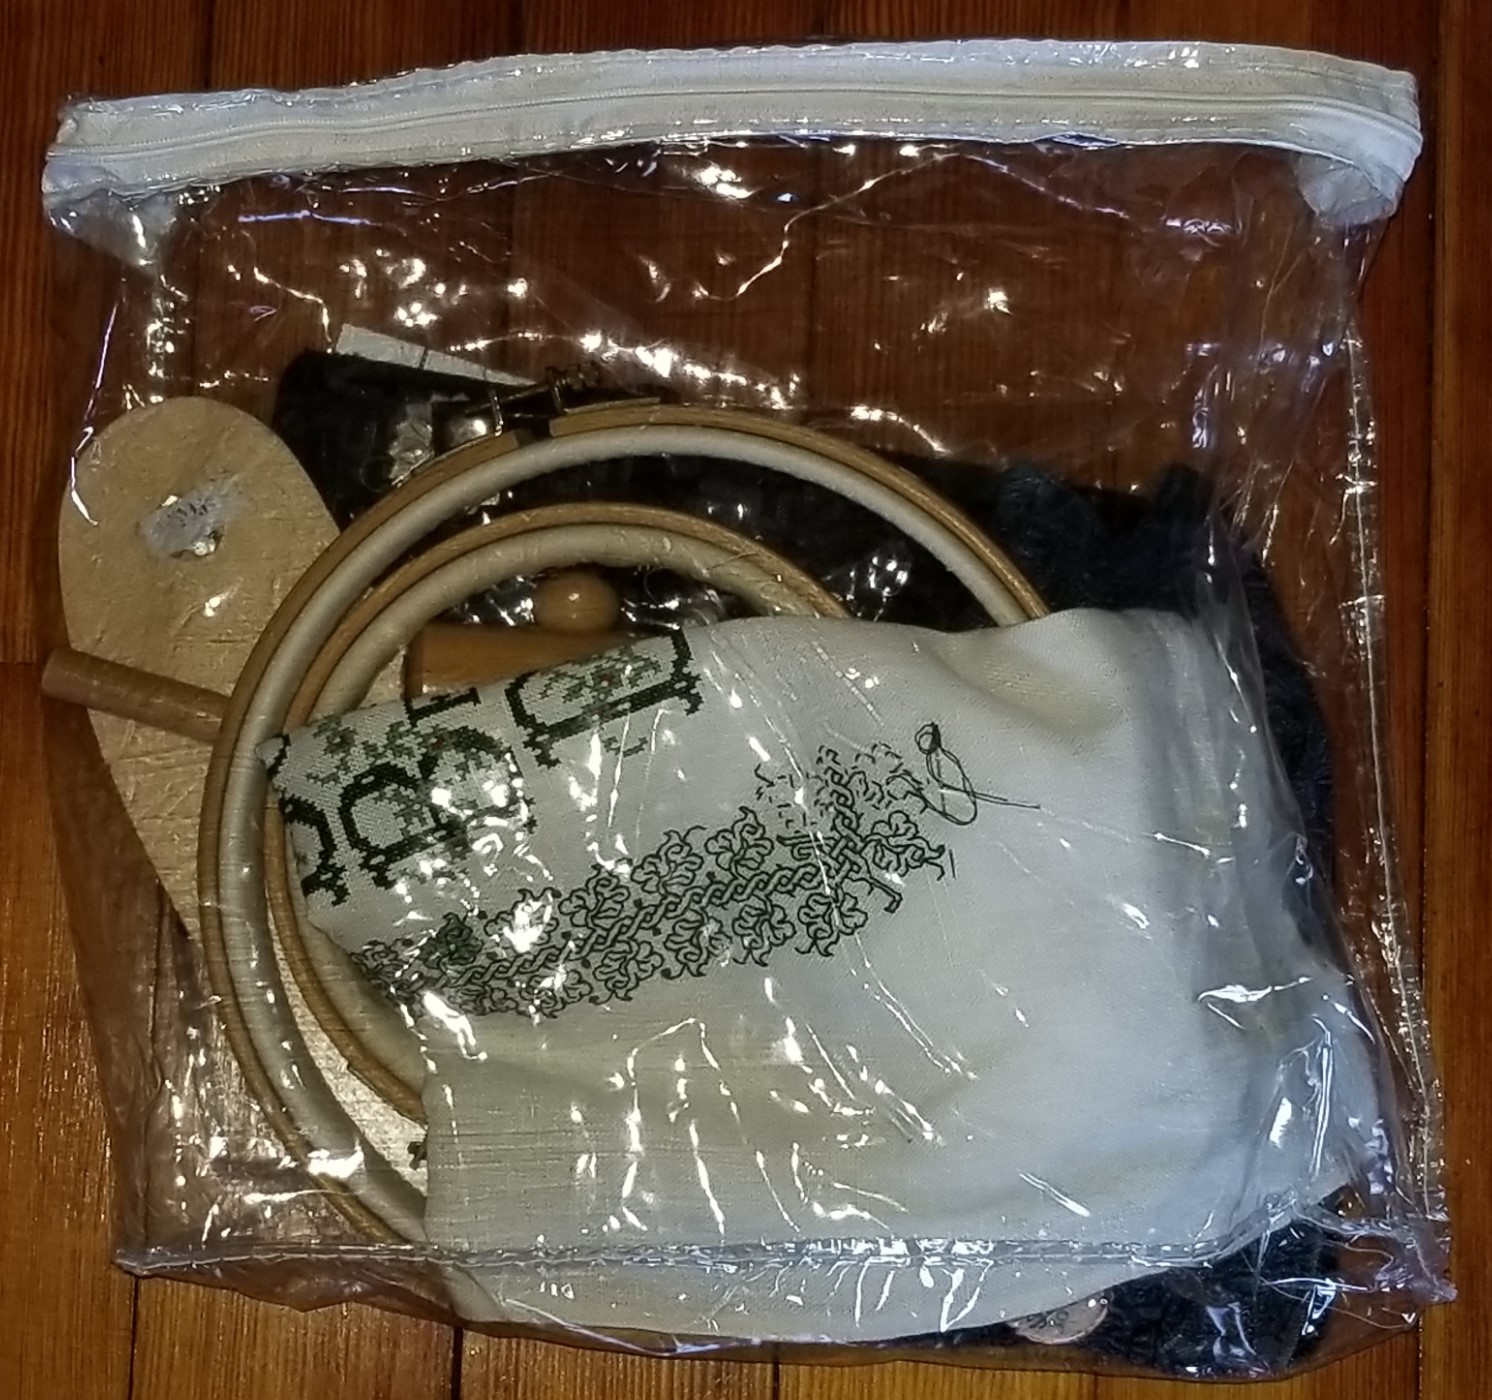

Here you see the main components of my travel kit – the three pieces that make up my sit-upon frame, the project itself, a zip pouch containing essentials (threads, beeswax; my third-best pair of scissors on a retractable spool and a laying tool, both attached to a beaded badge holder; my needle nose electrical assembly tweezers); a little magnetic stand/folder (with magnetic needle minder attached); and a spare in-hand hoop.
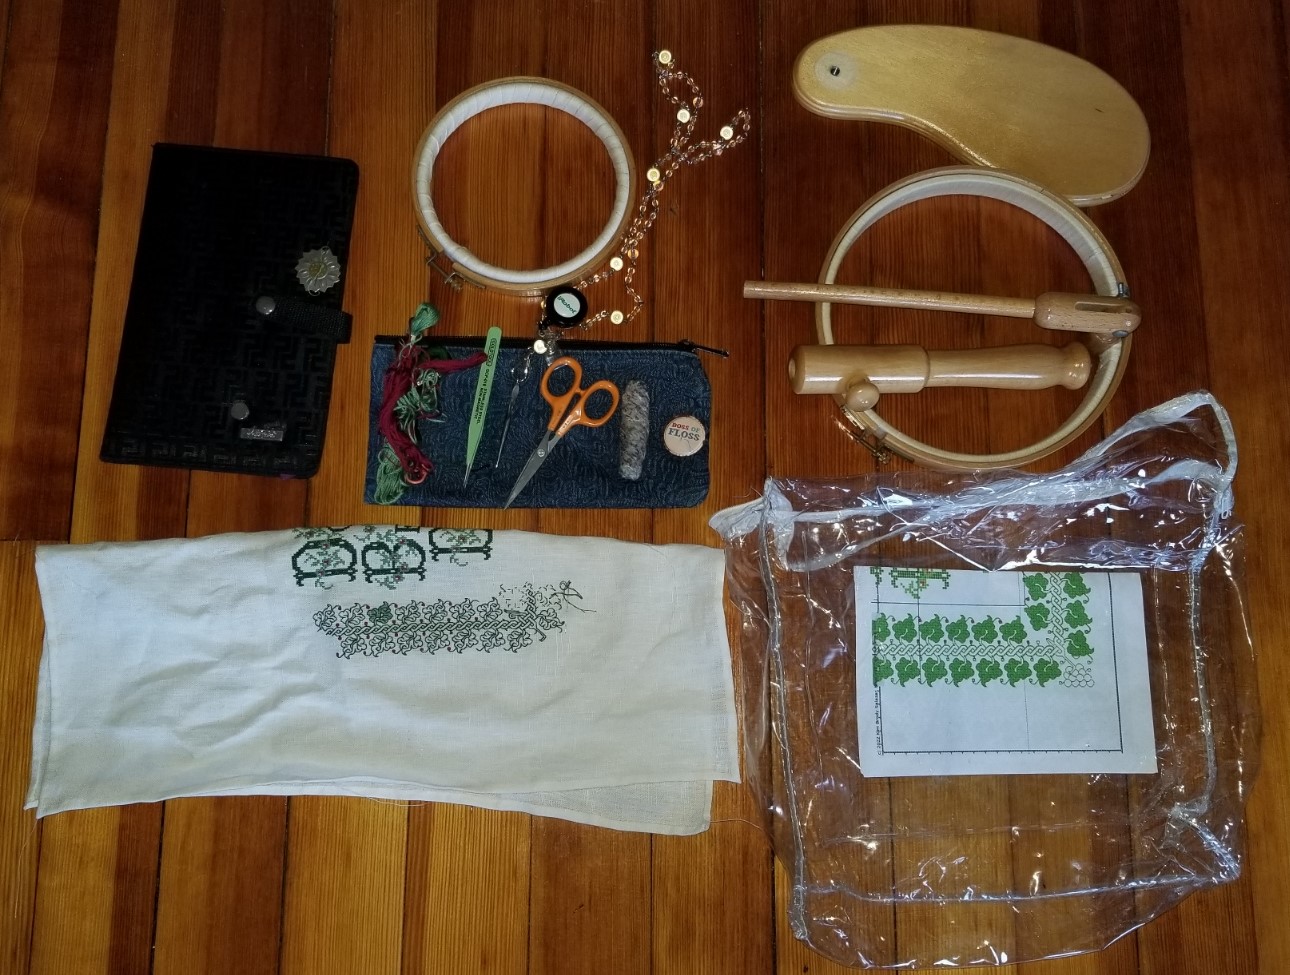
Note that the stand itself is an easy assemble/dissemble, and fits in the pouch with the project. I bring the spare hoop because it’s not always comfortable or possible to use the sit-upon, and because the sit-upon features a fixed hoop-on-stick, it’s cumbersome to use without full assembly.
When I stitch on the beach I leave the magnetic stand folded in the interior pocket of the see-through plastic pouch, with the pattern page on top. If necessary I have a place-keeping magnetic strip that can grip the board through both the plastic and the paper pattern. That way I can keep my pattern safe from dampness and wind on the beach. The supplies/tools zip stays safe in the transparent plastic bag, too, although I do either wear the beaded “chatelaine” around my neck, or clip the retractable badge holder that minds my scissors to my beach chair.

DETERMINING THREAD COUNTS OF SMALL-GAUGE LINENS
Lately I’ve been seeing discussion of linen, and whether or not it has to be even weave, sold specifically for counted thread work to be suitable for blackwork, cross stitch or other forms of grid-aligned stitchery. I maintain that while that does make things easier, and guarantees a certain precision look, it may not always be needed. Here’s a sample of a not-quite even weave being used for double running stitch.

First thanks to My Stealth Apprentice for the lovely linen remnant I’m using.
While it looks pretty uniform, it’s not. Up close you can see that the thread count is not even in both directions. Also you can see the combo of thin and thick threads that I admit can make stitching a challenge. But you can also see that both circumstances don’t quite matter as much as one might think.
My own counts, estimated by trying to take measurements between two pins placed an inch apart have been off up until now. But totally by accident, I’ve hit on a better way to calculate thread count, and it happened by using a standard US penny as a reference point to show relative scale.
The penny is three quarters of an inch across by specification. By taking a zoom-in photo, then counting the threads it obscures, we get a vertical thread count of about 33 threads in 3/4″ (counting the threads “tall”), and a horizontal count of about 25 threads in 3/4″ (counting the threads “wide”). A bit of math – multiplying both values by 1.33 – and that works out to a thread count of about 43.9 x 33.25 threads per inch. Not even weave in the least. But I can still work a (slightly squashed) rendition of the design on it. It’s distorted, but in a way that would not be apparent if this was to be done entirely as a strip.
However, I AM working this design as a frame around my central motif, complete with corners, so the skeleton dance will appear rotated to fit all four sides. Just as this bit is slightly squashed north-south, when I get to the side 90-degrees from this, the design will be squashed east-west – making my bony bois and pomegranates taller and thinner than they will appear here.
Optimal? Maybe some folks would object. But I am betting that it will still look good.
Oh, and add a penny (or any other coin or flat object with fixed and known dimensions) to your stitching gadget box, along with your phone’s camera. It’s much easier than those pins…
CRAWLING ALONG, WITH SNAIL AND BEE
Satin stitch (for me at least) is sllloooowwwww. Especially compared with double running. Even though I am not working the satin stitch on count, the degree of precision needed to do the gold, cranberry, and white bits is even greater than the counted green outlines.
That said, progress is being made:

This is the center of the piece. I’m not entirely happy with every leaf or bud part done in satin, but I am not at this point going to go back and take anything out. What is, is. And for the record, as wobbly and multi-directional as my stitching is, that on the historical piece I have used as my inspiration is about as weak as mine.


But am learning as I go, and things are evening out a mite.
First was finding a better needle. It was pretty clear that the blunt tip/small eyed needles I favor for the outlines are not optimal for satin stitch. First, the eye that’s good for two strands of well-waxed floss is too small for three strands of unwaxed. And that rounded point, so well suited for slipping between threads for double running, is useless for piercing ground cloth threads to make nice, neat satin edges – even if those edges are partially “buried” underneath the outlines. I am not sure what size needle I am using (I pulled it from among a bunch of loose ones in my needle case), but it’s a standard larger eye embroidery sharp – not a tapestry needle.
Second was better threading. I am spoiled by waxing the living daylights out of my double running threads. Even if the two strands I use for the outlines require a tiny snip to get a good “point”, waxing guarantees a stiff, thin, easy to mount threading end. Not so the loose flossy strands of this ultra skinny silky stuff, used in threes or fours unwaxed for the satin stitching. They are unruly, prone to separating, fluffing out at the cut end, and otherwise uncooperative. Sometimes in a fit of desperation, I do wax the last half inch, but I prefer not to do that because the wax does drag off and mat down the rest of the strand. So I went looking for needle threaders to help. Thanks to Mary Corbet’s blog, I found some nifty tools, one of which I didn’t know I needed.
To start with, prior to making any purchases, I wanted to corral my needles, because for the first time ever, I was using multiple needle types on the same piece, and the pincushion at my elbow kept skittering off. I rummaged through my box of Useful Things, and came up with two flat rare earth magnets – formerly the insides of two heavy duty magnetic hooks. I’d saved them when the hook parts died. I glued them onto the verticals of my Millenium, in the corners. That worked nicely to keep my needles at hand, yet out of the way.
Now came threading. Obviously a needle threader would be required to cut down on my swearing and frustration. Mary had recommended some from Puffin. I liked the look of them from the structural standpoint, with flat hook style business ends, and not wire loops. So I ordered two in whimsical shapes vaguely reminiscent of Elizabethan coif motifs. One regular size, one small.

The snail with the larger hook works like a dream with the standard larger-eye embroidery needle. The bee with the little stinger surprised me by actually working with my tiny-eye ball-tip needles. Both are magnet-enabled, and now perch on the magnet I glued onto my frame.
And the needles they displaced? This is the thing I didn’t know I needed. Looking back, I could have done something similar with my two plain recycled magnets, but I never thought of it…
I got one of the Puffin needle-keepers.
This is the pretty side of the thing. It is also magnet-enabled, and the two magnets are quite strong. So strong in fact that they grasp and hold together not only through my cloth, but also through multiple folds of my pattern page printouts. So my design pages now sit neatly next to the area being stitched – not on a separate stand, or balanced awkwardly on a cushion nearby. My alternate needles are firmly fixed in place on the flower’s center, while my needle minder does its double-duty holding the pattern.
Here you see the corner of my frame in its stand-clamp, showing off the needle minder (left), and the glued-on magnet with both threaders (right). Everything to hand.

Please note I accept no freebies and make no endorsement deals. And since I don’t indulge myself often, tiny advances in kit are really special.
I’m a happy camper, even in the face of all that satin stitching. Bravo, Puffin! Useful tools, nicely made.
TRAVEL COVER FOR A FLAT FRAME
Two weekends past The Resident Male and I went to an SCA event, a local one held here in the greater Boston metro area – known within the group as the Barony of Carolingia. We went to honor a worthy friend as she received a well-deserved high award. Sadly, we got there just in time for heavy rain, so our movements were rather constrained, and we did not find many of our old friends. But we did get to chat with several folks.
I brought my latest embroidery in a carrying case I made for an older frame and project, probably circa 1993. While my fancy leaves project was well received, the plain and boring cloth carrying case that was keeping it safe and clean hogged the majority of the attention.
Now, I never thought of that case as something special, and I did blog about it long, long ago (a post that now appears to have been eaten by Internet Gremlins). But apparently it is something that people really would like to have. So I write about it again, to the best of my recollection.
Here’s the cover, shown with the old scrolling/laced frame for which it was designed. Note that although my cover was made for adjustable scrolling frames with protruding parts that stick out in the corners, this could work just as well for a rectangular or square non-adjustable slate frame
And here is the same cover used with my new wider Millennium frame, showing how the piece wraps and holds itself in place without closures or fasteners even on the too-big-for-it frame. We are looking at the inside of the cover. The handle is on the outside, mounted on the long flap at the opposite end from the slit.


Cover laid out, side flaps brought through between work and stretcher bars

Side flaps closed to protect work

Bottom end of long flap brought up, with excess tucked behind the work. Top of long flap brought down over the work, with the handle (attached to the reverse of the long flap) tucked into slit.
In the best of all possible worlds, I would make a second cover, wide enough to protect the side bars of my new frame. But in truth, because lacing isn’t necessary with the Millenium, nine times out of ten, if I want to carry it I just release tension, remove the stretcher bars, and leaving the work on the horizontals, wrap the whole thing up in an old tea-cloth size tablecloth, skipping the carrying case altogether. But for the event weekend event I knew I would often be moving from place to place, and didn’t want to do reassembly each time I wanted to stitch or display my work-in-progress.
The How-To:
I used well washed and savagely preshrunk white 100% cotton duck (a tightly woven twill fabric a bit lighter than denim), but anything sturdy can be used – one of the lighter weight canvases in cotton or linen, for example. I picked white to minimize the chance of color crocking onto my framed work. The adventurous might want to use a showy fabric for the outside public side of the long center strip, and something else on the inside that comes in contact with the stitching. I didn’t want to do that because I didn’t want to deal with differential rates of shrinkage, or dual laundering requirements.
I can’t tell you how much yardage to buy, but note that ALL pieces of this are doubled, except for the handle, which was a rectangle, folded to make many layers, then topstitched. A length cut from a heavy martial arts belt from a karate or judo/aikido gi would work just as well as my improvised handle. Savagely pre-shrink any repurposed belt prior to stitching. (If you know someone who practices, chances are that he or she has a whole bag of leftovers, because most new uniforms come complete with yet another white belt.)
Note that there are NO fasteners on the case, of any kind. The only thing that holds it together is the insertion of the handle into the slit in the front flap. I did this on purpose – I didn’t want to risk snagging my embroidery, or any corrosion of metal parts and subsequent staining if the case happened to get damp. As is, my case can be thrown in the washing machine and laundered on hot, then machine dried without worry.
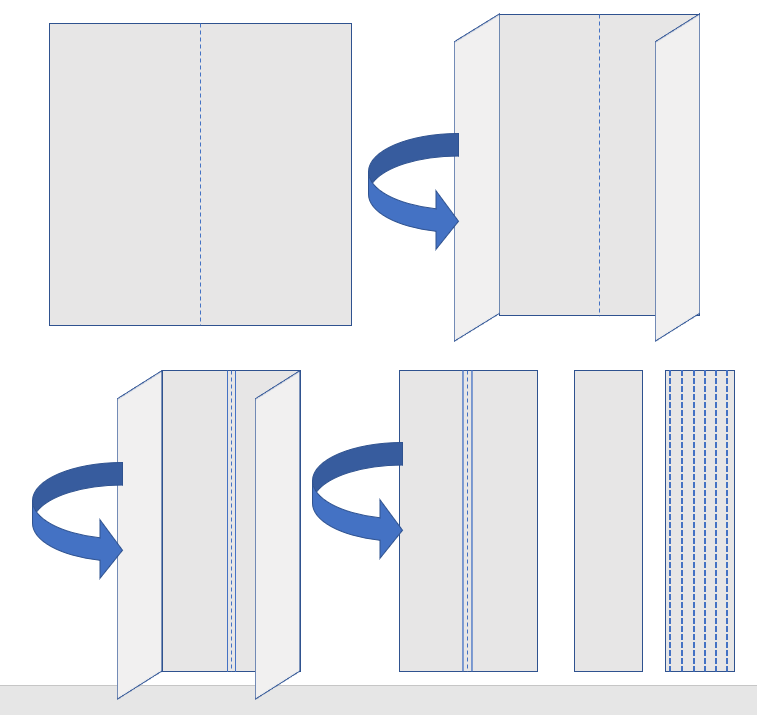
Here’s a schematic. Apologies for drafting it upside down compared to the photos above:

Note that all measurements on the schematic above should be adjusted to include seam allowances (for example, approximate height of stretchers + (2x desired seam allowance). All measurements are taken OUTSIDE the frame – measuring the working area plus the width of the wooden components assembled in the configuration in which you will be working. Don’t worry about any bits on the corners, they can stick out, like they do on mine.
The “shoulder flap” rectangles should be generous, they need significant overlap to stay in place.
The handle is positioned at the red rectangle, roughly the height of stretcher bar, as measured from the spot where the “shoulder flaps” join the center strip.
The black rectangle is the slit, and is cut and edged after the piece is assembled, positioning it to accommodate the handle. I topstitch/zig-zagged around mine, not taking special care to finish the edge with great precision.
Measuring and cutting:
- Determine the measurements of your target frame (how tall, how wide).
- Sizing the long piece: About 3.75 to 4 times your frame’s height plus seam allowances. That will give enough extra for the tuck part on the handle side, and the front flap that hangs below the slit. It’s width should be the approximate width of your stretchers, plus seam allowances all the way around. Cut 2.
- Sizing the side flaps: Approximately the height and width of your frame plus seam allowances all the way around. Cut 4.
- Sizing the handle. I used a piece of the same fabric, a square of about 12 inches (roughly 30.5 cm) I folded it in half and ironed it, then folded the left and right ends in to meet at the center, ironed it; and repeated – finally folding the entire piece down the center line to encapsulate the layers. Once I had my multilayer strip, I topstitched it the long way, as indicated below, and zig-zagged the short ends rather severely to prevent fraying. I ended up with a heavy, belt-like strip that was about 12 inches long and about 1.5 inches wide (30.5cm x 3.8cm). Precision is optional here – longer or wider/narrower won’t matter much, but I’d avoid making the strip shorter. And you can see why I recommend recycling a martial arts belt instead of fiddling with this part.
Stitching Logic
You should now have two long strips of fabric, and four smaller units to make the side flaps, plus your handle.
- Lay your long strips down and mark a point on each long side, approximately half of your frame’s height down from one end. Then lay your frame on the strip, aligning the top to the marks you just made, and make a second mark indicating its height
- Sew the side flaps to the long strip, positioning them on the marks (and taking seam allowance into consideration).
- You now have two roughly cross-shaped units, with the side flaps placed such that there’s a “long end” of the center strip, and a “short end”. The short ends will become the front flap.
- Place right sides together, and sew them together all the way around the outside, leaving about 6 inches unsewn so you can turn the piece inside out, capturing all of the seam allowances inside. Do so, teasing out the corners with a knitting needle, skewer, ruler, or dowel. Iron the thing and sew the turning hole closed.
- Up to now, if you used only one fabric for the whole piece, it hasn’t mattered which was the public side and which was the inside of the cover. Pick your favorite side to be the public side/outside.
- On the public side on the “long end” measure down roughly half of the height of your frame and make a mark. Then take your frame, and position it as if you were going to wrap it as I show above. Confirm that the mark is the correct place for the handle to be (it will ride on the top edge of your frame in carrying position). Centering the handle left to right on the “long end” of your strip, sew it to the public side. You might want to leave a little slack as you do so (rather than stitching it on absolutely flat) so that the handle loops up neatly when used.
- Try the cover on your frame. Note where the slit to accommodate the handle needs to be cut. Draw a line here. Take the piece back to the sewing machine and sew around the line several times as reinforcement (you could also zigzag, edge stitch or otherwise finish the area to be slit). Once you are satisfied that the reinforcement is sufficient, use a razor or knife to cut the slit itself.
- You are done. Put the thing on your work-in-progress and admire that your dressed frame is now additionally dressed, warm and safe for transit.
About the only structural element to improve upon the base design would be to stitch some kind of stiffener – possibly another length of the same folded fabric or judo gi belt underneath and parallel to the handle. That reinforcement should be wide enough to stretch clear across the entire width of the cover at that point. The reason is that my handle does pull up through the slit after extended carrying, especially when I use the case for frames different in size than the one for which it was designed.
If I were to make a new case, I might also include a “built in” needle book or pouch on one of the flaps, for convenience. But I am still loathe to add fasteners to the piece, so I’d have to figure out a secure closure that avoids velcro, snaps, zippers, or buttons. Perhaps tied lacings…
Also, I never embellished or embroidered my case. I suppose that I should have (at the very least) put my name on it. If you do decide to ornament the outside of yours, I would suggest selecting hard-wash-compatible threads, and doing any stitching on the pieces, prior to assembly.
If you make a carrying case like mine, please feel free to send pix – especially if you personalize it or improve on my meager design. Your photos will help others as they contemplate making one of their own.
SHINY!
I know there are people who want updates on the Two Fish project. Here’s progress as of last night:
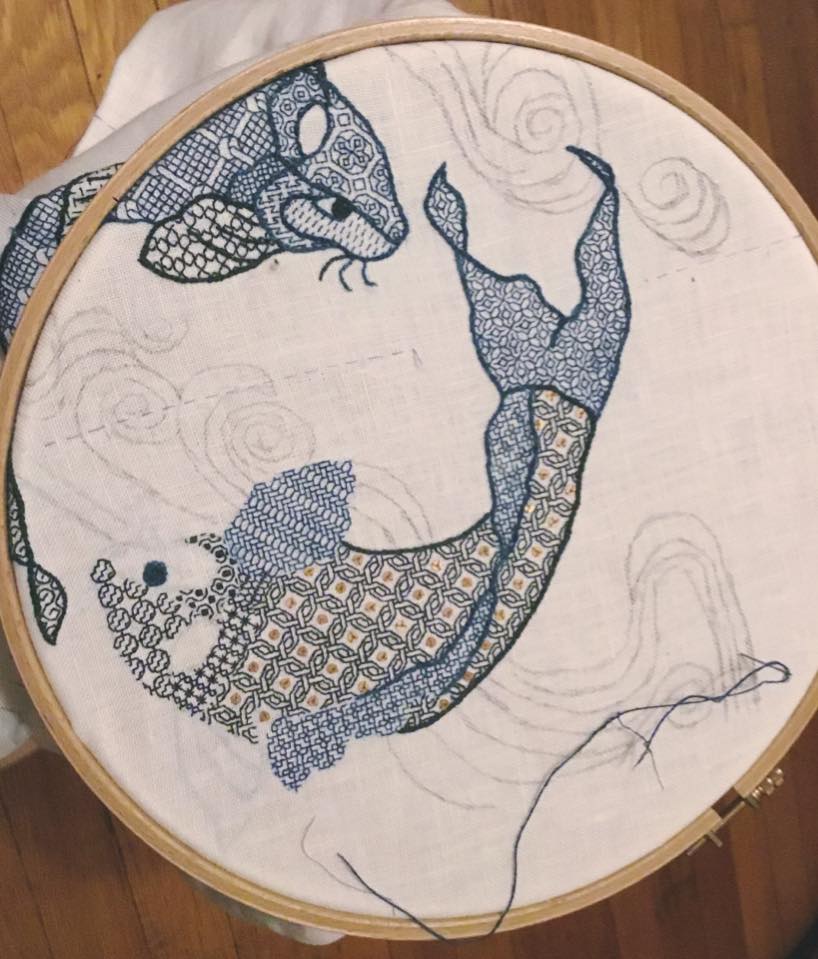
Just two more count-filled areas to go – the cheek between the eye and the gills, and the far fin. The cheek fill will be relatively light, and the fin, much darker than the rest of the fish, but I haven’t picked out either one yet.
Most obviously – I couldn’t wait. Since I don’t plan to relocate the hoop before I end up taking it off altogether and moving to my flat frame, I decided to add the sequins.
As per my earlier random thoughts, I sewed down one 2mm flat gold pailette in the center of each interwoven O shape in the body fill. I attached them using one strand of well-waxed gold tone silk – three stitches per pailette. I’m very happy with the look, and only lost a few that refused to cooperate, skittering away under my chair. If I were to do this again, I’d probably make a muslin cover for a squishy rectangular sponge, and scatter the sequins on it, then use my needle tip to pierce the center hole and pick up each little circle as I needed it. Putting a bunch in a dish, then trying to fish them out one by one with large, clumsy fingers was not efficient.
For reference, the extra-tiny pailettes aren’t a big-box-crafts-store item. I found them on-line, from General Bead in San Francisco. Their 2mm stock is very limited – a vintage assortment of various sizes and colors, made in the 1980s.
I’ve also gotten a start on the heavier outlines. I’ll add the overstitched details to the fins and tail after that. For a while I thought I might render those details in ecru silk, to match the ground fabric color, but I decided that it would be jarring to do that for one fish but not the other. The pailettes are enough of a differentiator between the two. I’ll use blue for those lines, to match the fin/tail color of Fish #2.
Unusual Stitching Gadget/Tool Report
The other bit to report is a rather unorthodox method of remediating crocking – the unwanted transfer of color from the thread to the ground fabric (or the stitcher’s hands).
The deep blue floss silk I am using is an experimental item, an early try at hand-dyed indigo by my Stealth Apprentice. She shared a sample from her initial trial run with me, to see how it worked, and to get feedback to improve her product. But even though we determined that she needed to improve color-set on subsequent batches (which she has done, with excellent results), I am too frugal to let anything go to waste. So I began this project with the beta-test silk.
For the most part, I don’t mind a small amount of crocking on this project. I think it adds to the watery look of the fish. But there have been a couple of mistakes and false starts on my part, where I have had to pick out stitches done in indigo. Those corrections left substantial residue on the cloth. So… How to get rid of the deep blue smudges without harming the already-stitched work? It’s obvious that water-based solutions aren’t going to help. They’ll just float more dye off the threads.
So I hit on an improvised solution.

Yes, that’s Silly Putty. Thinking back, I remember spending lots of time pressing Silly Putty onto newspaper comics pages, to lift images that could be stretched in laughable ways. If it could attract and hold ink from newsprint, might it be able to lift the surface dusting of indigo color from my ground cloth? Maybe…
Looking over the specs for chemical composition and the on-line Materials Safety Data Sheets (MSDS) for the components, it looked like the worst I’d be risking was potential deposit of oil. So I tried it on a scrap of fabric, and saw no oily residue.
I decided to go for it. Using the plastic eggshell underneath to support the fabric, I pressed the Silly Putty onto the smudged area, then quickly lifted it straight up (no scrubbing or “erasing” movements). The goal was not to let it linger on the cloth any longer than it needed to.
While this didn’t work perfectly, three or four quick blots did remove enough of the smudges to even out their tone with the rest of the surrounding area. The blotted area is the part of the back fin, the center of the back fin section closest to the tail.

Under magnification I can see no bits of Putty left in the cloth or in adjacent stitching, nor can I see any oily discoloration. Now that’s not to say that in 100 years (if this piece lasts that long) the blotted areas might not appear extra dirty or otherwise affected, but I won’t be around to do that bit of textile restoration, so for me at least, it’s a win.
Would I try the Silly Putty Solution again under similar circumstances? Probably.
Do I recommend it unconditionally? No. I caution that you carefully weigh possible risks prior to using it on a valuable piece of your own work.
NEW TOYS!
I just got back from a quick business trip. Sadly, I came back with a hitchhiker – a bad cold. But to cheer me up upon arrival was my package from Hedgehog Handworks, with my new Hardwicke Manor sitting hoop frame:


As you can see, I was so excited, I had to try it out right away, even before wrapping the inner hoop in twill tape. I’ll do that this weekend.
First the specs of my long-coveted indulgence. There are two joints providing freedom of movement. Looking at the back of the thing, the first is a slider that regulates height. The turned barrel at the base of the main vertical has a wooden screw tightener, allowing the vertical arm to be raised and lowered. Minimum height (pushed all the way in, with the frame positioned parallel to the ground) is 13.5 inches measured from table top to BOTTOM edge of the frame. Max height on which the tightening screw can be brought to bear is about 18.5 inches. The vertical stick also allows the frame to be rotated left and right, provided the wood screw is loosened to avoid damage.
The second degree of freedom is the y-shaped joint at the top of the vertical stem. The fixed attachment piece from the round frame fits into the slit of the y-shape, and is tightened by a bolt with a metal wing nut. (I will probably replace the wing nut with something a bit more finger-friendly in the future). This allows the frame head to swivel up and down, allowing access to the reverse of the work.
“Orthodox” use position and all of the pix I can find on line show the large paddle piece at the bottom being slid under the left hip, so that both legs sit upon it, and the frame is presented across the user’s lap. Users are also shown sitting bolt-upright on a chair or a sofa.
I’m a bit more relaxed. My favorite stitching chair is a Morris chair, with wide wooden arms, like mini-shelves left and right. It reclines. Instead of sitting upright, I tend to stitch in the reclined position. I also don’t want to bark the chair’s woodwork with the frame, so instead I straddle the base, with the paddle-bottom underneath my right thigh. I can adjust the position of the hoop so that it’s perfectly comfortable and accessible in that position.
All in all, I am VERY pleased, although I may need to stitch myself a small bolster on which to rest my left elbow when working with that hand beneath the frame. The chair arms are too high for comfort, and some support would be useful for extended sessions. Oh heavens. A quick project to make something useful that I can cover with MORE stitching. However will I cope? 🙂
In the same order, I also received some tambour embroidery hooks. I won’t show them here, but will save them for a future piece. Hmm…. that elbow cushion… What do you think?
And finally as a cheer-me-up, Younger Daughter, Needle Felting Maven and all around good kid, saw that I was in need of a small, weighted pin cushion that was presentable to leave here in the library next to my chair. Although she usually does far more intricate shapes (dragons, tigers, airplanes), she made me a little sea-urchin, weighted in the bottom center with a couple of big rupee coins, for extra sentimental value. It’s adorable, simple, in colors that match the rug in the library, and at about 1.5 inches across, with the coins giving it a low center of gravity, so it doesn’t go skittering off – the perfect size and weight.

Finally, I have been making progress on Trifles. As you can see, I’ve got less than a quarter of the surround left to go. And every single gear uses a different filling.

SPLURGES
Aside from the weakness for yarn common to all knitters, I don’t often spoil myself buying things for my own use. But given just a nudge, I have given in and have treated myself to two things:
A Hardwicke Manor sit-on round frame (aka a fanny frame), and a tambour needle set (not shown in proportion to each other).

![]()
I’ve wanted to try the round sit-on frame for quite a while. I like using my flat frame on its holder. Doing so allows me to position one hand above and one hand below the work, and stitch more efficiently, without needing to conjure a third hand to hold the frame in place.
For smaller pieces in non-fragile threads and stitches, I do prefer to use the smaller hoop though. But using it does raise those same third-hand issues. I am eager to experiment with the sit-on, and hope that I don’t miss the agility of being able to rotate the hoop in hand for optimal stitching direction at the same time as I appreciate having both hands free to work.
A fixed position frame is one of the things that enables use of a tambour needle. Again, one hand uses the needle on one side of the work, the other is positioned on the opposite side, and feeds thread to the hook, using up my quotient of hands before holding the frame in a convenient position is achieved.
I looked for a tambour hook in India. One would think that given the staggering array of tambour-produced textiles there, finding one would be easy. Indian Ari hooks are (in theory) slightly longer and finer in diameter than hooks made for the Western market. Sadly, I never saw one myself. In my region there were few shops that offered needlework supplies, and the ones that I found catered to ladies of leisure rather than people doing embroidery to make a living. Clerks in those shops either didn’t understand what I wanted (although I was armed with the correct name and drawings); or they didn’t carry them because they were “working” rather than “leisure” tools.
What sort of things are embroidered using an Ari? The overwhelming majority of stitched textiles offered in traditional crafts markets. Not all – running stitch quilting, satin stitch, poorly done Shisha, and pattern darning were also present, but tamboured pieces that looked like chain stitch predominated, especially in the better quality works that interested me most. Here’s a smattering of what we brought back:

")


The cushion cover on the left that we had made into the chair seat is densely stitched in wool on a cotton backing. I believe it’s from Kashmir.
Also from Kashmir is the rug in the center. Yes – that’s 6’ x 9’ (1.8 x 2.7 meters), totally stitched in tamboured cotton, with no ground showing. I had it professionally cleaned when we returned from India because it had been in daily use there. I’m not sure where we will eventually put it, so it’s rolled up in safe storage right now.
The third thing is our Dodo Curtain – a large cotton panel covered in tamboured metal threads, with probably man made silk (rayon) accents and paillettes. It’s covered with roundels featuring this bird, giving it a very Medieval appearance. I have plans to back this cloth with linen, then hang it as a portiere curtain between my living and dining rooms. We got this piece in Agra, but its ultimate province of origin wasn’t noted.
The jacket is also Kashmiri. It’s fine Pashmina, entirely tambour-worked using the same fiber. Even the plackets and hems that look like trim are densely packed tambour chain. This is probably the most extravagant thing The Resident Male bought for me on our stay, and wearing it makes me feel like royalty.
A side trip into literature and symbolism for those who wish to hang around for such things:
Some folk have told me that my curious dodo hanging may show the Garuda Bird, the king of birds, champion of justice, and celestial mount of Lord Vishnu, but I am doubtful. The noble Garuda is usually shown in with wings outspread, robust and fearless, often with a human face and limbs.

These big-beaked, comfortably round, bald birds, if not dodos, may represent vultures.
There are several vultures in Hindu epics. One is the mount of the deva Shani, revered as a teacher and righteous judge, punishing evildoers and betrayers. But Shani’s mount is rarely pictured alone. Other famous vultures in the story cycles appear in the Ramayana – two brothers, Jatayu and Sampaati. They figure in several tales, including one that echoes aspects of the Icarus myth, with Jatayu flying so high he was seared by the sun, but rescued by his loyal and courageous brother Sampaati who used his own wings to shield Jatayu from the sun’s fury. Unlike Icarus, Jatayu survived, and is not a symbol of the folly born of overconfidence. Jatayu also plays a supporting role in the story of Sita’s abduction by the demon Ravana, flying to Rama with news of Ravana’s escape route.
One last possibility – dodos were giant flightless parrots. If these birds are parrots, we veer off from justice and bravery into the worlds of compassion and love.
Origin stories vary, but Sukadeva was a parrot, and pet of the gods, particularly befriended by Krishna, who showed mercy and compassion to it when Sukadeva fluttered away from his mistress Radha. I’m not clear on the relationship between that story and others, but Sulka the parrot is often painted in henna on the feet of brides, in recognition of his service as the sacred mount of Kamadva (also known as Mandan and Mara) the god of sensual love.
While not as lofty as Garuda, if my dodos are the vulture brothers, they are still exemplars of bravery and self-sacrifice. However, if the bird shown is Sulka, the connection with love might make my curtain more apt for the bedroom than the dining room.
