GALLERY OF APPRECIATION
UPDATE: 6 FEBRUARY 2024 – I’ve added a permanent page for the Gallery of Appreciation. Click here, or find it in the tabs listing, above.
——-
I adore it when I see projects folk have worked up from my designs. I’ve shown off a smattering of them here on String under the tag “Gallery” on the categories list, but I have fallen behind of late. I will try to be more timely posting these fabulous finishes (and works in progress), as tribute and thanks to the creative people who have returned joy to me.
Right now I have several such submissions lurking in my email inbox. Apologies if you have sent photos to me that haven’t appeared yet. It’s a big inbox, and I am combing back, looking for the flags. Names and photos appear here with the permission of those who sent them. I also have some requests out to folk who have sent me photos, but from whom I do not yet have express consent to post. And if you’d like your work to appear here in a subsequent gallery post, please drop me a line. My Gmail address is kbsalazar (in the usual email format).
So in no particular order other than my stumbling around in the dark, I present the first of what I hope will be a renewed series of proud pieces.
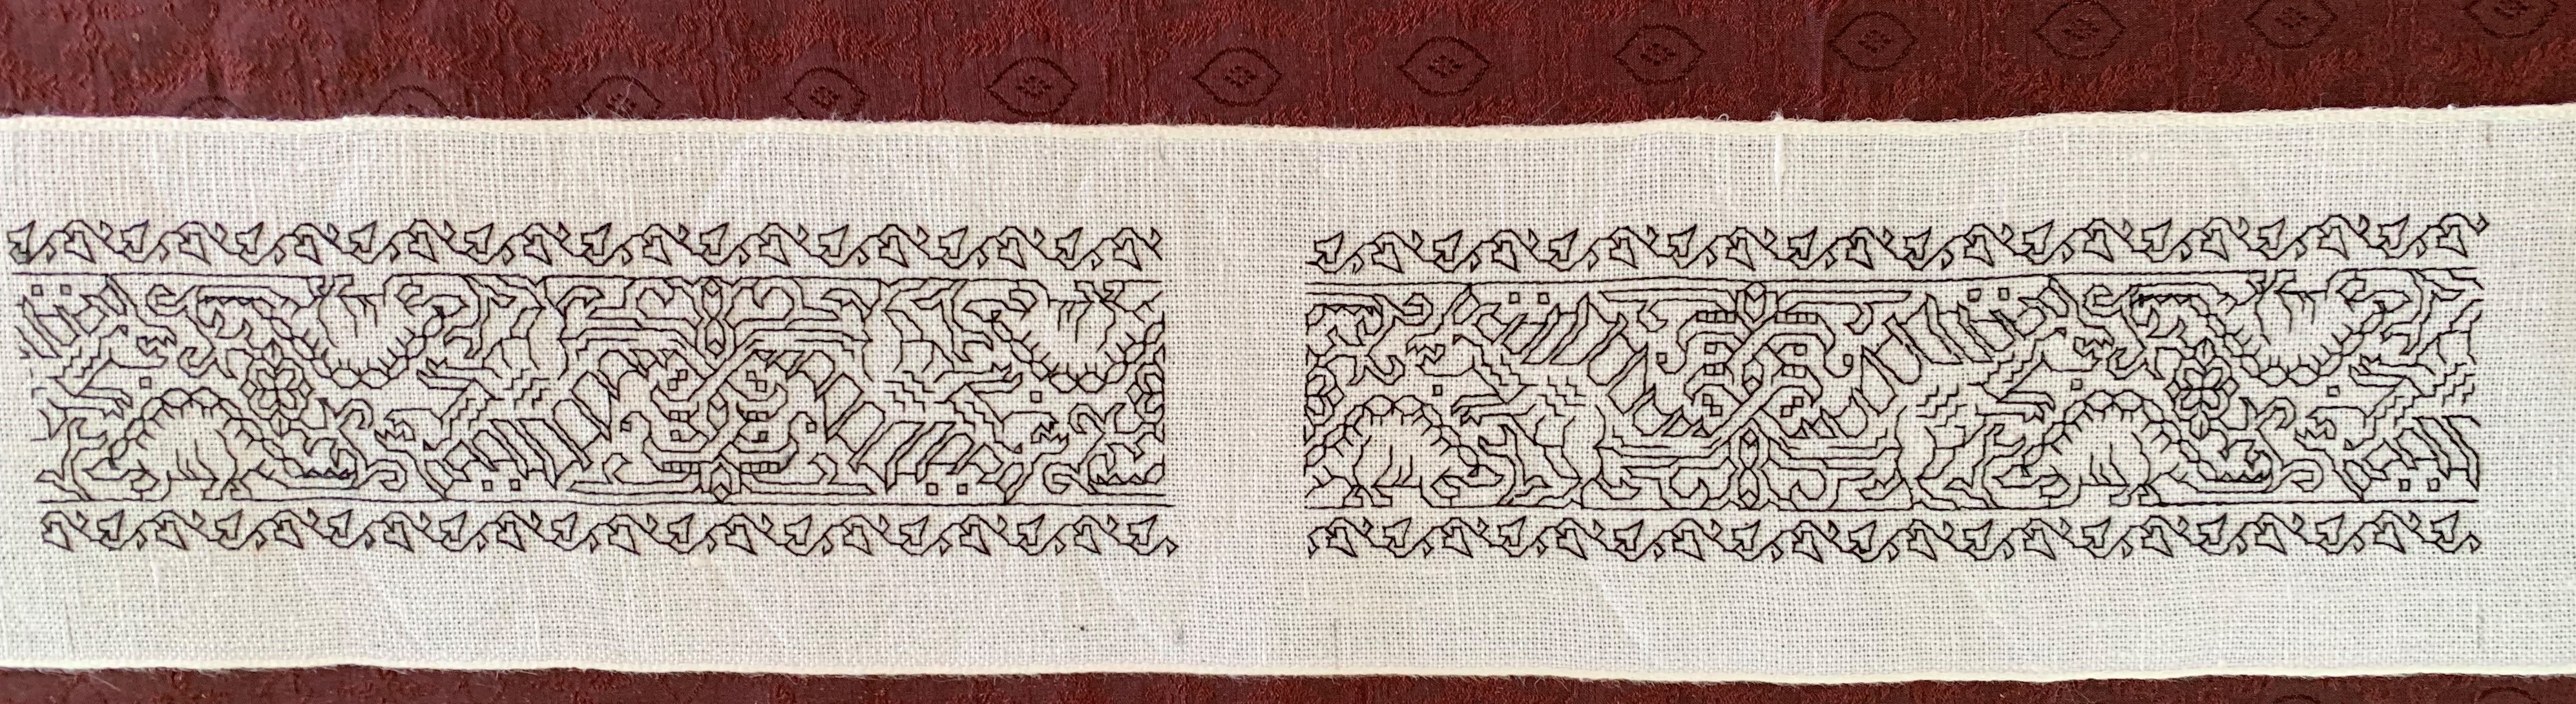
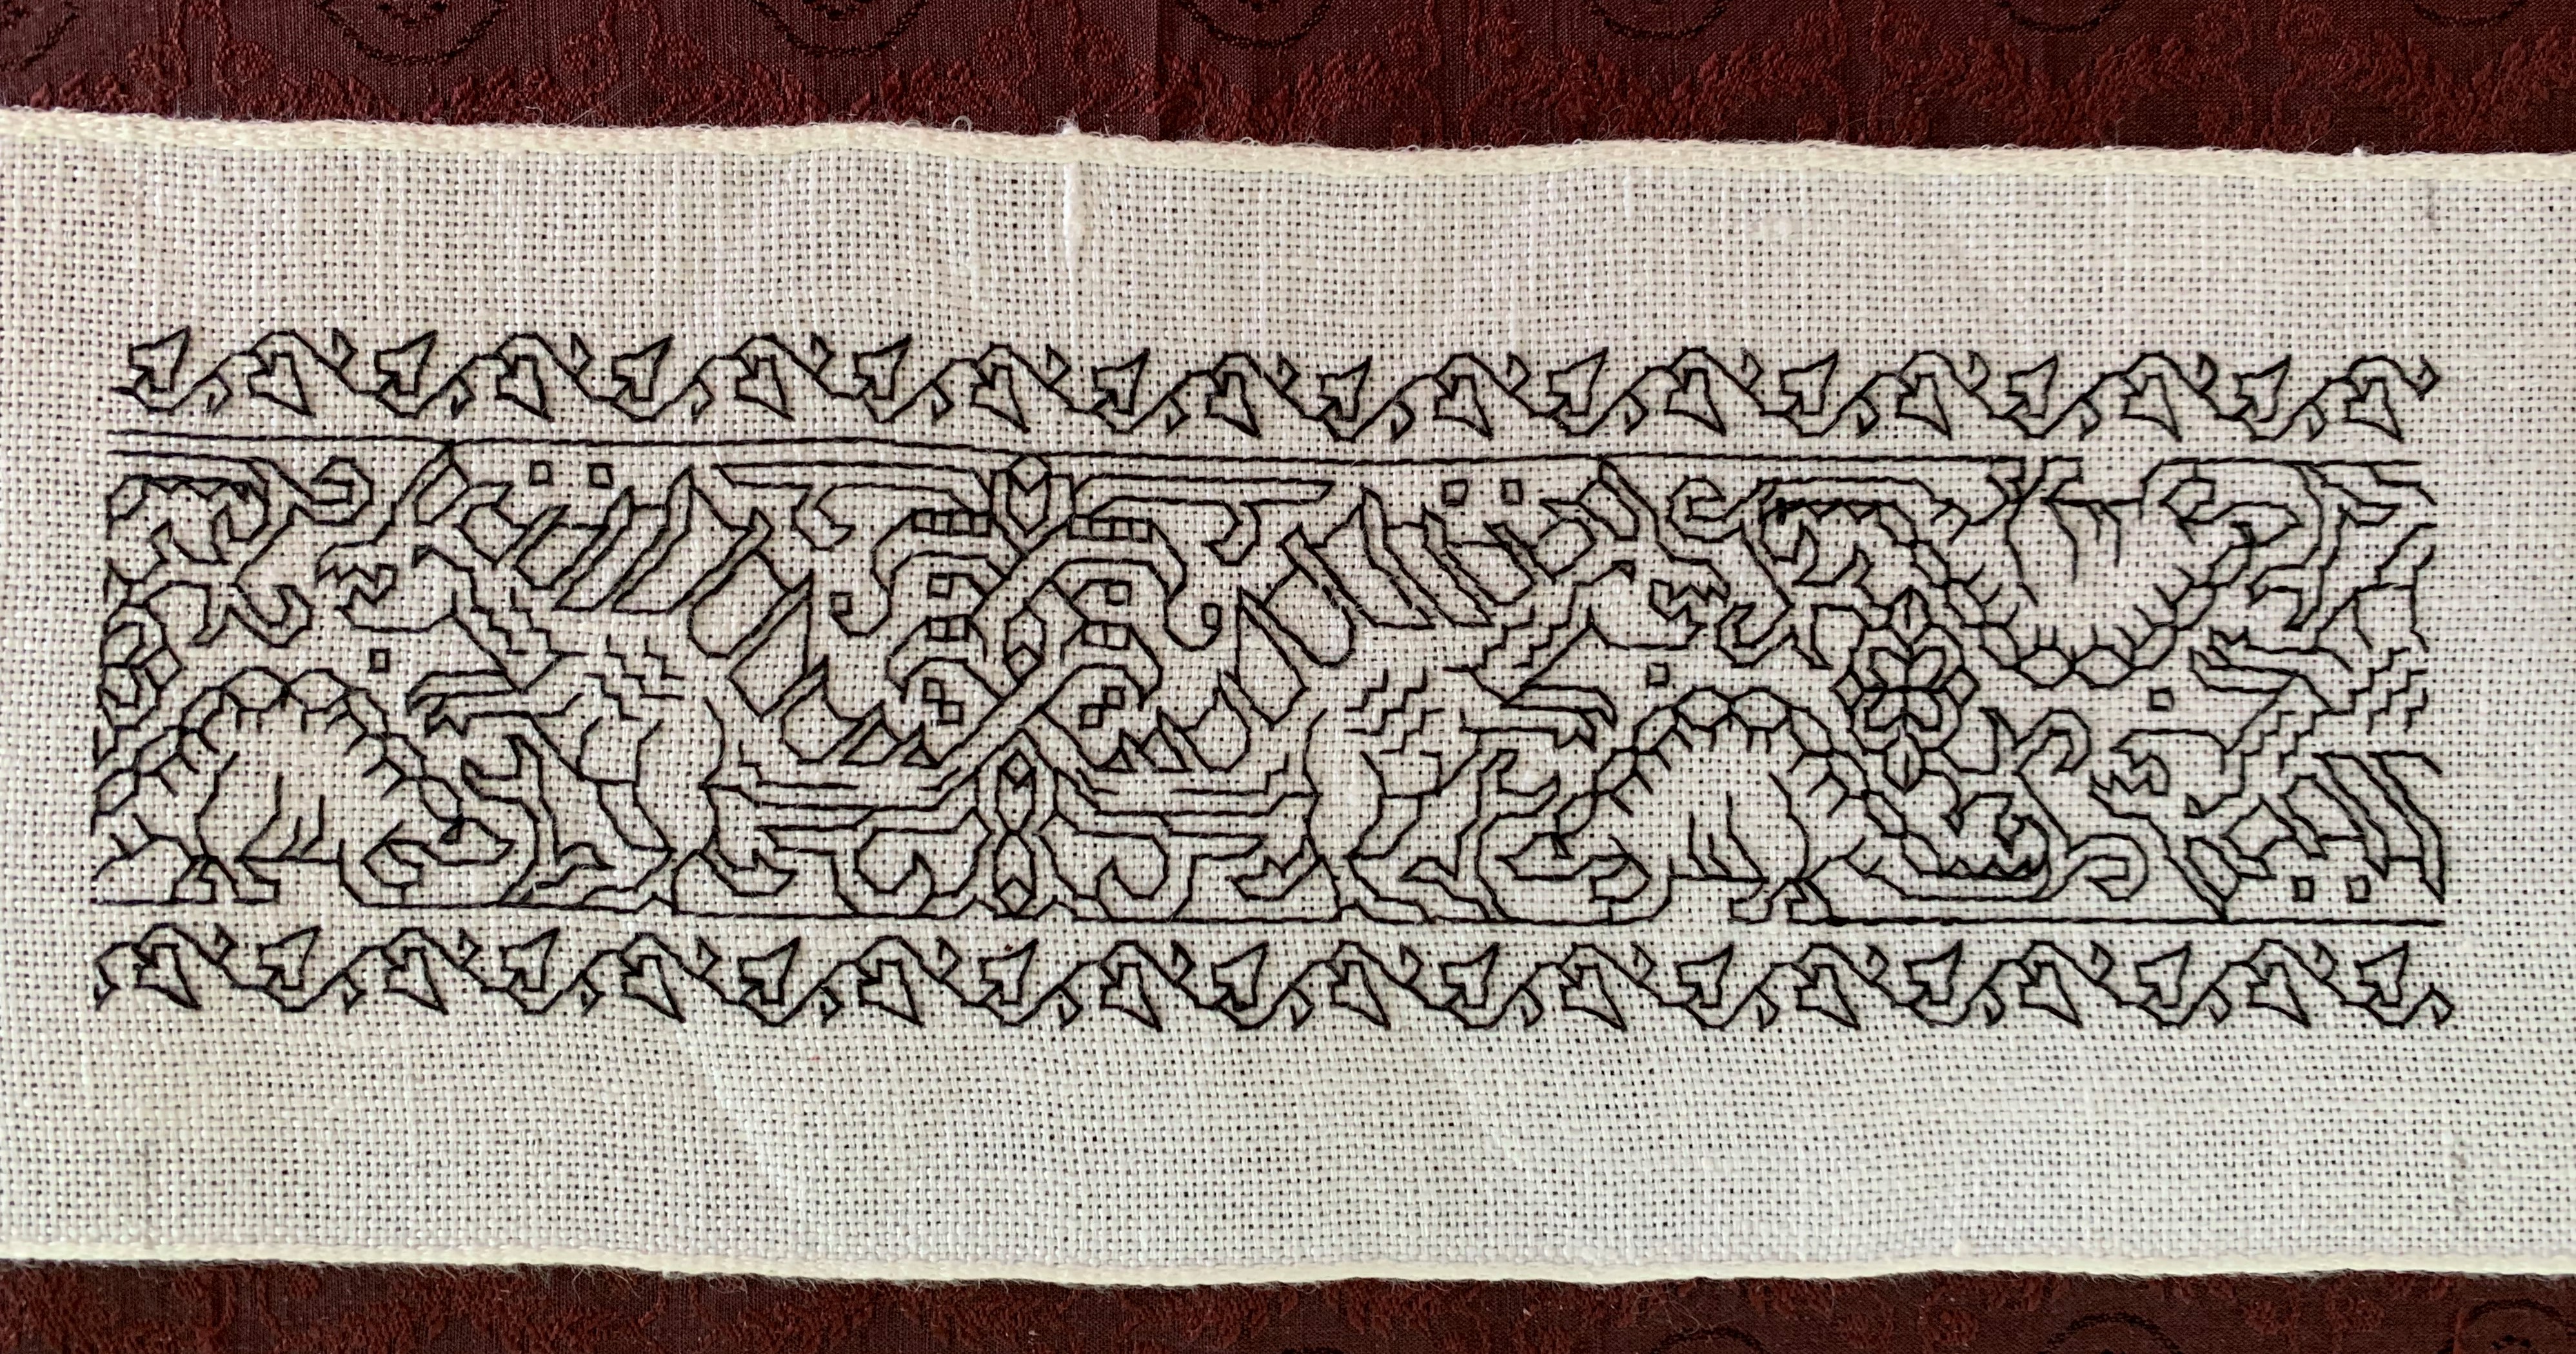
The Second Carolingian Modelbook
Sent in by Alex Logsdon, a genuine original composition featuring many motifs from T2CM, selected, snipped, and arranged in true “bungee jump stitcher” mode – picked on the fly and fitted to the space available. There haven’t been many finished objects from my latest book, and this one made my heart sing.

The New Carolingian Modelbook
Elaine Cochrane is working on a big purple band sampler, and has included in it some strips from TNCM. Elaine is also choosing designs on the fly in bungee-jump mode. I love seeing her piece evolve with the addition of each new bit.

Ensamplario Atlantio, Volumes I and II
It’s hard for me to separate out the fills in the two volumes in the EnsAtl series. With only a few exceptions, even I can’t remember which ones are in which book. V Louise Behrman is working on a couple of projects using the patterned fills from the books. One is a lovely bit of inhabited blackwork – panels for a casket (a small fabric covered keepsake/display box), the other is destined to be made up into an adorable needle book (a small fabric folder to keep needles safe, dry, and at hand). Both images below are (c) V Louise Behrman, 2022, and appear here with permission.


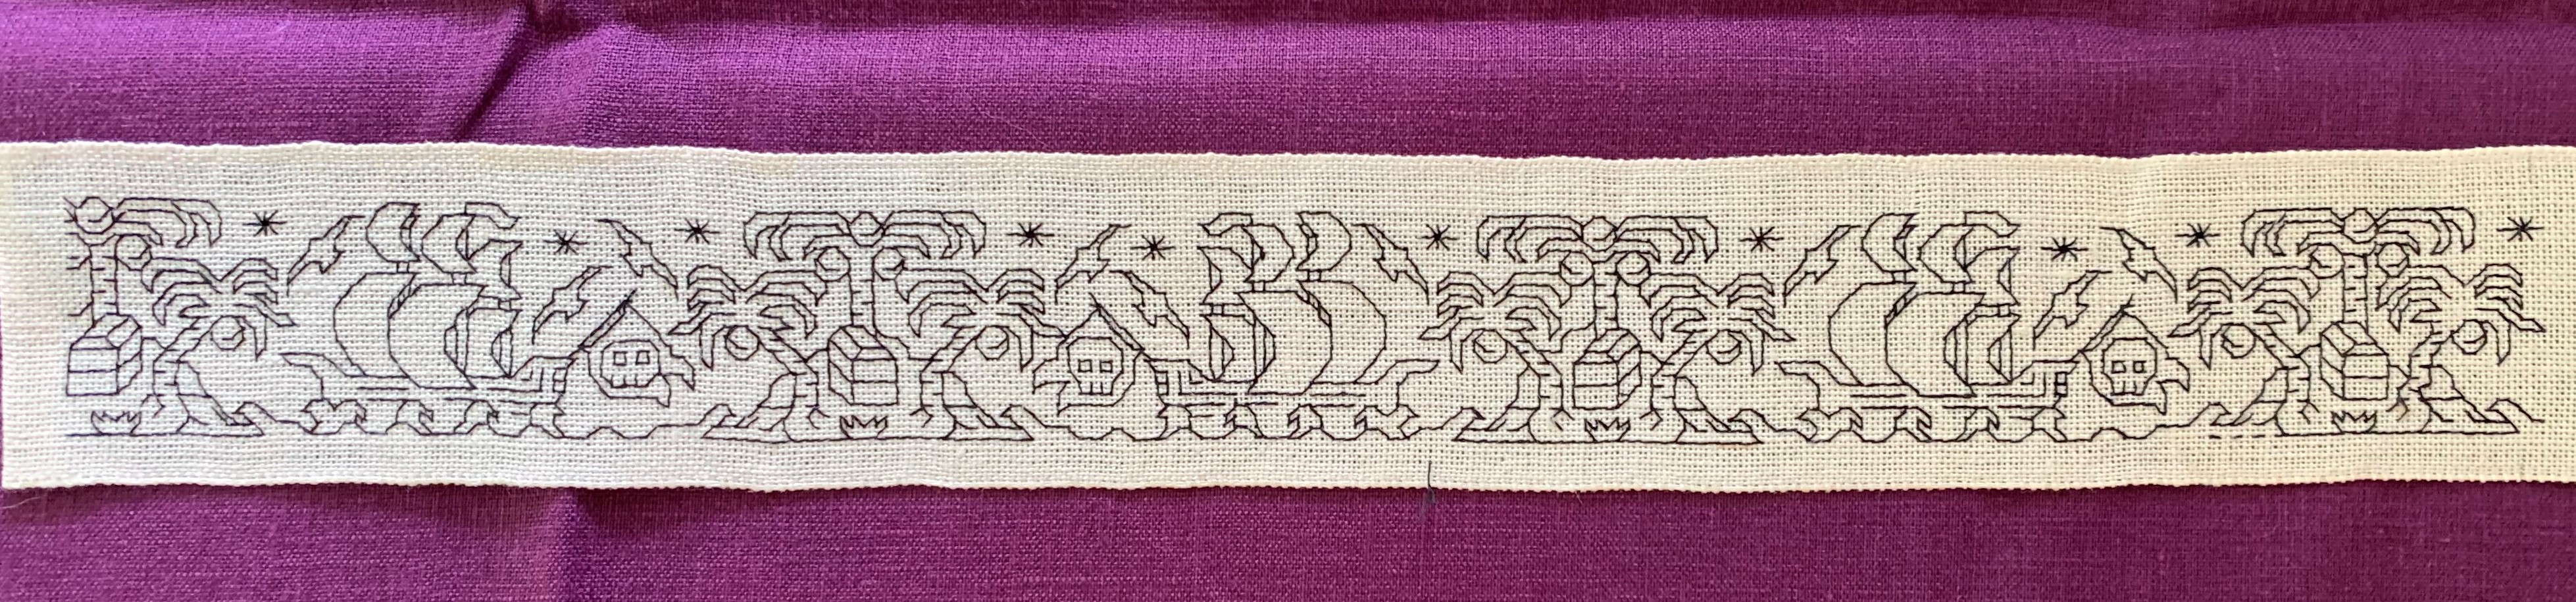
Epic Fandom Stitchalong – Adaptations
Long time friend and occasional SCA mentor Robert Himmelsbach was a stealth beta tester for some of the bands appearing as part of Epic Fandom. He used the dinosaur strips to make collar and cuff ornamentation for an otherwise historically accurate Renaissance era shirt, proudly proclaiming his ancient lineage and participation in that group’s pre-history (provided you look closely enough at his outfit). He is intending the pirate strip for a second shirt.
Links and/or info about the books mentioned are at the “My Books” tab above. The Stitchalong also has its own tab, above.
MASKS AND DOODLES
I continue on with the mask project. I’ve finished two sides for the first one, and have started (and am well into) the second.
Here are the two green sides:

And here’s the red one, in process:

It’s pretty obvious that I haven’t cut them apart yet. I want to do the red mask, and possibly one in black before I do that. There’s very little room between layouts on my ground cloth, and if I were to separate the pieces it would be difficult to stitch on the remaining scraps. So I continue.
Another thing that’s obvious is that I’ve made big mistakes on both. I’ve “colored outside the lines” on both the blue and red pieces. But it doesn’t matter one bit. My work plan is to finish all my decorative stitching, then run each mask piece around several times on my sewing machine before I cut them out (oh, for a serger!). The machine stitching will help fix the embroidery in place and give some stability to the rather ravely edges of the ground cloth, and the overage will land on the literal “cutting room floor.” The nice, fixed edges in turn will make it easier to stitch the fancy bits to their linings – two or three layers of tightly woven high count 100% cotton percale. The easy-count fabric may be just right for counted work, but has almost no value as a protective layer. I’ll depend on that percale to keep me safer.
Now on the designs I used. Both are from my latest freebie book Ensamplario Atlantio II. The blue mask with the chain like interlaces is Design #195 in that book. And yes – I chose it for that design’s visual allusion to knightly mail. It’s a straightforward implementation of the design as shown, but flipped left/right for the two complementary sides of the mask.
The second is also from the same book – Design #191. But in the book it’s presented as a strip design, useful for borders. I wanted to use it slightly differently, so I played.
The original:

The design at the left below is the most obvious way to make a full repeat. Yes, we can quibble about mating up the column ends so that there’s no blank line between, but that’s inconsequential. The strong verticals and horizontals are the most prominent feature. It’s a very regimented and in spite of the embellishments quite a forbidding layout, looking a lot like a Victorian era cast iron fence, or the bars of a very fancy jail cell.

By contrast look at the one on the right. It’s the same major design element, just shifted over one-half repeat, so that the large flower lozenge aligns with smaller two-bud cross. It has a different energy. It’s exactly as dense as the bit on the left in terms of stitching, but it looks lighter, more energetic, and more open. I preferred its movement, and the greater play it gives to the diagonals.
Those red bits in both? Just ways to visually unite what are clearly strips, to make a more melded all-over look.
Never being one to let well enough alone, I note that there’s ample space to play with this. For example, take the original repeat (black), rotate it, and add a couple of design elements. Most notably that Green Man that Ann and Lois spotted lurking in the original.

I’d stitch this up in one color, or if I used two – not as shown (that’s just to illustrate the old and new parts). I’d probably use the second color for the Green Man’s face, the larger flower sprigs at the center lines, and possibly the stand-alone motif in the middle. And this bit goes into my bin for further refinement and eventual release in Ensamplario Atlantio III (why stop at two?)
Finally – this is just a long and drawn out way to say “GO DOODLE!” While this example a bit overelaborate, the core idea is to take a design element and use it as a springboard to creativity. Pull out those drawing pads, sheets of graph paper, drafting software platforms, or needlework-specialty sketchers, and have at it. It’s fun. I promise!
MASK MADNESS
I am working on a couple of things here at String Central. One I can talk about. The other is mysterious and can’t be shown yet.
First – the progress on the masks. First side of the first one about at the half-way point. I had to take a week off from stitching for family reasons.
As anticipated, this early-experiment thread sheds dye, and picking it out leaves smudges. As explained before, I don’t care. These masks are not undying heirlooms of my house. They will bleed and spread dye during wash anyway. And I think that once that happens, the effect will be interesting.
The pencil outline you see barely traced onto the cloth is for a mask of this style:
The source of the pattern is the two-tie fitted variant published in the New York Times, back in March.
UPDATE: The link above appears to lead to a page that’s behind the New York Times paywall now. But fear not! They in turn got their design from FreeSewing.org, The edition of the design The Times posted nests three sizes on one printable PDF page, a pretty standard approach for sewing patterns. But since their original issue in March, FreeSewing has expanded the range of sizes for their design. If you click here, you’ll go to a page that lists a full range, from toddler to men’s ultra, plus how-to directions. More sizes for sure, but still the same basic pattern I used.
I’ve made quite a few of these for family and friends. It’s a bit more complicated than the pleated kind, but it fits us better. I make the largest size for adults (what in the update is now called Men’s Large), and use two or three layers of tightly woven 100% cotton percale (well washed). I substitute a long double-folded strip of the same fabric for the ribbon ties called for in the original pattern directions – mostly for durability in the wash. Precision isn’t important for the ties – I cut a long strip on the grain (not bias) – about 5 to 6 feet long and about 1.5 to 2 inches wide (152 to about 183 cm long, and about 3.8 to 4.5 cm wide). I iron it in half, folded down the center of the strip (parallel with the long side), then iron the cut edges to the center fold. Then I sew down the entire length of the long strip, an cut it into four equal pieces for the tie.
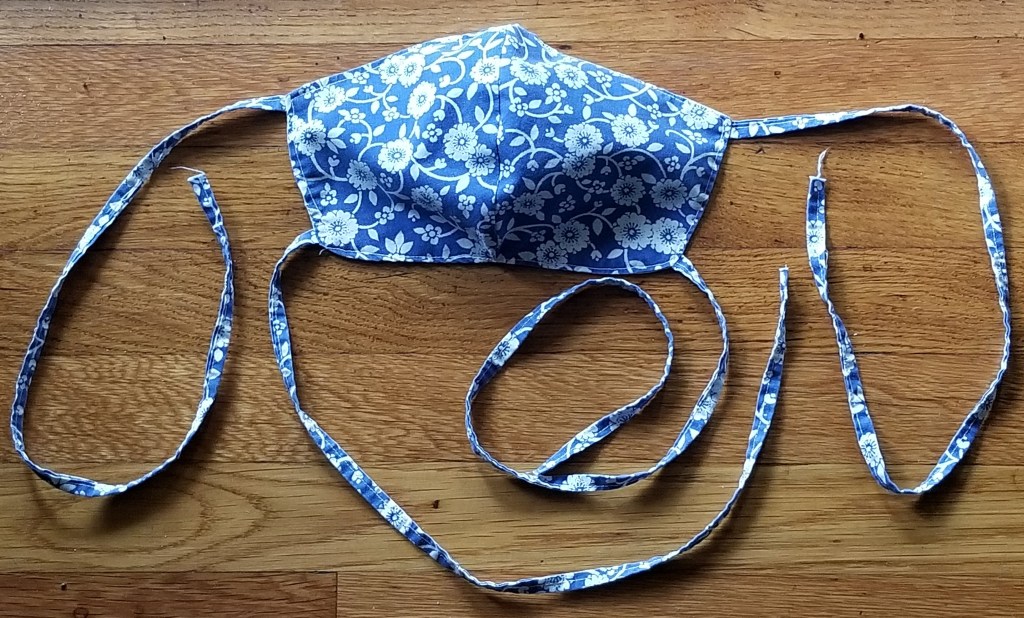
The blue flowered one above is sewn from the last remnant of the sheet set I took off to college in 1974. I had this print in red and blue, with a matching comforter. Over time the set became curtains, tote bags, cushion covers, baby carriers and crib furnishings. Ever dwindling in size, and picked apart for reuse multiple times, I had just enough left for several masks.
The fabric on which I am stitching the fancy design is no where near tight enough to provide effective coverage, so it will be a top, decorative layer over a double thickness of the standard high-count bedsheet percale.
My ground cloth has four two-unit sets traced onto it (each mask has a left and right side, seamed together at the center). I intend to stitch as many as I have the patience to do, but not cut them out until all I will be making are complete. But the loose weave and the embroidery both pose problems. I could cut veeerrrryyyy carefully to avoid nicking the stitching, but even if I did, the edges of the rather coarsely woven ground would ravel either during assembly or more probably, when the things are washed between uses.
So I am deliberately stitching past the half-inch seam line, right up to the cutting line (my pencil mark). The seaming line is a half inch (about 13mm) inside the cutting line. That half inch is the seam allowance – the bit you see turned inside at the seams in most sewn items.
Before I cut these apart I will throw the entire piece onto my Ancient Elna sewing machine, and stay-stitch all the way around each mask piece. I will probably sew multiple rows of reinforcement, but all within the seam allowance area. Then I will cut out the individual pieces and assemble the finished masks. The stay-stitching should secure both the ground cloth and the stitching. Since the reinforced area will be turned under into the seam, it won’t be visible. And I may even go a bit further and apply one of the non-fray fixatives sometimes used to reinforce stress points in applique or quilting. But I’m not sure about that yet – I never use the stuff and I am a bit wary of how it will survive laundering.
Will this work? Stay tuned! Eventually you will find out.
HARSH LANGUAGE FOR HARSH TIMES
UPDATE: This pattern is now available as an easy-download PDF file, via the Embroidery Patterns tab, above.
I start with a gallery of finishes. Sanity saved! Smiles spread! (Think what you must about the phrasing – I’m happy that my goal of preserving both have been achieved).
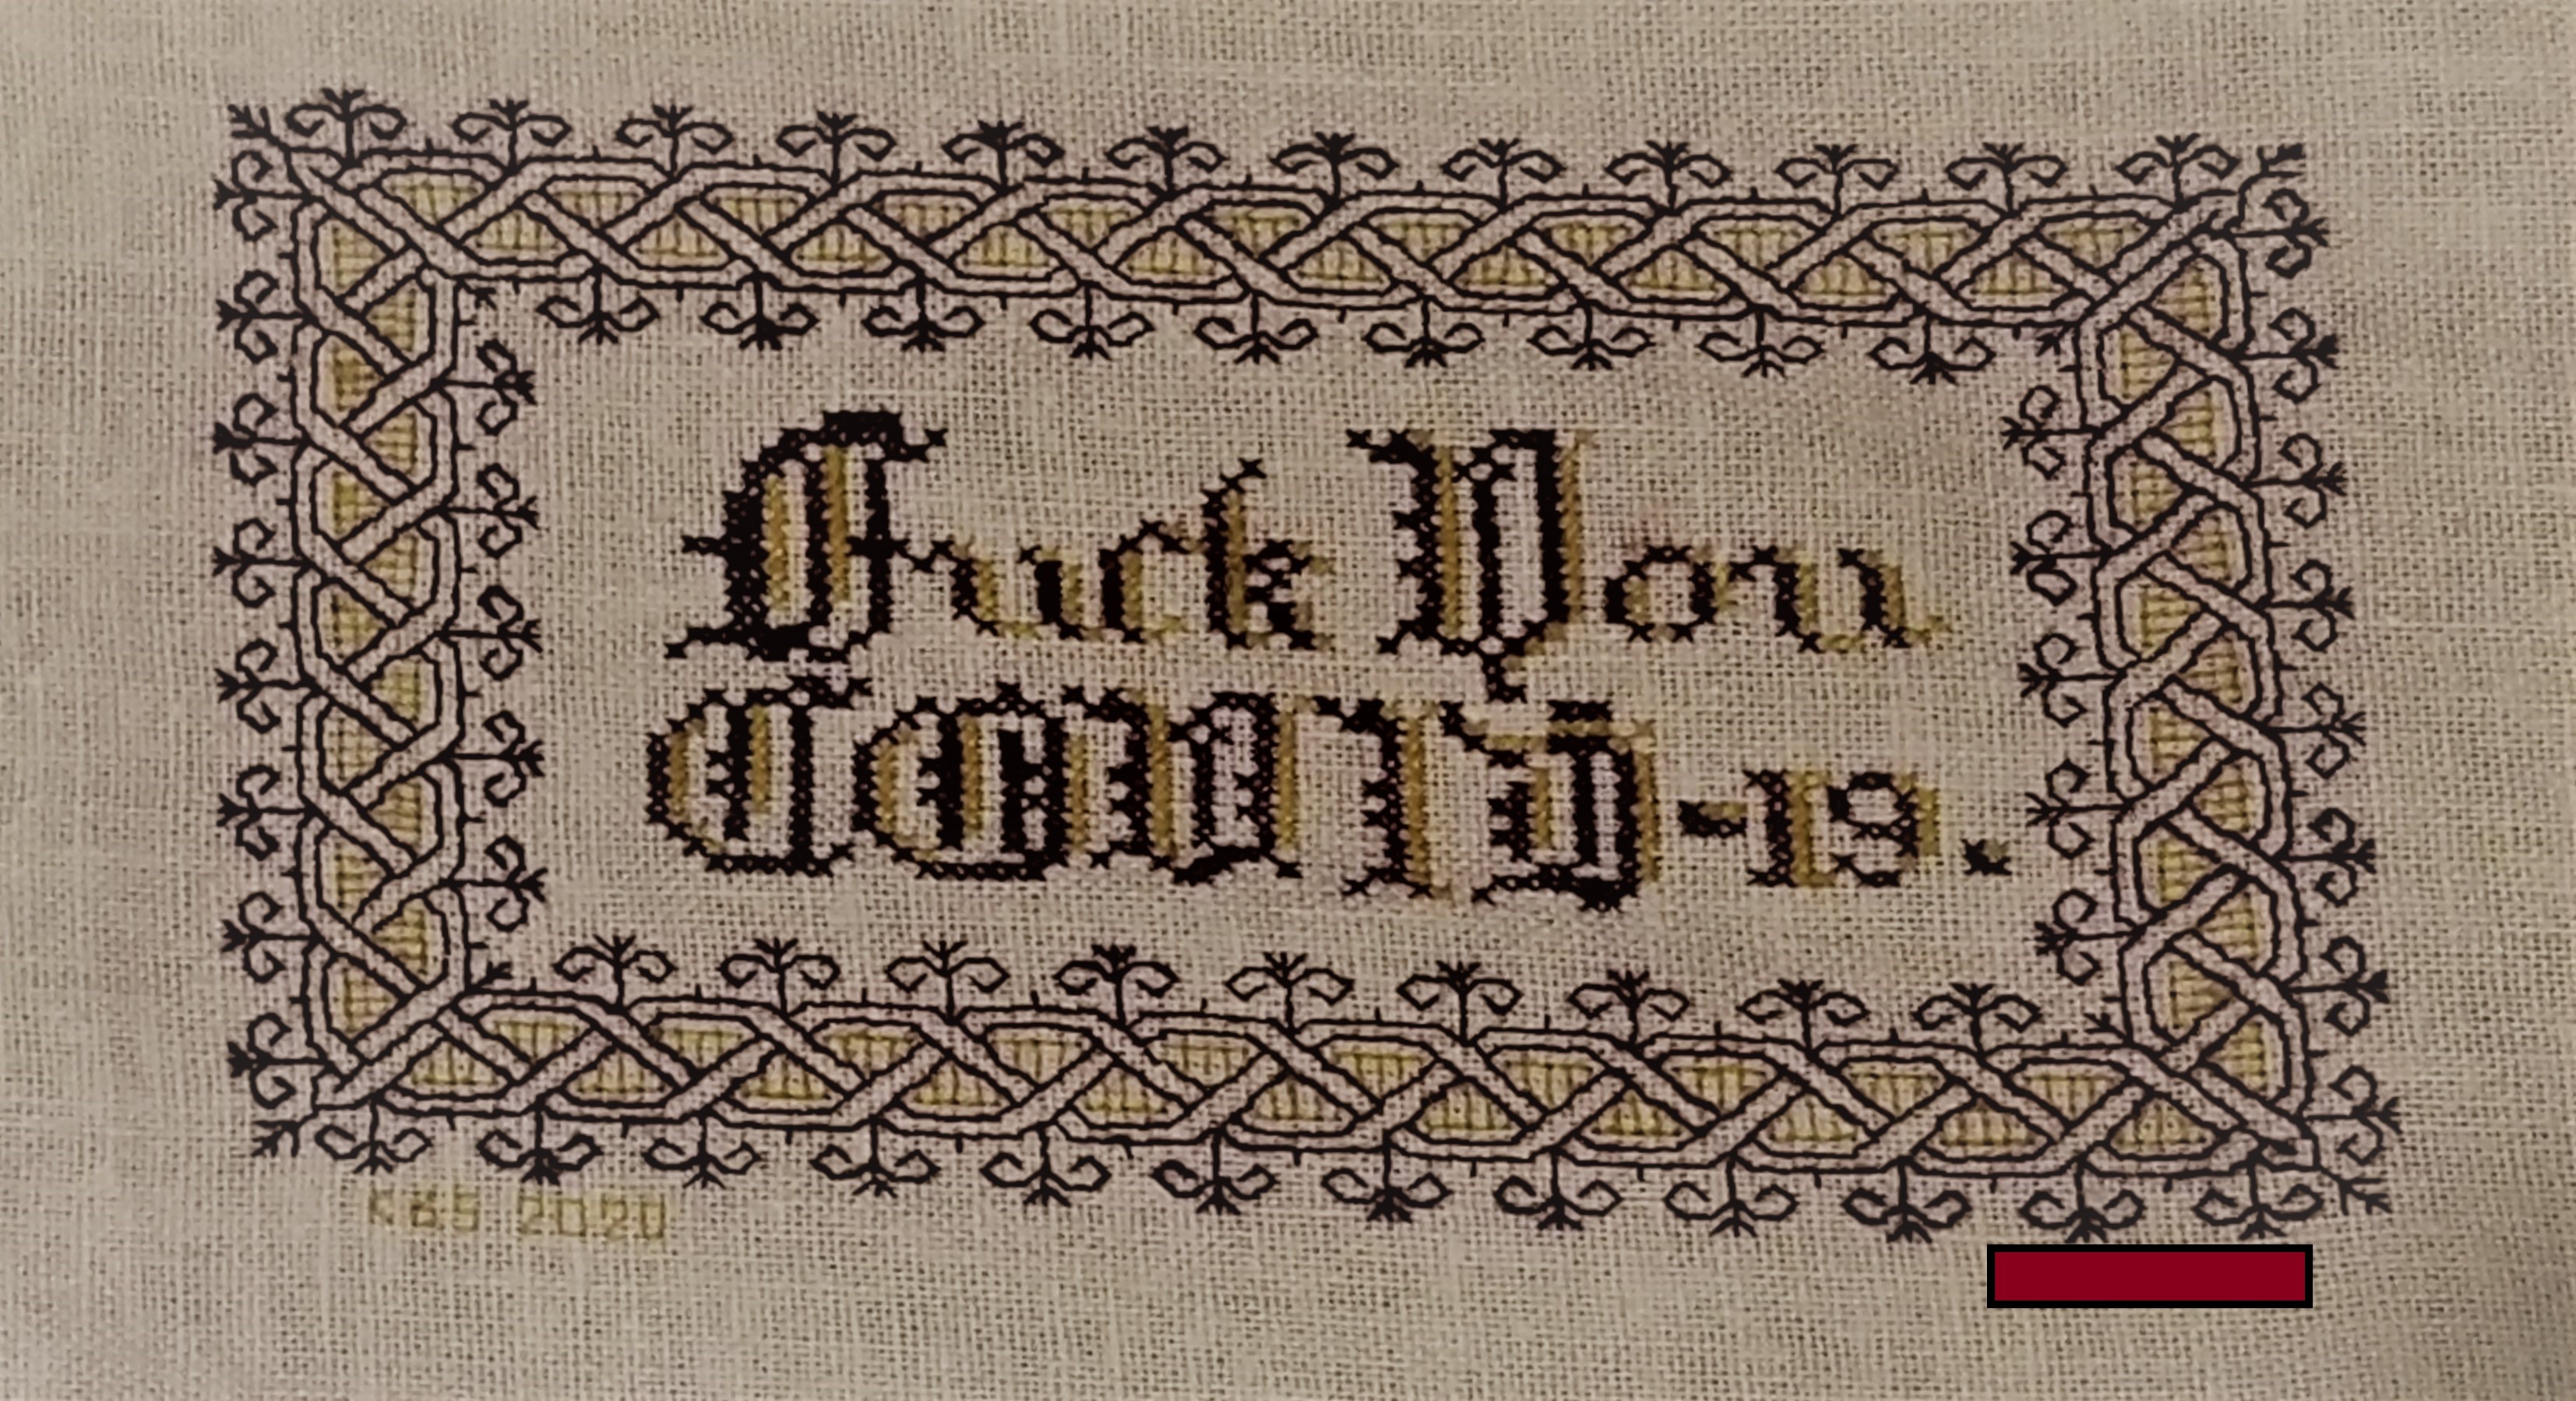
My own finish. Naturally dyed claret and mustard yellow wool on linen/cotton blend. I played with the color placement and letter forms a bit, since I can’t do anything verbatim these days.

Photo (c) 2020 by Madeline Keller-King, reproduced here by permission

Photo (c) 2020 by Breen Pat, reproduced here by permission
A couple of days ago I posted the design for my “Don’t Panic” piece, which has become shockingly relevant.
Friend Edith points out that harsh times call for harsh language, and that while some people might be soothed by a gentle statement, more strident expression suits many others.
Therefore for Friend Edith, and in the spirit of Dame Judy Dench, who is famed for stitching up provocative statements, I make this chart freely available for YOUR OWN PERSONAL, NON-COMMERCIAL USE.
Consider it as “good-deed-ware.” It’s tough out there right now. Pay this gift forward by helping out someone else in need; phoning or getting in touch with a family member, friend or neighbor who could use a cheerful contact; volunteering time or effort; or if you can afford it – donating to one of the many local relief charities or food banks that are helping those displaced from work right now.

Right-click on the image above to save it as a JPG.
This piece is intended to be done in cross stitch (the lettering), and double-running or back stitch (the frame). While it’s shown in black and red, use one color if you like, or substitute in as many other colors as you wish.
The source for the lettering is yet another of the offerings in Ramzi’s Patternmakercharts.blogspot.com collection. The border is from my recently released Ensamplario Atlantio II, a free collection of linear designs – mostly blackwork fills and borders.
Thank you Edith! Your inspiration and request will brighten the hearts of many, while rendering their walls cheekily NSFW.
(And there goes my PG blog rating, and any remaining shreds of reputation for gentility. But it’s worth it if someone smiles.)
BOOKMAKING 105 – ONE COVER DONE. CENTERING ECCENTRIC REPEATS
The first side is done! You can see that I’ve filled the entire defined stitching area, and that I’ve mirrored the border all the way around.

You can also see that I’ve left in the basted lines that mark the flap areas I will need to form the slipcover parts.
Now on to the second side. (I’m not going to call these front and back because I intend to let the recipient decide which one she likes better.)
IF YOU ARE WORKING A BOOK COVER YOU CAN STOP STITCHING HERE. Decorating the back and spine areas is a personal choice. You may want to skip one or both of those in order to finish more quickly. No shame in that, but you’ll have to wait a bit for the finishing instructions because I am going to do both.
Finding a Center Point on an Eccentric Repeat
Centering the pattern for the first side was pretty easy. I had basting stitches that marked the exact center point of my stitching area, and I had a pattern with a lovely swirly flower, complete with a perfectly defined center point. I could have used the center of the yellow lattice, but I chose to make the flower the focal point.
But what about an eccentric repeat? One that doesn’t rely on quadrilateral symmetry like the flower does. Or mostly does – that directional swirly center mixes it up just a bit, but the outline of the flower and lattice is solidly four-square symmetrical – you can flip it up, down or left/right and the outline remains the same.
Here’s the eccentric repeat I’ve chosen for this side:

Wow. Where is the center? The double-leaf sprigs do reverse-mirror up and down, but the reflection point is a box, not a dot (the dots representing the “holes” in our ground cloth). I’ve circled it in red.
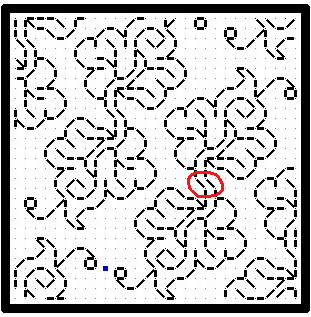
We COULD work the piece on skew count compared to the established prior work . That’s one of the advantages of using even weave instead of one of the purpose-woven grounds like Aida, but I don’t want to. I’ve left one two-thread unit as a clear zone between the border and the field on the first side. I don’t want to make that clear zone wider or narrower on this side.
Instead let’s find a better “center dot” location to line up with the the basted center lines. Ideally i want the piece to be visually balanced, in spite of the eccentric repeat. So let’s look in the spaces BETWEEN the sprigs. It just so happens that there is a perfect spot. There is a two-stitch gap between the buds on the curlicues – that tendrils that looks like they end with a berry. I’ve marked the dot between them. That’s the spot I mated with my designated center point in this stitching area.
Here’s the start of my stitching. You can just make out the remains of the basted center line to the left (the vertical one is already too picked out to show on this photo). But I’ve included the Blue Dot that matches up to the chart above. That’s the exact center of my area, and that’s my alignment/starting point for this one.

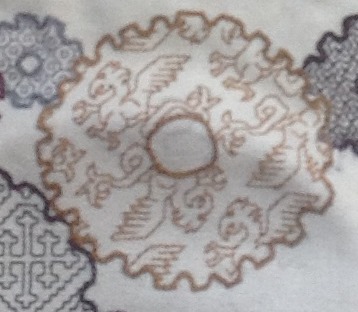
One thing to remember about aligning eccentric repeats this way – they do truncate around the edges. My chosen area is large compared to the scale of the motif. Several full repeats will fit both up and down and across that field. If I were to employ this filling in a smaller area, instead of looking for a visual center point for the design as a whole, I might place the design so that at least one full repeat was shown, or I might center the most prominent part of it (the leaf) in my area-to-be-filled, and let the rest of the design be cut off as it may.
Here’s an example of trying to shoehorn a larger repeat into a smaller area. The dragon won’t fit cleanly on any one side of the gear shape into which it was jammed. But by moving it around a bit rather than trying to center it cleanly, I was able to get enough of it in to make the thing “legible.”
And I continued on. Just as before I worked my way out to the right, until I got close to but not right up against the area where my border should go. I’m using the same border on both sides of the book, so it was easy to count and copy from established stitching. Once I had aligned the center knot on my basted horizontal center line, I worked down from that to the corner, copying the stitching I had already done on the finished cover. Then with my border established, I went back and filled in more of the field.
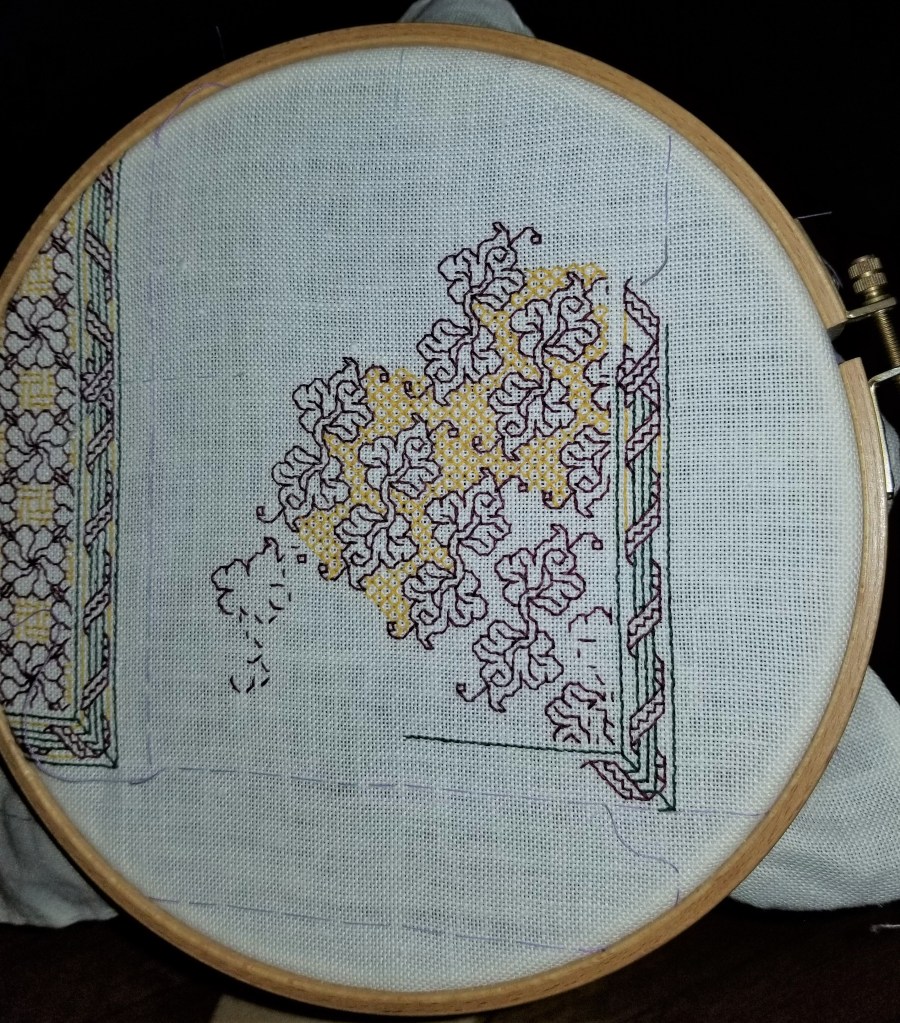
I liked the almost-voided effect of the yellow lattice on the first side, so I decided to work this design in true voided style. And since just the other day I found an example of a diamond voided fill on a historical piece, why not?
I’m fairly flying on this second side. Being able to copy the border (and being familiar with it at this point), plus the simplicity of the diamond ground is making this bit quite speedy. What you see above is more or less what I was able to stitch in about four hours total time, spread out over two evenings.
And I am liking this fill. A lot. I may have to use it again. Possibly in combo with border I designed to match. Both are in my free book, Ensamplario Atlantio II.
So. Is all of this clear as mud? Do you have any questions? Are you thinking of working an original project based on these principles? It could be a book, a pincushion, a pillowcase, a box top, a small hanging piece – anything. The same hints on defining a stitching area, centering a design, and working on the fly (as opposed to fully drafting out an entire stitch-for-stitch full project chart) all would be helpful.
Unleash your inner doodler/designer! Go for it! I know you can.
BOOKMAKING 103 – BORDERS
We go on with the removable book slipcover project.
Step 9: Laying Out and Choosing a Border
Last time I had begun working the field pattern for the first cover. I centered it on the center point of the available area, and began working left, right, up and down. Since the total area isn’t very large compared to the span of the repeat, pretty soon I got close enough to my first edge to begin considering what I wanted to do with the border. I stopped well shy of the basting line that indicates the edge of my territory:
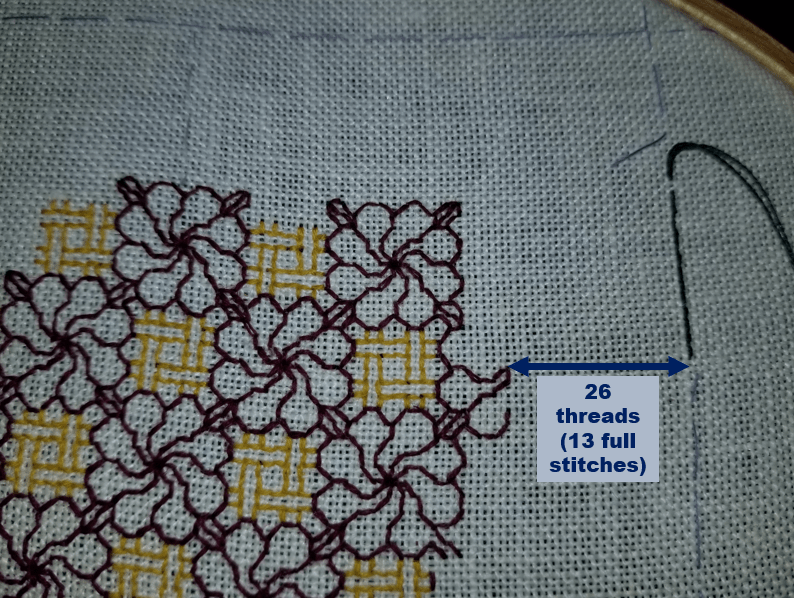
In the photo above you can see there’s lots of room to go, but I need to determine exactly how much room there is, so I can select, adapt, or draft up my border design. I’ve decided that whatever I do, it will be bounded both inside and out by a single line of deep green (DMC #890). (I like the contrast with the red and yellow). So taking care to make sure that I have FULL STITCH UNITS between the basted guide line and my stitching area – meaning even multiples of two threads – I start working my outermost solid green line.
Lucky me – it turns out that my basted edge falls exactly 13 stitch units (26 threads) from my established work. Had there been an odd number of threads I would have established my line one thread to the outside of my basted line. Better a tiny bit too large than a tiny bit too small. And yes, I counted the number of threads between the top basted line and the established work, too. It’s even bigger, so I am safe.
My border can be anything up to 13 stitches. But I don’t want one that wide. About half that is enough. So I went thumbing through my various stitch collections. I wanted one that would contrast nicely with the field and not fight with it, and would accommodate using up to three colors, including the newly introduced green.
I didn’t find a pre-drafted, complete border that I liked in this application, but I did come up with this all-over design, presented in Ensamplario Atlantio, my first freebie, in Part 3, Plate 16:91.

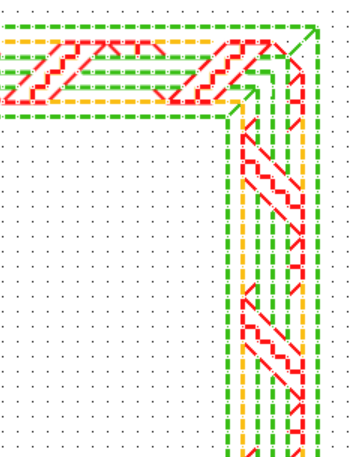
It looks complex, but it’s just a simple ribbon-wrapped column, repeated multiple times. If you abstract just one of the columns and add a line of framing stitches both left and right, it spans only 6 stitches across. A perfect size, and there are several color-use possibilities as well.
Based on the design above, I drafted this out and started stitching. Note that I began by making a nice, neat corner.
For the record, these and all charts for linear stitching on this blog have been produced using the open source drafting software package GIMP. Here’s a free tutorial for how I do it (read up from the bottom for best logic).
Step 10: Stitching the Border
Just go for it!

The observant will note that I started stitching from the corner and worked the border down, then went back and filled in my field pattern, stopping one unit away from the border’s inner line. I don’t care at all that my field pattern is truncated. I COULD have stopped at the last whole or half-repeat, but to me, for this particular work, it doesn’t matter.
I am also not in the least bit concerned about how to make the design fit either the length or width of my book. I intend to work from the corner out towards the center of each side, approaching but not connecting at the center. Yet.
The next steps will fill work more of the border across the top of the piece, then fill in a bit more of the field. But I will stop the border and leave a gap in the center. It’s my intent to work the other corners similarly, but in mirror image to this one. Since everything is done on the count and is exactly even, I will be able to draw up a “join” or top/bottom/left/right border center kludge of some type to unify the border as a whole. And I bet that had I not confessed this here, you would have never known I got this far without planning it all out in advance.
Bonus Bit: The Back
For the folks who have asked to see the back, here it is flipped over. You can see the wrapped inner hoop of my frame and its attached support stick.

As stated, I tend to work in double running, using (mostly) reversible logic, but I am not a slave to it on pieces that are not intended to be seen on both sides. There are lots of knots. And you can see that I’ve used heresy stitch in laying down my initial border outlines, and in advancing the border in general. The short length color runs necessitated by its rather fiddly color changes make it much easier to plot out than the double-pass of double running.
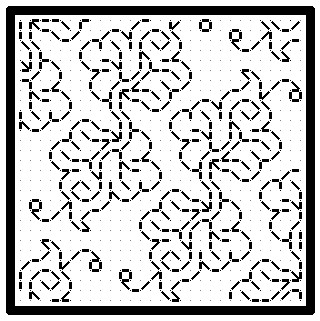
ENSAMPLARIO ATLANTIO II
While I am still struggling with the release of The Second Carolingian Modelbook at an affordable price point, other doodling has not ceased. I took a look at my notebooks and decided that enough had piled up to make a sequel to my free book of linear designs. And so I present Ensamplario Atlantio II.

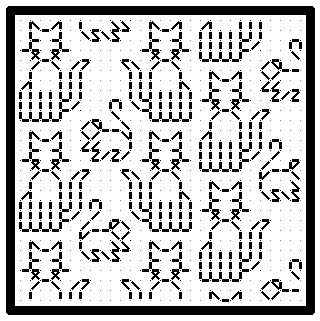
This one contains over 225 designs. Most are for the filling patterns used for inhabited blackwork (the outlines plus fillings style pictured on the cover), or for all-over patterning:


Some sport small motifs that can be scattered either at the represented or wider spacing:


Others can be repeated to make strips or borders:
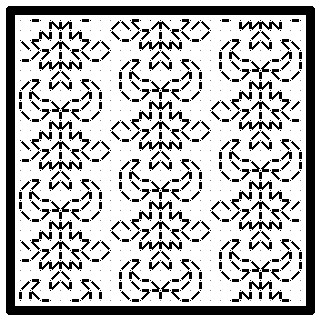


And some are just silly:


There are also longer repeats specifically meant to be borders


Finally, there are two yokes meant for collar openings, but if I tease everything here there will be nothing left.
Click to download –> Ensamplario-Atlantio-II <–
in PDF format (9 MB)
Although Ensamplario Atlantio II is free, I beg you to respect my author’s rights. These designs are intended for individual, non-commercial use. Please do not repost the book or its constituent pages elsewhere. If you want to use its designs in a piece or a pattern you intend to sell, please contact me for licensing. Other than that, please have fun with them.
And (hint, hint) I ALWAYS like to see the mischief the pattern children attempt out there in the wild world. Feel free to send a photo of anything you make from any of my designs. If you give permission, I’ll post it here, too.
UPDATE:
For those who want more and wonder where the first volume of this series is, no worries. Pop over here to download the constituent parts of the original Ensamplario Atlantio. Why four parts then, but one big download now? When EnsAtl first came out downloading a doc that big was more of a problem for some, so I snipped it into pieces for ease of retrieval. I don’t need to do that anymore.
