GANESH PROJECT – INSTRUCTIONS
Over the past few months I’ve gotten a few inquiries from folks who want to stitch up my Lord Ganesh piece. I don’t issue it as a kit or fully laid out project chart. For one, the outline isn’t mine. It’s a coloring page I found on line. But here’s a run-down of the piece, plus identification of the various sources and fills I used. All the fills are in Ensamplario Atlantio – my free collection of blackwork geometrics available elsewhere on this site.
Fabric: I used a 32-count not-so even weave linen-cotton blend. My piece was a rectangle about 12 inches wide, and about 16 inches long, but the motif itself as-stitched was only 8 inches across from lotus-leaf tip to lotus-leaf tip at its widest diameter.
Thread: I used DMC six-strand cotton floss, Color #498. I used two strands to stitch the counted fillings, and three strands for the simple chain stitch outlines. I am not sure how much I used, but three skeins should be plenty for the entire project.
Needle: I used a ball-point needle intended for sewing knits to work the fillings. If I am using only one or two plies of standard embroidery floss, the small eye makes for less “thread drop,” and the rounded tip slides between rather than pierces the ground cloth’s weave. I think I used a #26 or #28 embroidery sharp for the chain stitch.
Stitch count: I worked the counted fillings over 2×2 threads of the ground, yielding a worked stitch count of about 16 stitches per inch. However my ground cloth was not exactly even weave, so you can see a bit of north-south distortion, and fillings that were supposed to be square ended up a bit stretched in that dimension.
Pattern sources: The outline pattern – a coloring book page found here. Coloring books are a great source for simple line drawings suitable for use in embroidery of all types. For the fillings – all are in Ensamplario Atlantio, my free on-line pattern collection.
Working Method:
1. I retrieved the coloring page and enlarged the image so that it was about 8 inches wide. I used a graphics program to do the enlargement, although if you do not have access to one, a simple print followed by enlargement on a photocopier would work quite nicely.
2. I taped the pattern print-out to a sunny window, then taped the fabric on top of it. I traced the pattern onto my cloth. I used a plain old pencil – all I had at hand at the time. I did not bother to edge the cloth prior to tracing or stitching.

I did not use tape or overcasting to prevent fraying. The reason I didn’t is that I knew this would be a very quick little project for me, and took less than a week, start to finish. I didn’t see the need. If you think it will take you longer to do, you may wish to do something to preserve the ground cloth and limit fraying. Hemming, basting, overcasting, tape, serging – all methods have their proponents and one may be right for you.
3. Using an embroidery hoop, and starting in the center of the piece, I began to work counted fillings in the design’s fields. I chose them as I went along, and did a very rough centering of each design in the space provided by eyeballing the shape and sticking a straight pin into the visual focus of it, then using that indicated point for the center of the chosen geometric filling.
In some cases where the tight curves of the shapes didn’t align exactly with the grid of my design, I used half-stitches to eke out the edges, so that the geometrics would totally fill the shape areas. I started and ended each shape individually, and did not strand my working thread from one to the next, in order to prevent “show through.” I also tried to stitch using double sided-double running stitch logic as much as possible, but I did not cling to it. My piece has knots and ends, and is NOT reversible.
4. After each shape was filled, I used plain old chain stitch to go around its perimeter. This hid all “rough edges” that result when geometric fillings are used in curved shapes. The chain stitch was NOT worked on the count.

5. When the entire piece was finished – all fillings complete and all outlines complete – I went back and did Italian hem stitching to neaten up the edges of my cloth. This actually took longer to do than the rest of the project.
Here is a clean picture of Lord Ganesh for reference; plus one with the fillings numbered, followed by a list of the Ensamplario Atlantio design numbers for each filling used.

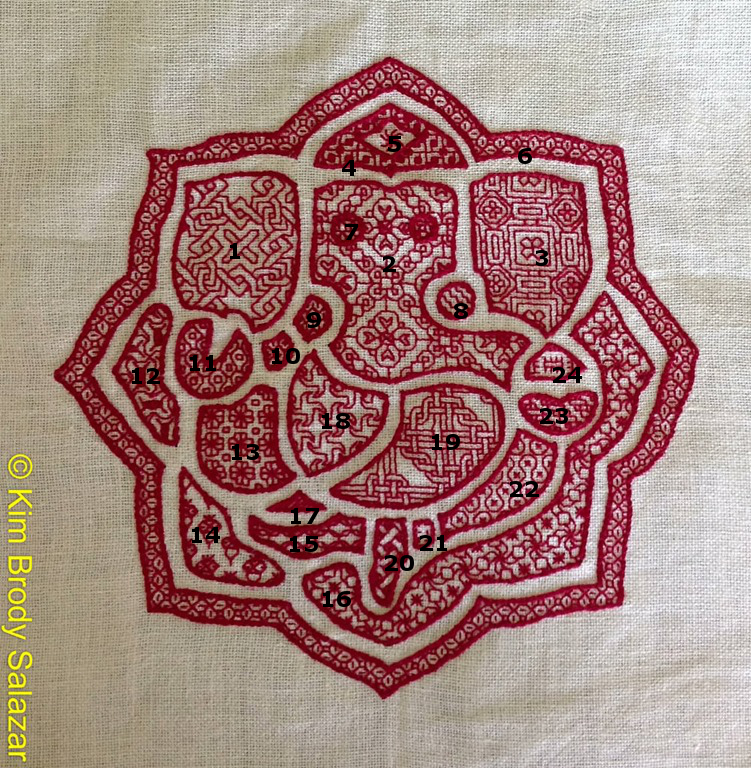
Ensamplario Atlantio Pattern Key
- EnsAtl Part 4, Plate 34:199
- EnsAtl Part 2, Plate 12:68
- EnsAtl Part 4, Plate 33:196
- EnsAtl Part 2, Plate 10:59
- EnsAtl Part 2, Plate 6:34 – one swirly star from the center of the repeat only.
- EnsAtl Part 2, Plate 11:64
- EnsAtl Part 2, Plate 7:39 – same used for both eyes.
- EnsAtl Part 3, Plate 16:94, lower leftmost
- EnsAtl Part 2, Plate 7:40
- EnsAtl Part 1, Plate 3:17 – made this one up on the fly and have no record of it. Use this one instead.
- EnsAtl Part 3, Plate 19:109
- EnsAtl Part 4, Plate 27:161
- EnsAtl Part 2, Plate 7:42
- EnsAtl Part 1, Plate 1:4
- EnsAtl Part 1, Plate 4:23 – worked sideways
- EnsAtl Part 3, Plate 16:93
- EnsAtl Part 2, Plate 13:74
- EnsAtl Part 4, Plate 31:182
- EnsAtl Part 4, Plate 25:147
- EnsAtl Part 2, Plate 8:43
- EnsAtl Part 2, Plate 14:84 – but done single stitch instead of double (off count)
- EnsAtl Part 3, Plate 17:98 – but just x in the centers, not boxed-x
- EnsAtl Part 2, Plate 12:70
- EnsAtl Part 3, Plate 22:129
I hope this helps those who want to make their own stitching of Lord Ganesh.
Enjoy!
HEMMING AND HAWING
Well, not “hawing.” Just hemming.
In answer to the question, “What do you mean by ‘Italian hemming’ since there are so many things that go by that name?” I trot out this picture of my Lord Ganesh cloth’s corner:


The person who asked the question is spot on. There are many types of hemming with confusing, occasionally overlapping names. Some are single pass rolled or folded hems like mine, others are double rows of stitching. I don’t remember where I learned this, but “Italian hemming” was the name attached.
Basically, the stitch I learned is similar to a hemming technique employed in withdrawn thread work, but in this case is done without removing any threads, as a pulled thread stitch. This style of hemming is worked on the reverse, and folds up/fixes the hem/makes the decorative pulled thread “dots” all in one pass. The stitches that make the vertical legs (as opposed to the stitches that do the horizontal bundling), are worked solely through the hem fold, and do not pierce the front or display side of the piece. All of the folding up is done with finger-pressing, neatly crimping the edges tight between thumb and forefinger, just ahead of the actual stitching. The same for the mitered corners – no ironing here, just careful folding along the threads of the weave, going slowly and working under a strong light.
I’m not the neatest at it, being long out of practice, but I’m finished, and not entirely displeased with the final product.
LORD GANESH–ENDINGS AND BEGINNINGS
The stitching part of my Lord Ganesh is complete:
All that’s left now is a little bit of finishing around the edges of the cloth. I may try out some Italian hemming, just for the fun of it.
Although I didn’t create this stitching specifically in honor of the festival, it is fortuitous that the project’s completion will coincide with Ganeshotsav or Ganesh Chaturthi.
Ganesh Chaturthi is celebrated throughout India, although it holds special significance in western areas of the country, including Maharashtra, the state in which we live. Lord Ganesh is venerated at the time of his rebirth. He is beloved as the patron of arts and sciences, who watches over the good beginnings of any venture. As I mentioned before, Ganeshji is a daily presence in life here. His images protect almost every vehicle on the road, and guard the front door of most homes. His shrines are everywhere.
In spite of this ubiquity, the festival itself is not all that ancient, becoming popular as a protest movement in the 1890s. It was revived as a unifying, mass assembly of people for a very public celebration, in opposition to anti-gathering laws in place during the British rule of India.
Modern celebrations include the erection of decorated avenues and temporary platforms, on which images are displayed. These festival areas are also the center of both scheduled and street performances – everything from music and theatrics to impromptu dancing. During the festival, offerings and devotions are also performed at the platforms (pandals).
You can see signs of the upcoming festival now all over Pune, with street constructions sprouting in neighborhoods, near temples and shrines, and along commercial streets, as civic, religious or community affinity groups try to put on the most beautiful and elaborate display. Some of the modern displays and performances are dedicated to additional causes, especially those of social justice. Families make (or buy) special delicacies for the celebration and reunite to enjoy the time together. Devotions culminate at the end of the holy week with huge processions, in which the images are escorted to bodies of running water, where they are immersed and destroyed, in a ritual that echoes the impermanence of the universe – be it of gods or men.
This ritual immersion presents a number of logistical and environmental problems. Many of the images are crafted from plaster of Paris, and are decorated with paints containing heavy metals. The sheer number of these can produce major pollution events, and can leave toxic residues in the bodies of water used. There is growing awareness of this problem, even among the most traditional of the devout. Clay, as opposed to plaster of Paris statues are more widely sold, albeit at greater cost. Some people are making their own rather than buying them. There are even calls for volunteers to recover immersed floral offerings, similarly retired to the waters after the festival, in order to reduce the effects of a large biomass of decomposing vegetation.
Logistical challenges include crowd safety, personal security, and fire awareness for unbelievably large throngs of people, all of whom are intent on getting the best view, having a good time, and enjoying the day and night time displays (complete with light shows and fireworks). There are also civic infrastructure challenges – in the cities, pandal construction damages the streets when holes for the supporting poles are drilled. Electricity for lights and loudspeakers is leeched off street poles, with improvised connections. And construction of the platforms and drapery-lined avenues can also be problematic, with enthusiasm often outstripping engineering for the anticipated loads or required clearances.
Still, for all of the challenges, the city is poised for what looks like it will be a major celebration. I’m hoping we can experience some of the edges of the festival, and come back with memories and pictures to post here.
CROSS-CULTURAL STITCHING
Lord Ganesh is a beloved and hard-working Deity here in India. His image is omnipresent. Aside from gracing his many temples, Lord Ganesh rides on dashboards all over the nation, protecting almost every car, truck, and bus. He wards the door of most homes; and blesses many shops, schools and public buildings. His image has been rendered in just about every medium, from exquisite woodcarving to molded pink plastic. He has been sculpted, printed, woven, painted, and stitched. Hmm. Stitched.
So of course, I had to work my own.
I tried to draw up my own freehand design, but decided in the long run that it would be easier to use an established image. That way I couldn’t get the iconography wrong. I found a kids’ coloring book page via Google. Its simple shapes were particularly suited to inhabited blackwork – the traditional form with heavy outlines enclosing counted thread fillings. I sized the design for some cloth I had on hand, and printed it out. Here you see the cloth and the design taped to a window – a free version of a light table – for pattern tracing:

And here’s progress to date – about four days’ worth:

He’s red because red is a happy color. I’m about two-thirds done, with one ear, some “filler” and some of the lotus frame left to go. I’m very pleased with the way he’s turning out.
For the record, I’m using plain old DMC six strand cotton floss, color #498; two strands for the fillings, three four the chain stitch outlines. I’m working on a coarse cotton/acrylic “linen” that’s not quite even weave (you can see the distortion in the floral pattern in the face, with the north-south axis looking slightly squished compared to east-west). I’m doing this at (for me) a huge gauge of 16 stitches per inch, and the entire piece measures across from lotus-point to lotus point is approximately 8 inches across. All of the fillings above are from my free Ensamplario Atlantio collection.
I have a special purpose for my Lord Ganesh, which will be revealed in time.
