DECEMBER SLIDES INTO HOME
A hectic month and a miserable year come to a conclusion. But not without completions.
First, as promised in the last post – a family photo of this year’s cookies. I tried to have smaller batches of only ten kinds, but was foiled by a concerted group effort.
Working it clockwise (recipe links for most of these can be found in my last post.

- Noon – Lemon cut-outs, magically maniacal. Special thanks to friend Laura Packer, who sent me the twisted cutters. Oh, and bonus tiny leaf (see below).
- 1:00 – Chocolate pudding cookies. A surprise addition courtesy of Elder Spawn, who for a first fling into the communal cookie pile, did quite well with an intensely fudgy bit of delight.
- 2:00 – Orange marmalade cookies with fresh orange icing.
- 3:00 – Cinnamon swirls. A specialty of Younger Spawn, who dazzles with flavor and presentation.
- 4:00 – Mexican wedding cakes.
- 5:00 – Classic Tollhouse chocolate chip cookies
- 6:00 – Our Oysters – a hazelnut spritz sandwich, with dark chocolate ganache filling
- 7:00 – Meringues (also see below)
- 8:00 – Bourbon/cocoa balls
- 9:00 – Triple Ginger/white chocolate cookies
- 10:00 – Earthquakes – Most folk call these “chocolate crinkles” but we like the more dramatic nickname. For some reason the crevices closed up. Possibly due to overbaking this year. My cookie, my fault.
- 11:00 – Peanut butter cookies
- Center of dial – Jam thumbprints, with mixed berry jam. Another contribution of Younger Spawn.
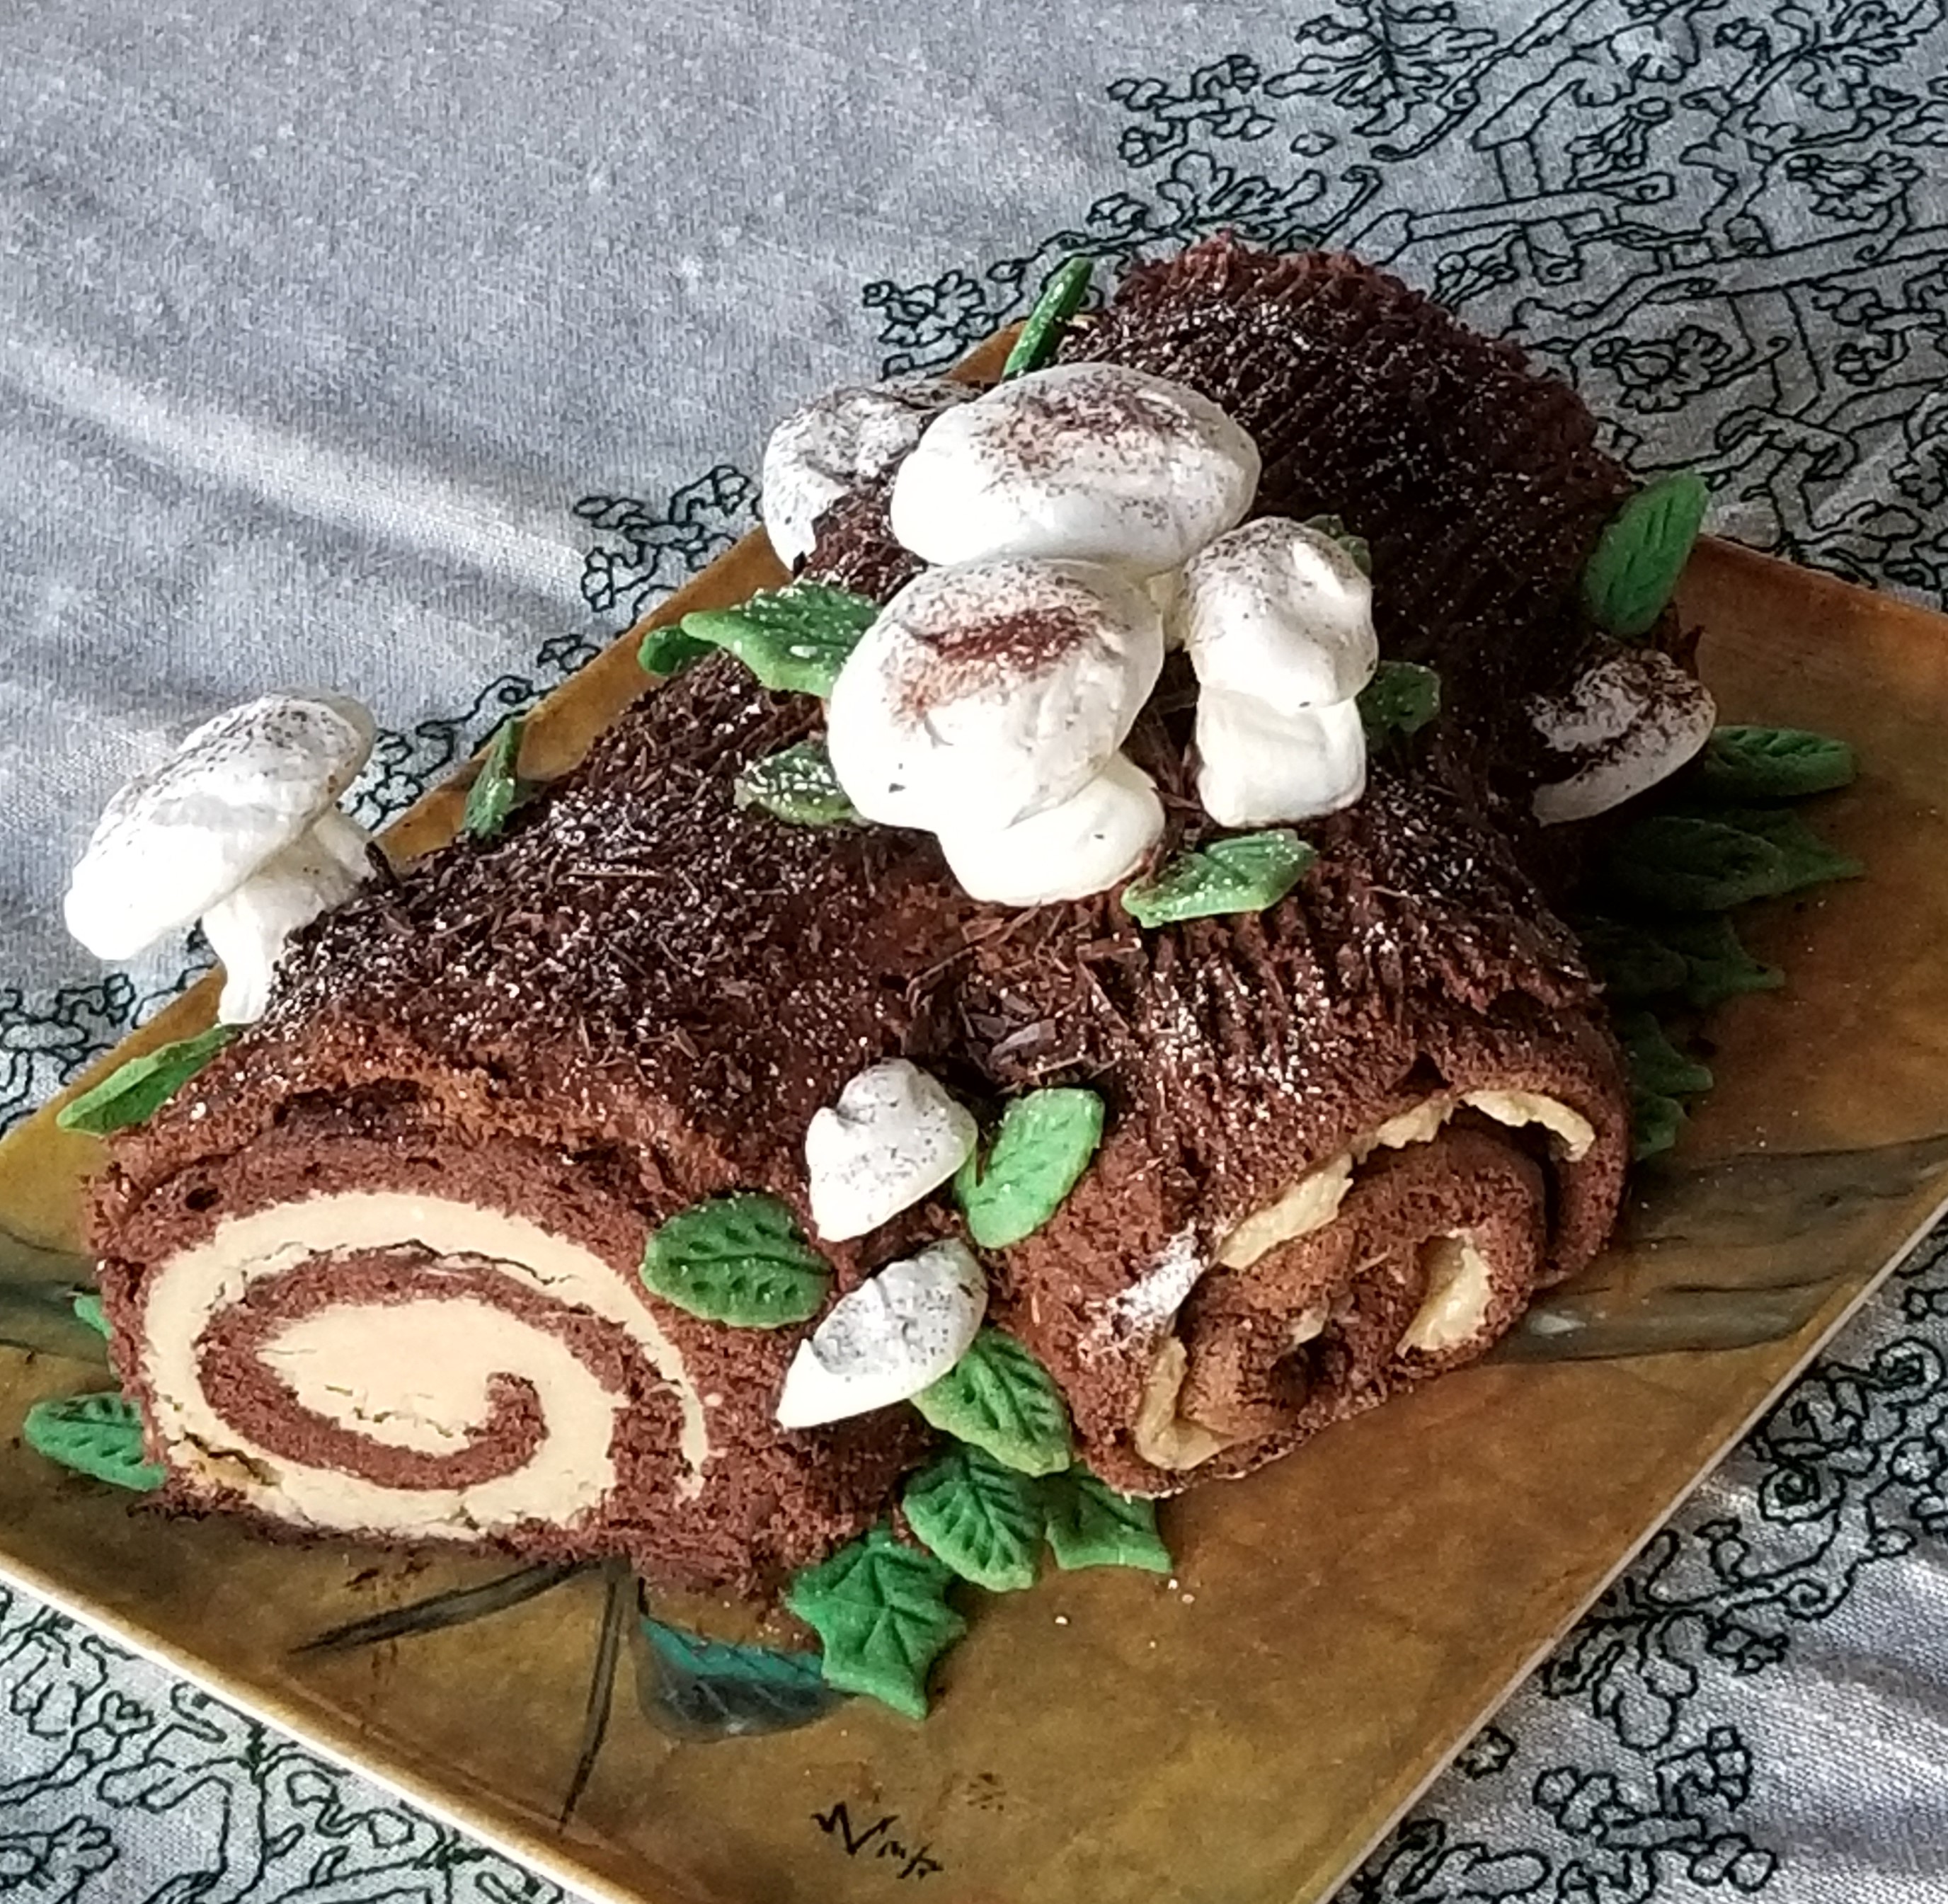
But that’s only the start. Younger Spawn also made a magnificent Buche de Noel (Yule Log Cake), with chocolate buttercream outside, and hazelnut buttercream rolled in a rich cocoa genoise. Including the traditional meringue mushrooms and little leaf-shaped sugar cookie leaves.
Not to be outdone, The Resident Male rose to the occasion and presented us with a Christmas Eve feast – seared fois gras with chanterelles; French onion soup au gratin; rack of wild boar with maple/chili glaze, plus potatoes Anna and spinach souffle.
And there are more year end finishes!
My Bony Boi piece, back from the framer and suitably hung in its place of honor in the Resident Male’s office:

The Great Masking
And I also finished my three blackwork plague masks.
I used one of Ancient Elna’s specialty cams to make a multi-stitch “hold fast” edging around the outer edge of each of the embroidered components. Then I cut out the shapes with confidence that the stay stitching would prevent any unraveling. (The stay stitching will be buried in the seam allowances, and never be seen.)
After that I sewed my stitching together down the center to make the outer layer. I toyed with a couple of treatments for the center seam to disguise the mismatch, but settled on a simple line of stem stitch, done in Krenick #16 metallic braid. The Elizabethan plaited braid I had originally envisioned was too heavy.

Then I cut the actual protective layers, traced from the same template I used to lay out the stitching, plus the lengths for the ties (I favor ties over elastic). Each mask has two layers of high thread count percale (harvested from retired sheets and pillowcases) in addition to the decorative outer layer.
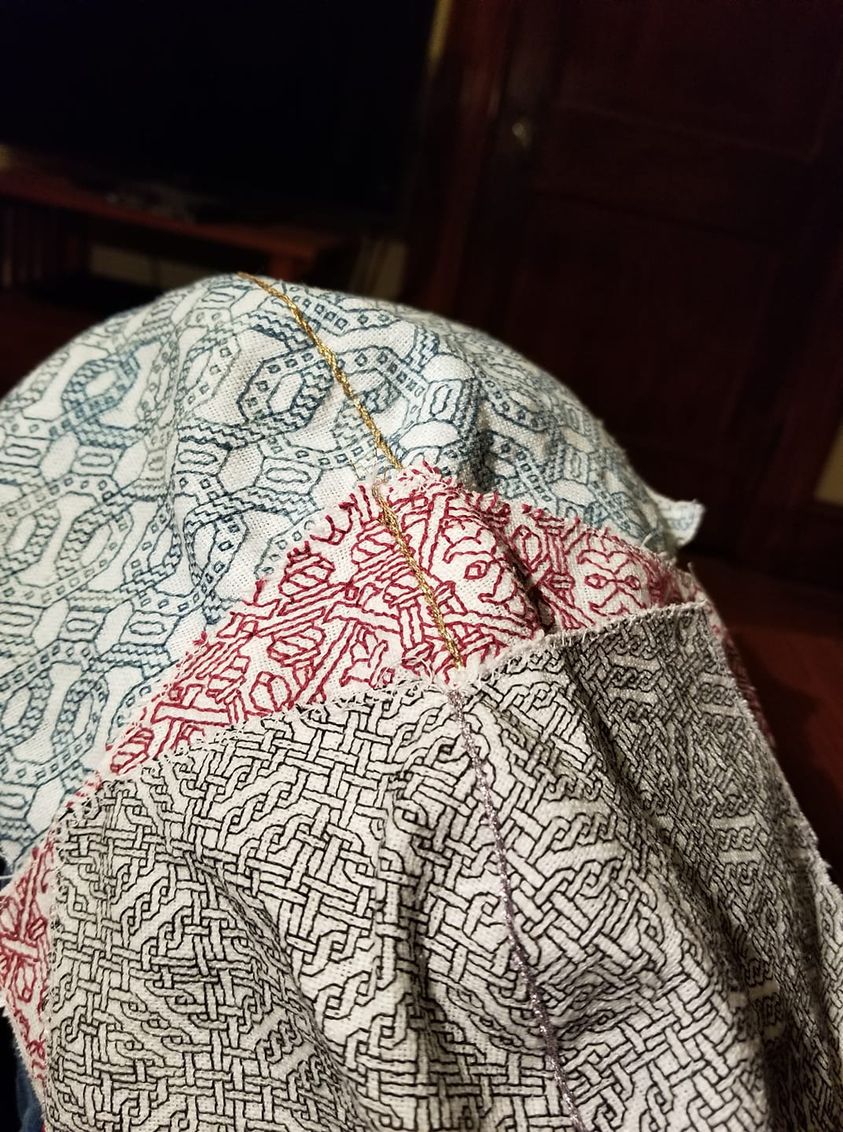
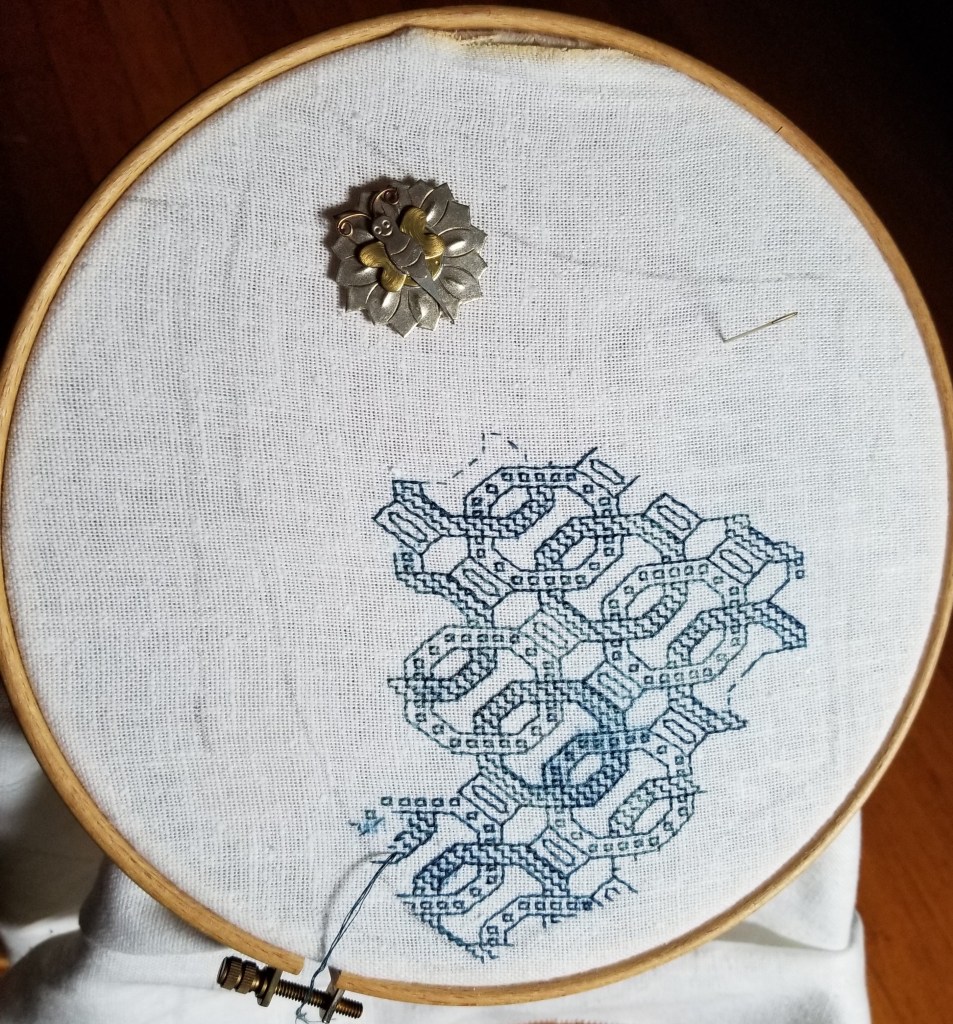
When that was done, I sewed my linings together down the center, pressed them, and pinned on the ties. Those get sandwiched between the right sides of the lining and decorative back double-layer, with care taken to make sure they are not accidentally sewn over when front and back are seamed together. The two fronts, with the ties pinned to the lining are shown below.

Once that was done it was a simple matter to sew front to back (right sides inside), leaving a bit of a turning space between the two ties on the left. The thing is flipped right-side-out by teasing the ties out and yanking. A press followed by a line of topstitching all the way around to set the edges and seal the turning aperture, and I was done:

Now on to the next thing. But first I have to decide what that is….
BLACKWORK THREAD THICKNESS AND GROUNDS
I’ve recently had chats with several folk who ask about the number of threads they are supposed to be using when working linear blackwork (fills or the strapwork designs commonly done in double running or back stitch).
I attempt to answer, and the answer isn’t a plain, flat “always.”
There are several factors to consider for counted work. First there is the ground fabric. Some people favor purpose-wovens like Aida, Hardanger, Monks’ Cloth or Anna Cloth. These are made with large, prominent holes for easy counting. They come in a variety of stitch-per-inch (or cm) sizes. They range from 9 to around 22 stitch per inch (aka “count”). The more stitches per inch, the smaller those stitches are.
Other types of grounds are also used, with even weave (or near-even-weave) being less popular than the purpose-wovens. These grounds are flat tabby woven fabrics. They do not have a system of prominent holes for easy counting – to use them the stitcher counts the threads of the weave itself. Most sold specifically for embroidery are more or less true and square, with very close equivalent measurements of the threads running the length of the bolt (the warp), and across the bolt (the weft). The measurement of fineness of weave for these fabrics is expressed as threads-per-inch (or cm), and they can range from around 20 threads-per-inch (tpi) all the way up to 50 tpi or more. Stitchers generally work over a visualized square of 2×2 threads, so a 24 tpi piece of even weave would yield the same 12 stitches per inch as 12-count Aida, but the holes between the threads would be far smaller and less obvious.
Now aberrations exist. Not everyone works over 2×2 threads on even weave, and it is possible to work counted styles on anything you can actually see well enough to count, whether or not the warp thread count is even close to that of the weft. But in general, the ground cloth world splits into purpose-woven/larger more prominent holes; and (near) even weave/smaller, less evident holes.
On to thread.
It’s all over the map. The most common thread used today is standard 6-ply embroidery floss, but there are hundreds of other options. And even plain old embroidery floss is NOT uniform. Not even if they are of the same fiber. For example, DMC and Anchor cotton flosses have very slight differences in ply thickness, with the DMC (most of the time) being ever so slightly thicker than the Anchor. And even within a line, there can be variation because different colors take up dye differently, or because of visual impact of the color used (a dark thread will often appear heavier than one of a lighter color, even if there is no actual difference between them). And if you begin comparing across fiber types/spin types even more complications ensue – One ply of DMC cotton 6-ply is thicker than one ply of Au Ver a Soie six-ply silk, for example.
Here are three examples on even weave (please excuse me for not having Aida samples to hand – I don’t use it.)
First, here is an example of 32-count even weave linen (16 stitches per inch), worked with two strands of a six-ply silk – a small lot product produced by a boutique hand-dyer. Note that the individual stitches are about as thick as the ground cloth’s weave. They fill the holes into which they are stitched completely, and in fact are a bit jammed up into them, making intersections just a bit muddy and tight:

Here is that same ground, worked using just one ply of the same thread used in the previous sample.
You can see that the stitched thread is significantly thinner than the ground cloth’s weave, and that corners and angles are sharper. But the stitching thread still fills the holes, and doesn’t “rattle around” in them. There is another difference – the stitching doesn’t look as even. It’s harder to achieve a uniform appearance with skinny threads, but the difference that shows up in extreme close-up is less evident at normal viewing distance.
Which is better? It depends. One or two threads are both suitable for use with this fabric. Do I want a light and lacy effect? Do I want something darker and more strident? Should I accent the close, dense and angular aspect of a design (as on the left), or should I try to bring out the curves and delicacy (on the right)?
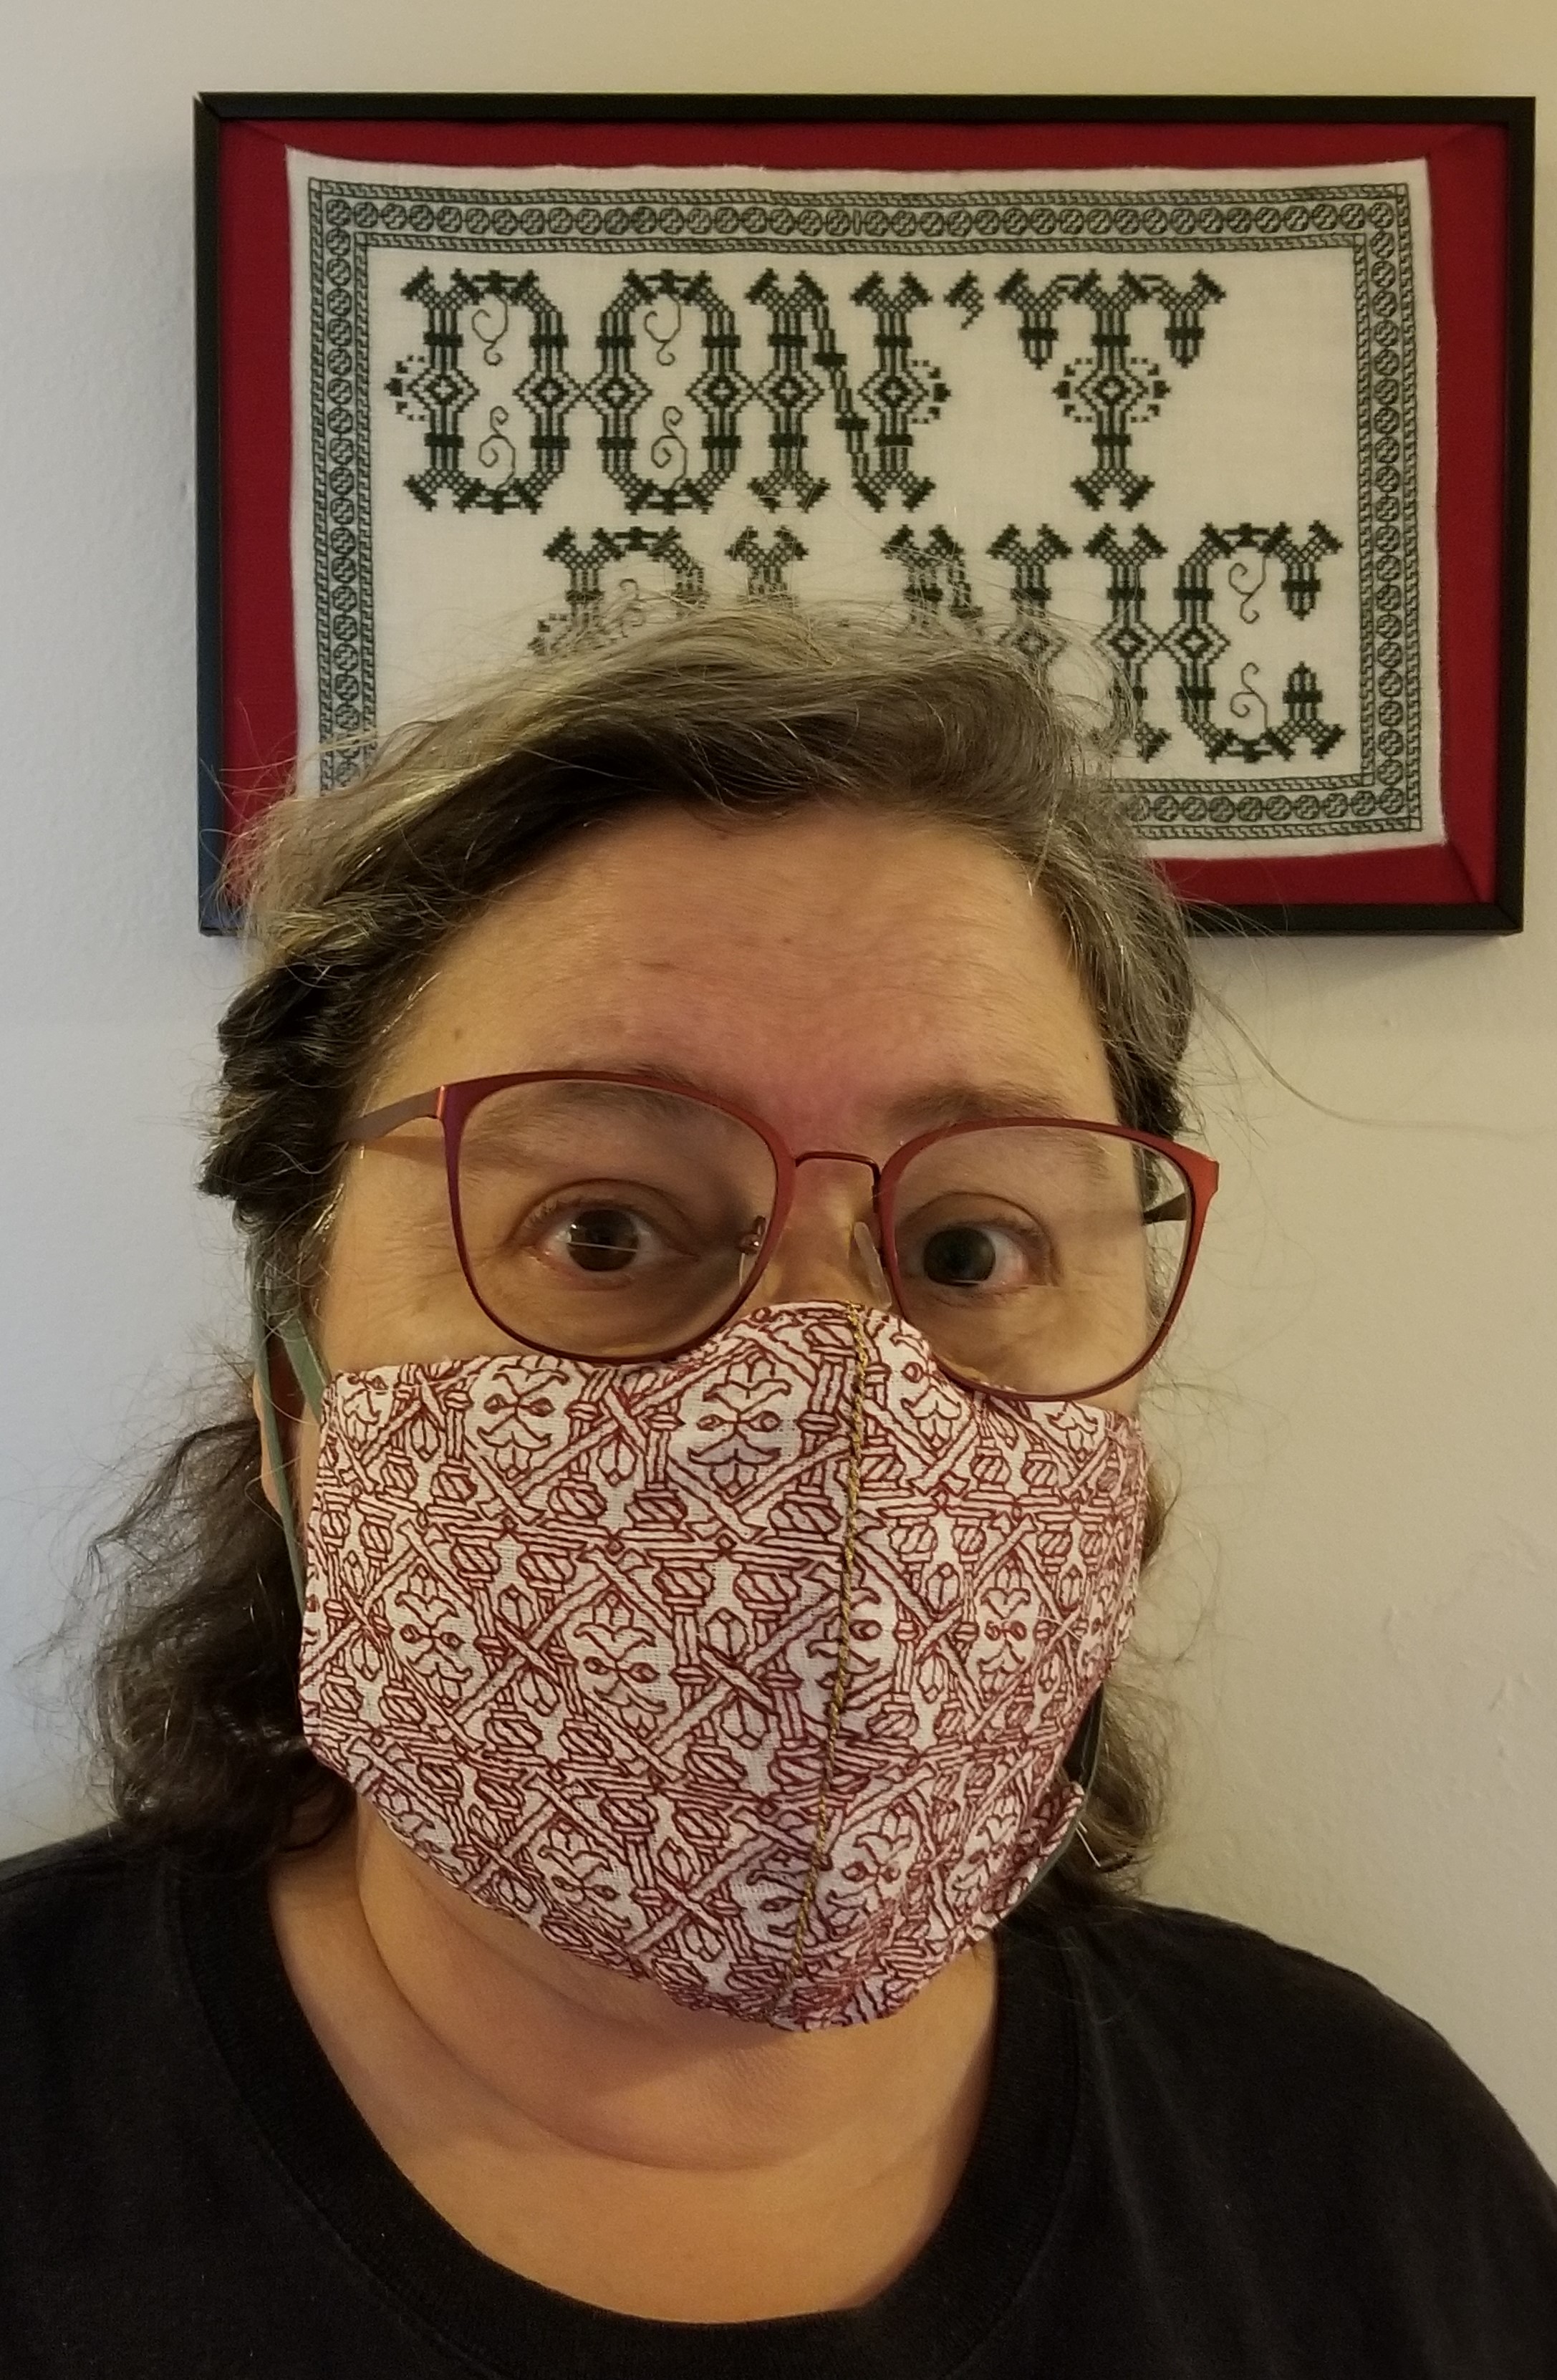
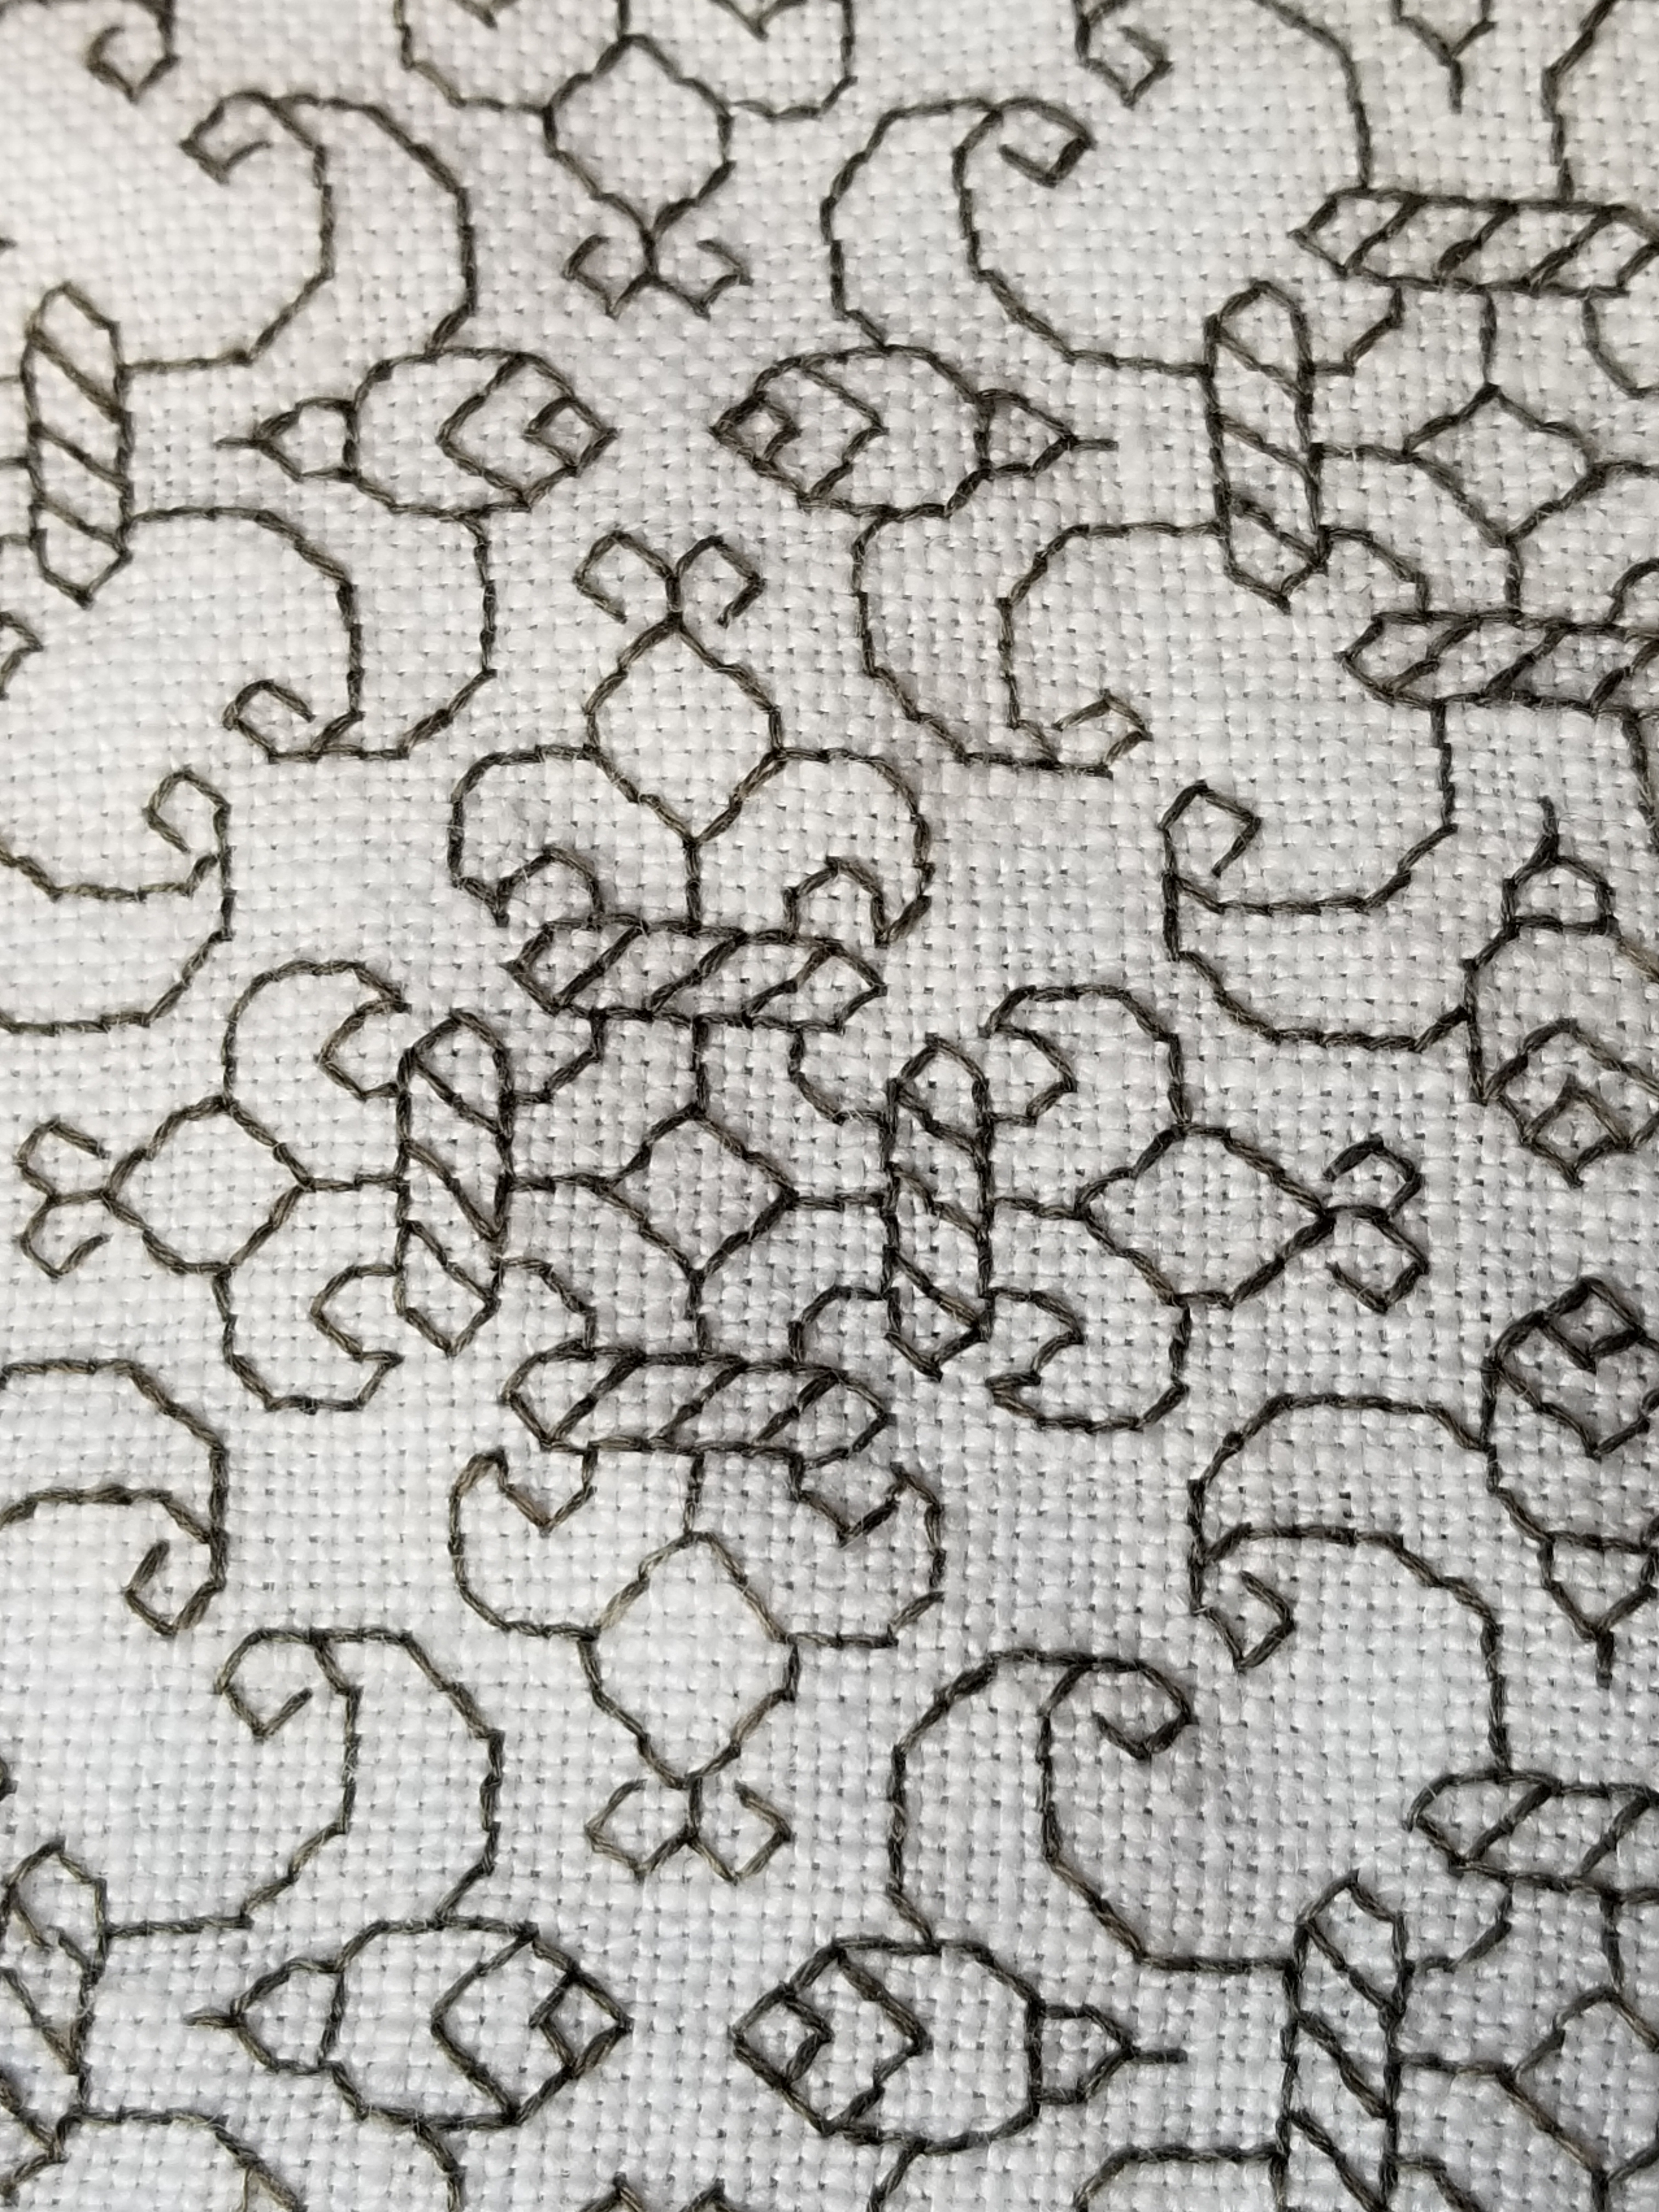
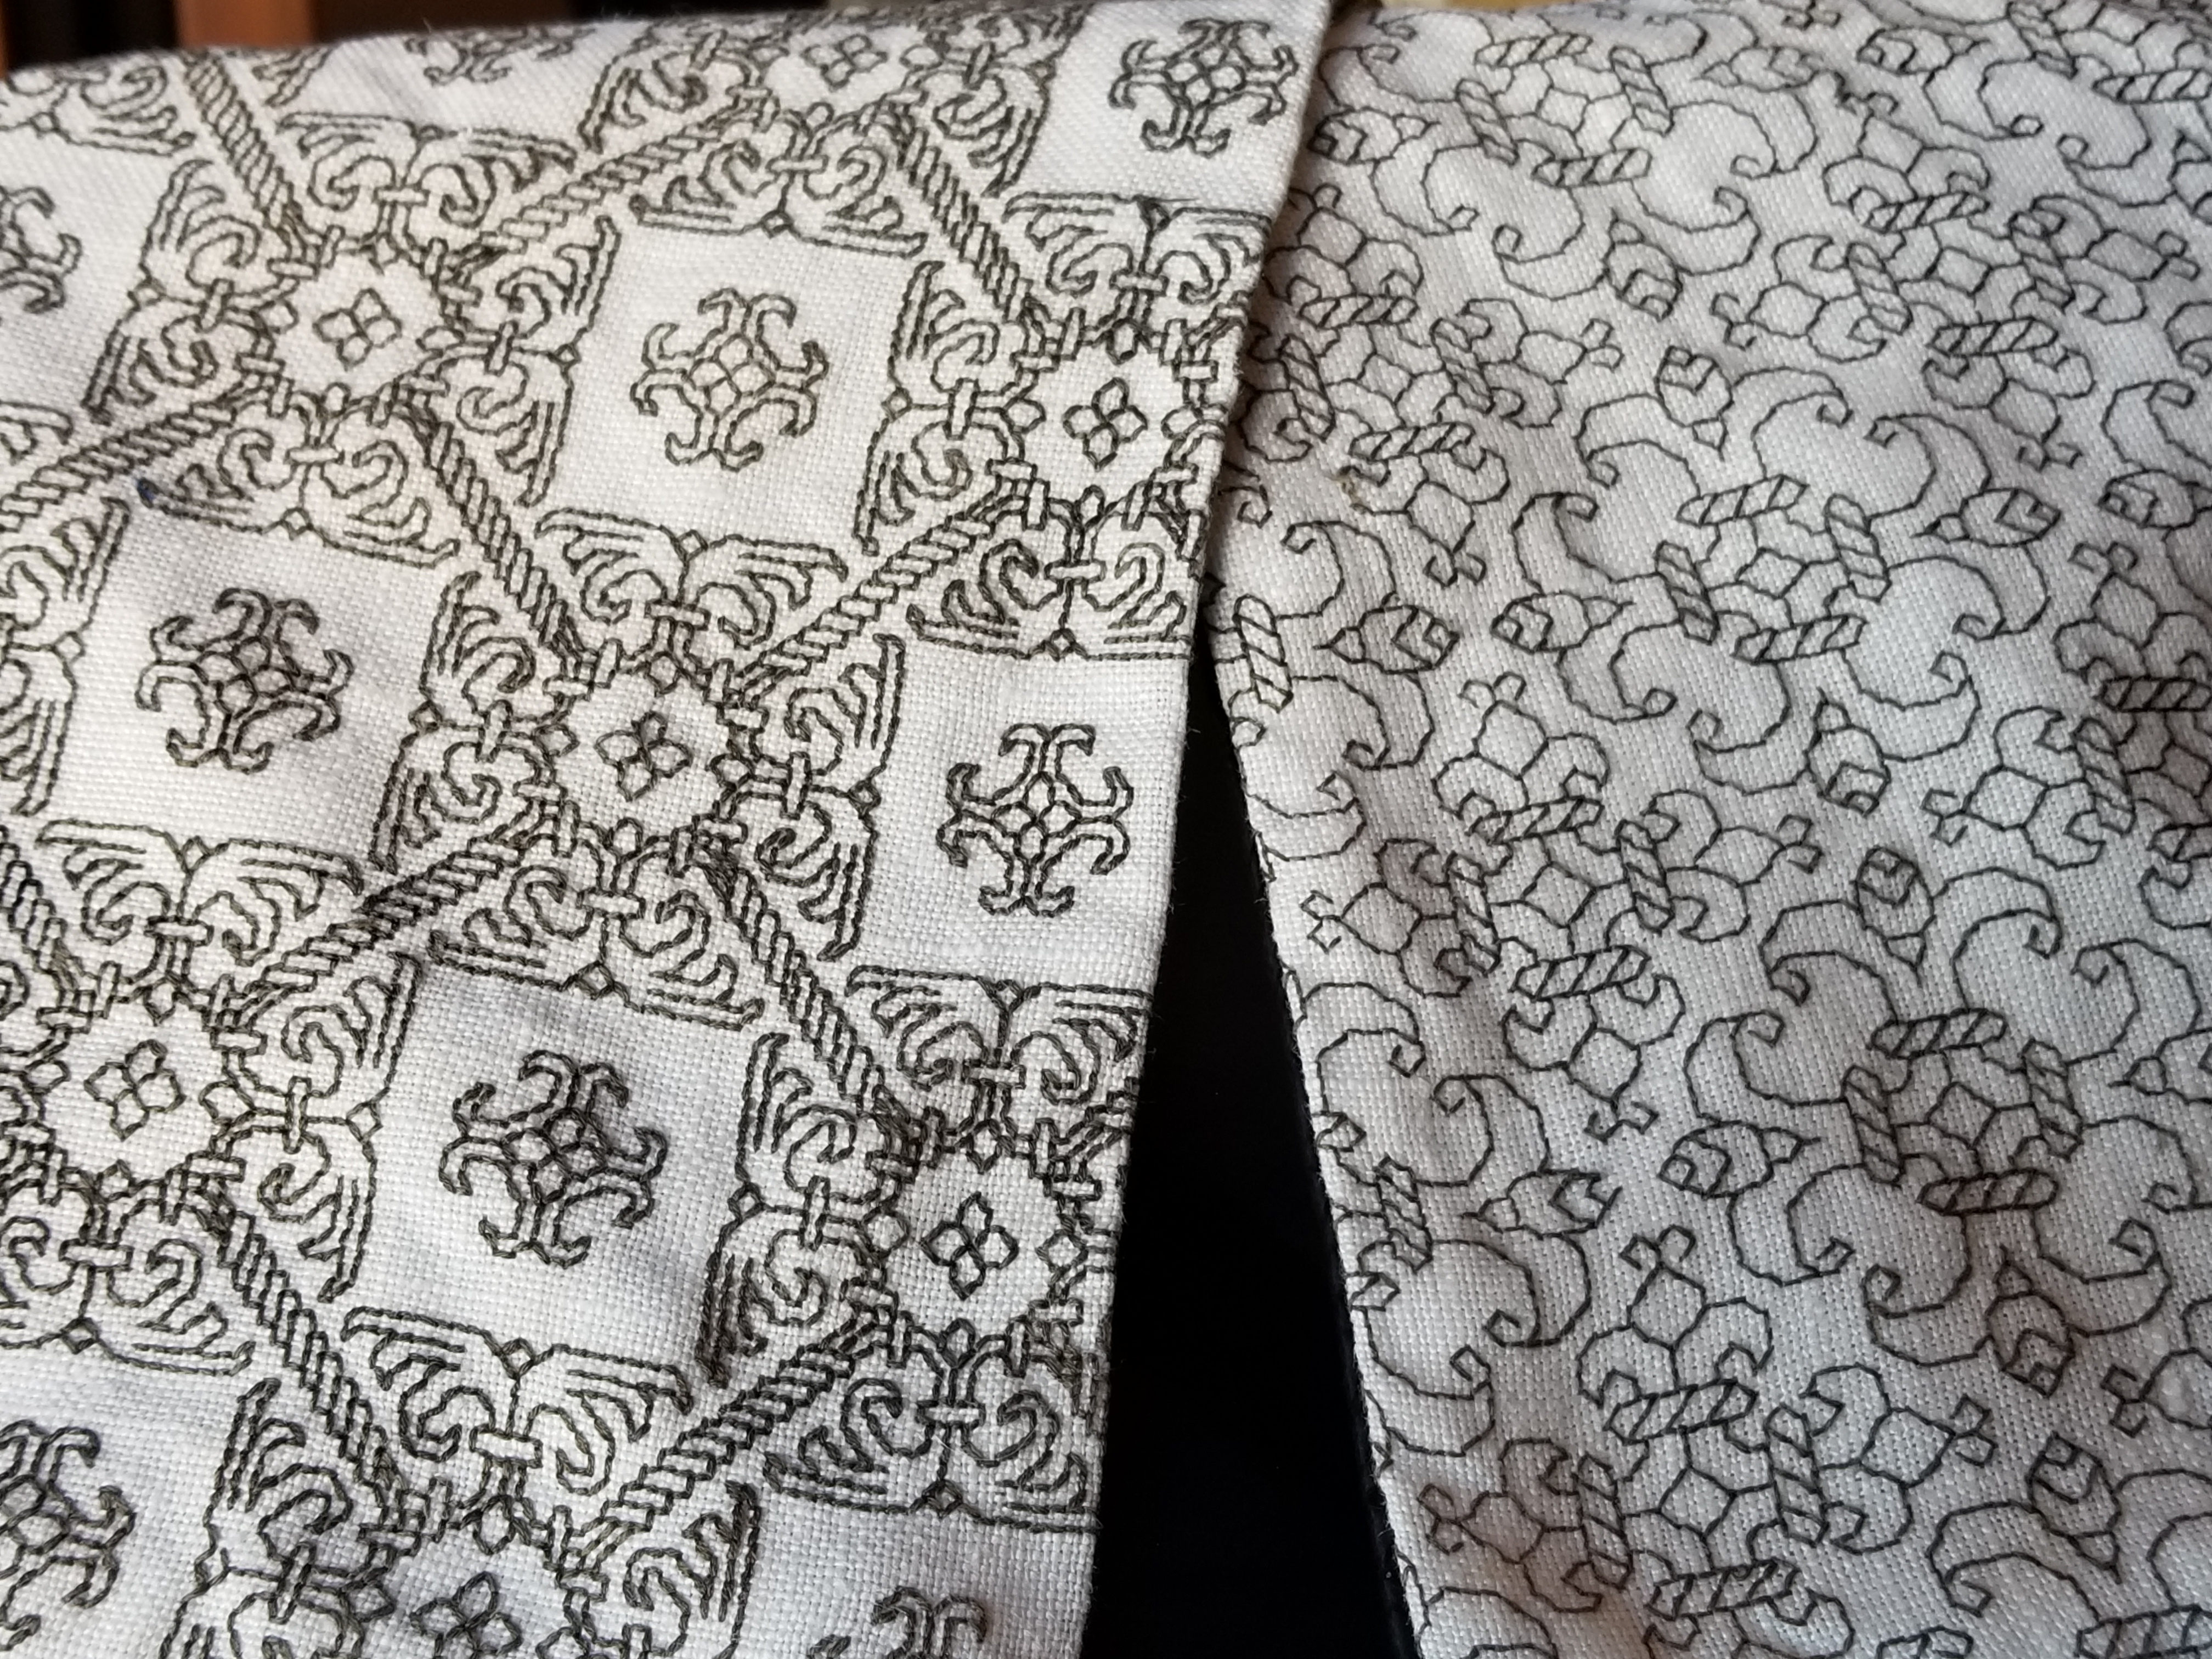
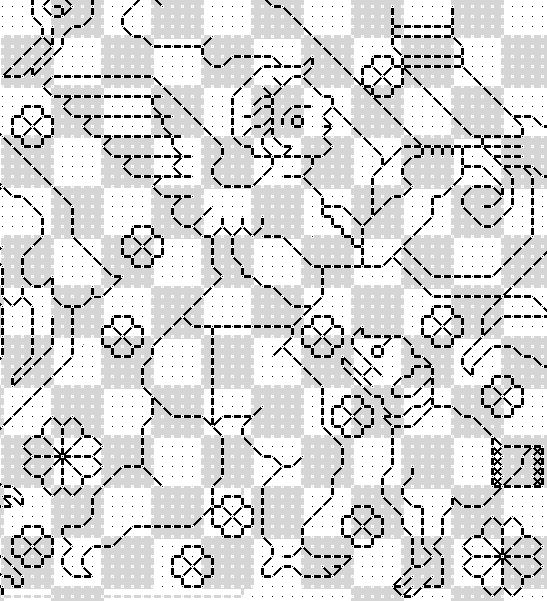
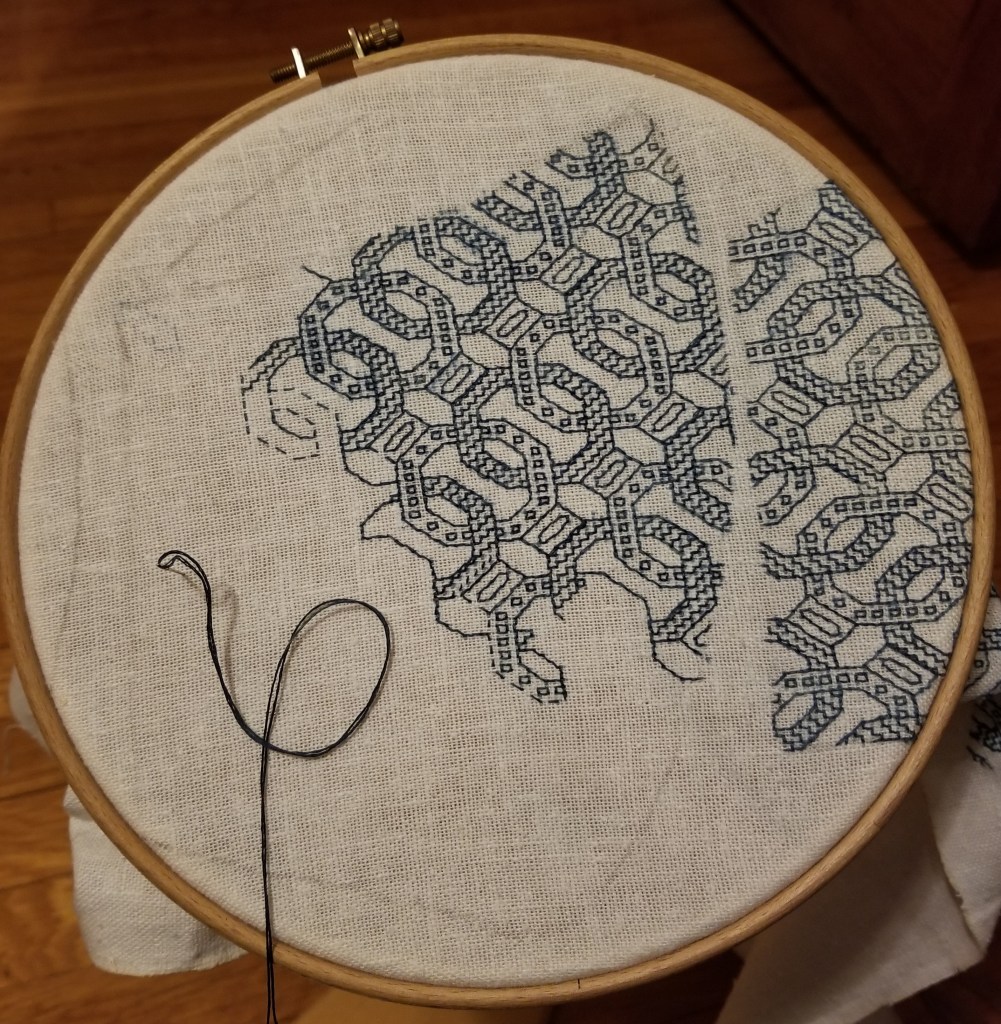
By contrast with these two balanced examples, there’s the piece I am working on right now. I am working the black bit with one strand of standard DMC 6-ply cotton floss. It’s about 14 stitches per inch (28 threads per inch).

Obviously the count on this stuff is skew. It’s not true even weave. Were it so the enmeshed ovals would present more like circles. But it’s close enough so stitched-it-will-be. Look closely at the size of the thread and the holes in the weave. Even though the black thread is slightly thinner than the fabric’s threads (like the lacy sample above) – look at it in comparison to the gaping holes between the fabric’s threads. It’s tiny and spindly. It’s lost. It wobbles. Corners are extremely difficult to keep square, angles are being pulled, and the threads that make up the design do not present in nearly as neat rows as the previous example. This same ground, with two plies of DMC? Much better looking:

In this case, I would advise AGAINST using this particular ground with only one ply of standard floss. It’s holes are too big. I’ll finish out my black interlace mask pieces, but I won’t be using a single on this stuff again.
And mixing thicknesses? It’s a great tool. Jack Robinson – the UK’s Blackwork Patron Saint (now of blessed memory) – was a strong advocate for both historical and modern pieces that mixed thread thicknesses.
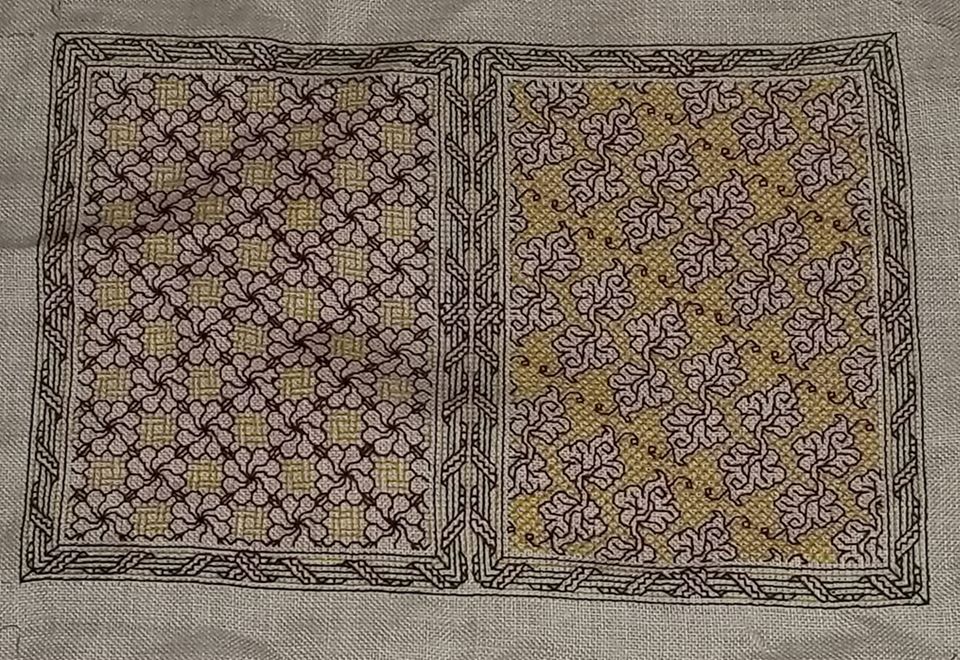
Here are a couple of examples of doing so, from my own work. I find it of special use for giving modern-style voided pieces a lighter background touch, although I have also used it to de-emphasize veining inside particularly complex leaves on non-voided work.
First: In addition to using a different background pattern for each, the yellow ground on the left is done with one strand of DMC floss, and the yellow ground on the right, with two so you can see the density.
Second: Foreground and background in the same color, but the foreground is worked with two strands, and the background with one.
Now how does this work out on Aida? Again, I apologize for not having samples to hand. I don’t use it. The reason why I don’t is that I find the holes to be a visual distraction that take away from the presentation of the work as a whole. I’ve seen magnificent stitching on Aida, and I throw no shade on those who prefer it. But to me those holes can be way too big for the thread choices many people use. Like my wobbly sample above, the threads have too much play, and even tension without distortion at the corners or avoiding jaggy lines can be more difficult to control because the holes are big compared to the stitching thread.
For myself and my own work aesthetic, I prefer a well-stuffed hole (sometimes bordering on over-stuffed), and select my threads accordingly. One strand on Aida? I’d suggest two. Or three if it’s 12 or 14 count. But as in all things, my practice is not a yardstick by which you should measure your own preferences.
Look closely at your product. Try to understand why the threads behave as they do. Are you happy with your stitching? Think about your design goals. Even if you are interpreting a pattern by someone else there is plenty of scope in there for your own design choices. Thread thickness and proportion to the ground and to the size of the holes are just more variables you can play with to make any piece visually distinctive and uniquely yours.
Remember my family’s latke rules. Every family’s latkes are different, and every family’s latkes are the best. The same goes for stitching.
MASKS AND DOODLES
I continue on with the mask project. I’ve finished two sides for the first one, and have started (and am well into) the second.
Here are the two green sides:

And here’s the red one, in process:
It’s pretty obvious that I haven’t cut them apart yet. I want to do the red mask, and possibly one in black before I do that. There’s very little room between layouts on my ground cloth, and if I were to separate the pieces it would be difficult to stitch on the remaining scraps. So I continue.
Another thing that’s obvious is that I’ve made big mistakes on both. I’ve “colored outside the lines” on both the blue and red pieces. But it doesn’t matter one bit. My work plan is to finish all my decorative stitching, then run each mask piece around several times on my sewing machine before I cut them out (oh, for a serger!). The machine stitching will help fix the embroidery in place and give some stability to the rather ravely edges of the ground cloth, and the overage will land on the literal “cutting room floor.” The nice, fixed edges in turn will make it easier to stitch the fancy bits to their linings – two or three layers of tightly woven high count 100% cotton percale. The easy-count fabric may be just right for counted work, but has almost no value as a protective layer. I’ll depend on that percale to keep me safer.
Now on the designs I used. Both are from my latest freebie book Ensamplario Atlantio II. The blue mask with the chain like interlaces is Design #195 in that book. And yes – I chose it for that design’s visual allusion to knightly mail. It’s a straightforward implementation of the design as shown, but flipped left/right for the two complementary sides of the mask.
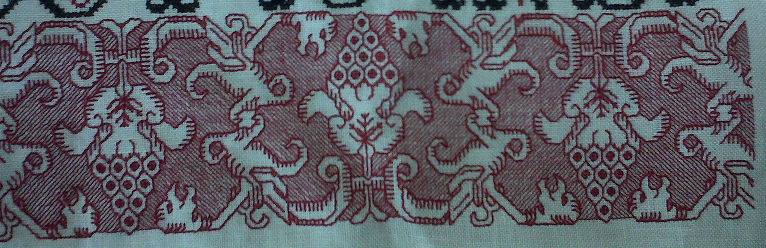
The second is also from the same book – Design #191. But in the book it’s presented as a strip design, useful for borders. I wanted to use it slightly differently, so I played.
The original:

The design at the left below is the most obvious way to make a full repeat. Yes, we can quibble about mating up the column ends so that there’s no blank line between, but that’s inconsequential. The strong verticals and horizontals are the most prominent feature. It’s a very regimented and in spite of the embellishments quite a forbidding layout, looking a lot like a Victorian era cast iron fence, or the bars of a very fancy jail cell.

By contrast look at the one on the right. It’s the same major design element, just shifted over one-half repeat, so that the large flower lozenge aligns with smaller two-bud cross. It has a different energy. It’s exactly as dense as the bit on the left in terms of stitching, but it looks lighter, more energetic, and more open. I preferred its movement, and the greater play it gives to the diagonals.
Those red bits in both? Just ways to visually unite what are clearly strips, to make a more melded all-over look.
Never being one to let well enough alone, I note that there’s ample space to play with this. For example, take the original repeat (black), rotate it, and add a couple of design elements. Most notably that Green Man that Ann and Lois spotted lurking in the original.

I’d stitch this up in one color, or if I used two – not as shown (that’s just to illustrate the old and new parts). I’d probably use the second color for the Green Man’s face, the larger flower sprigs at the center lines, and possibly the stand-alone motif in the middle. And this bit goes into my bin for further refinement and eventual release in Ensamplario Atlantio III (why stop at two?)
Finally – this is just a long and drawn out way to say “GO DOODLE!” While this example a bit overelaborate, the core idea is to take a design element and use it as a springboard to creativity. Pull out those drawing pads, sheets of graph paper, drafting software platforms, or needlework-specialty sketchers, and have at it. It’s fun. I promise!
CHARTING
I’ve gotten some recent feedback about the way I chart my designs – both positive and negative. However, the oddest feedback was from a couple of people who couldn’t put their finger on what I was doing different, or why. I attempt to explain
First off, I thank long-time Needlework Pal Kathryn for letting me use a snippet of her recently released redaction of a Lipperheide design. Because this design is so difficult to work out, I am using her stellar rendition as a “poster child” for a complex design drafted out using standard tools. Kathryn uses Pattern Maker by Hobbyware to chart. It produces a standard grid, and is largely intended for cross stitch. But with a a bit of work its outlining feature can be used to depict linear stitching (back stitch or double running). With even more tweaking those outlines can be made thicker so they read better against the background grid. Here’s a snippet from a chart she recently released.

In the chart above, each little gridded square represents one “unit” for the stitcher. That unit is most properly worked as a single stitch, and depending on the chosen ground cloth can cover one prominent square of Aida or Monk’s cloth, or a count of anywhere from one to four threads of an evenweave (or near evenweave) simple tabby ground. Work over 2×2 threads of evenweave is the most common.
By contrast, here’s the same snippet, more or less, in my own drafting method:

In my method, instead of showing the background grid, I show dots – the “holes” of the ground cloth. If one is working with Aida or Monks Cloth, each hole corresponds to a hole on the fabric. If working with evenweave, the dots represent the spots where a needle would plunge (every 2×2 threads, 3×3 threads, whatever the stitcher chooses to work). I eliminate the grid entirely. The lines that make up the pattern are broken into direct representations of the individual stitches to be taken. I also have the option of flood-filling the background to indicate an area to be overstitched if a voided effect is desired, without obscuring the “counting dots” of the ground (the grey area on the left).
Quick aside: Here are the three types of grounds, but the samples are not to scale since Monks Cloth usually has fewer stitches per inch or cm than does Aida. Note though that both purpose-woven grounds have very prominent holes, and on each stitches are generally worked over 1×1 unit. Evenweave by contrast is undifferentiated, and stitches can be taken over any number of threads.
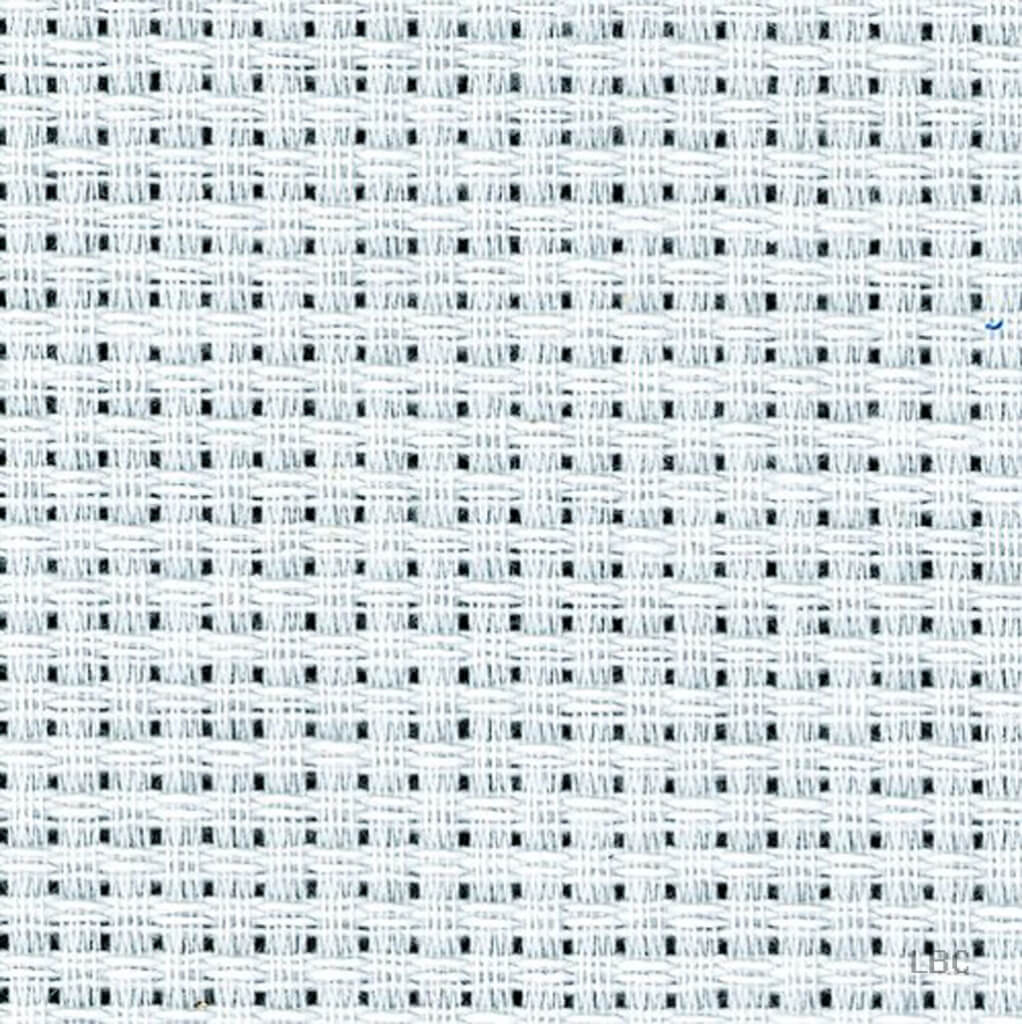 Aida |
 Monks Cloth |
 Evenweave |
As far as I know, I’m the only one who uses the dot/line method of charting. I devised it initially in 1990 for The New Carolingian Modelbook, (released in ’95) and I’ve stuck to it ever since. Yes, it’s different. And for people who are VERY used to the standard grid – my method may be difficult to get used to. But I do think it is an improvement on legibility and a reduction in visual clutter.
One thing I’ve toyed with is instead of using shading to indicate areas to be covered in voiding, using it instead with a color to emphasize the count, for the folks who like to baste guide lines onto their ground, to assist in keeping their place. That would look something like this:
I don’t particularly care for the checkerboard look though – I find it busy and distracting. I think that if anyone is tied to guidelines they are probably better served by printing out the pattern and taking a highlight marker to it, rather than my trying to add that info for everyone.
On my full page graphs, I do indicate the centermost point, and provide margin hashmarks, major ones every 10 units, with minor ones between on the 5s. 5 10 15 20 25 and so on, with the longer major ones on the bold numbers, and the minor smaller ones on the ones in between. But I do not provide the numerals themselves.
How do I go about using my aberrant method? Sadly, it’s not supported by any commercial needlework charting program at either the consumer or professional level. Instead I use a standard open source drafting program – GIMP, and a system of templates and predetermined settings to match those templates. I offer those templates here free on String, along with a detailed tutorial on setting up GIMP and using them (read up from the bottom – the blogging software arranges my lessons in reverse chronological order). One warning – GIMP works on the same layering principle as other advanced drafting programs, assembling finished images from a stack of transparent or semitransparent layers, much the way that cartoon animators build up their on-screen images from stacks of cels. If you’ve used Adobe Illustrator or PhotoShop you will be familiar with that paradigm. If you’ve only used standard needlework charting software you may need to take some time to get used to the concept. But it’s worth it. I may not be able to estimate total thread consumption by color used from my charts (a handy feature of needlework-specific programs), but I have far greater legibility, and no limit to page size or chart scale.
And progress on the current project? I’m about 40% of the way thorough the second side of the first mask. I’ve done a mental flip of the design, too. Not quite mirrored, but enough to complement across the center seam. Thinking of overstitching that center seam with one of the Elizabethan raised plaited stitches, too.
MASK MADNESS
I am working on a couple of things here at String Central. One I can talk about. The other is mysterious and can’t be shown yet.
First – the progress on the masks. First side of the first one about at the half-way point. I had to take a week off from stitching for family reasons.
As anticipated, this early-experiment thread sheds dye, and picking it out leaves smudges. As explained before, I don’t care. These masks are not undying heirlooms of my house. They will bleed and spread dye during wash anyway. And I think that once that happens, the effect will be interesting.
The pencil outline you see barely traced onto the cloth is for a mask of this style:
The source of the pattern is the two-tie fitted variant published in the New York Times, back in March.
UPDATE: The link above appears to lead to a page that’s behind the New York Times paywall now. But fear not! They in turn got their design from FreeSewing.org, The edition of the design The Times posted nests three sizes on one printable PDF page, a pretty standard approach for sewing patterns. But since their original issue in March, FreeSewing has expanded the range of sizes for their design. If you click here, you’ll go to a page that lists a full range, from toddler to men’s ultra, plus how-to directions. More sizes for sure, but still the same basic pattern I used.
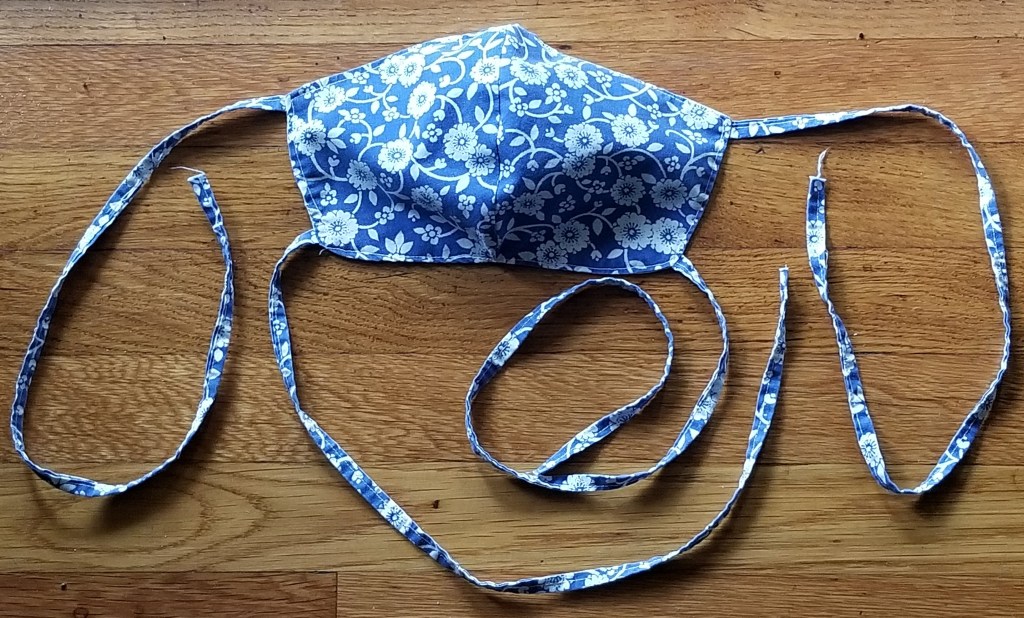
I’ve made quite a few of these for family and friends. It’s a bit more complicated than the pleated kind, but it fits us better. I make the largest size for adults (what in the update is now called Men’s Large), and use two or three layers of tightly woven 100% cotton percale (well washed). I substitute a long double-folded strip of the same fabric for the ribbon ties called for in the original pattern directions – mostly for durability in the wash. Precision isn’t important for the ties – I cut a long strip on the grain (not bias) – about 5 to 6 feet long and about 1.5 to 2 inches wide (152 to about 183 cm long, and about 3.8 to 4.5 cm wide). I iron it in half, folded down the center of the strip (parallel with the long side), then iron the cut edges to the center fold. Then I sew down the entire length of the long strip, an cut it into four equal pieces for the tie.
The blue flowered one above is sewn from the last remnant of the sheet set I took off to college in 1974. I had this print in red and blue, with a matching comforter. Over time the set became curtains, tote bags, cushion covers, baby carriers and crib furnishings. Ever dwindling in size, and picked apart for reuse multiple times, I had just enough left for several masks.
The fabric on which I am stitching the fancy design is no where near tight enough to provide effective coverage, so it will be a top, decorative layer over a double thickness of the standard high-count bedsheet percale.
My ground cloth has four two-unit sets traced onto it (each mask has a left and right side, seamed together at the center). I intend to stitch as many as I have the patience to do, but not cut them out until all I will be making are complete. But the loose weave and the embroidery both pose problems. I could cut veeerrrryyyy carefully to avoid nicking the stitching, but even if I did, the edges of the rather coarsely woven ground would ravel either during assembly or more probably, when the things are washed between uses.
So I am deliberately stitching past the half-inch seam line, right up to the cutting line (my pencil mark). The seaming line is a half inch (about 13mm) inside the cutting line. That half inch is the seam allowance – the bit you see turned inside at the seams in most sewn items.
Before I cut these apart I will throw the entire piece onto my Ancient Elna sewing machine, and stay-stitch all the way around each mask piece. I will probably sew multiple rows of reinforcement, but all within the seam allowance area. Then I will cut out the individual pieces and assemble the finished masks. The stay-stitching should secure both the ground cloth and the stitching. Since the reinforced area will be turned under into the seam, it won’t be visible. And I may even go a bit further and apply one of the non-fray fixatives sometimes used to reinforce stress points in applique or quilting. But I’m not sure about that yet – I never use the stuff and I am a bit wary of how it will survive laundering.
Will this work? Stay tuned! Eventually you will find out.
HARSH FINISH, SOFT BEGINNING
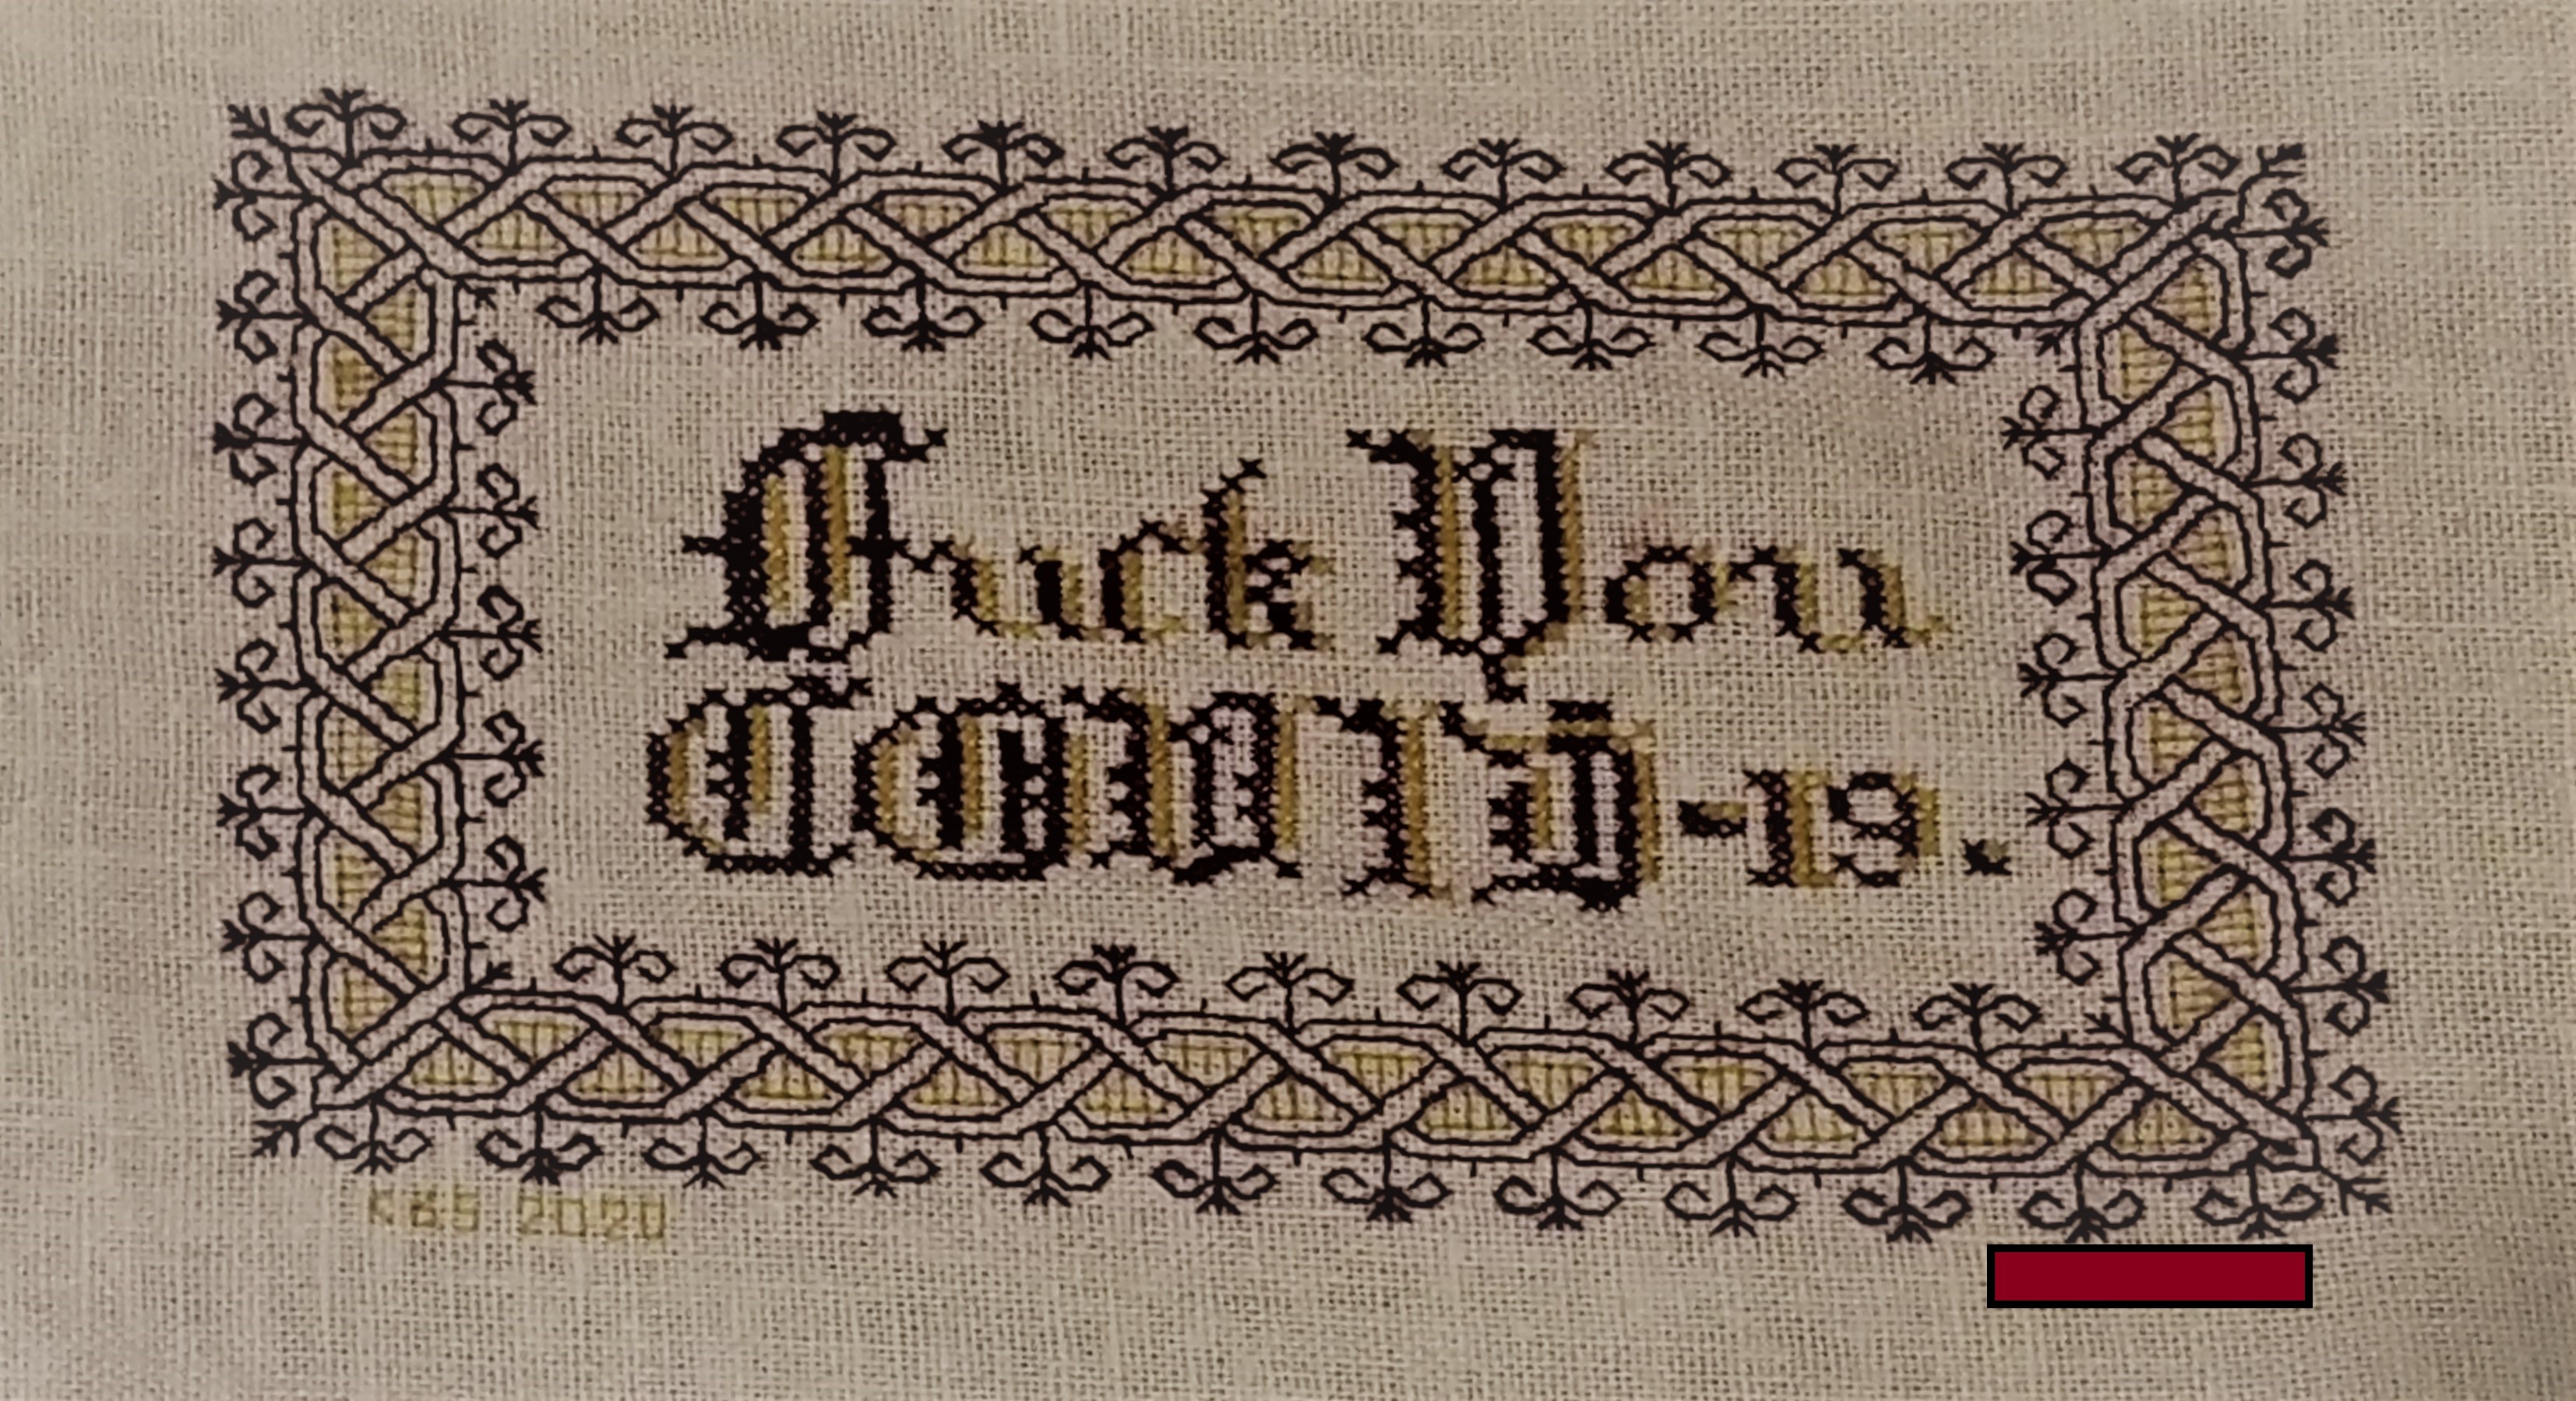
Setting a new overland speed record for completion, I offer my Harsh Language piece. I began it on 22 August, and finished on 30 August. Eight days. Lightning fast, especially considering that I only stitch for an average of an hour and a half per day (more on weekend days, less midweek). Here it is in all its glory. I’ve redacted not the offending verb but the dedication, because as I’ve said before, the recipient wishes to remain anonymous.
I did have fun playing with the wool. It was much thinner and more tightly spun and cleanly finished (read non-fuzzy) than tapestry/needlepoint wools, and a joy to use.
In addition to the hints I offered up before, I would add that even with the shorter length, care must be taken to let the needle and strand spin freely, in order to counteract the twist imposed during the stitching process. That twist can loosen the spin of the wool strand enough to denature it to the point of shredding. You can see a couple of heavy stitches in the piece, where I was nearing the end of the strand, and the thread had “bloomed” but I kept going.
And yes, the weave of the ground wasn’t quite proportionally even. I don’t remember where this stuff came from – purchased retail, found at a yard sale, acquired as a gift – but it’s been in my stash easily since 1996, and has a yellowed selvage edge to prove it. But aside from that flappy edge (no where near this stitching), it was sound. It’s probably a cotton/linen blend. You can see the skewing in this detail. Horizontal stitches are just a tad wider than verticals, and diagonals are not 45-degrees.

What’s next?
Well I pulled out this remnant, and used about a third of it on this little piece. The remainder will go to become decorative outer layers for some masks. This open weave fabric is pretty useless as any sort of barrier, so I will line the masks with two or more layers of nice, tight 100% cotton 300-count pillowcases (retired from their prior duty). They are navy blue.
I will be using more thread provided by Stealth Apprentice for beta-testing. It’s luscious silk, dyed in one of her early indigo vat experiments. The color of the thread ranges from a nice deep denim down to Wedgewood, and was the child of serendipity, not a planned effort to produce a variegated.
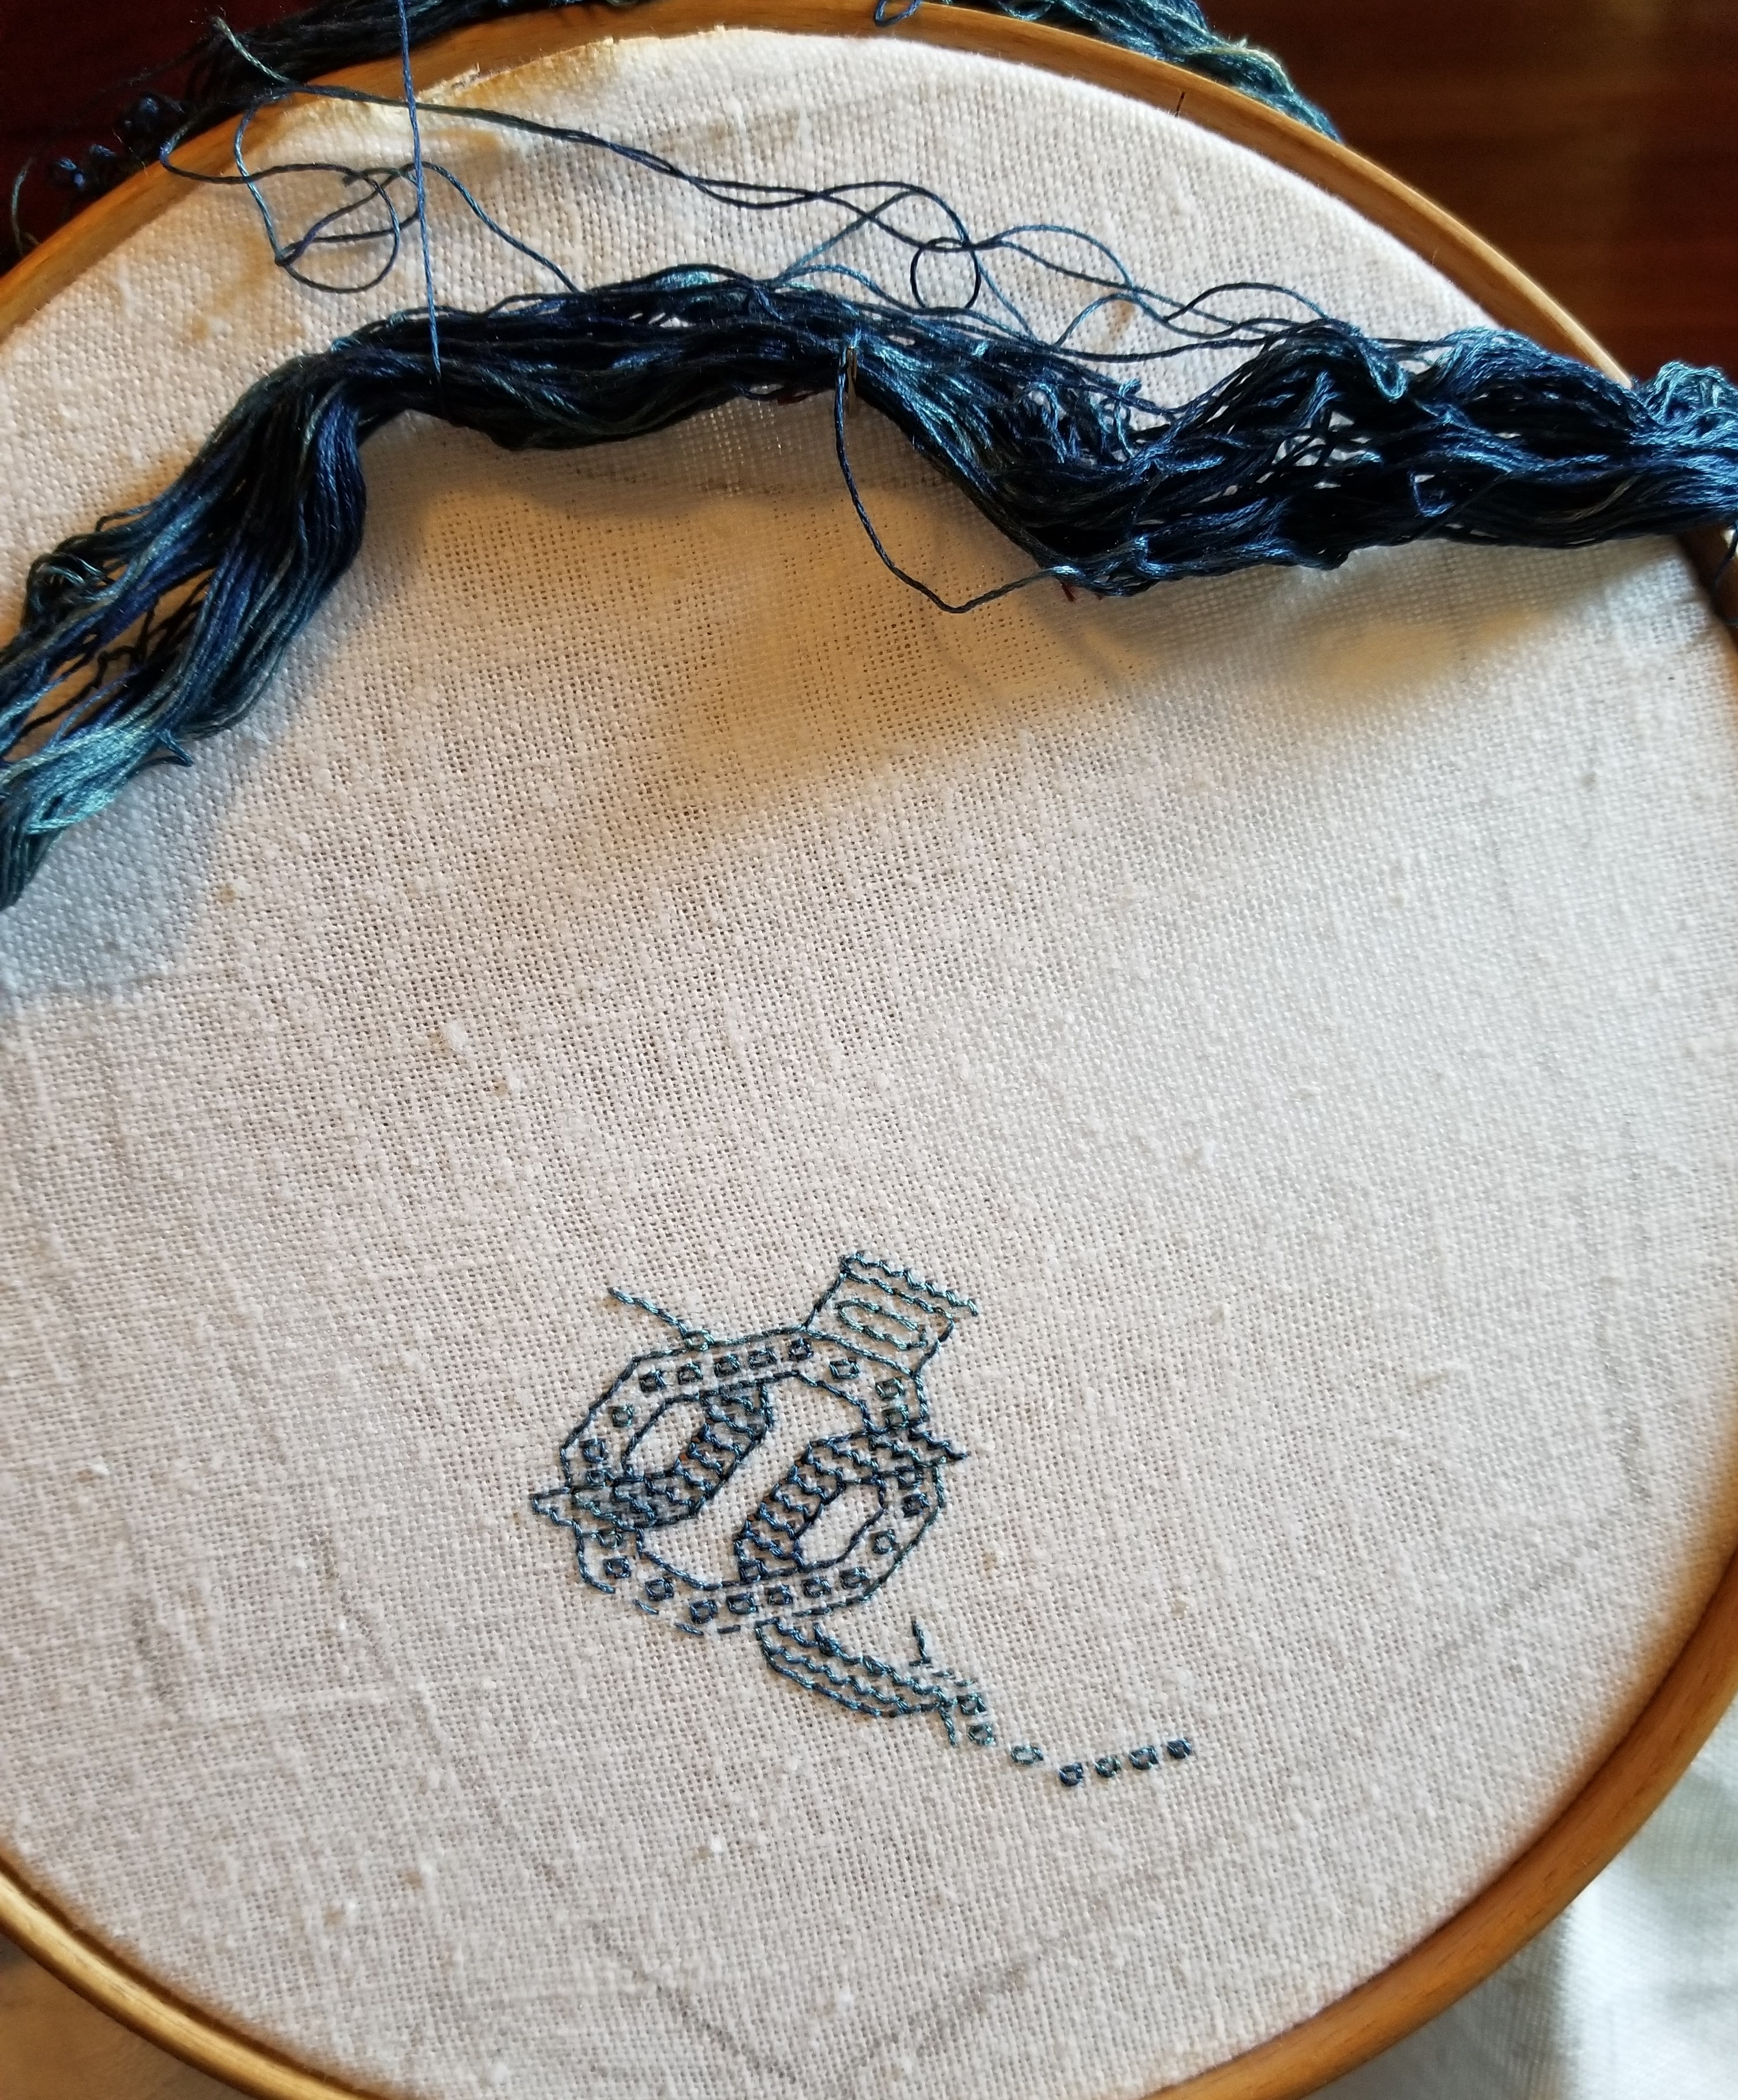
I admit I put this hank off because it posed some minor problems. It’s a multi-strand floss, but during color processing it became rather matted and tangled (it was before she learned better methods to secure the hanks during dyeing), and the indigo itself does crock quite a bit, leaving blue fingers and traces on the ground as it is stitched. However this blue was an very early experiment long before she went retail with her products, so all is forgiven.
To deal with the matting I’m using the full strand and not trying to separate the plies. To tame the tangle, instead of trying to wind it I cut the skein in one place, and looped it over a stick. I’m teasing out strands one by one at the loop, and using them in full “cut length.”
There can be no mistakes with this stuff – it does leave very evident marks if picked out. And I fully expect the color to migrate onto the backing during washing. But that’s o.k., too. I think the look will be quite interesting after haloing. The navy inner layers may peek through the somewhat loose weave and camouflage some of that halo.
Challenges considered, I am very glad I saved this thread until just the right project appeared. This piece will certainly change over time as it is subjected to my ungentle care. Masks after all need vigorous cleaning. The blue may bloom onto the ground cloth. Such leeched color may dissipate over subsequent washes, or the threads themselves might do a old-jeans fade. All are anticipated and none are unwelcome. So while the thread might not have been optimal for some other more formal projects, it’s spot on perfect for this one.
I’ve got enough fabric for at least four masks. Possibly five. I’m not sure if I will do them all in this blue, or I’ll play with other threads – either monochrome or in a wild mix (I think there’s only enough blue for two, anyway). I don’t know if I’ll stick to all-over designs. I might for example doodle up one in an inhabited blackwork design – the scrolling flowers with heavy outlines, with patterned or speckled fillings. I’ll probably skip metal threads and spangles though, due to the laundering requirement. Or I may do one with scattered, themed spot motifs – insects, for example. Or I may do several “zones” and use different fillings in each. Or I’ll work band designs on the diagonal. The possibilities are endless, and (sadly) I don’t see the need for masks going away any time soon.
Will I make all four? How will they play out? Will something else catch my easily distractable eye, and I’ll do that instead? Will I keep these or give them away? Stay tuned. (And they say needlework has no excitement, mystery, or suspense.)
Oh. And there is no “bad” thread. There’s a perfect project for just about anything that can be used. I love this blue silk and I will enjoy stitching with every inch.
