FIRST PANEL FLIP
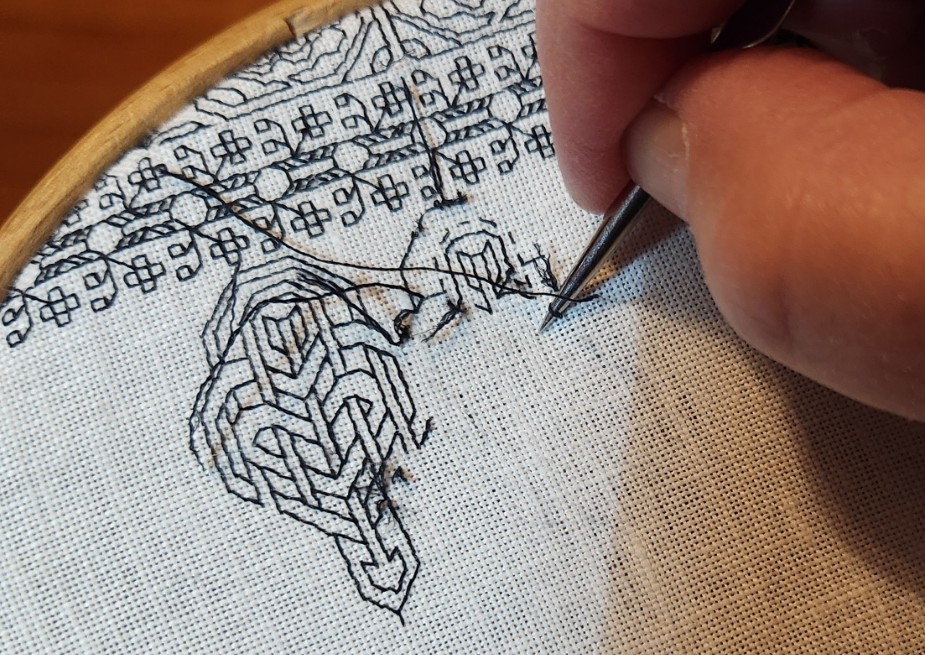
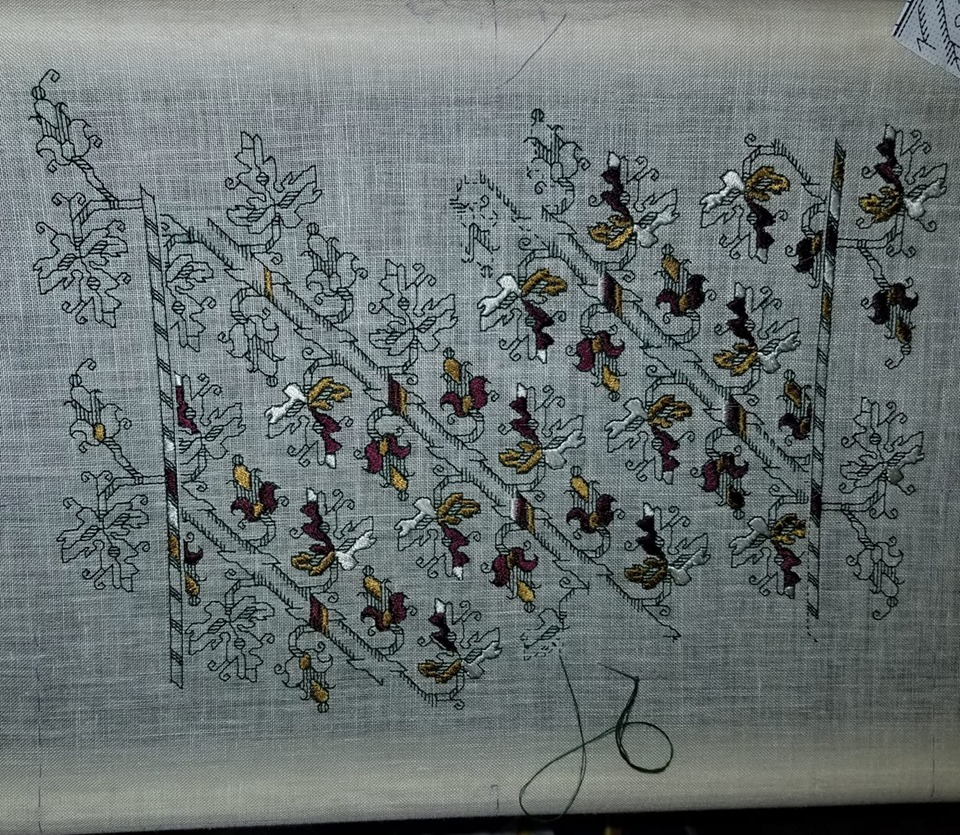
Moving right along on my latest. I’m just past the point of flipping the frame over.
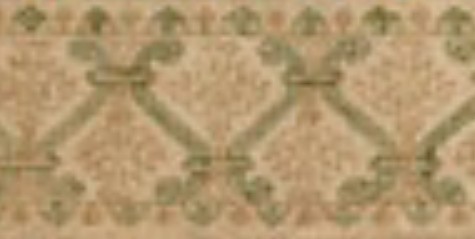
I’ve got all the black double running outlines for the main motif done. That’s not uncommon for Azemmour Cluster pieces, but is not a usual treatment for these larger ones. In the larger museum snippets they are usually outlined in the same color as the voided ground. In the later multicolor ones, anything goes. But it is more common for the smaller ones – especially the ones with birds and foliage or small urns. Since this is not intended to be a fully historically accurate piece, I feel free to take liberties. As for specific references for the pomegranate variants of the spider flower, I point you to these, both collected around the turn of the 20th century, and both formerly attributed as being Italian works of the 1600s.
Museum of Fine Arts Boston, Accession 11.2880, Newly attributed to Azemmour, 18th century.
https://collections.mfa.org/objects/68407/tent-stitch?ctx=4b923968-ddd5-426e-a76c-6afa55e9b949&idx=229
Cleveland Museum of Art, Accession 1929.843. Also newly reattributed and dated. Azemmour, 19th century
https://www.clevelandart.org/art/1929.843
A very similar motif also shows up on this late polychrome sampler.
Victoria and Albert Museum Accession T.35-1933 , Morocco, 19th century
https://collections.vam.ac.uk/item/O70740/sampler-unknown/
Flipping and Stitch Inversion
Why flip? Because I find it awkward to reach the entire area behind the frame for two-handed stitching. And the area of best access seems to be slightly different for each piece of work. But flipping long armed cross stitch (LACS) introduces a small variable that has to be dealt with. Inversion flips the direction of the interlace if the stitch is worked in the same way regardless of frame orientation. LACS is usually done in alternating rows, back and forth, to produce a plaited type appearance. While this is most evident when the thread offers better coverage than the sparse strand I am using, the effect is still there. I even take care to keep all rows across in the same left-right orientation, even if they are interrupted by a non-voided design element, so that when areas do meet up there isn’t a visible “seam” where two rows worked in the same direction abut.
Flipping however means that if I continue to work the same way, with the long arm originating along the top edge of the row and plunging back down at the bottom, slanted in the direction of travel, the spot where the voiding was laid down with the top of my stitching surface aligned at the top of my working area will be inverted compared to anything stitched after the flip. So to avoid those visible “seams” I have to mirror my stitching sequence along the vertical.
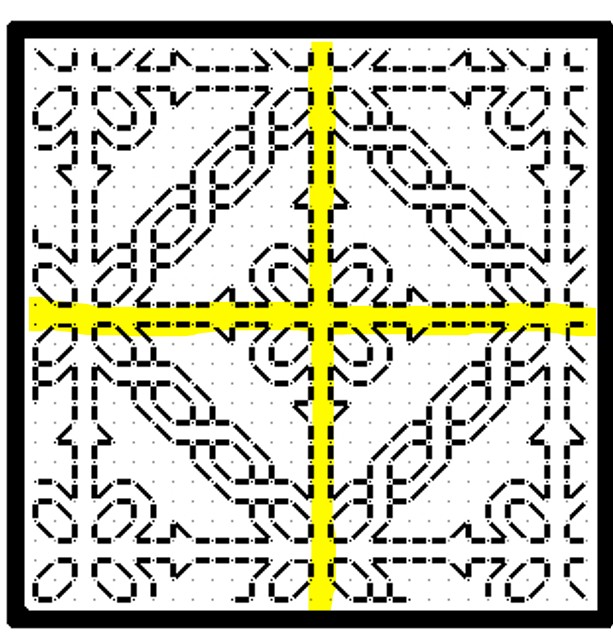
Now that I’m working with the side that was the bottom now at the top, my long arm stitches have to emerge at the bottom, proceed in the direction of travel, and re-enter the cloth at the top of my stitching line. Clear as mud? I thought so. This may help. the black arrows indicate direction of travel. And yes, the back side of this work presents mostly as vertical lines, with a bit of fudging at left and right, especially if a diagonal bit of non-voided area is encountered. And if that meet-up is not a diagonal, I do terminate my lines at each end with the equivalent of the missing plain old cross stitch leg, for a neater edge appearance.
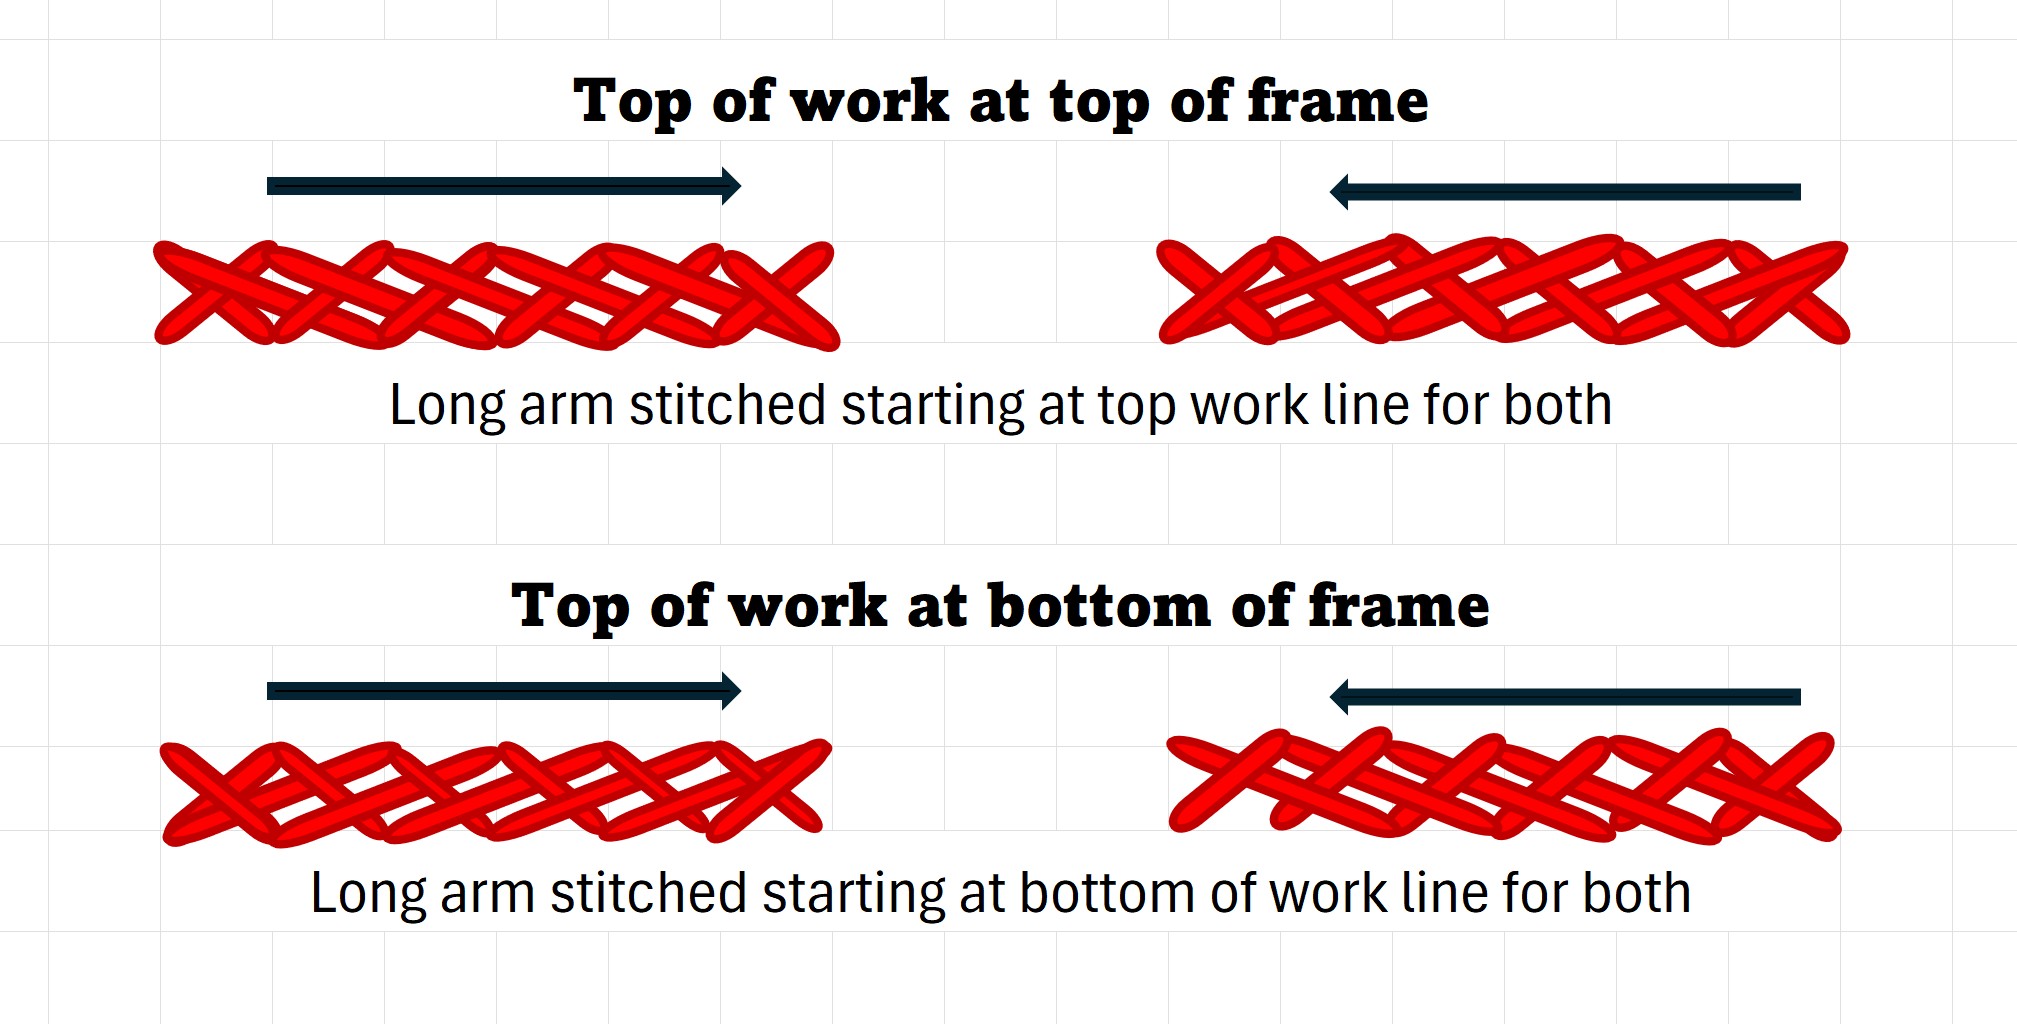
If you can visualize it while the direction of crossings look different when seen this way, once they are stitched they are identical, with no visible interruption in texture between them.
What’s Next?
It’s time to start thinking about the next strip. This one is just above the basted center line of my available ground. I am going to omit the traditional top and bottom framing motifs, often seen sprouting from or in addition to a divider like the rope edge I stitched, opting instead to just do a set top and bottom of the whole piece.
Next will probably be a narrower band, not voided. I think as a whole-piece theme, I will alternate voiding with plain double running bands. I am thinking about doing it in another color. I have some medium indigo color Alori silk, and some of the same stuff in purple. I’m considering one or both but probably not together, nor in combo with the black. Not enough contrast between them, and neither is in quantity enough for voiding. Have to ponder more on this.
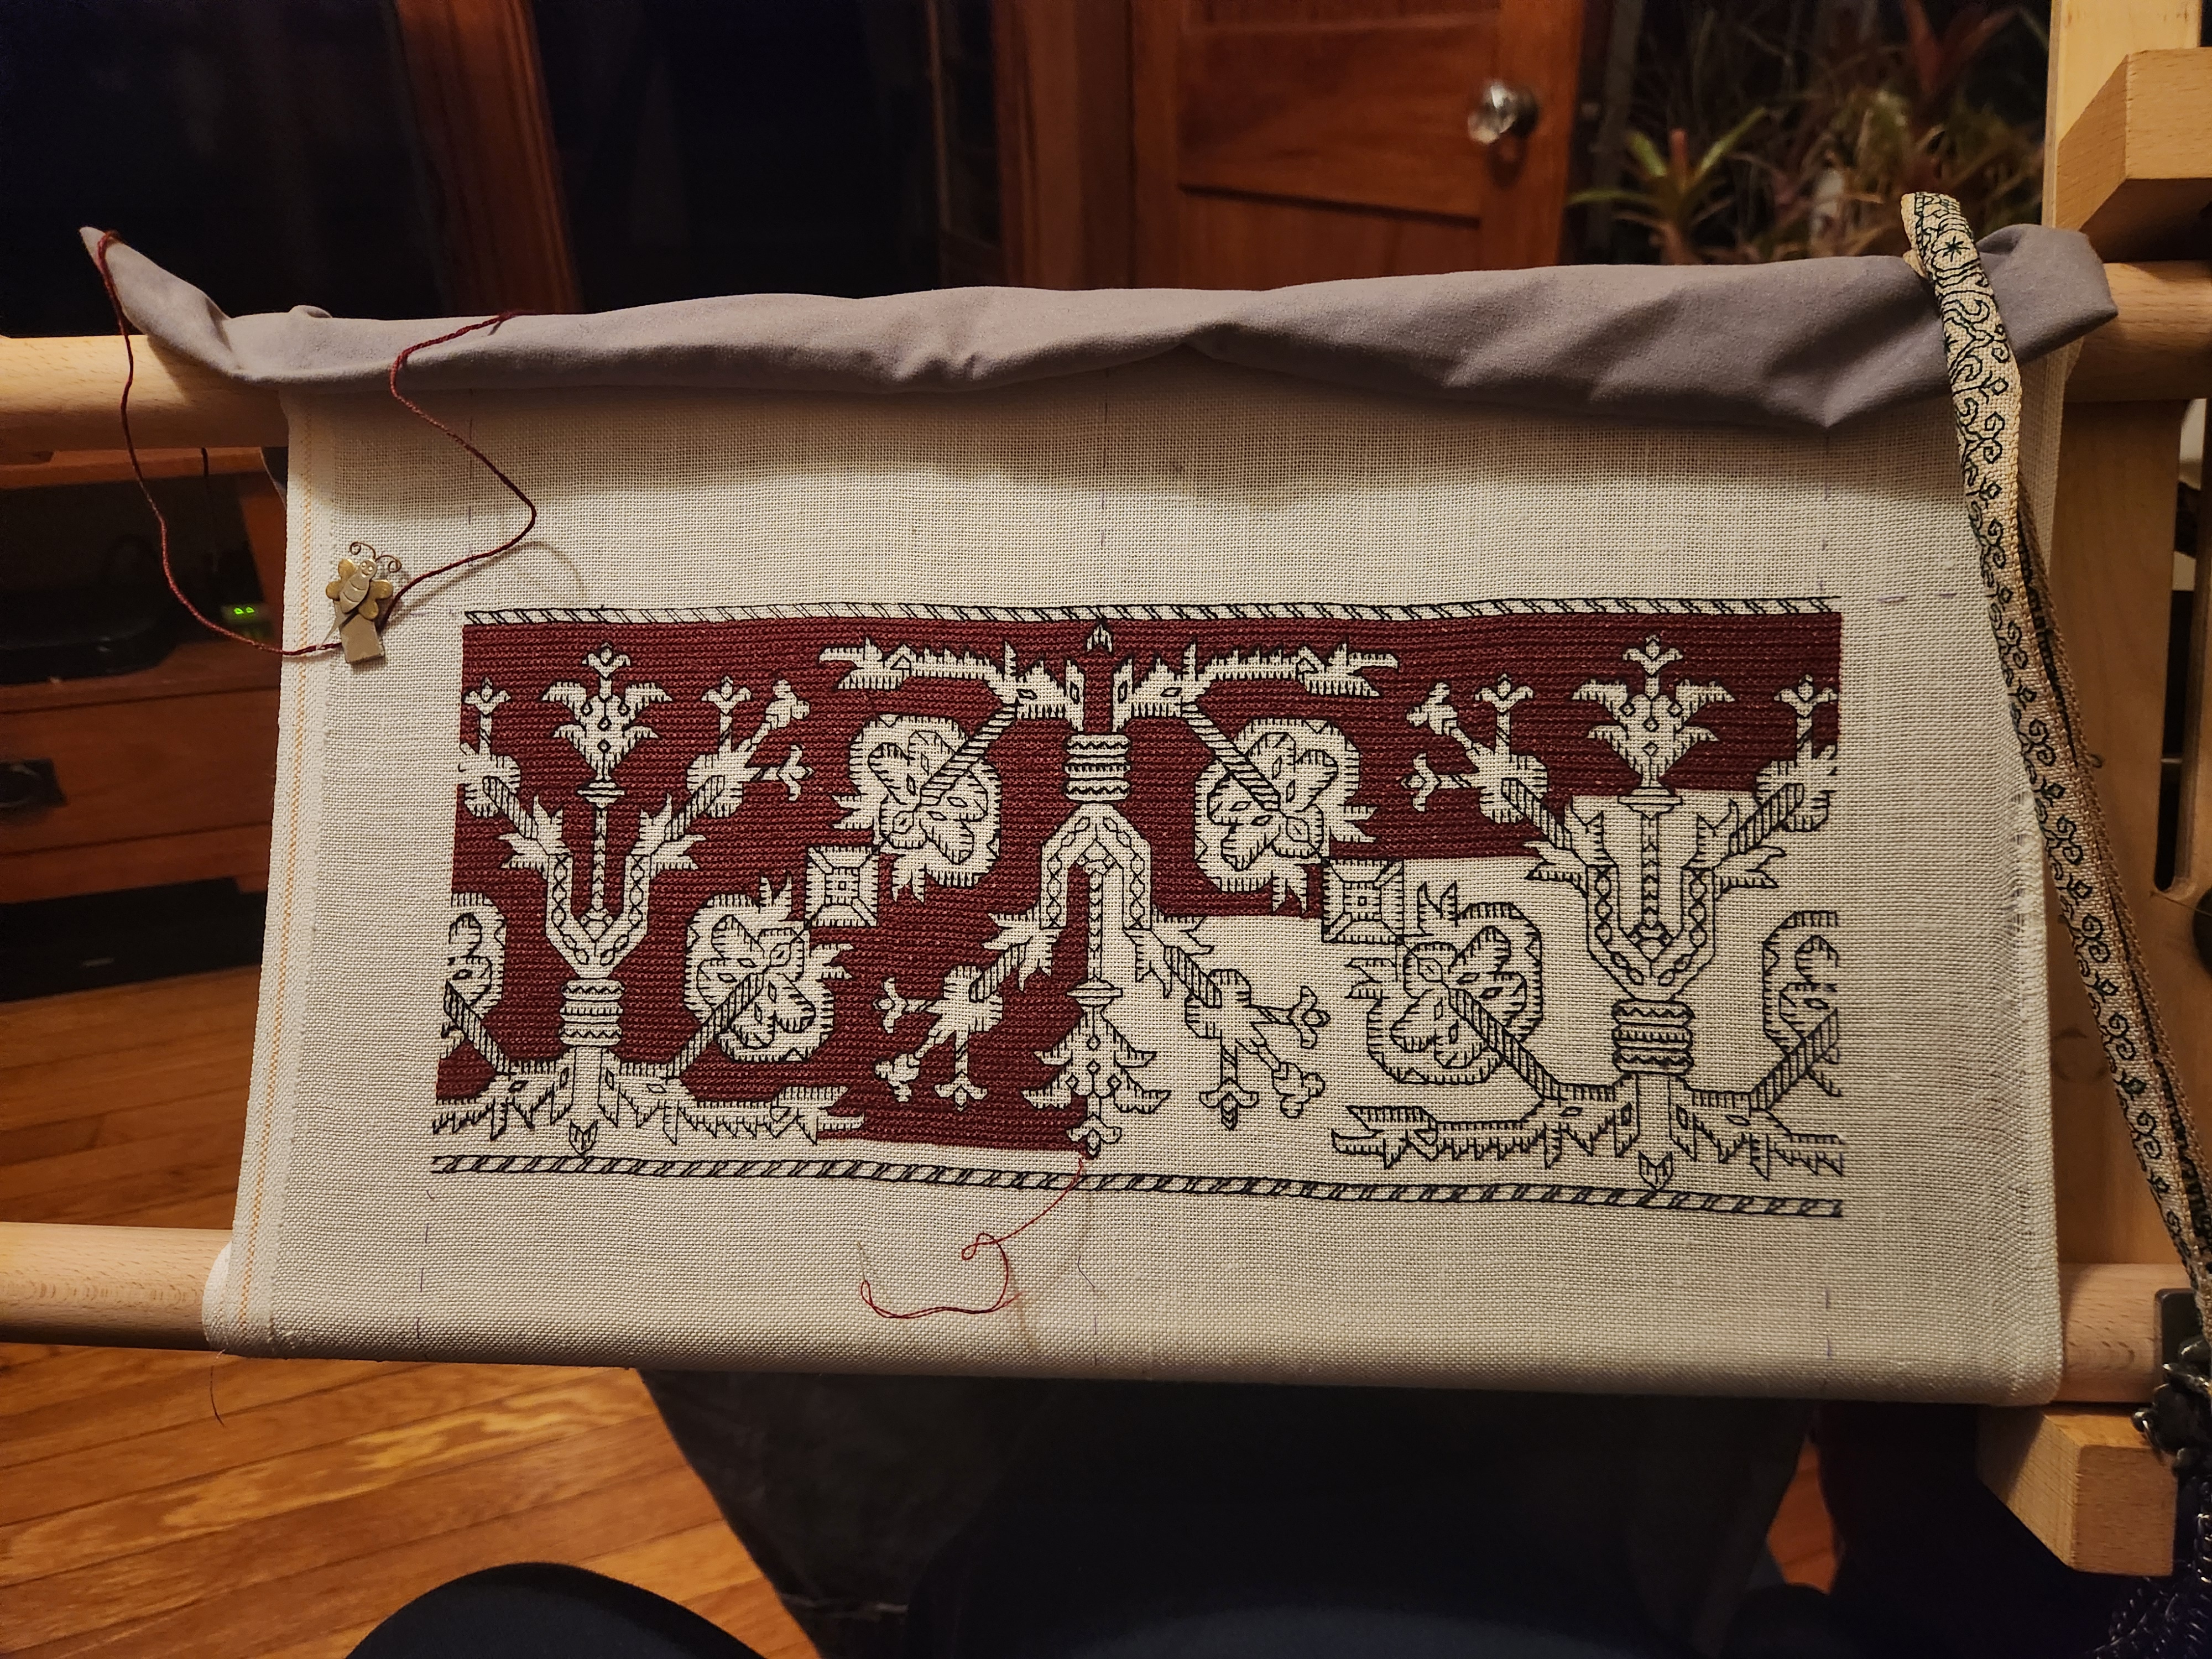
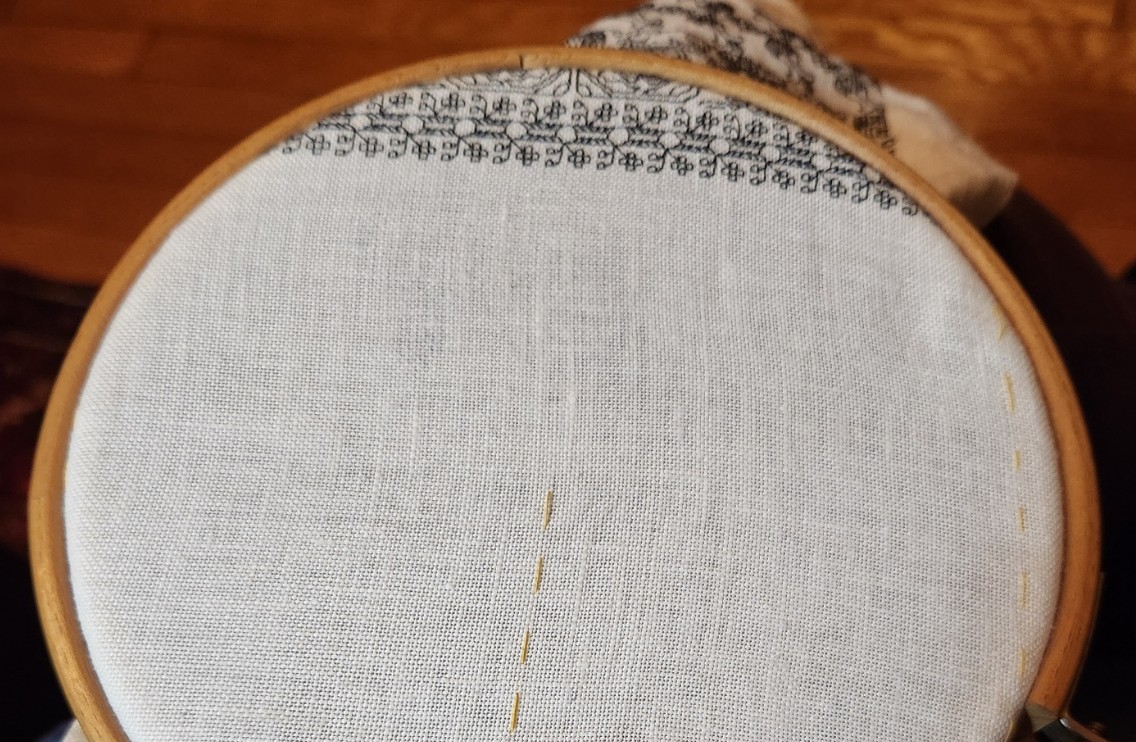
And just for fun, in the photo at the top you can see the whole frame set-up. My widest Millennium, grasped on the right (just the tips of the jaws in camera range, by the Lowery Large Frame Extender. My chatelaine is draped over it, where I stow it between sessions. You can see the old pillowcase I have pinned to the back of the work. That limits light transmission through the cloth, both from the television (upper left, various vintage Star Trek series are comforting accompaniments to stitching); and the library window (upper right) during daylight hours. I have a couple of magnets stacked in the upper corner of my margin, to hold my needle threader and keep the cut length of thread I’m drawing strands from handy.
Health update
Needle threader? For work on 28 count? And 28 count at all? Yup. Although my fave is 40+, especially around 50, right now my health complications include a modicum of double vision and close detail fatigue caused by mechanical pressure on the nerve that controls the eye movements needed for binocular focus. I can see well enough to stitch, read, or knit out to about fingertip length, but much beyond that diverges – to the point where driving a car is neither feasible nor safe. But because I anticipated a visual challenge and throttled back, I still have my Emotional Support Stitching to fall back on. And it is most welcome.
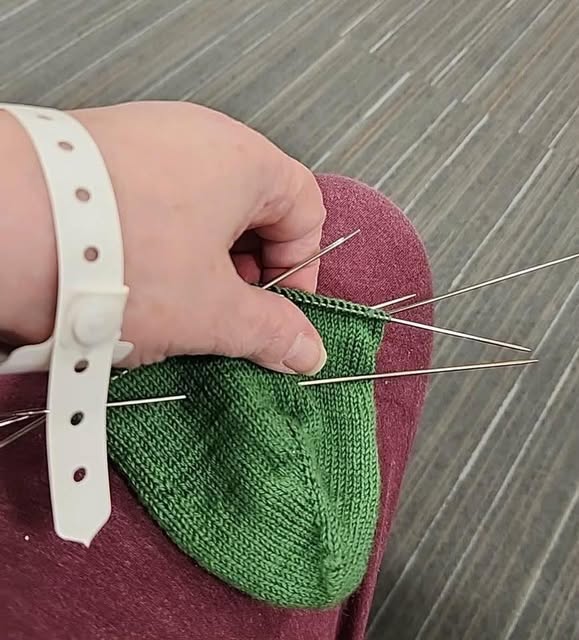
And I am happy to report that proton radiation therapy begins on Monday. We attack my cranial interloper aggressively, and I am optimistic for the outcome, and enduring the upcoming 40-odd days of treatment with minimal if any side effects. I did it last year and can do it again. Of course, I have other coping mechanisms. Knitting socks in waiting rooms, for example.
UPDATING THE PENNY METHOD
A while back I posted about using a penny, a cell phone, and a bit of math to determine the thread count of linens, both evenweave and skew. And now the US penny is quickly charging to extinction, abandoned by the US Mint, and soon to disappear entirely from circulation. Which means that I need to issue an update.
Voila!
The Dime Method.
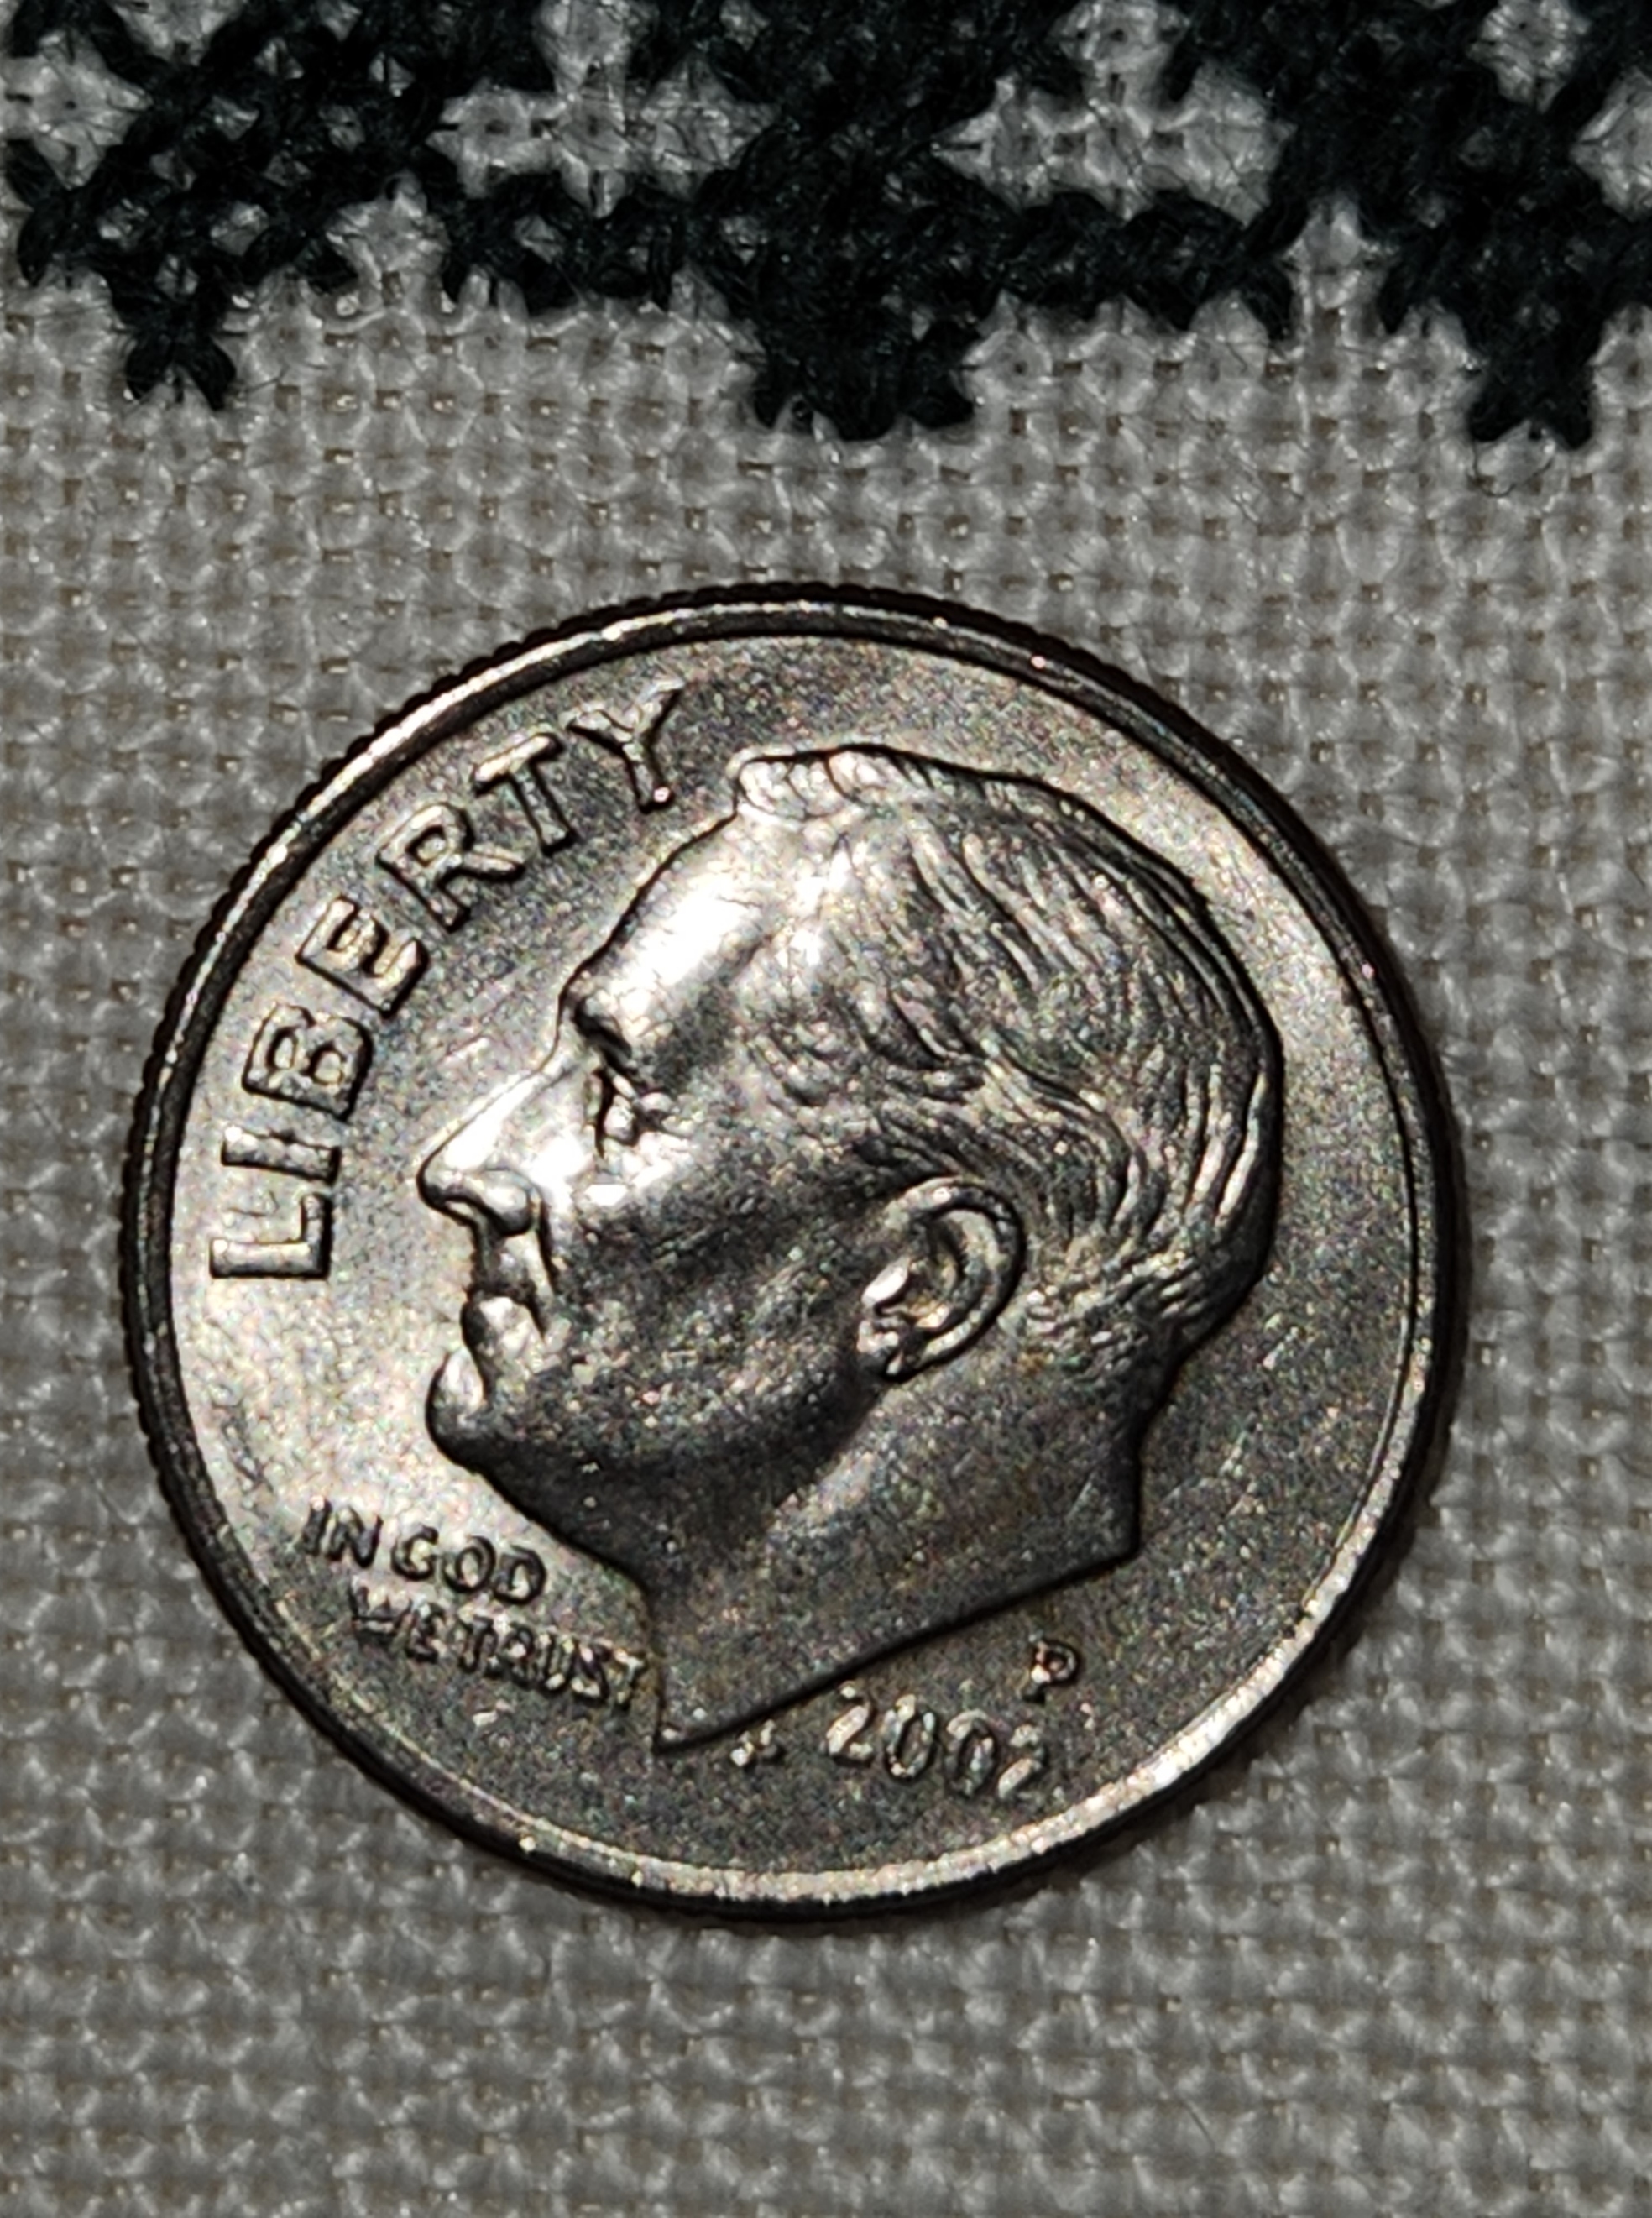
I picked the dime because it’s smaller than the nickel or quarter, and easier to count around the outside edge without losing your place. Counting the threads totally covered by the dime, heading north to south, we get a total of 26. And by counting the number of totally covered threads east to west, we also get 26. The first conclusion is a happy one. We have an evenweave.
Now for the math.
The official diameter of a US dime, as stated by the US mint, is 0.705 inch (17.91mm). I will continue the math here with threads per inch rather than metric to avoid confusing US folk, but the same method works perfectly well with metric measurements. And if you know the measurements of any other coin used anywhere else in the world, you can adapt this for local convenience, worldwide.
So what we have is 26 threads over 0.705 inches. We divide 26 by 0.705 and we get 36.88 (roughly). We can round that up to 37. My fabric in this sample is 37×37 threads per inch.
Let’s confirm that.

Yes, 37.
And you are right that’s a decimal inch ruler. I am proud to be an Engineer’s Daughter, and have many of my dad’s old drafting aides. I deliberately did NOT add any assisting lines to the ruler photo as proof of my assertion that it is FAR easier to count the threads obscured by the coin, going around the edge of the coin, than it is to do a straight line count across a ruler’s edge. It’s also FAR more likely that I would have a dime handy than a ruler in my pocket when I am out and about in the wild.
Try again. This time finer.

I get 31 in the north-south direction and 28 in the east west direction. This piece of linen is a skew count, with more threads in the vertical than the horizontal. Doing the math:
- Vertical (north-south) 31/0.705 = 43.97, rounded up to 44 per inch
- Horizontal (east-west) 28/0.705 = 39.71, rounded up to 40 threads per inch
Now, does a skew count mean that effective countwork can’t be done? Absolutely not. Here is the piece that I used for the second example:

The slightly skew count means that over the same length there are more stitches in the vertical direction than there are in the horizontal. My mermaids are then a bit squished in height compared to their width because the vertical stitches are a tiny bit shorter than the same number of stitches over the horizontal. But the only place that this is evident are the large, symmetrical flowers just above their tails. You can just make out the height elongation in them because (logically) they are supposed to fill a square volume, not a rectangular one. Here is an old post that discusses this challenge further, and shows what happens when you wrap a design around a corner on a skew count fabric, and confesses that flipping your measurements is an easy mistake that even I make..
For the record, I stitched this piece in 1994, from a chart I redacted myself. The photo source that I worked from was in Schuette and Mueller-Christensen’s Pictorial History of Embroidery. I presented this chart along with my own original accompanying border on Plate 75 in my own The New Carolingian Modelbook, published in 1995.
As for the piece I used for the first example? The full Don’t Panic chart is a free download on my embroidery patterns tab, right here on String-or-Nothing.
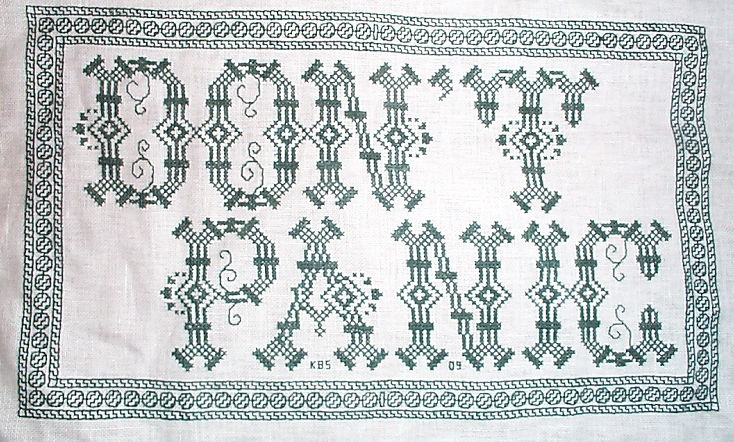
Don’t Panic is in fact the best advice I can give to the math anxious among us.
NOT QUITE EXACT, BUT GOOD ANYWAY
So. More examinations of the corners of the big towel from the MFA, and my first corner. Here are the four corners of the original

Not quite aligned but all there. Now my stitched corner as of this morning:

It’s closest to the one on the lower left, above. But not exactly. Look at this bit.
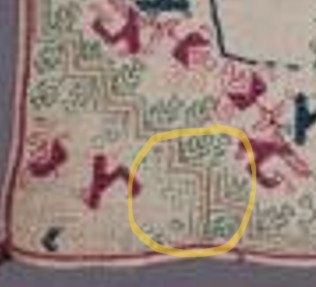
That’s a clear kludge. Not to brag, but my join is cleaner than this. I can’t deduce where the stitcher (or stitching team) began, but it’s clear that either the vertical bit on the left side of the photo, or the horizontal bit on the right was already laid down when that corner was rounded. The stitcher did their best, but the pattern doesn’t line up. For that matter, no two of the original corners ARE the same. But I bet you didn’t notice when you looked at the thing as a whole.
I will continue around on my mini-version. I haven’t decided yet if I will limit the width to multiples of the whole design, so I can replicate my corner exactly for the remaining three. Or if I will just make do, in a celebration of the heedless joy of the original.
And how far do I have to go to get to the next corner? Here’s my full cloth, so you can see the proportion of as-yet-not-done to the bit completed:
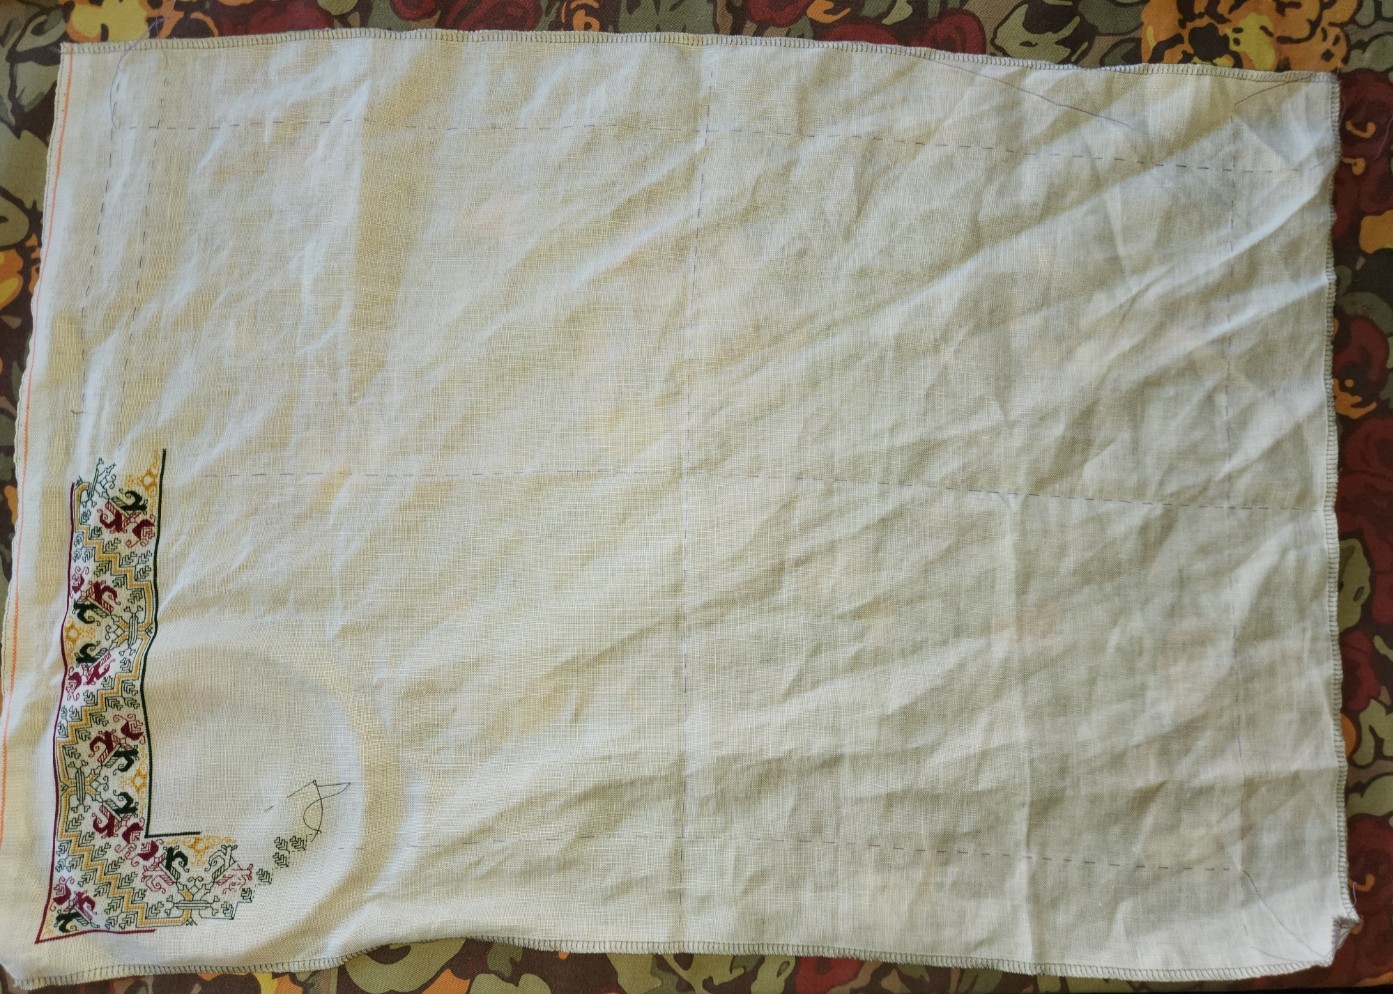
Quite a ways.
Aside from the corner challenge, upcoming decisions include a supplemental treatment spanning the center. Here’s the original again with two double width strips and two narrow single width ones across the center.

Examining those bars, I can conclude that they were done after the framing, and were aligned with the cloth’s horizontal centerpoint, because the band design is truncated (more or less) at the same point where it meets up with the frame, both north and south. But note that the centers of repeat along the long sides of the frame itself do NOT align with those bars, nor do they align with the measured center of the cloth. Again I bet you didn’t notice.
My smaller cloth may have enough room for one wide center bar; two narrow center bars; or one wide bar flanked with two narrow ones. Lots to think on there, but I won’t get to that part until after the frame around the edge is complete. And then there’s their alignment to consider. (I’m leaning towards filing them under Chaotic Neutral for the time being.)
On the healing front, I’ve completed Day 23 of radiation therapy. 17 more to go. No major perturbations, just the slog of rising before dawn to drive downtown and back before major traffic. Not that I’m counting or anything…
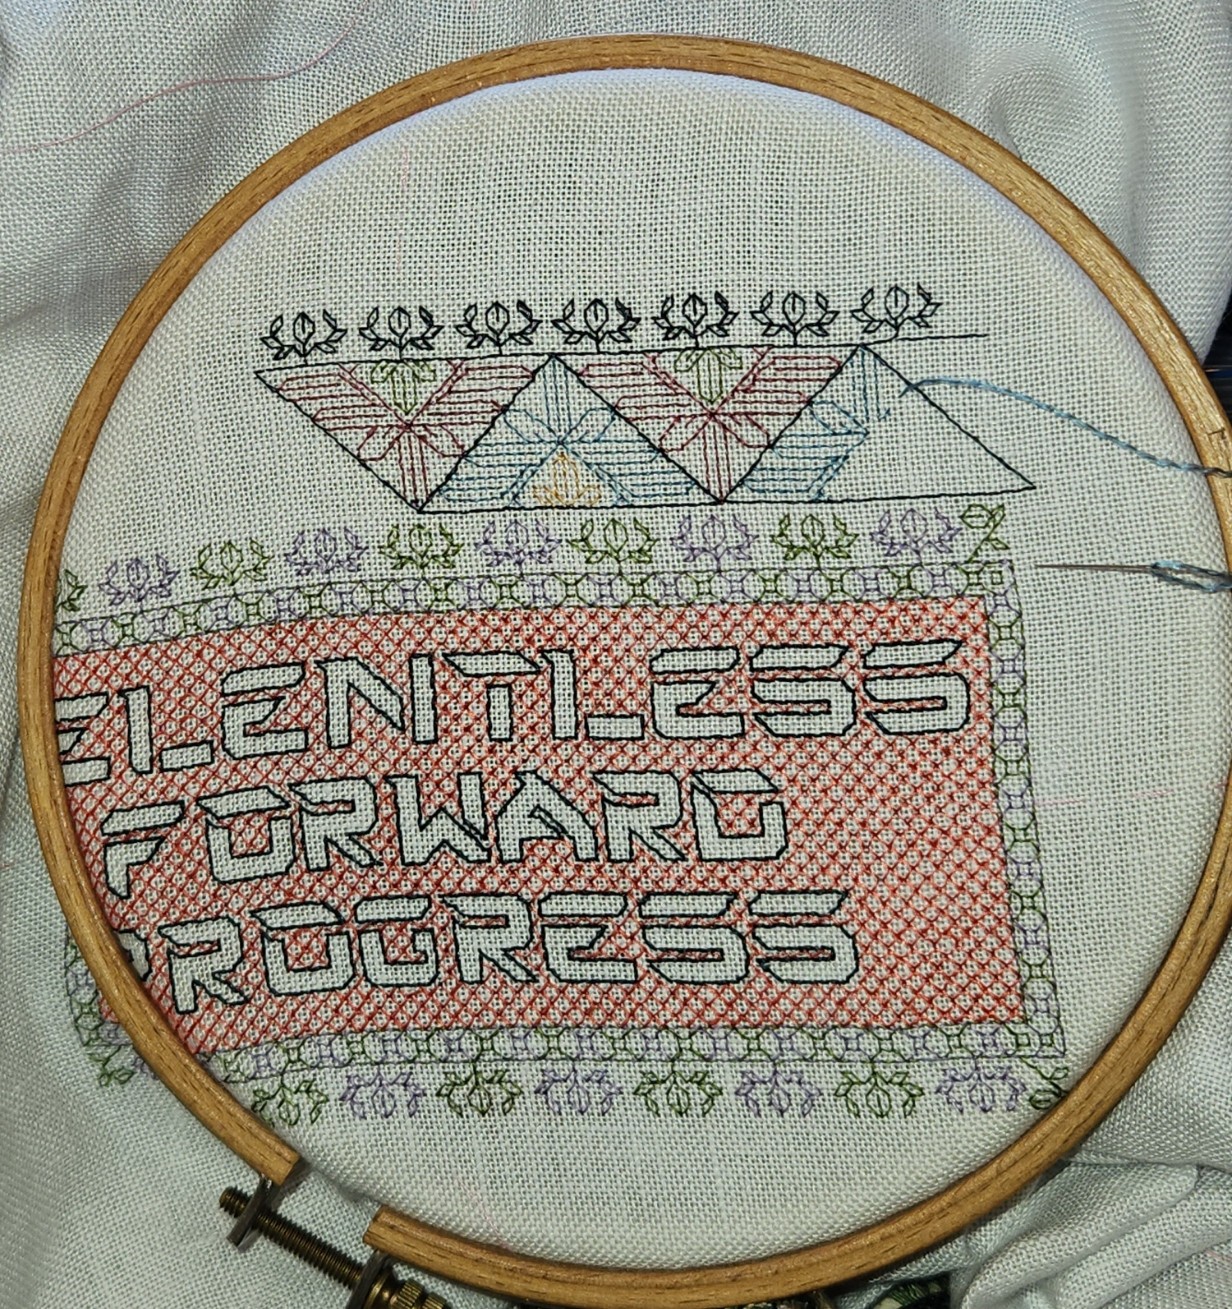
PROGRESS CONQUERED!
Finished. All that remains is to add my initials and date in the lower corner(s), frame it, and mail it to the recipients at Vanderbilt Rehab. I will be framing it myself.

I’ll figure out a stock size, get an acid free backing board, maybe a piece of black fabric to put behind the linen to camouflage any stray threads on the back, some short pins, possibly some carpet thread to keep the back neatly laced and tidy, and a simple metal frame. No glass, no mat. But this of course requires a trip to a crafts store like Michaels’, or ordering sight-unseen online. I prefer to select these materials in person. I haven’t tried driving yet, but I can now sit and my right foot is as spry as it ever was. This may be the impetus for the Next Great Step of Independence. Or the Resident Male may deign to give me a lift. We will see…
Lessons learned from this piece (so far) have largely been in silk fiber management. I’ve written before about stretching the vintage Pearsall’s silk by splitting its six from-the-maker plies in half. It worked, although handling the stuff was a challenge.
I had not finger-spun flying filaments before. When the two strands that made up the commercial ply were separated and gently stroked to release the commercial spin, so that they unkinked and straightened out, they were certainly long staple, with the silk fibers running the entire length of the strand and without short fiber fuzz, but they were disassociated into a slightly shredded longitudinal mass. I rotated the new, narrowed strand between thumb and forefinger gently, while holding the other end, to impart new twist. Not enough to make the thing kink up again and knot, but just enough to get it to resemble a single thread. Then I waxed lightly, very lightly, to help set the spin. I didn’t want to compromise the silk’s sheen, and it was too easy to shred the new thread if I held it tightly against the wax with my thumb as I drew it across.
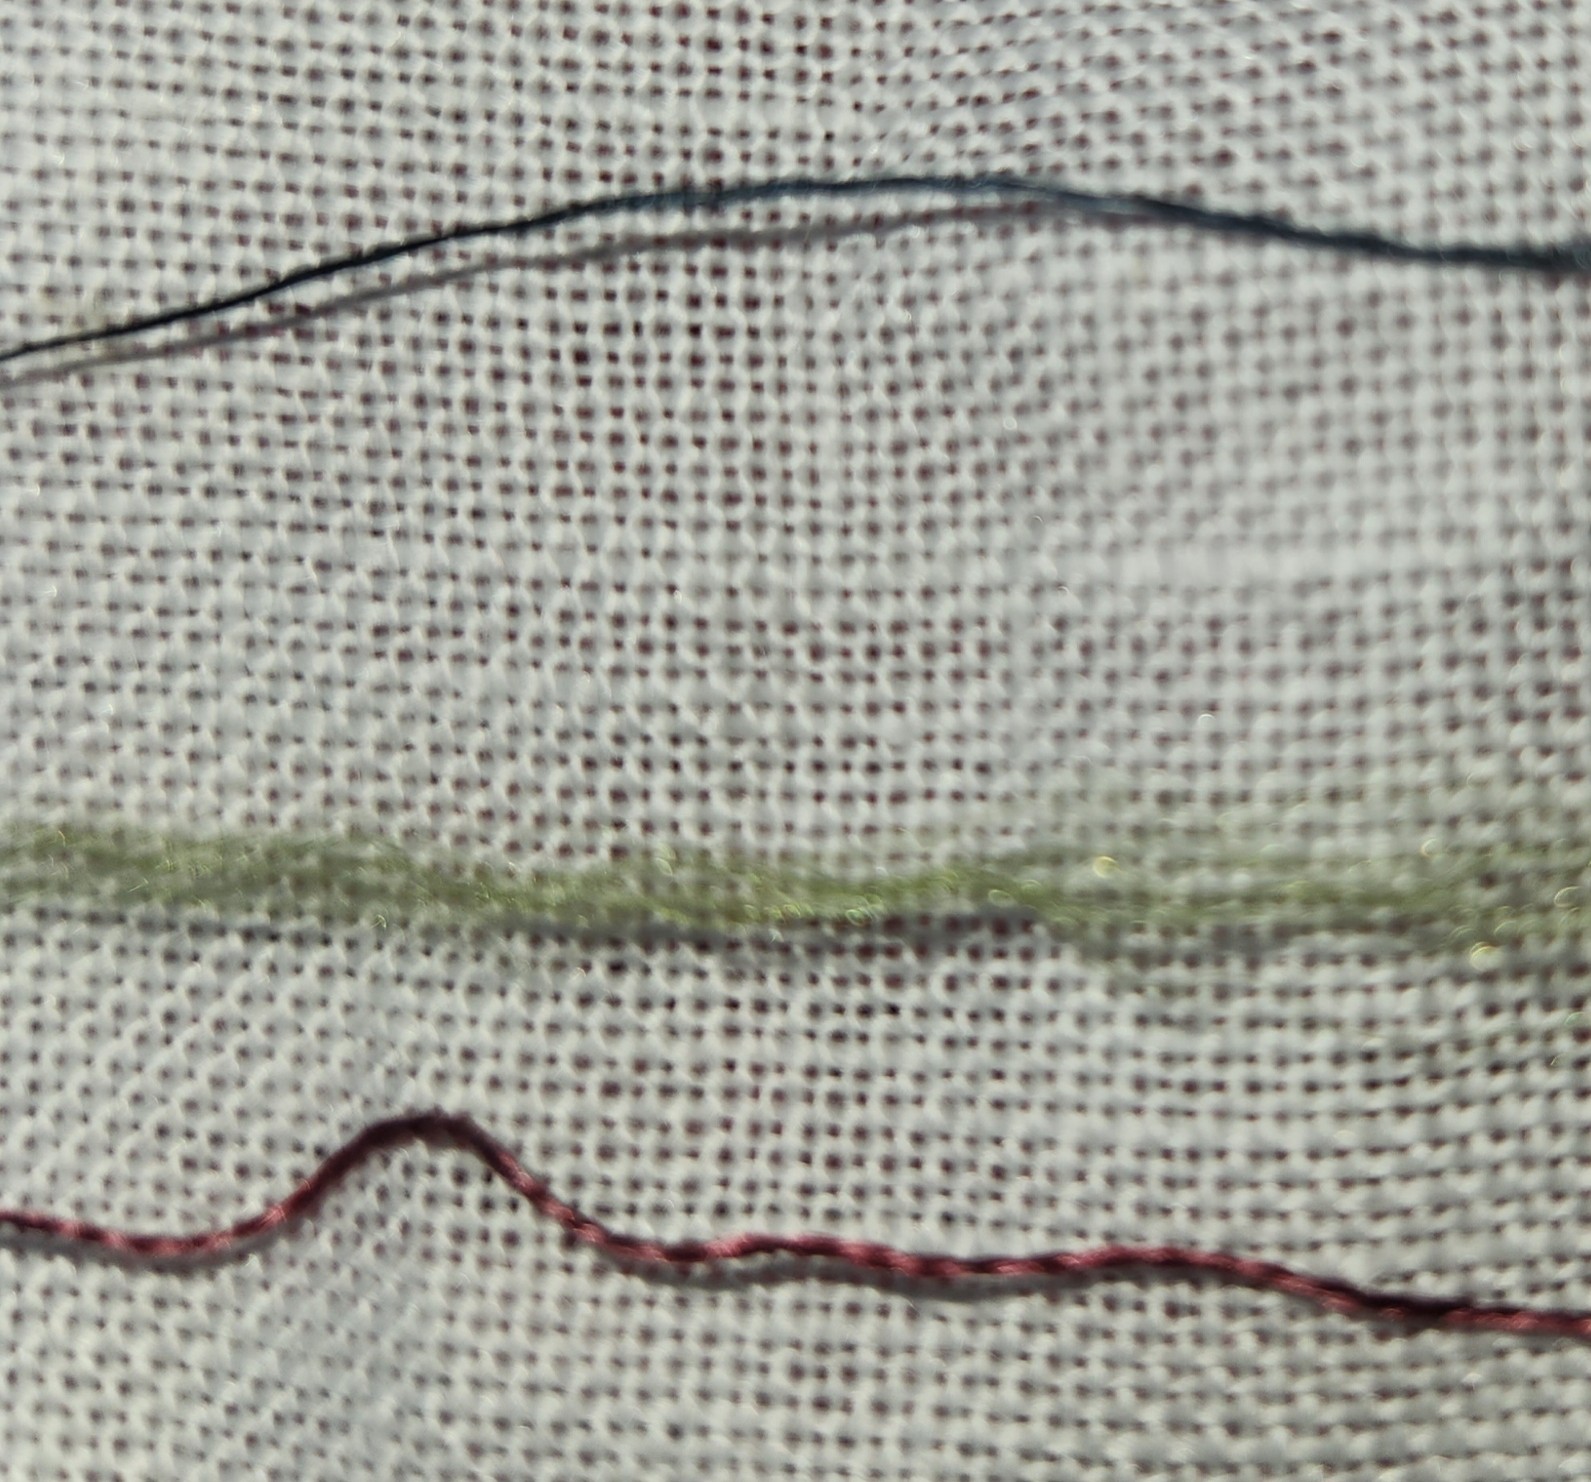
In the photo below the red thread at the bottom is a single “native” ply of my Pearsall’s six ply embroidery floss. Note that it’s structure is two-fold. This one strand is made of two plies of silk spun independently and twisted together. The green thread in the middle is what happened when I “unspun” those two plies. You can see the long staple filament fuzz that resulted. And the blue thread on top is what happens after I finger spun and lightly waxed the fluff. It’s a bit loftier than the original thread, but clearly half as bulky.
The re-spun thread was cohesive, and it handled well enough. It still needed attention and an additional spin or two as I stitched, to keep it as uniform as possible as I worked. Still, you can see spots, especially in the deep indigo that frames the outer border, where I was not entirely successful in maintaining thread spin/loft, and lines look a bit dashed, as thicker journeys completed previous lines laid down with a thinner, more tightly spun thread. But historical samplers have this look, too. Those stitchers, vastly younger than me, were learning to prepare their threads from reeled silk fibers and uniformity was a new skill to learn, and something that was a challenge even for them.
Picking out when I made the inevitable mistake was also a problem. It was too easy to latch onto only part of a strand, and shred the thread when a stitch needed to be removed. So I tried VERY hard not to make any mistakes. I was not always successful, and some waste did occur.
I still have the remainder of these colors, and more. I am not sure when I will get to use the rest of my vintage silk, but it will probably be on smaller, less densely stitched items; and again stretched to make use of every priceless inch.
Now. What’s up next?
I’m not sure. I will investigate my stash tomorrow. I just splurged on a pre-tariff large hank of antique red Au Ver a Soie silk. I want to do something with it. Possibly on leftover fabric from the coif, possibly on something less visually challenging. Maybe inhabited blackwork. Maybe strapwork. But no motto this time. Just a riot of pattern, with no lettering to center.
Or maybe I’ll finally do a faux Mexican style blouse in cottons. I have some well aged four inch wide finished edge cotton evenweave, sort of like the stuff sold for bookmarks but on steroids. It was last sold in the mid-1970s, and I got it in a stash trade a few years back. It would make a nifty base for a heavily stitched square shaped yoke, with a lighter cotton (perhaps muslin) full gathered blouse body below, and small cap sleeves. I might even have enough of the wide evenweave ribbon to edge the body hem, or to do a second blouse if the first one works out well. But instead of using traditional patterns, I might do something unexpected. Possibly one of my dinosaur strips, or the Pegasus strip – maybe even voided. Or something as-yet unseen. Suggestions welcome.
So many possibilities…
TWO COLOR DOUBLE RUNNING STITCH – TWICE THE FUN
As promised, here is a round-up of what I’ve been looking into on double running stitch, done in two alternating colors. First, heartfelt thanks to Melinda Sherbring and the gang over at the Facebook group Historic Hand Embroidery.
I knew I had seen examples of this type of work on samplers, but my own research notes are particularly poor in samplers. I tend to focus on the small fragments of household and body linen that lie quietly and largely unnoticed in museum research collections. Samplers receive far more attention, are often under licensing restrictions or have been fully charted by reproduction houses. So in a fit of laziness (it being vacation) I put out a call to the group and asked for assistance. Many people responded, Melinda especially so, furnishing 85% of the material I will cite below. So copious thanks, Melinda! I bow to your greater expertise on these, and will accept any/all corrections.
First, here’s what I am talking about. Here is a simple graph of a sprig pattern, worked in double running of a single baseline.

Note the alternating color stitches in the baseline. If I were to stitch this, I’d start with black, take that first stitch at the baseline’s left edge, then in double running work the rest of the first flower in black as a detour from my baseline. When I returned to the baseline, I’d continue on to the next black stitch, then I could continue working the whole thread of black until I ran out, carefully counting the units between black flowers. After that I’d start again from the left, filling in the missing green stitch, and taking detours to work the green flowers. Or I could do it the easier way – parking my black threaded needle, taking up a green one, and working green stitches until I got to the first green flower, working that as a detour in the standard manner, and marching on for a few stitches after, then catching up and leapfrogging ahead with the black. Note that using two colors means one will always be traveling along the baseline in the same direction. There is no doubling back to fill in second pass double-running stitches as one can if a single color is used.
After some experimentation, I found the “leapfrog” method far easier, in spite of having to be careful not to snag the parked thread. Less long distance counting means fewer errors for me. I suspect that close examination of encroachment on these historical pieces will turn up that leapfrogging was the way they did it, too. It’s just so intuitive and so much simpler.
One more observation – an alternating baseline is a giveaway that the band was done in double running. It would be quite awkward and wasteful of thread to achieve this effect in back stitch. And using back stitch to do the branching detour sprigs would mean having to terminate the thread on each one, or stranding over to return to the baseline. Again, something wasteful to be avoided.
Examples
Melinda provided far more than these photos, but I am cherry picking the ones with details that display the best. Click on the sampler institution/accession/date link to see the full pieces. A couple more of Melinda’s citations are at the end of this post, for those who want to do their own deep dive.
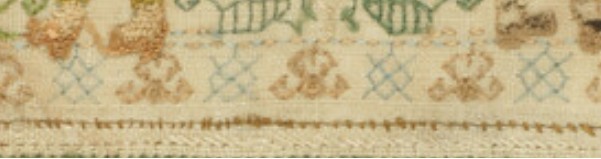
Ashmolean WA2014.71.3 (1631-1700) The boxers/urns panel has a companion border at the bottom with alternating pink/blue sprigs and a clear two-tone baseline. There’s also another pair of companion borders at the bottom that uses a band of green stitching with the alternating color sprigs and two-tone baseline immediately along its edge:
Ashmolean WA2014.71.27 (mid 1600s) has the alternating color sprigs on a two-color baseline on the topmost motif. This is the one I dimly remembered from tiny illustrations in a sampler book. Note that additional satin stitching was done in the centers of the motifs to bring extra dimensionality and color, but the double running outlines are still there.

Burrell 31.7 (1640-1670) Sadly, no high resolution image. But on the bottom-most strip – its framing border, top and bottom strongly looks like two-tone sprigs, and probably has an alternating baseline but it’s hard to make out the detail on the baseline. More investigation on my part needed. As an aside, it’s nice that the Burrell gives thread counts for the linen ground – 28 warp x 25 weft per cm, or 71.12 x 63.5 threads per inch. I’ve included the main strip because it or a close sibling pops up in connection with alternate two-tone borders in other works.
Burrell 31.9 (1640-1670) Third strip from the bottom. Again, certain ID limited by photo quality, but it does look like that much wider strip was done with a two-tone WIDER baseline (same spirit as mine, but a different pattern), with alternating color detours. Shares a lot of the aesthetic and some bands with Burrell 31.7 – interesting!
Cooper Hewitt 1981-28-70 (1600s) Love their high resolution photos. Another clear hit. The companion border around the bottommost wide strip, for sure – done in at least THREE colors (wow!) with a multicolor baseline and single color sprigs. A green, a blue, and possibly a red and a pink, the red and pink are very much faded. Or it might just be green, blue, and pink. It’s very hard to parse but it does look like the baseline was done in pink-green-red-blue-pink-green-red-blue, which would leave very long skips, overlapping on the reverse. I’d love to see the back to confirm that, and to confirm the number of colors.

There are more possibilities on this same piece, but for the most part they are heavily overstitched in satin stitch or (possibly) hollie point or another detached looping/weaving stitch, worked on the outline and for the most part obscuring it. It also looks like the second color was not necessarily used on the double running stitch outline for the sprigs, but was employed in the fill treatment Here’s one with an alternating baseline of blue and pink(?). The pink looks like it was used to outline the acorn and leaf shapes with double running. Pink and green were used for the detatched stitch fills for the acorn and leaf, but the blue of the baseline seems to have ben employed to fill the twigs between the acorns and leaves.

Fitzwilliam T.59-1928 (circa 1680) I stumbled across this one looking for the other items Melinda cited. I saw tiny black and white photo of this in one of the first embroidery history books I borrowed from the library – a book published before 1965 or so. I charted some of the strips from it with a magnifying glass, and used them on a piece I did in high school, long before I found the SCA. I haven’t seen this piece since. (People looking to chart now have no idea how much easier it is today with on line access to zillions of primary sources and high resolution photos, all of which can be enlarged right on the screen. A far cry from being smuggled into university libraries to stare at fuzzy microfiche images, or taking magnifying glasses to low quality black and white photos in books.) There is clearly a two-tone companion border with an alternating color baseline accompanying the prominent rose band:

By way of contrast, this bit from the same sampler was NOT done with a two-tone baseline. Even if there are pink straight stitches between the green diamonds and other motifs in the uniting center band, those sprouting leaves in pink are independent from the true baseline, which is solid, unbroken green.

Fitzwilliam T.61-1928 (1677) Also stumbled upon, and sadly a bit blurry. Two possibilities in the photo below – and the lower wide border to which one of the candidates is the companion one looks to a design that’s a cousin to the one from the Burrell sampler above. The two-tone companion is clearly not the same design, even though it’s difficult to see.

More citations:
Ashmolean WA2014.71.44 (1633) Not a sharp photo, but the red/green framing bands on the boxers strip does look like it is probably done in the dual tone baseline, alternating color detour method.
Fitzwilliam T.82-1928 (1691). Looks like there could be a couple of candidate bands, especially in the framing borders around larger strips, but the photo resolution isn’t quite there, and I can’t be sure that the colors are united by a two-tone baseline. I need to do more investigation.
Conclusions:
I have not seen this treatment in portraits, or in fragments of household linen – only on band samplers. I will keep looking, but I think Melinda’s generosity makes it clear that double running done in two colors, with a two-tone baseline and sprigs alternating between those colors was a 17th century innovation, popular in England of that era. She has given us lovely data points from 1629 to the 1690s. Given the paucity of extant samplers before 1600, that is to be expected. Thanks again Melinda!
But I never say never. All I can say is “I haven’t seen it yet.” And who knows, maybe someone out there HAS a citation for use of this technique before 1625, a sighting in works from other times/locations; or evidence on a textile fragment or portrait that it was used on clothing or household linen. If so, please add a comment with that reference here, and I’ll be happy to do a follow-up post.
And my own progress?
I’m up to the outer framing border. I just realized that I forgot to plot the way the wreath-springs work in the corners, so I will do that later or tomorrow, and concentrate on finishing out the upper edge tonight.
Yes, the colors are a bit disjointed, and I’m not entirely pleased with how prominent the diagonals turned out. But I am working under severe materials quantity constraints. Most of the colors were too light to show well in this style of work, and those that are are in single 8 yard six-strand skeins, most of which were already nibbled by the original owner for her prior projects. I am still splitting each strand of the six, to double the yardage, but it’s going to be tight.
THE SYMMETRIES OF LINEAR STITCHED FILLS AND STRIPS
As promised here’s a rundown on pattern repeat type, and centering fills and strips in designated spaces on your project. For one, there’s really very little need to sit down and stitch-by-stitch completely graph out the design to your final dimensions. In general knowing where the edges and centers of your space, plus the pattern repeat type is all that’s required. These hints go for both fills in regular and irregular shapes, and for strip or band type designs that march along the width of your project, or decorate the edge of a garment.
And a note on grounds, if I may. Aida, Hardanger, Anne Cloth, and Monks Cloth are types of purpose woven grounds used for modern countwork. They feature prominent holes outlining their base size units. Departing from that established grid can be very difficult and involve piercing the fabric in the solid spots between the built-in holes. Partial stitches do exist in the purpose-woven world, and are much despised by stitchers. Working multiple grids skew to each other on the same piece of purpose woven ground is almost never done. I’d say never-never, but somewhere it might exist, although I haven’t seen it nor the rants of despair from folk who have encountered it.
Evenweave (or near-evenweave) is a bit more flexible. Since the stitchers count threads on evenweave instead of hole-defined units, they can employ multiple grids on one piece. If the stitcher decides to work their unit over 2×2 threads, two adjacent spaces can use different grids, offset by one thread so long as the juncture where they meet is taken into consideration. I did this on my Two Fish piece, using the skew alignment to hint at undulating motion. Note the knot and grid filling. Not only is it stitched discontinuously across the bel, I also interrupted the grid. Both sides are worked 2×2, but NOT on the same 2×2 grid – the tail section is displaced one thread up and over.

So when you see me talking about skew grids or using partial stitches when centering various types of symmetry on a single piece, please know that the ability to do this is mainly something that can be done on evenweave. Purpose woven grounds like Aida will limit the way patterns of differing symmetries can be centered against each other. It’s just a fact of life.
Before I begin, all of the fills and bands charted on this page are available in my Ensamplario Atlantio series, my Epic Fandom Stitch Along, or previously shared here on this blog. All are available as free downloads for personal use. Links are provided.
OK. Finally getting into it. Patterns can be grouped into a few basic clusters, with some caveats.
Center Line Repeats
First we have simple line-center repeats. These are designs that cover even numbers of units, and mirror along a center line. The chosen pattern may be a band or strip, with one vertical line where the design mirrors to its left and right. Or it might be an all-over design or fill, with at least one vertical and one horizontal mirroring line.
This blackwork fill/all-over design has both a horizontal and a vertical center line, marked in red. The motif tiles into square blocks of 14 units. The easiest way to use it is to either count to or (if irregular) eyeball the visual center of the space to be filled, then begin stitching the design at the spot where the two center lines meet. Even if the space to be filled is NOT a multiple of 14 but is any other even number of stitches, if centered this way the design will truncate neatly around the edges, as it does in the sample from Ensamplario Atlantio Volume 1, below.
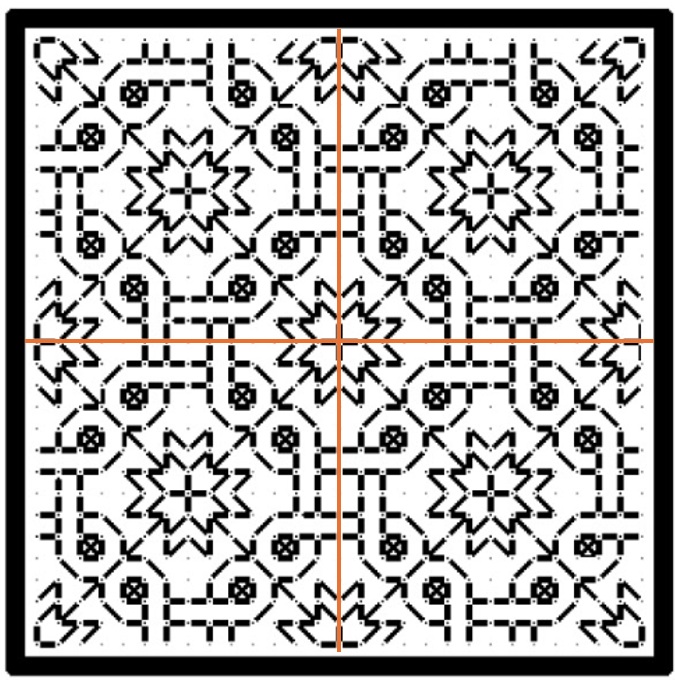
But if the space to be filled contains an odd number of stitches you will either have to displace the center lines so that there is one more unit to one side or the other, or you might have to work partial stitches all the way around the perimeter for full coverage.
Some people insist on using a single grid for ALL of the fills on an inhabited piece. That means that even if they are working over 2×2 threads on evenweave, where adapting the grid you are using to the space at hand would be quite easy, they choose not to. They end up having to either accept minor misalignments between adjacent patterns, or employing partial stitches to eke out the design. That can be avoided by NOT mixing fills or bands with this type of symmetry with some of those discussed later in this article.
Here’s the same type of symmetry expressed in a band pattern. This one is from my Epic Fandom Stitch Along. Note that in this simple meander there are two lines of symmetry (sometimes called mirror or bounce lines). The pattern replicates in mirror image on either side of them, just as it does in the all-over fill. One full repeat is 36 units, and alignment in your desired space can be focused on the center/mirror/bounce lines of either the up or down facing fronds.

Regardless of symmetry type, if you are filling an irregular spot, and you are eyeballing the center alignment point you might end up having to work half stitches around the edge of your area, again to eke out the coverage. This is one reason why some instances of inhabited blackwork (the kind with the freehand drawn outlines infilled with counted geometrics) rely on heavily stitched, thick outlines. Those “fig leaf” the offending partial stitch spots and make the work look neater.
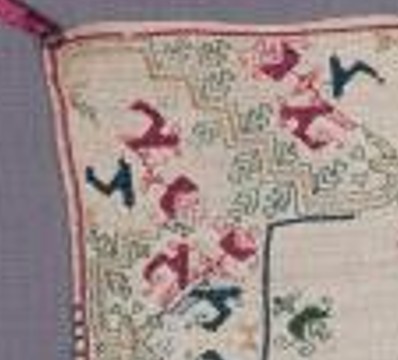
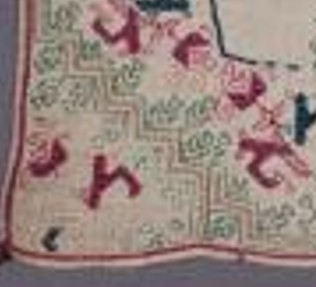
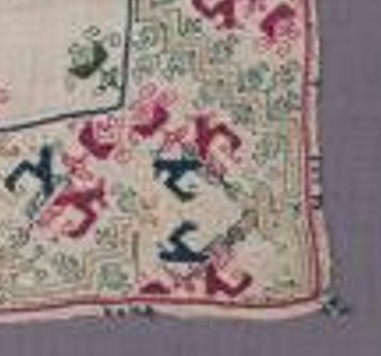
Here’s a bit on my Unstitched Coif, where I eyeballed the alignment of the fill, worked a ton of half stitches (a challenge on 72-74 count near evenweave, stitched over squares of two threads), then went back and put in heavier outlines to hide irregularities. Zoomed waaaaay in like this you can see them around the edges. For scale, that little bud at the upper left is smaller than a US penny.

Now there are some exceptions and complications. We’ll get to those later.
Center Unit Repeats
All well and good you say, but the symmetrical repeat I want to use doesn’t meet up neatly at a center line like those. In most cases your repeat has a “spine” of a single unit rather than a center line. That column or row of units is repeated only once, and is not mirrored, although the design itself does mirror left and right (or up and down) that non-repeating column or row. That means that a full repeat of the design includes two symmetrical wings, plus that pesky center unit – an odd number of units, total. Here’s a fill/all-over design that features center units. In this case one full repeat is a square of 23 units (one center unit, plus 11 more units to the left, and to the right of it).
And here’s a strip repeat, also with a simple center-unit style symmetry. Like the line unit band above, there are two possible centers. Either one can be used, although convention on band samplers is to feature two main motifs in the center of the stitched area – in this case the pair of beak to beak chickens.

The strip above is from my Workshop Handout broadside, another free download here at String you can access via this post or via the Embroidery Patterns tab at the top of every page.
Hybrid Repeats
Some designs display a delightful flexibility when it comes to centering because they incorporate BOTH a center unit and a center line bounce point/mirroring. This happens with fills/all-overs and for strip/band patterns.
Here’s a sample of a fill that includes both. I’m only marking one repeat of each type on it, otherwise the thing will end up looking like a swatch of plaid.

This design can be aligned either to the center lines (red), or center units (yellow). And here’s an example of the same type of pattern in a strip or band. The center can be the red line or one of the yellow columns.

Again, if a combo of center line and center column symmetrical strips are used on a band sampler in a mixed environment that doesn’t deviate from one universal grid note that true center alignment will not be possible. The even-number repeat centerline bands will all line up with each other. But if you insert a design with center unit/column symmetry but have to use the same “stitch holes” in Aida as the rest of your project, that center column will not line up with the true center of the rest of the piece. Which may or may not matter to you. Food for thought.
Staggered Drop Repeats
Now it gets harder to identify these. This style of repeat is common in fills/all-overs, but less common in strips/bands, but they do occasionally pop up. For the most part they employ mini-motifs, sometimes in straight-on replication, sometimes with mirroring or rotation; and use regular offsets to place them. Sometimes its a simple half-drop, sometimes it’s a larger interval or not regular when the horizontal and vertical offsets are compared. Most of the time these staggered or evenly scattered mini-motifs do resolve into very large area true repeats, with the same motif repeating in the same relative position in the field, but it’s rare to use these in areas big enough for that resolution to happen. How to center them? It’s a bit more complicated.
Here are three with different rates of periodicity (how big the sample has to be before it manifests a true, full repeat), presenting different problems. These are all from Ensamplario Atlantio Volume 1, Second Edition.

The flowers at left can be centered in a panel in one of two ways. Either using the regular center-line symmetry of the very simple little four petaled flower, or by counting to identify the centerpoint of the more complex sprigged flower. Either way will work, although I think using the smaller mini-motif would be visually more pleasing. Note that regardless of the size or count of the space you use these repeats “walk” and will always truncate around the edges.
The snail garden square at the right is a hybrid. It can be effectively centered either on the tiny squares and on the larger snail-bearing unit. Both work nicely. Which I would choose would depend on the size of the space I wanted to fill with it. If the space was large enough to accommodate four of the snail gardens without truncation, I’d probably use the tiny squares as my center alignment point. The snail gardens rotate around them, and optically form a flower-like shape when viewed from a distance. If the space was small, I’d put the garden in the middle to ensure at least one full iteration of it was represented.
The griffin/dragon beastie in the center presents a harder problem. There’s only one element here, and it has no clear center line or center column/row. Additional complications come from the rotation and offset of the beastie motifs. The easiest way to center this one is to find the center point of the beastie itself, match that to the center point of the area to be filled, and work the others around the first, completing the truncated ones as possible. In the photo below, this is what I did with the wing like bits, second from the right in the photo below, and what I SHOULD have done with the little dolphins in the box next to them, but obviously didn’t.

The myriad mistakes in my current piece are what inspired this post. In addition to the errant dolphins in the latest section, you can see that the voided bit currently underway wasn’t properly aligned. It’s a center line repeat, I have an even number of units across, but if you compare the left and right edges, you’ll see that the design is shifted two units to the right. The center of that strip does not align with the center of the set of boxes, above. The dolphin box is intentionally shorted one unit compared to the others in its row because my count across is not divisible by four (available area minus 6 units total for the gutters between the boxes). There are more similar mistakes in the previously completed part, now wound around the roller bars of my stretcher frame.
I confess to making many alignment sins on this one that together have landed me in this predicament, including initially basting the center guideline that runs the entire length of the piece offset to the right by three units; never going back and measuring, but instead working the other vertical guidelines off that one; starting the first blocks and not bothering to confirm centers or edges until it was too late to pick out and start again; fudging everything in to try to compensate for the pile of errors that was accumulating behind me; and not paying enough attention to centering the various fills in their boxes.
I will continue on to completion with this one, warts and all, but I may revisit the base concept of voided strips alternating with boxed fills in a future work.
RESISTANCE IS NEVER FUTILE, AND OTHER MISTAKES
I continue my quest for distraction, working on the impromptu doodle sampler I mentioned in my last post. I still haven’t decided what it will bear, but right now I’m leaning towards the single word “RESIST.” Time will tell, but I’m already looking at typefaces. Warm and fuzzy/ultratraditional/edgy and threatening? All nuance the message and are under consideration.
In the mean time I go back to my mail and comment inboxes and note that there are a few notes that claim envy of my work because I “never make a mistake.” Few things could be further from the truth.
I make mistakes ALL the time. In spite of how well I try to idiot-proof my methods, I consistently prove that I am beyond idiot-proofing. I could throw out excuses – I stitch mostly with divided attention, while watching TV, armchair kibbitzing/team playing video or console adventure games, listening to podcasts or books on tape, or sitting in a conversation with family or friends. I also confess to “stitching under the influence” – often our evening TV hour is accompanied by a glass of wine. I pick patterns on whim, and don’t always hit the right contrast/compliment point I was after. And I suffer from Memory Hubris. Once I’ve established two or three repeats of a design (in any orientation), I go “off paper” and attempt all future iterations from memory and by copying the initial segments, even if the newly stitched bits are mirrored or rotated from the prior work. I also fall prey to the common double-running flaw of trying to get away with using a too-long strand of thread. Needless to say all of these contribute to a healthy stream of problems.
These problems include:
- Missing the correct start point or alignment line, so that the work doesn’t meet up with or is uncentered against established stitching;
- Stitching off grid (not hitting the exact over-2 or over-3 spot) so lines and angles are off by a thread or two;
- Losing my place in a design and repeating an element where it was not supposed to go, or skipping one altogether;
- Veering off into hyperspace – getting totally lost on the number of stitches I need and their proper placement, especially on long diagonal runs with nothing to steady me nearby; and
- Deciding that I don’t like my bungee-jump pattern choice, and would prefer something else instead;
- Confronting errors in thread management – for example, twisting, knotting, snagging, catching the tail, disrupting the spots of prior starts/finishes.
What do I do about them? In rare instances if the problem is just an errant single stitch that doesn’t upset placement of the rest of the design, I might leave it in. This however is rare. That single stitch will glare at me with dragon eyes every time I look at the piece, even if no one else can spot it. Mostly I pick the errant work out and start again.
There are comparatively few descriptions of how to rip back safely, without danger to the ground or surrounding stitching. I’ll try to outline my method for doing so in double running. Cross stitch, back stitch and the like would follow most of the same process, with a little accommodation for stitch structure and working protocols.
OK. Here’s the latest sin on the latest sampler. I made a very big alignment error on the unfinished bit at the bottom. The top of the hearts and arrows design as stitched here may look good, but it’s only half of the pattern. There’s a vertical flip that I had barely begun, with arrows that point up. As stitched, that second half won’t fit. (Oh, and I’ll be reworking the previously released chart to make the logic easier to stitch. )

I also felt that I wanted another narrower band here before working a wider one. So, since I would have to rip back 90% of the hearts and arrows band anyway, I decided to eliminate it totally.
Here’s my frogging kit – a laying tool, my best embroidery scissors – sharp all the way to the tip, with a rounded safety end on one blade, a pair of precision tweezers – the kind sold for electronics assembly, and Silly Putty, which I’ve written about before. Note the absence of a seam ripper or any other cutting implement. (Yes, I remembered to take this photo after I had already begun the Big Rip).

I could “unstitch” the piece, slowly drawing out each stitch in turn, reversing the direction in which the double running stitch was created. I will do this if I’ve got just a few stitches to remove because of an alignment misadventure, and then I’ll keep stitching with the same thread. But it’s not optimal for a big removal. For one, drawing the stitching thread through the ground that many times will degrade it and make it unsuitable for re-use. Long lengths of thread drawn through the ground also run a higher chance of crocking (depositing dye on the cloth), or leaving fuzz behind. When the errant bit is this big, better to snip and remove.
But you can’t just snip willy-nilly. Each snip is a chance to wound the ground cloth, and the condition of the cloth and the soon-to-be sacrificed thread must be taken into consideration. For example, if the thread is very soft and fuzzy or prone to shredding or crocking (think wool and most commercial cotton 6-ply flosses), I might make my snips in the front, but pick the work out from the back. If the thread is long-staple, structurally sound and unlikely to crock I will both cut and pick from the front.
The first thing to go is the long stitching tail. Snip. Gone. Then I start at one end of the work and snip two stitches side by side, preferably diagonals because they are longer and easier to grab. I usually do several of these pairs at a time. But I don’t rush in with my scissors. First I use the laying tool to gently “pry up” each stitch to be cut. Not enough to deform the ground, just enough so I have slack into which to insert the lower blade of the scissors. Here you see the laying tool making room under a stitch for scissor blade placement.
That lower blade is the one with the rounded bump NOT the thin and wickedly pointy other blade. This safety end helps guard against inadvertently catching and cutting the ground.
Once two stitches are cut I tease them back an inch or so, stitch by stitch, using my laying tool, and occasionally the tweezers. I work two at a time because of the every-other stitch construction of lines laid down in double running. One of those dashed lines will have been stitched after the other, and by cutting two adjacent stitches I can tease out both of them, quickly determined which path is newer and then do that one first, followed by the other. It’s always easer to remove the newer stitching first because it sometimes pierces the older stitching, which can cause snags as you rip. Once I’ve freed an inch or two I snip the freed bits off about a quarter inch from the surface. I’m about to remove that long thread seen in the piece above. I do this to minimize the length of thread pulled through (remember – crocking, fuzz).
Removal stitch by stitch, snip by snip, taking care not to hurt the rest of the piece is tedious. It takes me considerably longer to rip back than it does to lay down the stitching in the first place. One thing I was thankful for in this piece is my thread choice. Since I’m working in silk here there was very little residue left behind as I remove the stitching. That reside is where the Silly Putty comes in. I dab it on the surface to remove any remaining dye and fibers. No erasing or rubbing motions – I support the fabric from below with the plastic shell, and do a quick and light vertical press of the stuff. BEFORE you try this on your own precious work please check out the article I linked above. I am willing to accept risks for my work, but you might not want to. Know what they are before you attempt this.
Once everything is picked out, and surface fuzz/dye crocking has been Silly Puttied into oblivion, I have a blank canvas again. Some of the stitching holes are a little distended. I will use the tip of my laying tool and gently stroke the ground cloth at a 45-degree angle to the weave. That returns the threads to proper alignment. The result:
And what goes there? Bunnies.

And yes. There’s a mistake in the bunnies already. The rightmost finished bunny is looking at a partial leaf. I’ll go back and catch that “oops, I skipped over it” error when I’m done with the current thread.
Perfect? Not me. Never.
TALKING HOOPS AROUND THE SUBJECT
Yesterday was a needlework housekeeping day. I put away the supplies from my last project, neatened up my stitching-on-the-go box, and cast an eye over my kit in advance of whatever project I will do next. And there WILL be a next – it’s just a matter of getting a couple of holiday obligations finished first.
Among the reassessments I made was an evaluation of my hoops. I have several. My best ones are three in-hand hoops, and one sit-upon hoop on a stick. All are hardwood wood and better quality, with sturdy brass hardware – not the bamboo ones with fragile clasps. Three of them are shown in the family photo below. The other one is an unwrapped duplicate of the smallest, shallowest hoop. I haven’t wrapped it because it happens to have much better tension than the one I did wrap, and there might be call for me to use an unwrapped hoop for a specific purpose. Since I don’t leave my projects hooped when dormant, there’s no call for me to have two absolutely identical ones, both prepped and ready.

The in-hand hoops are all 6 inches (15.24 cm) in diameter measured across the inner hoop. I find that the most convenient size both for maintaining tension and for use in tight places. The sit-upon is 8.75 inches (22.22 cm) across the inner hoop. I note that a 6 inch diameter hoop/stick part is now available from the maker. I might pop for that someday.
The ring of one of the in-hand hoops is 1/4 inch (0.63 cm) deep, and the other hand held one is 5/8 inch (1.59 cm) deep. The hoop on a stick is even wider – 7/8 inch (2.22 cm).

I also have a selection of both plastic and wooden quilting size hoops, a foot in diameter or more that I’ve gotten as hand-me-downs, or as part of “take the lot” yard sale/jumble sale needlework bundles. I rarely use them because I find they are cumbersome, and they don’t provide the drum-tight tension I prefer. None of those have been promoted to my on-deck group, and aren’t shown.
But why so many of the smaller diameter? Well, it happens I do have several larger scrolling frames, and use them when needed – mostly for things that have fragile threads, metallic threads, or other raised embellishments; or that employ crush-prone stitches that a hoop could injure when it is repositioned. But for smaller pieces, non-fragile pieces, and in some cases REALLY big projects like tablecloths, I prefer the hoops. These days I mostly use the sit-upon, but for sitting on the beach and stitching, the sit-upon is useless. You can’t sit upon a hard paddle seat in a soft fabric sling chair – so hand hoop it is.
Why both the deep and the shallow? The deep ones (including the hoop on the stick here) work better with thinner fabrics – the 38 and over count linens and blends I usually use. The shallower ones work better for thicker fabrics, especially heavy 28 to 36 count evenweave, denim, and other sturdier fabrics. If I used most Aida I’d probably employ the shallower hoop for that, too. Do you have a standard deeper hoop and you are struggling to get it over your Aida? Try a thinner wall hoop. It will be easier, even if you wrap the hoop.
Wrap the hoop?
Yup. Makes a world of difference. Wrapping the inner hoop with 100% cotton twill tape vastly improves the grip of the thing, and makes the fabric much easier to mount and to tension. It also cushions the work a bit, cutting down on stitches being crushed. I will probably wrap the outer hoops, too, to prevent those shiny areas that happen when densely packed stitching meets hoop tension. But so far I haven’t bothered.
How to do it. Note that the deeper hand-held hoop is wound with wider twill tape than the other two. That was the first one I wrapped. I have to say it was significantly harder to do it with the 3/4 inch (1.9 cm) tape than it was to do with the 3/8ths inch (0.95 cm) tape. The narrower stuff is easier to stretch to conform to the circle of the hoop, without lumping and gapping.
Lumping and gapping on the outer edge of the inner hoop is to be strenuously avoided. That leads to high and low spots with suboptimal tension. The inner surface can be less “policed” but it shouldn’t present gaps or kinks that might work their way around to the top, or catch needles during stitching.
I find the best way to achieve as uniform a contact surface as possible is to overlap the tape by 50%, row on row, and wrap as tightly as possible, maintaining the established angle and stretching the tape as I go. Yes, it can take me a couple of tries before I hit on the angle that produces the most even results.


I don’t use glue or tacks to hold the end, I just wrap, gripping the tape and hoop very tightly, placing each successive course with special attention. Here you see the start and the midway point. Eventually the origin end will work itself a tiny bit loose as I go, but I keep it folded flush against the inner surface of the ring, and take care to wrap over it. Eventually I get back to the start. I cut the tape, tuck the ends under to prevent fraying and firmly sew it to the inside surface of the ring, back where it meets the beginning. That spot is indicated by the arrow, below.

The only caveat on this whole thing is that wrapping may add so much diameter to the inside hoop that the little thumb screw holding the clasp together becomes too short. This happens mostly on the less expensive/mass market type hoops. If that happens, a quick stop at an old fashioned hardware store can help you land a longer replacement. And by that I mean a store with actual people who know the inventory, not a big box/self-serve hardware department store that sells everything in quantity, entombed in blister packs. Bring the hoop and screw in and explain the problem at a non-busy time. The staff will be able to size it and find **just** the right thing.
And that’s how it’s done. If done with proper care, wrapping a hoop of this size takes me about a half hour. And a half hour well spent.
Other Recent Projects
The multicolor headscarf I was stitching has finally been made up into its finished form – a lined triangle with ties. The ties are also 3/8 inch twill tape, but a heavier/denser and whiter one than that used on these hoops. I folded it in half longitudinally and stitched it to make robust tie strings. But I didn’t remember to take a finished item photo, and then decided to give it as a present to a dear old friend who married over the weekend past. I forgot to ask permission to use a photo of her wearing it. But I am happy that she loves it enough to tie it on immediately after the ceremony.
And the Fractured Symmetry sampler joins the rest of the to-be-framed or finished works on my Wall of Shame.

He is tucked in next to the underskirt panel at the far left, just below Stone by Stone. In addition to some of my perpetual unfinished objects (UFOs), there are now six pieces there, stitch complete, waiting for framing or other finishing. I suppose I should get on that.
BUT in the mean time I have seasonal obligations to meet. I promised a stocking with a wolf on it before the holidays hit. I’m on it. The recipient’s name with be duplicate stitched into the white band at the top. I’m afraid that the distortion inherent in translating squared graphs to rectangular knitted stitches (wider than they are tall) has stretched poor Wolfie a bit. I am hoping that additional embroidery – maybe an eye and some ornaments on that tree, will make him both more identifiable and more festive.

The pattern is one I’ve done twice before, once for each of the spawn. But the last time I knit it was 25 years ago. I found one of the pattern pages, but not the others. I’m extrapolating from the other two extant stockings. An interesting exercise, for sure.

MINI-SAMPLER PROGRESS
Munching along on my portable summer project, sized and scoped for on-the-go production. I’ve completed the first band and have started on the second.

Both of these original designs will be in Ensamplario Atlantio Volume III. As will (in all probability) the others I use on this thing.
Yes, I’ve chosen a second color – this piece will be in black and deep green. There’s a reason for that which I will reveal in the fullness of time. I’ve also chosen a motto for it – again for a specific reason that I will describe when appropriate.
I had begun this in part as a test of the single ply of Sulky 30 on this ground. While the thread is performing well in terms of ease of stitching, I’m not entirely happy with it. It’s too thin and weedy for best presentation, and two plies would have been overly massive. Here’s a discussion of thread thickness and grounds that will help you understand why I am less than pleased.
How big will this entire piece be? It’s a second-hand store piece of hand-hemstitched linen, a bit more rectangular than but about the same size as a dinner napkin.

You can see here how I tease out my guidelines as I progress, so that I never stitch over them. I know people who do full coverage cross stitch sometimes don’t bother to remove them, but since my style includes so much “white space” I find it better to never encroach on the lines. That makes picking out easier. For the record, I baste with some ancient 100% cotton machine sewing thread from my grandmother’s stash. It’s too fragile to use for structural sewing, but being non-crocking and very smooth, is extremely easy to pull out cleanly.
You can also see that I start in the middle. I worked the dragon strip right, to the guideline at the right edge. Then I filled in the top companion border to end to mate up with the line established by the dragon strip. After that I did dragon to the left, finishing up at the same point already established at the right edge. Since the strip is symmetrical, it terminates at the same distance from the hem on both sides of the work. Again the companion (non-symmetrical) narrow edging at the top was worked to the same point. Now that I have my edges established, I will work all subsequent rows aligned to the first one, using my basted center line for guidance, and finish them left and right in line with the previous work. Really and truly, this is MUCH easier to do than some folks think. Plus working this way does NOT require drafting up the entire strip to fit the available area. The only thing I WILL be drafting out custom will be the motto, so that I can determine its center. Since it will be narrower than the stitching area, I may go back to the doodle board and figure out what I can use to eke out that row left and right. Or maybe not. Another narrow strip after this one, and then we’ll find out…
BUZZ ON BEESWAX
I keep seeing questions about waxing threads on various social media needlework discussion groups. I usually end up retyping this. So to make reference easier while offering up this Helpful Hint, I take the time to write it out in long form.
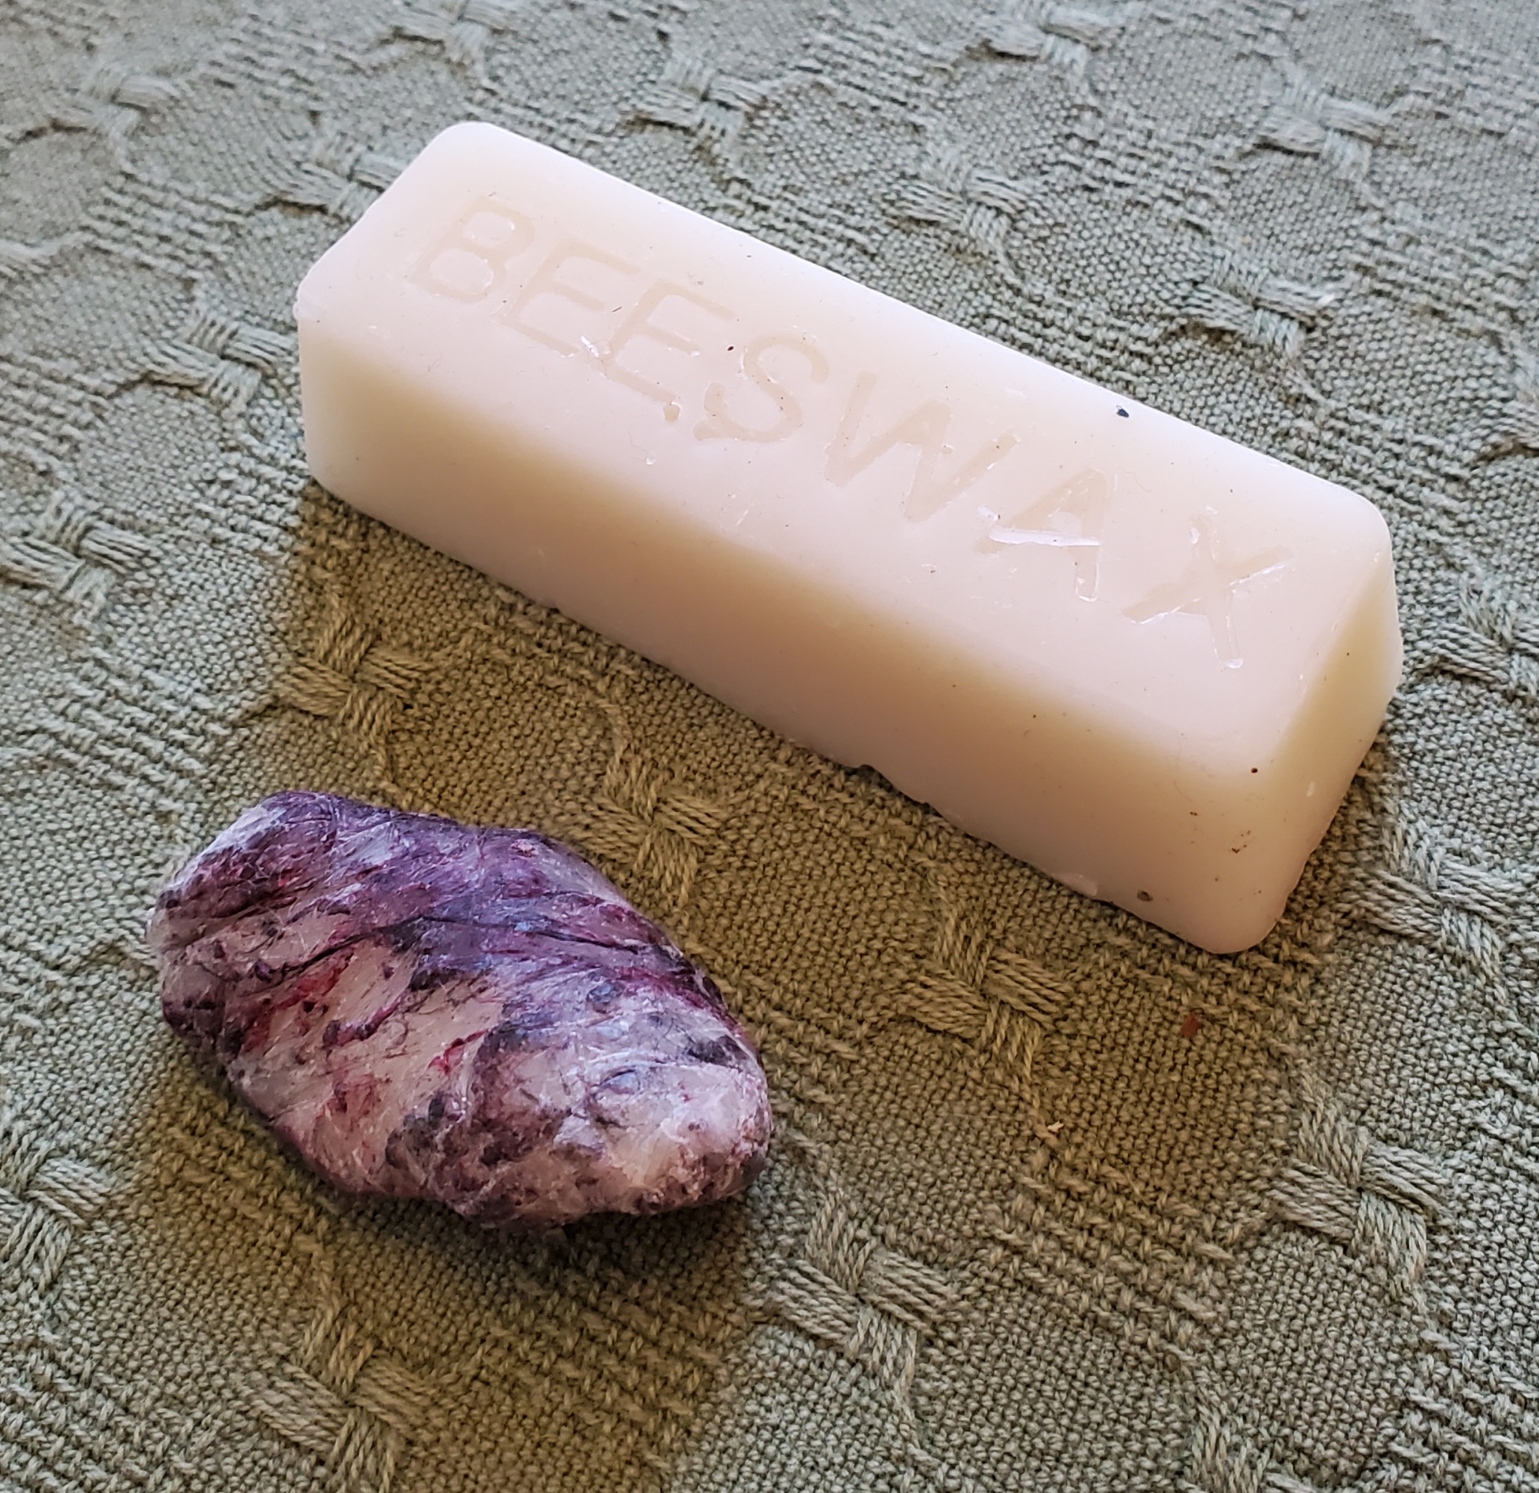
I use beeswax on my threads for blackwork and cross stitch. I only use 100% beeswax, not candles or other beeswax products that often contain fragrances, colors, or agents to soften (or harden) the wax. Whenever possible I buy it direct from beekeepers, at farmers’ markets or county agricultural fairs, avoiding the overpriced boxed or containerized offerings at big box craft and sewing stores. I’ve also bought it via Etsy and Amazon, but am leery of super-low priced imports that might contain adulterations. I look for domestic producers with a range of local bee-related products instead, especially those who guarantee the purity of their product. Even then it’s not a very expensive purchase. A one-ounce mini log is currently running between $1.50 to $2.00, and will last for years and years. By contrast those Dritz plastic containers of wax with no ingredient labeling are about $5.00 for an unweighed bit I estimate to be less than 25% of the mass of the one-ounce mini logs.
What does beeswax do for me?
- It tames surface fuzz on my threads, making them sleeker and smoother.
- It aids in needle threading, making that much easier and quicker.
- It cuts down on differential feed when using two plies of thread together. That means that both plies are used at the same rate, and I am less likely to end up with one extremely shorter than the other after a length of stitching.
- It eases thread passage through the fabric and “encourages” threads to lie next to each other in mutual holes rather than earlier threads being pierced by successor stitches. I find this leads to neater junctions in double running stitch and neater stitch differentiation in cross stitch.
- Since I stitch with one hand above and one hand below, occasionally the working thread is “nipped” as it is passed back from the unseen back to the front. A problem that leads to work-stopping knots and snarls that have to be teased out. Waxing cuts way down on this because the thread fibers are kept closer and are more difficult to snag.
- Less drag from less fuzz and eased passage through the work allows me to use a longer length of thread than I can get away with without waxing. Even a little bit of extra length before the thread degrades enough to make the work messy makes it easier to achieve a uniform appearance when working the second pass of double running, or doing the “return leg” of a line of cross stitches.
I wax my threads for blackwork and cross stitch: cotton, silk, faux art silk (aka rayon), linen – everything except wool. Note that I tend to work on higher count grounds rarely venturing below ground thread counts of 32 per inch (16 stitches per inch when done over 2×2 threads), and usually in the 38-46 range, sometimes up to 72 threads per inch (18 to 23, and up to 36 stitches per inch respectively). My blackwork and cross stitches are relatively short, so thread sheen is not a factor. If I am working satin stitch, or a longer linear stitch that takes advantage of thread directionality and sheen, like satin stitch, I skip the wax.
I usually keep two of those single-ounce logs going – one for dark colors, the other for light because even the best threads will crock dye and leave traces of lint in the wax as I use it. Since I do a lot of blackwork with strong colors, I don’t want to run a white, yellow or other delicately tinted thread through the accumulated color left behind by the darker ones. Below is a one-ounce mini log, untouched; and the remains of an identical log after about seven years of very heavy, daily use. The frugal will note that there’s more than enough in one mini log to break it in half, and use one piece for dark colors and the other for light, but that’s not what I did here. That grungy little stub used to look exactly like its brother. It’s so filthy now I may break down and melt the stub, skim off the lint and recast it in a silicon baking mold.
Applying wax to working threads is quite simple. I hold the bar in my hand, with the thread to be waxed between my thumb and the bar, under gentle pressure. Then I use the other hand to pull the thread across the surface of the wax once or twice. I don’t want to wax heavily – there should NOT be flecks of wax on the thread, and it should not feel stiff as a wick. In fact, after I thread my needle I usually run it once or twice through a scrap of waste cloth before use to remove any that might be there, before using the lightly waxed thread on my project at hand.
Back to when to use and when not to use beeswax. Here are a couple of examples. First, my project-in-waiting – the Italian green leafy piece. Lots of satin stitch. The dark green outlines are two plies of Au ver a Soie’s Soie D’Alger multistrand silk floss on 40 count linen (over 2×2 threads). Wax on all the outlines, even though they are silk. That infilled satin stitch worked after the outlines are laid out? More of the incredibly inexpensive Cifonda “Art Silk” rayon I found in India. No wax on the satin stitch. That lives or dies by thread sheen and directionality. While the stuff is very unruly and I do wax it when I have used it for double running or to couch down gold and spangles on my recent coif project, here doing so would not give me this smooth and shiny result.
And an example from the coif mentioned above. It’s on a considerably finer ground – 72×74 tpi. All of the fills are done in one strand of Au Ver a Soie’s Soie Surfine in double running. All waxed. The black outlines on the flowers and leaves are two plies of the latest batch of four-ply hand-dyed black silk from Golden Schelle, done in reverse chain stitch. Also waxed. The yellow thread affixing the sequins and used to couch the gold, the same Cifonda rayon “silk” used in the leafy piece, waxed, too. The black threads whipping the couched gold are two plies of Soie Surfine, waxed. But the heavy reeled silk thread ysed for the outline is Tied to History’s Allori Bella Silk. It’s divisible, and I probably didn’t do it as the maker intended, but that’s two two-ply strands, plus a single ply teased from a two-ply strand – 3 in all – worked in heavy reverse chain. That’s a longer stitch, thicker than even the black flower outlines, and because the stitch was long and I wanted to make it stand out from the other black bits, shine was part of what I needed. NOT waxed.

Many people have asked me if waxing makes the piece collect dust faster, leads to color migration, or makes the stitching feel heavy and well…. waxy, or if it stains the cloth when the piece is ironed. My answer is that I find no difference in dust accumulation on my finished pieces on display. And I see no color change, either. Beeswax has been used for stitching for hundreds of years with no ill effect that I have seen reported. Modern substitute thread conditioning products of unknown composition have not undergone that test of time.
As for a heavy, waxy feel – again, no. Not if you apply it lightly. I do cover my stitching with a piece of protective muslin when I iron it, and never iron pieces on which I’ve used the Art Silk anyway. I have never noticed waxy lines of residue on my ironing cloth when I have ironed my cotton, linen, or silk pieces.
So there it is. Waxing, why and how I do it. Your mileage may vary, of course.
