GALLERY – MORE PAISLEY!
I get a big kick out of seeing what others have made from my patterns
or pattern pieces. It’s a bit like meeting up with old friends
years down the road and finding out what they’ve been up to. I’m
delighted to be able to show off any photos of their work here in the Gallery section.
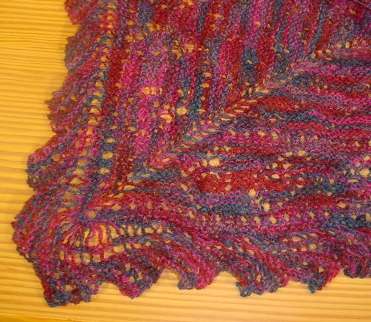
My latest vicarious bit of happy warmth was provided by my knitpal
Laura Need. She decided to do the Interweave Knits Paisley Shawl
from the Spring ’05 edition, but to finish it off with the simple edging I noodled up. She sent me the picture below and gave me permission to post it:
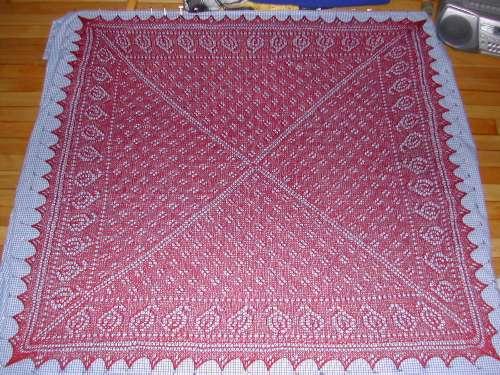
Laura used Zephyr, and her Paisley pinned out to about 46 inches
square. She did a much more even job of the knitting and blocking
than I did. Plus she had the wisdom to use a solid color.
You can see the difference:
Laura’s paisleys and eyelets really pop out. You can see the edging especially well. The piece’s texture patterning isn’t fighting for your attention with ground color variations. That’s a big improvement. I
took the lazy way out of blocking, using my wires rather
haphazardly and patting them in place rather than pinning them down to tension the work. She did it the more labor intensive way that
produces better results – pinning out the individual points evenly on a
dimensioned blocking surface. (Hers also pinned out to be six
inches larger than mine.)
All in all I’m extremely impressed and quite pleased that Laura found
fun in my minor contribution to this pattern. A great job!
QUESTIONS – WORKING NOTES AND BLOCKING THE SHAWL
?People are asking me for the Paisley Shawl’s pattern source, why/how I blocked it and final dimensions.
As I’ve mentioned before, the center part of the shawl up to and including the wide paisley border is Evelyn A. Clark’s?"Paisley Shawl" from the Spring 2005 edition of Interweave Knits. The outer border, including the double column of eyelets joining it to the shawl’s body is original. I’ve shared both the process I used to noodle it out and the final pattern here on String. The yarn I used was Helen’s Lace from Lorna’s Laces. My shawl, including my additional edging took about 80% of my skein. There’s enough left over for (perhaps) a small lacy ascot or scarflet.
I used US #5 needles, starting on DPNs, but quickly moving to first two circs employing standard two-circ methods, then one circ when I had enough stitches to go around the circumference of one. I could have kept on going using the two-circ method, but I’m not a big fan of multiple dangling needle ends, and the fine lace yarn was easy to manage even after the shawl grew larger than the circumference of the one needle. I worked the edging on one DPN and one point of the same circ that was holding the bulk of the shawl’s stitches. It took me less than a month to make the entire thing, including designing the companion edging. I’d say I did about two weeks of casual knitting of about an hour a day, plus five days of intensive vacation knitting (three or four hours per day).
Blocking
I did a quick and dirty block. I didn’t even use any pins. Instead of running the wires at the base of the edge triangles then pinning each one out separately (the thorough way), I opted for a less labor intensive method.
First, I gently hand-washed the shawl. While there was some minor bleeding of magenta into the wash water, the piece’s colors didn’t muddy or change, and there was no bleeding onto the blocking towels. Then I laid out my towels and threaded the points of the damp piece onto the blocking wires. I made sure never to run the wires under just one thread. Instead I was careful to pick up the entire point-end stitch. Then I teased the wires into a square, using the friction of the wet wool on the terrycloth towels to hold the wires in place. The whole thing took maybe two hours to dry, tops.
The down side to my quick and dirty method is that my basic saw-tooth edging was distorted a bit, and the points ended up (mid-block, anyway) looking a bit more like equilateral triangles than the shark-fin shape they’re supposed to have. For the record, I do note that as the points relaxed post-block, they reverted a bit to their native shape.
Yes, if this were a more important piece I’d have done a more meticulous job of blocking. But for the purposes of this project, my approach was good enough. The final (relaxed, post-block) dimensions are about 40"x40" (120cm square).
Lessons Learned
This started as a special request gift – a lace shawl of a size practical for regular winter wear with a jacket, preferably in purples and blues. I found the yarn and tried to force it around a pattern I had wanted to do for a while. While the pattern looked great and the yarn looked great, they didn’t work together. ?Conclusion – If I want to use it for some sort of lace, unless a hand-dyed or multicolor yarn has extremely short or extremely long color runs, I’m better off sticking to a texture pattern that’s mostly solid ground pierced by eyelets.
The two-circ method can be used for flat pieces knit around their circumference in addition to being used to knit tube-based items. Absolutely. Worked great. This wasn’t the first time I’d tried this. My Waterspun Kids’ Poncho also used two circs, but as I was working that – even though it was mesa-land flat – my mind was thinking "poncho = tapered tube," and not "poncho = tablecloth with hole in center." One caveat – the corner where the needles meet is just as stressed as a corner where two DPNs meet. Perhaps more, as the long lengths of the two stitch-loaded circs can lever themselves into all sorts of odd configurations and apply more force to that juncture than can two short DPNs. Care needs to be taken that the stitches at the needle junctions aren’t distorted. This is especially true if there are YOs involved.
Not every project needs to be executed with the fanaticism of a full-bore perfectionist. You may disagree or you may scoff, but for me – this was a valuable lesson. I tend to over-agonize about my knitting. Sometimes I end up squeezing all the fun out along the way. I decided that this project was for pure relaxation. The pattern was very simple, and required very little thought on my part to execute. Even the edging wasn’t that hard to noodle out. In fact, writing it up for String took more time and thought than did working it. There are some mistakes in the thing that I didn’t catch until much later, but I didn’t rip back and start again. I didn’t agonize over blocking either. All in all this one was easy, fast, and very relaxing. So I repeat the most valuable thing I learned from the whole thing: Not everything is an heirloom. Just have fun.
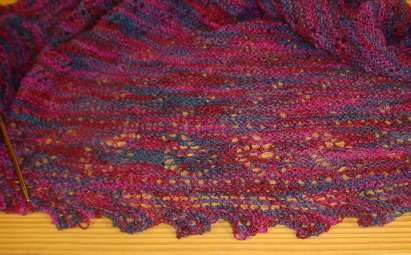
PAISLEY SHAWL -TAA-DAAAH!
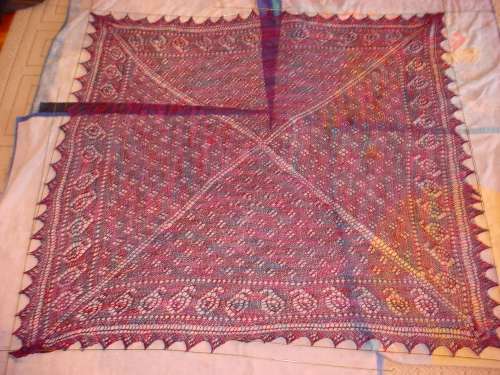
Thanks to the sixth (seventh?) cool, rainy weekend in a row, the paisley shawl has been blocked. Here it is on the blocking wires atop a pile of towels on my bedroom rug::
The strange blue triangles behind it are the printed sides of my beach towels. I wasn’t as neat about putting them down as I should have been. This flash shot also kills the colors somewhat. They’re brighter and more varied than this washed out photo shows.
You can see the paiselys, the quad-flower eyelts in teh piece’s center, and that each pint bears the same quad-flower. I also like the way the diagonals from the center are echoed by the edging’s join. I think it worked, even if my photography skills are too lame to document it well:
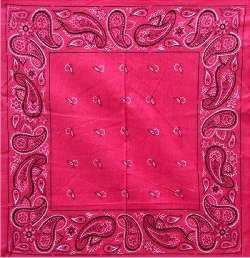
Now you can see why the thing reminded me of a bandanna. It’s got the same sort of all-over patterned center, with a bold paisley border all around the edges:
CORNERING
I did the first corner last night. It worked out more or less as I expected. My last motif ended within a stitch or two of the corner (I think I overlooked a couple of the K2tog-psso spots, otherwise it would have ended up exact). I then worked an extra repeat squashed into the three cornermost stitches, fudging the attachment points. You can see that the base of that repeat is slightly thickened, but that’s not very obvious.
The squish-stretch around the corner accounts for the oddly leggy appearance of the double yarn over column. Most of that should even out in blocking. Now all that’s left to do is to carry on and finish the remaining 2.75 sides. Maybe on the next lacy project I knit I’ll work out how to do mitered corners. That sounds like fun, too.
More questions:
Why do you do the K2tog-psso bit when joining?
Because the stitches are wider than the rows are tall, and I’m working my edging perpendicular to the direction in which the body was knit (that was done center-out). I need to even out that ratio just a tad as I go along. If I were to join my edging with K2s only (remember, that means one edging stitch joined to one body stitch) the edging would be more stretched around the perimeter and I’d get more cupping of the interior piece. Another way to even everything out is to knit the functional equivalent of short-rows in the edging, making free rows every now and again that aren’t attached to the body. I do this if the edging is VERY wide or unstretchy compared to the body, but it wasn’t necessary for this little bit.
What makes a hand-dyed multicolor yarn work in a lace project?
I wish I could say that I know a flat-out answer to this one. All I can do is report on what I look for. First, the color set should be tonally close, like an impressionist’s palette. Big contrast makes it much more difficult. Second, (surveying my scars from the Birds Eye experiment), the color has to take the center stage, not the lacy pattern. I now look for something that has acres of ground punctuated by lacy bits if I’m using a multicolor. And third, the more broken the color patterning or shorter the repeat, the more it fights with the texture pattern. This particular skein sort of pooled a bit. Stripers pool even more so. Too much pooling however can overwhelm any pattern. But even those yarns can be tamed. The feather and fan or old shale variants are especially forgiving, and can often be used for savagely aggressive multicolors that fight with any other texture.
Finally for hand-dyeds of all gauges, skeins with very short color splotches that make a tweedy appearance when knit up are the most difficult to use in combo with a texture pattern. Those I prefer to use either in plain stockinette, or in combo with an coordinating or accent color.
Do you like garter stitch based lacy patterns?
To be truthful, I prefer the look of a stockinette ground for solid color lacy work. But garter works well for this particular pattern and with this multicolor yarn. Garter stitch breaks up pooling colors and tames hand-dyed yarns because the garter ridges introduce the color of a later row into a previous one, blurring the boundaries between hues.
EDGING UP
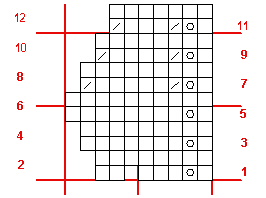
Here’s the final graph and directions for my edging to complement the Paisley Shawl from Interweave Knits, Spring 2005 edition. I haven’t worked out how to do the corners yet, but I suspect I’ll fudge them, working the equivalent of an extra repeat of the chart in each corner. I’ll start several stitches before each corner, working more than one attachment point into one stitch of the shawl body.
Simple Edging for Paisley Shawl
Work Paisley Shawl as directed until after the final row of the paisley lace border, just before the directions for the picot edging begin . You will have 156 stitches per quarter, as described. DO NOT BREAK OFF THE YARN.
The edging will be worked back and forth flat, using a DPN of the same size as your circular needle and the left hand needle tip of that circular. Place a needle stopper or rubber band on the right hand tip of your circular needle to avoid inopportune “stitch leakage” off the bottom of your circ as you work the edging.
Using the DPN, the active yarn strand and the half-hitch cast on, cast on 8 stitches. Avoid leaving a large skip between the circ and the DPN by taking care to make the first stitch immediately adjacent to the last stitch knit normally on your circular needle.
Flip the work over and knit the 8 stitches you just cast on. Flip the work over again and begin following the chart below at Row #1.
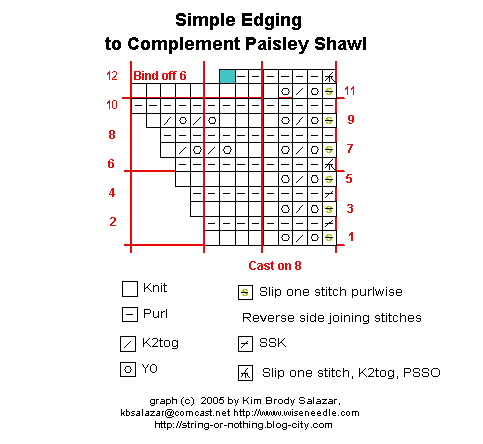
Note that at the end of every wrong-side row you will be working an attachment point. The attachments on Rows 2, 4, 8, and 10 are done as SSKs, with the first stitch of the SSK being the last stitch of the edging, and the second being a single active stitch of the shawl’s body. The attachments on Rows 6 and 12 are done by slipping the last stitch of the edging, knitting two stitches of the shawl body together, and passing the slipped stitch over the K2tog.
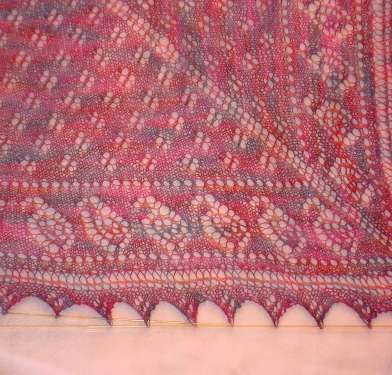
The result:
Each sawtooth has a quad flower on it, and the double row of eyelets at the base of the trim echoes the four double column of eyelets that follow the diagonal lines from the shawl’s center to the four corners. Plus the edging is about half the width of the paisley lace band that’s just inside it, so the proportions work well. This edging also knits up quite quickly. Last night I was able to do most (but not all) of Side #1. Based on yarn consumption, I should have enough to finish. Perhaps even have a little bit left over.
Enjoy!
DESIGNING SIMPLE LACE
It was pretty much guaranteed to happen. I went through the various lace books on my shelf, but didn’t find a pattern that fit my specs for the Paisley Shawl edging. So I’ll resort to drafting out one of my own.
Now I don’t claim to be any more than a rank beginner at this sort of thing, but I think I’ve grokked a couple of the fundamentals. The books that have helped me most in learning lace construction are:
- Lewis, Susanna. Knitting Lace. Taunton Press (Newton, CT), 1992.
- Miller, Sharon. Heirloom Knitting. Shetland Times (Lerwick, UK), 2002.
- Stove, Margaret. Creating Original Hand-Knitted Lace. Lacis Publications, (California), 1995.
To start, I’m contemplating either a saw-tooth or triangle edge piece, of indeterminant width (but probably not too wide, in order to conserve yarn). I want to put the quad-eyelet flower motif on it. I want the repeat to be a multiple of 12 rows.
Let’s start with the eyelet:

Not too tough. Just a couple of YOs and K2togs, spanning six rows – three of which are purled to make the garter stitch ground.
Now let’s look at a simple sawtooth and triangle. Sawtooth edgings are simple because they’re built by adding stitches somewhere on the row, usually at the rate of one every other row. When the edging is deep enough, the stitches at one side are bound off and the total stitch count is returned to the original number. Here’s a minimal 12-row sawtooth, starting with 5 stitches
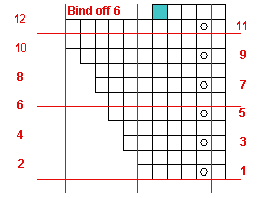
It starts with a cast-on of five stitches (not shown), then adds one stitch per odd numbered row. I stuck these increases in a column and made them eyelet-forming YOs, but they really could occur anywhere on the row, including at the very end and could be M1s or another increase that doesn’t make a hole. So long as each odd numbered row adds one stitch, the thing will widen appropriately. On Row 12 I bind off six stitches, returning the count to the original five cast on, in preparation for the following Row 1. The blue square is the last loop created by the bind-off conga chain, and is blue to remind me that I need to bind off until four live stitches plus the one formed by the bind off itself remain.
I’ve also charted these as all knits, but they could be anything, and anything can be plopped onto the base pattern. That includes the quad-eyelet, or other patterning. The whole thing can also be made wider by working some kind of vertical insertion strip at the right, prior to commencing the stitches of this mini-chart. For example, it’s common to increase the width of an edging by adding a column of faggotting, or a cable or lace insertion there.
Here’s a very 12-row triangle edging. It’s slightly more complicated because all the decreases needed to create the points aren’t lumped together and done on the final row:
Again, the increases and decreases can occur anywhere in the row. To make comparisons easier, I’ve included the column of YOs as a design feature in both this and the sawtooth. But running them the entire length of the repeat means I would be adding a stitch on the "downhill" side, when I need to be taking one away to make the basic shaping. Therefore I’ve put two decreases on Rows 7, 9 and 11. The first one cancels out the addition of the stitch created by the YO (placed near the YOs for reasoning clarity only, in fact they could go anywhere on the row). The second one forms the triangle’s shape.
I could make the triangle steeper by changing the rate of increase, either by doing something interesting on EVERY row instead of every other row. (That’s one of the discriminators that marks the difference between true lace knitting and lacy knitting. Knit lace mavens would say that these simple examples are properly termed lacy knitting, and not lace knitting.) Or I could add additional YOs, or use double YOs. The possibilities are endless.
Here are the sawtooth and the simple triangle, tarted up with the garter stitch main texture and the quad-eyelet. I’ll start by swatching these, then see if I want something more demonstrative and lacier, or plainer. I’ll also judge width. Narrower might be tough without compromising the space I need to show the eyelets, but wider is VERY easy. If I want to make my life easy I can use any texture pattern with a 3 row, 4 row, 6 row or 12 row repeat to stretch my edging wider. I could use patterns with different row counts, too, but that would make tracking where I am in the thing just a bit harder.

WEDNESDAY UPDATE:?
These two pattern charts will NOT make a nice, neat quad eyelet motif. Explorations of why and a correction are posted in tomorrow’s entry.
PAISLEY EDGING
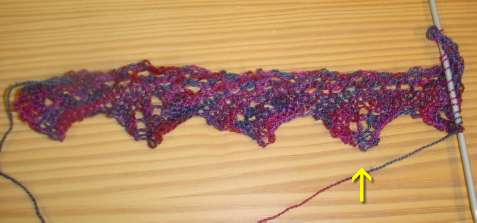
After much noodling, doodling, and swatching, here’s the result. I didn’t bother taking photos of every generation of interim swatches. All that rejection is just too depressing. I’m using the tail end off the outside of my yarn ball to work my experiments. Since I need to be frugal, I’ve been ripping back the rejects as I go.
One important thing to note is the difference in the quad eyelet motif. I thought about it some more as I sat in traffic during yesterday morning’s commute. In the shawl body, that motif is presented in plain old north-south orientation, with the rows running horizontally. The motif spans six rows and begins with a single eyelet on the first. In the edging, the repeat is presented on the bias. The motif wouldn’t show in the same orientation. Plus the extra stitches added to form the repeat skew the stitch count. Therefore working the repeat as shown yesterday would not make a quad-eyelet design comparable to the one in the body. If stitch placement were adjusted, it would make a square of eyelets instead of a diamond. Unadjusted as is, it would make a snaky looking blob of eyelets.
Sure enough, by the time I was finally able to swatch tonight that all became painfully obvious. So I began playing. If you look at the body at a 45-degree angle, the eyelets appear as two stacked groups of two. If I were to work them that way perhaps when the edging was viewed in its natural orientation, the eyelets would resemble the ones in the body.
Again, sure enough it worked exactly that way. Working two right side rows with (YO, K2tog)2x produced the proper appearance. But then I had the problem of where to place that repeating unit. How close could I put it to the right hand YO columns before it lost its integrity? On which two right side rows should the unit be worked?
You guessed it. More swatching. You can see some of my spurious results here, with the last complete dag (marked with the arrow) being the one with the most optimal placement:
And here’s the final graph.

Now to go back to the shawl and begin to work the thing onto the live stitches around the edge. More on that tomorrow, guaranteed!
QUESTIONS AGAIN
More from the inbox.
Stitch marker in the middle of decreases
Stinkyknitter is also working on the Paisley Shawl. She noted thatsome of therepeats in the second chart begin or end with a decrease, and asks how I manage stitch markers that end up in the middle of two stitches that are supposed to be worked together.
I move ’em.
Being a Continental style knitter, I’m loathe to remove my hands from my needles while I’m working. I usually use my "third hand," grabbing the offending stitch marker in my teeth and holding it for the one or two stitches required. One of the reasons I started using broken earring fobs and making fancy stitch markers a gazillion years ago was that the hanging ornaments made them easy to grab this way.
On my Paisley, the only markers that need to be moved are the plain split rings. They’re pretty small – small enough in fact to be slid through stitches if need be, but they’re also wide enough to stay put unless otherwise "encouraged." When I get to a SSK that’s bisected by a stitch marker I use my needle tip to pop it through the leading stitch, then transfer it to the right hand needle, and work the SSK on the appropriate (far) side of the marker. On K2togs, it’s the third hand method.
Yes it can be a pain to stop and shuffle them around. When I graph up repeats for my own use, I often finagle the beginning and end points so that my markers don’t end up splitting the difference in the decreases.
Re-knitting tension
A couple of people wrote to ask about gauge tension in the re-knitted repairs. They asked if the new replacement work looked different from the rest of the piece, or if the stitches at the edges of the new work where it bordered the old were distorted in any way.
To be truthful, a bit of care is needed when you’re re-knitting the ladders after ripping down. There is great temptation to start out each row working rather loosely, then wrestle to eke out the remaining stitches from the remaining length of the ladder strand. I make a conscious effort to avoid this, and try to form all my stitches with the same tension as the original knitting.
A couple of times I’ve had to re-knit a cable, and that cable was centered in the section being re-knit. I tried working the crossing several times, but always ended up not having enough of the ladder strand available to finish the couple stitches that came after it. So I worked that particular row from both ends, picking up the stitches to the left and right of the cable and then sliding them onto the needles that held the "good" knitting on either side of the section undergoing repair. After they were rescued, the only stitches that remained on my fix-it DPN were those of the cable crossing itself. I did those last, absorbing the tightness into the natural tightness of the crossing.
As far as appearance, after my usual post-knitting wash and dry prior to assembly, any unevenness is smoothed out. I’ve never needed to do anything else to a re-knit repair, nor have any of them been recognizable as such after garment completion. (If I had time instead of rushing out the door to work right now, I’d dig up some pieces that were fixed mid-stream and take some pix to prove it.)
Pattern source
A couple of people missed my first post on the Paisley Shawl earlier this week, and wanted to know where they could find the pattern. It’s in the Spring 2005 edition of Interweave Knits – page 96. Not the Summer edition that (most) subscribers received last week, but the one before that.

Writing
Thank you to everyone who sent in kind words about the tech articles at String. To be truthful, this blog is a busman’s holiday for me. In Real Life I’m a proposal writer, mostly working in/with engineering or high-tech firms. Compared to communicating concepts in nuclear engineering or high-end routing, writing about knitting is easier and lots more fun. Plus winging my way through this has reinforced my appreciation for editors. I’m embarrassed to admit the number of spelling, grammar, or punctuation mistakes I fly past without noticing while I’m writing,but find later. To quote a former boss, "Only fools proof their own work."
PAISLEY SHAWL SECOND MOTIF AND RIPPING DOWN
I’m past the center part now on the Paisley Shawl, and have finished the dividing section of K2, YOs. I’m pleased with it so far, although it’s tough to see well wadded up as it is on the circular needle. Still, you can make out some details if you squint at this:
See all those little stitch markers?
I’m a big believer in stitch markers in lace. I don’t use a lifeline, but I do mark my repeats – usually every repeat in a large piece. I find that doing so becomes a built-in proofing system. If the stitch count is off beginning the next repeat, I know something went wacky in either the previous one, or in the repeat one row below. I then have the option of ripping back or ripping down just that one repeat. There are complications of course if a decrease spans the juncture point between repeats, but in general this system has served me well. In this case I’m using three different types of markers. Large silver dinglebobs mark the beginning and midpoint of my rounds (the beginning one is especially elaborate). Small red rings mark the quarter points (my pattern is a square, knit center out, so the beginning, mid and quarter points each define a full side repeat set). Tiny silver color split rings mark each motif repeat. The split rings are crafts store specials, bought in a bag of 200 for less than $1.50.
Ripping Down
I know a lot of people are terrified at the prospect of ripping one repeat down. It’s not as scary as it sounds and can usually be done with success on almost anything. Yes, some stitches are harder to rip back, parse out, and reconstruct than others but it’s always worth a try. The alternative is ripping back entire rows. If deconstructing and re-knitting a section works, that saves the effort of redoing an entire row; and if selective ripping doesn’t work the worst that happens is that you’ll need to rip back that entire row anyway. So you can either luck out and save time, or if luck and skill fail you, you end up no worse than you would have been had the effort not been made.
To rip out a bunch of stitches vertically then re-knit them, it’s good to understand the nature of knit stitches and the way they are seated on the needles. I’ve mentioned stitch mounting and twisted stitches before. Recognizing the difference and seating stitches correctly is very important to this process. For starters, when you pick your stitches up after ripping past the broken part, you want to make sure that the survivors are mounted with the leading leg in front:

I start by identifying a good span surrounding the mistake. I don’t want to split a decrease, so I try to begin and end the segment in an area of plain stockinette or garter stitch. I find the corresponding section on my charted pattern, or if there isn’t one – I chart up the repeat and then identify the suspect bit. Note that if you are doing lace, colorwork or textures, this process is vastly aided by being able to work from charts. You can do it if you have prose directions and are thoroughly familiar with your repeat, but it is much harder to identify the stitches in the section that needs to be redone without a stitch by stitch representation of the work.
Once I have identified my bit to be redone both on the needles and on my chart, I isolate it. I’ll knit to just before it, then slide it onto a DPN of the same size as my working needles. This is one of the few times I use needle tips (or rubber bands). I plug the live needle ends before and after my broken section to prevent the balance of the work’s good stitches from leaking off and complicating the problem. Once I’ve got the section isolated, I ladder it back down past my error. I try to end on a row that’s easy to pick up. For example, rows with lots of increases and decreases or cable crossings can play havoc with stitch mounting, so I try to avoid them. The squeamish might like to thread a mini-lifeline through a row of good stitches below the error to make sure they don’t go down further than necessary, but I just take a deep breath and wing it.
When my suspect rows are unraveled, I end up with a bunch of strands suspended ladder-like between the areas of good knitting. I put the last row of good stitches below this mega-ladder back onto the DPN, taking care to mount them correctly. Then I take a second DPN and following the directions on my chart, and using the bottom-most string of my ladder, I re-knit the first suspect row. It’s usually a bit awkward there on the last couple stitches, but care and patience always defeats the problem. I repeat the process with the second row of the suspect area, using the now bottom-most string of my ladder. Sometimes I start each of these make-up rows at the right, working them all as right side rows. Sometimes I do flip the piece over and work every other row as if it were a wrong side row. It mostly depends on whether or not I’m working the whole project in the round or in the flat.
Once all the suspect rows have been re-knit and no ladder strands remain, I uncap the right hand needle and continue with my normal working strand across my "mainstream" row, working across the now rescued stitches. Once those are done, I uncap my left hand needle and continue merrily along my way as if no mistake had dared to intrude itself.
Give this a try the next time you look back several rows and spot a cable crossed katywumpus, or some purls that should have been knit. And if you’re timid, try doing it to a swatch on which you’ve made a deliberate mistake.
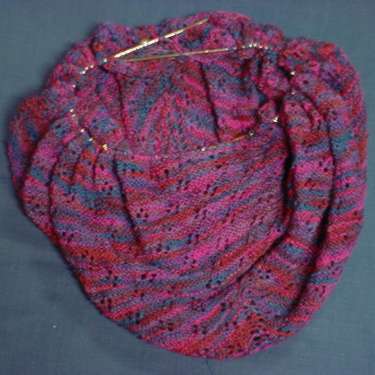
PAISLEY SHAWL PROGRESS
As promised, here’s a picture. I’m working it on one too-small in diameter US #5 circular needle. The fine yarn and airiness of the relatively large stitches make it easy to cram all the stitches onto the needles – hence the odd looking snood-like object below:

Not having my needle cache at my disposal, I started this piece with two #5 circs borrowed from my mother. I used them in the same manner as working socks on two circs until the piece got large enough, then transferred it to one circ. I’ll probably go back and use two (or possibly four) circs later in production as it grows even bigger.
In the mean time, you can see the center of the piece, the four radiating lines of YO, K1, YO, plus some of the flower-shaped eyelet sets. You can also see the play of color in my berry-hued hand-dyed better than in the jumble produced by the same yarn used for the Birds Eye pattern:

This piece is going much quicker than Birds Eye. For starters, as a true lace texture design there’s something happening on every row of that pattern. The Paisley is lacy knitting rather than lace knitting, in that every other row is worked without increases or decreases. In this case, they are done in purl to yield the garter stitch texture.
So far the Paisley has been quite easy to follow. The flower eyelet area is a repeat with only four simple rows to memorize (the other four being purls). The large size #5 needles make the work grow especially quickly. So far I’ve found no problems with the pattern, although I admit I started it slightly differently than described. Instead of the crochet cast-on in the directions, I used an I-cord beginning (one row of four-stitch I-cord, one row of K1, YO, one row of all knits, then plunge into the pattern from the point where it begins with 8 stitches total). I did this because my mom didn’t have any crochet hooks of suitable size. I am finding that Paisley is also more economical in terms of yarn consumption than was Birds Eye. At the progress points shown in the photos, both shawls have consumed roughly the same amount of yarn. The Paisley is a square approximatley 26 inches across (without stretching or blocking); the Birds Eye was a triangle measuring about 12 inches from the bottom point to the needles. I didn’t measure how wide it was though.
Because it’s been such easy sailing so far (even with my variant cast-on), I’d recommend this pattern to people who are looking for a center-out lace shawl pattern – even for a first lacy project, provided they feel comfortable knitting from charts. Also because it’s going so quickly, I’ll probably finish this piece off before returning to Rogue.
