BAGGED UP AND READY TO GO!
A finish! The mini-bag kit I savaged and repurposed to feature my own choice of stitching is now complete, and can be sent to the recipient.


To recap, in order to have better access for my hoop I unpicked the side seams of the evenweave decorative layer, and of the heavy cotton twill lining. The evenweave had no seam at the bottom. The twill lining was left with the bottom unseamed. Earlier in the process the bag could be splayed out flat, with only the bit of seaming at the top surviving – where the lining and evenweave were sewn together with the red handles. Here you see it draped out and in the hoop.
When I finished both sides, I sewed it back together by hand – my sewing room and machine being off limits due to the big basement rehab project. First I sewed the lining using back stitch. Then I attempted a fancy decorative openwork seam in black to reunite the two sides of the evenweave.
It didn’t work.
It looked rather Frankenstein-like. Of the stuff of nightmares. So I covered up the buttonhole stitch based seam with three rows of reverse chain, done with a whole 6-ply strand of my linen floss. The first row of reverse chain went down the openwork bit at the center of my former decorative seam, and the other two courses went left and right of that, hiding the bits that encroached into the body of the bag. Which is why there’s now a thick black stripe along both sides of the thing. Not an optimal solution but the best I could do right now.
And on to the next project.
This one I have to admit I am posting as a tease. I used time over the past pandemic year to design a free stitch-along. It’s a rather large and complex stitch-along, with a distinctly nerd-world/fandom theme. It will be released on The Enablers Facebook group, and also here on String, on a two-week delay, starting sometime in August. I will be creating a new page here on String to host it. Beta-test stitchers from that group have been working on their pieces to proof the design and confirm the directions, and their efforts have been much appreciated. The thing will NOT be a mystery stitch-along (folk should know what they’re in for before they commit), but it will be released one panel at a time, with periods between releases pegged to the complexity of the individual panels.
However, until now I haven’t started my own rendition. I won’t spoil the surprise, but as I warned – I will tease here.

Obviously not a historical redaction (for a change), and that’s going to be part of the fun.
PENDING
Some movement here at String Central, but not as much as I would have liked.
First, on the Great Basement Rehab, we are in hiatus. This being an old house, of course they found asbestos. Which we expected. Not friable, immediately dangerous asbestos, but materials that would be of hazard to the crew doing demolition. Most notably, in the adhesive that sticks down the floor tiles in the old sewing/craft room, and in some intact cladding around various pipes. Some of those pipes may be moved, and others will be less bulky to encapsulate if the cladding were absent. So it all goes. Unfortunately due to demand, the earliest the asbestos remediation team can deal with us will be the last week of May, so for the past week or so until then, nothing will be accomplished.
Except cleaning. The demo team was able to do quite a bit of wall removal down there. Some of the walls were old lath and plaster, which make a TON of dust. In spite of taping over the door to the basement with a plastic airlock, a ton got upstairs, all the way in fact to the second floor. It infiltrated through various holes in the floor around the pipe penetrations of the hot water radiator heating system, in between floorboard expansion voids, through the seams between mop boards (baseboards) and floors, and through the required vent to bring extra air to the kitchen (a code mandate for the gas stove/high capacity exhaust vent in the kitchen).
It took four moppings to remove that stuff from the bare wood and tile floors, and many vacuumings to see the original color of the rugs again. I’m still cleaning/washing every other surface and soft item – behind furniture, inside the kitchen drawers and cabinets, linens in the linen closet, behind books. Even the formerly clean socks in my sock drawer will benefit from a no-heat air tumble in the dryer. Right now I am concentrating on high traffic/high touch and food-prep areas. When construction resumes there will be more dust, so there is no point in going nuclear on what’s there now only to do it again in June/July.
To illustrate the dust that accumulated in just two hours, I moved this cork trivet from the place I had put it earlier that morning.

Yes, that’s a collection of little plastic bulls from Sangre de Toro Rioja wine bottles. An everyday plonk enjoyed here as a sentimental favorite, often enough over the years to have accumulated a herd.
On the stitching front, I’m well into the second side of the small tote bag project.

Here it is mounted on my sit-upon hoop. You can see that the bottom of the bag is just a fabric fold – no square box bottom. When I picked out the side seams of the evenweave there was no join at the bottom. However the lining will need a bottom seam. Prior to my surgery, the side seams of the lining only extended halfway down, and its bottom was unsewn – in a futile attempt to make stitching on the evenweave outside easier.
The design is yet another one from T2CM, but this one is original, loosely based on historical aesthetic, but with no point source or specific inspiration that’s been adapted. It’s a slightly eccentric framing interlace (the bits framing the tumbling lilies are just a bit taller than they are wide), I’ve worked it before, also with stairstep voiding, but done monochrome, with a different directional treatment, and without the concentric rings in the inner circles:
Note that last time I also used single ply for the fill and two plies for the interlace, but in the older bit the flowers were also done in one ply.
I’m about a third finished with this side. The rest is just “wash/rinse/repeat.” The next challenge on this piece will be the re-seaming. I will finish the lining on the sewing machine, but I intend on working some kind of decorative seam treatment on the evenweave outside layer. What it will be is as yet undecided.
EXPERIMENTS AND ADAPTATIONS
As an in-between, quick project, I’m working on the small tote bag – the piece on the bag body I salvaged from an old DMC cross stitch kit. I’m using yet another design from T2CM, but I’m playing with it a bit.

First, there is thread choice. Note how the black is thicker than the red, more matte, and a bit rustic-slubby. It doesn’t make factory-precise lines. It’s not cotton floss. It’s two strands of linen from a line of DMC six strand linen embroidery floss, discontinued about 7 or 8 years ago. My local independent crafts store had a small quantity left, and I bought it all out in 2016 or so. I don’t have very much of it, not enough for a large piece, for sure, and being discontinued, there is no more to be had.
Experimenting with it I have found that it needs to be used in much shorter lengths than cotton, needs a relatively thick needle compared to the ones I would use with cotton or silk on the same count ground, and performs best when very heavily waxed. That’s because the linen is surprisingly friable, and abrades heavily from the action of stitching. This is not stuff to be “sewed” – it has to be stabbed up and down. It is also stiffer than cotton or silk with a notable bend radius, and special care in tensioning stitches is needed to keep angles from distorting the weave.
The single-ply red by contrast is thinner, silkier, and easier to stitch. It’s plain old DMC six strand cotton floss, color 815 – the closest match I had to the color of the bag’s “built-in” cotton twill handles. Note though that there is minor thickness variation in the single red strand, but I bet you would not have seen it had I not pointed it out.
On to the design.
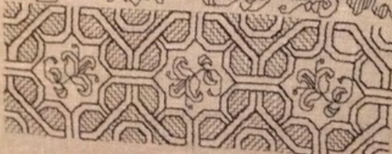
This particular zig-zag flower stripe is in my ever-forthcoming The Second Carolingian Modelbook. It’s adapted from the Museum of Fine Arts Boston holding, accession 99.178. It’s one of my favorites because the original artifact has a VERY evident mistake on it. Well, evident to me at least. Can you spot it?
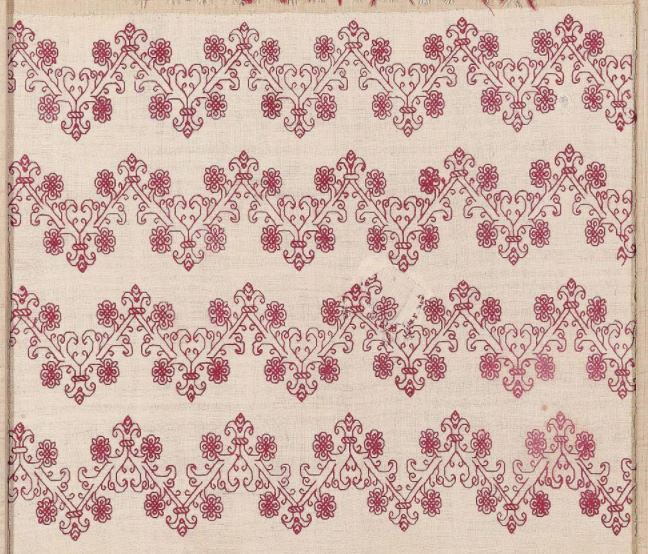
Good eyes if you have! The repeat is not quite symmetrical up and down. Look at the valleys – the V bits below the paired flowers. There are two different treatments for the foliate curls there. A “fat end ” one that curls back towards the zig-zag stem, and a “skinny end” one that curls back towards the center. The first three strips all are in the same orientation, with the “skinny end” curl on top. But that bottom one is upside down in comparison to the other three – in it the “fat end” curl is on top. It drove me nuts when I was trying to work out the pattern. Someday I want to use this ones on the sleeves and bodice of an 16th century Italian camica. I think It would be perfect for that….
Now on to my adaptation of the design for use on this specific piece.
I have moved the zig-zag stripes much closer together than the original because of the size of this very small carry bag. I’ve changed the direction of the striped “collar” around the terminal buds on the lower strip, just for fun. And I’ve introduced the step-fill between my strips. The heaviness of the double strand, rather rustic and slubby linen mates up well with the feel of the original; and the contrast between the step fill (mirrored along the center line for each up-down repeat) done in the smoother, more delicate thread adds interest.
Now. Is this a historically accurate use of the design? If I was to be totally textbook, have to say no, even after discounting its use on a contemporary tote-bag, worked in modern materials.
Yes, the flower zig-zag has a clear source. Yes, designs with voided grounds were worked at the time. Yes, designs with outlines in one color and the ground covered in another are not unknown. And Jack Robinson (the UK’s late and lamented blackwork master artisan) in his book noted the use of varying thread thicknesses on a single project.
However, I have not yet seen an artifact with a stepwise fill as a voided ground (square mesh yes; diagonal mesh, yes; diagonal zig-zags, yes). I have not yet seen a voided artifact with a ground that’s mirrored. And I have not yet seen an artifact with an all-over repeat of this type, worked with a voided background.
Do I care? Not particularly. I have no intention of entering this before any juried panel. It’s a doodle, for the sheer fun of playing around with the design. And it will eventually be a gift for someone special.
AT LONG LAST, LONG GREEN IS DONE
Not quite a record for the interval between commencement and completion, but close – but after years of languishing, my long green sampler is complete, signed and dated.
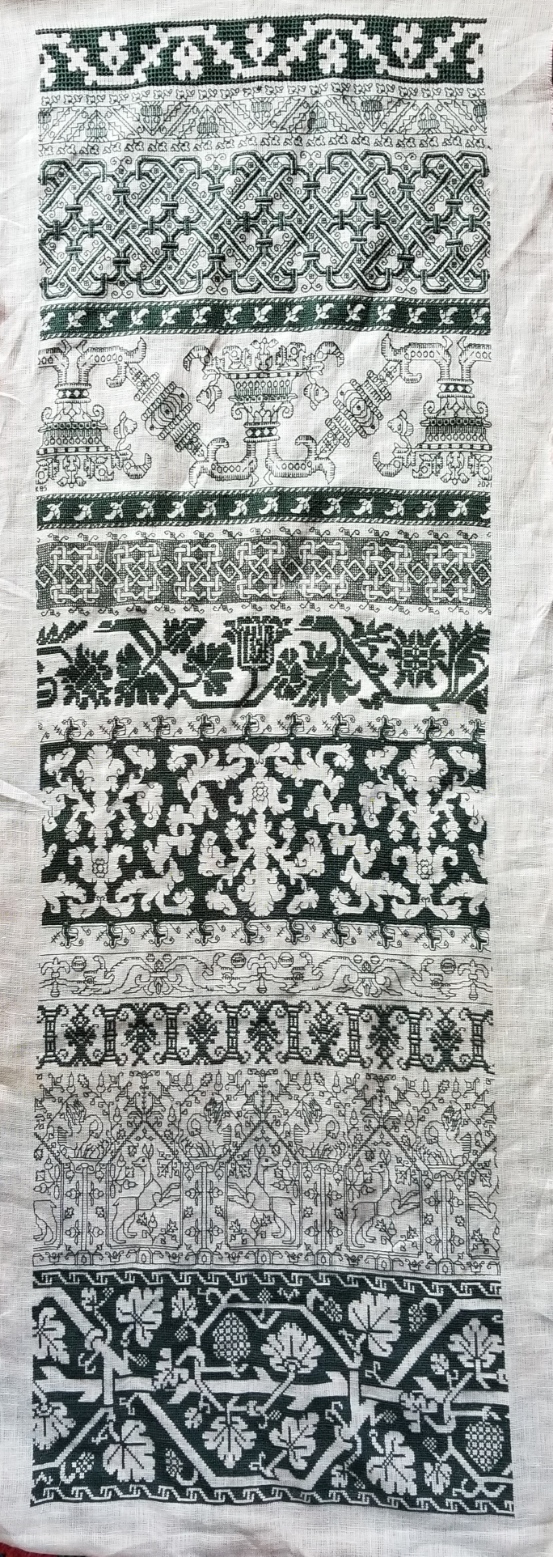
I used Au Ver a Soie’s Soie Alger silk thread, 40×42 count linen (you can see the slight distortion), and began it on 11 Feb 2012. I employed several stitching techniques including double running stitch, long armed cross stitch, plain old cross stitch, Montenegrin Stitch, and Italian four-sided cross stitch (pulled very tightly to achieve a meshy effect, and worked at two scales) . All of the designs here except the top one will be appearing in my ever forthcoming The Second Carolingian Modelbook. The top panel is from The New Carolingian Modelbook.
Long Green will languish again for a bit before I finish it off for display. Given that there is only about an inch of fabric at the bottom, due to the unfortunate destruction that happened over the years the thing sat waiting for me to resume stitching, I do not have enough fabric to frame it on a stretcher. And I really don’t want to frame it with a mat. With a stitched area of 10.5 x 34 inches (26.7 x 86.4 cm) that would be a very awkward and expensive piece. With the sewing machine out for the duration until our basement remodel is complete, I’m shelving this and moving on.
So. What to do next?
A couple of weeks ago I ran into a small DMC tote bag kit on our town’s freecycle/reuse/give-away exchange. I snatched it up. Although I didn’t want to stitch the rather boring roses intended, the kit with its big-as-logs 32 threads-per-inch evenweave was perfect for other counted work.

The bag itself was 90% assembled, and fully lined. There was an unfinished area at the bottom of the lining to allow access to the inside of the bag, to make working easier. But it was insufficient. I tried, but was unable to either hoop or work in hand as the kit stood. So I separated all of the side seams and laid the whole bag out flat:

I basted guide lines at the longitudinal center of the bag, and a half inch all the way around the edges. The total stitching area is two sides, each about 8.75 x 10 inches (21.6 x 25.4 cm). I am unsure if I will work just one design on this, front and back; or if I will do something different on each side. But the intent is to stitch, then use a decorative seam stitch on the visible parts, and a less fancy treatment on the heavier white twill lining, which won’t be very visible after the whole bag is put back to rights.
This being a rather small project, it doesn’t fit nicely in my sit-upon hoop, so I am working it in my hand held 6 inch (15.24 cm) hoop. Slow going compared to the two-handed approach I prefer, but even so this should be done quickly.

Here’s what I have so far. Two strands of standard DMC 310 black. I wanted the outlines heavy and prominent because I am considering working an open voided ground in a second color behind. At least for this all-over. And yes, it’s yet another T2CM pattern.
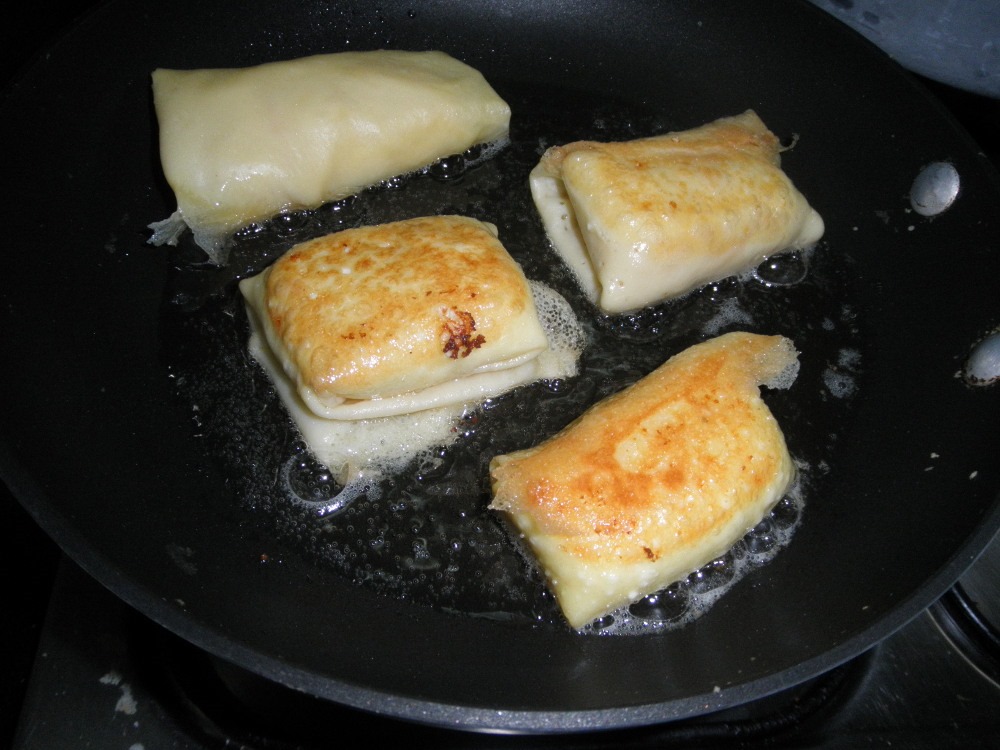
And finally it being eating season, both with first-run and leftover bounty, to celebrate the end of the Passover season, I transformed our leftover pot roast into a rather curious family specialty. Meat blintzes. It’s the standard blintz crepe outside, but with a mix of finely chopped leftover cooked pot roast, any remaining potatoes and carrots or onions that cooked with the roast, a handful of cooked rice, and just enough leftover gravy to keep the filling moist inside. I know of no one else who had this way of eking out an extra dinner in this manner. I suspect my grandmother or one of her sisters faced with hungry kids and a quarter pound of meat, made virtue of necessity, and passed their discovery down to me. There’s no real recipe here – it’s just doing the best with whatever leftover meat and sides are available.

So now I have about 3 dozen in the freezer, to be defrosted and pan-sauteed to finish prior to serving. Obviously these are not intended to be accompanied by sour cream. Instead, as a quick to fix/light dinner course they are usually preceded by a big bowl of chicken soup (also pre-made and stowed away against need), and are accompanied by a vegetable side dish.
If you are looking for the recipe for the blintz skins/crepes and a more traditional mixed cheese filling, it’s here. Just to be evil and make you extra hungry, I leave you with what they look like during the final sautee: