DON'T PANIC – AGAIN
A while back I stitched up this piece, both as a tribute to Hitchhiker’s Guide, and as a bit of inspiration for my office. I’m a proposal specialist – managing short deadlines and general panic are my stock in trade.
When I posted this on Facebook last Friday, I got several requests for the chart. So, tweaking memory dormant since 2009, I drafted one up.
I make this chart freely available for YOUR OWN PERSONAL, NON-COMMERCIAL USE. Consider it as “good-deed-ware.” It’s tough out there right now. Pay this gift forward by helping out someone else in need; phoning or getting in touch with a family member, friend or neighbor who could use a cheerful contact; volunteering time or effort; or if you can afford it – donating to one of the many local relief charities or food banks that are helping those displaced from work right now.
CLICK HERE TO DOWNLOAD THE DON’T PANIC CHARTS AND INSTRUCTIONS – THEN SAVE THE PDF THAT POPS UP
Eventually I will add this to the Embroidery Patterns page tabbed above. But for the time being – be safe, stay well, and care for those whom you love.

FULL THROATED PANIC
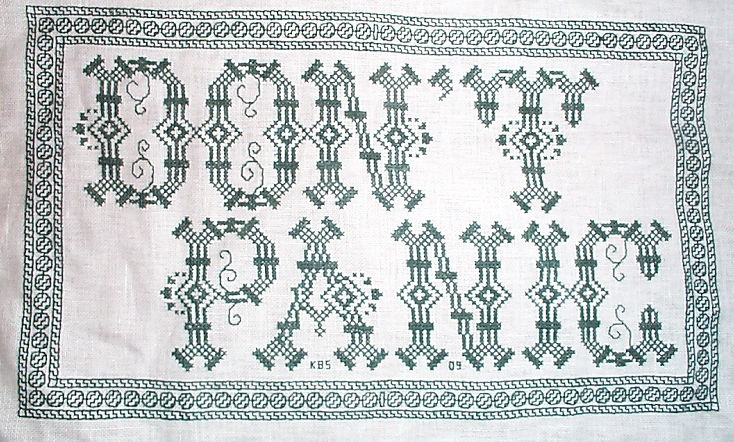
All the stitching on Don’t Panic is done! It now goes into the “finish me later” pile. This one will be framed, with a mitered fabric border all the way around. Not sure what color for the edging yet, but I’ll go for complementing rather than matching the deep green thread:
To answer a question, it’s about 8 inches across from border to border.
But I’m still not stitched out. The next one is the Clarke’s Third Law sampler. This one will be a large filled cloth, covered with various patterns in my usual haphazard style, probably a bit less symmetrical than the Do Right piece. I’m thinking that the saying will meander among the patterns rather than being rigidly confined to horizontal rows. It’s on a finer count linen than Panic, stitched with two strands of standard DMC floss. I present the very larval beginning:

It’s yet another strip pattern from TNCM, this one of grapes (Hi, Katheryn!). No, beyond folding the cloth in half to determine a rough center, I have not established a size, alignment lines, border areas, or done any other planning whatsoever. (Purists who baste in their center grids and edges are shuddering in horror right now.) I haven’t even decided whether the final piece will be displayed in portrait or landscape orientation. It will be an adventure.
In other news, in spite of another spate of horror deadlines looming from now to mid January, splatting directly on what was to have been a week off from work, I have started holiday cookie prep. Long time readers here know I aim for 10 types each December, to satisfy the family’s desire for lots of variety and to have plenty to give to family, friends, and co-workers.
This year’s line-up includes the traditional faves, plus a couple of new items. The standards making their annual appearance are chocolate chips, pecan sandies, peanut butter, Buffalo rum balls (so called because my ancient recipe copy is noted as being from the Buffalo Evening News, sometime in the 1960s), earthquakes (very similar to these chocolate crinkles), sugar cookie cut-outs (standard Joy of Cooking recipe, this year with new snowflake cutters), and oysters. Linzer cookies are making an encore appearance, too. The new ones are rolled gingersnaps (using an odd European cookie roller) and date nut rolls (from Tatte Bakery in Brookline, as published in the Boston Globe). Also back by popular demand is the panforte I’ve made before. Oh. And fudge to use up leftover chocolate and nuts. I can hear Elder Daughter hyperventilating over this, all the way from her dorm…
This weekend we baked the two items that improve with age – the rum balls that need to cure to lose that raw rum edge, and the panforte because we’re soaking it in Calvados this year. The others will follow, with the longer keepers like peanut butter being done first, and the tender ones that go stale quickly last (Linzers and the date nut roll). I try to have all baked by the weekend before the holiday. Deadlines willing.
And not to forget this week’s holiday:

Happy Latkes to everyone!
STILL NOT IN A PANIC
How did that challenge at the center of the horizontal bead strip play out? The little red arrow shows:

I ended up two units off repeat, which allowed me only enough room to make a narrow vertical bar. Had the area been wider, I might have done something else. But it worked out just fine as it is. The pattern for the bead border is here in yesterday’s post.
I’ll be done with this one before the weekend is over, provided no crises intrude. Then it’s on to the Clarke’s Third Law sampler. Even with request and gift knitting piling up, I still don’t have stitching out of my system.
PANIC BUTTONS
UPDATE: THE BORDER DESIGN BELOW HAS BEEN ADDED TO THE PDF COLLECTION AT THE EMBROIDERY PATTERNS LINK, ABOVE.
Well, I’ve decided to do a border around Don’t Panic. Again it’s one from TNCM, or rather, two that are presented together in the book. The first one is a very narrow geometric strip, the second is a bead (I think it looks like a march of panic buttons). The pattern is one of my originals, heavily inspired by historical sources, but not a literal transcription of any one design. The book doesn’t present a corner, but in this pattern one is very easy to improvise.

As an early holiday present, I share it and the corner elaboration here:

The astute will note that the repeats of the strip edging and the bead unit are different, and that a span of this pattern will not necessarily work out even, with all four corners identical. Because the step strip edging is so narrow this isn’t a problem. It looks fine ending it at the squared off corner with either the little L unit shown above, or truncating it one step earlier so that there is a little square next to the larger corner block (shown on the photo above, in the upper left corner). The key is to make both ends that terminate at the corner block the same so that each corner displays logical consistency. The four actual corners of the work are so far apart that any minor difference in the strip among them won’t be noticed.
It is however important to keep the bead units as near complete as possible. My north-south border strip works out to be an exact multiple of my repeat. You can see the happy march of whole bead units on the right. But what about the longer east-west panels?
I suppose I could be **perfect** and count them out, or plot the whole thing on graph paper first. But I’m a leap-off-the-pier problem solver. My solution is to work an even number of beads on each side, starting at the east and west corners. When the two sets met in the center if the count is off, I’ll either work a centered elongated bead, or I’ll figure out some other bit of complimenting ornament to fill the center space. I might for example choose the centers to sign and date the work.
The narrow strip then presents its own problems. I’ve established the repeat sequence on the right hand side. If I were to start it again from the left, I might run into a similar conundrum in its center. Instead, once I handle the bead problem I’ll continue working the narrow step strip from left to right, letting it end wherever it chooses to at my upper right hand corner. I might have to pick out the little bit of vertical strip already worked at the inner left so I can make it match the horizontal where both strips abut the box corner, but that’s life.
NOT QUITE PANIC
It’s been a month that was here at String, with near total immersion in work-related deadlines. Therefore progress on anything else has been minimal. But minimal doesn’t mean “none.” I’m on my last letter of Don’t Panic:

I’m not sure yet how I’ll finish out the piece. Whether I’ll add some spindly double running stitch curlicues to square out the sentiment, to coordinate with the ones built into the closed letters of this font, or if I’ll do something else. But whatever it is, this small doodle is almost done.
The remainder of my holiday weekend will be spent cooking our spin on the usual holiday fare (turkey with chestnut/prosciutto/leek/mushroom stuffing; Chinese broccoli with garlic, glazed sweet potatoes; pumpkin chiffon pie; black bottom pecan pie); enjoying the company of Elder Daughter, home from college and flush with her new semi-independence; finishing off both samplers for hanging; and not being at work.
Things I am thankful for: good children, a husband who likes to cook, that deadlines do end. All the best to the few who follow here, may your holiday season be warm and happy.
DON’T PANIC
Thanks for all the comments and suggestions on my last post! I’ve decided to do two pieces: my original thought of “Any sufficiently advanced technology is indistinguishable from magic,” and another smaller bit of stitching on Kate’s suggestion of “Don’t Panic.” There being only limited time of late due to all consuming work related deadlines, I started on the smaller piece first but I haven’t gotten very far:

I’m using an alphabet I found here on Ramzi’s Patternmaker Charts blog. (Thank you, Patternmaker Charts community!) It’s from an antique Sajou booklet. I’m not sure of the original date of publication, but by the look of the thing, it’s most probably pre-1900.
I picked this particular alphabet out of the dozens on the Patternmaker Charts site because the little diamond lozenges in the verticals of each letter have a nervous, throbbing look, perfect for this piece. The “Panic” part will be on the next line, offset by a half or one and a half letters from the row above, just to maintain that feeling of instability. I’m not sure what else will go on this cloth besides my “Don’t Panic.” I started my stitching in the upper left of the cloth rather than in the center. I will either keep the piece very small, with any fill-in patterns in line with the words, or I will add some smaller patterns to complete a rectangle, with the motto occupying the upper left third of the piece. Like usual, I’ll decide on the fly.
On the Do Right sampler, to answer Charlotte, I can give two answers on why the top line is so narrow. The face saving one is that my plans to finish this out include adding either hanging tabs or a hanging channel of a coordinating color fabric across the top of the entire piece, and the width of that hanging channel will finish out the visual balance of the work as a whole.
The real reason is that when I started I had no idea what was going to happen. I should have worked the first bit I did across the entire top of the cloth. I made my mistake when I finished out the right hand voided panel, taking it to the top instead of ending it in time to go back and complete the ribbon band east-west. Once I had the voided panel in place, and the sampler as a whole was taking on a distinctly balanced though not entirely symmetrical cant, I had to finish the many-motif scrollwork on the left hand side to the same length. And once that was done, I had a bottom-heavy piece with inadequate room at the top of the cloth to work a border wide enough to balance the one at the bottom. I considered a narrow but denser, darker band, but that would have looked out of place. So I opted for something narrow and simple, with a lot of movement back and forth, figuring that I’d make up the missing width in mounting.
Yes, I could have avoided this by carefully drafting out what I was going to do before hand, then stitching up the completed design to specifications. But what’s the fun in that? I know myself and the way I work. Execution of the stitching is fun, but solving problems on the fly is the real joy. Figuring out all of the sticky bits first would leave me with a huge pile of half-finished pieces, many more than I have today. So instead I leap off my needlework cliffs, at risk of dashing to pieces on the rocks below, but enjoying every minute of each flight.
