MUSEUM DISPLAY OF CROSS STITCH WITH ART
This week past we were in the Buffalo, New York area, visiting family and friends. We had a splendid time, and one of the things we did was pop over to the newly expanded and refurbished Albright Knox Gallery of Art, in the Delaware Park section of Buffalo. The museum itself is a little jewel box of contemporary art, with a surprisingly comprehensive sampling of works by most of the 20th century’s biggest names. Now it has the room to better display its collection, and additional space to stage specialty exhibits.
Right now they are offering After the Sun – Forecasts from the North – a collection of works by contemporary artists from the greater Scandinavian/Nordic/Icelandic sphere, as they contemplate the effects of climate change on the northern/Polar bordering landscapes and society. The works were done in many media, everything from traditional oil paint on canvas and carved wood/stone or cast sculpture, to stretched scraped membranes, and even a presentation of scented oil. And to my surprise it included a suite of cross stitched pieces. While it’s not uncommon for embroidery to be displayed in a museum, it is more usual for it to be seen by itself, and not as common for it to be displayed alongside other pieces outside of a historical context (like a “life in the 1500s” type exhibit). This was a general arts collection, with the stitched pieces being given the same respect of place as those done in more represented media.
The items below were composed and stitched by artist Vidha Saumya, a resident of Helsinki, with roots in India. Her exhibit’s blurb is below. I wasn’t able to get detailed shots of all of the pieces, but they are shown after the blurb.

Pieces 1-4

A close-up of #4 – Still the Day May Live. I apologize for the skewed perspective. These were hung both above and below eye level, making it difficult to grab a photo.

Pieces 5-7

And Pieces 8-11

Again I apologize for the poor photos.
I don’t pretend to be an art critic (especially not of non-representational art) but I was moved by these. They seemed both immediate and unspecific in time – like dream images barely remembered upon waking, inhabited by an overlay of dread and nostalgia, with flecks of wishful joy.
I want to express appreciation for the curators of this collection, and I wish Ms. Saumya every success. I was very happy to see the medium both given respect, and being used to such good effect.
STITCHING ON THE GO
I’m moving right along on the Don’t Be sampler. The cross stitched letters zoomed by. And over the past three days I’ve gotten a good start on the border, as well. Whole piece photo so you can see the overage I’m leaving to facilitate both stitching and final framing, plus the quick hem job.
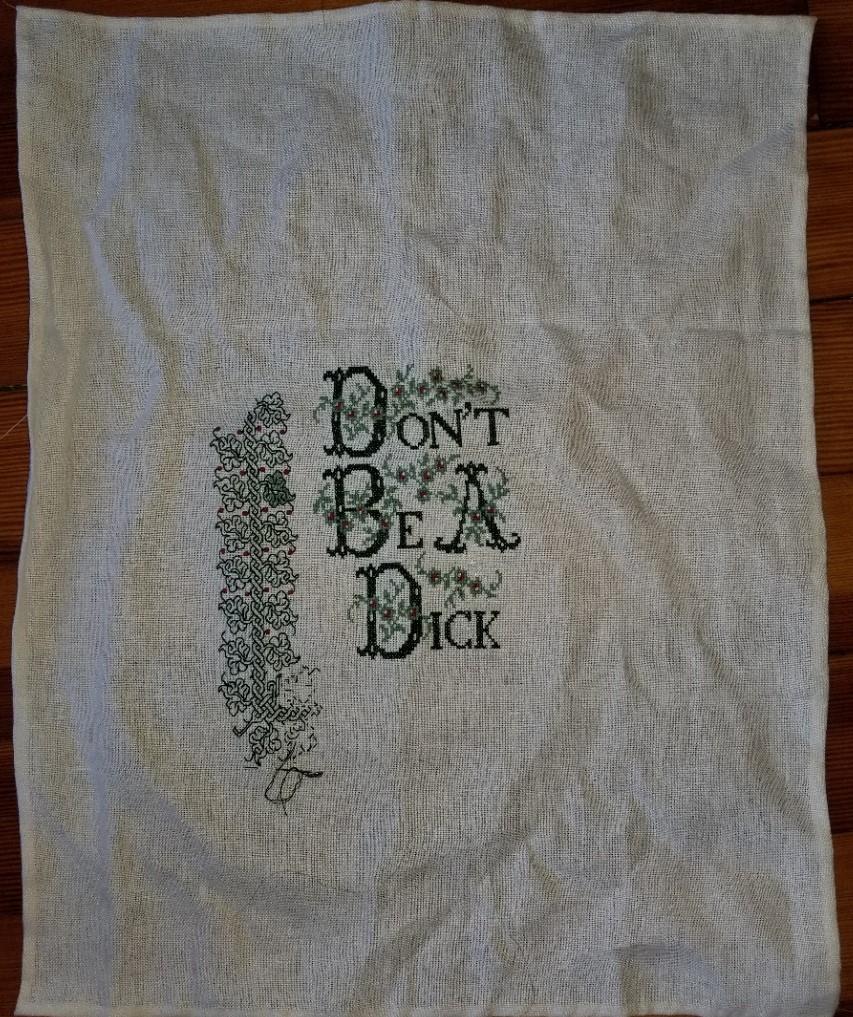
Note that my observation on the skew weave was correct. Those first couple of leaves on the return under the letters are differently proportioned than the leaves in the edge’s vertical part to the left of the motto. That will become more evident as I march along. I don’t remember exactly where I got this piece of pre-packaged ground, or how long it has sat in stash – possibly purchased, possibly as part of a supply salvage gift from a friend who passed it on to me, but certainly not recently. As it is, I will not use anything from defunct company “MCG Textiles” again. Ground sold as evenweave should be exactly that (ok, plus or minus a smidge I will forgive), but a 16% difference between the number of threads in warp and weft is flat out misrepresentation.
The corner is incomplete. I forgot to pack the correct shade of my garnet floss, so the little berries/grapes in the corner will be done later tonight. On the one green leaf, I’m still deciding whether or not to fill in all or some of the leaves. I used plain old cross stitch with one strand of DMC floss for that, flat out skipping partials, and only working full cross stitch X-units. It’s passable. It’s also tedious. When I am done with the double running I’ll make the grand decision. Every leaf, alternating leaves, or none at all.
Now. Where was I that I was working “on the go”?
We ran away to our place on Cape Cod for a last weekend before the renters descend. We went with some long time friends, so it was doubly fun. And I brought this project with me. Folk have asked before how I pack and bring projects, so here’s a thumbnail. Note that I didn’t do it perfectly this time – after all, I ran out of garnet. 🙂
First, the container. The plastic zip bag below (shown both sides) is something I saved the last time we bought a full set of queen size sheets for our bed. It’s rectangular, with an interior pocket, and a zip all the way around one end. It’s also a very tough plastic.
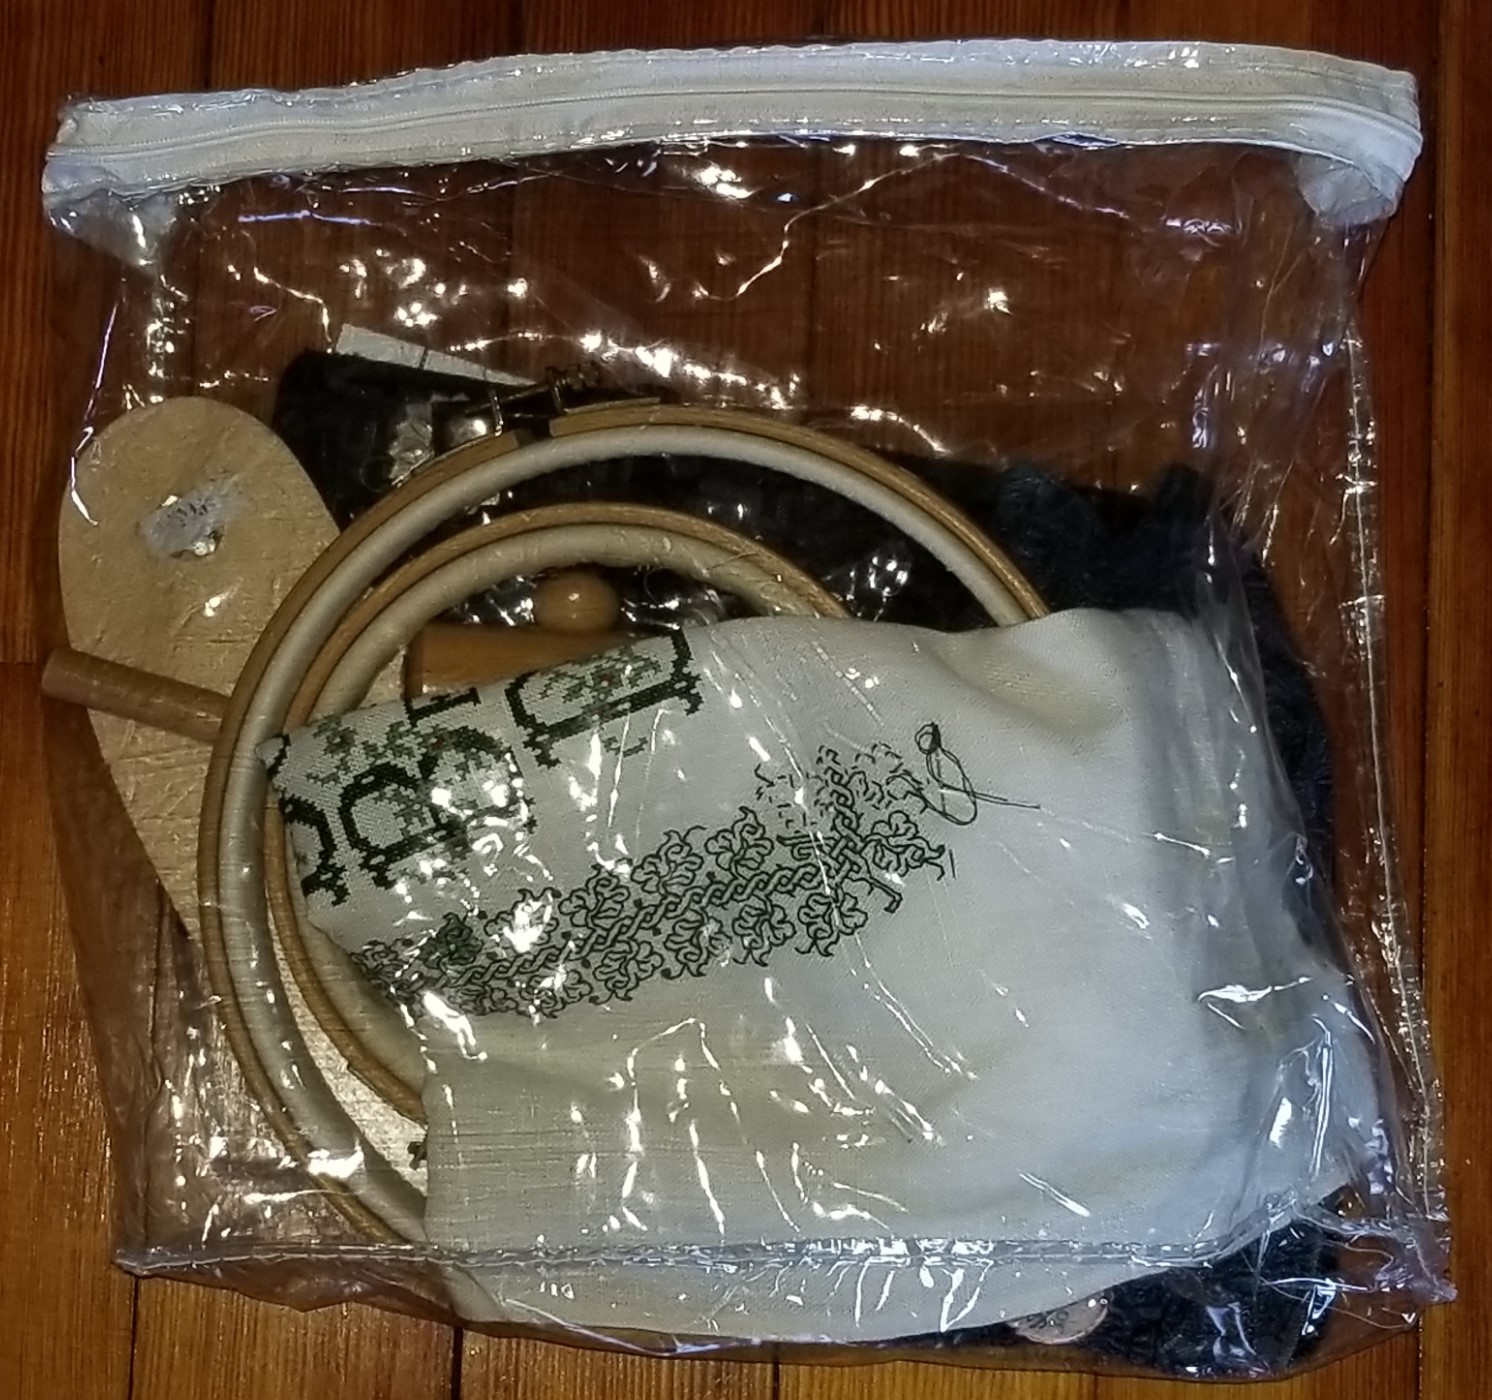

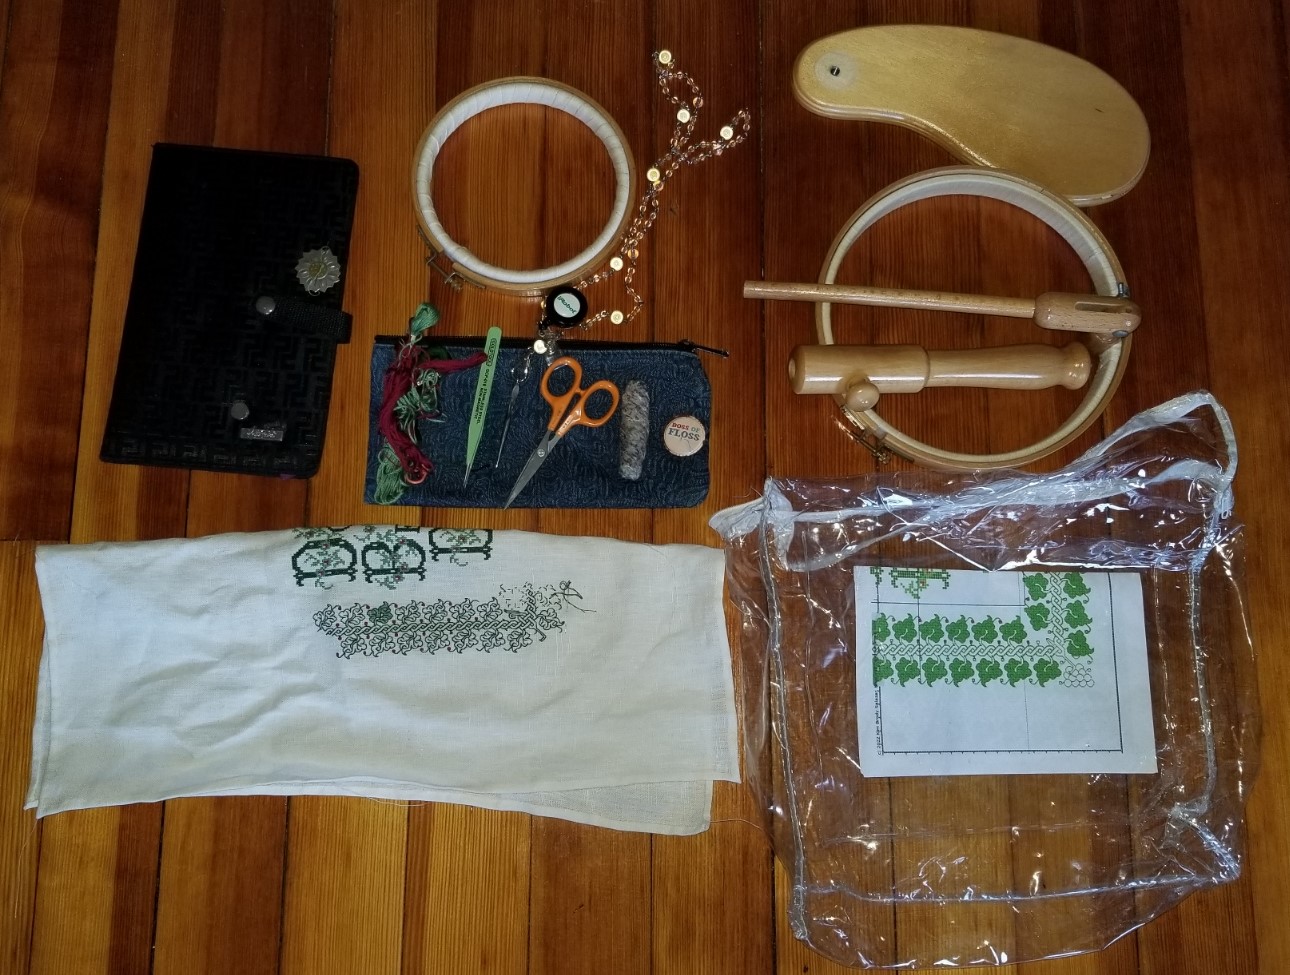
Here you see the main components of my travel kit – the three pieces that make up my sit-upon frame, the project itself, a zip pouch containing essentials (threads, beeswax; my third-best pair of scissors on a retractable spool and a laying tool, both attached to a beaded badge holder; my needle nose electrical assembly tweezers); a little magnetic stand/folder (with magnetic needle minder attached); and a spare in-hand hoop.
Note that the stand itself is an easy assemble/dissemble, and fits in the pouch with the project. I bring the spare hoop because it’s not always comfortable or possible to use the sit-upon, and because the sit-upon features a fixed hoop-on-stick, it’s cumbersome to use without full assembly.
When I stitch on the beach I leave the magnetic stand folded in the interior pocket of the see-through plastic pouch, with the pattern page on top. If necessary I have a place-keeping magnetic strip that can grip the board through both the plastic and the paper pattern. That way I can keep my pattern safe from dampness and wind on the beach. The supplies/tools zip stays safe in the transparent plastic bag, too, although I do either wear the beaded “chatelaine” around my neck, or clip the retractable badge holder that minds my scissors to my beach chair.

ANOTHER OPENING…
I offered to make one of my nieces a pair of socks or an embroidered bit – noting that I would be happy to stitch up any saying, no matter how profane it might be. She was amused and intrigued by the thought of naughty embroidery, padded off to think, and eventually returned with a request that I’d term more cheeky than offensive. True to my word, I’ve plunged in. The pearl-clutchers who sent me private notes decrying my lack of taste for the Covid sampler and removing themselves from following this website are no longer here, so at this point there should be few left to object.
First a method description because folk have asked how I go about starting a new piece.
I selected a piece of ground from my stash – a piece of 32 thread per inch evenweave with the branding “MCG Textiles.” Well, it claims to be 32 tpi, but it’s really 32×38, so some distortion is expected. I did this first so I knew roughly what size I was going to be designing to fit, rather than starting with the design then questing in vain for a piece of cloth of the correct dimension.
Then I and Target Recipient had a chat back and forth on the general aesthetics. We established that green was a favored color, considered overall composition choices, and looked at some candidate alphabets and strip patterns for the borders. Once we had general agreement on the direction for the piece, I set in, using my chosen computer-based drafting method – a home-grown solution based on the freeware drafting and image editing program GIMP. I offer a tutorial for that (including templates) here on String (read up from the bottom because the blogging software only allows newest at the top organization.)
This is what I came up with.
The charts below are deliberately blurred because while they are good enough for me, they would need to be cleaned up for use by others. Plus I am not sure if I want to add them to the permanent collection here. Target Recipient would have to give permission, for one.

For the record, the leaf and twist border is available in Ensamplario Atlantio II. The alphabet used for the initial caps is from Ramzi’s Patternmaker collection of pre-1920s European leaflets, Sajou #160. The body text from an older book on my shelf – Creating Historic Samplers, by Judith Grow and Elizabeth McGrail, Pine Press, Princeton, 1974. Original elements of this piece not published before include the supplemental embellishment around the words, adapted from the flowers on the initial caps, and the corner for the leaf and twist border.
The next step was to choose my colors – DMC 890 for the darker green, DMC 320 for the lighter green, and DMC 816 for the tiny flashes of garnet red.
Now we get to the fun part – setting up the cloth to begin stitching. The first thing I did was to square off the cloth. I unraveled the thing around the edges, removing all partial threads until I had a full span of both warp and weft. Then I carefully trimmed off the remaining “fringes” left from the unraveling process. I’ve written before about the poor quality control on the MCG packaged product, and this sample was no different. It was quite skew in cut and desperately needed this squaring to determine true grain and useable size. In this case, I lost about an inch of width in one direction and about a half-inch in the other. Having done that I cut the piece allowing a generous border all the way around the stitched area dimension.
Cut piece in hand, next I had to make sure it didn’t unravel further. I have to say am not a fan of taping the edges, and I’ve had equivocal results using zig-zag stitch on my sewing machine to secure them. I’ve had the whole zig-zagged strip pull off. I don’t have a serger, so I stick with old fashioned hand hemming. For this small project that took about an hour to do a finger-pressed double turn hem, a little less than a quarter inch deep all the way around. I followed the ground threads as I did this, so my hems are (mostly) even. Since this will be framed or otherwise finished so that the edges won’t show I wasn’t super-exact about mitering the corners perfectly, as I would be with a handkerchief, napkin or placemat.
The last step of preparation is determining the exact center point and adding the basted orientation guides for both the vertical and horizontal center lines. I use a light color plain sewing cotton for this, and I don’t bother to make the basted stitches any particular length long (some people carefully stitch these over evenly counted blocks of the ground threads). Just having the simple lines are good enough for me. You can see them along with a bit of the hem in this work in progress shot:

Now it’s just a matter of transcribing my graphed out design to the cloth, using cross stitch for the wording. I’m using two strands of the DMC floss for maximum coverage.
When I get up to the surround I will probably switch to double running, and work the outlines and veining of the ivy leaves and twist in the dark green. I am thinking of using one of the more open fillings, diagonal, boxy, or steps, for the infilled areas, and doing them in the lighter green. We’ll see if I change my mind and do something else when I get there.
All in all I expect this one to be a relatively quick stitch. It’s not large or complicated. Here’s progress as of last night. Considering I started this on Friday night, it’s flying.

I hope this step by step on beginning a project is helpful to someone. And as ever, if you enjoy my designs, free broadsides stitch-along and books, and my published books, please post pix. Obviously I’m in this for joy, and few things make me happier than seeing my designs being worked up by others.
STAYING BUSY
What have I been doing of late? Well, being lucky, I can work from home, so that’s been taking up most time, especially with major deadlines in the past week. In the time that’s left over, I have to stay busy, and not as a sacrifice to the “cult of productivity.” Mostly because unless my hands are occupied, my thoughts wander to dark places.
I have subdued a reluctant sewing machine and run up some face masks for my family:

I’ve been knitting a pair of socks from a gorgeous ball of yarn I had put away as being “too good for socks.” Well, I deserve nice things, too.

I’ve done some casual research, and found another rendition of The Old Castle design, dated to 1590-1610. I added it to my round-up of the designs in that family.
And I’ve embarked on a new stitching project. It’s a curious one that has no short explanation behind it, and in a way – it’s the ultimate FanGirl project.
As I’ve mentioned before, The Resident Male (pictured above) writes prime SF/fantasy. He is currently working on the second book in his Blair and Terendurr series. One of the delights of living with an author is that you get to read the output long before it escapes into the wide, wide world. And if you are really lucky, parts are read out loud to you as they are completed.
One of the stories in the forthcoming second book features a rather unusual band of confederates. I can’t go into more detail because I don’t want to post spoilers. But they have a motto in an other-worldly language, “Lucus Orthai Ta,” which translates roughly to “Life’ll kill ya.” I thought it would be fitting as his #1 fan to make a present for my author: an embroidery of this phrase, framed with The Dance border I posted here last week.
I started by combing through my usual haunt for unusual alphabets, Ramzi’s Patternmaker Charts collection of near 100 year old Alexandre, Sajou and other pattern booklets and leporellos, The one I picked is the third one on this page. They don’t get much more baroque or difficult to read than that set of squiggles. Perfect for an alien language.
And so I present the start – working out from the center and in cross stitch for the lettering, on 44 count almost-evenweave linen in “art silk,” it will take me a while to get to my skeleton army in double running stitch. But I will…

As for the story, you are just going to have to wait for him to complete the second book. It will be worth the wait!
DON'T PANIC – AGAIN
A while back I stitched up this piece, both as a tribute to Hitchhiker’s Guide, and as a bit of inspiration for my office. I’m a proposal specialist – managing short deadlines and general panic are my stock in trade.
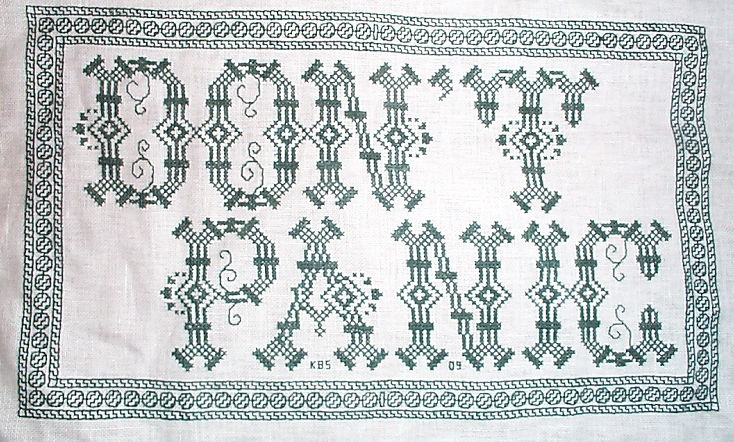
When I posted this on Facebook last Friday, I got several requests for the chart. So, tweaking memory dormant since 2009, I drafted one up.
I make this chart freely available for YOUR OWN PERSONAL, NON-COMMERCIAL USE. Consider it as “good-deed-ware.” It’s tough out there right now. Pay this gift forward by helping out someone else in need; phoning or getting in touch with a family member, friend or neighbor who could use a cheerful contact; volunteering time or effort; or if you can afford it – donating to one of the many local relief charities or food banks that are helping those displaced from work right now.
CLICK HERE TO DOWNLOAD THE DON’T PANIC CHARTS AND INSTRUCTIONS – THEN SAVE THE PDF THAT POPS UP
Eventually I will add this to the Embroidery Patterns page tabbed above. But for the time being – be safe, stay well, and care for those whom you love.

ANOTHER SAMPLER
This one’s a quickie – a present for Denizen (one of Younger Daughter’s pals, currently staying with us). She’s also headed off to university next year, and deserves her own bit of stitched wall art with a favorite saying.
Denizen has requested the immortal words of Admiral Grace Murray Hopper, “It is often easier to ask for forgiveness than it is to ask for permission.”

As you can see, I’ve already laid in the saying itself, using yet another of the alphabets from Ramzi’s Patternmakercharts.blogspot.com website. In this case, I’ve chosen a very simple all lower case set from Sajou #104. A fancy font would be too bombastic for this sentiment. I used plain old cross stitch (POCS) for the letters.
Ground this time is a large-as-logs 30 count even-weave linen remnant from my stash, long since disassociated from any label, vintage, or maker identification. The floss is more of my India-purchased faux silk – deep crimson, bright green, strident blue, and daffodil yellow. Patterns (so far) are all from The Second Carolingian Modelbook. Being unbound by any historical or usage constraints on this one, I’m happily playing with colors, limited only by the availability of my remaining threads. I’d like to use far more red to anchor the piece, but it’s the color of which I have the least, so I have to work it in more sparingly.
I’m also changing up the orientation and proportions of this one. Instead of long and thin like historical samplers, or portrait orientation like a standard reading page pieces I’ve stitched lately, I’m doing this one landscape – with the longer dimension east-to-west rather than north-to-south. I’ll probably run a more solid border the full width top and bottom, either POCS or long-armed cross stitch. There will be two banks of geometric bands, left and right both above and below the centered saying. Although I might mix that up with a collection of spot motifs above the saying. I haven’t decided yet.
One failure of note though. I wanted to do some Swedish Weaving stitch on this one, as a nod to the Denizen’s heritage. While that style is usually done on huck towling, it can also be done on plain tabby weave fabrics. Unfortunately, this particular ground cloth and my ultra-fine floss are a bad combo for the technique. I didn’t like the look so I picked it out and went with what I have. I’ll do a Swedish Weave project another time.
The motto took just one weekend, and at red bit is only one night’s stitching – about 2 hours worth, so I forecast that I’ll rip through this project in no time.
TRIFLES, ANYONE?
When I last wrote, I was just getting underway with my Trifles sampler, a special request from Younger Daughter. Some of you expressed surprise that I don’t plan out these larger stitched projects all at once, graphing them up in their entirety before I start. But I don’t, although this one is shaping up to be a bit less chaotic than my usual process.
To start – here’s what I’ve done so far:

First off, I hemmed all the way around the edge of the cloth. This is something I rarely take time to do, and always regret skipping. It was furiously frustrating – to have the ground in hand but put off stitching, but I steeled myself to it and completed.
Second, I basted lines indicating the centers, north-south and east-west. Long time pal Melisande will smile at this because the thread I always use for this purpose is plain old sewing cotton left over from the bridesmaid’s dress I sewed to wear at her wedding. It’s a pale baby blue – dark enough to be seen on white ground, and light enough to show on dark; non-fuzzing, quick to pull out, and non-crocking.
Yes, when originally stitched the two center lines intersected, but it’s my habit to pick out the guidelines as I no longer need them, so that they don’t get caught up by the embroidery stitches. I determined my center and began from there, removing and clipping my basted guidelines prior to working the cross stitching.
Cross stitching? Yup. Plain old cross stitch for the alphabets on this one. Also for the Daleks, one of which can be seen adjacent to the big “P.”
In this case I have actually graphed up the entire center section that bears the inscription and the offspring-mandated Daleks. Younger daughter prefers symmetry to chaos, and she specifically requested that I do everything I could to align the words neatly.
Now, what to do for the rest of the piece, once the motto is complete…. Originally I thought I’d do more strips from my upcoming book, just for the fun of trying them out. But the late 19th century alphabets in brown and gold silks is giving the piece a particularly steampunk look. Again welcome, since Younger Daughter is a big steampunk fan. I suppose those bands could work, but now I have been seized upon by a Concept, one that has affixed itself to me like a tiny homesick kraken.
Instead of strips, I will probably do this as a montage in inhabited blackwork – the style that features solid outlines, with various shapes filled in using geometric fillings.
Off I fly to draft and cut some standard stencils for my shapes, and to play with their placement. Stay tuned!
CROSS STITCH
Stitching geeks – like those immersed in every esoteric discipline – love to argue; even when an issue is settled. Sometimes assertions bubble up again, are discussed with passion, and then go into remission. Occasionally these debates cycle back, usually because reference materials with outdated opinions are found by a new generation of hobbyists who take the authors’ words at face value.
One of these oft raised/oft settled debates involves the use of plain old common cross stitch in historical eras: was or was it not done before 1600. And the answer isn’t crystal clear, nor does it come with hard boundary dates. Let’s look at modern stitching and a dated example from the late 1500s.
Figural cross stitch isn’t new. It isn’t modern. But it has morphed into a recognizable modern style that has migrated from its pre-1600s cognates. The photo below is of a contemporary sampler designed by Marilyn Leavitt-Imbloom, for Lavender and Lace. It’s entitled “Angel of Dreams” and is widely available for purchase (a quick Google search will turn up retailers):

Ms. Leavitt-Imbloom’s work is pretty much the poster child for the modern needle-painted cross stitch style. Note the fluid forms, the subtle shadings that mimic painting, the half and quarter stitches and sparing (though dramatic) use of double running stitch outlines.
By contrast, here is one of the Oxburgh Hanging panels dated circa 1570, stitched by Mary, Queen of Scots (and/or Elizabeth Talbot, one of her ladies) during captivity. The first photo is shamelessly borrowed from the artifact’s Victoria and Albert page (Museum accession #T.33JJ-1955). The detail shots below it were taken by Elder Daughter on our visit there. If you click on the details, you’ll be taken to larger versions for closer inspection (patience please on the download, some are huge).


Now, the official descriptions cite “tent stitch” for all of the Oxburgh hangings. But if you look closely at the insect being inspected by the sea monster, it’s pretty clear that cross stitch was employed on this particular slip. Also note that the different parts of the insect were stitched with no regard for maintaining “the same leg on top”. Although some unworked bits just north of the Monster’s head can be seen and counted, we can’t rely on that because the bright white cloth peeking through the stitching is conservator’s ground, onto which the fragile stitching has been affixed. Fortunately, there is a small damaged area just north of the insect where we can see the original fabric:

Yup. Cross stitch, worked over a 2×2 thread grid.
On style – yes there are shadings, produced by marling a small number of colors of fine floss-fiber together to make threads of intermediate hues, rather than selecting pre-dyed solid threads of graduated color. But the shadings are far les subtle than the modern work. There are strong outlines also worked in cross stitch, probably related to the drafting methods of the time, in which the design was drawn directly on the linen prior to stitching. It is possible that black outlines were worked in part to cover those inked or otherwise drawn lines. I also think the outlines were worked first, based on the way that other stitches encroach upon them, with the colors added later – first to the foreground items, and finally to the background areas. Note that the lines do break in a couple of places, but I can’t say whether that is due to differential thread wear or they were truly omitted.
Now these all-over figural embroideries like the Oxburgh slips are not the only form of historical cross stitch. In fact, pictures like these are among the minority of surviving examples. Far more represented in artifact collections today are borders and strips in long-armed cross stitch or its variants. They’re not common, but cross stitched pictures did exist in the world of of the 1570s. And they looked rather different from contemporary figural cross stitched pieces.
