MASK MADNESS
I am working on a couple of things here at String Central. One I can talk about. The other is mysterious and can’t be shown yet.
First – the progress on the masks. First side of the first one about at the half-way point. I had to take a week off from stitching for family reasons.
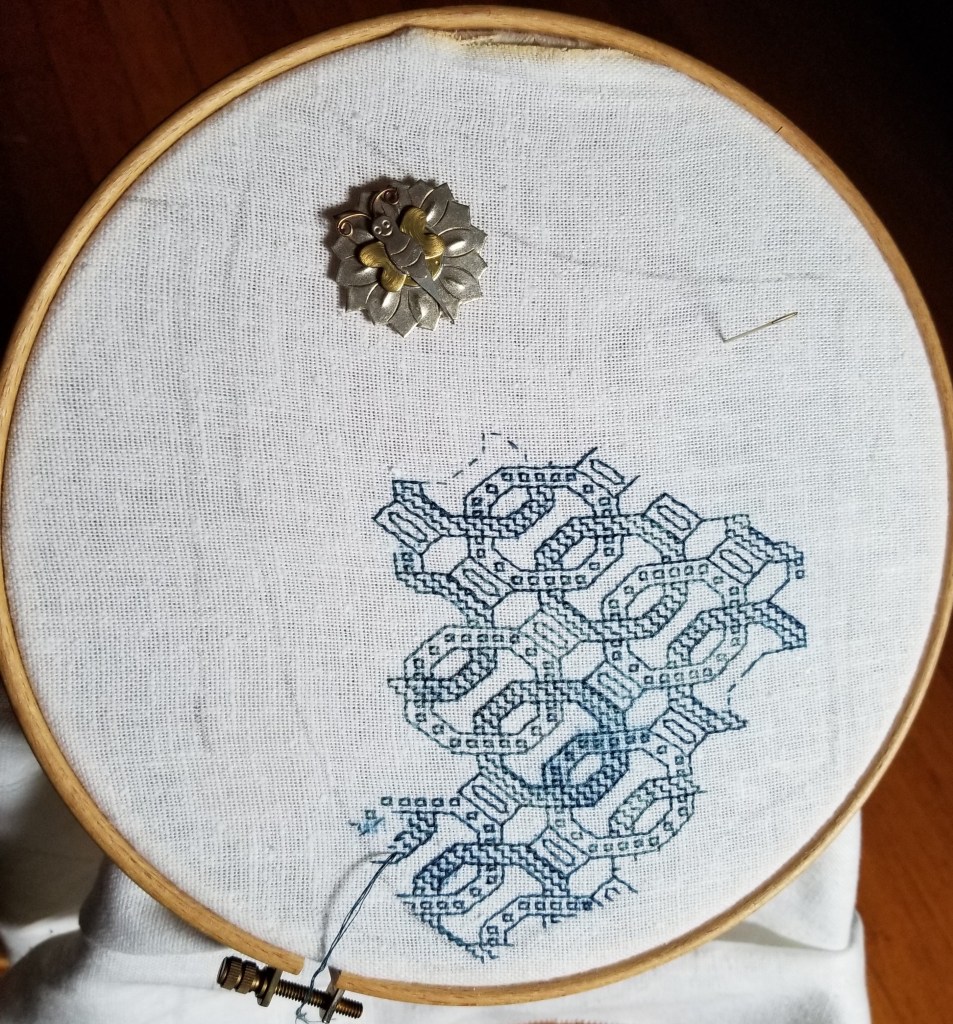
As anticipated, this early-experiment thread sheds dye, and picking it out leaves smudges. As explained before, I don’t care. These masks are not undying heirlooms of my house. They will bleed and spread dye during wash anyway. And I think that once that happens, the effect will be interesting.
The pencil outline you see barely traced onto the cloth is for a mask of this style:
The source of the pattern is the two-tie fitted variant published in the New York Times, back in March.
UPDATE: The link above appears to lead to a page that’s behind the New York Times paywall now. But fear not! They in turn got their design from FreeSewing.org, The edition of the design The Times posted nests three sizes on one printable PDF page, a pretty standard approach for sewing patterns. But since their original issue in March, FreeSewing has expanded the range of sizes for their design. If you click here, you’ll go to a page that lists a full range, from toddler to men’s ultra, plus how-to directions. More sizes for sure, but still the same basic pattern I used.
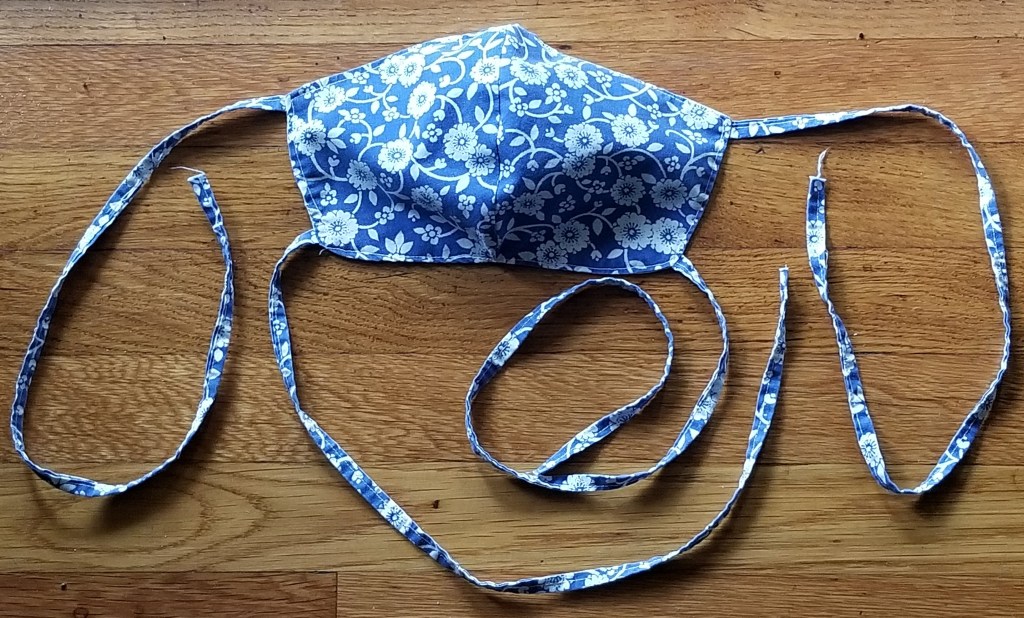
I’ve made quite a few of these for family and friends. It’s a bit more complicated than the pleated kind, but it fits us better. I make the largest size for adults (what in the update is now called Men’s Large), and use two or three layers of tightly woven 100% cotton percale (well washed). I substitute a long double-folded strip of the same fabric for the ribbon ties called for in the original pattern directions – mostly for durability in the wash. Precision isn’t important for the ties – I cut a long strip on the grain (not bias) – about 5 to 6 feet long and about 1.5 to 2 inches wide (152 to about 183 cm long, and about 3.8 to 4.5 cm wide). I iron it in half, folded down the center of the strip (parallel with the long side), then iron the cut edges to the center fold. Then I sew down the entire length of the long strip, an cut it into four equal pieces for the tie.
The blue flowered one above is sewn from the last remnant of the sheet set I took off to college in 1974. I had this print in red and blue, with a matching comforter. Over time the set became curtains, tote bags, cushion covers, baby carriers and crib furnishings. Ever dwindling in size, and picked apart for reuse multiple times, I had just enough left for several masks.
The fabric on which I am stitching the fancy design is no where near tight enough to provide effective coverage, so it will be a top, decorative layer over a double thickness of the standard high-count bedsheet percale.
My ground cloth has four two-unit sets traced onto it (each mask has a left and right side, seamed together at the center). I intend to stitch as many as I have the patience to do, but not cut them out until all I will be making are complete. But the loose weave and the embroidery both pose problems. I could cut veeerrrryyyy carefully to avoid nicking the stitching, but even if I did, the edges of the rather coarsely woven ground would ravel either during assembly or more probably, when the things are washed between uses.
So I am deliberately stitching past the half-inch seam line, right up to the cutting line (my pencil mark). The seaming line is a half inch (about 13mm) inside the cutting line. That half inch is the seam allowance – the bit you see turned inside at the seams in most sewn items.
Before I cut these apart I will throw the entire piece onto my Ancient Elna sewing machine, and stay-stitch all the way around each mask piece. I will probably sew multiple rows of reinforcement, but all within the seam allowance area. Then I will cut out the individual pieces and assemble the finished masks. The stay-stitching should secure both the ground cloth and the stitching. Since the reinforced area will be turned under into the seam, it won’t be visible. And I may even go a bit further and apply one of the non-fray fixatives sometimes used to reinforce stress points in applique or quilting. But I’m not sure about that yet – I never use the stuff and I am a bit wary of how it will survive laundering.
Will this work? Stay tuned! Eventually you will find out.
TOO BUSY TO BLOG
As ever, things have been very hectic here at String Central. Holidays, work obligations, family – you know the standard round of excuses. But that doesn’t mean that progress is not being made.
In no particular order, I present a subset of the accomplishments since the last post:
The Red Licorice pullover – finished. Amended slightly to meet the recipient’s specifications. Pix on this one are belated, since I gave it to the wearer who scuttled off with it before took photos of my own. I’ll go back and update this post when the pix come in, but I’ve held back publishing this long enough.
Six Pussyhats for the upcoming marches.

The now standard run of ten types of holiday cookies:

If you must know, clockwise from the top, they are coconut macaroons dipped in dark chocolate; chocolate chips; chocolate crinkles (aka Earthquakes); peanut butter, stamped with suns; hazelnut spritz with chocolate ganache filling (aka Oysters); raspberry jam filled vanilla wafers; Mexican wedding cakes; lemon cut-outs; bourbon/cocoa balls; and iced spice spritz cookies. In the center is homemade fudge, with and without hazelnuts. I also did two panfortes. Recipes for any/all available on request
And of course there were latkes (this year done in goose fat):

And of course over the three-holiday-week there were the donor goose; some heavenly fish quenelles (think gossamer gefilte fish and you would not be far wrong); a fantastic cassoulet made with duck confit we put up back in the summer; leek and potato soup; a home-made paté/terrine type loaf; our own sourdough bread; and an amazing spread of cheeses. Most of the heavy lifting cooking was done by The Resident Male.

We’re still eating the cheeses – there was so much that was (and still is) SO good. Thanks again to Cheese Gifters, Kim and Mike; and a shout-out to the Cheese Makers, Jonathan and Nina at Bobolink Dairy. If you love well-crafted, delicious cheese and have not tried theirs, you are missing out.
Along the way, I also started a couple more projects. First – curtains for the library. I’ve been threatening to do it for years, and have the linen and trim on hand, the trim being one of the embroidered things I treated myself to in India:

I’ve done all the calculations, pre-washed the linen, and ironed out the first panel of four. I’ve also obtained and pre-shrunk the lining. Next is to calculate placement of the trim and stitch it on to the first panel, prior to doing final assembly and hemming. I intend to use rings to hang the panels, from black iron or iron-look rods. Those will either be clip- or pin-type, so tabs are not needed. Parking these mysterious secret sauce numbers here for future reference (90, 10, 3).
And having finished the sweater and hats, I embark on another knitting project – Sandra’s Shawl, pattern by Sandra Oakeshott. This one features lots and lots of nupps – little multi-stitch bobbles. I am not a fan of making them, so instead of the nupps, I’m using beads. I’m using some really intense variegated green Zauberball Lace yarn (pix shamelessly borrowed from unrelated retail website):

And the beads are silver tone. As you can see, I’m already well into this one, past the unadorned center and out into the infinity rows where the beaded fun happens:


I can say that the pattern is well-crafted and easy to follow. I suggest putting markers at the beginning and end of the pattern repeat, to segregate out the edges in which the design is a bit perturbed by the increases required for shawl shaping. Some may wish to use markers between each pattern repeat, but I found it wasn’t necessary for me – the thing is easy to proof visually as one knits. And I most heartily recommend the use of beads rather than the fiddly nupps. Apologies to the designer, of course for using a non-traditional/alternative interpretation of her excellent pattern.
FINISHING OFF A HANGING SAMPLER
OK, I promised I’d write this up, and it has taken me a while, but here it is.
My thought here was to create a quick and easy way to finish off a hanging sampler, using a method that did no harm to the stitched piece, that was inexpensive to do, and required no special equipment or components that can’t be found in most crafts stores.
Why “no harm?” Because many inexpensive framing solutions do exactly that. They place fabric under stress, encase it in moisture-trapping glass, matt it or line it with acidic materials that over time discolor or eat away at the ground cloth, or place the fabric up against wood or metal that can corrode or mark the cloth.
This solution is far from ideal, but it manages tension to avoid stretch or strain in hanging, isolates the stitched piece from any wooden or metal framing elements, can be quickly picked out without harm to the original work, and is very inexpensive.
Here are several examples (the center one is mid-process):
")


In all cases, a larger piece of backing fabric has been used to encapsulate the stitched item. The hanging bar (wood or metal) and bottom-weighting only touches the backing fabric. All are totally sewn by hand – no machine stitching.
Note that you don’t need to have actually stitched a sampler to do this. It would be useful to finish off a decorative tea-towel, heirloom doily, cloth map, or small pieced patchwork as a hanging, or (for my SCA pals) to mount a painted or printed banner for display.
To do this you need:
- Your display piece.
- Backing fabric. I used plain old quilting cotton. Any fabric will do, although for the “no harm” bit, I suggest washed cotton or linen rather than polyester or other synthetic. Size needed calcs below.
- Plain old cotton sewing thread that matches the backing fabric.
- A hand-sewing needle – a sharp with a small eye is recommended.
- A metal bar or wooden dowel for a top support (fancy finials are optional, but can be handy for fixing hanging strings or chains in place so that the hanging mechanism doesn’t compress the top edge of the hanging).
- The aforementioned hanging string or chain.
- An iron and ironing surface.
- A pair of scissors
- Straight pins
- A ruler and a tape measure
- Standard office stapler
- Optional weights for the bottom edge. I have used a length of brass chain, threaded onto an old ribbon, and small zinc drapery weights (small bars of zinc enclosed in a synthetic fabric envelope). These are sold in packs of two or six, in the curtain-notions department. Avoid the lead ones just on principle – the world does not need more free-range lead. In a pinch, coins sewn into little fabric pockets will do. If you are using drapery weights or coins, you only need two.
I found the backing fabric, dowel, wooden finials, the drapery weights, and the chain all in my local JoAnne’s fabric/crafts store.
First, decide how you want to frame your piece. A large area top and bottom, with narrower areas on the sides? Equal frame all the way around? The general size will inform your fabric purchase, although one yard of most quilting fabrics will be MORE than enough for all but the very largest samplers.
For the Permissions sampler, I decided I wanted a blue frame about 3.5 inches all the way around, and to preserve about 1 inch of unworked ground between the stitching and the edging I put pins in my sampler to mark that distance from my stitching, and measured the “to be shown” dimensions of my piece. About a half inch of my sampler, all the way around, will be hidden inside the backing.
Let’s call my display width 20 inches, and my display height 16 inches (to be truthful, I didn’t write down the real numbers). I know I want 3.5 inches of framing edge to show on all sides. Plus I need a hem allowance, let’s call that 0.5 inch. Here’s the logic:
| Hem |
Edge |
Display Area |
Edge |
Hem |
|
|
Width |
0.5” |
3.5” x 2 |
20” |
3.5” x 2 |
0.5” |
|
Height |
0.5” |
3.5” x 2 |
16” |
3.5” x 2 |
0.5” |
So, by doing the addition, I need to cut my backing cloth to be 35” wide, and 31” high, which is what you see is half-way done here (I’ve cut the width but not the height yet):

The next thing to do is iron in the 0.5” hem all the way around. Note that the “right side” of the backing fabric (such as it is, is DOWN). I chose to iron in mitered corners for tasty neatness, but that’s optional, and there are a ton of video tutorials on doing that.


Then I positioned my stitched piece on top of my backing fabric, making sure that it was correctly placed (the edge of my stitching was 8 inches from the now-folded edge of the backing – I should have left in my dimension measurement pins but I forgot, and took them out.)
Once the stitched piece was correctly positioned. I folded the left and right edges in, carefully aligning them (measuring the distance from my embroidery), and finger pressing them down and pinning. Because I stitched on even weave, I was able to use the count of my ground fabric for **perfect** alignment without having to mark the fold-to line on my sampler.

Those two little white tabs? Those are the drapery weights – note that they have little tab ends that are handy for stitching. That’s where they will go, encapsulated in the edging/backing, far away from the stitching. Next I folded in the top and bottom and pinned them, too. Once all edges were pinned, I lightly touched up the folds with my iron, to make them slightly crisper. Then I slid those drapery weights in and pinned them into place.
Here’s the thing, ready for hand stitching.

You’ll notice that there are simple lapped corners – I didn’t miter them. By doing this I can use the flap-over on the top as my hanging pocket. I do not need to engineer a separate hanging method for attaching the bar or dowel.
Now for the hand-sewing. Yes, I could have done this by machine, but hand stitching is easier to pick out in the future, and easier for me anyway to keep neat and aligned. There’s no real reason (other than speed) to do this by machine. And yes – I probably should have basted, but hey, what’s the fun without a tiny bit of risk. 🙂
Starting at the lower corner where the bottom and side flaps meet, and working first completely around the stitched sampler part, ignoring the flapped areas at the corners, I worked a simple hand appliqué stitch, catching a tiny bit of the edging, passing through the ground cloth but not the ultimate backing – at a diagonal, ready to make my next stitch. Here’s a tutorial on the appliqué stitch.

Note that I used the even weave’s threads to keep my hem nice and straight.
After I had worked the appliqué stitch around the entire visible area of my sampler, I used the same stitch to affix the two lower corners – the places where the bottom folded edge lapped up and over the folded-in sides. As I did each of these two corners, I worked from the visible sampler area back out to the edge. When I got to the side, I turned the corner and used a tiny whip stitch to seam together the front and back edges. When I got to the place where the weight was pinned, I wiggled it up so that I could just nip its flapped edge in as I was whip stitching:

I worked the top two corners similarly, but instead of working all the way down to the tip of the corner as I whipped the front to the back, I stopped about 0.5” from the top on both the left and the right. This left an opening through which I could pass my dowel. A small bit of finesse was needed to thread it through (I used another scrap of dowel to nose the hem allowance out of the way on the inside).
To make the hanging stick, I used a 1/4 inch dowel. I probably should have used a metal rod or a thicker dowel, but that’s what they had in the store. I bought a little pack of finials, and ended up having to shave down the ends of my dowel just a tiny bit so that they fit into the holes on the finials. I also bought a length of inexpensive craft chain, intended for chunky necklaces, with links large enough to fit around the dowel.
I cut the dowel to the width of my finished piece, plus about 0.5”. Using a regular office stapler, I stapled the chain to my dowel, about a quarter of an inch from the end. I dotted the inside of the first finial with wood glue and forced it onto the dowel and over a bit of the staple, so that the chain was butted up against it. Then I threaded the dowel through the top of the hanging, squishing up the hanging a bit to keep it away from my working end, I stapled the other end of the chain to the dowel, then forced on the second finial.
Taa daah!

STEAMPUNK SATURDAY
…More like month-of-Saturdays, actually.
Here’s the outfit that accompanies the hat I showed off in my last post:

You can’t see the watch-type pendant and magnifying glass hanging from the chains at her waist.
The blouse and vest were flea market finds, along with the buttons and broken necklace chains that adorn it. We made the skirt and petticoat, the hat and the woven ribbon bag. The hat is a cut down New Year’s Eve party top hat, plus feathers and other adornments. The belt is an 80s-era retread from my closet, and the gear necklace and earrings were holiday presents this year past.
Here’s a close-up of the skirt trim. It’s a wide strip of brown ribbon, edged with black ribbon, folded and ironed into points:

I don’t remember where I first read about doing the points – possibly in an ancient Threads magazine, before they abandoned fine handwork, possibly in a Victorian era ladies magazine or millinery guide. The ribbon folding isn’t quite ruching, since no gathers are stitched, and it isn’t pleating, because the folds are not perpendicular to the ribbon. I used it once before, to make teeth on a dinosaur costume, when Elder Daughter was a toddler.
Wherever this trick came from was, it’s a very useful technique for producing custom, flexible trim that eases nicely around corners. I did mine in inexpensive double sided satin ribbon. A two-tone ribbon with different colors on each side would make points of alternating colors. Here’s how:


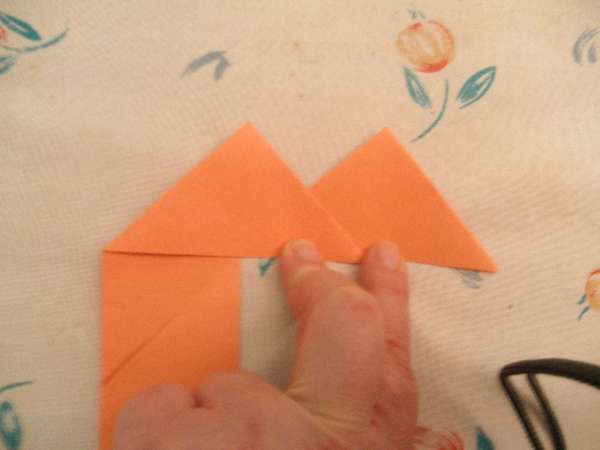
Fold a triangle, tucking the leading edge underneath. Then do an inverse triangle. Finally, flip the inverse triangle up so that it lies on top of the completed one.
You can see that if you wanted to make rick-rack instead of a row of upward pointing triangles, that second fold step would be done so that the “good side” landed on top, and the third step would be omitted.
Here’s the same process in actual ribbon, with firm steam pressing on the silk setting in between manipulations:

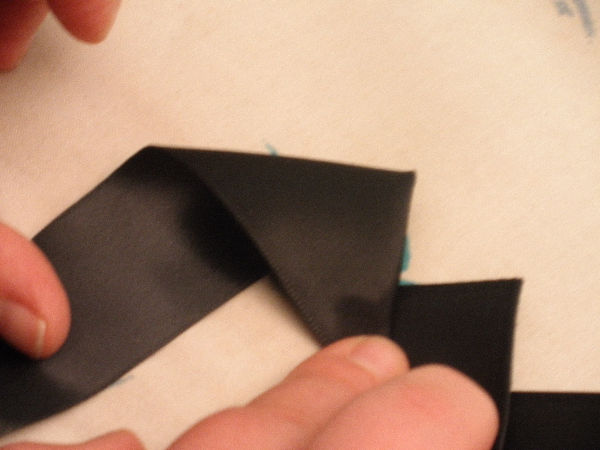

and the final product, ready to be pinned and sewn in place. Note the flexibility that can accommodate both inner and outer curves:

Younger daughter wore this to the Waltham Watch City Steampunk Festival, at the Charles River Museum of Industry and Innovation. After planning and accumulating the bits for the better part of the year, she was thrilled to do so, and had a great time.
SIDE TRIP INTO HOME SEWING – CAMO VALENCES
Elder Daughter is now in the Doc Martins and camo phase of teenage self expression. That expression has spiraled out to her immediate surroundings. As a result, last fall we replaced her pre-teen starry night sheets with a bed-in-a-bag set on this theme:

It came with a top sheet, a fitted bottom sheet, a comforter and a pillowcase. And for some reason – a bed skirt. To those who don’t suckle at the breast of Martha Stewart, a bed skirt is a somewhat prissy patterned dust ruffle that lies between the mattress and box spring on most beds, with the fashion fabric curtaining off the under-bed area from general view. Far be it from me to question the wisdom of the marketers who thought that someone favoring camouflage patterns might use and appreciate such a thing.
In any case, her bed is a high platform with built-in drawers underneath and a bed skirt is irrelevant. Still, the skirt came with the set, and I abhor waste, so together Elder Daughter and I decided to remake it into a pair of narrow valences for the windows in her room. It’s taken this long to start the project because my ancient Elna sewing machine has been up on blocks awaiting repairs. The machine has now been overhauled and I am no longer able to endure the puppy looks and pleading, so I’ve begun.
Here’s our general plan. My goal is to minimize sewing as much as possible, by re-using existing finished edges and seams:

I’m at the first step (upper left of the diagram), slicing the camo fabric off from the foot of the skirt and picking out the box pleated corners:

We have no ideas on what to do with the excised bit from the former foot. Various pillow and stuffed animal suggestions have been floated. I also considered (then discarded as too fiddly) the idea of using some of it to make curtain tabs rather than a simple rod casing.
I think I’ll take this opportunity to introduce Elder Daughter to Ancient Elna. Long straight seams are easy and sewing is a life skill. More on this as we progress.
COLONIALS INVADE
Life continues to intrude on my knitting time. Besides the regular flock of work-related obligations last week, I was surprised by Smaller Daughter. Thursday morning, rummaging in her backpack looking for her lunchbox, I found a notice for her elementary school’s Colonial Day. It’s an interactive festival sort of day, but one that requires all of the kids to dress in some attempt at a historical costume. (To be fair, I had heard about it long ago but forgotten.) So with a costume needed within 7 days, but my being away on a business trip starting Monday, my Memorial day weekend activities now included a close huddle with my ancient Elna sewing machine.
I wanted to make something relatively early – closer to first encounter than the Revolutionary War so that target child had a chance of wearing her outfit again. I pelted over to the fabric store during lunch hour on Friday and picked up a couple of remnants – 2.75 yards of a soft green twill whatever (plus matching thread), and one yard of a linen-look in white, all for about $10.00. The price was right.
Then I came home and thought about what to make. I had already made her a puffy white pirate shirt that could double as a chemise, and I have a small white cap and coif set. A skirt, a bodice of some sort, plus an apron would be enough. Drawstring skirts are easy enough, but the bodice part was tougher. Front lacing (instead of buttons) would do. Thankfully the topography of an 8-year old is easier to accommodate than that of a post-pubescent. I took measurements and drafted out a simple tab-bottom bodice with short sleeves. To make it substantial enough, I cut two of everything, so that the whole thing is self-lined. Here are the resulting pattern pieces, snipped from Red Sox coverage in the Boston Globe, plus all of the pieces sewn and assembled into the final bodice/jacket.


Things went pretty smoothly. I started by sewing the shoulder seams of the outer and inner shells, then uniting them along the neckline by sewing them together up the center front closure and around the neck. Then I sewed the side seams of the inner and outer shell, inverted the inner lining and pressed everything flat. The sleeves went together quickly, too. I sewed the inner and outer sleeve along the bottom edge, then did the underarm seam for the united unit all at once. I inverted the inner linings and pressed my sleeves. Once the sleeves were together, I set them in the bodice. Then I sewed together the inner and outer side of the tabs (that odd shaped piece below the sleeve) – making one for each quadrant of the garment. I turned them inside out and seamed them to the bottom edge of the outer shell. Last, I folded the inner shell’s lower edge down to cover the raw edges of the tabs, and hemstitched it down by hand (too may layers for my sewing machine to cope with).
Since I didn’t have much time, I didn’t go with a zillion buttons or hand-made lacing holes. There’s little if any tension on a little girl’s bodice, so I didn’t bother with reinforcing the lacing edge. I opted for the not very historical but really quick stage option – small rings sewn along the lacing edge to hold the fastening ribbon. Sacrificing a dozen split rings, formerly in use as place markers for lace knitting, I stitched them down by hand.
The apron was also easy. I cut two strips off the top of my yardage and lapping them end to end, pressed the seam lines for the apron’s band and strings. Then I sewed the edges of the remaining piece (again doing it double-sided for additional body), gathered the raw edge and encapsulated it in the center of the apron. Time from taking the first measurements to final hemming – approximately 16 hours of work.
Here’s the end result: one semi-historical kid-suit, inspiration from the 1620s. And yes, Target Child did help, learning how to use the sewing machine and working it for long, straight seams, tracing the pattern pieces with chalk, and doing a bit of the hand-work.

Knitting? I finished my vintage lace scarf. Blocking was postponed on account of Colonial Day.
