1941 VEST – FINISHED
My ultra quick 1941 vest project is finished. That’s 7 days from cast-on to finishing off the final end. Considering I only knit an hour or two a day, that’s lightning quick.


The fit is a bit different from most contemporary patterns. For one, the shoulders are wide and shaped, and the armholes aren’t gappy. My tiny cut-out at the back of the neck rides well with a golf shirt’s collar, and the length is just what he wanted. The fabric is soft and lofty. Since I rarely knit for him and the few times I have the results haven’t been optimal (mostly too big or too warm), I’m delighted to have produced a winner.
On the yarn – I think Cascade 220 is a yarn that’s overlooked in the mad scramble to Merinos. Yes, it’s not a Merino, and doesn’t have that silky hand. But it’s not an itchy or stiff yarn, and knits up quite nicely. The number of ends to finish off are minimized because of this yarn’s superior ability to spit-splice, and the 220 yard skeins. In terms of care, it’s quite pill-resistant. I’ve made several things from it, and have never found any flaws in it. Not so much as a knot. So pause a bit in your haste to knit this stuff up only if fulling/felting is your goal. Try some out for a non-shrunk garment. I think you’ll be pleased with the result.
As promised, here’s a modern pattern for the thing in Size 46. To make life simpler for us all, I’ve used Sweater Wizard to construct it.
Man’s 1941 Style Vest in Garter Stitch, a Redaction from Minerva #46
(c) 2006, 2007, 2013 Kim Brody Salazar

Needles: 7, plus size 6 circs or DPNs for finishing armholes and neck ribbing. One stitch marker.
Gauge:4.5 sts10 rws per 1″ Estimated Ydg: 1212 yards standard worsted weight yarn with a native stockinette gauge of 5 stitches = 1 inch.
Back
With rib needle, cast on 102 sts. Estab rib pat on Row 1: *K2 , P2. Repeat from *. End K2 . Work 29 rws. On row 30, increase as below. [2.75″].
Rib-to-Body Inc Row
6 incs total done this way: Work 14 [inc 1 in next st, work 13, inc 1 in next st, work 14] 2x. [inc 1 in next st, work 14] 2x. (108 sts) With body needle, work in pat st until piece meas 14.5″[row 118].
Armhole Shaping
Bind off 6 sts at beg of next 2 rws. Dec 1 st each side, every other row 5x. Cont in pat st until piece meas 25.5″ from start [row 228].
Shape Shoulders and Back Neck
Bind off 7 sts beg of next row. At beg of next row, bind off 7 sts, work 14 sts, attach a second ball of yarn and bind off 42 back neck sts. Complete row. At beg of next row, bind off 7 sts and dec 1 st at each neck edge.Bind off 7 sts beg of next row. Bind off 7 sts beg of next 2 rws. End off.
Front
Work as for back, including all shaping,and, at the same time when piece meas 16.1″ [row 134]
Begin Neck Shaping
Work to center, attach another ball of yarn and complete row.Turn. Work both sides at once. Dec 1 st at each neck edge every 2nd rw 3x, then every 4th rw 19x. Cont in pat st until piece meas 25.5″ from start [row 228].
Shape Shoulders
Work shoulder shaping (at shoulder edge) to correspond with back.
Armhole Edging
Seam sides. Seam shoulders. With smaller size ndle, pick up 108 sts around armhole edge. Work in K2, P2 ribbing for five rows. Bind off loosely.
Neck Finishing
With smaller circular or dp needles and RS facing, pick up 48 sts from back neck, pick up 60 sts from left neck edge, place center marker, pick up 60 sts from right neck edge, place end of round marker. (168 sts).
Round 1, 3 and 5 – Work first round in K2, P2 rib until two stitch before the center marker. K2tog, slide marker to right hand needle. SSK, continue in K2, P2 ribbing taking care to match the sequence immediately after the centermost decreases to the sequence immediately before them.
Round 2 and 4 – Work in established pattern.
Bind off. Darn in all ends.
1941 VEST – ALMOST DONE
As you can see, I’ve finished the back and front. I have sewn them together, and done the bit of ribbing around the V-neck. I’m now working on the bits of ribbing around the armholes.

The sleeve area on the right looks constricted because it’s on the needle right now. The ends of that circ are out of the shot. That’s also why the lower edge on the right is drawn up.
Seaming and picking up along garter stitch edges can be problematic, with the texture of the final stitches in the ridge and valley rows being difficult to pierce evenly. I cheated by using selvage stitches, both on the to-be-seamed edges and on neckline and armholes where ribbing stitches were to be picked up. This allowed me to do a more even pick-up, although the K2P2 rib texture off of garter stitch at this gauge will never be totally smooth.
In this detail of the neckline you can see the pick-up edge, plus the center front decreases that form the V:

When I did the side seams, I used mattress stitch on my selvage edges. I also did one cheat that made the waist ribbing a bit more even. In my stitch count, the ribbing for the back began and ended with a K2 section. When time came to work up the front, I made sure that the ribbing on the front began and ended with a P2 section. That way when the two were seamed together, the ribbing at the waist is not interrupted.

One more evening of sleeve ribbing, plus another to end off and another to do a light post-finish blocking (yes I was bad, and didn’t block my pieces before assembly).
1941 VEST – THE V-NECK FRONT
I’m tooling along on the vest. I’ve got the front completed up to just a row or two below the point where the stitches at the bottom of the armholes are ended off. I’ve also looked more closely at the width of the shoulders and back of the neck. I’ve decided that at this point I really don’t want to make the back of the neck wider, nor do I want to make the armholes deeper. Therefore the shoulder pieces are going to remain the width they are now. Of course, if I get the thing assembled and TRM doesn’t like the fit, the possibility of ripping back and reknitting both pieces still exists. But for now I will carry on just carrying on.
Now, my original shoulder and back of neck widths are predicated closely on the width of the original pattern’s V-neck. Although I’ve sized up the rest of the sweater, doing the math indicated that the original opening would be adequate. Were I making this in an even larger size I would probably play with these proportions, but for this quickie redaction, I’m keeping the neckline’s progression of decreases more or less the same. I am however moving the entire unit down just a tad. Since that makes the thing deeper (but not wider) there will be a little bit of plain knitting with no neckline forming decreases at the top of the opening near the shoulders. If you look closely at the original pattern you’ll see that it also sports a similar coping strategy. My extra .75 inch isn’t going to make a huge difference here.
So I arrive at my pre-armhole point. Poised to begin the simultaneous shaping of the shoulders and the V-neck; well on my way to finishing this project in about 2.5 weeks. Pix tomorrow when there’s something more interesting to see.
1941 VEST – SIZING UP
As you can see, I’ve made a fair bit of progress on my 1941 man’s vest. Here is the completed back:

The color is a bit darker and more heathered with a touch of gray than is the virulent cranberry reported in the photo.
Now to go from the original size 30 to my customized 46, I did a couple of things. First I measured The Resident Male and one of his favorite store-bought vests. Then we sat down and discussed what he liked and didn’t like about the historical vest. We came to this set of observations
- He liked the ultra simple garter stitch texture
- He liked the wide waist ribbing in contrast with the narrow armhole edge and neckline ribbing
- He liked the K2 P2 ribbing texture
- He liked the close fit
- He wanted a deeper V because he’d be wearing the thing over golf shirts, and not over dress shirts with ties.
- A closer look at the dimensions of the original rather than the photo revealed that the piece was longer than we originally thought, so no adjustments there were necessary.
- He didn’t like the straight edge at the back of the neck, and preferred a tiny bit of contour there
So comparing his measurements and the original I come up with
| Original | Custom size | |
| Length | 25″ | 25″ |
| Chest width | 30″ | 46″ |
| Bottom rib | 3″ | 3″ |
| Other ribs | 0.75″ | 0.75″ |
| Depth of V | 9″ | 10″ |
| Armhole depth | 12″ | 10″ (from fave vest) |
| Back neck depth | 0″ | 0.75″ |
| Shoulder width | 3.5″ | 5.25″ |
So I plugged my measurements into the original pattern, multiplying by the original gauge (which I achieved), and came up with the piece above. I knit the back first so I could become familiar with the armhole and shoulder shaping before adding the complication of the vee neckline. I also knew that because it has no vee, the back would take more yarn. If I consumed more than half of my yarn while knitting it, I’d know that I needed to buy another skein. As it was, I used two and a quarter skeins out of five, so I should have enough to finish.
To confirm my noodling (and because I had the tool at hand), I pulled out Sweater Wizard and typed my measurements into that, too. I came up with a pattern that was very close to my own hand-tinkered one – minus the erasures and bogus false starts. If I end up sharing the redaction, I’ll use the Sweater Wizard product for clarity and ease of use.
One lingering worry – the shoulders. They seem wide although they are comparable to the target store bought favorite vest’s measurements. I may go back and rip them out, increasing the width of the back neck and decreasing the width of the shoulders to about 4.5 inches. More thought here is required.
ANOTHER REASON TO SUPPORT YOUR LOCAL YARN SHOP
Because they are in irreplaceable source of knowledge.
I swatched out several yarns that I had here in stash, trying out possibilities for my 1941 vest. Everything ranging from some navy/maroon ragg style Bartlett worsted (circa 1998) to a recent find from Webs – a tweedy garnet. The Bartlett is really an Aran or light bulky. I achieved gauge, but the sample stood up like cardboard. The Webs 2/4 Highland Tweed purports to be Aran to worsted in gauge (4.5 to 5 spi) but it knit up like a DK. Again I achieved gauge, but the sample looked meshy and sparse. I suspect that it would have bloomed a bit after I washed it, but in an added complication, TRM mentioned that he liked the color but hated the tweedy flecks. So it was off to my local yarn shop on a fishing expedition.
I went to Wild & Woolly in Lexington, MA – my knitting home-away-from-home. Now Jackie the owner is a knitter with decades more knitting experience than I have. She gave me an important bit of advice. When looking over patterns in these older booklets, don’t go by the gauge any yardage deductions based on just one project. Look at all the projects in the book that call for the same yarn. You’ll probably notice a discrepancy among them. So we did. A couple of the other patterns look closer to true worsted gauge than the light worsted/DK thoughts I had when I walked into the shop. To top it off she also remembers the Minerva (and later Columbia-Minerva) yarn specified. She steered me to Cascade 220 – which is slightly denser and less lofty than the Minerva but of similar gauge. The more airy nature of the Minerva is what threw me off, providing the extra yardage and making the stuff seem like a DK . So I bought some Cascade in a regal heathered burgundy and took it home.
I swatched it up and it was perfect. Spot on for gauge, with a soft hand and drape. So offering up thanks for the entire Wild & Woolly family I set to work on my vest project.
I measured the target recipient, plus one of his favorite store-bought vests that fits well. Then we sat down together and looked at the original pattern, pointing out fit and finish items that made it especially appealing, and other things that we might want to forgo. For example, TRM likes the depth of the V-neck, and the proportions of the waist and armhole/neckline ribbing, but is less enamored of the short length, tailored at the time to compliment pants worn with the higher, more formal waistline of the 1940s.
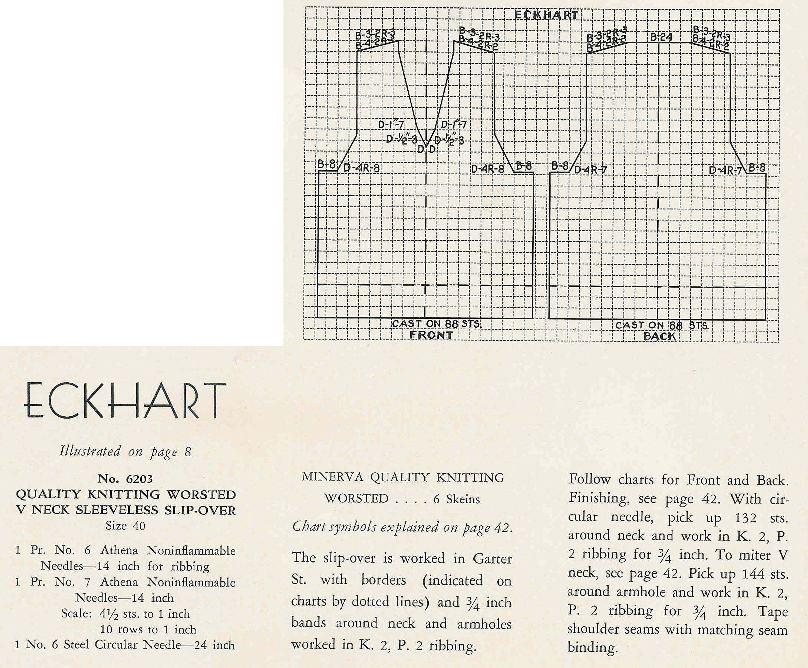
Then I looked at the pattern. I reproduce it here in its entirety, under fair use because I am using it to illustrate how to go about both reading an unusually formatted historical pattern, and how to go about redacting it for modern use.

You’ll notice that the write-up is much shorter than a modern pattern. There’s only one size given, plus a schematic with some notations on it and cursory working notes.
This pattern if translated straight would rely heavily on the schematic. The boxes represent a 1-inch square grid. Instructions on how to interpret notes like B-8 an D-1-7 are elsewhere in the pattern leaflet. Here’s what I start with – my interpretation of the original directions, plus a bit of editorializing.
“Eckhart” – Man’s 1941 Garter Stitch Vest from Minerva Hand Knits for Men in the Service, Vol. 62, size 30
Gauge in garter stitch: 4.5 st = 1 inch, 10 rows (5 garter ridges) = 1 inch
Back: Cast on 88 stitches. Work 3″ in K2,P2 rib. Then switch to garter stitch. Work even until piece measures 13 inches from bottom edge. Bind off 8 at the beginning of the next two rows. Then decrease one stitch at the right and left edge of the work every four rows. Do this edge reduction seven times total. At the end of the armhole decreases you will have 58 stitches. Work these 58 stitches even in garter stitch until the piece measures 11 inches from the under-arm bind off row and you end ready to work a right side row. Form shoulders by binding off four stitches at the beginning of the next four rows, then bind off three stitches at the beginning of the next six rows. Bind off remaining 24 stitches to form center back neck.
Front: Work as for back EXCEPT place a marker between stitch #44 and 45. On a right-side row when work measures approximately 15.5 inches from the bottom edge, knit to two stitches before the marker, K2tog. Then attaching a second ball of yarn, and starting with a SSK, work the rest of the row. Note that this happens BEFORE you finish making the underarm decreases, so watch for it.
You now have each side of the top front on either side of the V opening being completed from its own ball of yarn. From this point on you’ll be making paired decreases on either side of the opening on some right side rows, using a K2tog when indicated on the side that ends at the center, and a SSK on the side that begins at the center. Work three of these decrease pairs spaced approximately 1/2 inch apart (you’ll probably be doing the decreases every 4 rows). Then work seven of these decrease pairs spaced 1 inch apart (probably every 10th row). You will finish these neckline-defining decreases at about the same point where you need to commence the shoulder decreases. Finish the shoulders as directed for the back.
Finishing: Seam shoulders together. Starting at a shoulder seam, pick up 132 stitches around the neckline, taking care to space them evenly, and work in K2, P2 ribbing. Count off the stitches to make sure that the center two that will be in the point of the V end up as a K2 pair, and place a marker between them. Work the mitered join at the center front point of the V-neck by knitting the last two stitches just before the marker, and working a SSK immediately after the marker – do this EVERY OTHER row until the ribbing measures 3/4 of an inch deep. Bind off. Sew side seams. Pick up 144 stitches around each armhole and work even in K2, P2 rib until ribbing measures 3/4 of an inch deep. Bind off and finish ends. If you wish, reinforce shoulder area with a strip of seam binding, sewn by hand to the inside of the sweater to cover the shoulder seams.
O.K. Clear as mud? Now for the kicker. I need to work a size 46, slightly longer, with a bit of a center back neck scoop out (he doesn’t like the straight across the back of the neck bind-off). Plus I want to tinker with the depth of the V. How I do that alchemy is next.
MORE HISTORICAL KNITTING – 1941 MAN’S VEST
Another historical knitting project is in the works. Yes, I’m also still working on the leaf pullover and am almost finished with the back. But rare special requests from wiseNeedle’s technical wizard take priority. The Resident Male (TRM) has requested a particular vest from the 1941s vintage Minerva troop knitting folio he gave to me for the holiday.


This is a very plain garter stitch vest. It has slightly set in armholes, and K2, P2 ribbing. He’d like the V-neck opening to be a bit lower, but other than that, he likes the slim fit and style.
Now knitting this ultra simple thing will not be a straightforward as one might think. For starters, the leaflet offers up only size 40, and TRM is a 46. On top of that, the pattern is particularly sketchy, and not in a format used widely today. (More on this tomorrow). I could just look at the picture and then come up with something from scratch, fobbing it off as the real thing, but that wouldn’t be as much fun as trying to redact the original, keeping as close as possible to the 1941 instructions.
Let’s begin by looking at the materials specified – Athena Noninflammable Needles size 6 and 7, plus Minerva Quality Knitting Worsted – 6 skeins. I am delighted to report that this pattern DOES include specific gauge – 4.5 stitches = 1 inch, 10 rows = 1 inch. Gauge is not always included in these older patterns, and having it makes a huge difference.
The size 6 and 7 needles are about right for the stated gauge and are probably comparable to modern US 6 and 7, but an exact match is irrelevant. I need to use the needles I need to achieve the stated gauge. The sizes suggested in any pattern (not just this historical one) are supposed to be starting points for your own swatching purposes, not absolute dictates. It doesn’t matter a whit if you actually end up using 4s and 6s or 7s and 9s – so long as you achieve the specified gauge, your garment will fit as the pattern author intended.
Why “noninflammable” in the name of the needles? Prior to the early 1940s time early pre-plastic needles were either Bakelite or cellulose based. Cellulose needles were easy to ignite and burned quite hotly. The Athenas were probably either Bakelite or a new material (possibly nylon based), that melted rather than ignited when exposed to flame.
Now, “Minerva Quality Knitting Worsted – 6 skeins” is a bit more problematic. How much yarn is that? What would be a modern equivalent? How much do I need?
From the look of the picture, it’s clear that the yarn is a plain, smooth finish multi-strand yarn. If this pattern was knit in stockinette, I’d guess that it was a heavy worsted yarn, But it’s in garter stitch, which enlarges gauge somewhat, so I suspect that the yarn used is lighter than that, perhaps a true worsted with a native stockinette gauge of 5 stitches per inch. Possibly even a DK, with a native stockinette gauge of 5.5 stitches per inch. (True DK might be pushing it, as I’m not sure I can get 4.5spi with garter in DK without the fabric looking limp and loose).
More noodling is needed here. To start, I have a rough idea that a man’s sleeveless vest in size 40 should take approximately 900-1000 yards of worsted weight yarn. I base this on my Nancy’s Knit Knacks yardage estimator card, plus confirmation from Sweater Wizard, and from personal experience. If the original pattern called for 6 skeins, that would mean each skein would be around 150-166 yards. My absolute textbook standards for worsted weight yarns are Brunswick Germantown and Cascade 220. Both clock in at 220 yards per 100g (3.5 oz) or 110 per 50 g (1.75 oz). By contrast, DK weight smooth finish classic Rowan yarns tend to be between 240 and 255 yards for 100g (120 to 127 for 50g).
A web search on “Minerva Knitting Worsted” brings up an article on translating a 1934 vintage pattern, which calls out a yardage of 152 yards for 1.75 oz. Now 152 x 6 = 912 yards – within the target range, but 152 yards for 1.75oz (50g) sounds much lighter than worsted. I also find Columbia Minerva worsted on the Vintage Knits yardage chart. There it’s listed at 280 yards for 4 oz. That works out to 245 yards for 100g (3.5 oz), or 122.5 yards for 1.75 oz. Still more than Cascade/Germantown’s 110 and closer to DK than I expected when I started looking.
So to sum up my yarn weight findings, I’m now leaning to the light worsted/DK end of available choices, but without truly solid confirmation. Obviously intensive swatching is the next step. I want to make this vest out of stash-aged yarn. I’ve got a couple of choices on hand which I will detail in the next post.
