FIRST BUGS, NOW BIRDS
I’m edging into a new neighborhood on the Unstitched Coif Project. This one is inhabited by birds. The first one is stitched and I’m thinking on the fills for the second. You can see him at the center bottom of the piece, now presented in the correct orientation.

I think he looks a bit like a tiny raven, A slightly confused one at that. I could not resist the visual pun of using the feather fill from the collection presented at the official website for his body. You can make out another oddly shaped bird sketched in below and to the right of the pansy/viola flower.
All in all, I’m pleased with the way this is turning out, although like all participants, I wish my project was proceeding faster. Working so tiny is taxing. Mr. Raven for instance took about four hours to complete, counting the fills, outlining, sequin eye, and couched gold feet.
My game of not repeating fills between units is still afoot, although I am finding it harder and harder to find or devise fills for the particularly tiny areas, like the sepal-leaves on the pansy. And I have to go back and add lighter gold banding the the wings of the big bug.
One more challenge is that of adding the overstitched elements – the couched vein leaves and feather markings on Mr. Raven. I do the fills first, then neaten up their edges with the heavier outlines. But the fills obscure the placement of the overstitching. I do that by eye, referring to a printout of the master design. I’ve mentioned before that others do the outlines first, but with the heavy, embossed reverse chain stitch, working inside tiny spaces would be extremely difficult. I leave that to those who are using outline stitch, freehand fills, and speckling.
Today’s agenda will be filling out the spray of leaves at the (now) right edge, adding the gold stems to it, and flooding the few newly surrounded white space areas with spangles.
In other news, last weekend I visited Younger Spawn and surrendered the bespoken Eyeball Bolster Cushion, seen here in its forever home, on the target low back mid-century modern sofa for which it was designed. A perfect fit. The recipient was totally thrilled.

The sharp-eyed will spot my stitching set up near the sunny window. I added a hex wrench to my stitching kit, and can take the thing including the disassembled stand with me when I am on walkabout.
While I was out in Spawn’s neighborhood we went to a garden center/plant nursery. Spawn added to the resident collection of exotic houseplants that make the apartment a livable and calming oasis. I noticed that the prices for large, healthy outdoor plants were much lower there in the suburban Albany/Troy New York area than they are here in the outskirts of Boston, so I bought some plants to augment my growing perennial collection. Here they are, just before I plonked them into their spots.
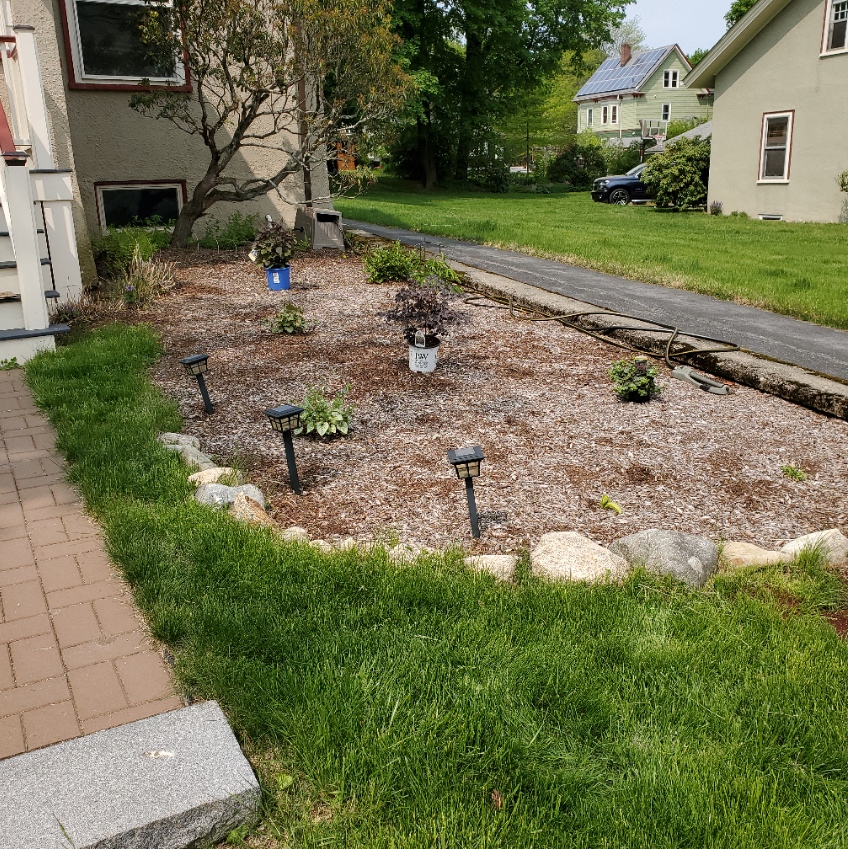
The big blue pot in back is a Chocolate Eupatorium (aka Joe Pye Weed). It’s a fall bloomer, with white flowers. The white pot in the middle is a red-leafed Astilbe variant, with purple/red flowers in mid to late summer. And the little guy over near the hose is a low-growing creeping sedum, that blooms purple in the fall. They join the transplanted peony, curly leafed Hosta, lemon Hosta, pink Astilbe, and two types of Brunnera (one red leaf, one green) that survived last year’s drought and fierce heat that doomed my Aconitum (wolfbane), and Hellebore. A less poisonous garden this year, but one I hope will outlive my ungentle care.
PRICE ALERT
One last thing – if you are interested in buying my pattern collection The Second Carolingian Modelbook, you may want to do so before 30 June. Amazon Kindle is raising print fees, and because the thing is on a razor thin margin, I will be forced to raise the price. I am sorry for this. I tried hard to keep it under $30.00 US per copy, and it will remain so until the end of June, but after than the price will be going up.

BEAUTY IN THE EYE OF THE BEHOLDER
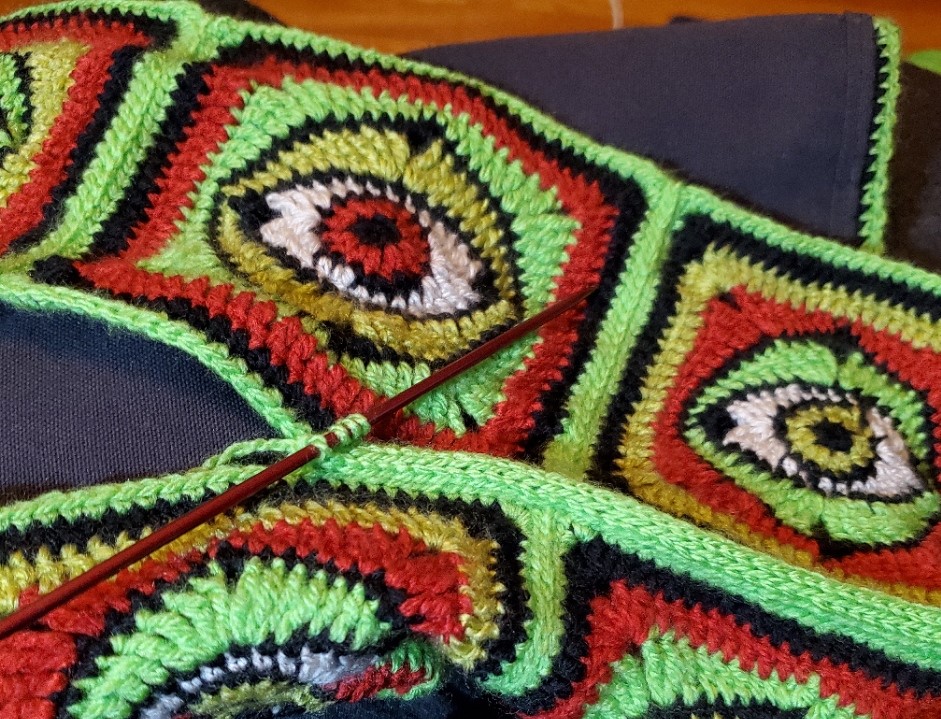
At long last it’s done! My Eyeball Bolster Cushion is fully assembled, with zipper installed, and pulled up around the custom cushion form I built for it.
Obviously this isn’t the sofa for which it is destined. That’s a mid-century modern low-back piece, in black, resident in Younger Offspring’s apartment. But you can get the scale of it on my rather more traditional living room couch.

I’m very glad that I was not recorded during the shimmy dance required to get the thing into final configuration. But it’s done. I am especially happy that the modesty panels work so well in keeping everything flat and level. I don’t expect the cover to rotate around the inner bolster because the outer shape is so well corseted. The corners are crisp, and the I-Cord piping join around the two large face edges pops nicely.


To be fair, there were a couple of hiatus weeks on this piece, especially in the past month. I savaged my fingers hand stitching the zipper onto the short side flap, and had to wait for a bit of healing before I could finish. All told, I began this on Halloween 2022, and finished yesterday. That’s a week shy of five months to crochet all 128 motifs, join them into sides with slip stitch, hand stitch the cover onto the inner foam slab, hem the modesty panels and stitch them to the assembled sides, join the sides with knit I-Cord, install the zipper, and stuff the cushion inside the assembled cover.
Not the longest tenure project I’ve done so far, but certainly the longest duration crochet piece I’ve ever attempted.
Now on to other things, with a pair of mindless socks in between for decompression and to allow time to contemplate what that next thing will be…
Oh, and I almost forgot. Motif designed by Christine Anne Melvin, Granny’s Eye Granny Square!
BY POPULAR REQUEST – FAUX WEAVE TOE-UP SOCKS
It’s been a long time since I added a sock knitting pattern. But I had so many requests for this one after I posted about it on FaceBook, that I had to write it up and add it to the collection. Like all the rest it’s toe-up, with a short row heel. It’s written for DPNs, but it’s very easy to adapt to work on a circular needle, or use with the two-circular method.

So to that end, my pattern for the Faux Weave Toe-Up Socks can now be found on the sock section of my knitting patterns page.
As for the ongoing work on the eyeball bolster cushion, I’m up to hand-sewing on the second side of the zipper on the end flap. Inside out the thing looks quite menacing. Like an gigantic and omnivorous sea cucumber. It’s slow going but I’m getting there. I hope to post final pix of the thing stuffed with its interior cushion quite soon.

EYES ON ASSEMBLY. AT LAST.
The multi-month eyeball square bolster project continues to roll along. I began this project around 25 September 2022, and first posted about it back at the beginning of October. The end may be in sight (pun intended) but it’s not imminent. Yet.
When last we visited this effort, I had just finished constructing the base pillow form to be covered by the (then) recently completed crocheted squares. I also in the final stages of joining the squares together to make the six sides of the cushion cover.
Now crochet in this style is not as opaque as knitting. There are holes, most notably in the points of the squares, and at the two sharp corners of the eyeball itself. These are large enough to see whatever is behind the crocheted layer. Obviously I didn’t want the Pepto-Bismol pink of the blanket covered foam slab to show, so I needed an inner cover. I tossed around the idea of making an entire second zippered cover out of black cotton duck – a canvas-like fabric, for durability and washability (after pre-shrinking). But then I thought about other pillows I’ve covered in knitting and crochet. The yarn layer on them was stretchy, and sometimes wandered around the inner pillow as it was used. Given that this piece is so big – the entire back of a low mid-century sofa – wandering could be expected. So I decided to cut panels of prewashed fabric, hem them, and then tack them to the assembled crocheted sides prior to joining those sides into the final pillow cover.
The first step was to measure the enrobed foam slab. Sure enough, a small bit was added to my final dimensions. Since I had the foam cut to size for my blocked but relaxed crochet assemblages, I am reasonably confident that stitching the crochet to panels in the newly measured dimensions would yield a good, close fit – stretching the crochet out a bit, providing inner stability against shifting and bagging. Note that I did subtract a quarter inch all the way around to leave the edge stitch of the crocheted squares revealed since I need to use those in fastening the sides together, and added a hem allowance.
First I machine-hemmed all of the sides of each modesty panel EXCEPT for the edges on which I expect to mount the zipper. Not up to that yet, so I’m still thinking that out. In any case, here’s a mid-tack photo showing the machine hemmed panel being affixed to the back, leaving the edge row of crochet (green) free for later attachment.

After all six pieces were prepped with their backings, I was ready to begin assembly.

That’s all 128 eyeballs. There are four more – two worked while achieving gauge, and two unknowingly worked in excess of need. One of the side strips is flipped over on top to show the backing. A loose edge which will be employed in zipper installation is at the bottom of that strip. Right after this I sewed three of the four narrow strips together to make one continuous band that wraps around the edges of my foam block. I left the last one free. It’s going to be the “drop seat” around which that zipper wraps, and needs special treatment.
Now to join with I-Cord. It’s simple once the right needle size is determined. I experimented on those spare squares until I found the needle size that produced an I-Cord that was stitch for stitch even in height to the width of my edge crochet chains.
To attach, I took those DPNs, and cast on four. Then holding my designated pieces back to back, I picked up another stitch through the outermost loop of the first chain on both edges to be joined. That makes five stitches on my DPN. I knit off three, then did a SSK, and picked up a stitch through the next chain stitch on both edges to be joined. And I kept going, making sure that each square was neatly butted to its neighbor, with an additional row of joining I-Cord worked into the columns of slip stitch that attach the squares together. For that my DPN needle tip wasn’t enough to tease a loop through, I had to pull out a smaller crochet hook to grab a loop, pull it up and mount it at the end of my DPN.
The image above shows four stitches on the DPN, ending with the SSK, just before I picked up the next stitch through the crocheted edge chains of the squares to be joined.
Now it was time for the corner. For that I needed a bit of ease, but I didn’t want to make a big loop like I had done before. I experimented a bit and decided to work up to the corner stitch on the squares, then make ONE round of free I-Cord, work the corner stitch in attached I-Cord, work another round of free I-Cord, and then continue on in my new direction as usual. That made a tight but non-distorting 90-degree turn:

Here’s the piece so far. First long side seam done, first short side seam done, along with the two corner transitions between them. I’m quite pleased with the way the raised “piped” seam looks. Now to continue on to finish this side, and begin the Special Treatment for the zippered end. Wish me luck!

NAKED CUSHION!
Nothing purient here, other than a disturbingly pink sofa cushion at the end of this post.
As folk who follow here know, I am in the middle of making a large bolster cushion for Younger Spawn’s low-back mid-century style sofa. The thing will have a unique cover of crocheted squares that look like eyeballs, and will span the back of said sofa. That’s a lot of crochet, now all done and assembled into the six requisite sides.
But how to find a cushion of the exact dimensions needed? It’s not an off-the-shelf item. In retrospect I suppose I could have gone looking for one, and then modified my gauge and motif count to make a cover that fit, but that’s not how I think. Yarn first. Then pillow. So having established my size (within stretch tolerance of the crochet), I had to make my own bolster to fit.
My original thought was to buy a piece of foam and wrap it with quilt batting. I’ve done that before for a bench seat cushion that has a sewn fabric cover. But that was thinner and smaller. I went on line looking for foam and found some, but it came in large sheets. I couldn’t feel it to gauge its loftiness or give, and I’d have to buy the tools with which to cut hard straight edges, then rely on my novice foam cutting skills to get it right. I weighed that against buying it in person from a shop that would cut to order. Although the on line cost was lower, when all was toted up (including angst) I decided to splurge on the custom cut foam. For the record, I got it at the re-opened Fabric Place in Natick, MA.
My 62″ x 20″ x 4″ (approximately 157 x 51 x 10 cm) acquisition, with our fridge for scale.

Massive foam slab acquired, it’s obvious that it has to be covered in some way. Since I blew my budget on this part already, I looked around to see what I had on hand.
Aha! The kids’ old summer camp blanket!
It’s acrylic and won’t fray, lofty, and detested both for its color, odd size, and affinity for scratchy bits of hay. It won’t be missed if it were to be cut up. So I carefully de-splintered it, washed it, and laid out the six pieces I would need (plus seam allowance). I had a lot left over, so I cut two additional panels for the front and the back, but slightly smaller. I zig-zagged them to the existing pieces, to sit inside the final assembly and provide extra cushiness.

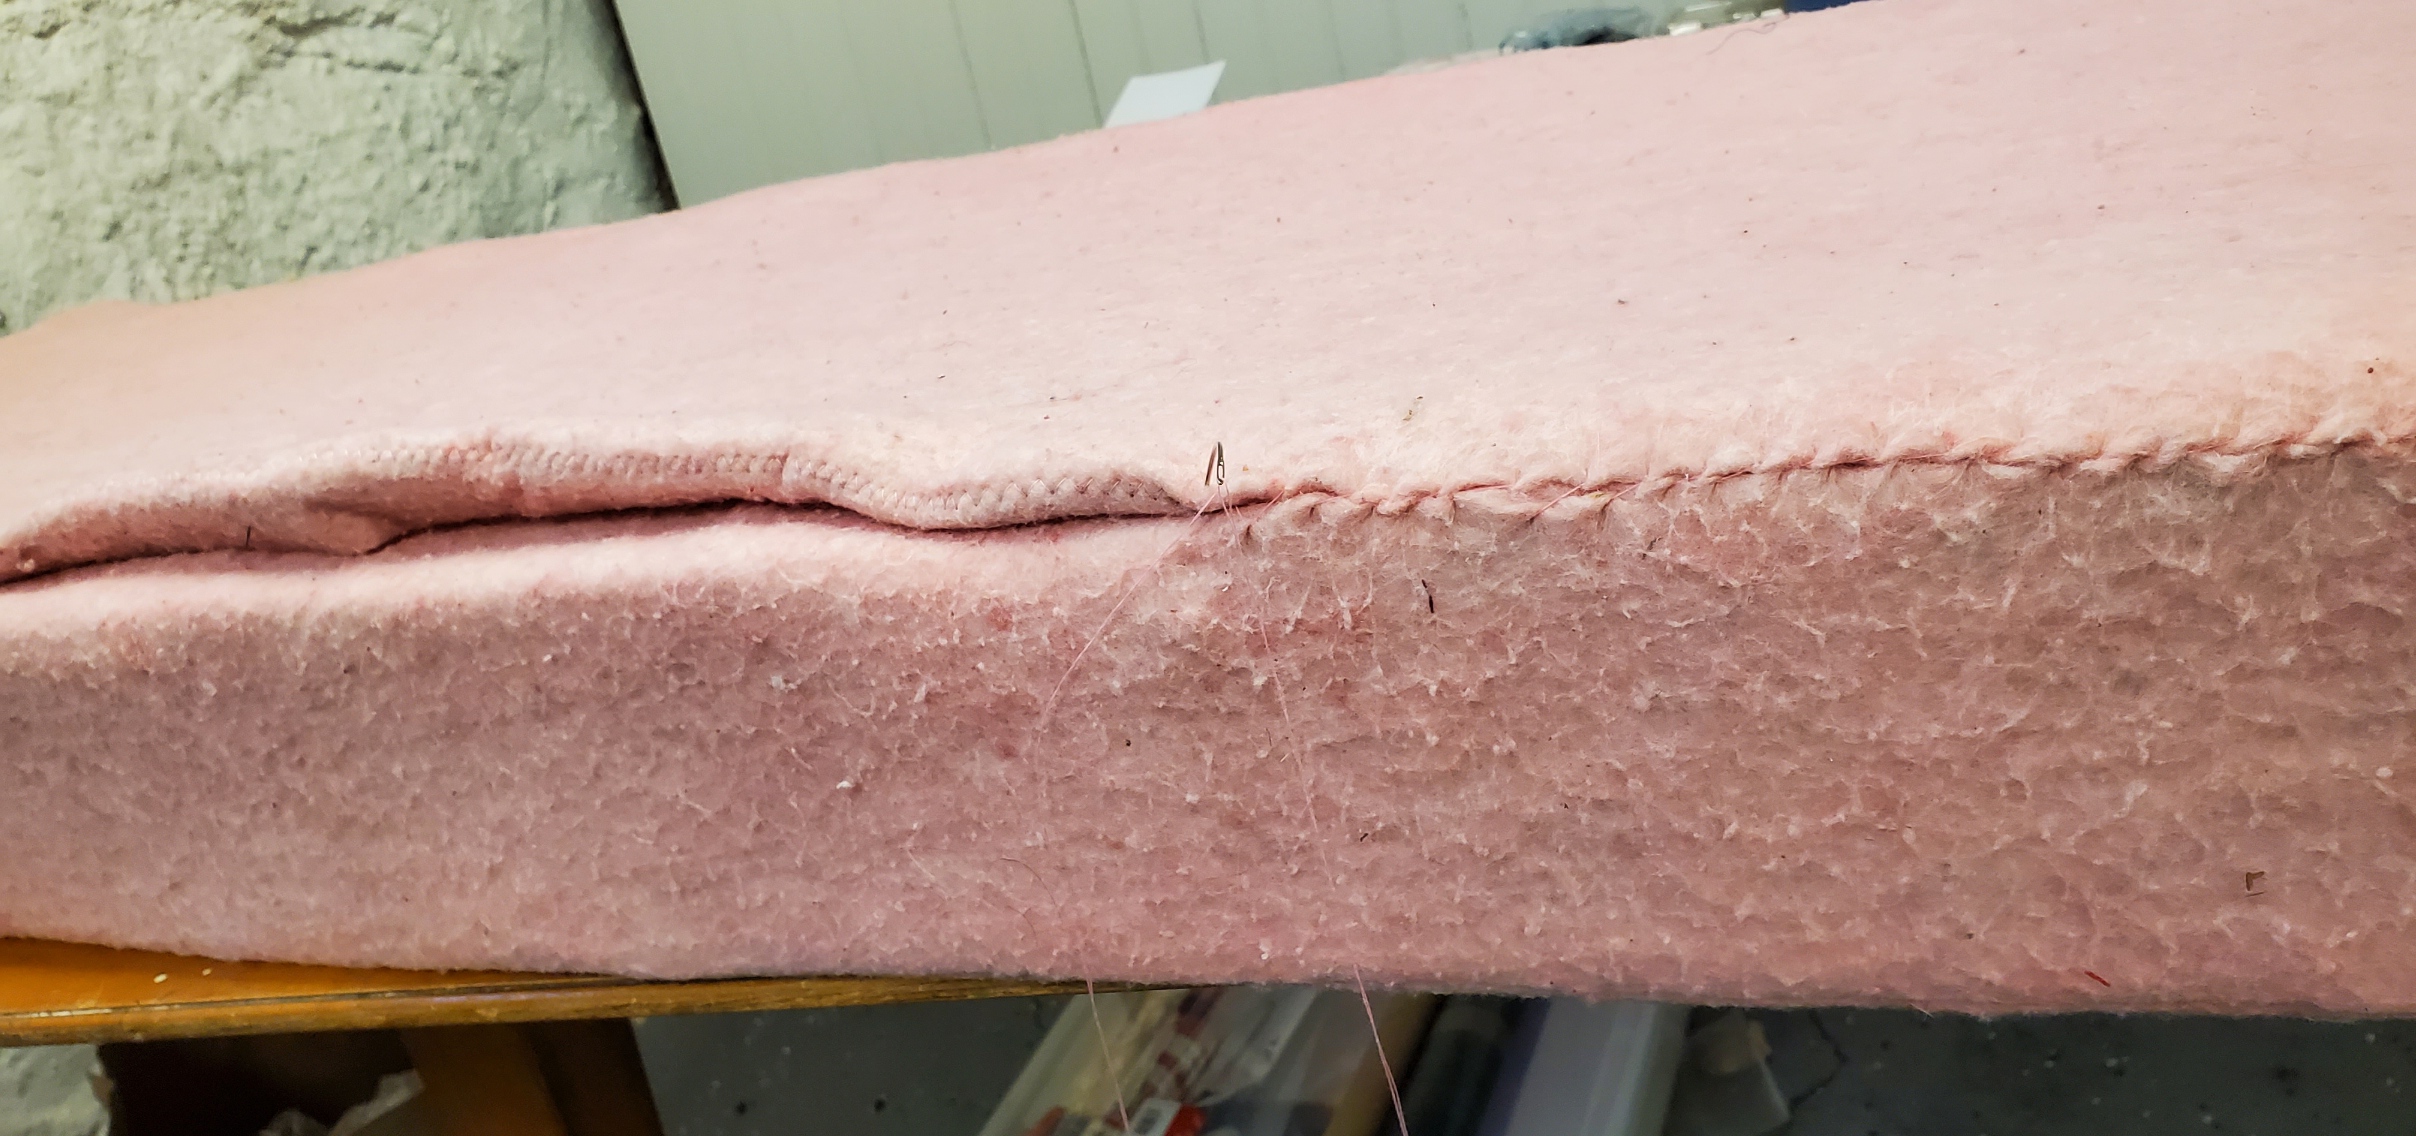
I began assembling the six sides to make my cushion cover, but discovered that my initial concept of making a big pillow slip and sliding the foam inside would not work. The grabby nature of both the foam and the pink fabric preclude that. Instead I assembled it “coffin style” – with the three edges of one of the long sides to be sewn by hand, instead of with the smaller end piece being stitched last. Here you see assembly and the final product. The pink stuff turned out to be very stretchy and unruly, and I ended up having to use more tension than I thought to get the cover fitted as closely as I could. The curved upholsterer’s needle helped a lot.


Now that the thing is (rather lumpily) assembled, I have final measurements of foam plus pink padding. I will use those to cut a “modesty panel” of black fabric for each of the sides. Then I will hand-sew those to the back of each of the cushion faces. I hope that the fabric will provide a bit of stability for the stretchy crochet and help keep it from rotating around the inner bolster, as well as keeping the egregious pepto-bismol pink from showing through the natural gaps in the crochet.
After that is assembling those six crocheted sides into the final outer cover using knit-on I-Cord to simulate piping, inserting a zipper in one end of the thing so the cover can be taken off for laundering, and finally clothing my massive but naked cushion with its eyeball-festooned sweater. We’ve come a long way since Eyeball Day 1, back in early October.

A WEALTH OF POSSIBILITIES
Progress and some potentials to report. First the progress:
I’m closer to finishing the initial seaming of the eyeball squares for the bolster cushion. Here are all of them. The group indicated by the yellow brackets on top is the front. It’s 12×4 units, all sewn together. The group in the yellow brackets at the bottom of the page is the back. I’ve just begun sewing the last course of 12 onto the other three.

Then there are the loose piles between the front and back, and to the right of the back. Those are the squares that will make up the sides. That’s another two strips of 12, and two strips of four. After I finish the seams on the back I will assemble those strips. After that will come an orgy of darning in ends. Once all six pieces are neatly finished off I will begin final assembly. I intend to sew the side strips in sequence – long-short-long (leaving one short side out briefly) with the same slip stitch method I used for the front and back. But when I unite the side strips to the front and back I will use a knit-based method rather than a crocheted one. I intend to use knit-on I-Cord edging as my seaming method, to make what will look like a piped edge, to make a green “frame” for the front and back. Somewhere along the way I will introduce a hand-stitched zipper into one short end, which is the reason for reserving that last short side.
I’ve done the I-Cord edging before to excellent effect on pillows. The one in front uses it. (I won’t be doing the free-loop corners though on this piece.)

This is the general look I’m aiming for. This is a bench-type cushion I built and covered for a storage settee that’s now on our enclosed front porch. This piece was sewn, and that corded piping was introduced with it was seamed together.
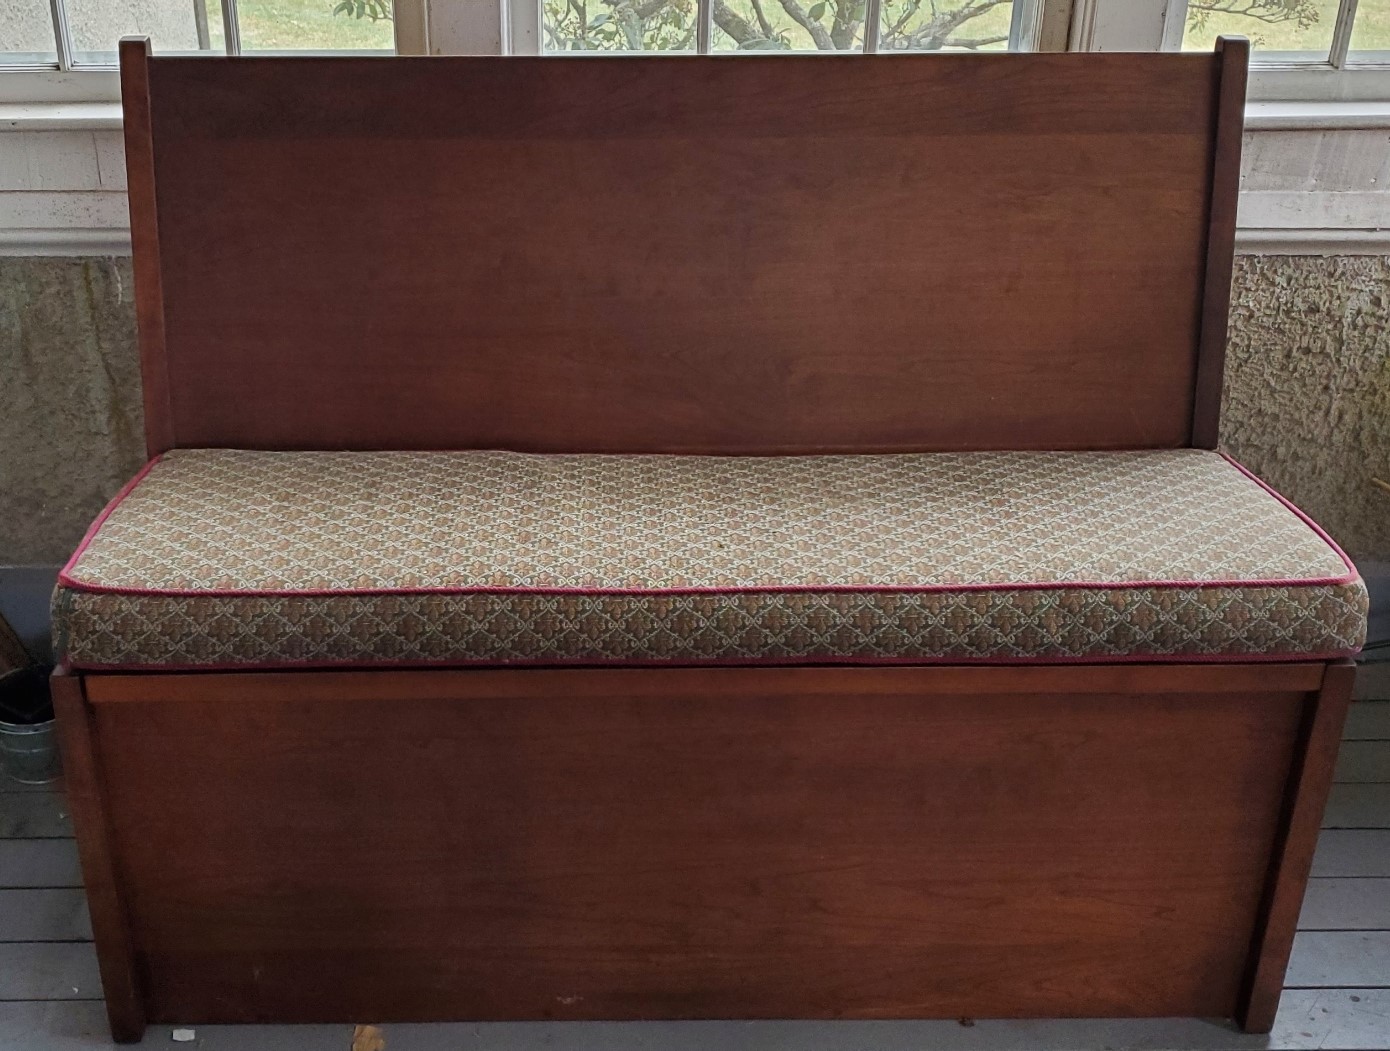
For the record, this cushion was built in the same way I intend to build the eyeball bolster – a slab of foam, wrapped in quilt batting, seamed into a permanent cover. But the eyeball bolster will have an additional removeable inside cover between the crochet and the permanent cushion. Crochet by its nature is rather see-through, with lots of small holes. The inner, removeable cover will be a heavy black cotton duck or canvas. Removeable just in case something is spilled on the bolster. It along with the decorative crochet cover will both be washable.
So even though I am almost done with eyeball assembly there’s still a lot of work to go on this piece.
Now on to other possibilities.
Thanks to the generosity of a long time friend, I find myself in possession of a set of twelve magnificent linen napkins. Never used. I had lucked into a similar but well-loved set of twelve at an estate sale this summer. I now have double the possibilities. First, both are eminently stitch-able:


The unused napkins are on the left, and the well worn ones are on the right. Counting threads and doing the math for the Penny Method the approximate thread count for the new set is roughly 40×40, and the old set is about 38×38 threads. Small, yes, but not impossibly so.
Now what to make….
I have many thoughts on this. First is the obvious, just embellishing one of the sets for obvious use as napkins. I’ve thought about doing a set with a big initial S in one corner, but each done in a different antique alphabet. This is a prime source for alphabets as magnificently ornate and over the top as anyone could desire.
The second possibility is a pieced tablecloth. There are all sorts of Renaissance examples of tablecloths and devotional pieces pieced together, some probably re-using earlier stitched fragments, others purpose-done. Some unite countwork pieces with darned net strips, others combine cutwork and other contemporary embroidery forms. Much to think about here and a lot of potential learning.
A third possibility also looms, for the well-used napkin pile. I have wanted to stitch a peasant style blouse for myself, using some of the more outre strip designs in my personal collection. Like dinos, for example. I am not quite sure how I would go about it, but I think with cleverness I could get a square yoke out of one or two napkins, a gathered body below that, and full 3/4 sleeves, also gathered. I have to mock this idea up with tissue paper to see if I have enough yardage, but I should.
I guess the moral of the story is that retirement is not idleness!
A BUSY DECEMBER
One of my periodic “where did I go” posts, reporting on everything and sundry that kept me from regular blogging.
Baking
First because I know there are cookie fiends out there just waiting for this year’s round-up, I present Cookie Plate 2022, arranged on the fused glass bison presentation dish given to us by my sister and brother in law. I use it in tribute to the resilience of my Buffalo, NY family and friends, enduring their second (and twice as bitter) lash of winter weather since Thanksgiving. May the lights and heat stay on and may the driveway finally learn to shovel itself!

Starting from the yellow and blue stars just above the bison’s head we have:
- Keto cutouts. I used this recipe this year, no “real” flour or sugar. I did make two enhancements, though. I put finely grated lemon zest in the cookie batter, and mixed the icing using powdered monkfruit based sweetener with lemon juice (and a dash of food coloring). Light and lemony. This dough worked relatively well for the simple star shapes, but it’s a bit on the cakey and fragile side, and would not be at its best if used for a cookie cut with an elaborate design, or with one of the plunger-style cutters that also embosses an impressed design. The icing too was a bit harder to handle than the confectioners’ sugar standard.
- Mexican Wedding Cakes. I subbed the monkfruit sweetener inside and used about a third almond flour in place of the regular all-purpose flour in this recipe, but dusted with confectioners’ sugar because the substitute doesn’t do that well for dusting. So I’d call these slightly slimmed down, but not keto.
- Keto peanut butter cookies. Last year’s recipe turned out rather poorly, so I tried a new one this year. Better results. Still a bit cakey-crumbly, but the taste and texture are better.
- Earthquakes, the name by which what most folk call chocolate crinkles are known in this house. Again not much seismic cracking this year, but the brownie-bite taste and texture were spot on. The usual recipe. Full octane – no slimming.
- Cinnamon bun swirls. This one is a specialty of the Younger Offspring. Clever fingers and exacting methods make those mathematically perfect spirals. These instructions but we skip the recipe author’s icing, The cookies are sweet enough as-is. Hint for avoiding the flat-tire look – slide the long rolls of this refrigerator cookie dough into the cardboard tubes from paper towels. They firm up nicely round without flattening that way.
- Triple Ginger White Chocolate Chip. My own invention. I love these, even though they are not chocolate. 🙂 I did slim these down a bit by using monkfruit brown sugar replacement instead of the real stuff. But the white chocolate chips probably make up for that little bit of virtue.
- Bourbon Balls. A family standard that I’ve made every year since I began baking holiday cookies from recipes more or less like this one. Since they start with crushed Nilla wafers and have a cup of bourbon in them they will never be full keto, but I did slim them a bit with sugar substitute. Note that these are also good with many other nut/cookie/liquor combos, with or without the cocoa. Chocolate wafer cookies/pecans/Chambord. Almond biscotti/almonds/amaretto. Nillas/hazelnuts/rum. One hint – they improve with long curing. Make these up right after Thanksgiving and put them in a tightly sealed tin. Then hide them until the end of December. Your forbearance in not gobbling them down right away will be rewarded.
- Jam thumbprints. Another contribution of Younger Offspring. This time the clever fingers fashioned heart shape wells, which were then filled with raspberry jam. A very buttery and light shortbread compliments that fruity goodness. Full octane. When I extract the recipe from the cookie artist I will post it here, but by the time this last cookie was baked, I was distracted and didn’t make a note of the source.
- French cocoa macarons with almond buttercream filling. Oh so good, and oh so sinful. Again Younger Offspring steps up to bat with authentic technique off a memorized recipe. Even the almond paste-based buttercream was extemporary. Obviously the Padawan has far surpassed the teachers.
- Chocolate chunk. This one started with the traditional old school Nestle’s Toll House original recipe (the one that still called for 1/8 tsp of water). No slimming and no nuts in this one, but about a third of the weight of chocolate chips was replaced by Trader Joes’ Cocoa Nibs. The remaining chocolate was chopped cold, making lots of chocolate dust, and tiny fragments. That really helps the flavor distribute itself throughout the whole cookie. The big hint on this one (aside from chopping) is to fridge the batter overnight, and roll it into uniform size balls rather than employing the two spoon/drop method. Much more uniform results.
- Yes there are 11 this year. We couldn’t cut a family fave to make the goal of ten. My Oysters. A simple hazelnut spritz with whipped bittersweet chocolate ganache filling. Slimmed a bit by using monkfruit sugar instead of about half of the regular white sugar, and a third almond flour instead of 100% all purpose flour, but it’s hard to call these virtuous.
I also made a keto lemon-chocolate swirl cheesecake, with a hazelnut/almond flour crust. I forgot to take a picture of that, and now it’s gone.
Not Baking
Aside from cookies, I had some knitting and crochet projects going.
First, as a favor to my mom, an old school knitter from the days of Knitting Ladies who sat by your elbow throughout design selection, customization, swatching, and execution to gauge. I didn’t do those earlier stage support functions but I did do the last and most important one – finishing. Taking the individually full-fashion knit pieces, seaming them together and adding final details like collars. Mom had completed but had not assembled two sweaters, intended for my nieces. I helped those projects over the goal. Both are adult size. Now that they’ve been bestowed, I can break silence and post them here.

Also with almost all of the squares complete, I have begun assembly for the I’ll Be Watching You sofa cushion.

More on this as I get more strips put together. Note that some rethinking happened. Due to color assortment challenges, we added two more units to the mix to make 12 individual color layouts, and upped the cushion width from 11 to 12 units. Needless to say that required a few more squares than I originally planned.
Other Accomplishments
Let’s see. I visited my mom in Florida the second week of December. We had a good time together, and even managed to hijack the Palm Beach area family for a dim sum brunch over the weekend. Why I have no pix from the week, I don’t know. I guess I tend to live the moment and not document unless I’m a spectator. But I think the visit was appreciated, productive, and satisfying. Next time I promise to be a better chronicler.
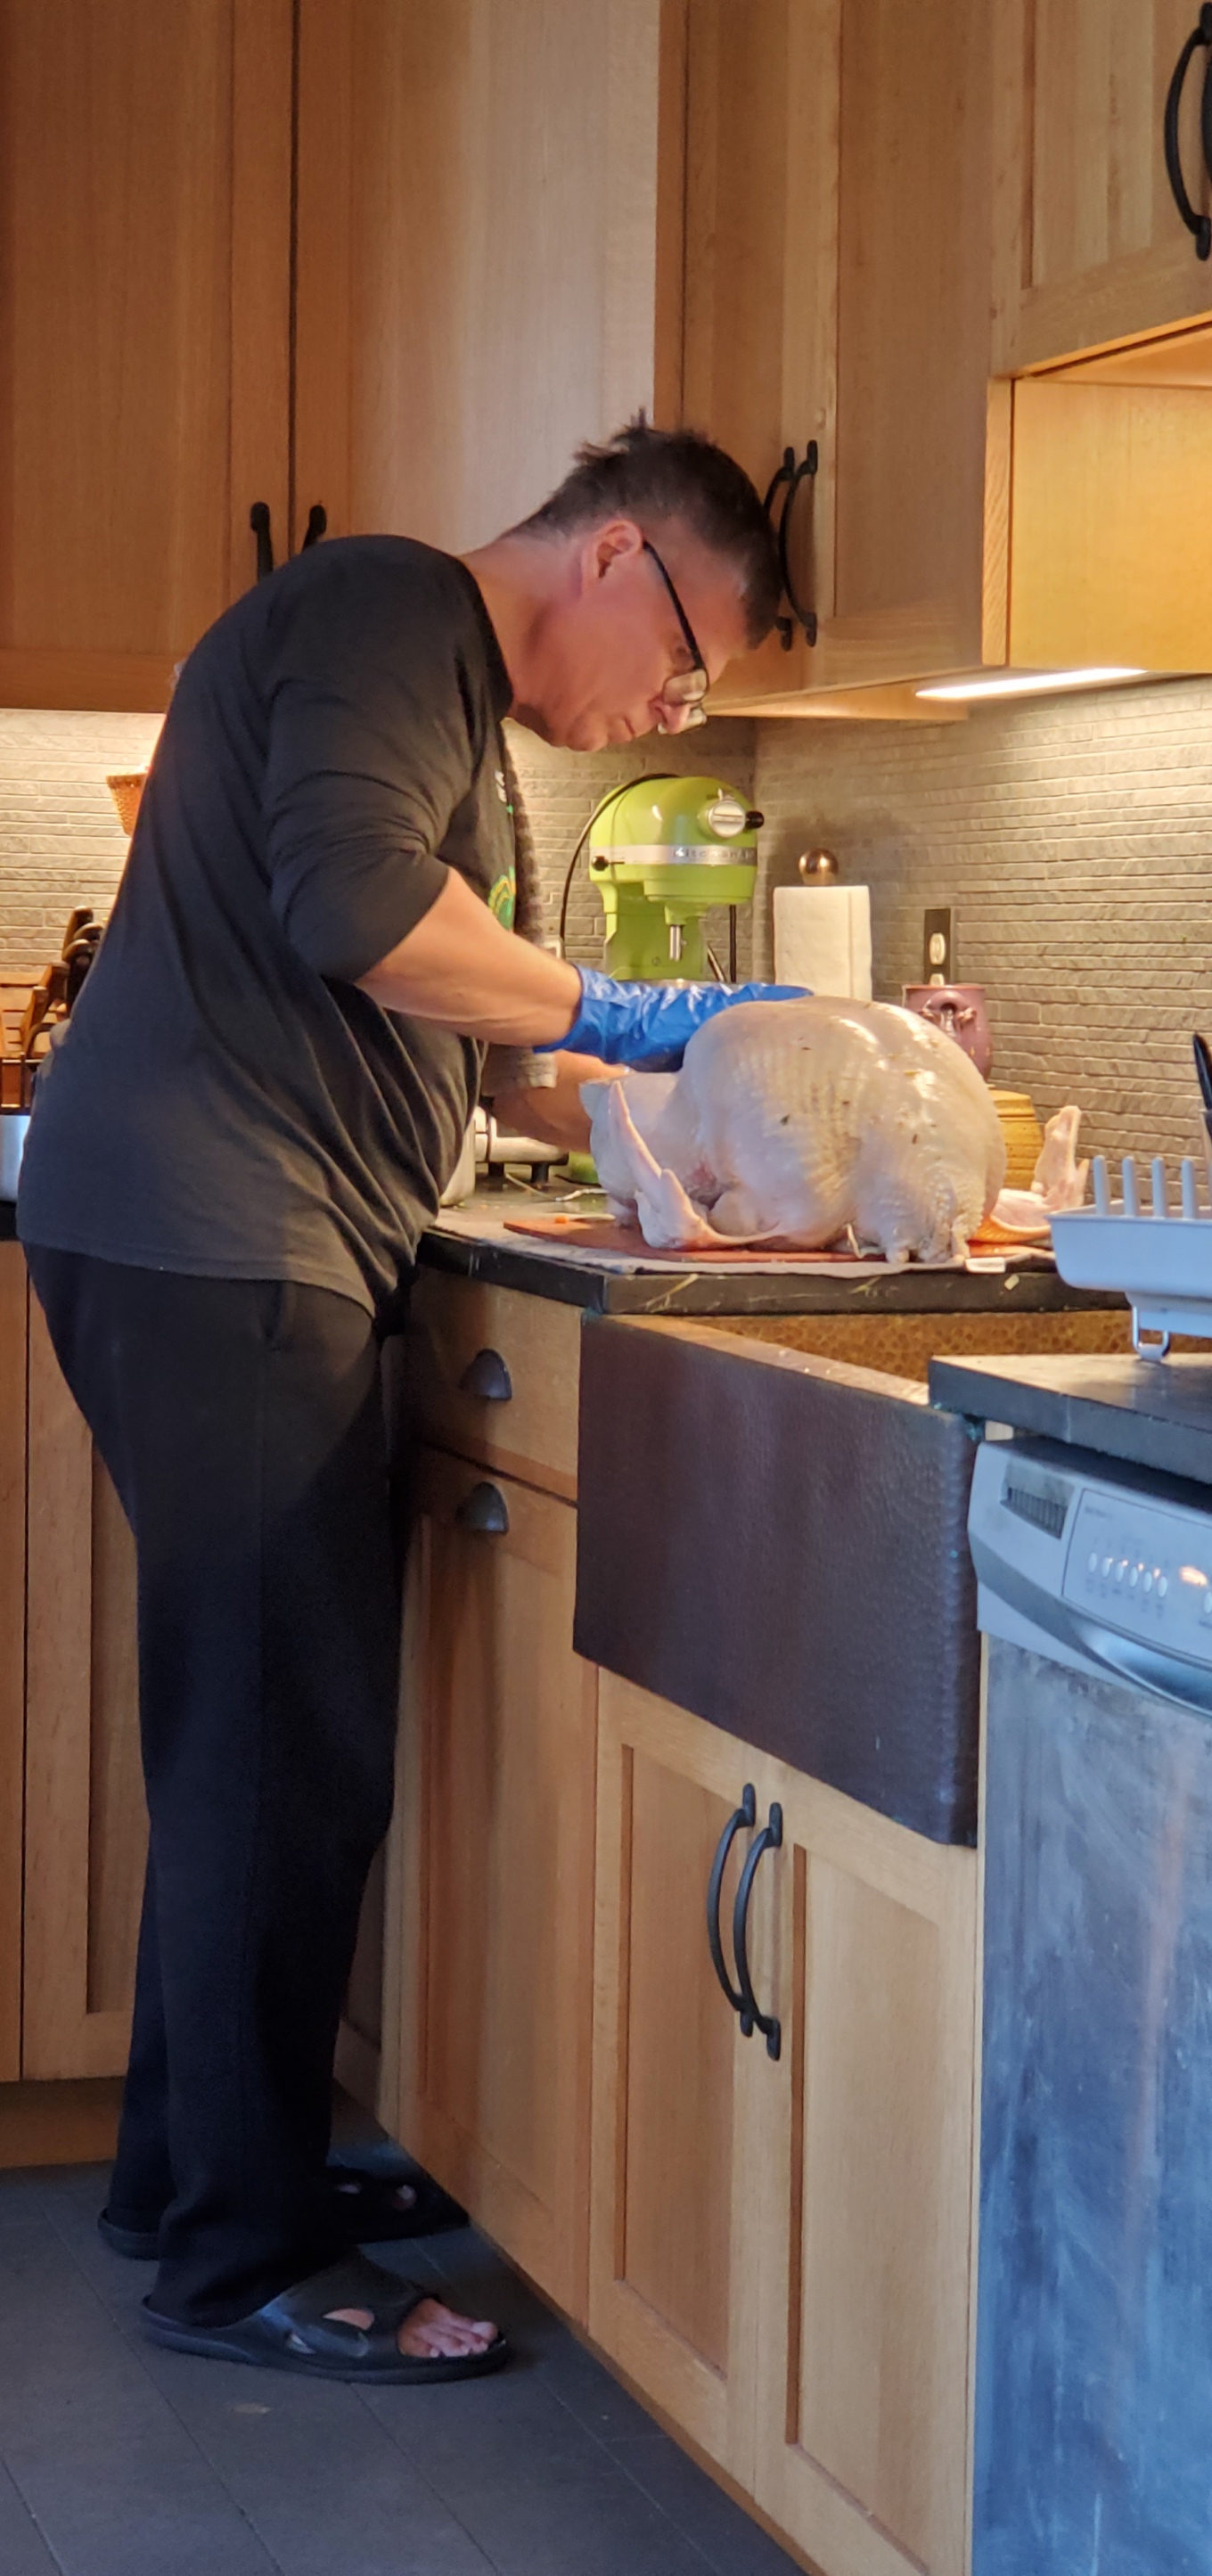
As spectator, I cheered on The Resident Male as he prepared an epic feast for Christmas Eve. His menu is here. When Henri, our Guest of Honor emerged from the oven, he had celebrity status. Everyone documented him.


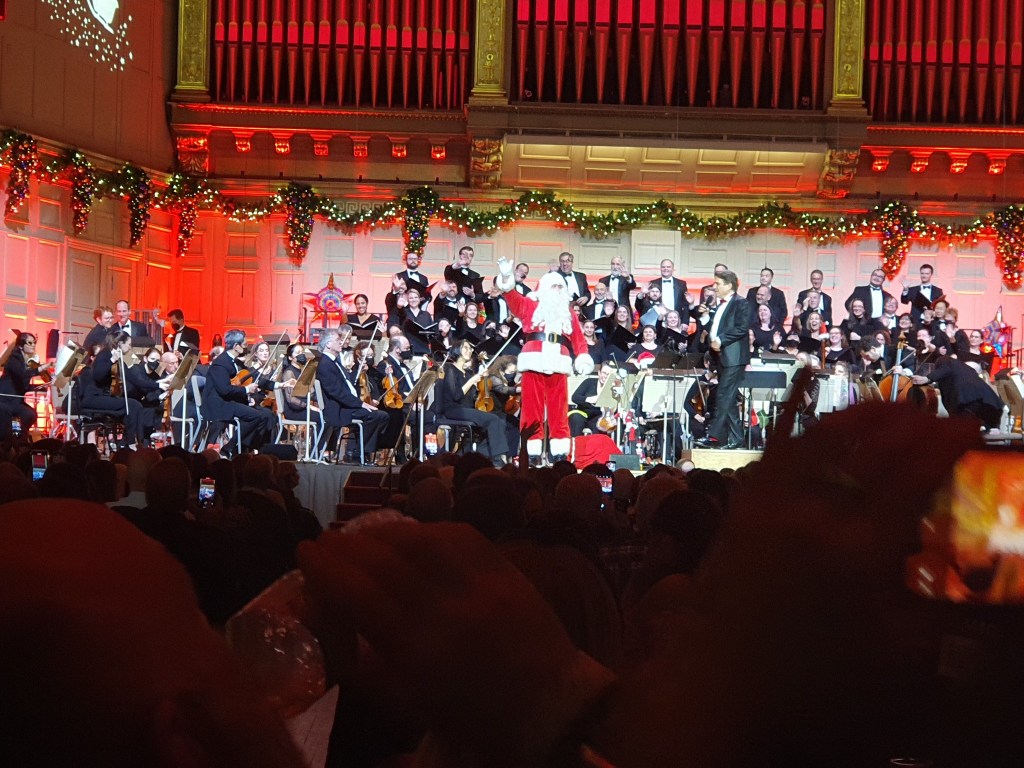
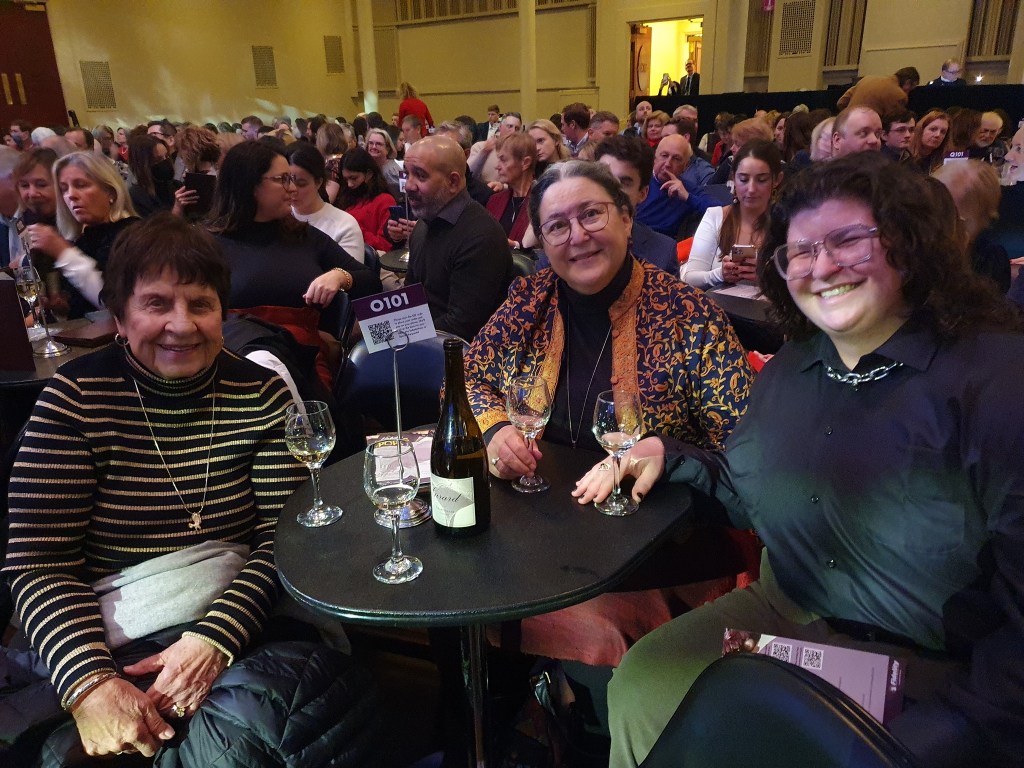
We also went to see a performance of The Boston Pops. It was a delight.

And as usual, we maxed out on holiday festivity, aside from food and drink. We lit candles (hard to see the fully illuminated menorah due to frost on the window). We did the tree. We had the fun of opening presents from each other. This year abetted by Fernando’s mom Carm, who is happy to be away from Lackawanna and the worst of the weather there.


EYE WITNESS TO PROGRESS
So. How is that eyeball cushion coming along? Faster than I expected.

Behold 90 of the completed 102 squares – that’s nine each of the 10 color combos. In total I will need 118, so I’m only about a week out from having them all. The designated recipient is here for a holiday visit, and with luck we will find time to do a placement for the front and back. That’s four rows of 11 squares across. I’ll take pix (just in case) and pin up the four courses, noting the order of the four. The back of the cushion will duplicate the front, and I will use up the rest to make the side edges, finishing out in a large rectangular block.
My plan is to slip stitch them together, assembling the strips of 11 as required, then slip stitching the long strips together for the two primary front and back sides of the bolster. Once I have the front and back, I will slip stitch together two more rows of 11, plus two of 4. However, instead of using slip stitch again to unite the front and back with the sides, I plan to make “piped” seams using I-Cord, knitting them together instead of crocheting. I’ve done this several times before, and the result is worth the effort. I’ll probably do that on something like US #2 or #3 DPNs (between 2.75 and 3.25 mm), I have some between sizes sets in that range, so I can experiment until I find the best fit.
I plan on using a zipper around three sides of one of the short ends, so the crocheted cover can be removed for washing. In any case, once I have the crocheted layer done and have an exact final measurement, I will build the inner bolster cushion (thick semi-rigid foam wrapped in quilt batting), encase it in a permanent inner cover (an old worn out bedsheet, repurposed), and sew a zippered “fashion lining” (black duck or cotton canvas). I need that lining because crochet isn’t uniformly dense, and there are little holes in the corners. I’d prefer they be backed by black, and whatever that black is – it should also be able to be removed for washing. So even when the crochet and knitting on this is done, the project itself will still be an ongoing effort.
Wish me luck. It’s been a while since I did a major cushion project, but this is much simpler than the knife edge, piped trim bench seat I did before. I’m sure this construction is not beyond me, but luck is always welcome. 🙂
In other news, like so many others we of Casa Magnifica had our own Thanksgiving celebration. Pies, turkey, sides, and the like. Just two pies this year due to it being a small crowd (pumpkin and chocolate pecan). And I share pix of The Resident Male tending to our turkey, which due to his care, skill, and watchfulness, was superb. Younger Spawn contributed to Pie Perfection again this year, crafting a pecan vortex of deliciousness, and an on-point pumpkin presentation, and along the way making a few key improvements to the basic recipes. I will be making additional notes on those soon to preserve those flashes of inspiration.

Oh, one last minor thing. If you have been following me via Twitter, apologies. I’m afraid that’s over. I no longer have a presence on that platform.
MORE BEHOLDING
Progress on the I’ll Be Watching You cushion. I’ve got six basic color combos done, as specified by Younger Offspring (the co-designer and recipient). We are in consultation right now about whether there need to be additional color arrangements of the lime, celadon, russet, and white – black being in stable placement across all the squares.

As often happens, when I started I had a general idea of what I was going to do, but now that things are underway, ideas are coming together. Here are some thoughts.
- I experimented with three crochet hooks in various sizes and styles ranging from 2.75 mm to 3.25 mm. The best results were with the Clover 3.25 mm. That’s what I used to do the set above.
- Crocheting in to end off as I progress is absolutely the right way to go. Every square has eleven concentric rings. That’s 22 ends per motif, or with 118 squares – 2,596 yarn ends to deal with. I don’t want to think about the pain if I left them until the very end. Right now each one only has the green tail from the final ring. Those of you who have received granny square throws and rejoice in their riot of color, know that someone loved you enough to deal with all of those bits.
- The black is slightly heavier than the other colors. But because every square has the identical use and placement of black, there is no differential effect on overall square dimensions.
- Both yarns are acrylic. There’s some rippling, as is common in crochet. I may have to “kill” the yarn – pinning them out and using steam and possibly pressure to set the fiber permanently in order to get rid of those undulations. It’s a bit more savage than blocking 100% wool which does relax each time it’s washed. “Killed” acrylic never bounces back. Before I commit to doing it however, I will try the method out on one of the experimental squares I made. Although it’s not the same dimensions as these keepers, it does have the rippled edges that these do, and will make a good test subject.
- For final assembly into the full bolster I will probably do mattress stitch in the neon green to unite the green outer rims. BUT my plan is to make a square edge cushion, so I am thinking of using knit I-Cord to seam the front and back of the cushion to its edges, to make the equivalent of a piped edge. This would also be in the neon green, and will disguise a zipper at one end so the cover can be removed and washed.
- Because there are gaps in the crochet where it would show through, I will be making a second cover for the cushion, probably out of pre-shrunk black cotton duck or light canvas. That will also have a zipper for easy removal and washing.
- The bolster at the center of this also needs to be constructed. I am thinking of using a single piece of dense upholstery foam, cut to size and wrapped with quilt batting. Not sure if yet a third cover will be required to keep it all in place inside the black cotton cover. But if there is, it will be something like inexpensive muslin, and permanently sewn (no zipper).
Because progress on this thing will mostly be just adding to a tottering pile of completed squares, I will probably hold off additional blather until something significant happens. Otherwise visits here would be like watching grass grow.
KEEPING AN EYE ON CROCHET
It’s Spooky Season, and I celebrate with a slightly off beat bit of crochet. This is the first block of many, destined together to become a long bolster cushion for a sofa.
Younger Offspring whose apartment décor sits at the junction of vintage, Goth, mid-century modern, and exuberant and individual artistic expression has requested this and picked the colors. I provide the manual labor, and enjoy the fun of the journey.
The pattern chosen is Granny’s Eye, a paid pattern available via Ravelry. The yarns were chosen for value and wash properties. The black is KnitPicks Brava Sport, with a native knit gauge of 24 stitches = 4 inches (10 cm). The other colors are all Herschnerr’s 2-Ply Afghan Yarn. Although it has the same gauge, it is not as dense as the black, and has a more airy hand, sort of like vintage Shetland sport yarn. As a result it’s an unruly crochet, with the strands separating and shredding – very difficult to get a clean “grab” on them when forming the stitches.
I am using a 3.0 mm hook, to make squares that are 4.75 inches (12 xm) across. Preliminary calculations are that 11 x 4 units for the front and back, plus a squared side edge of one unit all the way around yield a finished cushion dimension of 52.25 inches x 19 inches x 4.75 inches (132.7 cm x 46.3 cm x 12 cm). That means I have only 117 more to do. I may experiment with a hook one size smaller to see how I like the density. I want it as tight as possible for this use. If so, my size/number of units calculation will have to be redone. In any case, there are going to be a lot of eyeballs in my immediate future.
Oh – that forehead cloth I’ve been working on? I’ve put it aside to get cracking on this bespoken project request. I’ll go back to it as soon as I can.
Being craft-multi-dexterous means that I can cycle among knitting, embroidery, and crochet (and sometimes sewing) and so avoid boredom or falling into a creative rut. Highly recommended. 🙂
UPDATE:
I’ve now experimented with hook sizes and styles. I most prefer a Clover 3.25 mm hook with its soft, wide grasping handle. For some reason the 3.0 mm hook I have from a set of mutiples must have an unusual alignment for throat and hook end, because I can’t pull it through a stitch without it catching. I can get the same gauge with better tension using the more comfortable Clover model. On to mass production!
