CREWEL EMBROIDERY ON FULLED KNITTED GROUNDS
I’m well into the stitching on my Mystery Project. I’ve been forced to
abandon some of my more ambitious ideas. Working on the fulled ground
presents some problems, only some of which I anticipated.
First
– there’s the Fuzzy Texture problem. It’s no so easy to transfer the
design to be stitched onto a fuzzy, uneven ground. I started by drawing
my design freehand on paper, then pricking and pouncing. That’s the
time-honored technique of taking a pin, a fork, or one of those spiked
tracing wheel gizmos and piercing a paper pattern. While the modern
equivalent uses a waxy equivalent of carbon paper behind the paper
pattern, transferring its color to the substrate ground as it’s
pierced, the ancient method is slightly different. In the old way, once
the paper was pierced, it was placed on the ground and finely crushed
chalk (or charcoal, or another substance) was sprinkled on the pattern.
The theory was that the fine dust would filter through the holes and
mark the ground fabric. Once the ground fabric was marked the stitcher
could make the design less likely to blow away by over-basting the
chalked lines.
I do something similar. I prick the paper, lay it
down on my cloth, then trace over the lines using a fat and crumbly
piece of sidewalk chalk stolen from the kids. That leaves dots. Then I
either stitch directly over the dotted lines, or baste over them so
that they don’t flutter or blot away ask I work. This works well
enough, and seemed to be the best way transfer the design to my fulled
surface. But it wasn’t really perfect. The fuzz made the lines less
than crisp, and I did a lot of eyeballing where design elements were to
be as I went along.
The other problem posed by the surface
texture was the loft of the fuzz. I did go back and re-wet my surface,
whacking it down a bit to smooth it out, but even so – tufts of fuzz
sometimes bloom between embroidery stitches. That’s not the neatest
look.
Second, there’s the Substrate Structure problem. While the
fulling looks nice and uniform on the surface, the original stitch
construction is still very much present inside the fulled fabric. That
means that it is very difficult to get neat, smooth edges on stitches
that require them because in some cases the spot where a stitch needs
to be made isn’t dense enough to support the stitching. As a result,
edges that cross knit stitch columns or rows tend to reveal the
underlying structure as they deform around it. Satin stitch and the
flavors of ground-cover type couching I wanted to use suffer from this
ragged edge forced by fabric structure problem.
And third, there’s the Ground Thickness problem I anticipated.
The fulled fabric is thick and springy. It’s not easy to pull a needle
threaded with worsted through it (at least not in every spot).
Therefore stitches have to "nip" the ground rather than fully penetrate
it. This is annoying as the best effects and crispest edges are
often associated with plunging the needle through the cloth
perpendicular to its surface, rather than scooping up a bit on the end
of the point.
To deal with these problems, I’ve retreated a bit. I’ve greatly
simplified the design I’m attempting. I’m using a lot of stem and
outline stitch, and a little bit of Romanian couching. I’m also using
a little bit of a trellis style laid ground typical of Jacobean crewel
work. For an idea of what I’m taking about, here’s some else’s pomegranate (although I’m doing the same fruit, mine looks quite different from this kit).
MORE MYSTERY, BUT WINDING DOWN
A happy New Year to everyone who celebrates the same this week.
Progress continues on the Mystery Project. Apologies to those who
have written in dying to know what it is, but I can’t reveal more
details without permission from those who have contracted for the
article in question. I haven’t asked them yet if I can do
so. Being late on delivery doesn’t put me in a position of moral
certitude from which to ask special favors.
What I can say is that it’s fulled, it’s knit from Classic Elite
Renaissance in purple, it’s double stranded, and it’s being embroidered
right now. In addition to the base purple, I received several
complementary colors of the same yarn in which to do the ornamental
stitching. The design I’ve sketched out is a fanciful fruit, sort
of like a Renaissance pomegranate. Given the colors supplied, it
was either going to be that or autumn leaves, and leaves are all too
commonly seen. Because the stitching yarn is worsted weight and
the ground is fulled quite thickly, I’m taking pains to use stitches
that cover ground and anchor without requiring that the stitcher pierce
the fulled cloth completely. Yanking a needle full of worsted
through a tight fabric is a huge pain. There’s also a bit of
couching, in which a lighter thread is used to fix down the heavier
worsted.
On yarn consumption – I’ve seen people dither at yarn shops because the
project they wanted to make required just a bit of a contrasting yarn
for the ornamentation. They’ve wondered if it’s truly necessary
to buy a whole skein for just a yard or two. Sometimes it’s
not. If you’ve got a good stash and have yarns roughly comparable
to the suggested one on hand and you are comfortable color matching (or
selecting a whole new color suite) – there’s no particular reason to
buy a whole skein for a tiny bit of embroidery or other
embellishment. Stitching in the same color as the ground is also
a possibility, especially for fulled items, as the color/texture play
of the original texture yarn used for the stitching and that of the
fulled background can be very effective. Or if wools are being
used, I sometimes look to the yarns sold for needlepoint. They’re
thinner than knitting yarns, but can be worked multi-stranded to make
up the equivalent. Personally, I prefer the look of stitching
when done in thinner wools, so I’d probably use tapestry in less than
worsted thickness equivalents, but a commission is a commission and for
this item at least I’m sticking to the "use what’s furnished"
paradigm.
I’m still not 100% pleased with the item. In spite of intensive
swatching, my final row:stitch gauge fulling ratios were off a bit and
the shapes didn’t turn out as I had hoped. I wish I could do it
again, taking the lessons learned on this piece to make the second one
better. That’s a big problem with fulled pieces compared to plain
knit ones. Unlike unfulled projects where you can always rip back
and start again, you only get one shot at the fulling. After that
you’ve got what you’ve got and you can’t return to the beginning.
THE ABYSS OF FAILURE
Heroic efforts not withstanding, I am now an Official Failure. I
did not manage to complete my Mystery Project to meet the contractual
deadline. Last minute complications included a surprise 14 hour work day
(my career takes precedence over my hobbies); and the fact that the
miserable excuse for a clothes moistener acquired as part of last
year’s house purchase is totally inadequate to the job of
fulling (it barely washes garments). I gave up after four washes and ended up fulling by hand. That was very time consuming.
I can however report a success!? The yarn I used – Classic Elite Renaissance –
given an adequate method of fulling does in fact do so
beautifully. My stockinette piece is soft, dense, and without
stitch detail, although one area where I carefully lined up decreases
does show, and is now a nice textural contrast to the rest of the surface.
The piece is still not totally done, but I do intend on finishing
and furnishing the pattern even if it’s late. Having taken two
nights (or one evening plus what was left of the other after my 14 hour
day) to full the piece, I now have to do some minor seaming and the
embroidery. Flowers, leaves, abstract paisleys or
acanthus-like scrolls – all are possibilities. I’m a stitcher
though, so the embroidery I feel might be achievable by knitting
advanced beginners/intermediates might in fact be too much to attempt.
I invite comment. There are many embroidery stitches that could
be used, although the selection is somewhat limited due to the thick
and dense nature of the felt ground. I am thinking of using
variants on Romanian couching, herringbone, or other mostly-surface type stitches instead of satin stitch, which most embroidery beginners find easier to understand, but very difficult to execute cleanly. Perhaps a chain stitch variant, plain couching or knot stitches (coral stitch?)
as well. My question is – this is a knitting project, not
an embroidery project. Given clear stitch diagrams, including
motif placement and how-tos for all stitches, what’s your threshold
level beyond which a program of embroidery becomes unmanageable??
How much is too much, or how complex is too complex?? Where do you draw the line?
MYSTERY PROGRESS
I’ve finished the knitting on my Mystery Project. I fear I will
miss the extended deadline, though. This will be the first deadline
I’ve defaulted on in my knitting and I’m disgusted with myself over
it. I didn’t count on some personal stuff getting in the way, or
in three high intensity weeks at work. Family and earning a living
do come first.
In any case – I’ve got one shot to do this; to take the knitting, full
it, and finish the project. I will sew the piece together
partially before fulling. I’m afraid to join segments where a
horizontally knit section meets a vertically knit one. Row and
stitch count shrink at different rates. Something that’s smoothly
sewn now will end up a rumpled mess after fulling. So instead,
I’ll sew the seams that butt up pieces knit in the same orientation
before fulling, and the other seams after fulling. Then do the
embroidery (which I haven’t designed yet.)
I’ll set a wash going before I leave for work today, and do the first
dry when I come home. If sufficient fulling isn’t achieved (and I
bet it won’t be based on previous experience), I’ll run the thing
through again tonight, or do some hand fulling. With tons of luck
I’ll be able to finish the piece tonight. And if I’m even luckier
than that, I’ll be able to figure out a way to turn it in to meet the
photo shoot deadline tomorrow.
Oy.
TWO STEPS BACK, ONE STEP FORWARD
I am ever so thankful that the deadline for my Mystery Project has been
extended. Over the weekend I ended up trying out and then
scrapping two more construction schemes. The worst of which was a
re-work of the center-out disaster from last week. The result
still looked like one of Madonna’s nose cone outfits. I can’t show pix
for several reasons, not the least of which being that I’m working from
a very limited amount of yarn, and the abortive attempts have been
ripped out and re-used.
The latest attempt circles back to the original idea – a stockinette
piece knitted back and forth in the flat. I’ve moved back to
double strand, as the single strand stockinette after fulling was too
flabby for my intended use. I moved the increase points several
stitches in from the edges. This is creating a smoother contour,
and a shape more true to the design paradigm furnished with the
assignment. The flat construction is also much easier to describe
in written directions, a good thing as part of my directive is to
create a project that’s not too intimidating for relative beginners.
I’ve finished one of the two identical pieces that make up my Mystery
Project, and am well along in piece #2 (a duplicate of #1). The
third piece is differently shaped, and needs to be knit in an
inconvenient direction in order to keep the coefficient of shrinkage
uniform among all three. Why three pieces?? In this
case I thought that having a seam would be a strengthening and
supportive feature, with the extra thickness of the seam allowance
acting as a skeletal element.
Of course the scariest part will be the fulling. I’ve adjusted
the proportions of the knit original to mirror the shrinkage ratios of
the swatch. It looks rather odd – longer than it’s wide but if
I’m lucky, it should end up being close to the target
measurements. To top it off, I’ll probably be fulling this by
hand rather than in the washing machine. My machine is not very
good for this sort of thing.
As someone who believes in statistics, probability and the value of
planning rather than luck, I am not that comfortable right
now. Plus I’m fighting off project fatigue.
That’s the feeling I get when I’ve learned about all I can from a
particular effort or am confronted by a problem I don’t think is worth
the tedium to solve, and am not looking forward to the slog to
completion. Deadlines make it worse. This is the point when
I often set work aside, or feel the seduction of a parenthetical
project. Several are calling to me siren-like right now.
Not the least being a beautiful skein of blue/green hand dyed sock
weight merino graciously given to me by uber-talented June
Oshiro. That’s
calling out to become a pair of fingerless mitts. It’s a reedy
little voice, but an insistent one, and it gets louder every time I sit
down to work on the Mystery Project.
Moral of the story:? Knit for fun, not profit.
FRUSTRATION
My deadline looms and I’m nowhere near done. Not even
close. I’ve even moved to mocking up with yarns other than the
one provided because I won’t have enough to finish the project
otherwise.
I have a tricky shape to create prior to fulling. I’ve tried
knitting flat with end row increases/decreases. I’ve tried
short-rowing to build my contours. Neither worked well. I’m now in the middle of
trying to knit a flat medallion, center-out, differing the increase points and rate of increase, plus adding
short rows (rounds actually) to deform the thing into the configuration
I want. So far this last method is producing the most shapely
results, but I fear that the written directions will be complicated to
follow. Here’s one sample round:
*K1, M1, K19, M1, K1*; slip marker; K1, M1, K4, M1, K28, M1, K4, M1, K1; slip marker; repeat ** once
No two rounds are alike, increase points migrate all over the place, and the logic of the
increase progression changes several times over the course of the piece.
To top it off, I haven’t gotten up to the fulling step yet. I
have no idea whether or not my complex shape will full into a nice flat
piece, or whether it will crumple up like a head of Boston
lettuce.
Frustration, frustration.
Maxim number one, repeat as necessary: If you knit for
relaxation, as an enjoyable way to escape a high pressure,
deadline-driven career, taking on a commission that’s also
deadline-bounded is a Bad Idea. Especially if unforeseen events and
multiple
major work-related responsibilities wolf down the majority of what you
thought was discretionary time at the outset of the assignment.
Kim’s Corollary:? Nothing knit under extreme time pressure ever turns out well.
AAARGH.
WHERE HAVE I BEEN?
Mostly working. It’s been an high pressure week, with Life encroaching on knitting time. As a result, I’m woefully behind on my commission, and have done no personal knitting at all.
After all my swatching work (unsuccessful), I am now forced to do the exact thing I wanted to avoid – winging it. Making the project up as I go along rather than sitting down to do a bit of rational planning. While winging it isn’t a problem on one-offs or things I am making for myself, in this case I have to write down detailed notes as I go because the outcome is to be not only the finished piece, but also an intelligible pattern. There are some shaping challenges here, too that are complicating matters. In effect, I am making a flat motif in the round that isn’t symmetrical. I have to control for an even rate of increase, and hope that after fulling I end up with a flat piece instead of Mt. Fuji.
The other annoyance is of course, texture. I have had excellent success producing a flat and ultra dense fabric by fulling garter stitch, but I did it using other yarns. This yarn fulls nicely, but not to the extent of the other yarns I had used before. I will sacrifice a bit of extra oomph and sturdiness for a sleeker, less corrugated finish.
But enough whining. It’s off to work, and after work – to droning away to finish my Mystery Project.
POST SHRINK POST
Over the weekend I fulled the swatches from Wednesday’s post, with only
equivocal success. The washing machine in this house isn’t very good.
As you can see, there’s a little fuzzing, some uneven shrinkage, and no
loss of stitch definition, even after trips through the wash/dry cycle
with all six of the family’s weekly loads.
 |
 |
Swatch 1: Double strand, knit on US #10.5, 3.75 spi, 8 rpi. 15 stitches cast on.
- Pre-wash: 12mm wide x 10mm long.
- Post-wash: 10.5mm wide x 9.5mm long
Swatch 2: Double strand, knit on US #11, 3 spi, 6 rpi. 15 stitches cast on.
- Pre-wash: 13.5mm wide x 11mm long.
- Post-wash: 11.5mm wide x 9mm long. Very distorted
Swatch 3: Double strand, knit on US #13, 2.75 spi, 5 rpi. 15 stitches cast on.
- Pre-wash: 14.5mm x 12mm long
- Post-wash: 12.5mm wide x 9.5mm long
Swatch 4: Single strand, knit on US #10, 4 spi, 9 rpi. 18 stitches cast on.
- Pre-wash: 12.5mm wide x 10mm long.
- Post-wash: 10mm wide x 8.5 (to 11)mm long. Most distorted of all
Swatch 5: Single strand, knit on US #9, 4.2 spi, 10 rip. 18 stitches cast on.
- Pre-wash: 13mm wide x 9mm long
- Post-wash: 10.25mm wide x 8.5mm long
As to texture – all of the swatches firmed up somewhat. There was
very little difference in drape between #4 and #5, although of the two,
#4 was the more fulled. It had spots where the stitches were
almost melded together. Unfortunately it was also the most
unevenly treated, to the point where getting an accurate measurement on
it was very difficult.
I was surprised at how the heavier two-strand swatches turned
out. I really expected to see more shrinkage, and a tighter,
denser fabric with less stitch definition. While they’re nice and
dense, I haven’t lost the corrugation of the original garter
stitch. I also expected the swatches knit on larger needles to
shrink more in relation to their original size than the ones on smaller
needles.
I wouldn’t consider any of the results I got suitable for producing a
knitted bag, but I also don’t think my swatches have fulled to their
limit. I am going to try again tonight, working by hand with a
pot of boiling water and a pot of ice water, and see what I come up
with.
One aside – the color in today’s swatch photos is much more accurate than the earlier photo.
MYSTERY PROJECT
I’ve decided while I can’t write about everything, there are some bits
of my Mystery Project that I can discuss. Especially in the early
stages. I’ve already said that it’s a commission for Classic Elite, and
that it’s going to be fulled.
Here is my first set of swatches:
That’s a lot of swatches!
I’m using CE Renaissance.
It’s a 100% wool worsted weight yarn. It’s got quite a bit of loft due
to it’s three-ply construction, and the maker’s gauge is expressed in a
range – from 5spi on US#7 (4.5mm) to 4.5spi on US #8 (5mm). My
direction is to make a very firm fulled fabric, so I’ve made three
garter stitch swatches from double strand and two garter stitch
swatches from single strand. Here are the pre-wash specs:
Swatch 1: Double strand, knit on US #10.5, 3.75 spi, 8 rpi. 15 stitches cast on. Total dimension: 12mm wide x 10mm long.
Swatch 2: Double strand, knit on US #11, 3 spi, 6 rpi. 15 stitches cast on. Total dimension: 13.5mm wide x 11mm long.
Swatch 3: Double strand, knit on US #13, 2.75 spi, 5 rpi. 15 stitches cast on. Total dimension: 14.5mm x 12mm long
Swatch 4: Single strand, knit on US #10, 4 spi, 9 rpi. 18 stitches cast on. Total dimension: 12.5mm wide x 10mm long.
Swatch 5: Single strand, knit on US #9, 4.2 spi, 10 rip. 18 stitches cast on. Total dimension: 13mm wide x 9mm long
Although
I used up a whole skein plus part of another in swatching, it’s worth
it. Note that I’ve got not quite a straight progression, but enough of
a gauge and texture difference to make the experiment worthwhile. The
plan is now to full these as much as possible, then compare the final
dimension with the pre-wash measurements. That will allow me to figure
out what my knitted dimensions need to be to achieve a post-full target
measurement. I’ll also get to see how both row and stitch measurements
change (important as knitting does not shrink uniformly in both
dimensions. I’ll also find out which of my gauges produces the best
fulled fabric for my purpose. Washing will happen later this week. Stay
tuned!
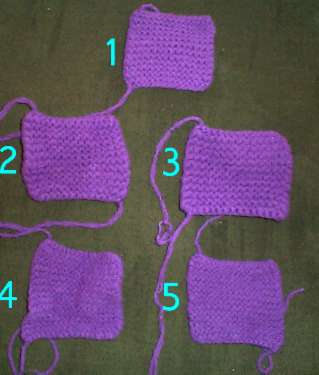
How do I know which swatch is which? See those knots in
the cast-on tails? That’s how they’re numbered. With luck those knots
will still be discernible after fulling.
