LETTERS FROM THE PAST
Antipodean social media pen pal and long time needlework/knitting co-conspirator Sarah Bradberry recently posted about a thrift store find – a 1971 vintage book entitled Lettering for Embroidery. It’s available for borrowing at the Internet Archive (free account sign-in is required). It’s an interesting read, although its overall aesthetic now looks 60s-retro rather than cutting edge fresh. Which is to say that it’s back in style.
Her post made me think about some of the unconventional alphabets I’ve drawn upon for my various non-traditional samplers, why I picked them, and how I used them.
To begin, I like letter forms – perhaps an inheritance from my grandfather Mack who owned a printing company. He would point out the often tiny differences among various typefaces and font sizes in printers’ samples, advertising materials, newspapers, and in books, and how those differences contributed to the overall message of the printed piece. While I obviously didn’t follow him into the family business, some of what he showed me must have stuck.
Let’s start with one of the more outrageous. It’s a phrase in an non-Terran language, picked up from my one of my Resident Male’s writing ventures. The book itself isn’t out yet, but I can say that in the text, it is translated as “Life’ll kill you.”
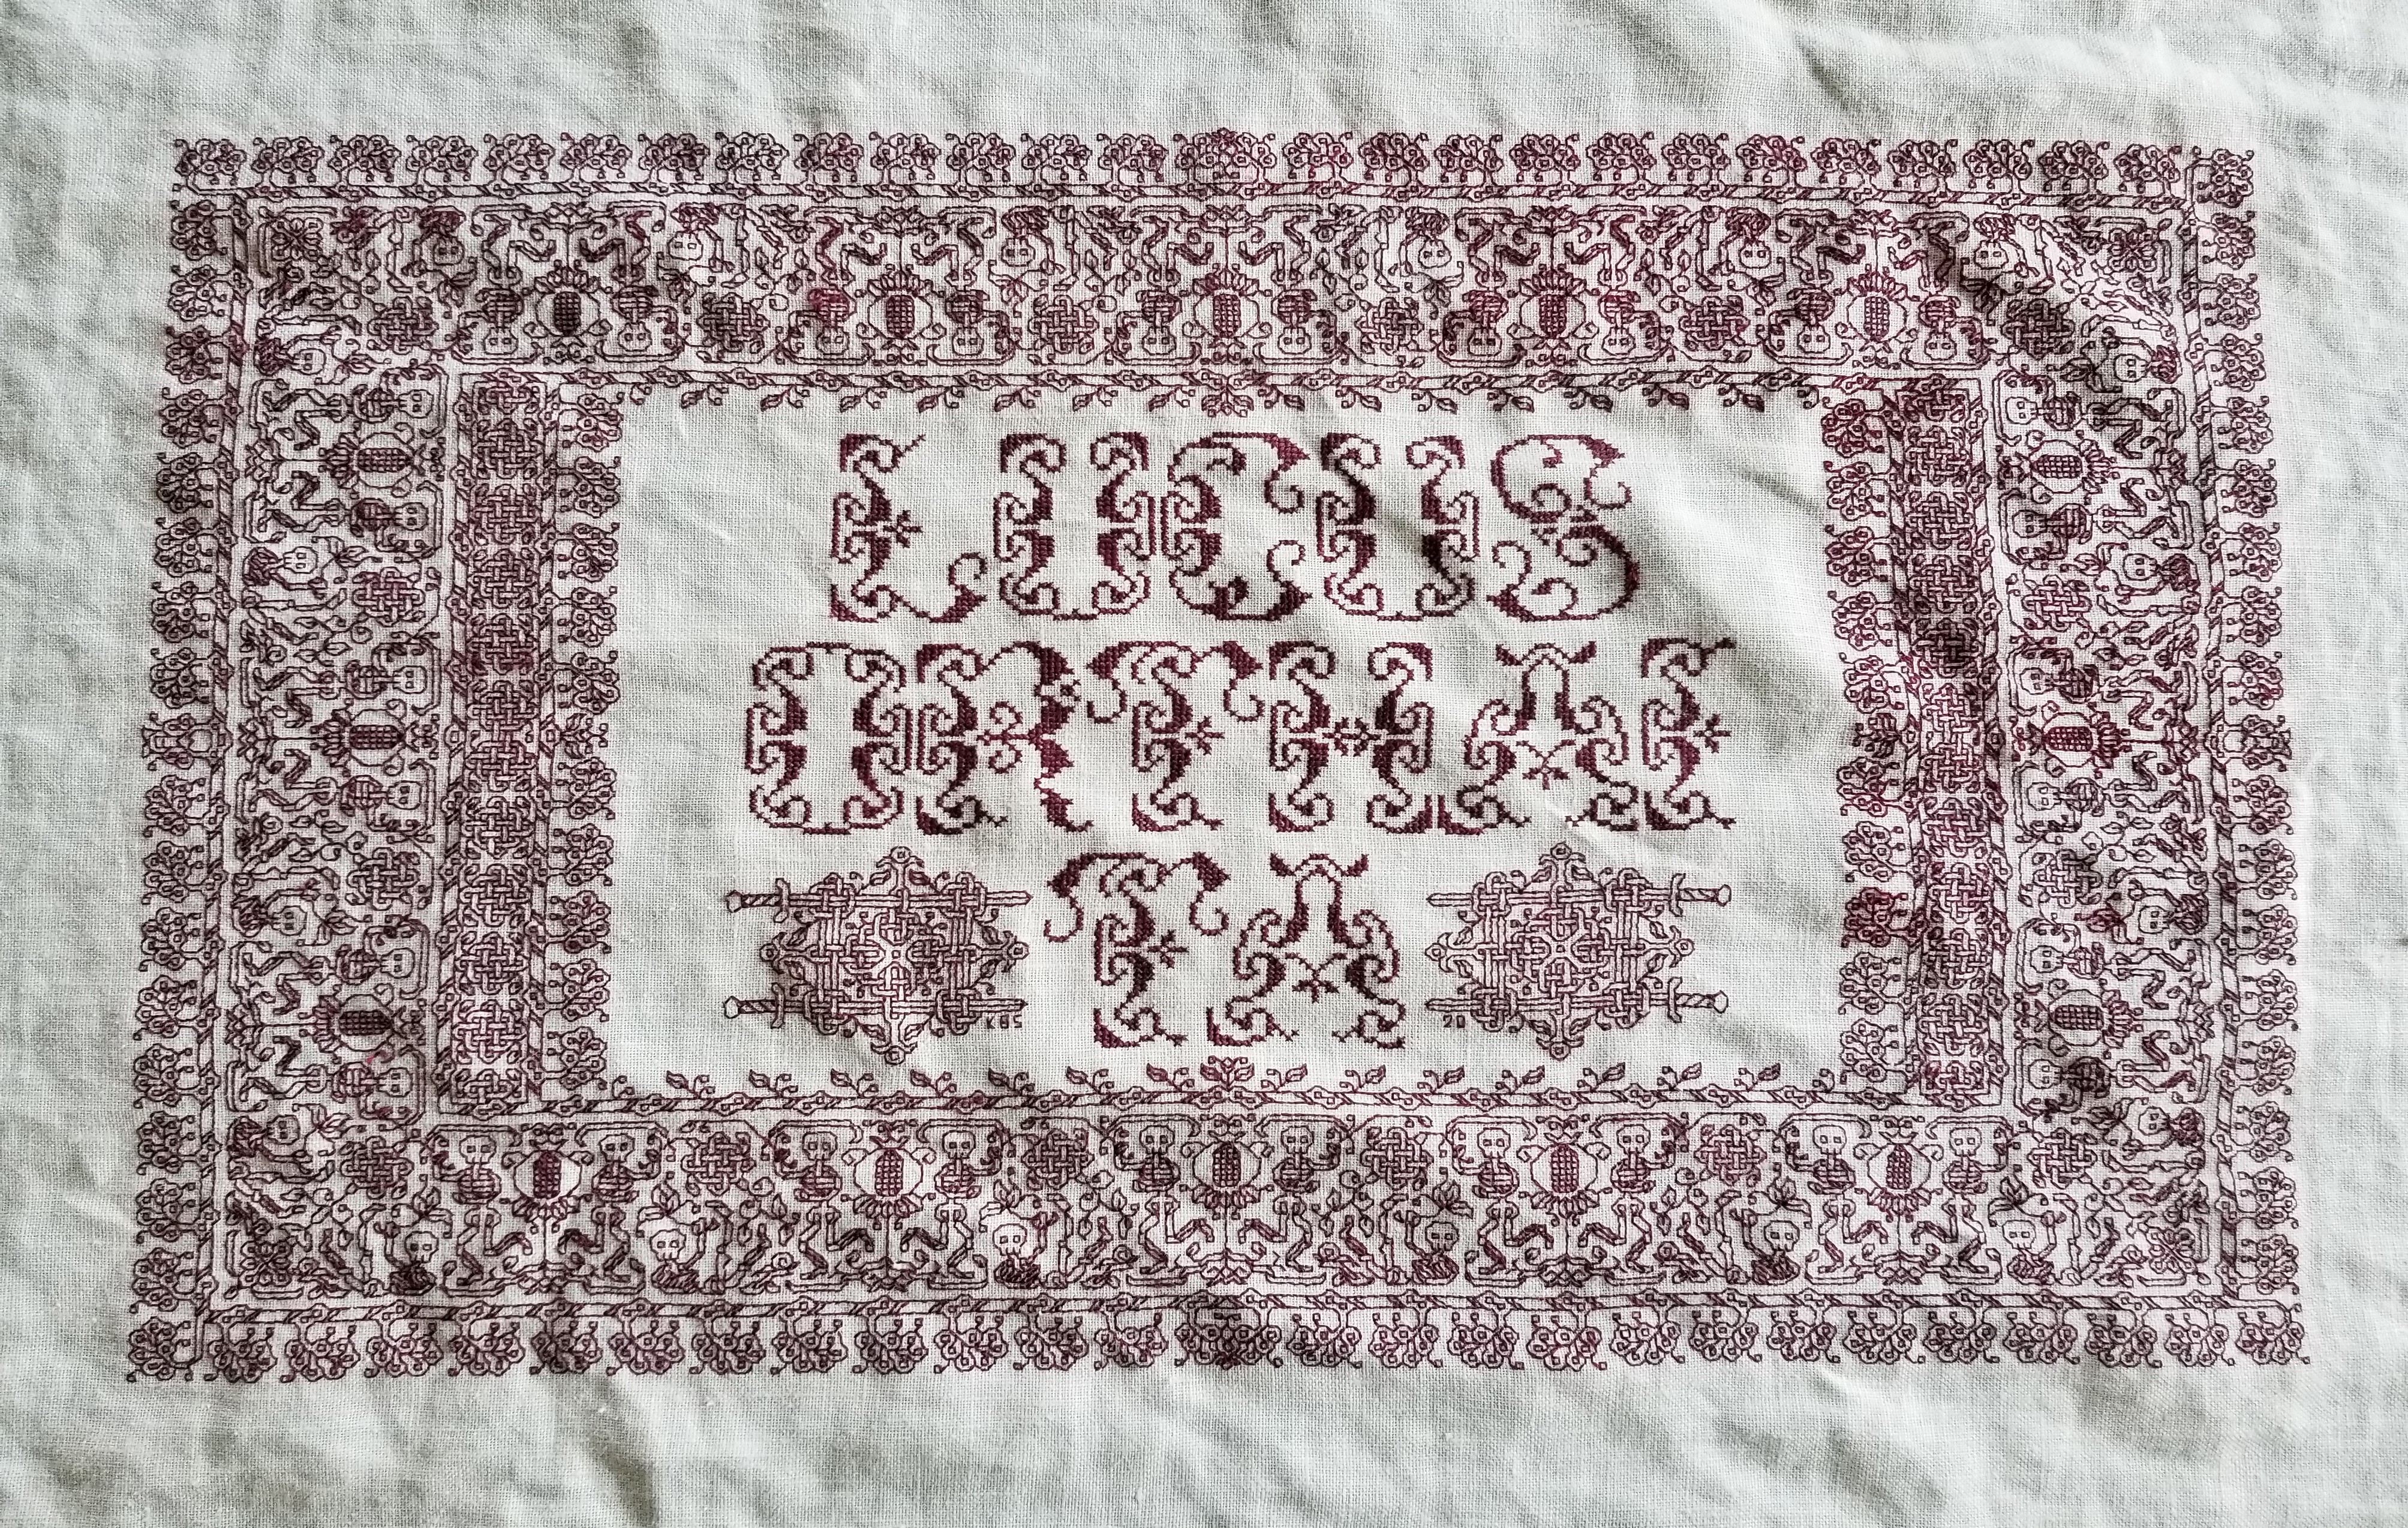

Ringed with my dancing skeletons, and bedizened with sword bearing interlaces to echo the stated meaning, I wanted to use an almost unreadable other-worldly set of letter forms; shapes that themselves danced. I went to my go-to spot for graphed alphabets – the free Patternmaker Charts collection of antique Sajou, Alexandre, and other leaflets. This one is from the Rouyer #248 booklet. I kerned and leaded the rather large letters tightly, to accentuate the flow of the curls across the words. (Kerning is the space between letters, leading is the space between lines of type). In terms of composition, the three words are centered, with no regard for how the letters stack vertically. These letters are also proportionally spaced because they vary so much in width, and cannot be easily worked monospaced (the way an old fashioned fixed-width Courier typewriter prints.)
Here’s another where I tried to fit form to the statement. The full chart for Don’t Panic is free here on String.
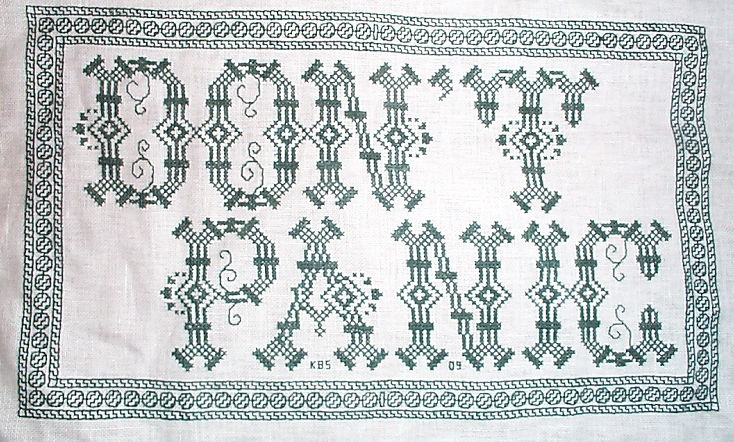

Yes, I know in the Hitchhikers’ Guide books the phrase is described as being “in large, friendly letters,” but this was going into my office where I managed frantic people wrestling deadlines under extreme pressure. I thought a jittery sign would be funnier. My favorite source to the rescue, this alphabet is from Sajou #325. It drips nervousness, even though the firm serifs imply regular stability.
Note that as with many of these vintage alphabets, the letters I and W are omitted, in keeping with the paradigm of classical calligraphy. I extrapolated the I, and doodled a matching apostrophe. Again, I kerned tightly, although I’m not fond of the space between the A and the N. I should have tucked them closer together, as I did between the P and the A. But As are problematic. I also chose not to center these words one on top of the other. The offset adds to the perceived unease.
Here are two more (slideshow presentation to save space, click on arrows beside the photo to advance). In these I chose to use the words as horizontal bands of ornament, flush left and breaking words when I ran out of space. I went back and eked out the bands to come up to the right margins. Mostly I did this because I was impatient. I didn’t want to take the time to do a full arrangement of the motto as it would appear before working the rest of the piece. I knew I’d have space to work the full quotation, but just stitched them letter by letter, with no advance planning. Since I had seen historical samplers that did just that, I felt confident beginning flush left and cutting words in the middle as space dictated.


I am not sure where I got the alphabet for the “Do not meddle in the affairs of wizards” piece. I stitched it circa 1994/1995, just before I began keeping a blog. Obviously the source followed the additional classical convention of presenting just a V shape to cover both that letter and U. I’m also pretty sure I extrapolated the I. In any case, the thread count on this one is no where near as fine as on the others above. There was less room for larger lettering, and I had to find something small enough to fit (most of) the words in, with minimal truncation.
The Arthur C. Clark quotation uses another alphabet from the Patternmaker collection, this time from Sajou #55. It may even be the project on which I stumbled across that source. Being a two-color piece, I wanted something that combined both, and that had an old-fashioned, formal look without being very stuffy. The red swirls suggested a bit of obfuscation and incantation as they tendril around the more solid letter forms. Again I extrapolated the I (thankfully there are no Ws in the phrase). This alphabet with the exception of the I has a very blocky, chunky and solid appearance in spite of the red whisps. There was no need to play with kerning, and spacing between words was easy and regular. The general look of boxy solidity underscores the sentiment expressed. For the A.C. Clarke attribution, I was lucky to find a tall and narrow alphabet in Sajou #172 to fit remaining space on the final lettering line. I will say that after this piece I lost my appetite for broken words.
At the risk of alienating all, my two coarse language pieces (behind the eyeball fig leaf image, also in slide show) use formal typefaces to express very informal and direct sentiments. If you are easily offended by rude words, skip ahead.
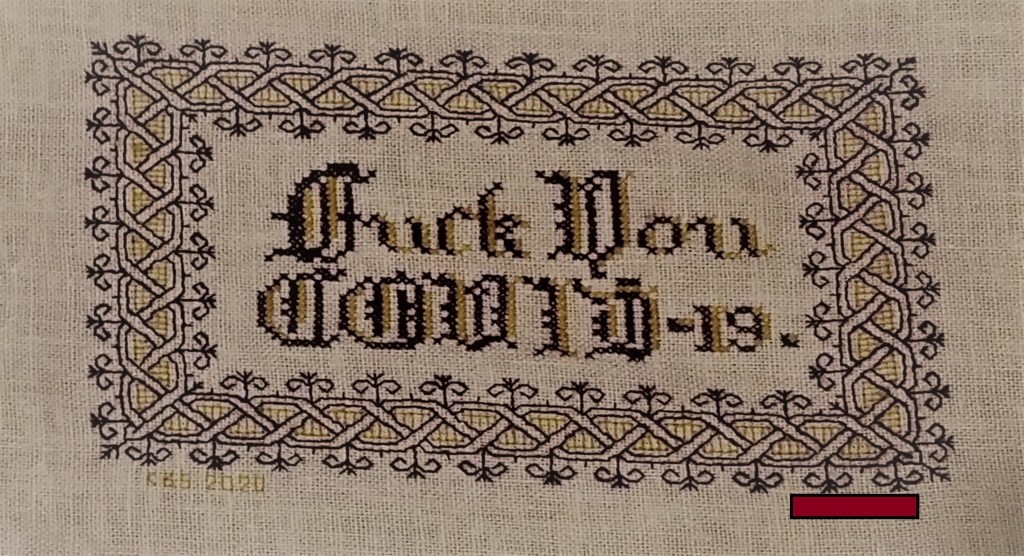
The Covid sentiment, done in a blackletter typeface, uses two alphabets from a German book, available on Patternmaker Charts. One is uppercase, the other lower. The lower case alphabet also supplied the numbers. Again I had to invent a matching letter I. Blackletter family typefaces are reserved for formal documents like diplomas, and newspaper mastheads here in the US. I wanted to play on that gravitas.
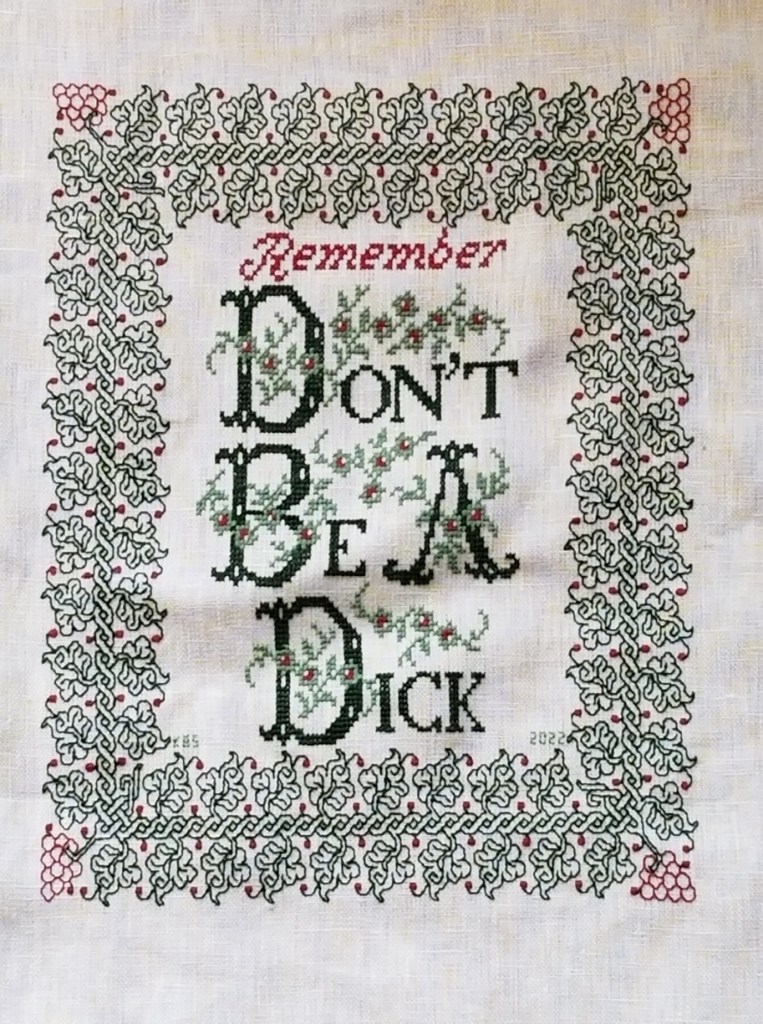
Similarly, for the admonition done in green, I wanted to evoke the greeting card world of hearts and gentle sentiment, to contrast the general scolding represented with sweetness and light. I picked one of the flowery alphabets from Patternmaker Chart’s Sajou #160 but leavened it with a smaller yet still uppercase typeface for the rest of the lettering. That classic form serif alphabet is from Grow and McGrail’s Creating Historic Samplers. The R of Remember is from Sajou #1 also on Patternmaker Charts, and the lower case lettering for the rest of that word can also be found in the Grow and McGrail book. I also adapted the floral ornaments from the initial letters for use as fill to surround the lower case one.
Pay Attention to Trifles has the most typefaces I’ve ever used on a single piece. I wanted the word Attention to leap out, Trifles to be the most ornate, and the message to be decoded only on a second glance. And I wanted a vaguely carnival type over the top mix of styles to complement the extremely busy design that is stuffed full of buried “Easter Eggs” as requested by the recipient.

All of these are from the Patternmaker Charts website.
- Pay – Sajou #652
- Attention – Sajou #654
- Even to – Alexandre #143
- Trifles – Sajou # 53 and 203
The dual tone coloration on these was not always noted in the original. Some I tarted up myself. I kerned each line separately, trying to best suit the alphabets being used, squishing ATTENTION a bit made it shout louder. Letting the other lines straggle a bit more made them a bit more lyrical.
While busy, the mad assortment is just over the top enough to gentle the nagging advice of the motto. If I had done the entire thing in the same face as Attention, the statement would have been way to strident. Throw in a bit of whimsey and it becomes an in-joke between the donor and the recipient. The centered text with the balanced motifs left and right is in contrast to the rather chaotic jumble of gears done in inhabited blackwork. There is repeating arrangement of the gears (more or less), but not the strict centering of the lettering. I think that adds to the haphazard playfulness of this piece.
I have done lots of other pieces with mottoes or words on them, but they don’t really showcase different approaches. The last one I’ll cite here is the piece on which I’m currently working. I’m almost done with the penultimate band, and have designed another custom-fit to go below it and end off the work as a whole.
I can’t say for sure where I found the alphabet I modified for use on this one. I found the image in my notes folder, with no attribution other than mid-March 2020 save date. I ended up upscaling from the typeface as charted by using a block of four units for every single unit in the original, and smoothing angles accordingly. Using the squared fill for the shadowing was intended to make the text reminiscent of a brick wall. That the span of the words is larger than the rest of the piece and contributes to that effect is serendipity, not planning. My count was off, and (thankfully) having started in the center, at least the motto protrudes mostly evenly left and right, looking even more monumental than I had planned.

I did kern aggressively to make the motto fit the space, but I should have lost one more unit between the B and Y of by. Still, I think it works. It’s blocky, yet because the letters are represented by outline and shadow, it contrasts nicely with the rest of the piece, overrun as it is with very busy fills.
OK. A conclusion now. Sort of.
If you are designing your own motto bearing piece, there are lots of choices out there that can make a real impact on the design, above and beyond the decorative elements that surround it. If you are unburdened by time/place restrictions (you are not designing a piece in the style of a specific location, school, style, or era), you are free to play. Think of the lettering as another element you can manipulate to underscore the message of your motto, or to convey a mood in which you would like it to be received.
Want to be playfully threatening, like an admonition to keep the kitchen or bathroom clean? How about using a different typeface and font size for each letter, to make it look like a ransom note. Want to convey warm wishes and affection to your extremely sweet and caring (but possibly somewhat humorless) family member? How about one of the ornate flower-bedecked alphabets from around 1900? Have a Goth leaning pal whose heart beats for irony and sarcasm? Use that same flower font in funereal black and purple to express an over the top sentiment.
You can speak words with typeface choice, font size, color, and spacing beyond the actual ones you stitch.
DECEMBER SLIDES INTO HOME
A hectic month and a miserable year come to a conclusion. But not without completions.
First, as promised in the last post – a family photo of this year’s cookies. I tried to have smaller batches of only ten kinds, but was foiled by a concerted group effort.
Working it clockwise (recipe links for most of these can be found in my last post.

- Noon – Lemon cut-outs, magically maniacal. Special thanks to friend Laura Packer, who sent me the twisted cutters. Oh, and bonus tiny leaf (see below).
- 1:00 – Chocolate pudding cookies. A surprise addition courtesy of Elder Spawn, who for a first fling into the communal cookie pile, did quite well with an intensely fudgy bit of delight.
- 2:00 – Orange marmalade cookies with fresh orange icing.
- 3:00 – Cinnamon swirls. A specialty of Younger Spawn, who dazzles with flavor and presentation.
- 4:00 – Mexican wedding cakes.
- 5:00 – Classic Tollhouse chocolate chip cookies
- 6:00 – Our Oysters – a hazelnut spritz sandwich, with dark chocolate ganache filling
- 7:00 – Meringues (also see below)
- 8:00 – Bourbon/cocoa balls
- 9:00 – Triple Ginger/white chocolate cookies
- 10:00 – Earthquakes – Most folk call these “chocolate crinkles” but we like the more dramatic nickname. For some reason the crevices closed up. Possibly due to overbaking this year. My cookie, my fault.
- 11:00 – Peanut butter cookies
- Center of dial – Jam thumbprints, with mixed berry jam. Another contribution of Younger Spawn.
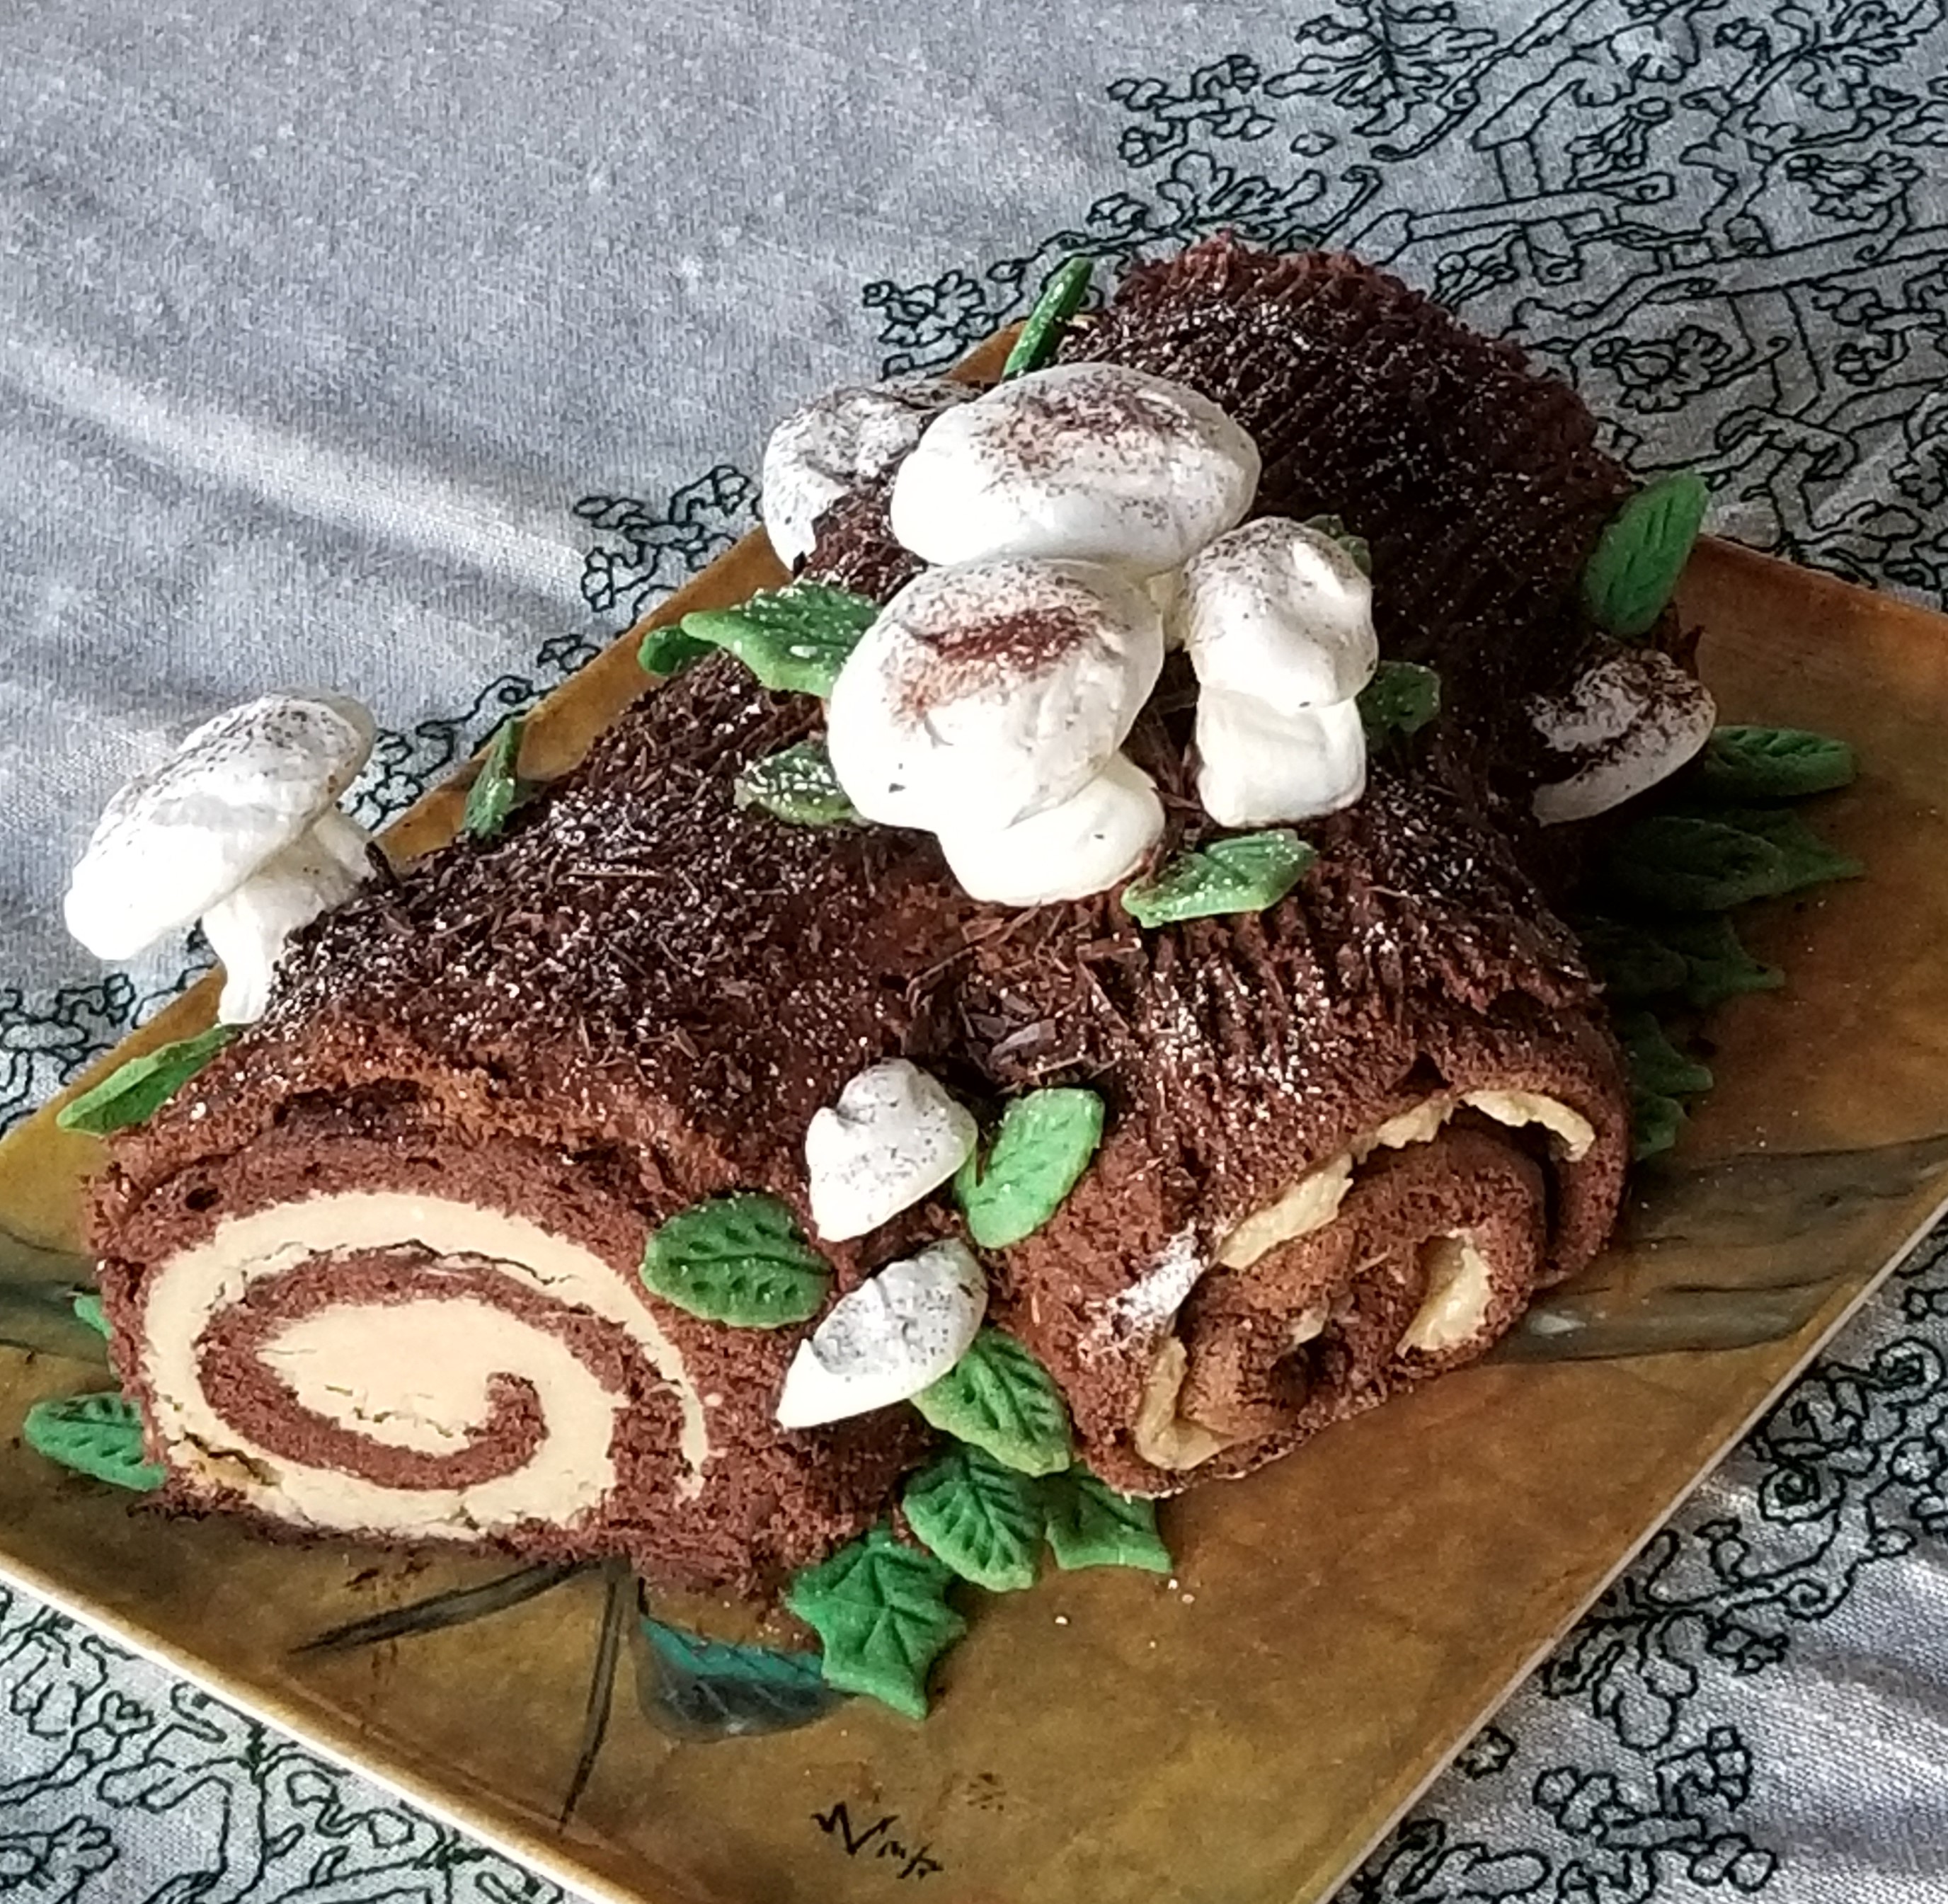
But that’s only the start. Younger Spawn also made a magnificent Buche de Noel (Yule Log Cake), with chocolate buttercream outside, and hazelnut buttercream rolled in a rich cocoa genoise. Including the traditional meringue mushrooms and little leaf-shaped sugar cookie leaves.
Not to be outdone, The Resident Male rose to the occasion and presented us with a Christmas Eve feast – seared fois gras with chanterelles; French onion soup au gratin; rack of wild boar with maple/chili glaze, plus potatoes Anna and spinach souffle.
And there are more year end finishes!
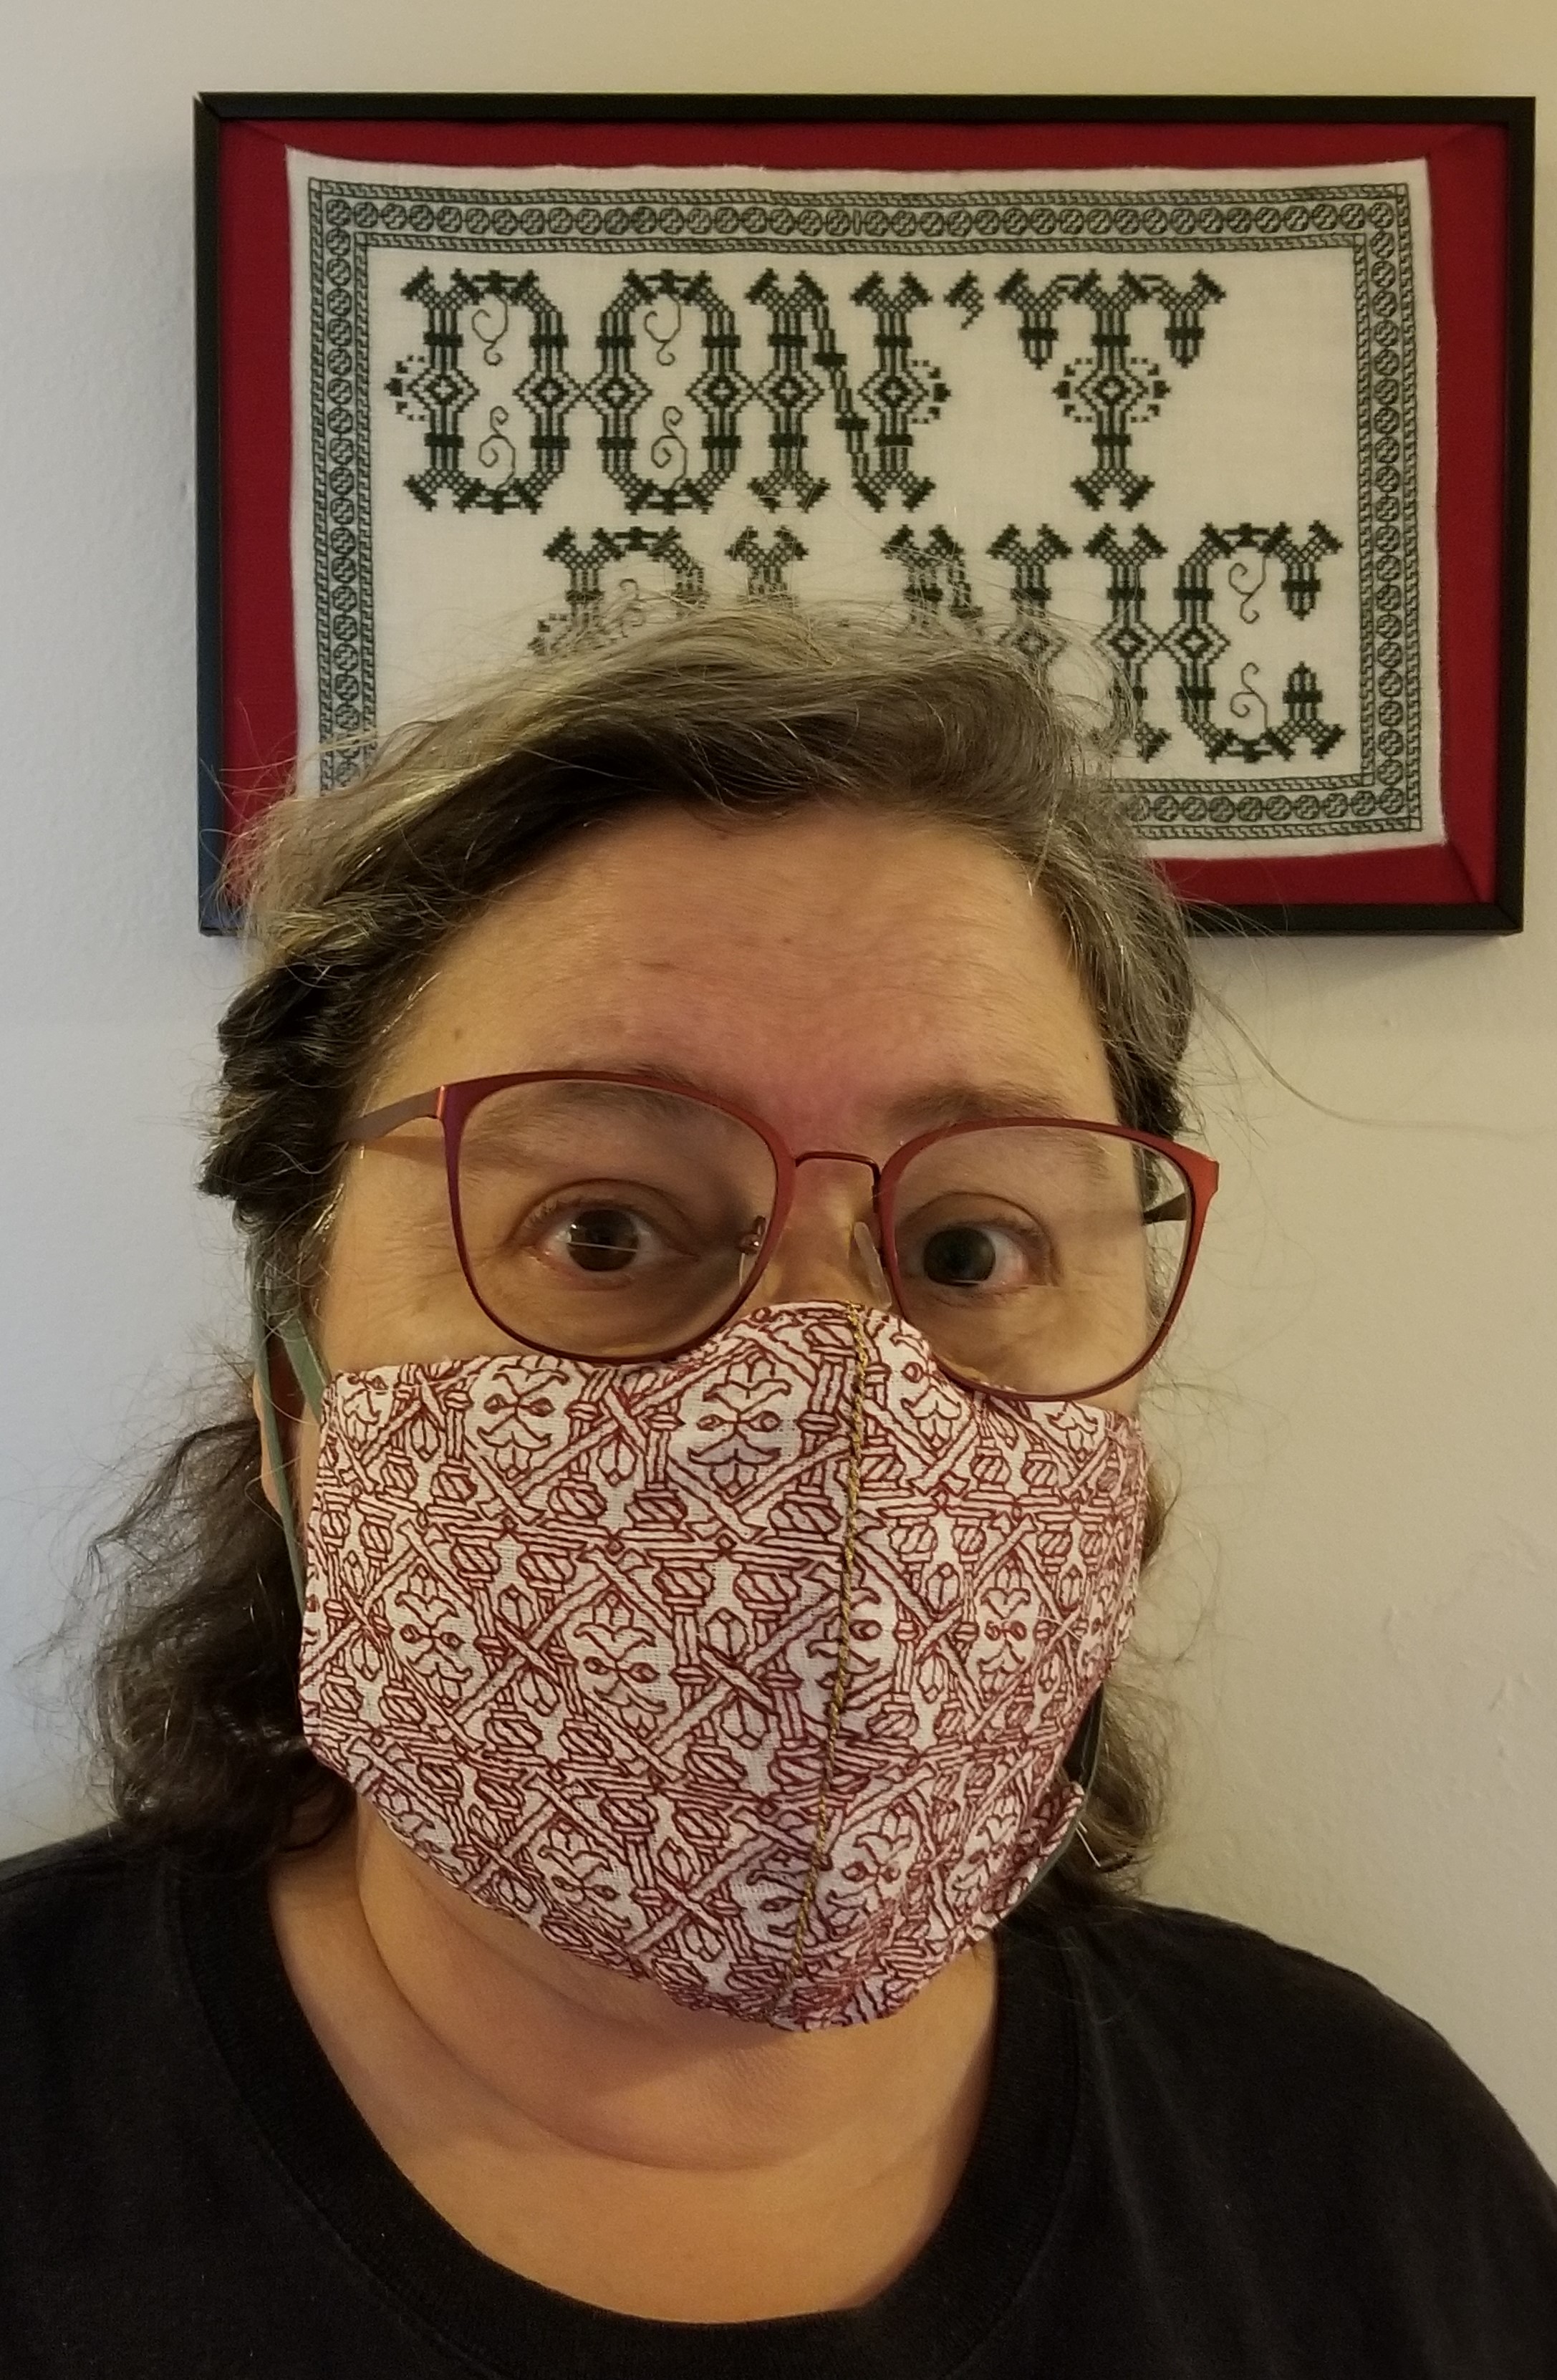
My Bony Boi piece, back from the framer and suitably hung in its place of honor in the Resident Male’s office:

The Great Masking
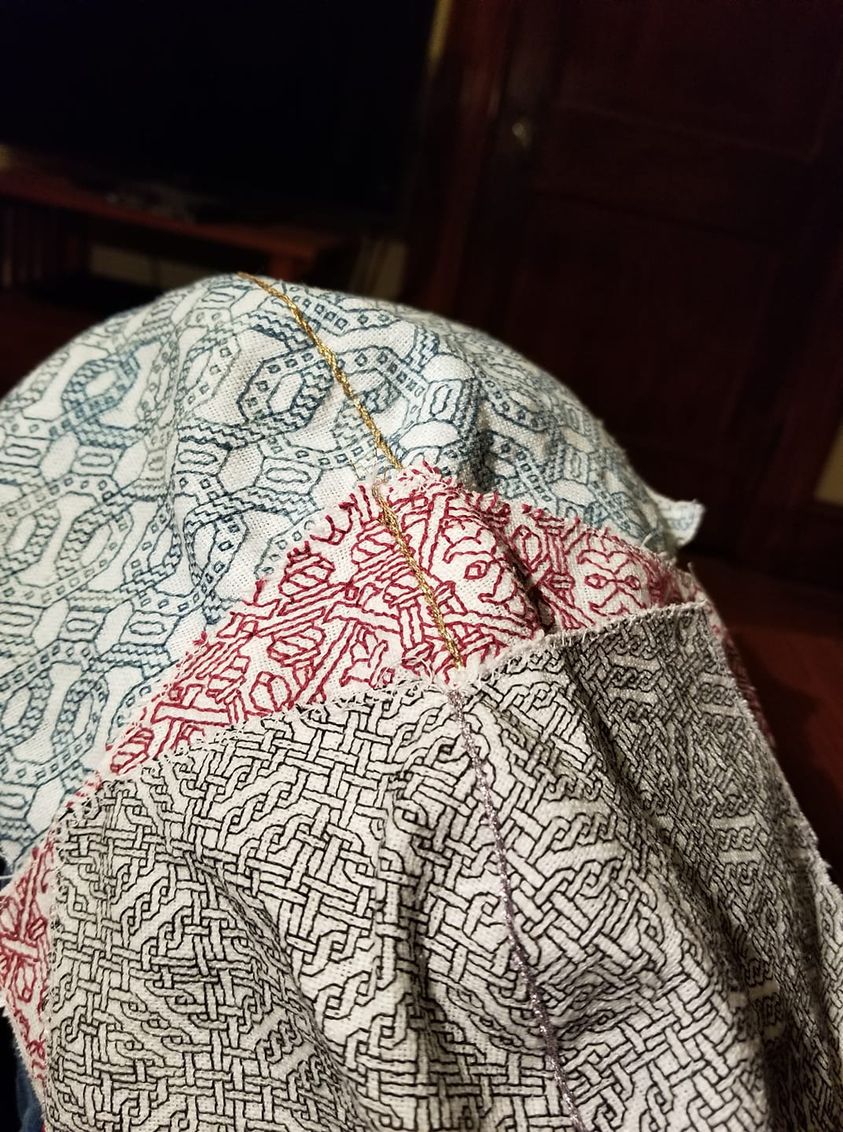
And I also finished my three blackwork plague masks.
I used one of Ancient Elna’s specialty cams to make a multi-stitch “hold fast” edging around the outer edge of each of the embroidered components. Then I cut out the shapes with confidence that the stay stitching would prevent any unraveling. (The stay stitching will be buried in the seam allowances, and never be seen.)
After that I sewed my stitching together down the center to make the outer layer. I toyed with a couple of treatments for the center seam to disguise the mismatch, but settled on a simple line of stem stitch, done in Krenick #16 metallic braid. The Elizabethan plaited braid I had originally envisioned was too heavy.

Then I cut the actual protective layers, traced from the same template I used to lay out the stitching, plus the lengths for the ties (I favor ties over elastic). Each mask has two layers of high thread count percale (harvested from retired sheets and pillowcases) in addition to the decorative outer layer.
When that was done, I sewed my linings together down the center, pressed them, and pinned on the ties. Those get sandwiched between the right sides of the lining and decorative back double-layer, with care taken to make sure they are not accidentally sewn over when front and back are seamed together. The two fronts, with the ties pinned to the lining are shown below.

Once that was done it was a simple matter to sew front to back (right sides inside), leaving a bit of a turning space between the two ties on the left. The thing is flipped right-side-out by teasing the ties out and yanking. A press followed by a line of topstitching all the way around to set the edges and seal the turning aperture, and I was done:

Now on to the next thing. But first I have to decide what that is….
COMPLETE!
All stitching is finished on my bony boi piece! Next it goes off to the framers. This one deserves a nicer finish than I can do myself.

And having played Thread Chicken, this is all I have left.

First sincere thanks again to Paula from Austin, who staged an intervention and shared her own stash. Since the thread I was using is not generally available, her generosity was key to this finish.
And a close-up of one of the “islands,” designed and added at last minute because the composition needed them:

Let’s see… Lessons learned. There are always lessons learned.
First and foremost, the obvious one – double check thread quantities, color numbers and dye lots. While I had two large hanks of multiple skeins of red, both with the same color number, it’s now obvious that one of them was either mis-numbered or a different dye lot. Or perhaps a lot older than the other. They didn’t match. Not only were the colors different (especially in natural light), the thickness of the individual plies also varied, with the “bad” stuff being just a tiny bit heavier. I ended up marling together the last of the “good” color (abetted by Paula’s donation), with the “bad” stuff, and making do.
I tossed caution to the wind in my hurry to get started and did not hem the edge of this cloth. But I did plan an extra generous blank area around the entire piece for later framing, so this ended up not mattering. Other than the annoying shed of edge threads, of course. I have to force myself to edge-control discipline. Hem, hem, hem.
I didn’t grid the piece prior to stitching. Yes, I know others do and find it helpful, but aside from marking my center north-south, and east-west with a line of basting thread, I don’t really feel the need. I went “around the world” on this one. I started the center top and continuing the border counter-clockwise, and had no problems mating up perfectly when I joined back up with the start after my journey. I proof constantly, and I admit a fair bit of picking out and re-doing to stay on count and true.
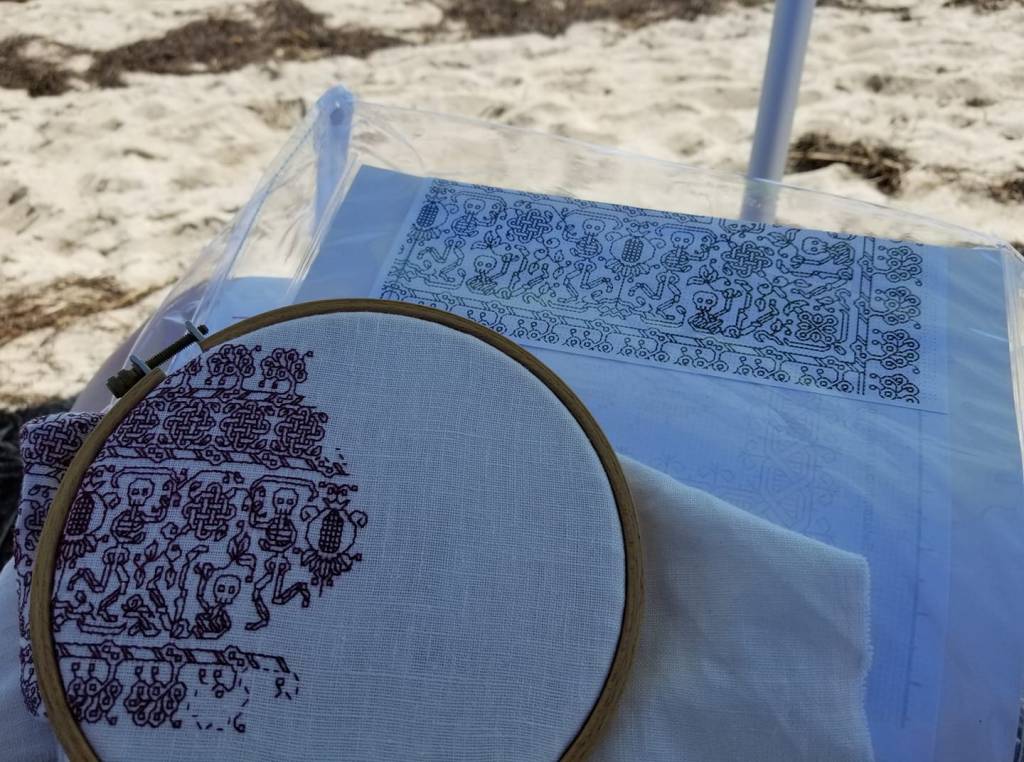
You CAN stitch outdoors in high winds. Hand held hoops work better than flat frames that can act as a sail when it really starts blowing. One of those zippered clear plastic cases that new sheets and blankets come in helps, especially if it has an inside pocket where the product info used to be. That works great for keeping a chart clean, dry, and away from the wind; and the zippered part is great for containing your threads and other essentials away from sunscreen and salt spray, (and holding the project between working sessions, too). You can even use two magnets to keep place on the chart without removing it from the pocket. Tethering your snips with a retractable badge holder works nicely. But at the beach on on very humid days, watch out for the damp! Some threads may crock or leech dye.

In a rare departure for me (although more common if I include text), I graphed out the entire project. I wanted the corners to miter nicely, which means I had to compensate at the centers of each side (12, 3, 6 and 9 o’clock as you go around). That meant I had to lay out my design against actual count, so I could fudge the centers. And I did the fudging on graph, rather than on the fly as I stitched.
But having drafted out the entire thing doesn’t mean I stuck entirely to the pattern I had drawn out. Those snails… My original stuck to the small twig and leaf of The Dance, the skeleton pattern I shared. I picked out that first twig and improvised a snail, then kept using the little guy on every repeat after. I also altered the plume flower slightly, taking out a couple of extra bars inside the outline that muddied the design. I did NOT go back and rip out the first two plumes. Those bars are among the mistakes I left in.
I will probably not be going back and ripping out that one very red plume, where I discovered the inadequacy of my “bad” batch of thread. Another difference batch to batch is that the “bad” stuff crocks like crazy, and oozes dye when it’s damp. If I get up close and personal I can tell which bits I stitched at the beach or during our weeks of high humidity and summer heat, just from the halos around the stitched bits. I will NOT be washing this piece. Ever. And I will not be perturbing already-stitched bits, lest I exacerbate the haloing.
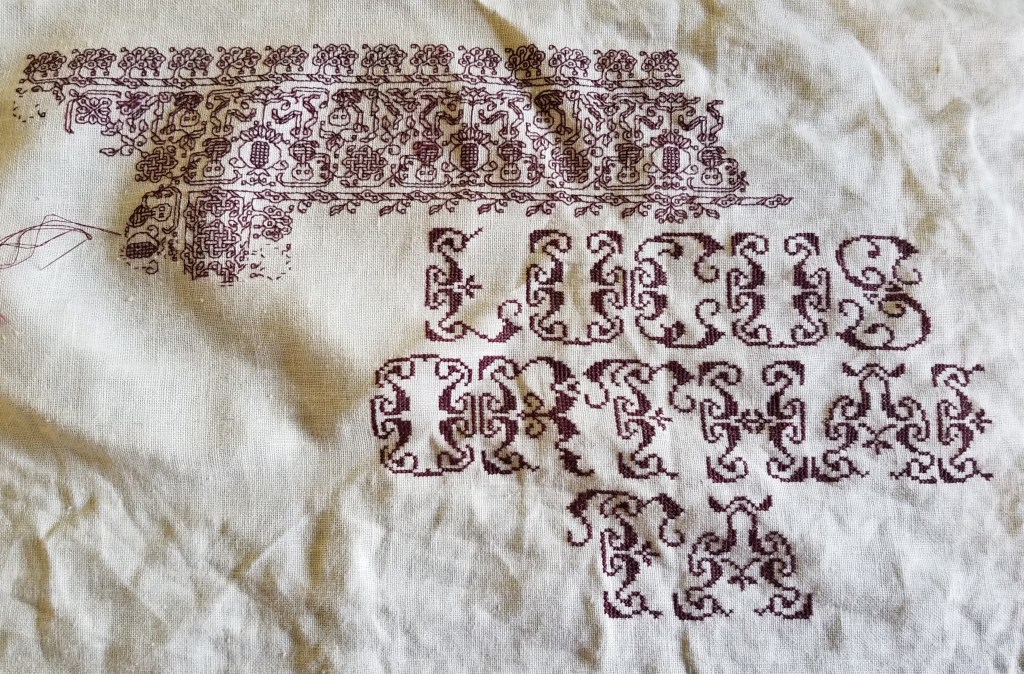
Now on to my next piece. I have promised a rendition of my Harsh Language design to a good friend who is a virus-survivor. This friend prefers to remain anonymous.
This should be a quick stitch after Lucus Orthai Ta, and I will use it to test out some new threads received from The Stealth Apprentice. She asks me to trial run some lichen-dyed wools that she dyed herself and is currently evaluating as a potential product for her Etsy shop. I am happy to oblige, doubling the value of the new piece.
And again because someone WILL ask about the meaning of the motto on this one…
The Resident Male is an aspiring science fiction and fantasy writer. He’s getting attention for Fractured Symmetry, the first book in a series featuring a classic detective pair – a grumpy, reclusive genius, and an hands-on action assistant. Only in this case, the genius is Terendurr the Blackstone, an imposing alien; and the assistant is Blair MacAlister, a woman you wouldn’t want to trifle with. The mysteries allow fascinating trips into off-world cultures (his universe is populated by many species, each with their own ethics, biases, strengths and weaknesses). He’s working on a second volume of stories right now. No spoilers – this phrase is a motto of a group that figures prominently in those stories. It’s not in any Earthly language, and translates roughly to “Life’ll kill ya.” So as his #1 fangrrl, I made this piece up for him. Yes, a bit quixotic I admit, but I do believe that he will find his audience, and I won’t be the only fan for long.
ROUND THE BEND
Yes! I have successfully rounded the corner, and reached out a tendril that confirms that the entire piece is spot on count and accurate to the repeat.

Now it’s just a matter of filling in that little bit at the upper right.
Of course, now I may go in and add something on either side of “TA” just to balance out the design. Still thinking on that, but in any case, the finish line is palpably near. Here’s the proof of alignment “tendril” – the inner border along the top edge fits perfectly, mating with the work I laid down at the very start of my journey around the edge (the bony boi and the border above his head, at the hoop’s right edge).
To put this in perspective for my non-stitching pals, this rendezvous is like marking a chalk X in front of your house, standing on it then putting on a blindfold and dancing wildly around the block nonstop until you decide you’ve gone far enough; then taking off the blindfold, looking down and realizing you have arrived exactly back on your point of departure.
Why not so much progress this week past? It’s been hot. We got back from our week on the beach in the middle of the heat wave. Like many in the northeast US, we have no air conditioning. Sitting under a halogen work lamp in the evening was more than I could contemplate in temps of 85 to 100 deg F (29.4 to 37.8 C), with high humidity.
I’ve been marling the offending brighter red (glaringly odd third inner plume flower up from the bottom of the right inner border) with thread in the color (or closer to the color) I have been using. By using one strand of “good” and one strand of “less optimal” together major color discontinuities are not so evident. I may go back and replace that offending plume flower. Or not. The “bad” red seems to crock considerably more than the other batches, and removal will leave a very evident halo.
Before I forget, extra special thanks go out to new stitchpal Paula from Austin, Texas. She read about my thread shortage problem and dug into her own stash, sending me oddments of various colors in and around the values I needed. Her generosity is what has enabled me to pursue the marled thread strategy.
Paula, I truly would not be able to finish this piece to my satisfaction without you help. My gratitude is eternal. When such things can happen again, the next time we are down that way visiting family, I reserve the right to drag you out for a special treat!
THE CLASSIC PROBLEM
Too much stitching left to do. Too little thread. With about a quarter of the stitching remaining I have a problem.

I am using thread I brought back from India. I found it in a shop in the old shopping district in Pune. They specialized in crafting materials, especially beads, pre-embroidered pieces, knitting yarns, and other goodies. But they had a few skeins of what looked like silk floss in one of the display cases. I pointed at it and asked the shopkeeper if he had more. He sent a little boy up into the storerooms, and he came back with a very dusty and crumbling cardboard box full of odds and ends. All of the same type of thread (which turned out to be “art silk” – rayon) but all of very limited quantity. I picked out all of what remained in non-pastel colors, including several multi-skein hanks of deep red, and bought it all, for an astonishingly low price.
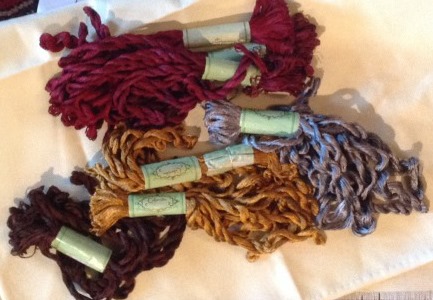
As you can see there’s a pile of crimson there. What remains of that pile now is much less –

The wound bobbin in the middle is what I’ve been using (with a caveat). It’s Cifonda Art Silk color number 145. So is the hank on the left. The hank on the right is color number 144. It’s in the same continuum, but a click lighter. At the bottom is flaming cherry red 530, not even close.
The caveat on the bobbin? It’s holding two skeins of 145. Underneath is New-145. On top is Old-145. I wound off the new one, then after stitching the bit below, went on a Wild Hunt, and found one last remaining skein of Old-145. You can’t see the difference between them, right? Neither could I until this happened.

I bet you can see it now. Leaf #3 and part of the interlace below it stands out. I stitched it with the New-145. It’s redder, more garnet in tone than the established work. Clearly the same color number, but a different dye lot (even though dye lots are not labeled ). Even if I could get more of this stuff the chance of matching color with my very-well-aged stock is practically nil.
I will finish out as much as possible with my last skein of Old-145. I may or may not pick out this leaf . Still thinking on that… And also thinking on how to finish out the piece using only what I have on hand. Go for New-145? Go lighter with 144? I’ve seen historical pieces whose stitchers faced the same problem and blithely ignored it. Which is what I will end up doing, one way or the other…
PROGRESS BY THE BEACH
Lest anyone think I’m on vacation, not so. Yes, we ran away to the beach place this three-day weekend past, but in this work from home era, we worked from there, and prepped the place for our booked guests in compliance with the state COVID-era short term rental requirements.
Still, even though it wasn’t all for fun, on Sunday I did get the chance to stitch on the beach. I adore it, even though the intense sunshine can lead to “white out” conditions on the linen, making thread counting difficult.

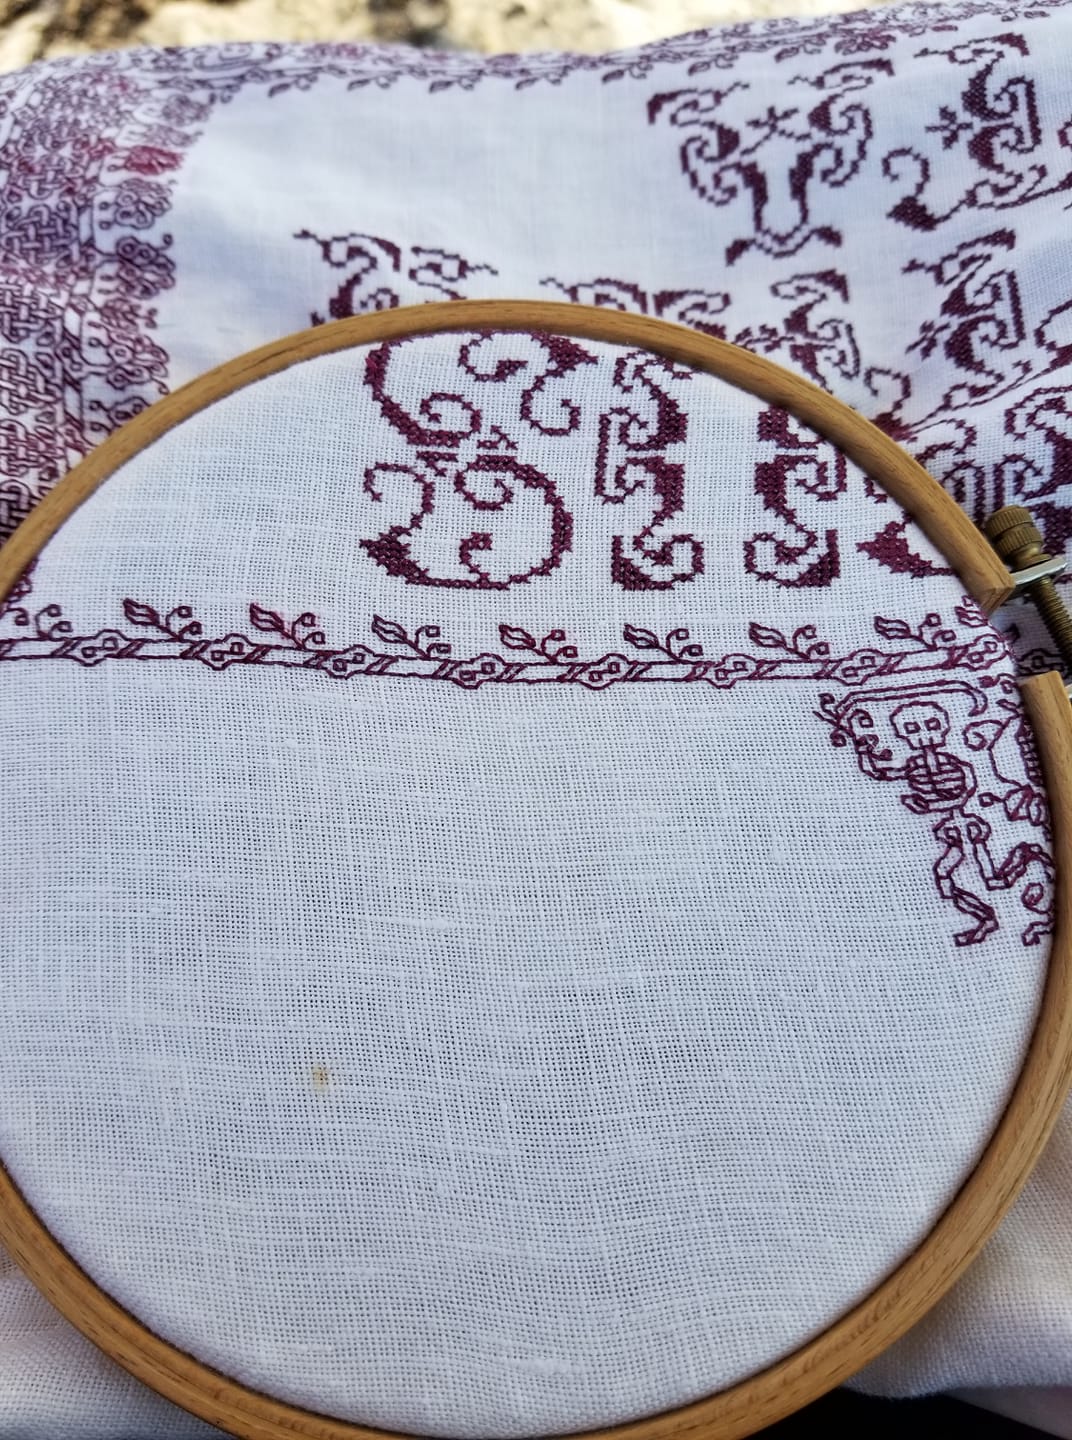
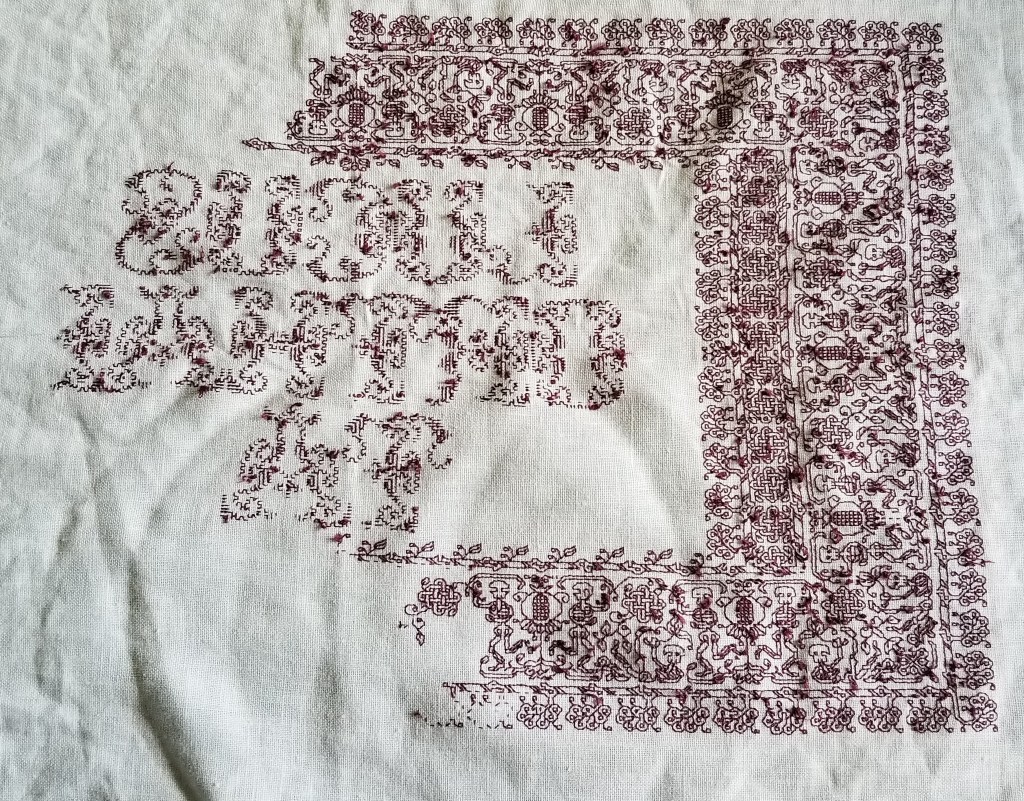
As for how far I’ve gotten so far – I’m just starting on the third corner:

Excuse the wrinkles – I don’t iron until the very end.
You can see the diagonal “spine” of the mitered corner. A snail will squeeze itself in underneath the rightmost tumbler’s feet. I will wrap the plume edging up and around the corner, too. You can even see the start of the double border with extra knot on the inner edge of the rising strip-to-be.
I wish I had grand new insights to share on this piece, but being in the home stretch, I’m fresh out. This is also always the most dangerous part of a project for me. I’ve figured out all that’s new, and all that’s left is perseverance – dogged execution of the known until completion. It’s the point where I often wander off to do something novel and interesting, with the promise of new challenges.
So, if you have any questions about working these long repeats, keeping place in them, how to draft them up, or pretty much anything else, feel free to ask. Now’s a good time to engage my attention. And I’ll thank you for keeping me on track and marching in time with my bois.
PROOFING
And we march around the perimeter, making skeleton after skeleton.

I’m just shy of half-way now, and I had to extend a tendril out to that point to make sure that I’m hitting my center mark. And I did!

As you can see comparing the blue line on the photo and the red line on the snippet of my chart, I’m spot on for alignment – not even a thread left or right of my center line.
One question I keep getting is how I maintain my location and ensure everything is in the correct spot without pre-gridding my work (without basting in an extensive set of guidelines to establish larger 10 (or 20) unit location aid across the entire groundcloth). I generally reply, “By proofing against established work,” but that then generates the second question. “How?”
So I attempt to answer.
For the most part I almost never work on fully charted out projects, with every stitch of the piece carefully plotted in beforehand. I compose my own pieces rather than working kits or charts done by others, and as a result I never have a full every-stitch representation as my model. My working method is to define center lines (and sometimes edge boundaries), but I pick strips or fills on the fly, starting them from my established centers, and working from smaller charts that are specific to the particular motif or fill that’s on deck. However, if lettering is involved I am more likely to graph that part out to completion prior to stitching, to ensure good letter and line spacing. (Leading, spacing, and kerning are close to my heart both as someone whose day job deals in documents, and as a printer’s granddaughter.)
For this project I DID prepare a full graph to ensure the centered placement of my very prominent text motto against the frame. I also wanted to miter the corners of the frame (reflect on a 45-degree angle) rather than work strips that butt up against each other, AND I wanted the skeleton repeat to work out perfectly on all four legs of the frame. To do that I had to plan ahead more than I usually do. (Note that the repeat frequency of the accompanying smaller edgings are different from the skeleton strip, so I also had to “fudge” center treatments for them so they would mirror neatly – another reason to graph the entire project).
But even with a full project graph available against which work, I didn’t grid – I worked as I always do, relying on entirely on close proofing as I go along.
The first step is a “know your weaknesses” compensation. To make sure I am on target I almost never extend a single long line ahead of myself, especially not on the diagonal because I make the majority of my mistakes miscounting a long diagonal. Instead I try to grow slowly, never stitching very far away from established bits, so I can make these checks as I work:
- Does the stitching of my new bit align both vertically and horizontally with the prior work? Am I off by as little as one thread? Am I true to grid?
- Is my new bit in the right place? Does the placement of the design element align with what’s been stitched before? For example, in this case, is do the toes of the mirror imaged bois back to back to the pomegranates match in placement in relation to each other and to the bottom of the pomegranate’s leaves?

Are my motifs in the right place?
- Am I working properly to pattern? It doesn’t matter if I am using a small snippet with just the strip design or fill that’s being stitched, a full project chart, or (as I am now) using prior stitching as my pattern – copying what’s been laid down on the cloth. Am I true to my design as depicted?


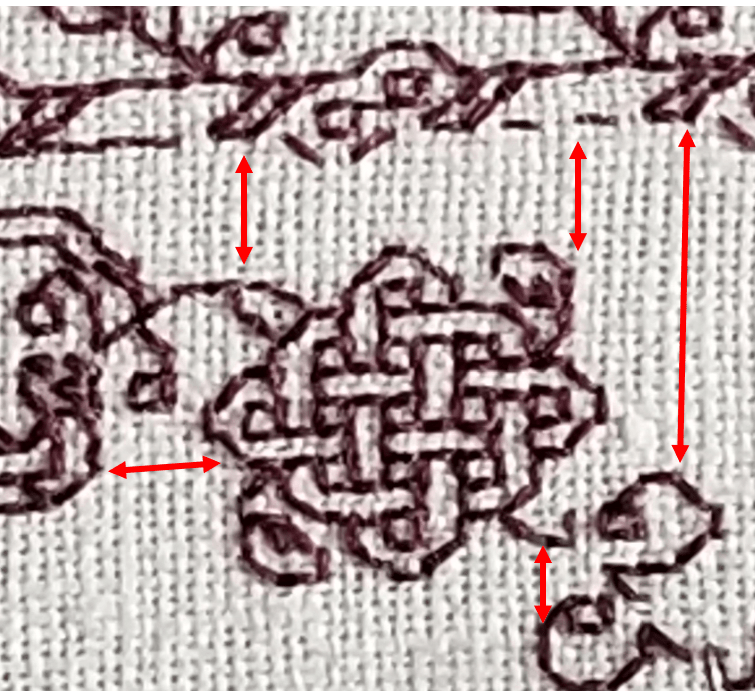
(Note the compression due to uneven thread count of the fabric.)
As I work, I constantly proof in these three ways – checking to make sure that my work is true. And if I discover a problem, I trace back to see where I went wrong, and I ruthlessly eliminate the mistake. For the record – there’s nothing to be gained by letting off-count stand in the hope of compensating later. Trust me – you’ll forget, mistakes will compound on mistakes, and you’ll end up wasting even more time, thread, and psychic energy on the eventual fix.
I hope this explains what I mean by proofing as you go. I know for most of the readers here, this will be second nature, and they won’t have thought of it as a disciplined approach, but for newer stitchers the old maxim “Trust but verify” should become a mantra. Verify, verify, verify. The sanity you save will be your own.
Finally, for Felice, who doubted I was using double running stitch for such a complex project in spite of the in process photos that showed the dashes of half-completed passes, here’s the reverse.
Yes, I do use knots for work with backs that won’t be seen, but I do it carefully so that the knots don’t pull through. Point and laugh if you must, but I reserve the right to ignore you.
HEADING FOR THIRD
I’m finishing up the second corner on my sampler, and beginning the strip across the bottom of the piece, headed for the bottom center, then on to the third corner.
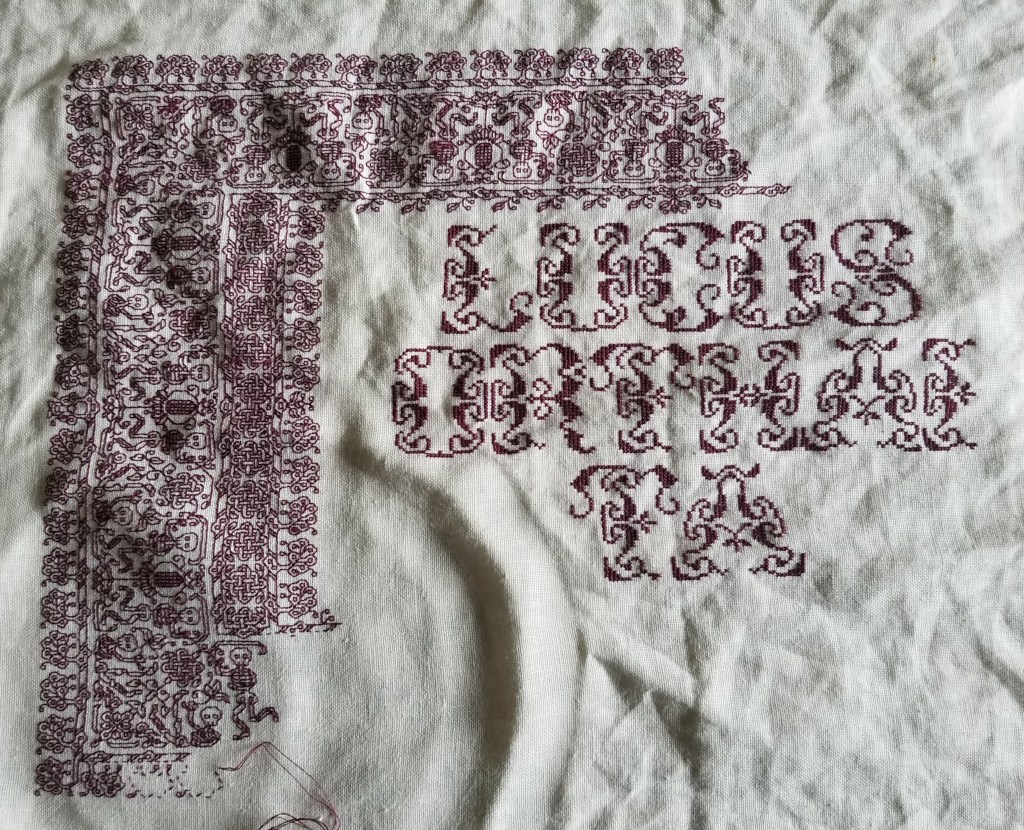
It’s going faster now because I’m free of the chart. I’ve (mostly) memorized the design now, and have ample reference stitching to refer to if I need reminders. The remaining two sides are just mirrors of what’s there already – with the corner and both centers established, there’s nothing on the chart that I haven’t already worked.
Questions from my inbox:
Why aren’t you working on a grid/why haven’t you basted guidelines every ten stitches so you can keep your place?
I don’t need to, although I do have two basted guidelines that mark the center of the piece, one north/south, and one east/west. I proof carefully of established stitching. That’s why you never see a long run “out in front” of the design as I work. For me, that’s a recipe for disaster.
I AM working in double running stitch. You can see the baseline for the bottom plume border in process. I will keep going in this direction until I finish this piece of silk. Then having established the bottom border (note that I work the branch from which the plumes bloom as I go), I’ll switch to the center strip and do more of the skeletons. When I catch up, I’ll hop up to the top border and do more of that. The whole design progresses more or less evenly across the design, keeping pace with itself as I go.
Why are you working left to right?
I’m right handed, and stitch with my right on top and my left below, using (in this case) a sit-upon hoop so both hands are free for stitching. I keep a very bright light over my left shoulder. By working left to right, I can see the previously worked bits (they are not covered by my right hand), so I can keep check on alignment of the new stitching, plus there is no shadow from my hand or shoulder occluding the work in progress. And when I start not at the left or right edge of my piece, but at the center, I often flip my work upside down, so I am also working the second half of my strip from left to right. Were I left handed or favored my left hand for the top when working two-handed, I would probably work from right to left, with the light over my right shoulder.
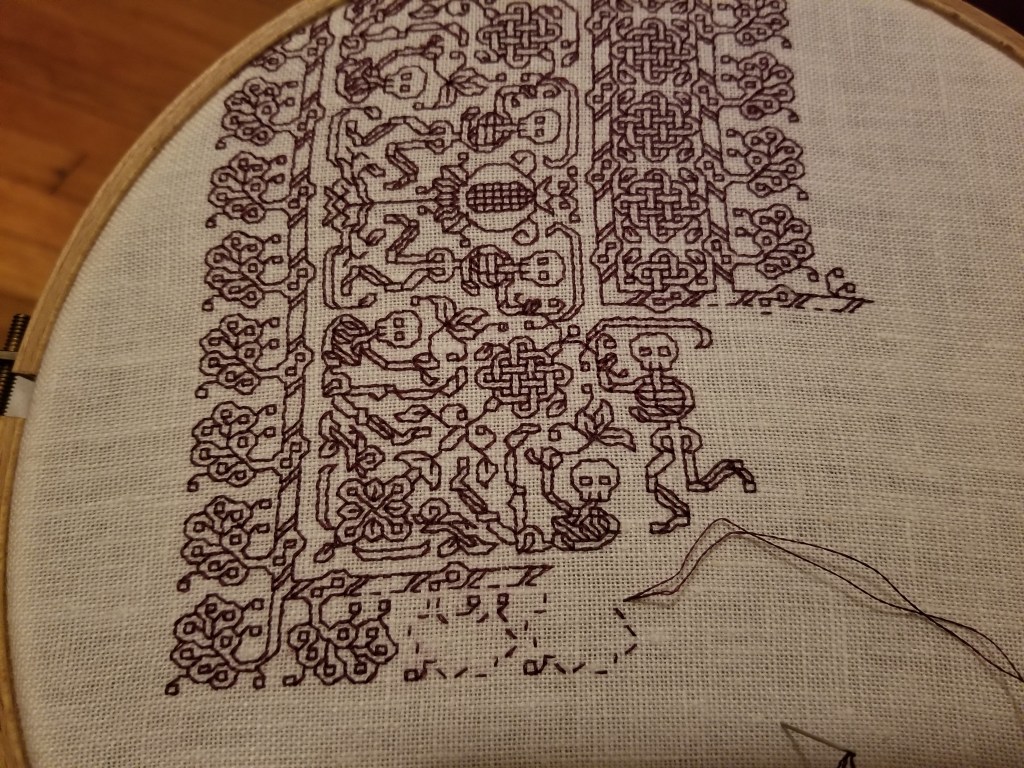
Can this piece be done double-sided?
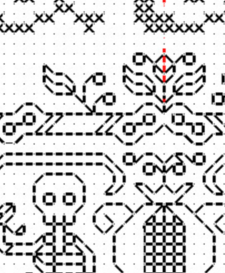
Yes and no. Right now it can be done mostly double-sided in double running stitch (aka Holbein Stitch, or Punto Scritto). But not entirely. The skeletons and the pomegranates are their own units, large enough for burying the ends invisibly on the reverse. Not so the snail – he’s rather small and would be difficult to stitch on his own, with invisible starts/endings. There is also the problem of tiny isolated elements. The eyes are the most obvious example, but the plume border has that little skew two-box spot at the base of each plume, plus a floating square in one of the lobes of the plume.
If I were to set this up for totally two-sided work, I would run a single unifying baseline across the entire bottom of the piece, and adding a stitch to tie the ribbons held by the skeletons to the side curlicue of the pomegranate. I’d also add a brow line to the skeletons, and anchor down the floating spots in the plume flowers. The red stitches below show the general idea:

With the red additions, all floating elements have been locked into the main trace. There are no islands left, large or small. The bois can now be done entirely double sided. And if contemplating another design with isolated bits, similar additions will render it likewise. (The astute will note that this doesn’t contain the snails in the as-stitched piece – I improvised them on the fly, and never bothered adding them to my quick and dirty project chart.)
Why didn’t I do this in the first place? It didn’t occur to me, and I like the rather puzzled look of the browless, wide-eyed bois.
Where can I find the pattern?
Look here for the broadside that contains the dancing skeletons and plume border, plus the reason why I don’t think they are morbid or creepy. And if you want to see all previous posts on this project, here’s the link.
No Cerberus?
One observant reader noted the skeletons and pomegranates and suggested a Cerberus (three headed hell hound) as the logical thematic accompaniment. Not a bad idea, and more grist for my imagination mill. Thanks!
Questions, comments, derision, criticism, suggestions? Send them in either in the comments here, or to the contact address alluded to in the About tab, above.
TAKING IT IN STRIDE…
See this egg?

It’s the one on my face. And deservedly so.
A quick recap:
- I’m working a project on skew count linen – with a different number of threads in the warp and weft. – Confirmed, that’s a fact.
- If a design is worked on such a ground, it will be compressed – shorter in the direction that has the higher count, and stretched out in the direction that has the lower count. – Again confirmed. That’s also true.
- I counted my threads, and planned out a design that featured “padding” on to compensate for anticipated compression, so that the difference between the proportions of the strips going across the top of my work, and down the side of it would not be so evident. – Yup. I did that, and I like the extra wide knot strip that I doodled up to use there.
BUT
Major snafu. I did not properly record my count/measurements and reversed them, attributing the denser count to the wrong direction. Instead of the new strip ending up with squatter, flatter skeletons after I rounded the corner, close comparison shows the new bois to be leaner and lankier than the ones previously stitched. Even more embarrassing, I did not notice the problem until I had a fair bit worked up.
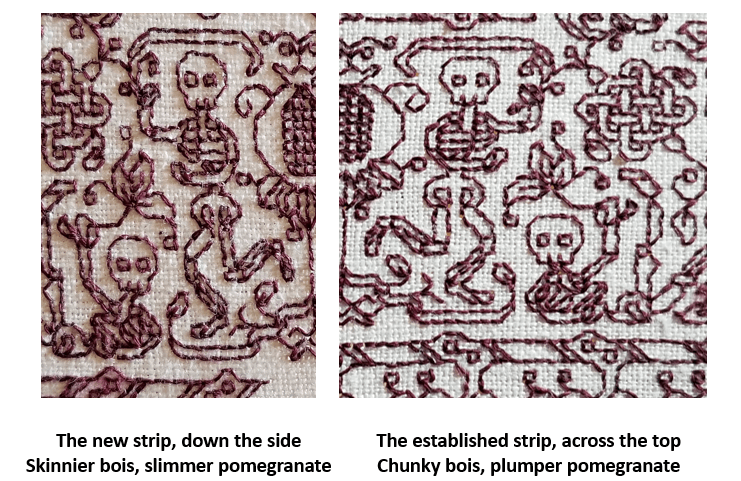
So it goes.
Obviously I have a good lesson-learned on this one to add to my roster of mistakes as teaching moments. And I’m not going to go back and rip anything out. (I may have a second lesson on finite stash supply vs. thread consumption rates to painfully experience, too.) So my piece stays as is, and I get to look like an idiot in front of everyone. While this isn’t going as planned, and I did make a giant mistake – it’s not totally fatal. I declare myself just a tiny bit sadder, but wiser, and will keep soldiering on.

You may point and laugh now.
DANCING AROUND THE CORNER
Having gone on and on about straight repeats as my bony bois march across the top of my piece, we have now come to the first corner.
Thankfully, my count is spot-on and everything is in place.
But why did I start with the strip of skeletons doomed to dance upside down? Because I knew that I would probably make some tiny adjustments to the design as I went along. The viewer’s eye is drawn to the closest point of the work, and the most logical part – that’s always the strip across the bottom, where the motifs are all right-side-up.
It’s unlikely that any small tweaks would be noticeable in the upside-down part at the top. So being too lazy (and waaay too short of thread I can’t replenish) I started there, knowing that I would not be ripping back vast regions to norm those tweaks.
Closer up, in a more normal orientation:

My last post discussed the non-historical use of the same framing element on either side of a mirrored repeat with horizontal directionality. Here’s another feature of this strip that’s not often seen in museum artifacts – the mitered corner.
The majority of corner treatments in surviving historical fragments have butted-up or improvised corners. Carefully plotted mirror images across a diagonal (mitering) are quite hard to find. But I decided to do one anyway. You can spot the diagonal running through the center line of the rightmost internal knot, down through some leafy bits, and into a flower-like shape. I’ve also established the beginning of the 90-degree flipped border, with the upper part of that skeleton plus the first pomegranate underway.
I’ve also rounded the outside corner. In a serendipitous happenstance (I can’t claim I planned it ahead of time), the width and height counts of my marching plumes are equal, so I was able to fudge the corner with one last plume on a long stem.
Side note: At this point I really don’t need to refer to my printed pattern any more, I am mostly working off prior stitching, with occasional glances back at my chart to make sure all is aligned and true.
But that inside edging – it’s different. I’ve introduced another element, playing with the eternity knots and tying them into the plume strip. I did this because the thread count of the warp (the threads that stretch up-down in the detail photo) is denser than the thread count of the weft (those that go across in the detail photo). The closer together the threads are, the more compressed the design will be in that direction. My skeletons marching up/down the sides of my piece will end up looking ever so slightly shorter and chunkier compared to their more lanky brothers that tumble across the top and bottom. BUT I can draw the eye away from that difference by adding the additional knotwork strip.
So it turns out that my design is all about insouciance, breaking historical composition precepts, and visual deception. Still for all of that I think that its look is more closely aligned to the aesthetic of historical blackwork rather than more modern pieces. Just my opinion, feel free to differ.
Class Handout Page
And for having the patience to read down this far, here’s another present. I was going through some older files and came across this class handout page. I’ve taught several workshops using it. The last one I came equipped to do was for a public SCA demo in Rhode Island, although the circumstances and attendees made just sitting and chatting about the stitching a better option. Still, I did update the handout, and it may as well be of use to someone.
The patterns are (more or less) ordered in level of complexity, and are intended to be a self-tutorial in double running stitch. When I teach I provide the page below, a strip of Monk’s cloth and length of standard embroidery floss and needle, plus an inexpensive hand hoop (if I have some to spare). Depending on prior experience, stitching proficiency, confidence level I encourage the participant to select one of the designs from the leftmost two columns, to try out face-to-face in the workshop. Then I encourage everyone to use the rest for self-study at home.
For self study, what I suggest is to just grab a piece of cloth and begin – no need to plan an intense, composed sampler. Pick a point anywhere on your chosen ground, then starting at the spot in the upper left column where you feel comfortable, continue down that column to the simple acorns. Then keep going. The next design in the complexity sequence is the flower spring at the top of the next column. Go down that column to the folded ribbons.
After that, I’d suggest attempting the birds at the bottom left. From there the vertical star flowers, then the knots, four-petal flower meander, and the design immediately above the title. Once you’ve done all that the remaining four intermediate patterns on the page should be well within your grasp (the heart flower all-over, fancy acorns, geometric strip, and oddly sprouting peppermint-stick squash blossoms).
Of course you can be totally random and just use these designs as you will. No need to march in lock step with the protocol, above.

Download this handout in PDF format from my Embroidery Patterns page. It’s the last one listed (click on the thumbnail there to get it, then save it locally).
As ever, if you stitch up something from any of my designs, please feel free to send pix. I always get a big smile out of seeing you having fun with the pattern children. And if you specifically say so and give permission to re-use your photo, I will be happy to post it here and index it under “Gallery”.
