AND NOW WE ARE FOUR
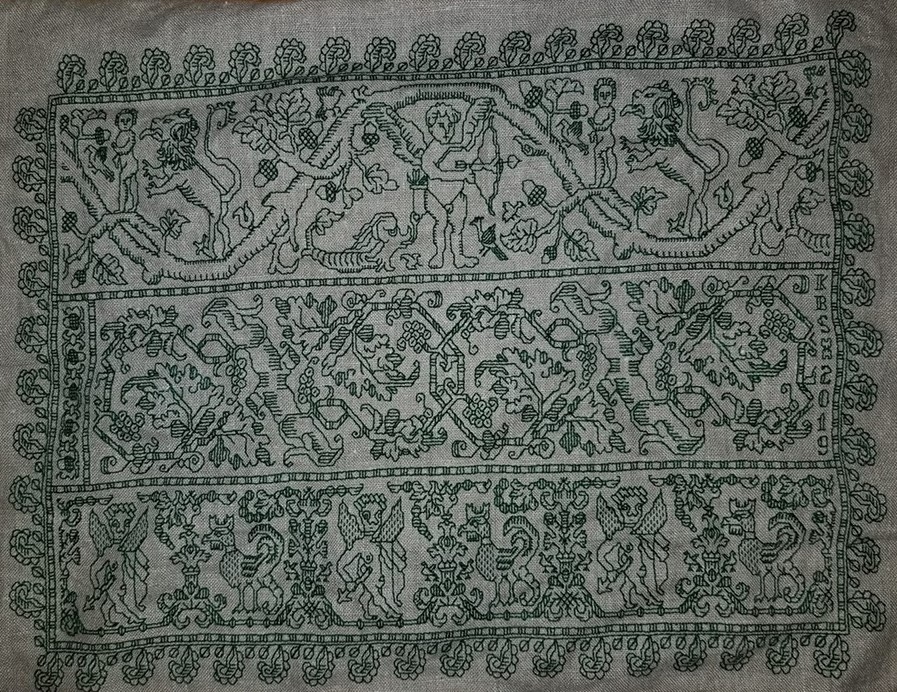
I report the finish on my RESIST sampler. Completed, signed and dated.

Don’t worry about that dot on the bottom margin – that’s just fluff I neglected to brush off prior to the photo. The message is dead serious, but there are some silly bits in it. Like the dragon heads that parade across the top. The eyes in the original are empty – no pupils. But I put some in on this strip, and got several emotions when I did. My dragon heads look angry, attentive, contemplative, attentive, and bored. And more. Just a whim.
I am also pleased with the Pegasus strip – doodled up just for this piece. It will be included in my forthcoming Ensamplario Atlantio Volume III (EnsAtl3). No timeline yet for that release. Here are the sources for all fifteen bands, top to bottom.
- Dragon head edging – The Second Carolingian Modelbook (T2CM), Plate 25:4. Redaction with impromptu manic eyeball improvisations.
- Acorn meander – T2CM, Plate 25:3. My original.
- Line interlace – T2CM, Plate 11:3. Adaptation of non-graphed modelbook design.
- Twisted meandering eels – T2CM, Plate 27:2. Redaction
- RESIST using alphabet border – Whole alphabet blocks and bits that fit around them, EnsAtl3. My original.
- Lily buds – Several versions in my various works, this one from my free class handout available on my patterns tab. Adapted redaction.
- Kittens and string – EnsAtl3. My original.
- Large floral all-over – EnsAtl3. My original.
- Doubled simple flower strip – T2CM, sample figure on building larger borders from narrow ones, on the write-up page for Plate 7. Original narrow strip, T2CM, Plate 6:3. My original.
- Cursed bunnies eating my hostas again – I had fun stabbing these guys, too, for obvious reasons. EnsAtl3. My original.
- Very large sprouting all-over. Broadside available here on String here and on my patterns tab. Redaction.
- Block edge border T2CM. Plate 23:2. My original.
- Thistles – T2CM, Plate 30:3/ Adaptation of non-graphed modelbook design.
- Pegasus strip – EnsAtl3. My original.
- Rooster edging – (Turn it upside down and you’ll see them). EnsAtl3. My original.
Now RESIST joins the three fangirl samplers I have completed, celebrating the science fiction works of my Resident Male. That’s a lot of stitching since June, shown here on my Wall of Shame, where all my finished but not yet framed works live.

What’s next? Probably another in the PERSIST-RESIST grouping. ASSIST will be longer than RESIST. Also on a high count not-so-evenweave linen remnant. As you can see, the prep step of hemming has started.

I’m torn about colors and threads. And I have to calculate the thread count of this scrap piece. I have a feeling that it’s a bit more skew than the other four, and probably a skosh coarser than RESIST. I have some silks in various colors that might work on it, doubled in happy polychromatic chaos. Or I might do it all in deep red, possibly with a spot of a shiny black for emphasis.
As to what to put on it, I’m also contemplating options. The word, for sure. Possibly some voided bits or heavy foreground long-armed cross stitch strapwork bands (I haven’t done much of that recently). Or maybe I’ll work in some tiles of fills. But not worked inside freehand drawn shapes – just in geometrics. I have LOTS of fills begging to be taken out to play, some of which I came up with on the fly for the Unstitched Coif project. Since that’s off at the V&A, it seems proper that I stitch them up on something I can look at and enjoy here at home.
Stay tuned for more stitchy mischief.
PAST PROJECTS AND LESSONS LEARNED – PART 3
Continuing on and finishing up the parade of past completions, misses, and items still languishing unfinished in the ever growing midden next to my favorite sewing chair, we arrive in near recent times.

In the last post in this series I mentioned sending Elder Spawn off to college with a bit of nagging to hang on her wall for continued parental admonishment. Well, it worked, so I did it again for the younger in 2015.
The request for the Trifles sampler included a laundry list of relevancies, including an overall steampunk theme, with nods to anime and Dr. Who, and at least one dragon or unicorn. I found a relevant precept in Book of Five Rings, then hit all the bases, and along the way playtested a lot of the fillings in Ensamplario Atlantio, plus many that ended up in Ensamplario Atlantio II. I particularly like the soot sprites caught in the mechanism, quoted from Spirited Away. This one was done with some of the faux silk floss I found while we were in India, on 38 count linen/cotton blend. It’s finished as a hanging banner.
Lessons Learned: This was the piece that taught me the joys of beeswax. The “art silk” is very fine but also very unruly, and being quite old when I bought it, can be friable. Waxing held it together, eliminated differential feed of the two plies, and kept me from piercing it prematurely as I stitched with one hand above and one hand below the work.

In 2015 we had an extended stay guest – a friend of Younger Spawn who spent the senior year of high school with us prior to graduation. She needed a send-off inspiration, too. But instead of imposing parental nagging on her, I asked her for a favorite saying she might want on her wall. She suggested this Grace Hopper classic. More tryouts of T2CM patterns ensued. This was also done in the art silk I used for the Trifles sampler, but on 32 count linen/cotton blend.
Lessons Learned: I used this one to experiment with color and open-voiding (squares, diagonals or zig-zags instead of solid fills or meshy stitch). It’s all double running, and like most of my pieces, wasn’t designed for dual sided display, so the color changes didn’t mean that I had to bury all of those ends. I rather like the playful brights I used on this one.

Shhh. But the secret is already out. In 2016 I took my first apprentice. Although my blackwork journey had been recognized inside the SCA with a Laurel award (the group’s high honor for achievement in the arts), it predated the establishment of apprentices as a concept (kind of like squires to knights, but not for martial prowess). But neither my apprentice nor I are good at formal statements, so we kept it under wraps and very free-form. Instead of giving her a green belt, I gave her a long strip of linen, with a belt embroidered at one end – the idea being that she could use the thing to experiment with stitching, painting, printing, dyeing, whatever. I think this is on 32 count linen in Au Ver a Soie silk, but I don’t remember. She’s gone on to make me quite proud of her explorations and achievements in historical arts and sciences (but we are still quiet about the whole thing).
Lessons Learned: While the plain old cross stitch that made up the lettering is not double sided, the belt mostly is. I learned once more what a pain in the neck burying all those ends can be.
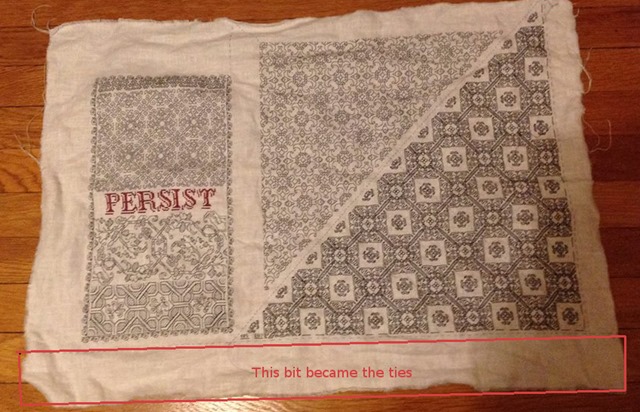

In 2017, tired of having my hair blowing in my eyes in the wind and bored with bandannas, I decided to make two forehead cloths – a kind of kerchief popular in the 1500s and 1600s. And yes, I wear them with modern clothing, not re-enactor wear.
In a happy coincidence Stealth Apprentice was busy dyeing embroidery silks with historically accurate ironwood dyes, and asked me to try them out to see if texture, “stich-ability,” strength, or colorfastness in the wash were issues. I’m happy to report that her threads were prime. Both pieces have been through the wash multiple times, and both still look as good as they day they were finished. I made two cloths (only one pictured complete with ties), and while I was at it and abhor wasted space, I finished out the 32 count fabric with a doodle sampler of “Persist.” All of these designs are in T2CM. The darker triangle was stitched with two strands, and the other pieces with one strand.
Lessons Learned: Yes, there’s very little area between the two triangles. I cut neatly between them to separate the pieces, then lined them with well-washed muslin, and made some of the waste fabric into the ties. BUT notice the doodle sampler. It’s awful close to the kerchiefs. Too close. I haven’t finished out this mini-sampler yet, but to do so I will have to border it all the way around with fabric, then affix the entire thing to some some sort of frame, or into a little banner. I should have started that piece closer to the leftmost edge of the cloth. Oops.
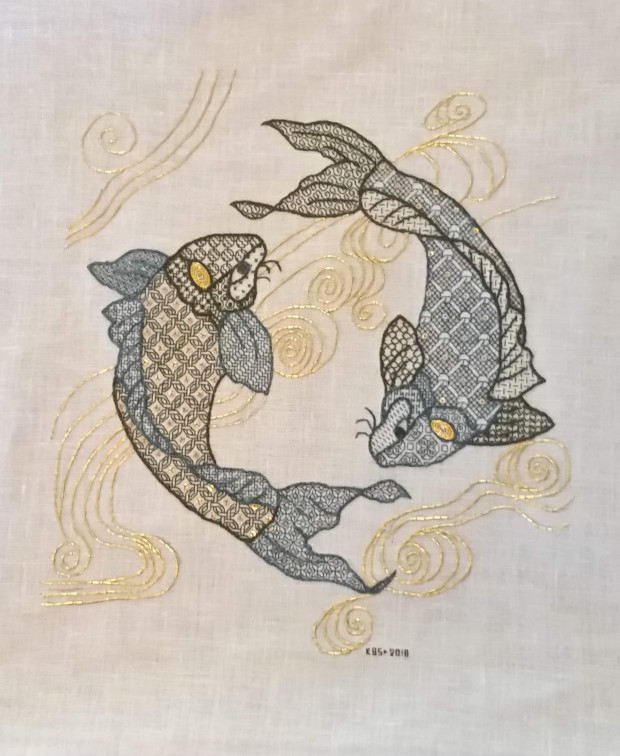
This one is probably the most ambitious piece I’ve ever done. Silk, and Japanese gold, with 2mm paillettes, on 40 count linen, and finished in 2018, I loved every minute of my two fishies. The indigo silk was also dyed by Stealth Apprentice. The green is more of the Au Ver a Soie. All counted fills are done in one strand; the darker outlines are worked in reverse chain stitch with three strands. The whiskers are split stitch and the eyes are satin, both done with two strands. The gold is couched down and the paillettes are affixed with one strand of yellow faux silk (more of my India stash). The counted patterns are mostly in Ensamplario Atlantio II.
I spent a lot of time carefully considering (and sometimes picking out) the fillings. I was aiming for flowing mobility, a suggestion of scales, and glimmer under the the water’s surface. While the fills are all strict and regimented geometrics, offsetting them, and picking ones with strong diagonals and curves helped avoid the blocky, heavy look that many projects with fills fall into.
No, no one in this house gives credence to astrology – it’s not a Pisces depiction. The back story is that the Resident Male described a cloth with two fish embroidered on it in one of his early stories. I made it so. (Pun intended).
Lessons Learned: I haven’t put my hand to couching metal threads in other than the most trivial way since that silver horse pouch in 1975. I re-learned a whole suite of techniques to manage it, including plunging and finishing off ends, forming the curves and tensioning the gold as I stitched it down, how to increase or decrease the distance between the couching stitches to achieve the desired radius, and how to keep two unruly strands of the stuff side by side and not flopping over each other for best effect.
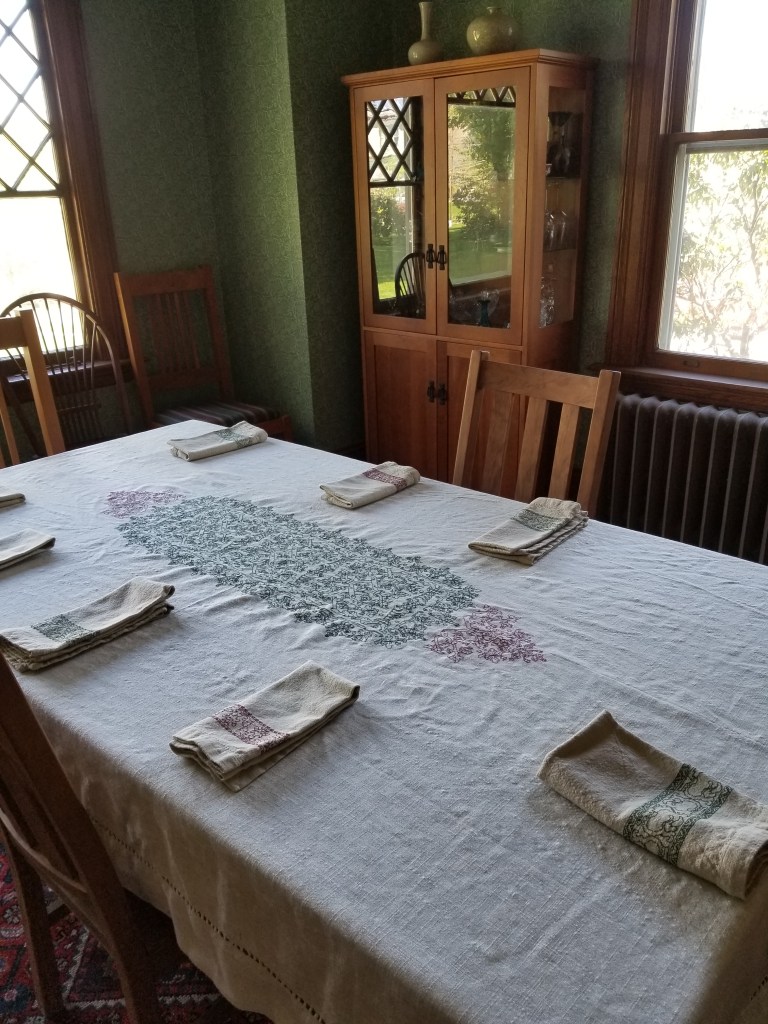

I’m beginning to run out of wall space. In 2019 I decided that I needed to stitch up some napkins – quick and dirty because they will undoubtedly get dirty quickly.
I wanted something fast to stitch that could endure harsh laundering. So I took a chance and ordered some pre-finished “rustic look” napkins and coordinating tablecloth. They’d be useful for my holiday table whether or not they were stitchable. And I lucked out. This is plain old DMC floss on big-as-logs 26 count poly-cotton napkins, and 28-count tablecloth. More or less – none were exactly evenweave when they started, and no two napkins ended up as the same size after pre-shrinking. But I don’t care. I had fun testing out more T2CM designs, and no – while I took pains to work double running and used the catch-loop method to begin each strand, I did not end off invisibly. There are tiny knots on the back of the napkins. So far no guests have turned them over to tsk, tsk.
What about stains you might ask? I don’t care. The napkins were quick and cheap enough to replace if they are too far gone. Note that the eating areas of the tablecloth are NOT stitched. If the thing gets damaged, I can always cut out the center part and apply or insert it into another one. Or not. “Look, here’s the gravy stain from 2023” sounds like it would be a nice bit of nostalgia ten years after.
Lessons Learned: There is no such thing as uniform shrinkage. Ever. Also a tablecloth is big. I ended up using my sit-upon frame to work the center, gathering up the ends of the tablecloth into two pillowcases to keep it clean. That worked well. Oh, and I hate ironing, so don’t expect to ever see this smooth and linen-press pristine.
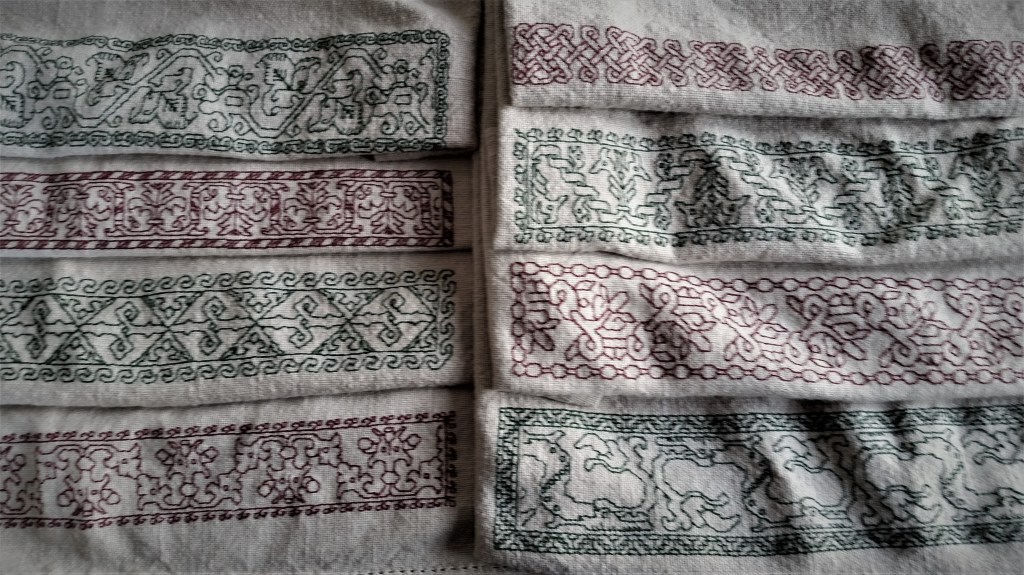
It’s an addiction. I just can’t stop, so I plunged on, working up three of my favorite strips (and an edging) from T2CM. My Stupid Cupid doodle was done in June/July of 2019, on a piece of craft store 32 count linen/cotton blend, in DMC floss.
Lessons Learned: I ended up going back and editing my book pages on two of these designs because I hadn’t normed the repeats uniformly. My take-away is that it’s ALWAYS good to playtest a design rather than just trusting that one’s initial drafting is perfect.

Finishing out 2019 I thought I’d do up a cushion for my living room sofa. Well, maybe not a cushion. This is more of that faux silk, plus green Au Ver A Soie on 38 count linen. See all of that accursed satin stitch? It took only a couple of nights of working on it before I decided that if ANYONE sat on it with studs on their jeans pockets, I’d have a meltdown. Yet another piece destined to hang on the wall, I guess.
What you see here is the center third of my Leafy Multicolor – a piece very closely based on an extant artifact. I intended on making quite a large item, but the rather large leafy edge would only be on the top and bottom (as displayed in final, not as stitched). Have I mentioned that I detest satin stitch?
Lessons Learned: I really hate satin stitch. Especially in silk or faux silk with a laying tool. This is still on my frame. Everything I’ve done since is escapism because I HAVE to finish this one. But that satin stitch… Shudder.

The book cover project 2020 was a welcome break from you-know-what. It came about after some queries about how to make the book covers I had done back in 2012. I had a book, I had DMC floss, I had 30-32 count cotton craft store even weave, and I had patterns. Why not? So I wrote up the whole thing, from the initial planning stages all the way to the finish, so others could do their own. No idea if anyone will, but I hope someone does.
Lesssons Learned: No one is perfect, least of all, me EVEN when I am trying so hard to be because others are following along. I made a measurement mistake midway, but it all worked out. And going back to the first bit of almost-voiding with a red foreground and a yellow background I did on the Permissions sampler, above – I still like the loud and cheerful look.
And that brings us up to the current piece. I’ll tease that one here, but I save the Lessons Learned for when I’ve fully grasped all of the mistakes I’ve made on it to date.
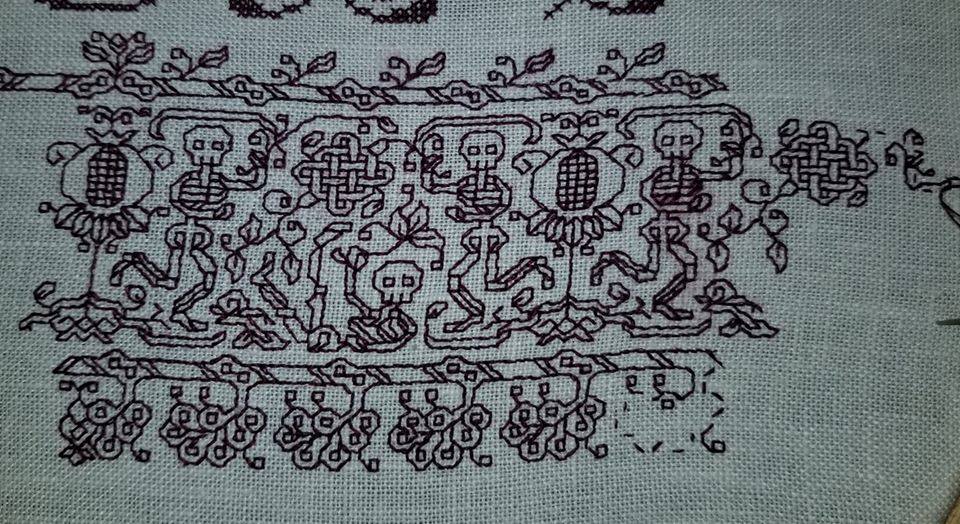
LETTERING COMPLETE – ON TO THE DANCE
I’ve been working away on my admittedly odd fandom sampler, and have finished the motto.

US penny provided for scale.
With more precise counting, the ground cloth is approximately 46-48 threads per inch but isn’t exactly even weave, so the piece is roughly 23 x 24 stitches per inch, with small variations for slubs or skinny threads. But that’s ok.
As for what this rather curious saying in the equally curious and difficult to decipher font says, it’s “Lucus orthai ta.” It’s a saying in an alien language that figures in The Resident Male’s forthcoming book. It translates to “Life’ll kill ya,” and so was fitting to be something ringed round with the skeletons from my Dance pattern page.
Having finished with the plain old cross stitch part, now comes the fun stuff. In an unusual move for me, I’ve graphed out an adaptation of the Dance strip and corner, specific for this piece. I usually don’t bother, but in this case I wanted to be sure that everything was centered. You can see just above the “LUC” I’ve begun a course of the innermost edge of the wide border. It’s mirrored at the center point, over the C. I did this so that my corners would meet up perfectly. Now of course as I go on we’ll see how well I have been ensnared by hubris. But for now, I can hope. Also consult my pattern graph.
Oh. And for the strip across the top, the skeletons will be upside down. You have been warned.
Questions about materials or technique? Comments on the futility of producing a tribute to an as-yet unpublished book? Desire to read the first book in the series? Post your queries here and I’ll try to answer.
STAYING BUSY
What have I been doing of late? Well, being lucky, I can work from home, so that’s been taking up most time, especially with major deadlines in the past week. In the time that’s left over, I have to stay busy, and not as a sacrifice to the “cult of productivity.” Mostly because unless my hands are occupied, my thoughts wander to dark places.
I have subdued a reluctant sewing machine and run up some face masks for my family:

I’ve been knitting a pair of socks from a gorgeous ball of yarn I had put away as being “too good for socks.” Well, I deserve nice things, too.

I’ve done some casual research, and found another rendition of The Old Castle design, dated to 1590-1610. I added it to my round-up of the designs in that family.
And I’ve embarked on a new stitching project. It’s a curious one that has no short explanation behind it, and in a way – it’s the ultimate FanGirl project.
As I’ve mentioned before, The Resident Male (pictured above) writes prime SF/fantasy. He is currently working on the second book in his Blair and Terendurr series. One of the delights of living with an author is that you get to read the output long before it escapes into the wide, wide world. And if you are really lucky, parts are read out loud to you as they are completed.
One of the stories in the forthcoming second book features a rather unusual band of confederates. I can’t go into more detail because I don’t want to post spoilers. But they have a motto in an other-worldly language, “Lucus Orthai Ta,” which translates roughly to “Life’ll kill ya.” I thought it would be fitting as his #1 fan to make a present for my author: an embroidery of this phrase, framed with The Dance border I posted here last week.
I started by combing through my usual haunt for unusual alphabets, Ramzi’s Patternmaker Charts collection of near 100 year old Alexandre, Sajou and other pattern booklets and leporellos, The one I picked is the third one on this page. They don’t get much more baroque or difficult to read than that set of squiggles. Perfect for an alien language.
And so I present the start – working out from the center and in cross stitch for the lettering, on 44 count almost-evenweave linen in “art silk,” it will take me a while to get to my skeleton army in double running stitch. But I will…

As for the story, you are just going to have to wait for him to complete the second book. It will be worth the wait!
HARSH LANGUAGE FOR HARSH TIMES
UPDATE: This pattern is now available as an easy-download PDF file, via the Embroidery Patterns tab, above.
I start with a gallery of finishes. Sanity saved! Smiles spread! (Think what you must about the phrasing – I’m happy that my goal of preserving both have been achieved).
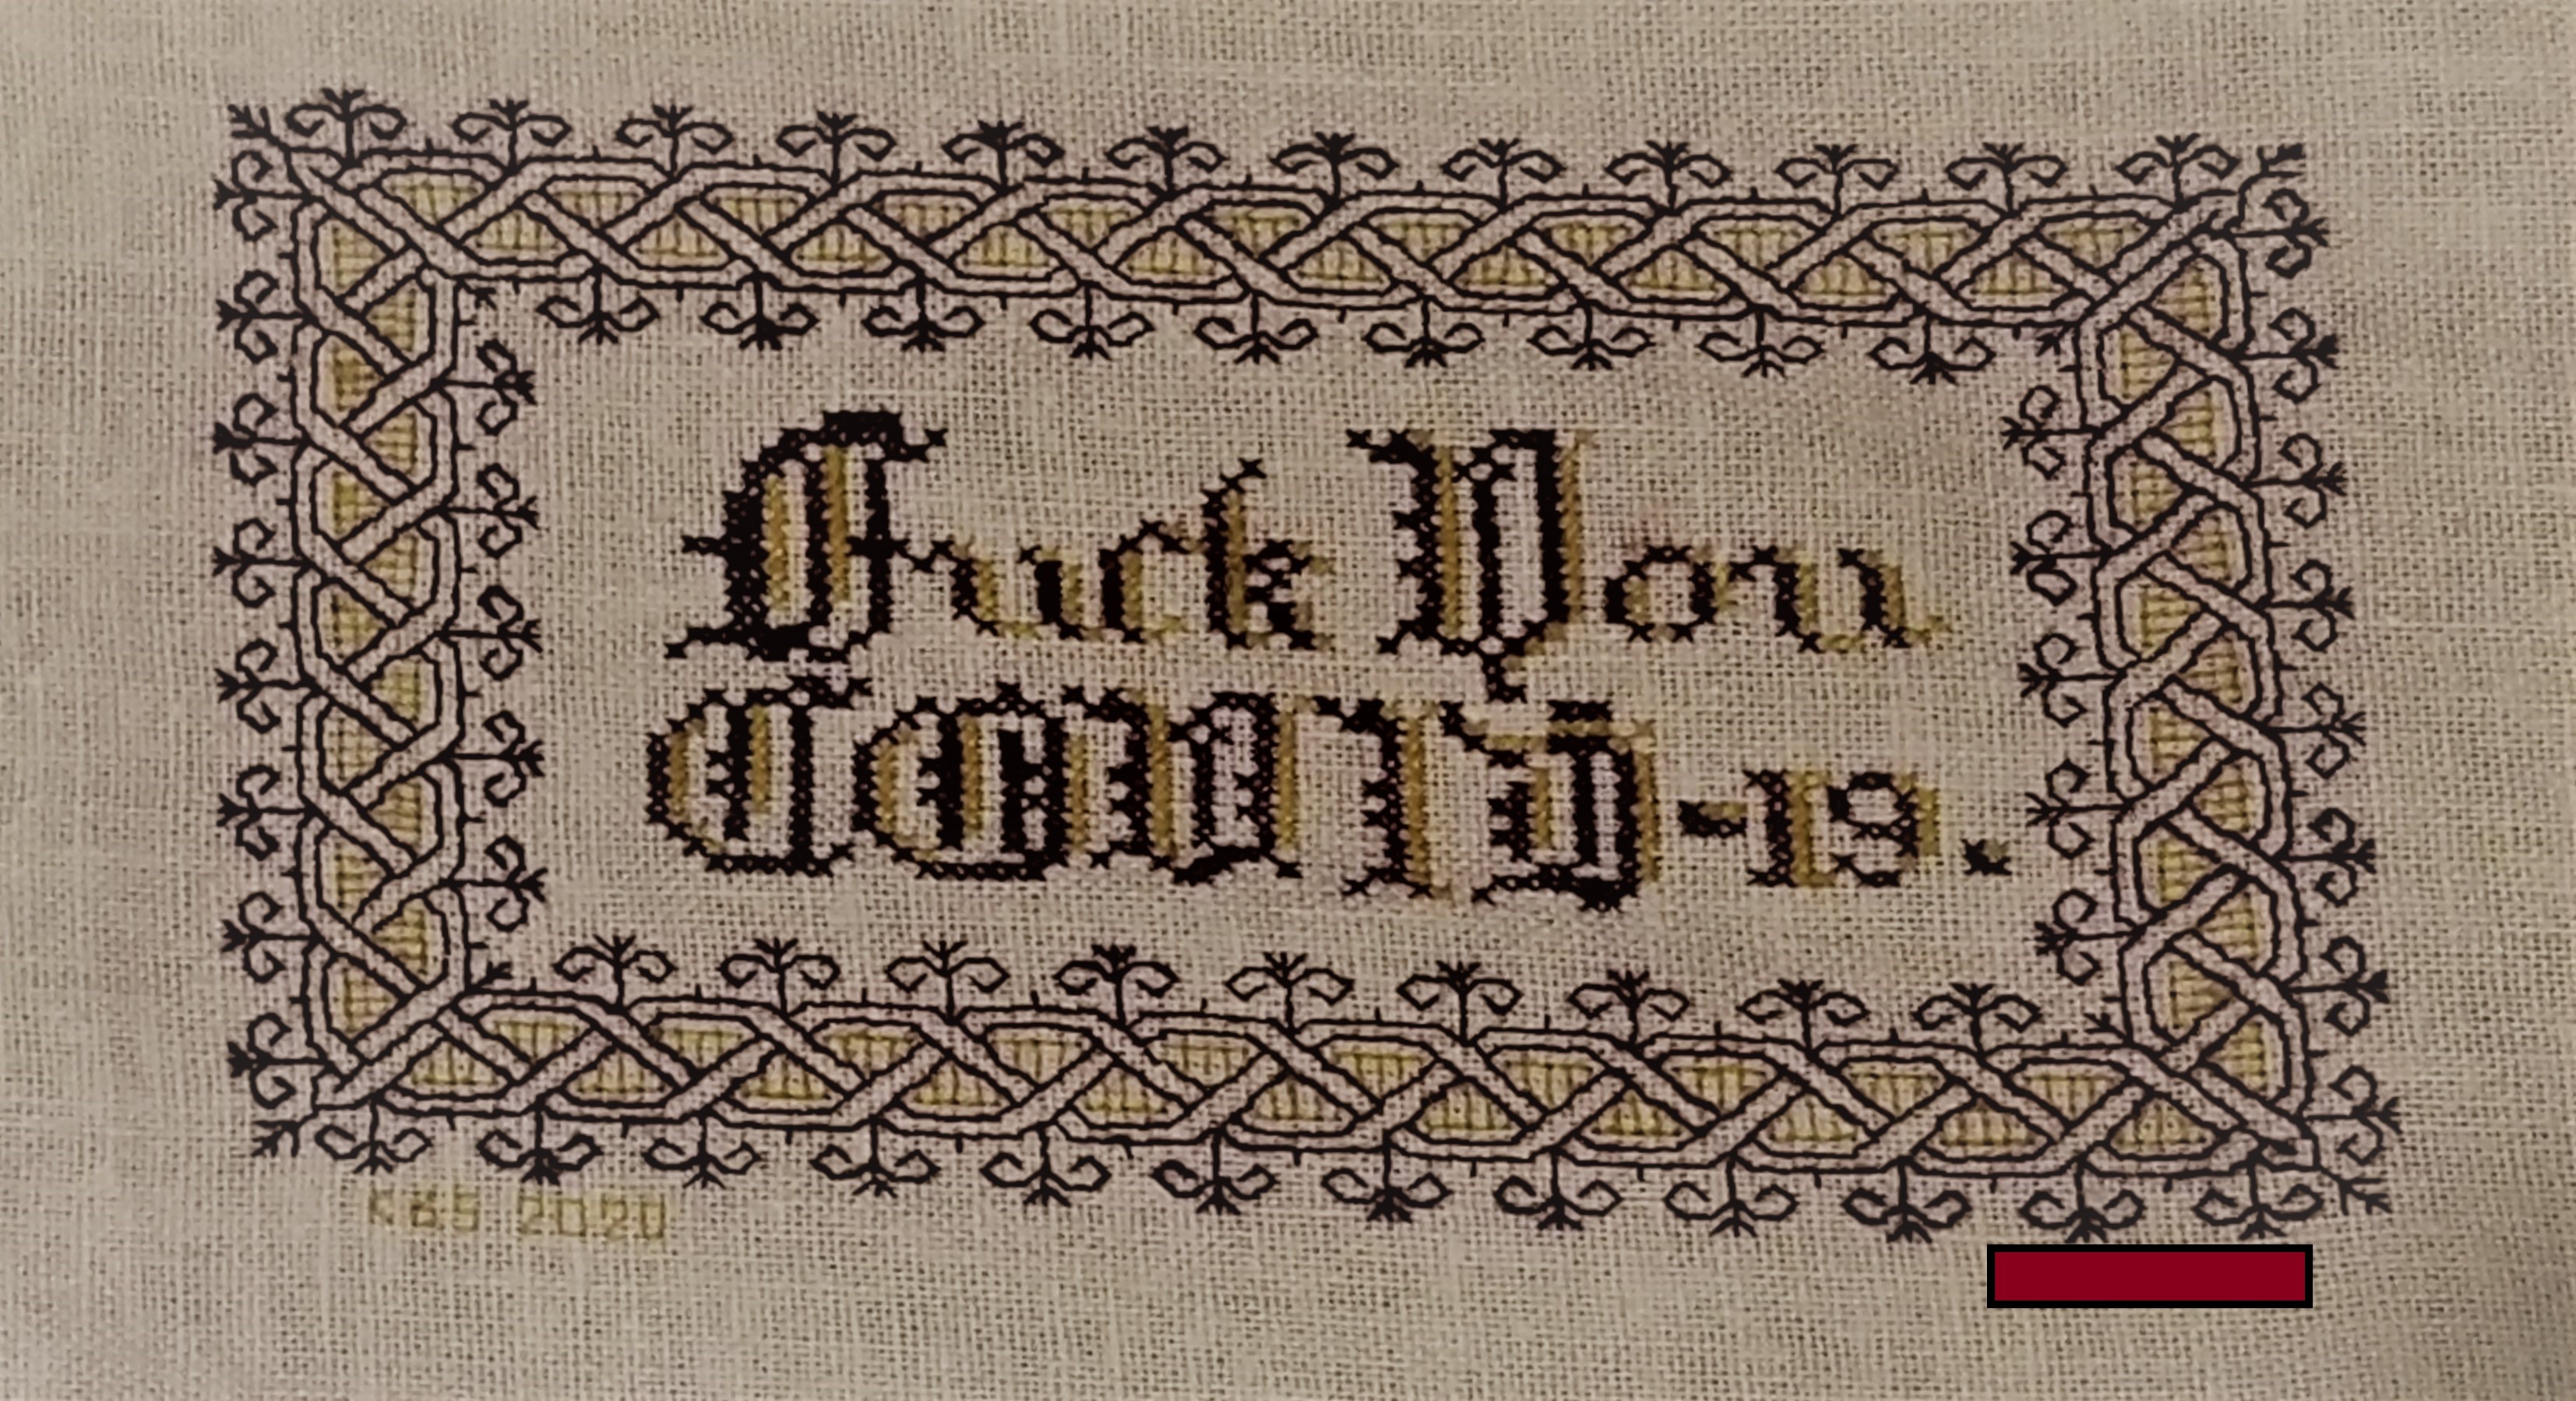
My own finish. Naturally dyed claret and mustard yellow wool on linen/cotton blend. I played with the color placement and letter forms a bit, since I can’t do anything verbatim these days.

Photo (c) 2020 by Madeline Keller-King, reproduced here by permission

Photo (c) 2020 by Breen Pat, reproduced here by permission
A couple of days ago I posted the design for my “Don’t Panic” piece, which has become shockingly relevant.
Friend Edith points out that harsh times call for harsh language, and that while some people might be soothed by a gentle statement, more strident expression suits many others.
Therefore for Friend Edith, and in the spirit of Dame Judy Dench, who is famed for stitching up provocative statements, I make this chart freely available for YOUR OWN PERSONAL, NON-COMMERCIAL USE.
Consider it as “good-deed-ware.” It’s tough out there right now. Pay this gift forward by helping out someone else in need; phoning or getting in touch with a family member, friend or neighbor who could use a cheerful contact; volunteering time or effort; or if you can afford it – donating to one of the many local relief charities or food banks that are helping those displaced from work right now.

Right-click on the image above to save it as a JPG.
This piece is intended to be done in cross stitch (the lettering), and double-running or back stitch (the frame). While it’s shown in black and red, use one color if you like, or substitute in as many other colors as you wish.
The source for the lettering is yet another of the offerings in Ramzi’s Patternmakercharts.blogspot.com collection. The border is from my recently released Ensamplario Atlantio II, a free collection of linear designs – mostly blackwork fills and borders.
Thank you Edith! Your inspiration and request will brighten the hearts of many, while rendering their walls cheekily NSFW.
(And there goes my PG blog rating, and any remaining shreds of reputation for gentility. But it’s worth it if someone smiles.)
DON'T PANIC – AGAIN
A while back I stitched up this piece, both as a tribute to Hitchhiker’s Guide, and as a bit of inspiration for my office. I’m a proposal specialist – managing short deadlines and general panic are my stock in trade.
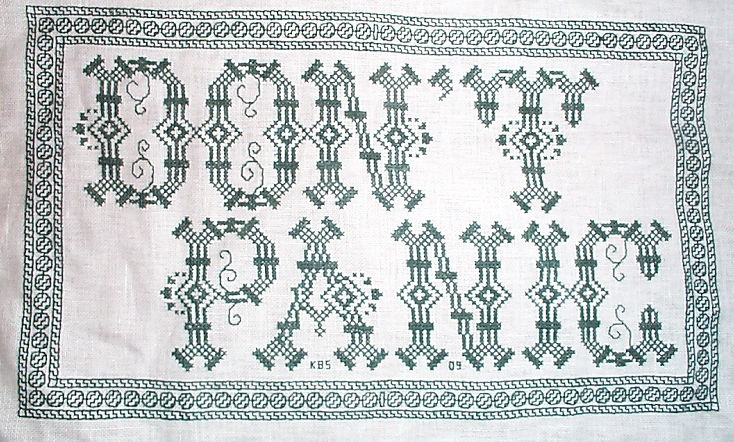
When I posted this on Facebook last Friday, I got several requests for the chart. So, tweaking memory dormant since 2009, I drafted one up.
I make this chart freely available for YOUR OWN PERSONAL, NON-COMMERCIAL USE. Consider it as “good-deed-ware.” It’s tough out there right now. Pay this gift forward by helping out someone else in need; phoning or getting in touch with a family member, friend or neighbor who could use a cheerful contact; volunteering time or effort; or if you can afford it – donating to one of the many local relief charities or food banks that are helping those displaced from work right now.
CLICK HERE TO DOWNLOAD THE DON’T PANIC CHARTS AND INSTRUCTIONS – THEN SAVE THE PDF THAT POPS UP
Eventually I will add this to the Embroidery Patterns page tabbed above. But for the time being – be safe, stay well, and care for those whom you love.

TRIFIAL PURSUIT
Back from our annual escape to North Truro, and reporting progress on the recently dormant Trifles sampler, being stitched for Younger Daughter to take with her off to college next fall. I decided that for my no-longer-little Steampunk (and Dr. Who) fan, instead of working lots of bands, the design for this one would feature gears. But I had a lot of problems hand-drafting up a nice set of them. It took a while, but eventually I hit on the idea of using a commercial stencil intended for airbrush work, then filling in the traced gear shapes with blackwork counted fills.
Here’s where I am now:

I’ve finished the main motto and the frame around the to-be-worked area. Minor brag: Note that having marched all the way around the piece without drafting first and using only counts of the border repeat to stay on target, I ended up even, perfectly aligned.
All of the fillings I will use on this will be from my free eBook, Ensamplario Atlantio. The ground patterns are stitched using two plies, mostly in double running, with lots of departures to accommodate the non-continuous nature of many of the fills. The outlines are plain old chain stitch, done in three plies of the same color as the gear filling. I am not taking any special pains to make the cam teeth totally square, or to make them mesh. I am liking the rounding and imprecision. Right now I’m thinking of covering the entire piece with gears in burgundy, brown, gold, and silver, relying on classic Four Color Theory to avoid making any two contiguous gears the same hue. Choosing fills for color in addition to density and form is adding a new dimension to this decidedly un-traditional yet somewhat traditional blackwork piece. And I may insert a surprise Trifle or two, just to emphasize the point.
On execution, I can report that I’ve managed to tame the extremely unruly Indian “silk” (in reality, man-made rayon) thread.
Beeswax.
I occasionally wax the last inch or so of my silk threads to make threading easier and to help ward off “ply creep” – when one ply of a multi-ply threading is consumed faster than the others. But I usually don’t wax the entire length unless I’m working with linen thread. However this stuff is hellaciously difficult, shredding and sliding, breaking and fraying, and catching. Using shorter lengths wasn’t the answer – no usable length was short enough to use comfortably. So I moved up to waxing the entire strand, and when I did so, most of my problems disappeared.
I am very pleased with the results using the fully waxed threads. They don’t break. They don’t escape from the needle’s eye. They don’t shred. Both plies are consumed at the same rate. Double running is nice and crisp. A major improvement that’s increased the enjoyment factor of a project that might have been truly tedious.

And I’ve wanted an excuse to stitch up those griffon-drakes since I drafted them up for the book.
SECOND HELPING OF TRIFLES
Two progress status reports today!
First is the Trifles sampler, in progress as a dorm gift to Younger Daughter, who will need such a thing in a year or so. (I have given myself lots of time for completion). As you can see, the motto is finished, using four different alphabets from Ramzi’s Sajou collection. I’ve played with them somewhat, working in the gold color accents, which are not marked as a secondary color on the charts.

I have also stitched in two small Daleks, to comply with her request, stitched in gold and off white silks. I am up to the surround now. I had originally planned to stitch lots of linear strips, patterns from my upcoming book, but as I alluded to before – I have been seized by Another Idea. The small stitched area just getting underway next to the T of TRIFLES is the beginning. I am going to make an interlocking and overlying mesh of gears of various sizes and configurations, each outlined in a heavier non-counted stitch, but filled in using the geometrics found in my Ensamplario Atlantio. I’ll be using coordinating fall colors for these – a bit of the brown and gold from the alphabet, but also cranberry, silver, and possibly a deep green. The total effect should be rather Steampunk, and a lot of fun.
However as much fun as this piece is, necessity intrudes. A friend of mine is welcoming a baby come the turn of the year. She’s expressed a fondness for traditional baby colors, so I am knitting up a small baby blanket for her. It will be car-seat and basket sized, not crib or reception size, so it is going quite quickly.

I’m using Encore Colorspun worsted, an acrylic/wool mix for maximum washability, this being a baby blanket and all. I’m knitting it on US 10.5 (6.5mm), which is relatively large for worsted in order to bring out the lacy stitch pattern. The stitch pattern itself is adapted from an 18-stitch-wide strip pattern appearing in Knitted Lace Patterns of Christine Duchrow, Volume I. I’ve chosen the narrow strip so that the gradual color changes pool, rather than speckling across the rows. I’ve also chosen to work the stripes horizontally because I only have four balls of this yarn. If I had run the piece the long way I might have risked running out before I reached a useful width. By fixing my width, I can keep going until I have just enough to do an edging, or I can find a coordinating pink or off-white Encore for the edging, if there isn’t enough of the graded color yarn. And finally, being a lazy person and not wanting to sew the strips together, I am using the long-loop join method I learned while working Fania Letouchnaya’s Forest Path Stole to knit the strips together as I march along.
Oh, and yes – those are massively long DPNs – about 12 inches long. I really like extra long DPNs for hats and sleeves, and generally don’t use circulars for anything less than 20 or so inches around. As a result I’ve got a collection of these admittedly unusual needles.
