It was pretty much guaranteed to happen. I went through the various lace books on my shelf, but didn’t find a pattern that fit my specs for the Paisley Shawl edging. So I’ll resort to drafting out one of my own.
Now I don’t claim to be any more than a rank beginner at this sort of thing, but I think I’ve grokked a couple of the fundamentals. The books that have helped me most in learning lace construction are:
- Lewis, Susanna. Knitting Lace. Taunton Press (Newton, CT), 1992.
- Miller, Sharon. Heirloom Knitting. Shetland Times (Lerwick, UK), 2002.
- Stove, Margaret. Creating Original Hand-Knitted Lace. Lacis Publications, (California), 1995.
To start, I’m contemplating either a saw-tooth or triangle edge piece, of indeterminant width (but probably not too wide, in order to conserve yarn). I want to put the quad-eyelet flower motif on it. I want the repeat to be a multiple of 12 rows.
Let’s start with the eyelet:

Not too tough. Just a couple of YOs and K2togs, spanning six rows – three of which are purled to make the garter stitch ground.
Now let’s look at a simple sawtooth and triangle. Sawtooth edgings are simple because they’re built by adding stitches somewhere on the row, usually at the rate of one every other row. When the edging is deep enough, the stitches at one side are bound off and the total stitch count is returned to the original number. Here’s a minimal 12-row sawtooth, starting with 5 stitches
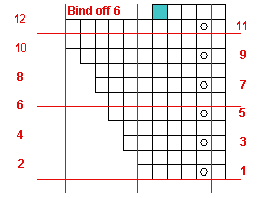
It starts with a cast-on of five stitches (not shown), then adds one stitch per odd numbered row. I stuck these increases in a column and made them eyelet-forming YOs, but they really could occur anywhere on the row, including at the very end and could be M1s or another increase that doesn’t make a hole. So long as each odd numbered row adds one stitch, the thing will widen appropriately. On Row 12 I bind off six stitches, returning the count to the original five cast on, in preparation for the following Row 1. The blue square is the last loop created by the bind-off conga chain, and is blue to remind me that I need to bind off until four live stitches plus the one formed by the bind off itself remain.
I’ve also charted these as all knits, but they could be anything, and anything can be plopped onto the base pattern. That includes the quad-eyelet, or other patterning. The whole thing can also be made wider by working some kind of vertical insertion strip at the right, prior to commencing the stitches of this mini-chart. For example, it’s common to increase the width of an edging by adding a column of faggotting, or a cable or lace insertion there.
Here’s a very 12-row triangle edging. It’s slightly more complicated because all the decreases needed to create the points aren’t lumped together and done on the final row:
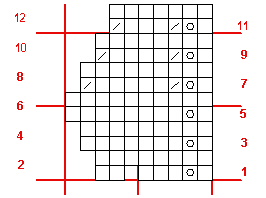
Again, the increases and decreases can occur anywhere in the row. To make comparisons easier, I’ve included the column of YOs as a design feature in both this and the sawtooth. But running them the entire length of the repeat means I would be adding a stitch on the "downhill" side, when I need to be taking one away to make the basic shaping. Therefore I’ve put two decreases on Rows 7, 9 and 11. The first one cancels out the addition of the stitch created by the YO (placed near the YOs for reasoning clarity only, in fact they could go anywhere on the row). The second one forms the triangle’s shape.
I could make the triangle steeper by changing the rate of increase, either by doing something interesting on EVERY row instead of every other row. (That’s one of the discriminators that marks the difference between true lace knitting and lacy knitting. Knit lace mavens would say that these simple examples are properly termed lacy knitting, and not lace knitting.) Or I could add additional YOs, or use double YOs. The possibilities are endless.
Here are the sawtooth and the simple triangle, tarted up with the garter stitch main texture and the quad-eyelet. I’ll start by swatching these, then see if I want something more demonstrative and lacier, or plainer. I’ll also judge width. Narrower might be tough without compromising the space I need to show the eyelets, but wider is VERY easy. If I want to make my life easy I can use any texture pattern with a 3 row, 4 row, 6 row or 12 row repeat to stretch my edging wider. I could use patterns with different row counts, too, but that would make tracking where I am in the thing just a bit harder.

WEDNESDAY UPDATE:?
These two pattern charts will NOT make a nice, neat quad eyelet motif. Explorations of why and a correction are posted in tomorrow’s entry.
