Over the past few months I’ve gotten a few inquiries from folks who want to stitch up my Lord Ganesh piece. I don’t issue it as a kit or fully laid out project chart. For one, the outline isn’t mine. It’s a coloring page I found on line. But here’s a run-down of the piece, plus identification of the various sources and fills I used. All the fills are in Ensamplario Atlantio – my free collection of blackwork geometrics available elsewhere on this site.
Fabric: I used a 32-count not-so even weave linen-cotton blend. My piece was a rectangle about 12 inches wide, and about 16 inches long, but the motif itself as-stitched was only 8 inches across from lotus-leaf tip to lotus-leaf tip at its widest diameter.
Thread: I used DMC six-strand cotton floss, Color #498. I used two strands to stitch the counted fillings, and three strands for the simple chain stitch outlines. I am not sure how much I used, but three skeins should be plenty for the entire project.
Needle: I used a ball-point needle intended for sewing knits to work the fillings. If I am using only one or two plies of standard embroidery floss, the small eye makes for less “thread drop,” and the rounded tip slides between rather than pierces the ground cloth’s weave. I think I used a #26 or #28 embroidery sharp for the chain stitch.
Stitch count: I worked the counted fillings over 2×2 threads of the ground, yielding a worked stitch count of about 16 stitches per inch. However my ground cloth was not exactly even weave, so you can see a bit of north-south distortion, and fillings that were supposed to be square ended up a bit stretched in that dimension.
Pattern sources: The outline pattern – a coloring book page found here. Coloring books are a great source for simple line drawings suitable for use in embroidery of all types. For the fillings – all are in Ensamplario Atlantio, my free on-line pattern collection.
Working Method:
1. I retrieved the coloring page and enlarged the image so that it was about 8 inches wide. I used a graphics program to do the enlargement, although if you do not have access to one, a simple print followed by enlargement on a photocopier would work quite nicely.
2. I taped the pattern print-out to a sunny window, then taped the fabric on top of it. I traced the pattern onto my cloth. I used a plain old pencil – all I had at hand at the time. I did not bother to edge the cloth prior to tracing or stitching.

I did not use tape or overcasting to prevent fraying. The reason I didn’t is that I knew this would be a very quick little project for me, and took less than a week, start to finish. I didn’t see the need. If you think it will take you longer to do, you may wish to do something to preserve the ground cloth and limit fraying. Hemming, basting, overcasting, tape, serging – all methods have their proponents and one may be right for you.
3. Using an embroidery hoop, and starting in the center of the piece, I began to work counted fillings in the design’s fields. I chose them as I went along, and did a very rough centering of each design in the space provided by eyeballing the shape and sticking a straight pin into the visual focus of it, then using that indicated point for the center of the chosen geometric filling.
In some cases where the tight curves of the shapes didn’t align exactly with the grid of my design, I used half-stitches to eke out the edges, so that the geometrics would totally fill the shape areas. I started and ended each shape individually, and did not strand my working thread from one to the next, in order to prevent “show through.” I also tried to stitch using double sided-double running stitch logic as much as possible, but I did not cling to it. My piece has knots and ends, and is NOT reversible.
4. After each shape was filled, I used plain old chain stitch to go around its perimeter. This hid all “rough edges” that result when geometric fillings are used in curved shapes. The chain stitch was NOT worked on the count.

5. When the entire piece was finished – all fillings complete and all outlines complete – I went back and did Italian hem stitching to neaten up the edges of my cloth. This actually took longer to do than the rest of the project.
Here is a clean picture of Lord Ganesh for reference; plus one with the fillings numbered, followed by a list of the Ensamplario Atlantio design numbers for each filling used.

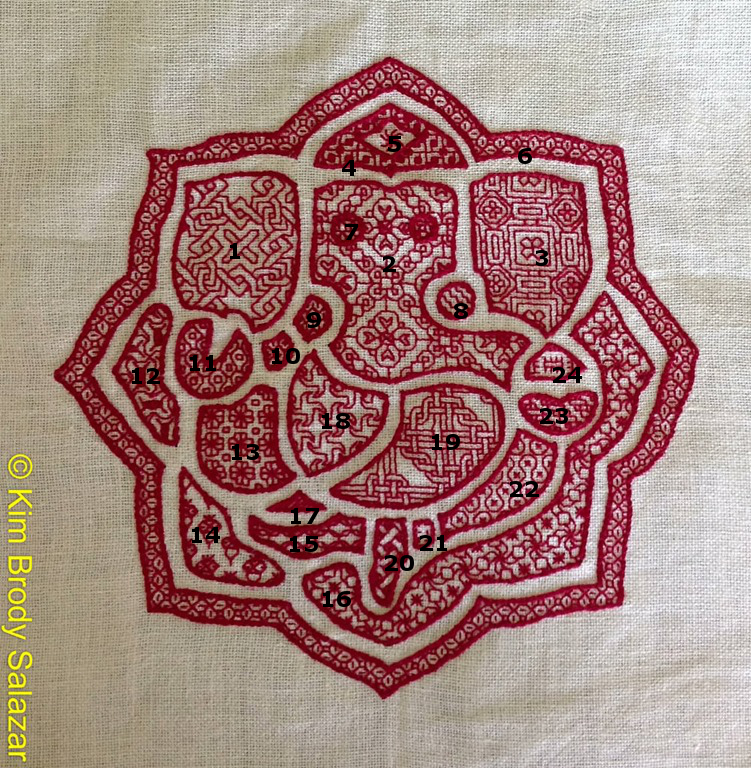
Ensamplario Atlantio Pattern Key
- EnsAtl Part 4, Plate 34:199
- EnsAtl Part 2, Plate 12:68
- EnsAtl Part 4, Plate 33:196
- EnsAtl Part 2, Plate 10:59
- EnsAtl Part 2, Plate 6:34 – one swirly star from the center of the repeat only.
- EnsAtl Part 2, Plate 11:64
- EnsAtl Part 2, Plate 7:39 – same used for both eyes.
- EnsAtl Part 3, Plate 16:94, lower leftmost
- EnsAtl Part 2, Plate 7:40
- EnsAtl Part 1, Plate 3:17 – made this one up on the fly and have no record of it. Use this one instead.
- EnsAtl Part 3, Plate 19:109
- EnsAtl Part 4, Plate 27:161
- EnsAtl Part 2, Plate 7:42
- EnsAtl Part 1, Plate 1:4
- EnsAtl Part 1, Plate 4:23 – worked sideways
- EnsAtl Part 3, Plate 16:93
- EnsAtl Part 2, Plate 13:74
- EnsAtl Part 4, Plate 31:182
- EnsAtl Part 4, Plate 25:147
- EnsAtl Part 2, Plate 8:43
- EnsAtl Part 2, Plate 14:84 – but done single stitch instead of double (off count)
- EnsAtl Part 3, Plate 17:98 – but just x in the centers, not boxed-x
- EnsAtl Part 2, Plate 12:70
- EnsAtl Part 3, Plate 22:129
I hope this helps those who want to make their own stitching of Lord Ganesh.
Enjoy!

This is screaming amount of beautiful. I can also see this same concept applied to making lace. I forgot what kind of call it but I am in the beginnings of another move and I wish I could sit down and do this right now but priorities stink.
Beautiful! An interesting take on Ganesh
[…] Ganesh Project. How to replicate my blackwork method Lord Ganesh, done as a present for a family friend in India. […]