We go on with the removable book slipcover project.
Step 9: Laying Out and Choosing a Border
Last time I had begun working the field pattern for the first cover. I centered it on the center point of the available area, and began working left, right, up and down. Since the total area isn’t very large compared to the span of the repeat, pretty soon I got close enough to my first edge to begin considering what I wanted to do with the border. I stopped well shy of the basting line that indicates the edge of my territory:
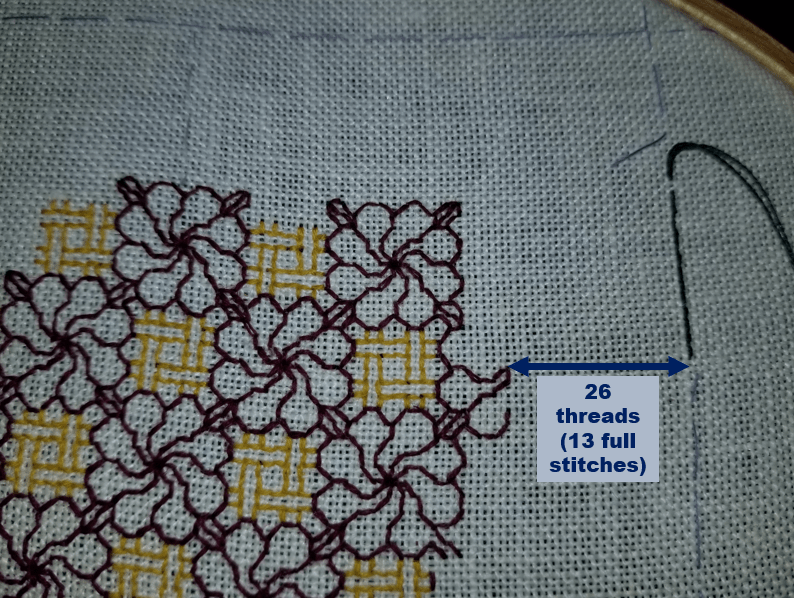
In the photo above you can see there’s lots of room to go, but I need to determine exactly how much room there is, so I can select, adapt, or draft up my border design. I’ve decided that whatever I do, it will be bounded both inside and out by a single line of deep green (DMC #890). (I like the contrast with the red and yellow). So taking care to make sure that I have FULL STITCH UNITS between the basted guide line and my stitching area – meaning even multiples of two threads – I start working my outermost solid green line.
Lucky me – it turns out that my basted edge falls exactly 13 stitch units (26 threads) from my established work. Had there been an odd number of threads I would have established my line one thread to the outside of my basted line. Better a tiny bit too large than a tiny bit too small. And yes, I counted the number of threads between the top basted line and the established work, too. It’s even bigger, so I am safe.
My border can be anything up to 13 stitches. But I don’t want one that wide. About half that is enough. So I went thumbing through my various stitch collections. I wanted one that would contrast nicely with the field and not fight with it, and would accommodate using up to three colors, including the newly introduced green.
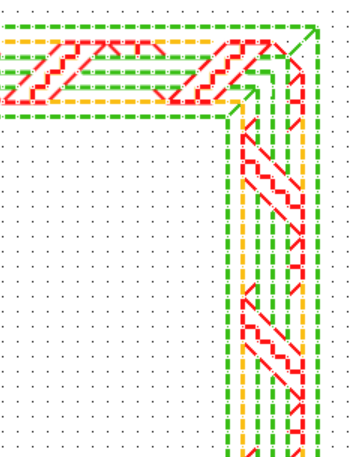
I didn’t find a pre-drafted, complete border that I liked in this application, but I did come up with this all-over design, presented in Ensamplario Atlantio, my first freebie, in Part 3, Plate 16:91.

It looks complex, but it’s just a simple ribbon-wrapped column, repeated multiple times. If you abstract just one of the columns and add a line of framing stitches both left and right, it spans only 6 stitches across. A perfect size, and there are several color-use possibilities as well.
Based on the design above, I drafted this out and started stitching. Note that I began by making a nice, neat corner.
For the record, these and all charts for linear stitching on this blog have been produced using the open source drafting software package GIMP. Here’s a free tutorial for how I do it (read up from the bottom for best logic).
Step 10: Stitching the Border
Just go for it!

The observant will note that I started stitching from the corner and worked the border down, then went back and filled in my field pattern, stopping one unit away from the border’s inner line. I don’t care at all that my field pattern is truncated. I COULD have stopped at the last whole or half-repeat, but to me, for this particular work, it doesn’t matter.
I am also not in the least bit concerned about how to make the design fit either the length or width of my book. I intend to work from the corner out towards the center of each side, approaching but not connecting at the center. Yet.
The next steps will fill work more of the border across the top of the piece, then fill in a bit more of the field. But I will stop the border and leave a gap in the center. It’s my intent to work the other corners similarly, but in mirror image to this one. Since everything is done on the count and is exactly even, I will be able to draw up a “join” or top/bottom/left/right border center kludge of some type to unify the border as a whole. And I bet that had I not confessed this here, you would have never known I got this far without planning it all out in advance.
Bonus Bit: The Back
For the folks who have asked to see the back, here it is flipped over. You can see the wrapped inner hoop of my frame and its attached support stick.

As stated, I tend to work in double running, using (mostly) reversible logic, but I am not a slave to it on pieces that are not intended to be seen on both sides. There are lots of knots. And you can see that I’ve used heresy stitch in laying down my initial border outlines, and in advancing the border in general. The short length color runs necessitated by its rather fiddly color changes make it much easier to plot out than the double-pass of double running.

“Heresy stitch” — love it!