This is the second piece in the series on making an embroidered book jacket, based on the general instructions I presented earlier this month. The first piece dealt with drafting up a simple pattern to construct the book cover, preparing the piece of cloth I am using, and transferring the guide lines from the pattern to the ground cloth.
In this session I discuss laying out the design for the embroidery itself. While I encourage folks to play along at home, starting their own book project and working with me, I will not be presenting a “Stitch-Along.” There will be no full project graphs presented here. Instead I encourage people to pick their own designs, and I hope that by describing my own thought processes, I will enable others to think outside the box.
Let’s start where we left off. We have our ground cloth prepared and ready to stitch:

The stitching areas – the front, the spine and the back – are all defined by basting lines at their edges. There are also basting lines marking the horizontal center (spanning all three areas), and the vertical center of the front and back. The spine is so narrow that it’s easy to count to determine its exact vertical center.
Step 5. Stitch Design Layout
I chose a medium count even weave fabric for this. It’s is about 30-32 threads per inch, which means I’ll get 15 to 16 stitches per inch. There’s no reason why Aida or other purpose-woven grounds intended for cross stitch cannot be used. However the fineness of the cloth will influence what counted patterns are used.
As a “bungee-jump” stitcher, at this point I am just starting to think about my layout. Possibilities abound, and I try not to close any out until I am absolutely sure. For example, even before I get to the choice of the fill pattern(s) these general layout options exist:
- Work a single design to cover the entire piece, ignoring the divisions between the spine, front and back covers.
- Work the front and back covers separately, each with its own design, with or without some sort of stripe or divider running up the spine.
- I could work a border around the front and back cover, either meeting along the spine, or leaving space between for yet another fill.
- I could divide the front and back into subsections, and work each of them in a different fill (again, with our without borders)
- I could draw a freehand shape or other motif on the piece, then fill it with one or more fills (a la the inhabited blackwork style).
Here are general representations of some of the possibilities above:

Decisions, decisions. Best not to back myself up a tree. Not just yet. But right now I’m leaning to the version in the lower right. Front and back covers, each a single field pattern, but different; some sort of border around the edges of the front and back cover (same border front and back to unify the design). Something on the spine, possibly a third design, Possibly words. No clue.
Step 6. Stitch Design Selection
Since I am planning for 15 or so stitches per inch, my cover is about 3.5″ wide and 5.5″ tall. If I do a single repeat on each cover I will have room for play. My total field is about 52 stitches across x 82 stitches tall. Even if I subtract some for a border, there’s room for one of the larger repeats from Ensamplario Atlantio, or Ensamplario Atlantio II.
While I’ve stitched up some of these before, I haven’t play tested them all. This is a fun opportunity to do some I haven’t worked up yet. Plus I rarely do multiple colors, so maybe I’ll think of that, too. Paging through the books I come up with a few possibilities. Number 110 from Ens Atl II hits me for one of the covers, but just about every design in both books is a good candidate:
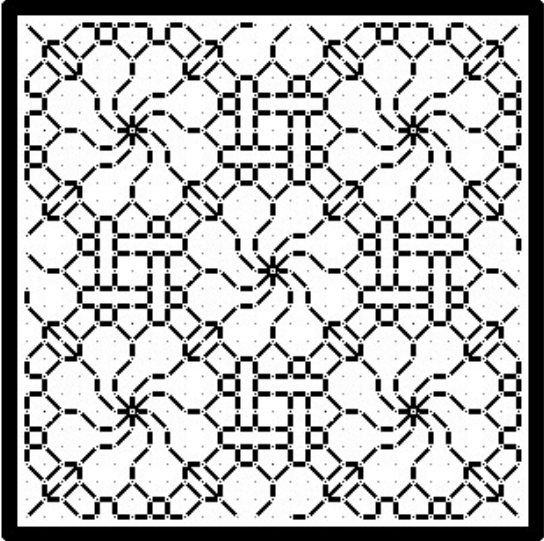
This is an intermediate complexity 16-stitch square repeat (the count from the center of one flower to the next is 16 stitches). A simple square repeat with a half-drop, I should be able to get at least 2.5 repeats across – that would be about 40 stitches across out of my available 52. That would leave 12 stitches (6 per side) for a border. And there’s nothing to say I can’t just truncate the design anywhere I like – there’s no reason to worry about completing the edge repeats across.
Now, if I had selected a coarser ground – say 11 count Aida, my stitching field would be smaller because there are fewer stitches per inch available. In that case my field would be about 38 stitches across. Two repeats would be all I could fit. I could still use this design to good advantage, but designs with a wider repeat, like this more complex panel of pears (28 stitch square), would be harder to squeeze in Just one full repeat would fit across, with a bit extra for a partial, or for a border. (Come to think of it, pears may be in order for the other cover… Hmmm. Not decided yet, but maybe…)

Why do I say “other cover” and not front or back. Simple. Both of these designs are totally symmetrical and at this point either one could serve as front or back, depending on which way the book is held.
Now on to placement. I have a couple of options. I could deliberately center my design at the centerpoints I established by basting, or I could skew them left/right/up/down, to produce an asymmetrical composition. Both are valid, and asymmetry can be quite dramatic. But I think I’ll stick to the easiest way out here. Instead of skewing the repeat, I will place the center of one flower exactly at the center of my cover area, and I will begin stitching there.
By beginning in the center I get to establish my design. I will work out left and right, and when I get close to the edge, I’ll stop and decide whether or not I still want a border, and if I do – I’ll pick it or design it to fit the available space. My guess is that I’ll probably work to within 6 – 8 stitches of the basted edge line. We’ll see…
Step 7. Thread/Color Selection
OK. I’ve got my lattice-and-rose picked out. What threads and colors to use… Again this is just my thoughts and preferences. For your project pick whatever you enjoy using that’s suitable for your chosen ground.
First, this is a removable book cover. It will get dirty. It may end up on another book after the target one is filled up. Chances are that it will need to be washed at some point in its life. Therefore I am opting for plain old cotton thread over silk or rayon. DMC will serve quite nicely.
I do a lot of monochrome, much of it modeled on historical pieces. I don’t get to play with multiple colors very often. I’m not a big fan of variegated threads for this type of work. I think the color gradations unless very carefully handled distract from the delicate structure of the stitching, so I’ll stick to solids. And nice, deep, contrasting solids. Two, possibly three colors.
Pawing through my stash I come up with the first two. If I use a third color, I will employ it on the border – not in the field patterns. I’ve chosen two regal colors – DMC 814, a deep red, and more burgundy/less crimson than the red I usually stitch with; plus DMC 3820, a goldenrod yellow – a color I rarely use.

Step 8. Start Stitching
Now for the fun part. Finally. After all of this planning and prep, I get to start stitching. I reserve the right at any time to decide I don’t like the result and pick everything out, but off I go, none the less.

On the piece above you can see the remnants of my light blue basting threads that marked my centerpoint. The center of one of the first flower I worked is exactly where those two lines intersected. Note that I clip back the basted centering threads to keep them out of my way as I go along. I find it’s better to remove them bit by bit, rather than stitch over them and try to pull them out later.
I am using one strand of floss, doubled. I cut a length twice as long as I need, extract one strand, and fold it in half, taking care to match the cut ends. Then I wax it lightly EXCEPT FOR the last inch, leaving the loop open. I thread the now adhered-together cut ends through my needle. Without making any knots, I make my first stitch, pulling my thread up from underneath and plunging back down from the top. I take care not to pull my thread all the way through and on the plunge back down, I catch the loop at the end of the thread with my needle. Then I gently draw up tension until the loop on the back looks like a normal running stitch. In effect, I’ve started off my double running with a noose instead of a knot.
I continue along in double running, plotting out my course to keep “leapfrogging” on. A lot of people trip up by thinking they have to stitch in one direction until half of their thread is used, then turn around and retrace their steps. For something like this, it’s better to head off in one direction until your strand is used up, taking detours as they arise but always returning back to your main path (if you don’t have enough thread to complete a detour and return, end off before you start the branch).
Then you take a second strand and fill in the every-other stitch on that main path. Any thread that remains after that second pass on established stitching is complete is used to go on further in the design. It’s kind of like a game of hop-scotch, one thread advancing, the other filling in then continuing the design, and the thread after that starting at the point the first one ended, but filling in the skipped stitches left behind by the second. Black is the first thread, red is the second, and blue is the third in this example. Each dangling leaf is a detour that’s started and finished on the baseline:
On my stitching you can see around the edges of the red flowers where I have left attachment points for future journeys, and in a couple of spots, the partially worked lines of departure for those branchings. I find the path planning to avoid painting myself into a corner to be mildly challenging, and quite relaxing. And yes – sometimes I do trap myself. So it goes. Sometimes I can use unidirectional heresy stitch to get myself out of a bind, sometimes I just have to knot off and go on. (I do knot unless there is a compelling reason to work entirely double-sided, but it’s got to be a darn good reason because I hate working in the ends.)
You’ve also noticed how I’ve employed my colors. The red for the connected flowers, and the gold for the background lattice. It’s just one way of doing it. I do end off each gold lattice segment separately, opting not to leave long connector stitches on the back.
I’ll be working on this for a bit longer before I make decisions about the border. If for nothing else, just to keep everyone in suspense.
In the mean time, if I’ve been a Bad Influence and led you astray, please feel free to comment, critique, send pix of your book cover in progress, or otherwise kibbitz. All input/feedback is welcome.
