OK. Now that I’ve armed a whole bunch of people with a wealth of counted all-over designs – what to do with them?
Pretty much anything you want. While samplers are the most common, there are lots and lots of things you can make that don’t involve using up precious wall space. Pincushions (either plain square or rectangular pillows, or fancy biscornu); pillow or cushion covers; napkins, doilies, and tablecloths; kerchiefs (aka for the historically-minded – forehead cloths); tray or coaster inserts (using pre-made items intended to showcase a piece of stitching or painting); zip or tied pouches or folios of various types – jewelry or lingerie rolls are examples; slip-in cases for sunglasses, phones, or tablet devices; small rice or lentil-filled handwarmers or heating pad pillows (warmed in the microwave, for gentle comfort or cold fingers); greeting cards or festive ornaments; all are examples of things that might sport your stitching.
But I want to revisit one project in particular – the book cover.
Making a Slip Cover for a Small Notebook

This is a general logic recipe for making a reusable slip cover in for a small notebook, using the same method as the standard brown-paper-bag covers kids of earlier eras employed to protect school-issued textbooks. The basic logic can be adapted to cover any size book. I’ve written this with special steps for counted embroidery project, but any fabric or stitching style can be used.
In this particular case I covered two small pocket notebooks, roughly equivalent in size to Moleskines, but of a far less expensive make. They are about 3.5 inches wide, by 5.5 inches tall, and roughly 0.5 inches thick across the spine (about 8.9 x 13.4 x 1.3 cm). They came with an elastic cord to keep them closed/mark one’s place, and were about half as expensive as the fancy name brand ones.
Layout
I wanted to know how big a piece of fabric I would need. Having measured a notebook, I did a mockup of the cover, drawing the shapes to size on a piece of paper to make my pattern. I used a brown paper grocery bag to do my layout and mockup (fitting it onto my target notebook to make sure it all worked. That pattern is now long gone, but here’s the logic I used. I strongly suggest making a mock-up and “dry fitting” it before you begin the project, just to make sure that the dimensions work. Note that some books have thicker cardboard covers or heavier spines than others, and may require a bit more “wiggle room” to be added to the measurements below – even if the books have the same general dimensions as the ones I used. If your book is significantly larger than mine you may want to increase the depth of the flaps all the way around. But you should not need to add more than the indicated amount beyond the stitching area (the red rectangle below). The overage of the grey area is just there to provide purchase for a hoop or frame.
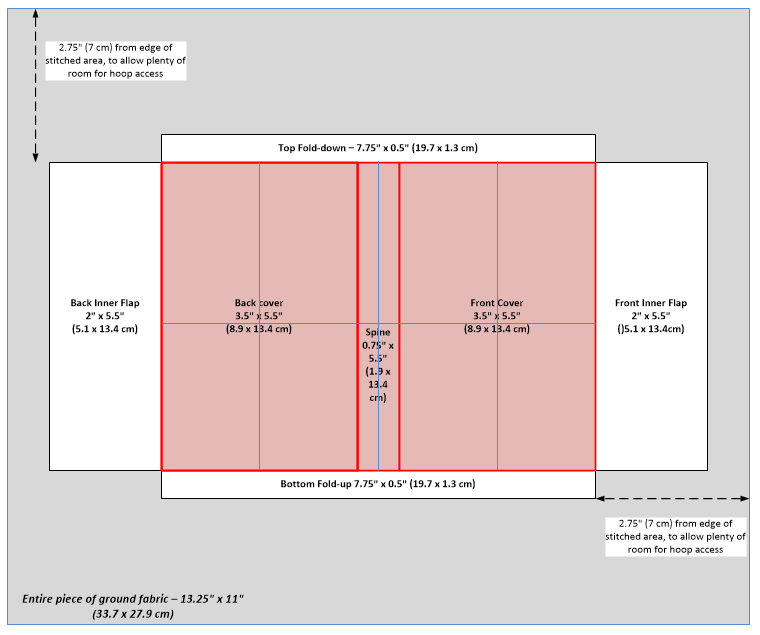
Note that I’ve allowed a little bit of extra width for the spine, so that there is enough slack for the book to open and close properly. I’ve also allowed lots of extra room around the stitching area, to accommodate use of my hoop or snap frame. You can use a smaller piece of cloth closer to the dimensions of the book cover itself if you like, but be aware that frequent repositioning of the hoop to get close to the edges is a pain in the neck, and all of that tugging and yanking isn’t good for your threads or ground either. And if you’re mounting this on a flat or scrolling frame, tensioning the sides and ends very close to the stitching area can lead to distortion, so having a bit of extra room for the stress to even out is also good.
For my standard size pocket mini-notebook, I’ll need a piece of ground fabric that’s about 13.25 x 11 inches (33.7 x 27.9 cm – all metric measurements are rounded off). If I intended to hem my edges of my entire ground cloth prior to starting (as opposed to whipping or serging), I’d add a half inch all the way around to this measurement.
Selecting the Fabric
What type of fabric? Well, whatever you enjoy working. This project will be a tiny bit easier to lay out on even weave, but not overly so. You can use Aida, Monk’s Cloth, Fiddler’s Cloth, Hardanger, in whatever count is most comfortable. But the count you select will also be key for what design you select. The lower the count (fewer stitches per inch), the larger your finished iteration of the design will be and the fewer repeats of it will fit in these designated spaces. If for example you want to stitch 11 count Aida, our front cover – only 3.5 inches wide would mean your total stitching area is about 38 stitches wide (rounding down). A repeat of say 8 stitches across would appear 4 full times plus some fragment at left and right (more on this later). A repeat that’s 14 stitches across would show in full only twice, with a fragment at the left and right sides.
Why would layout be easier to do on even weave as opposed to Aida or one of the others? Because you can determine the center point more accurately on even weave. In one of the purpose woven grounds with their well established holes (and especially in the fewer-stitches-per-inch sizes), the centermost line of holes may be off the exact center of the piece just a teensy bit, and may be enough to annoy you.
One last suggestion – whip, or serge your edges after you cut your fabric to size. Some people use tape. I don’t recommend it because of the adhesive residue.
Marking the Fabric
In this type of project, where we don’t intend to graph out every single stitch beforehand, knowing where the edges and center lines are is very important. Some people use water soluble markers or pencils for this. I’m old fashioned. I would baste. Some people are very specific in technique, taking each basting stitch over 4 or 5 stitch equivalents to aid in counting, but I’m pretty haphazard. I just establish my lines and don’t try to make my basting stitches even.
To transfer the dimensions of the diagram above to my cloth, I’d start more or less in the center and measure out from there, basting in lines, probably in a couple of colors. I use plain old sewing thread; spools of thread inherited from my grandmother – 100% cotton, in pale pastels, too fragile for use in seaming, but perfect for this. I’d outline my stitching fields using one color (the heavy red lines on the diagram). Then I’d mark the center lines both north/south and east/west (the thin blue lines). You may find that you have either a line of holes or a full stitch at the very center of your front cover, back cover, and spine. Decide now if you are a perfectionist or not, and if your purpose woven cloth forces you to mark at one side or the other of any center column/row of stitches, which side of the center you have marked. More on this below.
There’s no strong reason to mark the no-sew flap areas at this point, but they are on the diagram so you know they exist, and their width should not be forgotten.
Choosing your Design
Elsewhere on the site you’ll find books and books of fills and other patterns. Thumb through. Pick something that appeals to you, that’s a good fit for your chosen ground fabric’s count. BUT also be aware of the Center Problem.
Some patterns have a specific center line. They have even repeats – 4 stitches, 8 stitches, 22 stitches – whatever. Each repeat is an EVEN number of stitches. These repeats mirror evenly left and right of an line. Other designs have ODD numbers of stitches in one repeat – 5 stitches, 9 stitches, 11 stitches – again any number but an ODD one. That means that there is a center stitch in these designs. Here are examples:


The wavy plumes (shown in two variants) are an EVEN 14-stitch repeat with a specific center line. The framed pears is an ODD 15-stitch repeat. It’s center is the X unit where the four pear stems meet.
Why does this matter? If you are a perfectionist using Aida (see above) and the center of your area to be stitched is in the middle in between two columns of holes, look for an ODD stitch repeat. If the center of those areas work out neatly to align with a column of holes pick an EVEN stitch repeat.
Now you know why I mentioned that layout on even weave is easier. Not being forced into using specific hole locations makes fudging that center line easier and if your heart is drawn to either an odd or even repeat, any finagling you might do to make placement will be less obvious.
Choosing Thread and Stitching
Here I am of less help, especially for folk using Aida. I can tell you that on 32-38 count linen (16-19 stitches per inch) I usually use one or two plies of silk or cotton floss. 40-50 count linen (20-25 stitches per inch), I use one ply. And that I run the thread through beeswax prior to stitching. If you are using a lower count ground I’m afraid you’ll have to experiment to see whether you like 1, 2 or 3 plies the best.
In any case, no matter what your ground is, your basted lines will tell you exactly where the center of your area to be stitched is. Find the center of your chosen pattern, and start from there. Double running or back stitch – even heresy stitch – it doesn’t matter. Start in the center and work your way out. You can choose to work the ENTIRE stitched area – front cover, spine and back cover as one unit, and start in the center of the spine. Or you can work the front and back covers either identically or different; and leave the spine unworked, or treat it in another manner (perhaps a narrow border, solidly covered with cross stitches, or anything else you dream up). There is no wrong here.
When you get close to the basting line that describes the edge of the section you are working on pause. Decide whether you want to continue the design right up to the edge, or if you want to stop (possibly at the natural edge of your repeat, or at some unobtrusive place in it) and save the remaining area to do a border. That’s what I decided to do on my two sample books above. Any narrow geometric band – even just parallel straight lines – can be used to frame the center design and draw the eye away from truncation of the center design.
Finishing the Piece and Assembly
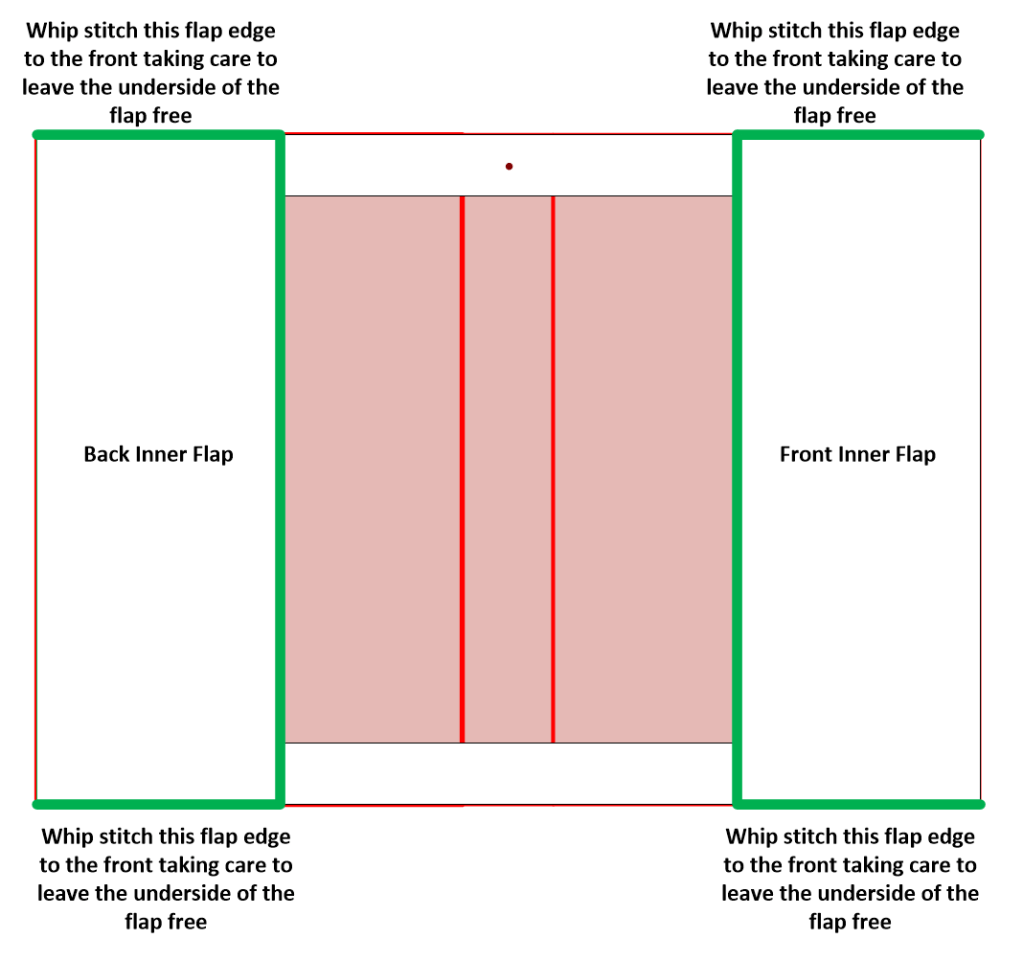
Once everything is all stitched, you can do a gentle wash and iron (nothing with big agitation, harsh detergent, or high heat). Or not. It’s up to you. Now is the time to draw or baste-mark those extra flaps. If you are going to serge them you can mark them and cut to exact size. Note that the ONLY places where secure edge treatment is mandatory are shown in green below. I strongly recommend hemming for those, although serging will work in a pinch. The other edges can be fray check secured or even left plain (they’ll never see the light of day again). Personally, I mark the flaps, and cut leaving a quarter inch seam allowance for the green bits that I turn back and hem, doing a veeerrrryyyy careful diagonal cut at the corner where the front and back inner flaps meet the top and bottom flaps. When I turn back the outer points of the front and back inner flaps and hem them down, I cut off the triangular excess to reduce bulk.
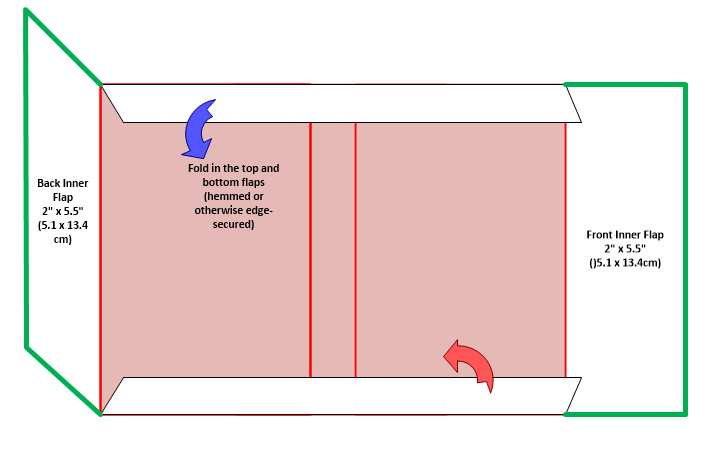
The top and bottom flaps do not need to be stitched down. Ironing them flat is enough. The final step is folding in the back and front inner flaps and stitching them to the front and back, along the edges of the book. This leaves a neatly edged pocket that will slide over the book cover. If the book cover doesn’t fit, feel free to snip it just a bit so that it slides in nicely. No one will ever know.
One last refinement. Many of these books come with an elastic loop that can be used to hold the book closed or mark a page. It’s useless in this application. I snip it off the book prior to fitting the cover. Instead, to serve as a bookmark, I stitch on a length of narrow ribbon, attaching it at the little red dot marked on the diagram above.
OK. Now armed with the basic how-to. Let’s see what you can come up with yourself!

Beautiful idea. I have seen this in magazines and thought it was complicated. Thanks for the information
[…] is the second piece in the series on making an embroidered book jacket, based on the general instructions I presented earlier this month. The first piece dealt with drafting up a simple pattern to construct the book cover, preparing the […]