Two weekends past The Resident Male and I went to an SCA event, a local one held here in the greater Boston metro area – known within the group as the Barony of Carolingia. We went to honor a worthy friend as she received a well-deserved high award. Sadly, we got there just in time for heavy rain, so our movements were rather constrained, and we did not find many of our old friends. But we did get to chat with several folks.
I brought my latest embroidery in a carrying case I made for an older frame and project, probably circa 1993. While my fancy leaves project was well received, the plain and boring cloth carrying case that was keeping it safe and clean hogged the majority of the attention.
Now, I never thought of that case as something special, and I did blog about it long, long ago (a post that now appears to have been eaten by Internet Gremlins). But apparently it is something that people really would like to have. So I write about it again, to the best of my recollection.
Here’s the cover, shown with the old scrolling/laced frame for which it was designed. Note that although my cover was made for adjustable scrolling frames with protruding parts that stick out in the corners, this could work just as well for a rectangular or square non-adjustable slate frame
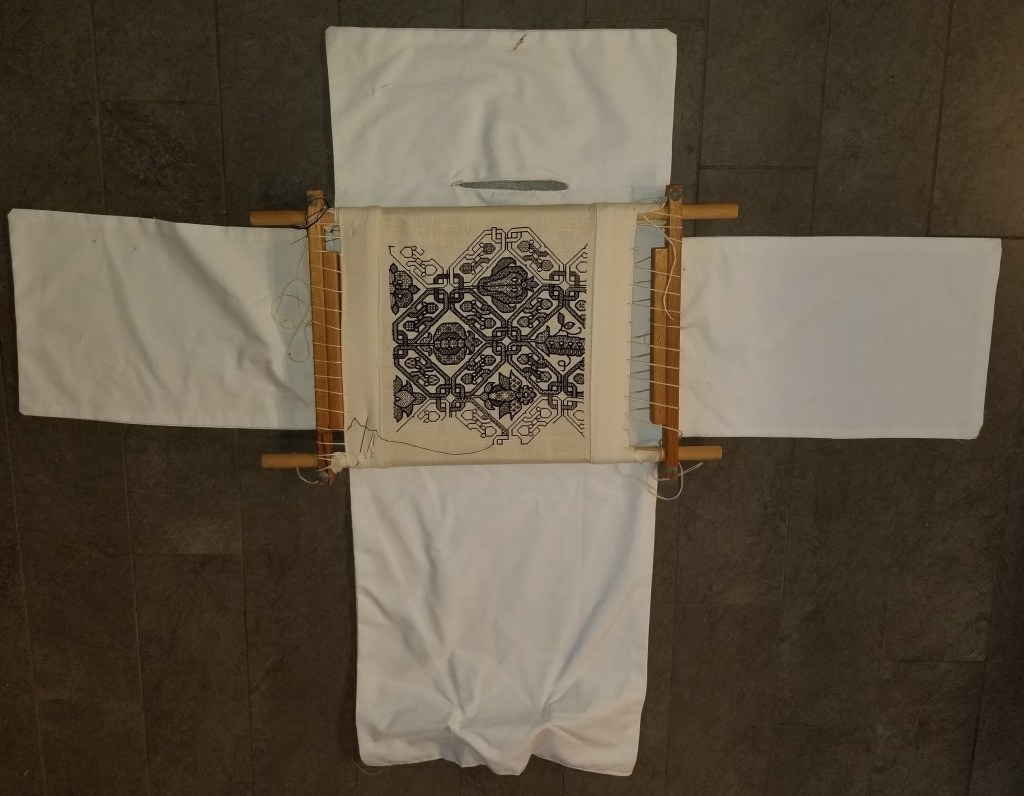
And here is the same cover used with my new wider Millennium frame, showing how the piece wraps and holds itself in place without closures or fasteners even on the too-big-for-it frame. We are looking at the inside of the cover. The handle is on the outside, mounted on the long flap at the opposite end from the slit.


Cover laid out, side flaps brought through between work and stretcher bars

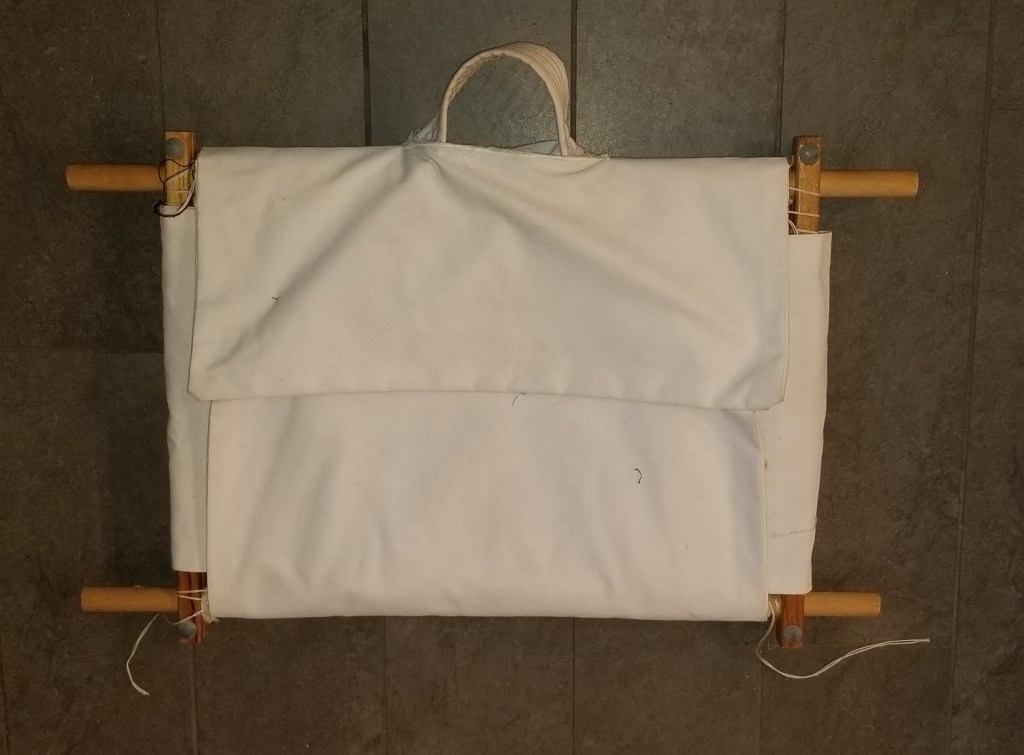
Side flaps closed to protect work

Bottom end of long flap brought up, with excess tucked behind the work. Top of long flap brought down over the work, with the handle (attached to the reverse of the long flap) tucked into slit.
In the best of all possible worlds, I would make a second cover, wide enough to protect the side bars of my new frame. But in truth, because lacing isn’t necessary with the Millenium, nine times out of ten, if I want to carry it I just release tension, remove the stretcher bars, and leaving the work on the horizontals, wrap the whole thing up in an old tea-cloth size tablecloth, skipping the carrying case altogether. But for the event weekend event I knew I would often be moving from place to place, and didn’t want to do reassembly each time I wanted to stitch or display my work-in-progress.
The How-To:
I used well washed and savagely preshrunk white 100% cotton duck (a tightly woven twill fabric a bit lighter than denim), but anything sturdy can be used – one of the lighter weight canvases in cotton or linen, for example. I picked white to minimize the chance of color crocking onto my framed work. The adventurous might want to use a showy fabric for the outside public side of the long center strip, and something else on the inside that comes in contact with the stitching. I didn’t want to do that because I didn’t want to deal with differential rates of shrinkage, or dual laundering requirements.
I can’t tell you how much yardage to buy, but note that ALL pieces of this are doubled, except for the handle, which was a rectangle, folded to make many layers, then topstitched. A length cut from a heavy martial arts belt from a karate or judo/aikido gi would work just as well as my improvised handle. Savagely pre-shrink any repurposed belt prior to stitching. (If you know someone who practices, chances are that he or she has a whole bag of leftovers, because most new uniforms come complete with yet another white belt.)
Note that there are NO fasteners on the case, of any kind. The only thing that holds it together is the insertion of the handle into the slit in the front flap. I did this on purpose – I didn’t want to risk snagging my embroidery, or any corrosion of metal parts and subsequent staining if the case happened to get damp. As is, my case can be thrown in the washing machine and laundered on hot, then machine dried without worry.
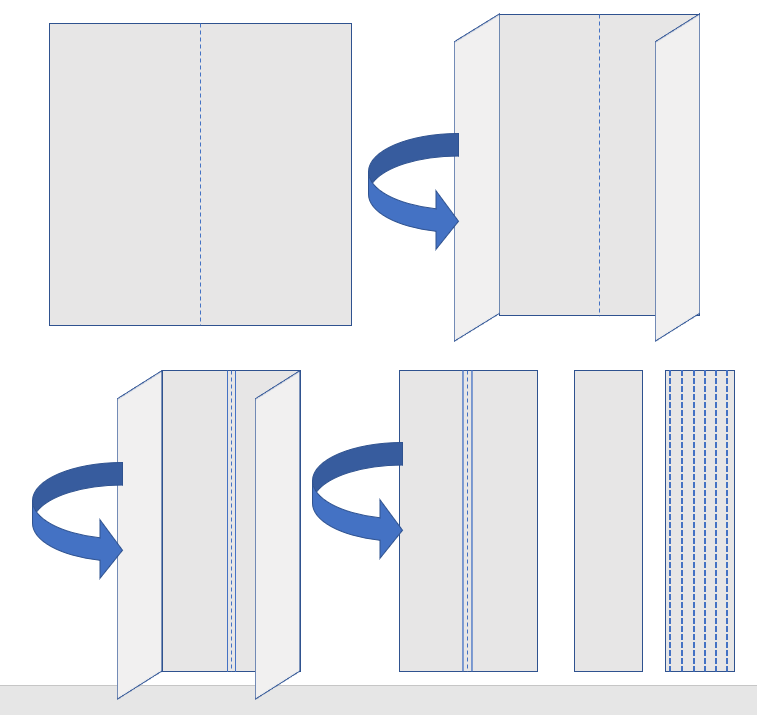
Here’s a schematic. Apologies for drafting it upside down compared to the photos above:

Note that all measurements on the schematic above should be adjusted to include seam allowances (for example, approximate height of stretchers + (2x desired seam allowance). All measurements are taken OUTSIDE the frame – measuring the working area plus the width of the wooden components assembled in the configuration in which you will be working. Don’t worry about any bits on the corners, they can stick out, like they do on mine.
The “shoulder flap” rectangles should be generous, they need significant overlap to stay in place.
The handle is positioned at the red rectangle, roughly the height of stretcher bar, as measured from the spot where the “shoulder flaps” join the center strip.
The black rectangle is the slit, and is cut and edged after the piece is assembled, positioning it to accommodate the handle. I topstitch/zig-zagged around mine, not taking special care to finish the edge with great precision.
Measuring and cutting:
- Determine the measurements of your target frame (how tall, how wide).
- Sizing the long piece: About 3.75 to 4 times your frame’s height plus seam allowances. That will give enough extra for the tuck part on the handle side, and the front flap that hangs below the slit. It’s width should be the approximate width of your stretchers, plus seam allowances all the way around. Cut 2.
- Sizing the side flaps: Approximately the height and width of your frame plus seam allowances all the way around. Cut 4.
- Sizing the handle. I used a piece of the same fabric, a square of about 12 inches (roughly 30.5 cm) I folded it in half and ironed it, then folded the left and right ends in to meet at the center, ironed it; and repeated – finally folding the entire piece down the center line to encapsulate the layers. Once I had my multilayer strip, I topstitched it the long way, as indicated below, and zig-zagged the short ends rather severely to prevent fraying. I ended up with a heavy, belt-like strip that was about 12 inches long and about 1.5 inches wide (30.5cm x 3.8cm). Precision is optional here – longer or wider/narrower won’t matter much, but I’d avoid making the strip shorter. And you can see why I recommend recycling a martial arts belt instead of fiddling with this part.
Stitching Logic
You should now have two long strips of fabric, and four smaller units to make the side flaps, plus your handle.
- Lay your long strips down and mark a point on each long side, approximately half of your frame’s height down from one end. Then lay your frame on the strip, aligning the top to the marks you just made, and make a second mark indicating its height
- Sew the side flaps to the long strip, positioning them on the marks (and taking seam allowance into consideration).
- You now have two roughly cross-shaped units, with the side flaps placed such that there’s a “long end” of the center strip, and a “short end”. The short ends will become the front flap.
- Place right sides together, and sew them together all the way around the outside, leaving about 6 inches unsewn so you can turn the piece inside out, capturing all of the seam allowances inside. Do so, teasing out the corners with a knitting needle, skewer, ruler, or dowel. Iron the thing and sew the turning hole closed.
- Up to now, if you used only one fabric for the whole piece, it hasn’t mattered which was the public side and which was the inside of the cover. Pick your favorite side to be the public side/outside.
- On the public side on the “long end” measure down roughly half of the height of your frame and make a mark. Then take your frame, and position it as if you were going to wrap it as I show above. Confirm that the mark is the correct place for the handle to be (it will ride on the top edge of your frame in carrying position). Centering the handle left to right on the “long end” of your strip, sew it to the public side. You might want to leave a little slack as you do so (rather than stitching it on absolutely flat) so that the handle loops up neatly when used.
- Try the cover on your frame. Note where the slit to accommodate the handle needs to be cut. Draw a line here. Take the piece back to the sewing machine and sew around the line several times as reinforcement (you could also zigzag, edge stitch or otherwise finish the area to be slit). Once you are satisfied that the reinforcement is sufficient, use a razor or knife to cut the slit itself.
- You are done. Put the thing on your work-in-progress and admire that your dressed frame is now additionally dressed, warm and safe for transit.
About the only structural element to improve upon the base design would be to stitch some kind of stiffener – possibly another length of the same folded fabric or judo gi belt underneath and parallel to the handle. That reinforcement should be wide enough to stretch clear across the entire width of the cover at that point. The reason is that my handle does pull up through the slit after extended carrying, especially when I use the case for frames different in size than the one for which it was designed.
If I were to make a new case, I might also include a “built in” needle book or pouch on one of the flaps, for convenience. But I am still loathe to add fasteners to the piece, so I’d have to figure out a secure closure that avoids velcro, snaps, zippers, or buttons. Perhaps tied lacings…
Also, I never embellished or embroidered my case. I suppose that I should have (at the very least) put my name on it. If you do decide to ornament the outside of yours, I would suggest selecting hard-wash-compatible threads, and doing any stitching on the pieces, prior to assembly.
If you make a carrying case like mine, please feel free to send pix – especially if you personalize it or improve on my meager design. Your photos will help others as they contemplate making one of their own.

This is just terrific. Thanks! I also tend to just release the tension and put mine in a pillowcase. I have the long Millennium as well.
I like your frame/project protector, especially that it’s adjustable and easily storable between travels.
[…] Travel Cover for a Flat Frame. How I made mine, and how you can make one, too. […]
[…] the pillowcase does double duty. This piece on my longest Millennium frame bars is too wide for the travel carrying case I made for on-frame projects. I suppose I could make another, but time does not stand still. I pop this one into that king size […]