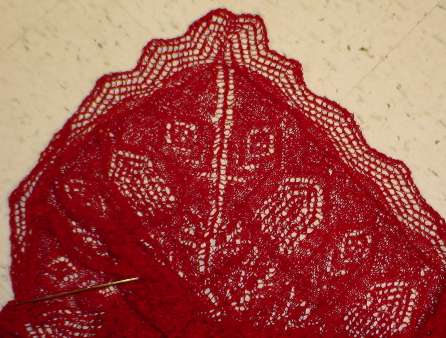
I’m in the home stretch on my Alcazar. I’m about three quarters of the
way through edging the second side. That means I’ve worked one corner
and am about to work the second. I have to say that how to work the
corners wasn’t intuitively obvious in my first read through of the
pattern, and the original photo was of little help. It’s almost
impossible to see exactly
what’s going on with the edging in the photo because in the sample it
was knit in a
darker color which cannot be seen against the high contrast black
background used to display the rest of the shawl.
The pattern itself wasn’t too tough. It’s a plain variant of a
classic wave edging. It took me a couple of times through before
I realized that Carter was describing wrapped short rows for her corner
treatments. Now conceptual interference might have been in play thanks
to the glass of wine I had just before embarking on the corner, but
confusion remained even upon revisiting the instructions in the sober
light of morning. I admit I got the gist of the thing from the chart
and written accompaniment, and then (mostly) winged it. I’m not 100% pleased with Corner #1, but not so unpleased that I feel like tinking back and doing it again.
The
first step is to pause roughly one repeat away from the corner. Count
the number of live stitches remaining between your stopping point and
the absolute corner. There should be 25. Work that final repeat. If
there are too few or too many, adjust your rate of attachment by either
working one or more attachment points as sl 1, K1, psso instead of sl
1, K2tog, psso; or as sl 1, K3 tog, psso. The former should be done if
you’ve got fewer than 25 stitches remaining; the latter if you have
more than 25.
With luck and planning you’ll reach the absolute
corner stitch on the last row of the pattern repeat – the last row in
the first segment of Chart 4. You then work the plain return row, and
embark upon the next segment of the edging chart. Work across all the
stitches as directed. You’ll end up with one more stitch than is
accounted for in the chart. Wrap it short row style. Flip the work over
and slip this just-wrapped stitch, then finish off the plain return
row. On the next row work the stitches as directed. There will be two
left over. Wrap the first one, ignore the one further away from the
point of your left hand needle, flip the work, slip the just-wrapped
stitch and complete out your plain row. Do the same thing on the
remaining rows of the chart, only on each row the number of "sleeping"
stitches dormant at the end of the needle will be incremented by one.
Finish out this second segment of the chart. That last row will have
only two live stitches on it, plus a whole load of sleeping stitches
waiting for the next step.
And that next step is to begin the
next chart segment. Again work the stitches as directed. This first row
is two knits. The next stitch will be one that you had wrapped and set
dormant before. Knit it along with the loop around its base, then flip
the work over, slip this just-woken-up stitch and finish off the plain
side row. Keep doing this – following the chart, waking up the stitch
after the current row is completed, flipping the work over, slipping
that first newly woken stitch and finishing out the plain side row.
With
more luck, by the time you get to the last row of this chart segment
you will have woken up all of the formerly dormant stitches, and you’ll
be ready to march along Side #2 working the main edging repeat.
I
have to confess to one major error. Those plain side return rows? I
worked them as purls, yielding a stockinette-based edging. It wasn’t
until I was all the way around the corner and well into Side #2 that I
noticed that the directions said to knit them. A garter-based edging
would be a tad less curl-prone. I sat there and thought about ripping
back, but I decided to keep going as-is.
The flogging will commence in the morning…
