OCULAR PROOF?
The latest strip. Unusual because of the columns:
Angelique asks when this type of needlework was popular. I respond that double running stitch came into vogue in the early 1500s, and continued to be worn for the next 130 years or so, although the actual designs worked in the stitch changed over that period. The strips I’m doing now are late, mostly adapted from a photo of a sampler, and that sampler is dated to the late 1500s, early 1600s. Which would put it at Shakespeare’s time and just after.
So. Does my favorite style of needlework appear in Shakespeare? Possibly. People have looked to his texts and found all manner of things that might or might not be there, but I have a feeling that double-sided counted work of this type did make an important cameo.
My case? Othello.
As those of you who know the play remember, Othello is swayed to believe in his wife’s supposed infidelity by scheming Iago, who points to a particular handkerchief as proof. Othello had given the piece to Desdemona. It was filched by her lady in waiting (Iago’s wife) and planted as manufactured evidence that Desdemona was having an affair with Cassio, Othello’s trusted favorite whom Iago envies and despises. The play’s central tragedy results.
The handkerchief is mentioned in a couple of places. It’s in Act 3, Scene 3:
IAGO
Nay, but be wise: yet we see nothing done;
She may be honest yet. Tell me but this,
Have you not sometimes seen a handkerchief
Spotted with strawberries in your wife’s hand?
OTHELLO
I gave her such a one; ’twas my first gift.
IAGO
I know not that; but such a handkerchief –
I am sure it was your wife’s–did I to-day
See Cassio wipe his beard with.
And is described further in Act 3, Scene 4:
OTHELLO
That is a fault.
That handkerchief
Did an Egyptian to my mother give;
She was a charmer, and could almost read
The thoughts of people: she told her, while
she kept it,
‘Twould make her amiable and subdue my father
Entirely to her love, but if she lost it
Or made gift of it, my father’s eye
Should hold her loathed and his spirits should hunt
After new fancies: she, dying, gave it me;
And bid me, when my fate would have me wive,
To give it her. I did so: and take heed on’t;
Make it a darling like your precious eye;
To lose’t or give’t away were such perdition
As nothing else could match.
DESDEMONA
Is’t possible?
OTHELLO
‘Tis true: there’s magic in the web of it:
A sibyl, that had number’d in the world
The sun to course two hundred compasses,
In her prophetic fury sew’d the work;
The worms were hallow’d that did breed the silk;
And it was dyed in mummy which the skilful
Conserved of maidens’ hearts.
Later in the same Act: Cassio comes upon the handkerchief and gives it to his doxy Bianca:
CASSIO
Pardon me, Bianca:
I have this while with leaden thoughts been press’d:
But I shall, in a more continuate time,
Strike off this score of absence. Sweet Bianca,
Giving her DESDEMONA’s handkerchief
Take me this work out.
BIANCA
O Cassio, whence came this?
This is some token from a newer friend:
To the felt absence now I feel a cause:
Is’t come to this? Well, well.
CASSIO
Go to, woman!
Throw your vile guesses in the devil’s teeth,
From whence you have them. You are jealous now
That this is from some mistress, some remembrance:
No, in good troth, Bianca.
BIANCA
Why, whose is it?
CASSIO
I know not, sweet: I found it in my chamber.
I like the work well: ere it be demanded–
As like enough it will–I’d have it copied:
Take it, and do’t; and leave me for this time.
So allowing me the license used by many Shakespeare pretenders, what we’ve got here is a handkerchief – essentially a two-sided piece work, embroidered with strawberries. There’s an allusion to the embroidery being a deep crimson silk (“the dyed with mummyconserved of maidens’ hearts”), although Lord alone knows whether or not mummy was actually used as a dyestuff, and if it was, what color it might have produced or abetted. We’ve got a link between the work and a mysterious Egyptian/Moorish origin. It’s worth noting that the name for double running stitch at the time of the plays debut was “Spanish Stitch,” and it was wildly fashionable and popular. Plus it’s clear that whatever type of embroidery it was, it was easily copied.
Taken together – reversible, red (along with black, one of the most fashionable colors for Spanish Stitch), stitched in silk, easily copied, link with Moorish origins – that’s my style!
If the local amateur troop ever decides to stage Othello, I think I’ll volunteer to stitch the handkerchief. And I plan on doing a strawberry panel on the current sampler, for good measure.
PROGRESS AND USING STITCHING CHART PROGRAMS FOR GRAPHING KNITTING
In the middle of this charting program exploration I have had time to do a bit on my Clarke’s Law sampler. But first to answer a question. Aileen read my last couple of posts and wondered what I would consider a complex double running stitch pattern. I answer with pix of my current piece, plus a snippet of this pattern done up using Pattern Maker Pro, from yesterday’s review.


The nickel shows scale (click for better size shots of each). This strip is stitched using one strand of DMC floss, color #498 on 32 count linen (16 spi). Not particularly fine, but fine enough to show the patterns. The entire stitched area is about 15.75 inches across. From the top of the dark red twining strip to the bottom of the the D of ADVANCED is about 8.6 inches.

The top strip and the cross stitch words were all done using two floss strands. The outlining of the motif in the wide grape strip was done using two strands, and the squared background was done using one. (I’ve since found historical precedent for the squared background treatment).
All of the strips between the words will be relatively light in value, done in some combo of plain or voided double running stitch, but they won’t be as wide as the grapes (well, maybe the last one will be just to balance). I won’t do another dark band in long armed cross stitch (either foreground or voided) until after the entire quotation is done. I think it will take another three bands of text before the whole quotation is complete. Then I’ll fill out the cloth with a mix of styles, perhaps doing some in two-tone. It’s all fly by night here. I’ll also figure out something to eke out the line ends where the lettering comes up short. I think that NOT centering each line of text works better for my purposes, especially because I’m breaking text between lines in an unorthodox manner.
Now back to writing up the results of my stitch charting program explorations. Which for my knitting and crocheting readers, will have value. Either of the programs I described yesterday can be used to graph out colorwork repeats, or linear crochet (filet and tapestry styles). Pattern Maker Professional also allows you to assign a True Type knitting font (like the one from Aire River) to the symbol palette, and then using the program in symbols-on-graph mode, to compose knitting charts. Here’s a sample from PM showing a simple double 1×1 twist cable:

Where this falls apart though for knitting is if you try to display both colors and textures at the same time. The purl symbol will always be associated with one chosen color, the knit symbol with another. Although you can override the program and display more than one symbol per color, this program links symbol and color in a way that you can’t have multiple colors per symbol. Numbering rows is also problematic.
As I write up the rest of the sampled programs I’ll include their potential for use by knitters.
CHARTING SOFTWARE FOR DOUBLE RUNNING STITCH – PART 2
O.k. Let’s start looking at the various available charting packages, two at a time. Again, I’m not doing a full-on evaluation and comparison of every available capability. In particular I’m ignoring the import/translate capability that people use to turn standard graphics and photos into cross stitch designs. I’m looking at just one aspect of these tools – charting complex double running stitch patterns.
KG Chart LE for Cross Stitch by iktsoft v 1.09.06
PROS: First off, you can’t beat the price for this one. It’s freeware, no registration required. It presents output in both graphed and stitch simulated formats, and includes a DMC-based thread palette. The program is optimized for cross stitch, but it does contain a back stitch option that allows drawing straight stitches. Standard ouput in in-program composition mode appears to max out at 73×73 per printed page but mesh size can be manipulated to present more units per page (reducing down as far as legibility will permit and then some. Prints to paper (and PDF if a PDF writer is installed) and exports to JPG, PNG, TIFF, TGA, PCX, JPG-2000 and as pixel only to make icons.
CONS: Backstitch doesn’t present on screen in either mode as a series of countable, identifiable units. Yes, you can count the boxes over which the stitches travel, but that can be difficult, especially in low light or in dense patterns. While back stitch clusters can be selected and moved, inverting or mirroring them introduces errors – the replicated units don’t look like the original (plus transformation). Multiple page works are presented without repeats/overlaps for cross page orientation. Zoom is constrained to 8 set levels.


VERDICT: An excellent value for the casual cross-stitch user who wants to create multicolor block unit patterns and who may want to use the occasional outline or straight stitch unit. Not very useful to anyone composing entirely in double running.
Pattern Maker for Cross Stitch (Professional) by HobbyWare, Version 4
PROS: Back stitch and straight stitch have symbol sets that can be manipulated to display individual stitches (see settings in screen shot below). Units can be selected as part of a rectangular block or “lassoed” as a non-standard shape (Pro version only) and the selected or pasted bit can be mirrored/flipped/rotated with no loss of relationship among constituent units. Stitches can be represented on screen in floss-strand equivalent thickness units, and different stitches can use different thicknesses of thread. The thickness backstitch and straight stitch symbol representations can exist independent of floss thickness Output can be printed to hard copy, and mesh size can be manipulated to present as many per page as are legible. A dizzying array of available colors from most major floss and thread makers is included.
CONS: To show stitches as individual units, back and straight stitches need to be drawn one at a time. You can’t paint a line of them across multiple chart blocks and have each one neatly display as a separate unit. I can’t figure out how to display both cross stitch and line stitch symbols on the same view (I’d like to be able to show the line stitch units from the left hand picture and the color x units from the center pix on the same final image. Freehand “lasso” selection and export to JPG, TFF and other standard graphics formats are only available on the Pro version (JPG export shown in right image). The Pro version costs $120. US. The four day trial is a pain (those of us with careers may not have four linear days in which to make an adequate assessment of both versions).


VERDICT: A possibility, but pricey. Need to test it on a really complex bit of charting.
I’d appreciate hearing from others who are using any of these (or other) dedicated charting programs or who may be bending general purpose graphics programs to this need. Love a program? Have problems with one? Have hints/clues/insight into features/limitations? I’m sure that others would love to know, too.
CHARTING SOFTWARE FOR DOUBLE RUNNING STITCH – PART 1
I’ve got enough patterns now on tap that I should start thinking of how the follow on to The New Carolingian Modelbook should be composed. It’s been notional for a long time, with the tentative name of Ensamplio Atlantaea in honor of the other SCA region that took me in during my self-imposed absence from Carolingia.
Aside from having no publisher for this one, the biggest impediment is that I haven’t figured out how best to graph the patterns for publication. At this moment, I’m still bound to paper and pencil. The graphs in TNCM were made using my late, lamented Macintosh computers (a II and a IIcx); and Aldus Superpaint drawing/drafting software. We shifted over to the PC world long ago in response to the strain of keeping two parallel suites of hardware and software functional, and in response to the PC-centric nature of employment in this house.
To date, I’ve not found Windows based general graphics software that does as good a job for charting as the vintage-1990 stuff I used for my first book.
I’m still looking. I have an interim solution using MS Visio. It’s cumbersome, and time-consuming compared to my Superpaint method. In Superpaint I was able to establish a bitmap based graph as a separate field, then paint on lines set up with voids to correspond (in negative) with the dots of my background. So instead of painstakingly noting each individual stitch, I could run a length of stitches in one stroke and have those stitches neatly separated by voids to mark the length of each. For example, instead of a solid line four units long, I was able to paint a line that looked like it was broken up into four exact stitch length units, and do it on vertical, horizontal and diagonal planes. But in Visio I can’t do that. The best I can do is create several blocks, each with a line segment corresponding to a stitch (one side, two parallel side, two sides meeting at one corner, one diagonal, two diagonals, one diagonal and one side, etc.); then stack and rotate my blocks into my finished pattern. Although this method works well enough for block unit patterns it is excruciatingly slow for line unit designs, and compared to my old method is too tedious to use for a whole book.
So it’s back to exploring the world of commercially available charting software. There are several programs created expressly for needleworkers. However they’re not aimed at my needs, they’re all targeted at multicolor tapestry style cross stitchers, who are interested in styles that look more like needlepainting (creating multi-color pictures with stitch units corresponding roughly to the pixels in a raster display image) than in the linear and mostly monochrome styles I prefer.
To date I’ve looked at several programs including:
- Cross Stitch Professional, DPSoftware
- PC Stitch 9, M&R Technologies
- PatternMaker for Cross Stitch, HobbyWare
- Easy Cross, Fulford Software Solutions
- KG Chart LE for Cross Stitch, iktsoft
Mind you – remember I’m not looking at the features that most of the world wants in these cross stitch packages, notably the ability to turn JPGs or photos into cross stitch graphs, fidelity to a dizzying array of potential thread/color choices, or final output targeted at publishing complete patterns (with thread consumption and stitch symbol charts). I want something that will graph out double running stitch in a manner that enables stitchers to clearly discern the number of units in a long run, that allows easy selection/inversion/mirroring of pattern subunits or areas, and that otherwise eases production and use of of high complexity charts for double running or other similar linear stitching styles.
In mainstream graphics programs, I’ve been playing with Visio (described here) and Open Office Draw. I’m thinking of exploring the world of contemporary raster based Windows graphics programs next, but there has to be a better solution.
I’ll post detailed observations of these programs this week. Stay tuned. And if you have any suggestions for other Windows-based software that might suit my purpose, please let me know.
STITCHING STORIES
More babbling on here today.
Faithful Reader TexAnne noted my mention yesterday of the “print to transparency” cheat for flipping charted patterns and added another that I had forgotten. Some printer drivers and photocopiers allow you to mirror-image their output. This option is most accessible in the Mac world. I remember my late, lamented Macs having a prominent command in the print dialog that allowed mirror-image printing, something that came in handy for printing out driving directions. I’d print them out in a large font in mirror image and lay them on the dashboard of my car. They were just visible as a right-side reflection on the windshield in front of me, and acted as a “heads-up” display.
Since TexAnne’s note I’ve tinkered with the print dialogs of several PC world printers from HP and others, plus some large office photocopiers, and in most of them I’ve found a buried “Print Mirror Image” command. It’s usually on an “Advanced Commands” tab that summarizes the state of all available printer options, but it’s not often displayed as an easy to get to setting. But it’s usually there somewhere. Scan to print or printing mirror image is a matter of finding and setting this hidden command. It’s another useful way to use technology do do a mirror image chart flip.
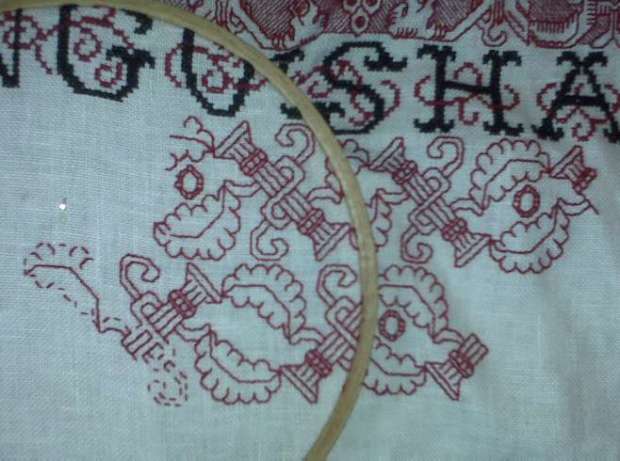
Long Time Needlework Pal Kathryn reminded me of a story connected with the pattern I’m stitching now.
![]()
![]()
Back when I was working it voided on the Think sampler (lower band, shown flipped to the same orientation as the current work for comparison) I did lots of stitching (and knitting) in public. I worked in the Washington, D.C. area, and would take my projects outside at lunch and do them on park benches. I wrote to Kathryn that one day an elderly lady and her granddaughter approached me. They were of Hmong ancestry, a Southeast Asian people with a rich heritage of traditional counted cross stitch embroidery. With the granddaughter translating, the lady admired the work and asked if the pattern was traditional to my home village or family. I thanked them for their compliments and said that sadly, Brooklyn, NY did not have its own embroidery tradition, and that I’d found the pattern in a book. Kathryn says she’s thought of this particular design as “the Brooklyn Pattern” ever since.
COOKIE PARADE
As promised, proof that there are ten kinds (plus fudge) for 2009:

1: Linzer Cookies – recipe from the King Arthur Flour website, this year with almond meal and using cherry preserves instead of raspberry. We used the smallest snowflake shape to make the center hole. The dough is very delicate and is best rolled out between waxed paper, with the center holes being cut after the cookie has been placed on a baking parchment covered cookie sheet. These really are best the day of making because the cookies tend to absorb moisture from the filling. They’re still very good, but they are softer and more cake-like if kept.
2. Light Spice Rolled Cookies –another from King Arthur (their cookie recipes are uniformly excellent). The only substitution I made was to use 1/4 tsp Chinese Five Spice Powder in place of ground cloves. (I don’t like a strong clove flavor). I used the cookie roller described in the last post. Aside from the advice posted there, I strongly suggest very lightly dusting the top of the dough with flour before trying to use the embossed roller, and using the roller without the handle. Cookies are light and crisp, not too sweet. Overall, this is an excellent ginger/spice tea biscuit, worth doing again. (This dough can also be rolled thin and cut out with conventional cutters if you don’t have the roller.)
3. Classic Peanut Butter Cookies – this one is from our circa 1970s copy of Joy of Cooking. We usually use crunchy peanut butter instead of smooth because it makes a better texture, but this year Younger Daughter has braces on her teeth and crunchy is banned for the duration. For decoration instead of the standard fork-tine checkerboard on top we use a cookie stamp, just because we have it. Peanut butter cookies tend to be moist and oily and keep a long time. They’re usually the second cookie we make in our march towards our requisite 10 types.
4. Buffalo Bourbon Balls – This is a standard no-bake cookie recipe that starts with ground store bought vanilla wafers, cocoa, and ground pecans. Ours comes from a version published in one of the Buffalo NY newspapers some time in the early 1960s. I’ve posted it before, but the recipe appears to have gone the way of all things so it’s repeated at the end of this post. We switched to using rum a few years ago, and prefer the results. Rum or bourbon, cookies also benefit from being made at least two weeks in advance so that the spirits mellow out. They’re always the first cookie we make each year because they keep so well.
5. Sugar Cookie Cutouts – this year in snowflake and holly leaf shapes only. Another classic cookie. This one is “Rich Rolled Cookies” also from our old Joy of Cooking. Our variant is to add a couple of drops of lemon extract to the batter, and to make the icing by using just enough lemon juice to make confectioner’s sugar spreadable, then dividing it into several smaller quantities, each tinted with food coloring. This icing hardens up nicely and if the cookies are left spread out after painting until they’re firm to the touch, will not cake up in the tin.
6. Chocolate Chip – our version of the official Toll House cookie recipe, although I do admit we splurge and use Ghirardelli semisweet chips and lots of broken pecans for an over the top touch.
7. Chocolate Crinkles – In this house they’re called Earthquakes because of all the fault lines. I alternate between the King Arthur Flour version, and a very similar cookie recipe from a clipping sent to me by long time pal Kathryn (Hi, Kathyn!). The King Arthur version is smack-you-in-the-face-with-chocolate, but the other one has a better texture and is less candy-sweet.
8. Pecan Sandies – Another recipe with Buffalo heritage, this one is an heirloom from my husband’s extended family. My variant is to sort through the bag of pecans and set aside the unbroken halves, then grind the bits to add to the batter. The pretty halves get dunked in water and pressed on the cookie tops just before baking. As you can see I’ve gotten a little better at shaping them over the years.
9. Easy Fudge – the condensed milk version. Super easy to make and a great way to use up leftover nuts from the other cookies. This year’s was bittersweet chocolate and walnuts. I repeated using the silicon oval baking forms to shape the pieces. Much neater and more uniform than the pat it into a pan and slice method.
10. Tatte Date Nut Rolls – recipe from the Boston Globe. This one was new this year. Preparation was very easy with a klutz-avoid rating of only 2 out of 10. The dough was well behaved, rich tasting dough and yummy date/walnut filling. Although it doesn’t look like there’s a ton of filling while the cookies are being made, the proportion of filling:cookie at the end is perfect. This is a keeper, but it’s not my ideal Christmas cookie. They taste fantastic, and would be the star of any holiday buffet, but they’re too delicate for plonking into cookie-share boxes, and like most fine pastry they do not keep especially long. (I’m thinking of all sorts of other fillings and will make this again for a dinner party, for sure.)
11. Oysters. My own invention. A hazelnut spritz sandwich cookie with a rich chocolate filling. It turns out that Younger Daughter is a dead-eye ace with the cookie press. She formed all of these this year. One caution – use one of the simple cookie press dies. The fancy shapes with small or narrow openings will not work. The ground hazelnuts will clog them and you’ll get the haphazard odd shapes that prompted this cookie’s name.
Buffalo Bourbon Balls
Adapted from the women’s pages of a Buffalo newspaper from the 1960s. Best if made at least two weeks in advance and allowed to mellow in a cookie tin.
Ingredients for cookies
|
1 12-oz. box |
Store bought vanilla wafer cookies |
|
2 cups |
Confectioner’s sugar |
|
1 cup |
Finely chopped pecans |
|
cup |
Cocoa |
|
cup |
Rum |
|
cup |
Light corn syrup |
Special equipment
|
Food processor |
Directions:
1. Using food processor, grind cookies to powder. Remove from processor.
2. Using food processor, grind nuts finely. Add to cookie crumbs.
3. Sift sugar and cocoa together into crumb/nut mix.
4. Stir in rum and corn syrup. (Clean-up hint – measure the half cup rum into glass measuring cup, add light corn syrup to same cup until total volume equals 3/4 cup. Mix the two together in the measuring cup, then pour mix into dry ingredients. Much easier than trying to measure sticky syrup by itself). Keep stirring wet into dry ingredients until everything is combined (this may take a while).
5. Form into inch balls. Roll in confectioners sugar or a mix of cocoa and confectioners sugar to coat.
6. Store in a tightly covered container. Makes about 40-50 cookies, depending on size.
Variants: Use rum instead of bourbon. Walnut/Bourbon is a good combo. Use almonds and Amaretto; hazelnuts and Frangelica; or almonds and Chambord, Kirsch or other cherry or berry liqueur.
COOKIE CODEX
Yes, it’s the end of December here at String, and that means cookies (and latkes). In spite of work younger daughter and I have managed to finish baking nine of our ten planned varieties. For 11, she’s stellar and can mix a batter on her own from the recipe without leaving the kitchen a disaster. She’s also dead eye accurate on the cookie gun, and can turn out uniform spritz cookies on her own. As a result we’ve managed tag team production, with me swooping in to do stuff that she prefers not to do, or juggling the sheets in and out of the oven.
This year’s production included a new item – a light gingerbread style cookie rolled out with a European style cookie roller:

The recipe I used is from King Arthur Flour’s website – Light Spice Cookies. I had tried another from Fine Cooking, but was sadly disappointed. That dough has been relegated to pat-in-pie crust status.
The King Arthur cookies I had made before, using standard cut-out cookie cutters. They turn out quite nicely, sort of like gingery animal crackers, and are especially good when rolled out very thinly. For the record, I use Chinese 5 spice powder in place of ground cloves, just to be different and to tame the clove undertaste a bit (I don’t particularly like cloves).
Here you see the dough roller results. I think the roller’s impressions look a bit like a Mayan Codex.

To get this result, I rolled out my dough very thin, less than 1/8 of an inch. Although it was tender and easy to manipulate, the handle of the cookie roller and not the cookie dough turned out to be the weak part of the system. Applying any pressure at all snapped the removable patterned cylinder out of its mooring. So I set the handle aside and used the heel of my hand to apply slow, even pressure as I rolled out the impressions. The raised bits on the roller are high enough to cut the cookies almost completely out. A small bit of encouragement with the tip of a very sharp knife was needed to release a couple of the tricker bits, like the cat’s tail, and the protruding feather of the upside down bird immediately above the cat (or is it a fox or wolf – it’s hard to tell).
In any case the cookies did separate nicely and the dough preserved the textured detail even after baking:

Nice crisp (almost hard) grown-up ginger spice cookies. Not too soft, not too sweet. A perfect accompaniment to hot tea.
A full visual catalog of all ten kinds later this week. I promise.
KNOT MORE KNOTS!
UPDATE: AN EASY TO PRINT PDF OF THIS PATTERN IS NOW AVAILABLE AT THE EMBROIDERY PATTERNS LINK, ABOVE.
To follow up yesterday’s post and to answer the question “What do you mean by deconstructing and reassembling the knot motif?” I present this:

Click on the image above to get the pattern JPG at a useful size.
The original motif is presented in my book in negative, as it is in the 16th century originals – with the background blocks filled in and the foreground left plain, but this way works, too. They had to do this by hand-carving a wood block, the fewer flimsy little lines interrupting clear areas, the better. I have the luxury of Visio.
The strip at the top is representative of how the pattern was shown in those originals – a three unit knot with a one unit spacer. But that design is full of possibilities. The center interlaces, end units and terminal twists can be recombined into an infinite array of patterns. I present some that I just doodled up tonight.
So look at those old pattern books, historical or contemporary with a new eye. See how the pattern repeats – where it can be broken apart and recombined. You may end up with something entirely new and pleasing, perfect for your next project.
KNOTTY PROBLEMS
Invaders having been secured, I add another panel pattern. This time it’s a nifty knotwork interlace, also graphed out in TNCM, on plate 31:1.

What exactly it looks like will become clearer as I move along. This block unit pattern appears in several early books. I spotted it in a Ensamplario di Lavori published by Vavassore in 1532, and also in a different modelbook entitled Convivio Delle Belle Donne, also dated between 1530 and 1540. If you look at enough of these early pattern books, you can see all sorts of reprintings, adaptations, regraphings, possible block trading, and very probable plagiarism as the various semi-itinerant publishers interacted.
If you consider that each print block was very laborious to create (these patterns not being amenable to moveable type), the habit of publishers of re-issuing some of their old pages in new collections is easy to understand. Trading is, too. I can imagine two publishers based in different areas, but who traveled around a circuit (or who had agents who did) exchanging blocks so that each would have new material at minimal additional invested effort.
The “borrowing” is also easy to conceptualize. These pattern books were very popular, and the designs in them were highly sought after. It’s quicker to copy a design from a competitor’s book than it is to come up with a totally new one yourself, especially in the days when pre-printed graph paper was a rarity (some of the pattern books are mostly just that – blank graph paper, with a few pages of pre-done patterns as intro.)
How to identify copying versus trading? You have to get up close and personal with the patterns. As I regraphed them for TNCM I noticed small variants among different versions of the same basic design. Peter Quentel’s two-birds panel from 1527, reproduced on this page from blog Feeling Stitchy is well represented, and exists in many very close variants. There are very slight differences among them in the layout of the flowers, the position of the birds’ feet. This same pattern persisted in middle European folk embroidery, gaining and losing detail over time as it was copied and recopied, in sort of a multi-generational needlework game of telephone.
This particular knotwork pattern has always been a favorite of mine because of its versatility. You see a three-loop knot at the center of the piece I’m stitching now. The knot itself is easy to deconstruct and reassemble. I’ll be using the three-loop center, with a one-loop iteration on either side. Then depending on spacing and relative room, I’ll either do another two or three-loop knot followed by a one or more little terminal center loops to finish.
And finally to answer the person who wrote to say that they liked my stitching but found it woefully modern, and thought TNCM was “contaminated” by my including my own designs – I have to respectfully disagree. I took extreme pains to carefully document every design in the book. The ones that were “inspired by” rather than transcribed bear that notation. Original work is always marked and is less than 10% of the book. Most of it is there to fill out pages so that no space would be wasted.
[controversial thought warning for the following]
I do not believe that producing a slavish copy of a period original is the highest form of expression or understanding. Yes, it does demonstrate extreme mastery, perseverance, and skill that deserve praise. But to create a totally new piece that were it compared side by side with its historical siblings, and see that piece as an absolute exemplar of the type – to the point that were it transported back to the point of origin, it would be unquestioningly accepted – that’s mastery of the inner form. It’s parallel to martial arts practice. Knowing the katas and training forms perfectly is a matter of high skill, but that skill might not equate to being able to abstract the lessons in those forms and apply them in an un-choreographed street fight.
I do not pretend that my doodle samplers and contemporary stitching approach the new-artifact level (with the possible exception of my forever coif). But I do think that the few original designs presented in TNCM do come close, and the reaction some readers that they feel “cheated” proves my point. If those designs were somehow substandard and not tempting, people would not be expressing frustration. Do those looking for meticulous documentation to substantiate and produce a pedigreed work for an SCA Arts and Sciences competition want use my original designs? Some might, from an aesthetic standpoint, but they wouldn’t do so because those patterns can’t be sourced back to a specific stitch-for-stitch or published historical original. But that’s why they’re marked as mine.
KNITTING IN SOCIAL GATHERINGS?
I don’t know if this link will remain live for long, but it’s to an “Ask Amy” column appearing in the Washington Post on-line edition (free sign in may be required). The advice columnist printed a letter from a California knitter who was asking about the propriety of knitting at an informal gathering of friends.
The gist of the letter is that the writer’s friends gather for a lazy afternoon of chitchat, drinks and snacks on the porch of a friend’s cabin. At the last of these recurring afternoons overlooking the river, the knitter (gasp) brought her knitting. She brought something simple, was an active eye-contact participant in conversations (as opposed to sitting in a corner squirreled away with her yarn); and was a general all-around helpful house guest, assisting the host with whatever prep and clean-up was at hand. However, the knitter’s husband when asked about what he thought of the knitter’s activity voiced a negative opinion, saying it was rude of her to have taken out her needlework.
The Ask Amy columnist was very supportive of the knitter, saying that the activity within the bounds cited wasn’t rude, and “the world would be a more congenial place if more people laid aside their handheld devices and picked up some needles and yarn.” She suggested asking the husband why he found needlework in an informal gathering to be an inappropriate activity.
I for one don’t feel that the knitter was in the least rude, and I encourage her to raise the banner for public knitting.
Knitting at chitchat gatherings has a long history, and in the past genteel needlework was considered almost a required accessory for informal visits. I often bring needlework with me to social gatherings, judging when I get there as to whether or not the circumstance is comfortable for me to pull it out. But apparently some aren’t convinced about this type of behavior. (I also think the husband might have been annoyed because less attention was being paid in specific to him, but that’s another story.)
So – as an item for discussion – Would you feel comfortable knitting at a lazy afternoon gathering of convivial friends? Would your spouse or significant other object? Why?
