CASKETS AND SNAILS
Spring floods here. A minor one in the basement, brought on by the inordinate amount of rain we’ve had in this area this month, and at work, with more deadlines rushing one upon the other. Which must be good for business, but is exhausting none the less.
Last post I promised two things. The first one is a dream project. Something I will probably never have the time or resources to accomplish (especially the time): my own embroidered casket. Not the kind you’re thinking of.
Back in the 1600s the crowning achievement of what passed for female education was the completion of a small box covered with embroidery. These were called cabinets or caskets, and often featured dimensional embroidery. They were about the size of a large tabletop jewelry box and were truly spectacular. The Peabody Essex museum in Salem has one one dated to 1655.. Here’s a particularly nice one in the Minneapolis Institute of Art’s collection. They’re highly sought after by collectors.
Via Needleprint, I stumbled across this:

It’s a modern chest base, made by a woodworker specifically for creating cabinets. If you click on the link you’ll see that the individual panels are made to be removed. All that needs to be done is stitch up a piece of the correct dimension and lace it onto the panel, then refit the panel into the cabinet. Now all I need do is set aside two years, a pile of silks and metal threads, some excellent linen, and $800 for the box base (including shipping). Another item on my ever growing never-never list…
The second thing I promised was word of a snail invasion in the Antipodes. Again, not the kind you’re thinking of. Garden plantings are safe. But Friend-of-Friend Fred Curtis, resident in Australia happened upon my book and is doing all manner of happy things with my snails. Here’s a trial for a man’s necktie to be covered with snails. He also stitched a camera straps using TNCM patterns (shown in process), and has used another of its patterns on a baby bib. But back to the snails. Here’s another of his pieces, offering up early spring inspiration to those of us in the Northern Hemisphere.

(Photo reproduced with permission). I’m always tickled to see stuff worked up from patterns I’ve posted, both for knitting and embroidery. If you’d like to see them posted here in the Gallery, please feel free to send me an image or a link. Fred – thanks for the smile!
IMPROVISED GADGETS – THREAD REELS
More progress on my Do Right sampler.

It’s going slow due to mounting work-related deadline pressure, but it’s moving along. Here’s a close-up of the latest strip:

Half cross stitch doesn’t provide anywhere near as dense a background cover as regular cross stitch or long-armed cross stitch, but it does give an interesting twill-like effect to the ground. Plus it uses far less thread.
And in the realm of improvised tools and gadgets – today’s is the lowly thread reel. Flower Thread comes in pull skeins. Or I should say – alleged pull skeins. They are not as well behaved as standard 6-ply floss skeins. Because I hate putting my work down to wrestle with my materials I tend to wind each skein of the Flower Thread as I use it. This is a very traditional thing to do. Little flat thread winders of various configurations were common work basket items prior to the introduction of spooled and reeled threads. You can still buy bone, mother of pearl and wooden thread winders. They’re a wonderful addition to one’s general stitching ambiance, especially for those who pursue needle arts in costumed settings.
But me – I’m cheap. Very cheap. I also am mostly retired from SCA events these days, and no longer need to keep up appearances. I make my own thread reels from business cards. Business cards are a renewable resource for me, new ones cross my desk almost daily. Once I transcribe the giver’s information into an electronic storage, I have little need for the small cardboard rectangles. But they are made from thicker, higher quality paperboard than index cards, manila folders, magazine inserts or other similar items. As a result business cards make sturdier, more durable thread reels. And did I mention that they’re free?
One business card yields two thread reels. As you can see from my samples, precision snipping is optional.


VISIO STENCILS AGAIN
I noticed quite a few hits in the past couple of days from people looking for my Visio knitting symbol stencils (templates). They’re the tools I use to do all of the charts here on String. However those files appear to have gone astray. I’m having problems going back and editing the original posts to edit the links there, so I am offering up this set of links instead.
I’ve got two sets, both for older versions of Visio. For Visio 5 here’s a Zip file containing the basic shape set, increases and decreases, and cables. And here’s the same thing for Visio 2000. I know for a fact that my stencils work with Visio 5, Visio 2000 and the last version of Visio in MS Office 2003. I haven’t had an opportunity to test the latest Visa version of Visio with my templates yet.
Here’s a link to the original post describing my method, but in short – I’ve built a series of “alphabet blocks” each bearing a standard knit symbol. I build my patterns up block by block. I can group or rotate blocks as needed. Once my blocks are in order, I add chart notations, including my grids and row numbering, and a key. I can also use the same system for colorwork charting by assigning my desired colors either to the whole block, or to a small square unit in a block’s center, as needed.

I offer up these stencils to anyone who wants to use them. For the record, I’ve heard that these blocks can be imported and used in other less expensive graphics programs including Edraw. I know that Edraw can open Visio files, but I don’t know if it uses a stencil or template library that can import Visio stencils. I suspect that to adapt my symbols you’d take one of the files in the zip dowloads above, then use Edraw to open it and copy the symbols out.
If you do use my files to create your own charts, I’d greatly appreciate a link back or a line of acknowledgment in your final work. I hope that someone else finds these useful as I do.
LOG CABIN BLANKET GROWTH AND CREATIVE REPURPOSING
The modular baby blanket continues to grow. To get an idea of large it is, the wooden Brittany birch DPN in the upper left is about 7.5 inches long. I’ve used approximately four balls of yarn so far. Although this yarn is rather ho-hum in its color gradients, I am really liking the effect.

Done in brighter colors, this might have an effect reminiscent of the wonderful play of narrow striping exhibited by larger Kente Cloth pieces made from many strips of narrower weaving.
The Batika yarn is turning out to be a minor annoyance. It’s one of those slipperies, put up in self-destructive puffballs. The balls implode when worked center out, and tangle when worked from the outside end. I’m doing both in order to swap around the color progression. But last night as tomatoes were sliced for dinner, I had a brainflash. The little foam nest that protected the tomato (and that can often be seen around Asian pears) can be repurposed as a yarn tamer for puffball put-ups:

It works quite nicely for this shape yarn ball, even better than the green mesh cylinders that the wine store uses to cushion bottles if you buy more than one (which I also use to tame cylindrical pull skeins).
MORE ON STRICKFINGERHUTS
Techknitting is posting an interesting series on stranding, and as part of it, mentioned the use of Strickfingerhuts (knitting yarn guides/knitting thimbles), linking back to my original post on the subject.
For those who are unfamiliar with them, they are those gizmos that sit on the end of the left hand index finger, that are used by Continental style knitters (pickers) to hold and separate two or more yarns while doing stranded colorwork.

Adding some more detail on the subject, I’d like to address a problem TK points out as being common among those who hold two yarns in one hand while stranding – differential feed.
If a row has more or less equal numbers of stitches of both colors, both yarn strands are consumed at the same rate. But if a row has lots of Color A, but very little Color B, A will be eaten at a much greater rate, eventually causing the knitter to readjust his or her grasp of the yarn to even things out.
Those of us who do use Strickfingerhuts find that the differential feed rate problem is greatly minimized compared to trying to hold both yarns in the left hand unassisted. Yes, eventually the difference in yarn consumption catches up with us and we have to yank the strands even, but no where near as often.
We do however find that over time we prefer to put the dominant color (the color most represented on a row) in either the left or right eyelet to minimize the feed problem. There’s no hard and fast rule to this, it’s a matter of personal preference.
In stockinette in the round, I prefer to have the dominant color in the right eyelet, and the less represented color in the left. This helps when I lock in my floats:

Although I usually work stranding in the round, occasionally I have to do it in the flat. If I’m knitting stockinette in the flat using a Strickfingerhut, and I’m on the purl side, I prefer to have the dominant color in the left hand eyelet.
For the record, I notice no difference in the appearance of the finished product if I mix eyelets – sometimes putting the dominant color in one, and sometimes in the other. I do however note that some other Strickfingerhut users do, and advocate always keeping the background color in the same eyelet regardless of its relative dominance on any one row. Again, experimentation is your friend.
INNOVATION AGAIN – BUILDING A BETTER MAGNET BOARD
The idea I hinted at yesterday has to do with magnetic boards. It’s not
something I can make at home, but it’s a set of improvements I’d like
to see made.
To recap, the standard issue magnetic board is very useful and very inexpensive, but it has some shortcomings.
 Boughten |
 Scavenged |
LoRan
appears to be the leading (possibly only) seller of magnetic boards.
LoRan appears to have been bought by or is marketing through the Dritz
line of sewing and crafting notions. LoRan boards come in several
configurations. Some have easel backs, so they stand up on their own.
Some of the easel backed ones have small pencil-holding ledges along
their bottom edge. Sizes appear to be 6"x10", 8"x10", and 12"x18".
There are also supplemental accessories including separately packaged
easel stands, plain gray metal/plastic magnet bars, magnetic bars with
rulers printed on them, see-through magnifying magnet bars, and special
packaged bundles of the base model boards plus accessories. There are
also "after market" vendors that sell other types of place-marking
magnets/magnifiers for use with magnetic boards.
My problem with the LoRan line are:
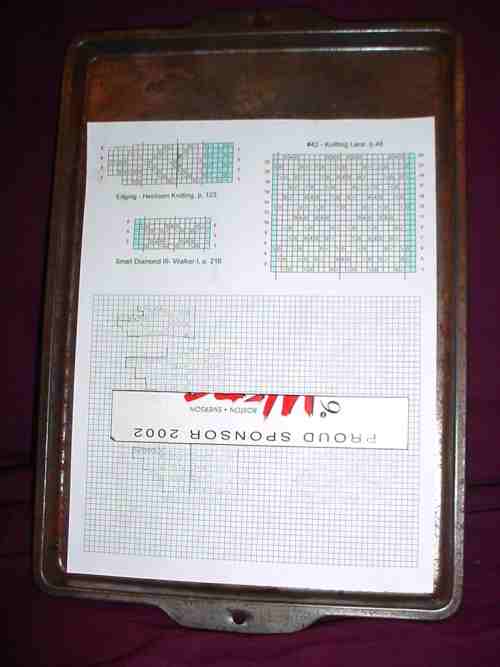
1.
That it does a lousy job of protecting the charts while the work is in
progress. I didn’t realize exactly how lousy a job until I began using
my improvised solution. The largest LoRan size is bigger than I need
for 99.9% of my knitting charts. But the two smaller sizes are smaller
than standard US 8×11" paper (or the standard Euro A4 size of
210x297cm, for that matter). Charts put on the boards get bashed up –
even if both the board and the page are slipped into a page protector.
This damage is especially bad if the board/chart combo is stuffed into
knitting bags in between working sessions. My el cheapo scavenged
cookie pan’s raised rim did an excellent job of keeping my project
together and unrumpled, and keeping the magnets in place in between
uses.
2. The boards are flimsy and prone to bending and denting.
Once they are no longer flat magnets have a more difficult time
sticking. Again, my cookie sheet was thicker and (for non-cooking
purposes at least) resisted warping and denting better than the
commercial product.
3.
The magnets are wimpy, and can’t grab
through more than a page or two, or are easily displaced in between
working sessions. This one is a balancing act. There are incredibly
strong magnets out there, but they would be difficult to move while
working. Finding just the right amount of stick to stay put when needed
and still be easy to move when necessary is difficult. Even more so
when you remember that for most low adherence magnets, the magnetism
slowly dissipates over time. What worked last year might be less useful
this year. My cut up promotional fridge magnets did a fine job
through up to two sheets of paper, but I like to keep all the pages of
a pattern together when I’m working. I’d want something a bit
stronger, perhaps something that could stick through a plastic
protective cover, plus three sheets of paper, but not necessarily
something thicker. The thicker the
magnet, the more difficult it is to read Think thick rulers vs. thin
rulers. Thick rulers are visually offset from what they are
measuring, making taking accurate measurements more difficult.
What I want is something like this:

Wouldn’t it be nifty if
that transparent magnet-through plastic cover was a full-sheet magnifier page?
Now, how much more would I pay for something like this above and beyond
the flimsy market standard? Not sure. If the least expensive packaging of the LoRan 8×10
sells for about $5.00 US (more or less), I’d pay around $15
for something this elaborate, provided the quality of the piece was
commensurate with the price.
Remember – if you see this product for sale out there, you saw the idea here first. [grin]
INNOVATION UPDATE GRAB BAG
Innovation Update
Kate
from the UK has sent a lead on something that’s even better than the
narrow sticky notes I wrote about yesterday. She points us at
removable, translucent highlighter tape.

It’s
inexpensive. Even better, it comes in several widths and lots of
colors, and is packaged as either sheets of removable strips or in
dispensers like adhesive tape. From a quick product search, it appears
to be most widely used by teachers and professors for book
highlighting, and by pilots for annotating aviation charts. A Google
search on "highlighter tape" or "highlight tape" turns up a bunch of
sources. Here are several sources that has a pretty complete listing of
the available form factors (no affiliation):
http://www.windmillworks.com/catalog/c1_p1.html
http://www.crystalspringsbooks.com/products.asp?dept=333
http://www.avidaviator.com/tape.html
Some
advantages include transparency – being able to "look ahead" in your
pattern without displacing the mark, and availability in assorted
colors. Why colors? Two reasons. First, some charts come in color. One
might need to find a contrasting highlight to avoid "wiping out" one or
more colors shown on the chart. Second, I’m no educational or visual
perception theorist, but I know there are people who find reading much
easier if they view pages through colored filters. I wouldn’t be
surprised if some of the chart-shy have perceptual wiring that would
benefit from using color highlights, too.
I’ll be looking for this stuff to try out.
More goodies in office supply stores
I’ve
written about knitting tools that can be found in hardware stores. Now
this train of thought takes me on another mental shopping trip – tools
that can be found in office supply stores. Some are obvious:
- Drawing/drafting
supplies – rulers, protractors, French curves, graph paper, tape
measures, cartographer’s measures (people who do full scale dimensioned
drawings and slopers might find these useful) - Calculators of all sorts
- Filing supplies – sheet protectors, binder and loose files
- Tote
bags – Some of the smaller computer bags and the not-quite-briefcases
meant for file-toting road warriors make excellent stealth knitting
bags. - Organizers – In-drawer, in-briefcase, and desktop organizers can be handy to corral knitting doodads
- Typing stands – Great for propping up charts or leaflets
Some are less obvious. Here’s a smattering of the latter:
 |
 |
Transparencies
– clear plastic pages that can be run through printers or copying
machines. Need to grid up a picture or photo? Print a transparent sheet
up with a graphed lines in the same height:width ratio as your knitting
gauge. Lay that clear line-printed sheet over the image you want to
transcribe to knitting. Voila! Instant knitting graph.
Circular paper clips – Instant stitch markers.
Check files – Yet another possible solution for storing those circs.
Tomorrow – another wish list item.
INNOVATION
Yesterday’s post got me thinking. (Always dangerous.)?
There must be tasks we wish our knitting or crocheting tools could do,
either as tweaks to existing products, or as entirely new items.
I’ve come up with several minor ones over the years. In the
spirit of Anne L. MacDonald* At the risk of compromising patentability
or re-inventing the wheel, I invite people to share ideas, and prime
the pump with some of my own.
Counting Beads

I wrote about these back in my Stupid Stitch Marker Tricks
post. This is intended to be an aid for people who are
working row count repeats or those annoying "Decrease two stitches
every sixth row" directions. It’s a chain with links large enough
to admit a knitting needle, and two different color beads, one at each
end. On the first row, the knitter puts the needle into the link
closest to the green bead. On the next row (or next right side
row if working in the flat), the knitter advances the needle to the
next link, and so on. If the links are used to count pairs of
rows, a six-link chain could count 12.
Inch-Striped DPNs
I know I’ve seen photos of WWII-vintage DPNs that were striped,
but I don’t know if they were striped off in exact inch measurements
(or 2 cm for our metric friends). If I had a set of striped DPNs
I could use them to measure off length as I knit, without fumbling
around for a tape measure or ruler.
Two-Tone DPNs
This idea could be used in combo with the stripes, above. I wrote
about this one in the post remarking on a really bad answer offered up
by Lion Brand. If one had a set of similarly colored DPNs that
had a different color marking one end of each needle, one could use
that color to track where rounds began and ended. (Yes, I know
most people look for the tail, but sometimes it can be less evident,
like when you’re knitting a flat motif center out.)? The knitter
would knit all DPNs with the same color end, EXCEPT for the one that
starts off the round. That one would be employed with the
contrasting color first. If we used red and green again, we’d
knit the first needle with the green end, so that the red end was
rightmost in the work. All successive needles would be knit with
the red end. As the knitter traveled around the work he or she
would know that when a red end presented itself, that was Needle #1.
Long, Thin Sticky Notes
This one is left over from my stitching days, although I sometimes do
use sticky notes to mark my place on knitting charts. I want a pad of sticky notes
that’s six inches wide and less than an inch deep. The sticky should be
along the long edge, not at the tab end. If it had? 10 to
the inch rules on it with prominent decads, so much the better. I want to use it to
mark off the active row of an active knitting or stitching chart. Having rules on the thing would help me keep my place on the chart and if the chart’s scale was 10 to the inch – allow me to do "speed counting."
Anyone have any other innovative ideas for working tools, storage
ideas, charting aids, or other new thoughts for here-to-for unknown
tools or tweaks to existing ones?
*Anne L. MacDonald is best known for her book No Idle Hands:? The Social History of American Knitting, but she also wrote Feminine Ingenuity: How Women Inventors Changed America.
GADGETS – CIRC LABELS
It’s no secret that I don’t see as well as I used to. Between eye
infections and all-purpose aging, I need help. For most things glasses
work just fine, but there are a couple of minor annoyances even with
glasses. One is the teeny labels etched onto most circ needles –
especially the ones smaller than US #4s.
Now,
if I were one of the Super Organized, I’d have a system for storing my
circular needles. Perhaps one of the sorting hanger thingies (see
below), or a binder notebook full of pockets. But I have a lot of circs
and little patience for filing things away, so I make do. Most of mine
live in a hand-me-down wood box that once held a bottle of gift wine.
The lucky few among them get replaced in their original packaging. Not
all of my needles are lucky. The less fortunate among them live in an
incestuous tangle, stuffed into that same wooden box. Figuring out
which needle is which is always a challenge that involves finding the
size gauge that’s supposed to live in that same box, and playing "size
me" until the right one turns up. Either that or calling over one of my
offspring whose eyes function better than mine and having them do the
squint work for me.

I’m not this organized.
Enter my latest acquisition, hot off the gadget rack at my LYS.
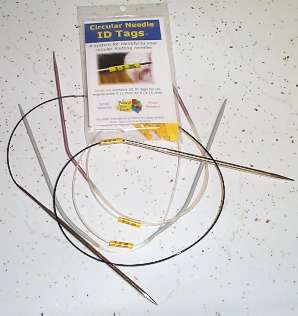
It’s another clever invention from Nancy’s Knit Knacks
– the Circular Needle ID tag set. (No affiliation). Tags are packaged
in two sets – one for US#0-4, and one for larger needles.
(Engraved labels on larger needles are easier to see, so I didn’t buy
the larger set.)?
I can find and read these tags in my needle jumble with no trouble at
all. Needle ID bliss! Of course one still has to remember to put the
tag back on the needle after the project is over, and manage not to
lose the thing in between – but that shouldn’t be too hard. I’ve
stapled the little plastic zip bag of tags in the circ box and will stow
the tags there between uses.
I also note that Nancy’s has been busy, issuing a new needle sizing
gauge that goes down to 000 (always welcome, although I wish it went
down to 00000), and an electronic version of the old katchaa-katchaa
style counter. I don’t use the things but I know that many people
do swear by them. It looks like the electronic one can subtract,
which is nice if you need to rip back. I’m surprised though that
it seems to have only one memory register. It would be even more
useful if it could remember two things at once (like total rows, and
rows in the current repeat).
 High tech |
 Low tech |
No
affiliation here between Nancy’s and me. I am however impressed that
they manage to identify and market to so many niche needs, including
the whole Knit Kard info system, the yardage gauge, and the WPI
tool. There are lots of companies selling knitting notions, but
most seem to be content with the old standards. Nancy’s is one of
the few that seems to be actively seeking out innovation.
MARVELS OF MODERN TECHNOLOGY
I’m sure others have blogged about this already – needles with built-in sensors that
log the stitch count for you. There’s a base station that
displays the count, and appears to have holders to park the needles
when they’re not in use.
I can’t find any confirmation that this has moved beyond prototyping
into the realm of a real product, but regardless of development stage I
would have some questions for the maker:
- Are the sensors adaptable to any size needle, or is the knitter locked into using only one size?
- What is that size, and how long are the needles?
- Does it equally sense the movements of both throwers and pickers (British/American and Continental styles)?
- How does it handle complex stitches?? For example, would it
log a SSK as one stitch or three – counting the three movements it
takes to produce it as separate stitches? - Can you dial up or down to readjust stitch count and compensate for multiple movement stitches?
- Is there a memory function?? For example, if I sit down and knit today will it remember where I left off yesterday?
- Is it possible to get interim counts, kind of like the way you
can use trip set on a car odometer to record smaller intervals??
This might come in handy if one wanted to track a repeat in addition to
tracking total stitch count. - Does it handle row count?? (For most knitters, row count is a far more annoying tracking problem than is stitch count).
- Is there an upper limit? For example, if I work a flat piece in a
tiny yarn, I could easily have a couple hundred stitches across, even
on a 14-inch straight. - Does the count span rows, or is it set up to track on a single row basis?
- How sensitive is it to spurious movements?? For example, if
I bobble the needles as I reach for something or flip the work over, will that increment the
count?
I’m not about to run out and buy something like this, even if my
questions were all answered, but it’s very interesting to see some
creativity and technology applied to the problem.
For me, low tech is still the way to go:? my stitch marker abacus
for tracking rows, and for those projects where I need to know count
across at all times (very few and far between), a series of stitch
markers placed every 10 or 25 stitches (or between repeats), as counted
out from the center.
