ROMILLY AND NOT (GADGETS – BREAD TAGS)
Firefighters Socks
Several people wrote to ask where they could buy my Firefighters Socks pattern. You can’t buy it. No one can. It’s not for salebecause I give it away free at my wiseNeedle website. The links here (and in yesterday’spost) will take you directly to it. It’s written for worsted/heavy worsted yarn, and if you’ve never done toe-up socks with a Figure-8 toe or short-rowed heel, being at such a large gauge is a good pattern for a first attempt.
Romilly-les-Chaussettes
Thank you to everyone who wrote to say that thepostcards I posted yesterday were printed around WWI. I thought that was rather obvious, so I didn’t bother to note it. Most of the others on the site I mentioned were of the same vintage, with a smattering of earlier and later cards.
And a BIG thank-you to Spinnity, who was intriged enough by the sock card to comb through history sites (in French) to find out more about Romilly and its curious link to socks. She left a nifty comment. I’ll summarize her theories:
Romilly was a center of sock manufacture, with at least two large factories nearby producing socks and stockings. This line of regional specialty continues to at least March of this year, when Jacquemard, a major sock factory, closed. The town apparently has had the name “Romilly-les-Chaussettes” (Sock Romilly) for a very long time. Here’s her link detailing the passing of Jacquemard mills(for some reason it didn’t come through on her comment post): in French; in machine-mangled English.
Here’s another Romilly-les-Chaussettes postcard:
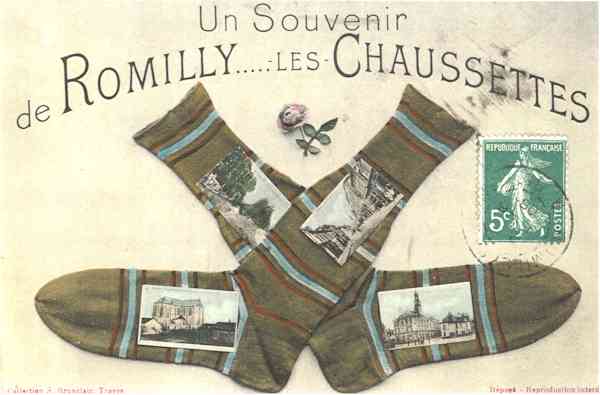
Again we see the stripes passing north and south of the heel. But the heel isn’t a short-rowed one of the type often seen on machine-made socks. It has a wide heel flap that wraps around the entire back of the foot, then a cupped bottom area. It looks like after the heel unit is finished, stitches are picked up along the heel’s foot-side edge, and the foot is continued tube-like from that point, incorporating live stitches from the top of the foot.
Apparently the tradition continues. I found mention of at leasttwo more sock factoriesstill in operation in the area around Romilly surSeine (Olympia, Aube Chaussettes); plus in true French fashion – a regulatory board or committee overseeing standards of manufacture and appelation.
Not in France Anymore
Having had a brief whirl through France, I turn to something that causes shudders of horror in every visitor I’ve ever had from that land: American packaged bread. Well, not the bread itself, but the little plastic tags used to close the bags. Continuing the series on indispensible but free knitting gadgets, I put forth the humble bread tag:

What use are they? Well, you can write on them then clip them onto things.
Have you ever been working on a garter stitch piece and forgotten which is the front? While you could remember that the front is the side that has the cast-on tail at the right or left (depending on your method of casting on), I for one can never get that straight. A bread tag with an “F” on it, placed on the front of the work can be a lifesaver.
Need to track the point where something tricky has happened? Bread tags can mark armhole decreases, sleeve increases, buttonhole locations, and the like. They attach firmly to your work, and rarely fall off. Safety pins work well, too but the coils of standard safety pins can get tangled in the knitting yarn, and not all of us have the fancy coil-less safety pins sold in knitting and quilting shops to hand.
I’ve used them for marking yarns in my stash. If I’ve swatched, I’ll scrawl the acheived gauge and needle size on a tag and affix it to the ball. I’ve used them to identify or otherwise mark swatches submitted to pattern publishers as part ofmy designproposals.
Bread tags arefree and completely disposable. You can break them to remove them from your knitting, and not feel you’re tossing away a good tool. (In my house at least they are a constantly-renewing resource and rank up there with wire hangers and AOL CDs.) They also come in lots of colors – good for any color coding scheme you wish to devise.
In a non-knitting mode, I’ve also found them very useful for marking the cables that plug into my routers. I know know exactly whom I am disconnecting when one gets unplugged, even if the shout of dismay wasn’t audible.
Finally, I know people who use them to mate socks before laundering. A bread tag through the toe keeps the pair together, andavoids thatdreaded One Sock Syndrome.
So if you’re looking for a way to make in-work/on-work notations, don’t pass up this humble resource. After all, it’s not like you have to rush out to buy some.
GADGETS – MAGNETIC BOARDS, BOUGHT & IMPROVISED
As I’ve posted before, I’m in the throes of moving. My entire stash, most of The Chest of Knitting HorrorsTM and the majority of my knitting tools are packed away in the storage cubby. Need however, does not sleep.
This weekend past I needed to work from charts. I like to use a magnetic board, but my slab-o-steel and fancy magnets were packed away with the rest of my goodies. I had several alternatives to the keeping-my-place problem. I could use plain old pencil ticks, marking off rows as they were completed. I could use yellow sticky notes to keep track of where I was. Or I could improvise a magnetic board.
Pencil ticks are a pain, and while they help me see what’s been done, they’re of little use mid-row, especially in a long, or wide repeat. Post-its are useful, but the stickum wears out, and any time I take a stack of them out of the Forbidden Drawer, the kids attack (corollaries to this type of household piracy include liberation of Mom’s Good Scissors, and unauthorized Scotch tape squandering.) Repositioning them is also trickier compared to just nudging a magnet bar.
As a result, I turn time and time again to my magnet board. I’ve gotthe standard issue 8×10 flat model:

Lo-Ran appears to be the leading (perhaps only) outfit marketing these.Boards come in several sizes both with and without pencil ledges at the bottom. Theyare marketed in several bundles, some with additional accessories. Accessory packs are also sold separately. Mine didn’t come with the little white magnetic ruler pictured, but I bought it a zillion years ago. I also don’t use the magnifying bars, stands, or other supplemental gadgets. The half-barrel shaped magnifiers distort too much for my liking, and as a Wandering Knitter – the less impedimenta, the better.
About the only down sides to using the boards are:
- Even though the corners are now rounded off, the edges can be sharp. I suggest covering them with book repair tape or some type of tape that doesn’t bleed adhesive over time (NOT duct tape, woven electrical tape, or first-aid tape).
- 8×10 is smaller than my pattern pages, so my copy gets battered;
- Being thin, they bend easily. The magnets don’t stick well to an undulating surface, so I’ve had to resort tobangingmine back into shape with a rubber mallet a couple of times over the years.
If I’m using a published pattern, I make a photocopy and put my original back on the shelf (fair use under copyright laws – if I’ve annotated it with notes I want to keep, I staple it to the original and file both away after use; if not, I destroy the copy).I slide the copy into a plastic document sleeve or zip-lock bag, along with my thin metal magnet board. Then I use the magnets on the outside of the sleeve, positioning them as needed to highlight my working section. I place my magnet to cover the row above the one on which I’m working, sliding it up as I go along. That way I can see both the row I’m on, and the rows I’ve just completed. In knitting it’s rarely necessary to mark a vertical, but some people I know do position two additional magnets to frame a repeat, removing these vertical markers when they get to the final iteration and need to work any non-repeating stitches at the end of their rows.
Without my board thisweekend past, I had to improvise. My kid refused to let me borrow her magnetic paper dolls set, having seen my true nature when Iinvaded her K’Nex building toy set for rings to use as stitch markers. Not having a typist’s metal copy stand (remember those?), a tabletopmusic stand, or access to sheet steel and a machine shop, I raided the kitchen.
I found a flimsy, cheap Ecko raised lip cookie sheet/jellyroll panI bought back when I got my first apartment. You know the kind – the type of flat panthat warps at any temperature over 250F, and is guaranteed to burn anything baked on it. I’m sure you’ve got one squirreled away somewhere, making appearances to re-heat pizza or catch drips, but not to do any real cooking. Mine is the worse for wear, havingrecently been rescued froma three-year turn outdoors underneath the barbeque. It’s scrubbed clean, but it’s too nasty looking to use without foil between it and food.
Then I scarfed one of those promotional business-card style fridge magnets that breed with the same frequency as AOL CDs or coat hangers. This whopping big index-card size one came with the thank-you for your membership letter from WERS, a Boston-area Public Radio station based at Emerson College. (Just because I’m ancient doesn’t mean I have to give up on college radio.)
I cut the flexible WERS magnet into strips, slapped my chart on my pan and had my no-cost magnet board. While it’s not as flat as my regular fancy board, it is larger than my sheet of paper, so the edges aren’t getting battered. Also the pan shape has been very usefulas a tray forcontaining spare DPNs, pencils, and other items as I carry my knitting room to room:

My solution isn’t pretty or elegant, but it works; and using all scrounged materials – it was free.
GADGETS – STRICKMUHLE
A while back I asked for advice on buying one of those little hand-cranked I-cord knitting machines. I now present the outcome. This one is very definitely a boutique sort of item. Not everyone has use for miles of I-cord. I do.
I knit lots of baby booties using the pattern Ann Kreckel posted to the KnitList in the summer of 1995. The pattern is available at Woolworks. There’s a similar pattern in Taunton Press’ Knitting Tips and Trade Secrets. I make them as gifts for friends and family, or for charitable donation.
I don’t have any finished booties on hand right now and my sock yarn stash is in the storage cubby, otherwise I’d whip up a pair to photograph. I’ve modified the pattern a little bit, knitting the cuff with fewer rows so that it is more rolled than folded. I also like the look of I-cord rather than crocheted, braided or longitudinally knitted ties. But I-cord is tedious. It takes me almost as long to knit the I-cord ties as it does to make a bootie, so I splurged on a gizmo to do it for me.
About three years ago I got sick of hand-knitting the ties. I looked at the Bond Magicord Machine, the Inox Strickmuhle, and a couple of older models I found on eBay. Both the Inox and Bond machines have changed from the ones available at that time. Except for color, they’re now identical, both sporting little clear plastic sleeves surrounding a 4-hook needle bed.
|
|
|
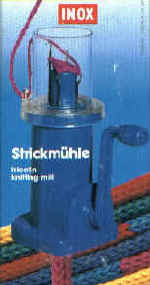

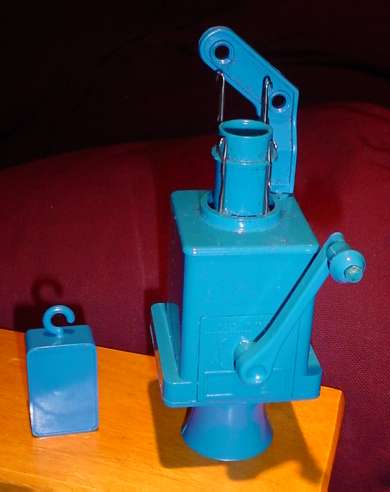
My older version of the Strickmuhle has no sleeve, uses a different type of weight, and has a protruding arm to position the yarn feed:
Back when I bought this one there was a big difference in quality between the Magicord and the Inox, with the Inox being much sturdier. Now they’re the same machine, so any differences will be in the accompanying documentation (if any).
You can see the hook-weight on mine(there’s a block of metal inside). On the newer models the hook-weightappears to have been replaced by some sort of clip. Mine also came with a second slightly smaller collar (that’s the blue circle that you can see sticking up among the four hooks). In theory, the smaller collar should be used for fingering and 3-ply yarns, and the larger one should be used for sport and DK, but I’ve never found the two collar sizes to have any effect on ease of production or I-cord evenness.
My machine works best on fingering through DK weight yarn, with best results from sport weight (6 spi). I’ve forced some Cascade 220 worsted through it (5 spi). It worked, and I got I-cord that I later used in a fulling project, but I wouldn’t recommend it for worsted as a matter of course. There’s areal knack to using this toy, especially with heavier yarns. Starting a new cord can be especially trying.
I did pick up a couple of starting tips from the French language instruction card (it came with a French, German and English card, but my English card was missing) – When starting out, make a loop, then stuff the yarn end into the tube’s body. Hang the weight from the loop. Then lay the yarn and turn the crank VERY slowly, skipping every other hook on the first round. You will be using Hook #1,Hook #3, then Hook #2 and finally Hook #4. After you get to Hook #4 you can let the yarn feed without skipping hooks. The combo of constant weight on the dangling yarn, plus the skipping-hook row produces a nice even end and minimizes the un-caught stitches that can make starting a cord difficult.
Once a cord is started, the thing does work quite easily. I often hand off my gizmo to one of my kids and have her crank out the required length. My weight isn’t as convenient as the spring clips, but I can move it up the cord if I need more yardage than the 5-year old is tall. Ending off is easy. I snip the yarn and keep turning the crank until the cord falls through. Then I use a tapestry needle and the dangling end to thread through the cord’s four loops. If I’m making bootie ties, I don’t bother making a two separate cords. Because starting is the trickiest part of operation I make a single cord that’s double long, plus a couple of rows – then snip the thing in the middle and bind off the two new ends.
Looking around, I see other people playing with these toys. Jenanne posted a summary of her experiments with the new version Bond and an Aran weight yarn (4.5 spi). Kate at Will Knit for Food also wrote about making I-cord from worsted weight yarns, then fulling it for bag handles.
Other than cost ,limits on the weight of the yarns it can handle, the difficulty of holding the thing, the yarn and cranking all at the same time (I wish it had a table clamp), and some trickiness starting off a new cord, my biggest disappointment is that the user is unable to alter the number of hooks being used. You get four-stitch I-cord. That’s all. One of the pre-1940s-vintage German-made all-metal machines I was tracking on eBay came with 6 hooks, and could be used with as few as two (sort of as a turbocharged lucet).
I also ran across the Hobby-Knit on eBay:

It looks interesting, but I couldn’t get anyone to confirm whether or not it could be used with a variable number of hooks. Also the very few of them that seemed to offered in operational condition were selling for upwards of $100. Much more than I could justify for such a trivial function.
If anyone knows more about this vintage toy, feel free to clue me in.
GADGETS – STUPID STITCH MARKER TRICKS
I love stitch markers. I use them for just about everything – the more the better! I buy them like popcorn, and make or improvise as many as I buy. They infest my house and are always found while sweeping up, in between cushions, and in the dryer’s lint trap. In fact, I’ve got two little dishes – one next to the washer and one on my dresser, both there for the sole purpose of catching stitch markers at convenient points in the laundry process.
I prefer rigid markers to bits of string or contrasting color yarn. I find for me they transfer from needle to needle faster, and because I often knit without watching my fingers, are easier to spot by feel.
Here are some of the things I use as stitch markers from the catch-all on my dresser:

Clockwisearound the outside and spiraling in, there’s a beaded lizard made for me by my Tween-ager; several split rings and jump rings bought by the bagful at the jewelry findings counter of my local crafts store; some flat gold-tone beads with large holes, and a heart charm intended for use on keychains (same source as split rings); a paper clip; three home-made beaded markers; a yellow flat split ring marker; three more home-made beaded markers (small size); two Susan Bates white plastic rings; an ancient Susan Bates split ring; red and blue Susan Bates flat rings; two coil-less safety pins, and two small turquoise rings “liberated” from my kids’K’Nex building toy set.
I tend to ue the larger decorated markers as row end or abacus markers; and the plainer ones as repeat dividers, or to denote other spots whereI need to pay attention. I don’t have any problem using the stitch markers with the dangling bobs. I let them hang on the side of my work that faces me. Since I sometimes need to use my “third hand” when doing maneuvers like decreasing across a marker, the beads make convenient grabbing tabs for my teeth. (Confession:I feel sort of responsible for foisting the beaded marker fad on the rest of you. Back in ’94 or so I wrote a post to the ancient KnitList that described how I used broken earring bobs and necklace pendants as stitch markers, and was beginning to make singlets expressly for that purpose.)
I used to use the coiled split rings (shiny red, above) to mark individual stitches – usually to help count decreases or spots that needed to line up when a garment was assembled. It has been a long time since I’ve seen these coiled guys in the stores, so I’ve switched to using either jewelry split rings or the safety pins instead.
The one type of marker I absolutely detest is the pig-tailed yellow split ring. I bought them only once and don’t remember the brand name. Those cursed pig-tails seemed to look for an excuse to snap off. They also dug into my fingers as I was working.
Marker Use #1 – Decrease/increase counters
I’m a counting disaster. I detest counting rows. I’m forever losing those little barrel-shaped counter devices that sit on the needle or hang below it. I am also a Wandering Knitter, so I don’t always have a nice settled place to put a pad and paper nearby, nor am I reliable enough to remember to click off the rows on a katchaa-katchaa counter.For the same reason pegboards or counting stones aren’t for me (I’ve got a sweater that ended up with a sleeve eight inches too long because someone kept eating the M&Ms I was relying on as counting stones). I’ve even tried the flipping the string over every ten rows gambit, but ended up pulling out my string. I need to have a tangible reminder to do something, placed directly in my work so that I can feel it. Everything else gets lost, or forgotten. Therefore being the only idiot working on my knitting, I have used markers to idiot-proof my knitting world.
In addition to just sitting prettily between pattern repeats, or marking where one switches attention from chart to chart, I use markers to help me keep track of those pesky directions that say things like “increase every fourth row six times.” If that was my direction, and I’d decided to add my stitch by use a make one (lifted bar) increase after the first stitch of my row, I’d proceed this way. On the first row of my increase section I’d work my first stitch, then place a thin marker and after the marker was set – work my first M1. Then I’d place another thin marker and work to the end of my row. The next time I needed to add a stitch, I’d again work the first stitch of the row, move my marker over, do a M1, then work across the row I’d work along, only having to keep track of how many plain right-side rows were between increase points because ALL of my increases accumulate between the markers. When there are six new stitches between the markers, I’d know I’d done enough.
I handle decreases in much the same way. The first row of the decrease section I place markers before the first stitch that I’ll be decreasing away, and after the last stitch that will be decreased away. Then I work my rows, decreasing at the rate specified until my markers touch.
I’ve got another little gizmo that I’ve used to keep track of the how-many-rows between problem. I’ve made two over the years, but I can’t lay hands upon either one right now. They’re probably packed away in the storage cubby with the rest of my knitting stash, but here’s an illustration:

This is a length of chain links with two different color beads at each end. Red and green are nice mnemonics to set up start and finish, but any color will do. The links are large enough to admit the needle size being used. I made one of these with eight links and one with six. I prefer the one with six because I can use it to count up to 12 rows by using each link to represent two rows. There are VERY few patterns that ask you do do something every 12 or more rows.
The way I use my counting-chain is to substitute it for the first marker in my string of decreases or increases, right in line on my working row. The first row of the six-row decrease set, I put my needle tip into the ring closest to the green bead. On the second row, when I get up to the counting chain, I slip my needle tip into the second ring away from the green bead. Third row, third ring, and so on. In this case, when I got up to the sixth ring I’d know that it would be time to do my increase again, and I’d return my needle tip to the first ring after the green bead.
Now if you see someone selling these after today, know that you saw it here first; and remember I was foolish enough to repeat my mistake of writing about an idea beforepatenting it. [grin]
Marker Use #2 – In-Line Abacus
As I said before: I’m hopeless at keeping track of rows. I’m a lousy and lazy row counter, and manage to muck up every row-counting aid – including placing safety pins every ten rows or slipping a strand of contrasting color string back and forth every ten rows. Instead I use stitch markers as an in-work abacus.
This technique uses two or three stitch markers – preferably ones that are unavoidably different both from those put to other purposes in the work, and from each other. It works best for straight pieces of knitting without edge increases or decreases, or texture patterns that alter the number of stitches on the needle. It can be used in a piece with any of these, but you have to remember to compensate, or you have to place the markers in a relatively unperturbed area.
Let’s say I have a straight run of plain old stockinette worked flat, and I want to keep track of the number of rows I have knit. I decide which of my distinctive stitch markers designates ones and which designates tens. I knit my first stitch, place my ones-marker and keep working. On the next right-side row I advance my ones-marker two stitches to show that I’m in the middle of the third row. I keep going until I’m finishing the tenth row (it’s a wrong side row). At that point I remove my ones marker. On the next row (my eleventh), I work one stitch, place my ones-marker, then place my tens-marker and work to the end of the row. On the next right-side row, I work one stitch, keep my tens marker in place and advance my ones-marker two stitches. That shows I’m on the 13th row.
I can keep doing this for as long as required. Sometimes I need to introduce a hundreds-marker. Other times I move the counting markers in from the edge – mostly to avoid shaping increases or decreases, marking my point of origin with another distinctive marker that never moves. Using a point of origin marker I can even use my stitch marker abacus to keep track of rounds in circular knitting.
Of course there are disadvantages. Fiddling with the markers often involves use of that “third hand.” I haven’t swallowed a marker yet, but some have spun off to add to the feral herd of markers swarming in my house. I do find however that I am FAR less likely to forget to move a counting marker than I am to forget to spin a barrel counter, or make a notation on a pad. And unlike M&Ms – other people can’t eat my tracking device as I knit.
GADGET – WPI TOOL; PARROT SWEATER
Private eMails brought three questions yesterday, which I answer in turn.
What’s "parrot-color"?
The easiest way to explain the parrot thing is to show you this pullover:

It’s a flash sweater knit from Rainbow Mills Matisse.Their "Navajo Panted Sky"kit included six 4-ounce skeins of Matisse, and produced a one-size-fits-many sweater that’s about 48 inches around.Mine is about as big as the materials provided allow, and I wear a tall 18. Note that thewidth of the piece isfixed so that thecolor repeats flash. Smaller peoplecan make thebody and sleevesshorter, but end up with a baggier fit than I get.
I foundthis10+-year oldkit for buried in a stack of other things at my local yarn store three years ago. Although I’ve seen Matisse listed on a couple of on-line sources lately, and know some of their other kits are still around, I hadn’t seenthis particular packagefor quite a while.I lusted after the thing because I’ve got a magpie’s taste in color, and because I’d done a couple of flash-type pieces before: the one worn by The Tiny One in yesterday’s post (Grandma’s Little Darling,a Rainbow Mills kit of unfortunate name), Flash (my own noodling); and my Typeset Tee (a modified flash piece, also original).
I enjoyed this piece immensely. At this giant gauge (well, giant for me, anyway) it went very quickly. I finished it in about a week. The single-ply construction Aran weightMerino is particularly soft. Even though I rarely wear even the softest of wools next to my skin I am comfortablewith only a cami or tee underneath. Of course the tradeoff for having such a soft wool spun as a single is a certain amount of pilling, but it’s actually quite moderate compared to the pilling I’ve experienced off of Manos.
What’s a WPI Tool?
I know that lots of people – especially spinners and weavers – employ the Wraps Per Inch (WPI) system to describe yarn thickness/weight. I’ve had people recommend that I include fields for it in the yarn review collection. I’ve held off doing so because of an experiment I conducted a while back.
Over the course of a week I took several yarns and a ruler into my local yarn store and asked about fifty people to determine the WPI count for each. I asked most participants to do the test twice. I used a fingering, a sport, a worsted and a bulky yarn. The results were quite disappointing. There was very little consistency among the readings with large variations from person to person, and in some cases from attempt to attempt. Bad data is worse than no data, so based on this lack of consistency and the limited familiarity of the knitting public with the WPI measurement, I decided not to include it in my standard data set. I did however continue to play with the system myself, trying to train my bumbling fingers in The Right Way.
I had absolutely no success at consistent WPI measurement until I found the WPI Tool put out by Nancy’s Knit Knacks. I bought mine within this past month. It’s shown in yesterday’s post – the little stick thing with the notched end. It also is marked off in 1-inch increments and comes with a laminated card that lists the WPI count for various yarn types. It provides a smooth, calibrated surface which is twirled to accumulate the wraps, in contrast toan edged ruler around which the yarn is wound (and apparently, stretched). Using this tool I can finally get consistent, accurate WPI measurements. I still don’t plan on adding WPI as a permanent field in the yarn review collection, but I’m going to add that figure to all future write-ups as part of what I write aboutin the yarn review Comments sections.
So what’s with the endorsements?
For the person who wrote toask if I’d been paid off to post thegadget articles here, please note that I maintain my full independence. On beyond the "no affiliation" disclaimer, I can say that I’veforked overfull retail for every item I’ve described, and have received no compensation or consideration from any pattern writer, yarn or gadget maker, retailer, or wholesaler in connection with anything I have ever said or published about a particular product.
In the interests of full disclosure, I have written patterns that I have sold to publishers including KnitNet, Schaefer Yarns, and Classic Elite, butI have recused myself from reviewing any yarn connected with those sales, and (with theexception of remindingpeople not to bug me for the Seesaw Socks)do not provide references or links to retailers selling them.
GADGET – IMPROVISED STITCH HOLDERS; GADGET POUCH CONTENTS
We’ve all heard the one about the parentage of invention. More than once, I’ve found myself knitting late at night without the stitch holder I needed, or on the other side of a trip involving air travel, having neglected to pack all the doodads I needed. For some reason stitch holders seem to be the things I most often forget.
Yes, I know I could always just cut a length of my working yarn to serve as a stitch holder, but I prefer not to do that. I either don’t want to crack into another skein, or I don’t want the hassle of figuring out which is the stitch and which is the fastening yarn when time comes to transfer the stitches over. I could also just employ a bit of string, but that would mean that I’d had the forethought to remember some in the first place (and if I had done so, I probably would have remembered the stitch holders, too).
As a result, I’ve pressed all sorts of things into service.
Spare needles are a natural first grab. Stitches can be slipped onto a DPN and secured with a rubber band looped around both ends. Circs can be used as long, dangly stitch holders. But again – if I don’t have my full knitting bag I might not have these to hand. For larger yarns, chopsticks and pencils can also be used instead of DPNs.
Sneaker and shoelaces are good stitch holdersfor large numbers of stitches. The the skinny kind made for kids shoes that still have the reinforcement on the lacing end works especially well. Thread the stitches you need onto the lace, and tie the ends. Plastic lanyard string is also good because it is stiff and easily threaded through stitches, although shoelaces hold knots better.
Safety pins are a natural for small numbers of stitches. The coil-less ones work best, but if I’m without my knittinggadget bag, I’ll use the standard kind. I’ve also used paper clips, twist-ties from plastic bags, and once in a moment of absolute desperation – a hoop-type earring.
But the ultimate improvised solution is making one’s own stitch holders. Store bought holders will always be prettier, and will have nicer ends, but in a pinch late at night when the yarn shop isn’t open, these are viable substitutes. In fact I still have and use some of these I made when I was just starting to knit and had more time than money.
Tomaketwo stitch holdersyou need a wire clothes hanger and a pair of wire snips or cutting pliers (the kind with a cutting jaw), plus a pair of some kind ofbending pliers (the kind with either asmooth end or a ridged end for gripping and bending). The hangers that are too skinny to hold anything heavier than a dress shirt are the ones that cut the easiest. The snipping part might leave a bit of a burr on the cut ends of the wire. Nibbling away at the end with the snips will take off most of it, a file or rasp might be needed if you’ve got a really big burr that bodes to catch on the yarn. Wire hangers being so plentiful, and with each hanger supplying raw material for two holders, if my cuts are rough, I toss the snipped part and just try again. Cut one end a bit longer than the other so that you have ample length to fold over to make the hook that secures the holder. The last sketch below shows the stitch holder seen in perspective, so you can see how that end is bent:

Again, these aren’t perfect, but they’re cheap.
And what’s in the knitting gadgetpouch I (almost) always keep in my knitting bag? Here arethe contents of my best-equipped one:

The mid-size stitch holder next to the needles and pins is one I made myself from a coat hanger.
Airline travel is the main reason for not having this or a similar pouch of goodies in my knitting bag. Rather than poking through the thing and removing the banned pieces, I tossa spare calculator,tape measure, a couple of stitch markers and whatever else I rememberin the bottom of my knitting bag, but leave the tool pouch at home.
Have you other must-have tools you wouldn’t be without on a daily basis? Let us know!
GADGETS – NEEDLE GAUGES
More observations on little things that make a difference.
This time it’s plain old needle gauges. Why would I need a needle gauge when every needle has its size printed on the side? Well, some needles do and some don’t. Most of my double pointed needles aren’t marked. While many of my circular needles ARE marked, the labels are teeny, difficult to read, and in some cases, pretty much illegible.
I also have a collection of needles accumulated by regular retail purchase, from yard sales, and that have been given to me by friends and relatives. Not all of them are labeled with accurate sizes (the needles, not the friends or relatives). The older needles in particular can vary quite a bit from their imprints. I’ve got 7s,big 7s, and little 7s. All are labeled 7, but some are spot on to the modern definition of 7 as 4.5mm, and some are closer to modern 6s(4mm), and some are closer to modern 8s (5mm). I find the differences useful, as sometimes to get perfect gauge I can slide over to one of my in-between needles instead of going down a full modern size. Sometimes the difference isn’t readily perceptible if I’m grabbing needles and just moving along, but using a small 7 DPNs to start off a cuff but following that up by a large 7 circular when the project’s circumference warrants can lead to all sorts of mismatched gauge problems. But in order toeither take advantage of minute gauge differences or avoid them, I need to know how my needles stack up against a set of standardized sizes. That’s where a needle gauge comes in, and why anyone who has accumulated more than a few pairs of DPNs or needles of specious size should consider buying one.
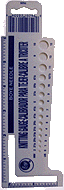
Here’s the most common needle size gauge.The Susan Bates KnitCheckis about 5.5 inches x 3 inches,made from aluminium, and in the US is sold just about everywhere that sells yarn. The little two-inch L-shapedslit for measuring stitch and row gauge is very handy.The KnitCheck isalso very inexpensive:
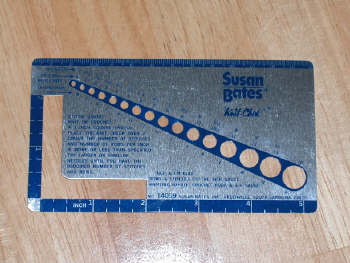
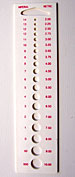
And here are both sides of my favorite one. One side lists the metric sizes, and the other shows the US and the old BWG (British Wire Gauge) sizes. It’s plastic, is about 2.5 x 3.5 inches and is slighty more expensive, but still only a couple of bucks:

Why do I prefer the European gauge from Inox? Because it’s more accurate and more complete. The Bates gauge rates their own needles, and is US-centric. There isn’t as much difference among different companies’gaugestoday as there was in gauges of10 or more years ago, but some small differences still exist. For example, Bates US #6s measure 4.25mm. Other companies’ #6s measure 4mm.
Bates gauges also skip all the interstitial metric sizes that have no corresponding US size.Those extra holes on the Inox aregreatfor measuring my in-between vintange needles and European-origin needles that don’t exist in the modern US scheme of things.For example 2.5mm is between a US #1 and US #2 (2.25 and 2.75mm respectively). The Inox gauge can parse it correctly, but the Bates gauge can’t. The Inox gauge is also smaller, and fits in the box I keep my DPNs. Of course since most of you probably aren’tusing a Glenfiddich Scotch Whiskey box like I do as prime needle storage, this may not be as much of an consideration. Of course ,the Inox model doesn’t have that stitch/row gauge measurement slit or a nifty little ruler down one edge, but I carry a measuring tape in my knitting gadget bag, soneither absence is a big loss.
My only wish is that both of these needlesizers went down smaller than US #0/2mm. I’ve got a stack of DPNs ranging down to 000000 (.75mm) and a gauge that went down that small would be very helpful (of course Bates needles don’t come that small, so they really have no motivation to do so, but Inox needles do). I know there are a couple of brass gauges available on the Web for around $15 US that go down to 0000, but that seems rather pricey. I keep hoping I’ll find a metric wire gauge in a hardware store that’s a bit more reasonable.
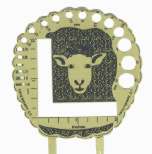
While I’m at it, here are some other pix of needle gauges that I found while web-wandering today. The first two are available mostly in Canada and the UK. The Braille gauge is from anAustralian site that specializes in tools for the visually impaired. And the brass sheep gaugeappears to be a specialty product in limited circulation(Google searching for "knitting needle gauge" sheep should turn up the source).
|
|
|
|
|

GADGETS – STRICKFINGERHUT
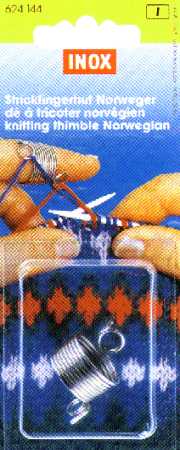
Some people have been curious about the coiled wire Strickfingerhut I mentioned in my post on the Cursed Socks. Here’s a shot of the two most common kinds:
 |
 |
I’veseen mostly these two Inox models, but there are also a couple of others on the market. They are both intended for the same purpose – to assist Continental knitters doing stranded colorwork. Strickfingerhuts hold two (or more) strands of yarn at the same time, allowing the knitterto reach in with his or her needle tip and select the desired color.
I’ve been using one for about six years now, and I can nowknit stranded work in the round at about 90% of the speed at which I can knit single-color stockinette. Before I found my gadget I used to do my stranded work two-fisted, with the dominant or background color being held in my left hand and knit Contiental/picking style, and my contrasting color held in my right hand and beingintroduced in English/American/throwing style.With practice the two-fisted methodwas faster than drop-and-grope, but I never was entirely pleased with my tensioning. I always ended up with puckering as I could never quite get the contrast color yarn to knit as loosely as the main color – especially across the "corners" between DPNs. With this gadget my tensioning is perfect, and even unblocked, my stranded pieces are smooth and unpuckered. I **love** my Strickfingerhut and at this point, detest stranding without it.
After extensive experimentation, I’ve found I the coiled wire version to be better for the particular way I knit. It’s also more comfortable to use. The coiled wire type shapes itself to one’s finger over time. Brand new, it tends to ride a bit further out on the finger than after it has been "broken in." With use the the coils nearer my knuckle expand just a tad and the thing develops an in-out directionality. Although it has a slit in it, the plastic type does not expand overly much, and is too tightfor comfort. The closed end limits the location of the thing on my finger, and makes it feel hot and sweaty.
Comfort aside, in terms of working utility, the way I hold my yarn and needles makes the coiled wire type a clear winner. The coil can be set at any angle. I get the most efficiency by letting the eyelets ride on the front of my left index finger, angled forward so that they’re almost underneath. The two eyelets are offset and separated, giving lots of room for strand selection, and for finagling with the two colors if long floats need to be twisted in. By contrast, the channels of the plastic model must be positioned so that they ride on top of the finger because the little bar that secures them isn’t strong enough to resist bending if the yarn is pulling against it. It holds the yarns flat in the same plane. I find it much harder to both select a strand and to do the weaving in motion over long floats.
Here’s how I hold my yarn and work a normal stitchusing a Strickfingerhut :

In the photo, I’m about to make a stitch with the multicolor yarn. I do admit that in normal knitting my index finger isn’t waving out there so much. I’m holding it further away from the work than normal so that ou can see the separation of the strands.
Now if I were to want to make a stitch with the multicolor yarn but I wanted to strand the black yarn in because otherwise it would be carried over a very long float this is what I’d do:

Instead of just grabbing the multicolor yarn in the most straighforward way, this time I reached up and under the black yarn to retrieve it. Similarly, if I wanted to strand in the multicolor while knitting a black stitch, I’d reach down and under the yellow to grab the black. LATE BREAKING ADDITION: The stitch that’s holding the contrasting color I’ve stranded in will be seated the wrong way. Its leading leg will be in the back of the working needle. I correct the problem and avoid leaving a twisted stitch by knitting into the back of that stitch on the next round.
About the only drawback of these thingies is that it is possible to bend the eyelets and stretch them out over time. The coiled wire ones aren’t as easily broken as the plastic ones with their swivel bars, but I have managed to go through a couple over the years. At this point I keep two. One relatively new one with nice, tight eyelets that I use for sock and sport weight yarns, and another older one with slightly larger eyelets I use for heavier yarns. My only other caution has to do with liking them so much you become dependent upon them. Loss is a big problem, and even though most yarn shops that stock Inox accessories can special-order them, very few keep the wire Strickfingerhuts as regular on-the-shelf stock. When I see one, I usually buy it (they’re very inexpensive, especially for something so totally useful).
What do I do when I can’t find my Strickfingerhut? I admit I’ve never mastered holding two yarns in the same hand without some sort of mechanical aid. If I’m up a creek without my paddle, Iuse a ring with a large stone bezel that I normally wear on my right ring-finger and jam it on that last knuckle of my left index finger. Then I hold my yarns as I usually do, but make sure one strand is on the left of the stone, and the other is on the right. This is much slower than using my Strickfingerhut because the two strands are closer together and aren’t separated by that little angle, but if it means the difference between knitting and not knitting, it will do.
Footnote: Standard disclaimer – no affiliation yadda, yadda…
