JUSTIN’S COUNTERPANE; BLOCKING BOARDS
A couple items from my inbox.
Question on Justin’s Counterpane
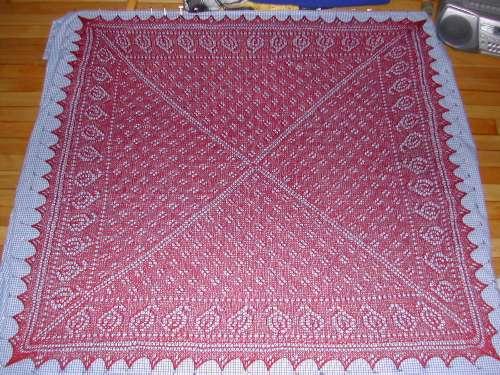
Cindy wrote to say she was having problems conceptualizing how the pieces to make my Justin’s Counterpane pieced blanket fit together. This particular blanket is a large scale intro to white cotton/lacy knitting. Only twelve main units are needed to complete it – six keyhole shaped motifs, and six whole octagons. Ten triangles are used to eke out the sides and make them straight. An optional edging finishes the thing. They’re put together like this:

I did not use additional triangles at the corners to make a true rectangle because it’s easier to go around a more gentle angle without mitering than it is to go around a 90-degree turn. And I didn’t want to go through the bother of mitering my corners.
Because of the relatively few units used and the simplicity of the classic pinwheel motif, I think that people wanting to make a first item in this style might find the pattern useful. Being a blanket, it doesn’t have to fit anybody so gauge is a guideline, not a mandate. It can be worked in any cotton or cotton blend yarn you like. The yarn I chose was a very inexpensive DK weight, but by using the appropriate size needles, a piece of usable dimensions could be made in anything from sport to worsted. Much heavier than that though and you’ll get into weight issues, cotton being quite a bit massive than its equivalent thickness in acrylic or wool. (You could even work this in standard wool or acrylic, but I think the design will be crisper in cotton.)
In any case, some basic guidelines for knitting and seaming together pieced counterpanes include binding the motifs off especially loosely; blocking the units before assembly, by wetting them down and pinning them out while stretching them to their maximum extent; and using whip stitch or when possible, mattress stitch done in half of the edge most stitch to sew them together. Back stitch or mattress stitch done further into the motifs will make the seams too dense and rigid, and may introduce cupping.
Bargain Hunters’ Blocking Boards
Rachel and I had an eMail chat recently. I think it was over on one of the knitting-related boards at Live Journal. She was looking for advice on blocking. In specific, she was looking for low-cost alternatives for blocking. We went through the standards – pinning out on carpet covered with towels or on a padded table or bed, but she wanted a rigid surface that was easy to stow in addition to being inexpensive.
I recommended getting a half-sheet of drywall from the hardware store, taped around the edges to reduce crumble, and topped with a flat sheet through which the pinning happens. I also suggested scouring yard sales or opportunity shops for the squishy/spongy foam pattern/alphabet block floor tiles or play mats favored by the parents of toddlers. They’re indestructible and often outlast the toddler years, landing at second-hand venues. Top those with a sheet and pin away, happy that you’ve found a modular, easy to store solution that as a creative recycle, nibbles away at the waste stream.
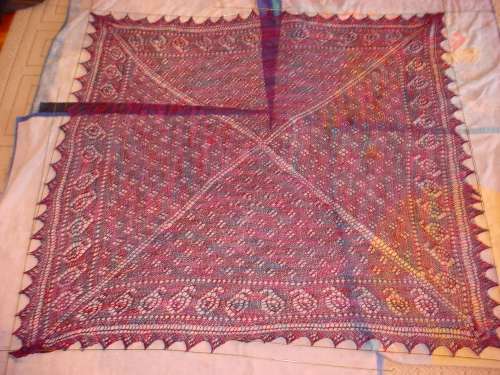
Rachel decided to go with the play mat idea. She sent me a note of thanks, and included this shot of her shawl blocking:

(Photo is hers, used with permission). She also notes that she got her mat at WalMart, and it was less than $20. Love the shawl, Rachel, and as ever – I’m delighted to have been useful.
GALLERY – MORE PAISLEY!
I get a big kick out of seeing what others have made from my patterns
or pattern pieces. It’s a bit like meeting up with old friends
years down the road and finding out what they’ve been up to. I’m
delighted to be able to show off any photos of their work here in the Gallery section.
My latest vicarious bit of happy warmth was provided by my knitpal
Laura Need. She decided to do the Interweave Knits Paisley Shawl
from the Spring ’05 edition, but to finish it off with the simple edging I noodled up. She sent me the picture below and gave me permission to post it:
Laura used Zephyr, and her Paisley pinned out to about 46 inches
square. She did a much more even job of the knitting and blocking
than I did. Plus she had the wisdom to use a solid color.
You can see the difference:
Laura’s paisleys and eyelets really pop out. You can see the edging especially well. The piece’s texture patterning isn’t fighting for your attention with ground color variations. That’s a big improvement. I
took the lazy way out of blocking, using my wires rather
haphazardly and patting them in place rather than pinning them down to tension the work. She did it the more labor intensive way that
produces better results – pinning out the individual points evenly on a
dimensioned blocking surface. (Hers also pinned out to be six
inches larger than mine.)
All in all I’m extremely impressed and quite pleased that Laura found
fun in my minor contribution to this pattern. A great job!
GALLERY – DRAGONFLIES AND FLOWERS
I am so flattered!?
My friend Nancy has done an amazing thing with some graphs from The New Carolingian Modelbook. She took the tulip repeat from Plate 5:1, and the dragonflies from Plate 12:2, some snappy color choices, a good eye for placement, a comfy garment shape, and a true talent for stranded knitting and came up with this:

I’m tickled pink (and blue, and green, and yellow…)
Details on the graphed patterns
Tulip – This pattern was published at least?three times?prior to 1600 (early pattern book publishers freely copied off each other.)? The first appearance of it I’ve found is a book entitled Furm Oder Model Buchlein, put out in Augsburg, Germany, 1524.That makes it from?one of the earliest extant books of graphed patterns. (It’s theorized that broadside sheets were sold prior to entire books of collected patterns, but none of those leaflets survive.) The?other appearances of the tulip pattern?I’ve stumbled on were in Matteo Pagano’s Trionfo Di Virtu, Venice, 1559; and Sessa’s I Frutti, also Venice, 1564.
Dragonflies – This one is my own, inspired by insects appearing in a series of Italian pattern books from the 1530s.

The excellent photo was taken by Nancy’s friend Terri (credit where credit is due). Nancy didn’t tell me the yarn she used, but she’s a frequent visitor – perhaps she’ll see her masterpiece and leave a comment.
For those looking for a copy of TNCM, it’s hard to come by. The publisher did a disappearing act shortly after the book came on the market. Copies continue to trickle out for sale, and it sometimes shows up used or on eBay. Both Amazon.com and abebooks.com list used copies as being available, although some of them are at grasp-the-chest-and-stagger high demand/collector prices.
GALLERY – SOX, TACO, AND MORE
I promised a while back that I’d post pix of finished projects done from the patterns here, on wiseNeedle, or adapted from The New Carolingian Modelbook. I’m tickled to say that I’ve gotten pix from a couple of people recently.
First there’s Frieda, who worked up these little blues from the Tiny Sock pattern I posted here on String. She’s got a red one artfully posed on a present, too. Very cool!

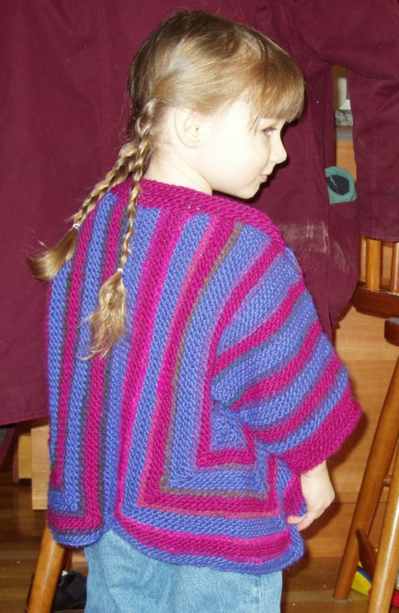
This kiddie-size Taco Coat was done by Dana. She took the general principles of the thing, then invented her own. Great job!
I hope I’m not breaking blog-etiquette by posting the following links, as I’ve been too lazy this afternoon to write and ask permissions from the various original posters. But I’m posting links to the sites themselves, not pirating bandwidth, so it should be o.k.
Works from TNCM patterns can be found in several spots.
- Two handkerchief borders in blackwork embroidery
by the very accomplished Lady Ethelind of Darkwind Keep (an SCA member from Caid) - A magnificent blackwork panel, worked by Linda. Very nice!
I’m also wildly impressed by these knit things:
- See Saw Socks, knit by Marilyn (a pattern I sold long ago to KnitNet, that has been reprinted by them twice)
- Jelly Bean Toe Ups, also knit by Marilyn – pattern here
- The Knitting Geek took the basic texture pattern from my See Saw Socks and adapted it for a beautiful lacy scarf
- Impossible Socks done at a human gauge, knit by Katherine (who in an amazing coincidence, happens to be the highly talented mom of an old friend) – pattern here
Since I’m in this for fun not money, my biggest thrill is seeing what my pattern "children" are up to out in the real world. If you’ve ever knit or stitched something inspired by a work I’ve published, please let me know (and make my day). If you’d like me to post a picture or a link, please let me know, or leave a comment below.
GALLERY
Remember two days agoI said I’d be delighted to show off any projects that other people did either from or inspired by my designs? I’ve started the blog category "Gallery" for just this purpose. First off, here’s a nifty example of a piece adapted from a stitching design in my book:
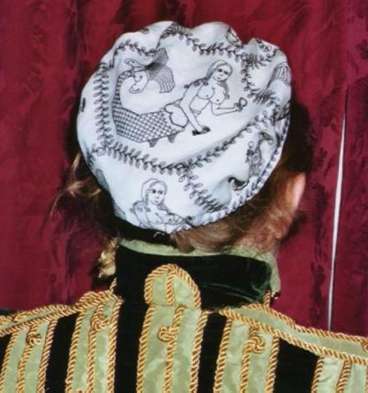
This hat is part of an Elizabethan costume made by a fellow participant in greater Boston, MA area SCA activiites. The stitcher’s SCA name is Lady Lakshmi Amman, and the recipient (and model) is Mistress Morwenna Westerne. Click on the photo for more detail shots ofLakshmi’s work, including graphs forher adaptations ofmy winged undine from Plate 75:1 of The New Carolingian Modelbook. (Lakshmi’s photo appears here by permission.) Because the piece was made to celebrate the artistic accomplishments of Mistress Morwenna, Lakshmi’s undines each carry something associated with Morwenna’s favorite pursuits. There’s an embroidering mermaid, a cooking mermaid, a performing mermaid, and several others. Very clever!
More on Crochet
I’ve gotten some more feedback and help on ways to attach edging and borders to pre-existing filet pieces; and advice on how to better keep 1:1 true square proportionality when forming meshes.
First, advice from Vaire, the Innocent Abroad onmaking my squares square. She says that try as she might, she was never able to achieve true squareness using the base-4 style mesh I’m using. Instead she switched to base-3. That’s one double crochet between the legs of the mesh to form a filled square, and one chain stitch between the legs of the mesh to form an open one (I do two of each right now). She said that this reduced the width spread of her squares.Vaire went on to suggest another method of increasing mesh size: using 3 ch betwen trebles, instead of 2 ch between doubles. This makes a larger, more airy mesh, and opens opportunities for partially as opposed to solidly filled squares (tr, ch, tr, ch, tr). Thank you, Vaire! Both are intriguing ideas, well worth experimentation.
My pal Kathryn also continues to ply me with great ideas too numerous to all list here. Several have been for methods of joining filet sections. There’s been a step-style join that makes a mitered corner. I need to try that one out before I can explain it better. At first I was afraid that my not-square squares would throw the miter off, but used in combo with Vaire’s base-3 idea, it sounds like it would work quite well. She’s also sent me quotations from pre-1920 books that discuss methods like overhand basting to hold sections together; and picking up and working an edging in another style of crochet.
Finally Vaire also suggests using double crochets as horizontal "brides" (reseau) to attach the new bit to the old. This is also a nifty idea, and one I considered, but I was doomed by a poorly planned design choice. I want a two-mesh strip of empty meshes all the way around the piece. I’ve already made that. To do the bride method, I’d have to have done only one, as the row of attachment would provide the second. Since I want most of the joining row to be solidly worked, were I to do it with horizontal double crochets I’d run afoul of the proportionality problem again. Again, thank you! A good idea for a future project, but I’ve pretty much painted myself into a corner on this one.
