INCHING ALONG
Incremental progress on two fronts here at String. First, demolition is now complete. Evil Upstairs Bathroom having been stripped to the studs now finds itself at the very beginnings of build-out. The new larger shower stall has been roughed in, and the electrical work has commenced.

You can see the back side of the lath and plaster hallway walls on the outside of the old wall studs. 1912 was deep in the pre-drywall and wallboard era.
And on the lace shawl, I’m over the half-way mark in constructing the center square. I’ve got only one or two repeats left before my proportions are correct.

I’ve also tinkered a bit with the base pattern, translating it to modern notation and changing the directionality of some of the decreases to sharpen the lines. Since I have changed it somewhat and recharted it, I present the result. Click on the thumbnail below to load a full-size image

The original lacy knitting pattern from The Knitted Lace Patterns of Christine Duchrow, Vol. 1 was presented as part of two complex garment designs – a blouse and a baby bonnet. There are a couple of complementary simple band patterns for cuffs and trim on those projects. Except for the introduction (which provides a helpful translation key for the symbols and some historical German knitting terms), the entire book is in the original German. From what little knitting German I’ve picked up I can tell that even the written parts aren’t quite modern German knitting prose. Like English knitting instruction writing, the conventions in German have changed over time. While I can work from the chart to make my own whatever, it would be an extreme challenge to knit up the blouse as described.
As the editors of this book report, Duchrow was among the first to try to present knitting instructions in graphical rather than prose format. Her graphs are idiosyncratic by modern standards and use letters and symbols rather than visual representations to represent the various stitches, but with a bit of practice her graphs are not difficult to knit from. Even though I can’t read a word of the accompanying text in Vol. I, I’ve ordered a couple more books in the same Duchrow reprint series. If you’re a lace and lacy knitting fiend, you’ll probably have as much fun with Duchrow patterns as I am.
I feel confident I can share the design because I have redacted it into modern symbols, included corrections, and made changes in the pattern as presented. While my graph is recognizable as a variant of the historical one, there are subtle differences. For example, the original graph for this pattern treats all double decreases identically, rather than using directional variants to reinforce the framing diagonals. It also didn’t continue the pattern into the edge areas as uniformly. It also didn’t show the even numbered row. But for all of that, the pattern works up quite nicely even in the original presentation. I share my redaction/correction as tribute to the original author and the editors of this work, to help other knitters bridge from modern instructions to historical ones, and to encourage others to seek out these patterns and knit them without fear.
Interesting conjecture – from the style of the blouse, it would not be a stretch to say that it was current around the time my house was built. For all I know, the original owner may have sat in the library 95 years ago, knitting the same lace patterns I am working from today.
VINTAGE LACE SCARF; ATTACHING LACY EDGINGS
Where have I been? Well, first there was another spate of chaos deadlines at work. Then it was the beginning of Birthday Week here in the String household (they’re 7 years and four days apart, with mine shortly thereafter). And to no one’s surprise, I came down with a nasty flu. I’m not yet over that, but it was severe enough for me to stay home from work – something I’ve done only once or twice in the last decade.
For her birthday Smaller Daughter specified a volcano cake with a dragon on it. She’d seen something like this in a kiddie cookbook – a bundt with a lava-like frosting poured on, surmounted by some clever marzipan decorations. So we made it a group project. I provided the almond bundt with chocolate fudge filling and frosting; Older Daughter molded the marzipan dragon with dried apricot wings; and Smaller Daughter made the strange red prey creatures fleeing from the dragon:

We were hard pressed to find enough room for the obligatory birthday candles. The cake and decorations however were delicious.
I did manage to make some progress on the lace scarf over the last week. I’ve finished the center section, and am working on the edging. It looks like I’ll have to nip into my third skein of Prescott, so I’m thinking of pausing on the edging to go back and add some length to the center section before lapping all the way around that last end. I’m not doing anything fancy here – no mitered corners. I’m just working an extra repeat of the pattern into the cornermost stitch, and hoping that all blocks out evenly later.

UPDATE: THE LACY EDGING BELOW IS NOW AVAILABLE AS A SINGLE PATTERN DOWNLOAD UNDER THE KNITTING PATTERNS LINK, ABOVE.
I played with quite a few edging patterns for this piece, finally settling on the “Doris Edging” from Miller’s Heirloom Lace. It has framed diamonds that exactly complement the center strip. Along the way I noodled up another simple triangle-based edging. This is an out-take, and didn’t end up on the scarf. I won’t violate copyright by sharing Miller’s edging (which I used more or less verbatim), but I will share this one:


Knitting an edging onto a piece isn’t difficult. It helps if your base item was worked with a slip stitch selvage edge, but that’s not mandatory. I’ve knit edgings onto all sorts of things, including finished fulled/felted items, fabric, and leather (some caveats on this, below). The slip stitch selvage just makes it easier. Your chosen trim will have one edge intended to hang free. Most often that will be dagged, serrated, scalloped or otherwise fancified. It will also have one (more or less) straight edge. This straight edge is intended to be sewn or knit onto something else. I like to work in the orientation shown in the knit sample and pattern, above – with my straight edge on the right, and the fancy edge on the left. My right-side rows commence from my main piece outward, and my wrong-side rows return from the fancy edge back to the main piece.
Sometimes I use a provisional cast-on and start my lace rows immediately after it. Other times I use a half hitch cast on, then work one row back in knits before starting my lace patterns. There’s no real rhyme or reason here. It’s just what I felt like doing at the time. In this case, I cast on using half-hitch, and worked a row of knits back, working my first join on that “back from cast-on” non-repeated row. The join itself is quite simple. When I get to the last stitch of my wrong side row, I pick up one stitch in the edge of my established body piece. Then, for the first stitch of my right-side lace row, I either knit or purl that newly created stitch along with the next stitch after it on my needle.
If I knit those two together I end up with a neat column of stitches that makes a visual line between the lace edge and the main body. While this can be desirable in some cases, it does present a different appearance on the front and reverse of the work. Because the lace center of this piece is garter, and the edging is also presented in garter, I used a P2tog to make the join. The front and back of the work look less different from each other if I purl the join instead of knit it. Once the join is made, I work out the remainder of my right-side lacy row, and the return row. So long as I remember to pick up one stitch at the end of every wrong-side/return row, then work that stitch together with the next one as I begin the right side row, my edging will be firmly united with my main body.
Sometimes you don’t want to do a row-for-row join. Occasionally the stretch of the lace edging or the ratio of the edging rows to body rows isn’t 1:1. This might happen if you are working the edging on smaller needles; or if you are working the edging across a row of live stitches (or across the top or bottom cast-on or bound-off edge) rather than along the “long side” of the work, parallel to the main body’s knitting. In that case you may need to either work additional non-attached lace rows every so often, or pick up at the end of the wrong-side/return rows by knitting two body stitches together, again every so often. The former adds more length to the lace, the latter subtracts width from the body. Which method is used depends on the stretch of the body.
The biggest caveat in attaching knitting by knitting on rather than by seaming is that if you do so, the lace is no longer “portable.” Let’s say in a fit of Suzy Homemaker frenzy, you edged out a set of exquisite hand towels. It’s now some years later, and your children have stained those towels beyond recognition, but the edging still looked good. If you had knit the edging separately and seamed it on it would be very easy to remove and re-apply to new towels. But even if you had run a band of slip stitch crochet down the edge of the towel to provide an easy edge for attachment first, if you had knit that edging onto the towel, removing the fancy lace from the towel will be …problematic.
As far as knitting onto fabric, fulled material or leather – it CAN be done. If the edge can be pierced by a needle tip (or was conveniently punched beforehand), you can knit right onto the edge of anything. BUT the warning about not being able to take the lace off again or adjust it later is strongly in effect. If you want to attach a lace edging to any of these substrates, it’s worth it to work one row of slip stitch or single crochet along the item first, then knit (or seam) your knitted edging onto that crocheted foundation row. The foundation row of crochet gives you a stable, evenly placed line of stitches for the joins, and stabilizes the base item’s edge somewhat. It also (in the case of leather) makes working into previously punched holes easier (a crochet hook is much easier to thread through and grab a strand than is a knitting needle’s tip). Plus, if you think the item being trimmed might shrink, consider seaming rather than knitting on so you can make adjustments later.
So. If you plan on using a lace edging again on another item, or you think your base item might shrink – take the time to seam (collars, cuffs, bed or bath linens). If the edging will remain on that piece, living and dying with the item that bears it – consider knitting on instead (knit counterpanes, scarves). To illustrate this post I wish I still had the denim jacket I trimmed out in knitted lace, or the baseball jacket that used strips of recycled fur interposed with white Aran style heavy cables…
In any case, back to sniffling and a nice lie-down.
APPLIED STRIP EDGING WITH MITERED CORNER
I’ve played around some with methods of producing and applying the edge finish to the khaki vest. First I tried the separately knit/sewn on band method, using a couple of different approaches to the seaming (fold band longitudinally, sew the band up, then apply it; sew on both sides in one pass; sew on the display side, then do a separate seam to affix the facing side). Of all of them, the last method worked best, but it was the most effort intensive of them all.
So I looked further. Plain I-Cord (knit on or applied) was too narrow to stabilize the edge, and two courses of it would have been too bulky. I didn’t like the way that picking up along the edge then knitting out looked – especially along the curve of the armhole.
Even more experiments ensued. Finally I landed on knitting-on a strip parallel to the edge, then going back and seaming down the free side on the inside of the piece. Doing that I could produce an edge of any desired width, go around curves and even plan on mitering the vest point corner. Here’s a swatch with a mitered corner. Note that I haven’t sewn down the facing on the inside yet, but natural stockinette curl is keeping it nice and neat. (For some, the inside seaming might be optional, but I plan on doing it on my finished piece).

To miter the corner of this 8-stitch strip, I used short rows. Here’s how I did it:
Applied 8-stitch Strip Facing with Mitered Corner
Start with the public side of the work facing you, holding it with the bulk of the piece on the left, so that you’re working up the right side of the thing (upside down from the picture above). Using straight needles, cast on 9 stitches, then pick up one stitch in the edge of the piece being finished. While the strip is 9 stitches wide, one is consumed during joining, so the part that protrudes is really only 8 stitches wide.
Row 1 (wrong side): P8, k1.
Row 2: S1, k6, ssk, pick up one stitch in edge of swatch
Row 3: S1, p7, k1
Repeat Rows 2 and 3 until you reach the corner, having just completed an odd number (wrong side row)
Row 4: S1, k6, wrap and turn.
Row 5: Slip the wrapped stitch, p6, wrap and turn
Row 6: Ignoring any previously wrapped stitches, S1, k5, wrap and turn
Row 7: Ignoring any previously wrapped stitches, Slip the wrapped stitch, p4, wrap and turn
Row 8: Ignoring any previously wrapped stitches, S1, k3, wrap and turn
Row 9: Ignoring any previously wrapped stitches, S1, p2, wrap and turn
Row 10: Ignoring any previously wrapped stitches, S1, k2, knit the next stitch along with the loop around its base, turn
Row 11: Ignoring any previously wrapped stitches, S the stitch you just knit, p2, purl the next stitch along with the loop around its base, turn
Row 12: Ignoring any previously wrapped stitches, S1, k3, knit the next stitch along with the loop around its base, turn
Row 13: Ignoring any previously wrapped stitches, Slip the stitch you just knit, p4, purl the next stitch along with the loop around its base, turn
Row 14: Ignoring any previously wrapped stitches, S1, k5, knit the next stitch along with the loop around its base, turn
Row 15: Ignoring any previously wrapped stitches, Slip the stitch you just knit, p6, purl the next stitch along with the loop around its base, turn
The corner is complete, return to repeating Rows 2 and 3. Optional finish – seam down the inside edge of this facing.
I’ve stated applying this same edging to the armholes of my vest (having previously seamed the shoulders).

I plan to do the bottom edge next, incorporating the mitered corner on the vest points. But I haven’t played with the buttonhole band treatments yet. Sadly, I have misplaced my copy of InkKNitters. It’s here. Somewhere… Weekend plans include tossing my knitting library to find it.
Oh. Unless a monsoon is upon us, weekend plans also include attending the annual Gore Place Sheepshearing Festival in Waltham, Massachusetts. Not a big festival as fiber fairs go, but very local and lots of fun. Look for me with both Elder and Smaller Daughter in tow.
DRAGONFLY MITTENS – FINISHED PATTERN
UPDATE: THIS PATTERN IS NOW AVAILABLE AS AN EASY TO PRINT PDF, AT THE KNITTING PATTERNS LINK, ABOVE.
My mis-matched mittens are done. Today I present pix plus a write-up and more reliable graphs. I changed the placement of the decreases on the graph. They’re now shown along the side strips rather than on the triangle that forms the mitten top. This eliminates any confusion caused by the double // notation inherited from the original inspiring mitten blank. I’ve also fixed the pattern alignment on them so that they integrate better with their palms and graphed my thumbs out to be a stitch wider than the hole provided for it in the mitten body. I found that I needed to pick up a stitch at the left and right corners of the slit formed when the provisional stitches were removed. If I didn’t do that, I ended up with a hole at either side of the base of my thumb.
First, proof that the mittens are done, courtesy of overly dramatic Smaller Daughter (code name Sarah Heartburn).

She does have very large hands and feet for an 8-year old, a sign that she’ll probably inherit my family’s height (at 5’8″ I’m the shortest female in my immediate family). But the mittens are a bit large on her. I’d call them kids’ extra-large, or teen/small woman size.
Dragonfly/Pomegranate and Knot Mittens
a knitting pattern,
(c) 2007, Kim Brody Salazar, http://www.wiseneedle.com


Materials:
Approximately 1.5 ounces total of lofty Shetland style sport weight yarn, with a native stockinette gauge of about 6 stitches per inch. (This will be knit down to a much tighter gauge to make a warmer mitten). Four colors were used:
- Color A: About 50% of the total – Navy blue
- Color B: About 35% of the total – Light green
- Color C: About 10% of the total – Cranberry
- Color D: About 5% of the total – Light blue.
Size 3.25mm double pointed needles (Two circs or one-circ “magic loop” methods can be substituted). DPNs highly recommended for the thumb.
Scrap of contrasting color yarn or string for thumb “place holder”
Gauge:
8 stitches = 1 inch
Finished measurements:
Mittens measure approximately 4″ across the palm and 9″ from tip to cuff
Instructions:
Using the predominant color and a tubular cast-on, cast on 64 stitches. Work in two-color K1 P1 corrugated ribbing for 2 inches, using Color A for the purl columns and Color C for the knit stitches. Using Color A, knit one row and then purl one row. Using Color D, knit four rows. Using Color A, knit one row and then purl one row.
Using the chart of your choice (below) for stranded knitting, work as shown. The creative will note that given four different and interchangeable mitten sides, any combo thereof would make perfectly suitable mittens – all four as presented needn’t be used. Regardless of the mitten graph chosen, introduce a small bit of waste yarn or string for the stitches indicated in red. Make sure that you mirror that placement for your left and right mittens, as shown in my charts. Alert: On the pomegranate and knot mitten chart, I call for decreases done in Color A. I’ve introduced a separate symbol for those decreases. It’s noted on the chart. End off the mitten at the top by grafting together the last 8 stitches.
Thumb:
Returning to the waste yarn introduced for the thumb, carefully remove it, slipping the live stitches above and below the newly formed slit onto DPNs. Using a third DPN start at the side of the thumb to the right of the newly created hole. Looking at the thumb chart for the visible side of the thumb (the one with the pattern that matches the palm), pick up one stitch in the right side of the newly created thumb slit. Do this in the color indicated for the first stitch of the thumb chart. Note that the thumb pattern should seamlessly integrate with the palm pattern, although each of these mittens does that in a different way. Work across row 1 of the visible side thumb chart. Switch to the inside-the-thumb chart (the one with single stitch checks), again starting with the first charted stitch, pick up one stitch in the side of the thumb slit prior to working across the rest of the thumb chart. Follow chart as shown, grafting the final stitches at the tip of the thumb. Darn in all ends.


JUSTIN’S COUNTERPANE; BLOCKING BOARDS
A couple items from my inbox.
Question on Justin’s Counterpane
Cindy wrote to say she was having problems conceptualizing how the pieces to make my Justin’s Counterpane pieced blanket fit together. This particular blanket is a large scale intro to white cotton/lacy knitting. Only twelve main units are needed to complete it – six keyhole shaped motifs, and six whole octagons. Ten triangles are used to eke out the sides and make them straight. An optional edging finishes the thing. They’re put together like this:

I did not use additional triangles at the corners to make a true rectangle because it’s easier to go around a more gentle angle without mitering than it is to go around a 90-degree turn. And I didn’t want to go through the bother of mitering my corners.
Because of the relatively few units used and the simplicity of the classic pinwheel motif, I think that people wanting to make a first item in this style might find the pattern useful. Being a blanket, it doesn’t have to fit anybody so gauge is a guideline, not a mandate. It can be worked in any cotton or cotton blend yarn you like. The yarn I chose was a very inexpensive DK weight, but by using the appropriate size needles, a piece of usable dimensions could be made in anything from sport to worsted. Much heavier than that though and you’ll get into weight issues, cotton being quite a bit massive than its equivalent thickness in acrylic or wool. (You could even work this in standard wool or acrylic, but I think the design will be crisper in cotton.)
In any case, some basic guidelines for knitting and seaming together pieced counterpanes include binding the motifs off especially loosely; blocking the units before assembly, by wetting them down and pinning them out while stretching them to their maximum extent; and using whip stitch or when possible, mattress stitch done in half of the edge most stitch to sew them together. Back stitch or mattress stitch done further into the motifs will make the seams too dense and rigid, and may introduce cupping.
Bargain Hunters’ Blocking Boards
Rachel and I had an eMail chat recently. I think it was over on one of the knitting-related boards at Live Journal. She was looking for advice on blocking. In specific, she was looking for low-cost alternatives for blocking. We went through the standards – pinning out on carpet covered with towels or on a padded table or bed, but she wanted a rigid surface that was easy to stow in addition to being inexpensive.
I recommended getting a half-sheet of drywall from the hardware store, taped around the edges to reduce crumble, and topped with a flat sheet through which the pinning happens. I also suggested scouring yard sales or opportunity shops for the squishy/spongy foam pattern/alphabet block floor tiles or play mats favored by the parents of toddlers. They’re indestructible and often outlast the toddler years, landing at second-hand venues. Top those with a sheet and pin away, happy that you’ve found a modular, easy to store solution that as a creative recycle, nibbles away at the waste stream.
Rachel decided to go with the play mat idea. She sent me a note of thanks, and included this shot of her shawl blocking:

(Photo is hers, used with permission). She also notes that she got her mat at WalMart, and it was less than $20. Love the shawl, Rachel, and as ever – I’m delighted to have been useful.
1941 VEST – FINISHED
My ultra quick 1941 vest project is finished. That’s 7 days from cast-on to finishing off the final end. Considering I only knit an hour or two a day, that’s lightning quick.


The fit is a bit different from most contemporary patterns. For one, the shoulders are wide and shaped, and the armholes aren’t gappy. My tiny cut-out at the back of the neck rides well with a golf shirt’s collar, and the length is just what he wanted. The fabric is soft and lofty. Since I rarely knit for him and the few times I have the results haven’t been optimal (mostly too big or too warm), I’m delighted to have produced a winner.
On the yarn – I think Cascade 220 is a yarn that’s overlooked in the mad scramble to Merinos. Yes, it’s not a Merino, and doesn’t have that silky hand. But it’s not an itchy or stiff yarn, and knits up quite nicely. The number of ends to finish off are minimized because of this yarn’s superior ability to spit-splice, and the 220 yard skeins. In terms of care, it’s quite pill-resistant. I’ve made several things from it, and have never found any flaws in it. Not so much as a knot. So pause a bit in your haste to knit this stuff up only if fulling/felting is your goal. Try some out for a non-shrunk garment. I think you’ll be pleased with the result.
As promised, here’s a modern pattern for the thing in Size 46. To make life simpler for us all, I’ve used Sweater Wizard to construct it.
Man’s 1941 Style Vest in Garter Stitch, a Redaction from Minerva #46
(c) 2006, 2007, 2013 Kim Brody Salazar

Needles: 7, plus size 6 circs or DPNs for finishing armholes and neck ribbing. One stitch marker.
Gauge:4.5 sts10 rws per 1″ Estimated Ydg: 1212 yards standard worsted weight yarn with a native stockinette gauge of 5 stitches = 1 inch.
Back
With rib needle, cast on 102 sts. Estab rib pat on Row 1: *K2 , P2. Repeat from *. End K2 . Work 29 rws. On row 30, increase as below. [2.75″].
Rib-to-Body Inc Row
6 incs total done this way: Work 14 [inc 1 in next st, work 13, inc 1 in next st, work 14] 2x. [inc 1 in next st, work 14] 2x. (108 sts) With body needle, work in pat st until piece meas 14.5″[row 118].
Armhole Shaping
Bind off 6 sts at beg of next 2 rws. Dec 1 st each side, every other row 5x. Cont in pat st until piece meas 25.5″ from start [row 228].
Shape Shoulders and Back Neck
Bind off 7 sts beg of next row. At beg of next row, bind off 7 sts, work 14 sts, attach a second ball of yarn and bind off 42 back neck sts. Complete row. At beg of next row, bind off 7 sts and dec 1 st at each neck edge.Bind off 7 sts beg of next row. Bind off 7 sts beg of next 2 rws. End off.
Front
Work as for back, including all shaping,and, at the same time when piece meas 16.1″ [row 134]
Begin Neck Shaping
Work to center, attach another ball of yarn and complete row.Turn. Work both sides at once. Dec 1 st at each neck edge every 2nd rw 3x, then every 4th rw 19x. Cont in pat st until piece meas 25.5″ from start [row 228].
Shape Shoulders
Work shoulder shaping (at shoulder edge) to correspond with back.
Armhole Edging
Seam sides. Seam shoulders. With smaller size ndle, pick up 108 sts around armhole edge. Work in K2, P2 ribbing for five rows. Bind off loosely.
Neck Finishing
With smaller circular or dp needles and RS facing, pick up 48 sts from back neck, pick up 60 sts from left neck edge, place center marker, pick up 60 sts from right neck edge, place end of round marker. (168 sts).
Round 1, 3 and 5 – Work first round in K2, P2 rib until two stitch before the center marker. K2tog, slide marker to right hand needle. SSK, continue in K2, P2 ribbing taking care to match the sequence immediately after the centermost decreases to the sequence immediately before them.
Round 2 and 4 – Work in established pattern.
Bind off. Darn in all ends.
ANOTHER REASON TO SUPPORT YOUR LOCAL YARN SHOP
Because they are in irreplaceable source of knowledge.
I swatched out several yarns that I had here in stash, trying out possibilities for my 1941 vest. Everything ranging from some navy/maroon ragg style Bartlett worsted (circa 1998) to a recent find from Webs – a tweedy garnet. The Bartlett is really an Aran or light bulky. I achieved gauge, but the sample stood up like cardboard. The Webs 2/4 Highland Tweed purports to be Aran to worsted in gauge (4.5 to 5 spi) but it knit up like a DK. Again I achieved gauge, but the sample looked meshy and sparse. I suspect that it would have bloomed a bit after I washed it, but in an added complication, TRM mentioned that he liked the color but hated the tweedy flecks. So it was off to my local yarn shop on a fishing expedition.
I went to Wild & Woolly in Lexington, MA – my knitting home-away-from-home. Now Jackie the owner is a knitter with decades more knitting experience than I have. She gave me an important bit of advice. When looking over patterns in these older booklets, don’t go by the gauge any yardage deductions based on just one project. Look at all the projects in the book that call for the same yarn. You’ll probably notice a discrepancy among them. So we did. A couple of the other patterns look closer to true worsted gauge than the light worsted/DK thoughts I had when I walked into the shop. To top it off she also remembers the Minerva (and later Columbia-Minerva) yarn specified. She steered me to Cascade 220 – which is slightly denser and less lofty than the Minerva but of similar gauge. The more airy nature of the Minerva is what threw me off, providing the extra yardage and making the stuff seem like a DK . So I bought some Cascade in a regal heathered burgundy and took it home.
I swatched it up and it was perfect. Spot on for gauge, with a soft hand and drape. So offering up thanks for the entire Wild & Woolly family I set to work on my vest project.
I measured the target recipient, plus one of his favorite store-bought vests that fits well. Then we sat down together and looked at the original pattern, pointing out fit and finish items that made it especially appealing, and other things that we might want to forgo. For example, TRM likes the depth of the V-neck, and the proportions of the waist and armhole/neckline ribbing, but is less enamored of the short length, tailored at the time to compliment pants worn with the higher, more formal waistline of the 1940s.
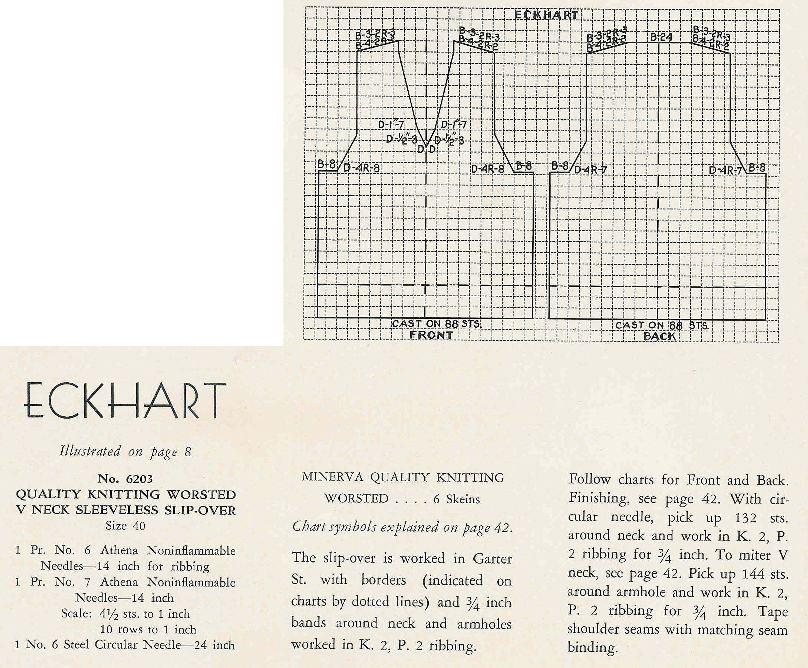
Then I looked at the pattern. I reproduce it here in its entirety, under fair use because I am using it to illustrate how to go about both reading an unusually formatted historical pattern, and how to go about redacting it for modern use.

You’ll notice that the write-up is much shorter than a modern pattern. There’s only one size given, plus a schematic with some notations on it and cursory working notes.
This pattern if translated straight would rely heavily on the schematic. The boxes represent a 1-inch square grid. Instructions on how to interpret notes like B-8 an D-1-7 are elsewhere in the pattern leaflet. Here’s what I start with – my interpretation of the original directions, plus a bit of editorializing.
“Eckhart” – Man’s 1941 Garter Stitch Vest from Minerva Hand Knits for Men in the Service, Vol. 62, size 30
Gauge in garter stitch: 4.5 st = 1 inch, 10 rows (5 garter ridges) = 1 inch
Back: Cast on 88 stitches. Work 3″ in K2,P2 rib. Then switch to garter stitch. Work even until piece measures 13 inches from bottom edge. Bind off 8 at the beginning of the next two rows. Then decrease one stitch at the right and left edge of the work every four rows. Do this edge reduction seven times total. At the end of the armhole decreases you will have 58 stitches. Work these 58 stitches even in garter stitch until the piece measures 11 inches from the under-arm bind off row and you end ready to work a right side row. Form shoulders by binding off four stitches at the beginning of the next four rows, then bind off three stitches at the beginning of the next six rows. Bind off remaining 24 stitches to form center back neck.
Front: Work as for back EXCEPT place a marker between stitch #44 and 45. On a right-side row when work measures approximately 15.5 inches from the bottom edge, knit to two stitches before the marker, K2tog. Then attaching a second ball of yarn, and starting with a SSK, work the rest of the row. Note that this happens BEFORE you finish making the underarm decreases, so watch for it.
You now have each side of the top front on either side of the V opening being completed from its own ball of yarn. From this point on you’ll be making paired decreases on either side of the opening on some right side rows, using a K2tog when indicated on the side that ends at the center, and a SSK on the side that begins at the center. Work three of these decrease pairs spaced approximately 1/2 inch apart (you’ll probably be doing the decreases every 4 rows). Then work seven of these decrease pairs spaced 1 inch apart (probably every 10th row). You will finish these neckline-defining decreases at about the same point where you need to commence the shoulder decreases. Finish the shoulders as directed for the back.
Finishing: Seam shoulders together. Starting at a shoulder seam, pick up 132 stitches around the neckline, taking care to space them evenly, and work in K2, P2 ribbing. Count off the stitches to make sure that the center two that will be in the point of the V end up as a K2 pair, and place a marker between them. Work the mitered join at the center front point of the V-neck by knitting the last two stitches just before the marker, and working a SSK immediately after the marker – do this EVERY OTHER row until the ribbing measures 3/4 of an inch deep. Bind off. Sew side seams. Pick up 144 stitches around each armhole and work even in K2, P2 rib until ribbing measures 3/4 of an inch deep. Bind off and finish ends. If you wish, reinforce shoulder area with a strip of seam binding, sewn by hand to the inside of the sweater to cover the shoulder seams.
O.K. Clear as mud? Now for the kicker. I need to work a size 46, slightly longer, with a bit of a center back neck scoop out (he doesn’t like the straight across the back of the neck bind-off). Plus I want to tinker with the depth of the V. How I do that alchemy is next.
VOYAGEUR’S CAP/LIBERTY HAT/FORAGER’S HAT
My forager’s hat is finished – a nice big modified stocking cap with a blunt end and a double-thick self-lined brim (no ribbing). The only thing left to do is to find out if my re-enactor pal wants the optional big honking tassel at the top or not. Here you see it modeled by Smaller Daughter. This is really an adult size hat. It’s not stretched at all on her head.

I used a very dense deep teal hand-spun yarn 100% wool yarn. I purchased it from an outside vendor at a local spring farm festival held at Drumlin Farm in Concord, MA. This yarn had no name, and the spinner (selling her own products) didn’t include a card with the sale. The gold is a fragment of another single of similar weight. I know that the gold is Merino, but I don’t know the fleece type of the teal, but it’s scratchier than the gold (but not too much so to limit wearing).
My yarn has quite a bit of slubbing, and looks like the color was produced by aggressively combing together black and teal dyed fibers prior to spinning (some of the slubs are clearly one or the other color, others are blended). It’s not bad, but it’s not uniformly good, either. The staple is short and the twist is uneven. As a result it breaks easily. The good news is that it also splices easily. In terms of weight, it counts out to 15-16 wraps per inch, which lands it in between fingering and sport in weight.


You could use a lofty sport, knit down to gauge, or a very dense fingering – something thicker than a standard sock yarn though. I think the Regia and Socka style European sock yarns would be too thin for this. My hat weighs in at about 90 grams, which is about right as I used all of one 50g skein plus a bit more than half of a second. I haven’t made a tassel yet so I can’t estimate how much more yarn would be needed for one.
If you are making a Voyageur’s hat – they were most often deep red. Liberty caps were most often red or blue. Sometimes liberty caps had patriotic mottoes knit into the brim area. “Don’t Tread on Me” would work. An aside – Older Daughter tells me that people wanting to cosplay Link from Legend of Zelda would also want one of these hats, but in green and with a bit more of a pointed rather than rounded end.
This patten is a transcription of my working notes. I haven’t test-knit a second item from them, so mistakes are certainly possible.
Voyageur’s Hat/Liberty Cap In the Style of the Mid-1700s

Materials:
- Roughly 90 grams of a heavy fingering/light sport weight yarn, with a recommended label gauge of 6.5-7 stitches per inch (this does not include any yarn for a tassel)
- Waste string for provisional cast-on
- Double pointed or circular needles – US#0 (2mm)
- Extra circular or double pointed needle to hold stitches while fusing the brim US #0 (2mm) or smaller
- Tapestry needle for ending off
- Five stitch markers
- Optional: A graph of a motto or design that is no more than 30 rows tall
- Optional: A 4-6 inch long tassel made from the same yarn as the hat, and a small holed button (not a shank button) to sew it onto on the hat’s inside as a reinforcement.
Gauge and Dimensions:
- Taken over stockinette on US #0 (2mm) needles – 6.75 stitches and 9.5 rows per inch
- Finished hat will fit most adults. It’s 21 inches across the bottom opening (stretching to fit easily on a 23 inch head). It measures roughly 17.25 inches from brim edge to top.
Using a provisional cast-on, cast on 130 stitches. Distribute on DPNs or if you’re using the two-circ method – onto two circular needles. Knit 32 rounds, then purl two rounds to create a fold line. If you are inserting a pattern follow the optional directions below. If not, skip to the no design instructions.
If inserting an optional graphed colorwork design. Your graph can be worked in stranding or intarsia, but must be no more than 30 rows tall. For best proportions and an authentic look, I suggest single color (plus background) patterns of no more than 20 rows in height. My X is 16 rows tall). In terms of horizontal placement, the hat’s brim finish ensures that there is no visible jag where the cast-on round begins, and there is no front or back, so don’t agonize about centering the pattern in any one particular spot. Subtract your graph’s row count from 32, then divide the result by two. Knit that many rounds before starting your graph. Knit the remainder after the graph is complete. To prepare for the next step, look at your colorwork area. Take a moment to tug any extra loose ends so that the appearance on the front is as neat as possible. If any are particularly unruly, thread them onto a tapestry needle and take a little sewing stitch to secure them. So long as you flick the loose ends right and left so that there is no giant lump of strands in any one spot, you don’t need to take the time to end them all off neatly.
If not working an optional graphed colorwork design. Knit 32 rounds.
All knitters. At this point you are ready to fuse the brim. The knitting done before the fold welt will become a self facing, totally encapsulating any loose ends resulting from the optional colorwork. Unzip or unpick your provisional cast-on, threading those stitches onto spare DPNs or a circular needle.
Hold the work folded at the purl welt with the purl sides inside. Then knit around one row, knitting each stitch from your active needles along with its complement on the needle holding the now awakened stitches from the provisional cast on. At the end of this row you will have the same 130 stitches left on your active needles, and the brim will be completely fused to the hat body with all ends neatly out of sight.
Continue knitting in stockinette (all knits) until your hat measures 8 inches when measured from the bottom of the purl welts at the brim’s opening. On the last round before you begin the decreases, place a stitch marker every 26 stitches
Decrease rounds:
Round 1: (Knit 24, K2tog)5x – 125 stitches remain (You will be knitting to two stitches before the each stitch marker, then working your K2tog)
Knit 10 rounds
Round 12: (Knit 23, K2tog)5x – 120 stitches remain
Knit 10 rounds
Round 23: (Knit 22, K2tog)5x – 115 stitches remain
Knit 10 rounds
Round 34: (Knit 21, K2tog)5x – 110 stitches remain
Knit 10 rounds
Round 45: (Knit 20, K2tog)5x – 115 stitches remain
Knit 5 rounds
Round 51: (Knit 19, K2tog)5x – 110 stitches remain
Knit 5 rounds
Round 57: (Knit 18, K2tog)5x – 105 stitches remain
Knit 5 rounds
Round 63: (Knit 17, K2tog)5x – 100 stitches remain
Knit 5 rounds
Round 69: (Knit 16, K2tog)5x – 95 stitches remain
Knit 5 rounds
Round 75: (Knit 15, K2tog)5x – 90 stitches remain
Knit 5 rounds
Round 81: (Knit 14, K2tog)5x – 85 stitches remain
Knit 5 rounds
Round 87: (Knit 13, K2tog)5x – 80 stitches remain
Knit 5 rounds
Round 93: (Knit 12, K2tog)5x – 75 stitches remain
Knit 5 rounds
Round 99: (Knit 11, K2tog)5x – 70 stitches remain
Knit 5 rounds
Round 105: (Knit 10, K2tog)5x -65 stitches remain
Knit 5 rounds
Round 111: (Knit 9, K2tog)5x – 60 stitches remain
Knit 5 rounds
Round 117: (Knit 8, K2tog)5x – 55 stitches remain
Knit 2 rounds
Round 110: (Knit 7, K2tog)5x – 50 stitches remain
Knit 2 rounds
Round 113: (K6, K2tog)5x – 45 stitches remain
Knit 2 rounds
Round 116: (K5, K2tog)5x – 40 stitches remain
Knit 2 rounds:
Round 119: (K4, K2tog)5x – 35 stitches remain
Knit 1 round
The rounded point:
Continue working (K1, K2tog) until fewer than 10 stitches remain. Break the yarn leaving a 6 inch tail. Thread tail onto tapestry needle, and use the tapestry needle to gather up all remaining stitches draw-string style, pulling them together and securely ending off on the inside of the hat. Affix any optional tassel to this center point, sewing it on through a small button placed on the hat’s inside. This button acts as a reinforcement and decreases the chance of the tassel pulling out or distorting the end to which it is sewn.
BEGINNING TO BECOME HUMAN AGAIN
UPDATE: AN EASY TO PRINT FULL PAGE VERSION OF THIS DESIGN IS NOW AVAILABLE AT THE EMBROIDERY PATTERNS LINK, ABOVE.
I met my major deadline today, and am beginning to decompress. The best way to do that is to think of something completely different, so I’ve begun to contemplate patterns in general, with some idle thought to my Spanish hat. So I began playing with motifs I have lying around. Like this one

I don’t think this particular one is great for the hat, but I have an odd fondness for it, plain as it is. As the source annotation states, it’s one of the patterns I included in The New Carolingian Modelbook. While it looks like it would be at home as a border on the wall of a 1950s era tiled bathroom, it does in fact date back to 1546 by specific annotation. It may well have appeared elsewhere, although most of the da Sera patterns are pretty unique to his books. (If you think pattern piracy is rife these days, you’ll not be surprised by 16th century publishing ethics).
This particular pattern would work as nicely for stranding or for knit/purl textures as it does in cross stitch or other forms of counted thread embroidery. In fact it would have a number of advantages if done in knit/purl:
- Complete reversibility
- Low curl factor – roughly equivalent amounts of knit and purl
- Deep texturing – the knit/purl sections would pull in a bit like ribbing unless strongly blocked
- Ease of memorization – purl rows mimic the lay of the knit rows below them, and there are only two different row patternings, alternating blocks of k2, p2, and alternating blocks of k6, p6
So I put it here in part to make up for the consternation I caused with yesterday’s subject line.
NORTH TRURO COUNTERPANE LAYOUT
[Repost of material originally appearing on 3 August 2006]
First, here’s a picture showing one finished meta-unit, plus one that’s mid-assembly. You can see the swirl hex in the center, plus where the square and triangle units fit.

In the layout I’m using, these meta-units fit together with plain triangles inserted at the point where three meta-units meet.

I suppose I could have made just one big triangle for those spots instead of four smaller ones. That design variant will have to wait for a future blanket. In the next photo you can see how the concept above actually works:

Finally, here are some other arrangements for the same basic units. The swift will note that the one in the upper right is in fact the layout I am using:

In addition to these, the squares and triangles can also be used by themselves, or in combo. LATE UPDATE: The two layouts on the right are in fact different. While both employ entire meta-units, with plain triangles where they meet, the top one butts the meta-units up against each other by uniting the edges of the squares, the other unites the edges of the triangles. The differences are subtle, but the lines of the piece do look different if the lower right hand arrangement is made.
In terms of technique used and hints for seaming – the squares fit stitch for stitch along the edge of the hex. Due to decrease ratios, the triangles are in fact just a bit wide at the base. To eat up that extra width, I play with ease, plus I sew them in using mattress stitch. I take a slightly bigger “bite” out of the triangles’ sides than I do out of the edges of the squares to which I am sewing them. So far it has worked out well enough. Other spots where cast-on/bind-off edges meet are sewn together with whip stitch, picking up the innermost edges of the chains formed by the cast-on or bind off (or if no chain was formed, the equivalent edgemost stitch).
I do note that I’ve gone back and forth several times between working the hex, then sewing on the squares, or working the hex, then working the squares directly onto it’s live stitches. I had forgotten I had done this as I began this summer’s production, but looking at my finished blanket, I’m hard pressed to identfy the abberant sewn-on squares. I’ll go back to the knit-on method on the next meta-unit. In the mean time, I’ll just sit here in the heat and think about knitting, because at over 100-deg F indoors, it’s too hot to actually do anything more than sit in one spot and pant like a dog.
Now. Has anyone else tried the hex yet?
