PROJECT: MAGENTA’S COMING OVER!
No, the kids’ Blues Clues videos haven’t gotten to me. One of my all-time favorites is a sweater done in screaming magenta wool. I did it ages ago, back when I was a regular customer at Washington, D.C.’s late, lamented Woolgatherer in Dupont Circle.
There was a guy helping there who was fantastic. Back then I had the itch to knit, but a ramen noodle?budget. ?I’d walk in, pull my crumpled dollars and left-over laundry quarters out of my pocket and say "I want to make the most magnificent thing I can afford."? And he’d find it. Sometimes we’d find a luxe pattern and a budget yarn, pairing them against all likelihood of success. Sometimes there’d be an odd lot or strange color at an off price, and he’d spend the time to hunt down a project that could be made from that amount. On top of it all, he had fantastic color/style judgement. Not only were his recommendations fun to knit and in my price range, they were also great wardrobe additions in colors that always suited me. He’s gone now – yet another AIDS victim, but I think of him fondly whenever I wear the things he helped me with, or show someone else one of the pointers he shared. Alas, I am truly ashamed to admit that for all the times I visited and all the help I received, I never learned his name.
This item is proof of his expertise. Magenta?? Who can wear something that loud?? It turns out that I can. The yarn is Brown Sheep Lambs Pride. I knit this around ’86 or so from an Aarlan pattern appearing in one of their large-format magazines – possibly from that year’s fall or winter issue (I haven’t found the box with it yet, otherwise I’d be sure).This is?a case where cross-materials substitutions worked well. The original pattern was done in a linen/silk combo. The?yarn?was a very expensive yarn that would have cost me easily five times what the Lambs Pride did. I would never have thought of so drastic a departure back then.The gauges however matched, the wool showcased the texture stitches brilliantly, and the piece just clicked together with no problems whatsoever.

There are several details on it that I’d like to point out. First, note the ribbing. Remember how I said I always liked twisted stitches?? This is the piece that started it. The ribbing is done in P2, K1tbl. That’s what makes the nice, crisp, widely spaced verticals. The color on the detail shot below is closer to real life, although it’s a bit lighter than the original.
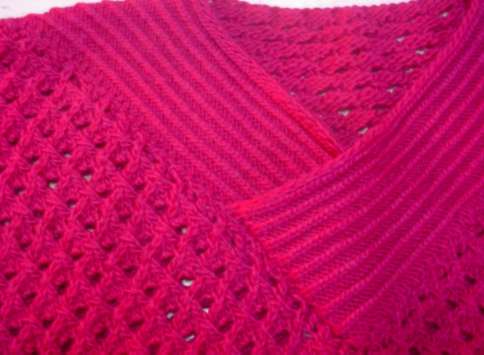
The body is entirely knit in a variant of Wide Waffle (Walker II, p. 152). That’s a stitch formed from a zillion twisted stitches (1×1 cables) plus YO eyelets. Although the pattern was fussy, it was quick to memorize and being on large needles (#9s) was fun and quick to knit. I especially like the contrast of the heavily diagonal, textured?body and the wide bits of crisp ribbing.
The neckline was also done in an unusual manner that was very common on Aarlan pattens of the time. The back of the piece is bound off straight across, with no shaping or edging whatsoever. The front is worked leaving a very wide Vee. Two strips of ribbing are worked as separate pieces (with slip stitch selvedges for neatness, since they show), and are then sewn on to the edges of the Vee, overlapping at the bottom point. It’s an unconventional treatment, and one I was afraid would pose problems of durability, but as you can see – this sweater is still going strong almost 20 years later.
Again, the moral of the story:? if you want your pieces to last, use the best quality materials you can afford; and you can’t go wrong with real wool. That and AIDS has claimed so many of our best and brightest. We miss them all.
ENTROPY IN ACTION – PINK BLANKET DEATH
All good things must come to an end, and it’s nearing that point for the baby blanket I knit 14 years ago for The Larger Child. It was the first piece of lacy knitting I attempted, and?is a combo of the double star keyhole motif from Phillips’?Knitting Counterpanes?(slightly modified); plus a perimiter trim I tinkered up from a standad leaf edging.
Pink?Blanket?wrapped?said child when we brought her home from the hospital, slept with her every night until she was?in Kindergarten,?accompanied us on every family vacation, served as a cape, costume, and tent, survived countless wash/use cycles, and even went off to summer camp with her for the past?four years. Now the nameless cotton it’s made from is finally giving up the ghost.
![]()
The simple slits between motifs where the stiching has come undone are quick and easy fixes. I’ve even grafted and re-knit bits of the border before?where it got snagged. The other holes in the ladder lace upper part of the trim, and in the motif in the lower left however are bigger deals. I’ve still got some of my nameless cotton if I want to try fixing Pink Blanket again. Amazingly, the piece has not faded over the years, so the color match is still good. Still, 14 years of hard wear for an odd-lot yarn bought at a long defunct yarn discount store in Maryland, and a first attempt at a knitting style – that’s not a bad return on my investment.
Follow-up – Blauband Blanket
To follow up yesterday’s Chest of Knitting HororsTM post, the fragment you see is about 80% of the finished blanket. I have enough yarn for two more courses of hexes, plus half-hexes to finish out the sides square. I’m looking for a coordinating yarn just to do a trim around the entire edge. But Nancy’s "outside the box" idea of edging with satin blanket binding rather than more knitting is well worth considering. Thank you!
Frivolity
A friend sent me a link to this game. If you’re into sheep and have time to kill, you can waste hours there.
TWISTING THE NIGHT AWAY
I was showing something about twisted stitchesto a knitting pal the other day, and I thought that other knitters might like to see it too. I know that I’ve discussed them here before as part of the post about knitting backwards, but I’ll recap.

Twisted stitches are made when you knit or purl into the back as opposed to the leading leg of an existing stitch. Sometimes people make them inadvertently when they work a stitch as usual, but that stitch was mounted with the leading leg behind the needle:
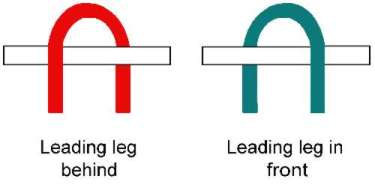
The person I was working with does exactly what my mother does – forming stitches so that she routinely ending up with leading legs behind after working a knit row, then untwisting the stitch on the purl row. Ifmom is working stockinettein the flat, the final product looks like everyone else’s knitting, but ifshe’s working stockinette in the round, they end up with all twisted stitches because there are no purl rows on which to de-twist. My knitting pal was having the same problem. We worked on being able to tell the difference between legs in front and legs behind so that she could choose to either compensate or alter her technique. While learning to recognize and compensate is certainly a good solution, it is a limiting one. To this day my mom prefers knitting in the flat and working intarsia to knitting in the round or doing texture patterns. She especially dislikes texture patterns that do not include rows of plain purling in between the rows in which other manipulations occur. With no plain purl rows to un-discombobulate her stitches, she runs into that same twisting problem.
But twisted stitches aren’t entirely bad. Sometimes there’s good reason to make them. They’re great decorative accents, and have structural uses as well. I happen to like using twisted stitches in my work. In terms of structure, Ifind them particularly useful for working ribbing on cottons, silks and linens because they are a bit firmer than regular knit stitches, and help the ribbings in those fibers keep their shape between washings. That firmness and crispness of line is also a great tool to use in surface decoration. Here’s an example from a pattern available on wiseNeedle.

The pattern is for a lacy blouse with a wide vee neck and clingy fit. The combo of the diagonal lines of openwork and the vertical ribs makes it especially flattering to the zaftig among us. Here the firmness of the twisted stitches is put to use making the cotton yarn hold its ribbed, body-hugging shape. Also the verticals formed by the twisted ribbing really stand out. I chose to do them synchopated, so that the K2, P2 ribs don’t line up after they’ve been intersected by the eyelet diagonal. That movement of line makes the piece more lively, with a more interesting total surface effect. (Or so I think.)
Here’s another nifty use for twisted stitches. In this case, I can take credit only for execution. The pattern is from Reynolds, and was put out around four years ago in a summer book for their Saucy Sport yarn. Look at the nifty way the twisted stitches are used to make the lobster’s outlines, feet, feelers, and to differentiate the textures of the filled-in areas in head, body, tail, and claws. All in all, a very clever design:

Apologies both for the quality of the photo, and for the wear-and-tear on the lobster. This is one of my favorite summer sweaters, and he’s no longer fresh from the trap.
What yarn are these two samples knit in? It so happens that I used the same yarn for both. It’s Silk City Spaghetti, a cotton sport-weight woven tape, now long discontinued. I love this stuff, and even though it does shrink in the wash(my lobster sleeves are now about an inch too short), I’d buy it in a flash were I to find it still available. I do have enough left over from my cones of the khaki and paprika that I might be able to do a shell out of each. Or if I could countenance the resulting color combo, combine them in some sort of a two-tone piece. The jury is still out on the color combo thing.
OTHER PROJECTS – MYSTERY OBJECT
Reaching back into time (and into the bottom of a box that surfaced during unpacking yesterday) I come up with my first-ever attempt at both knitting in the round on DPNs, and at stranded colorwork in the round:
I did ita couple of yearsafter I started knitting, about the same time I began becoming rabid about knitting in general. I used a bunch of Shetland scraps raided from my mother’s stash. Like most samplers I do, I didn’t bother planning or charting anything out before hand, I just did it on the fly, experimenting with technique, color, size of floats, number of DPNs (I tried out everything from 3-6 on this piece), and pattern.
Now. Have you guessed what this thing is? It’s not a mitten or glove. It’s not a sock. It’s not a piece of gentleman’s intimate apparel, either (were it so, the size alone would make it pretty spectacular, athough the itch-factor might be somewhat limiting).
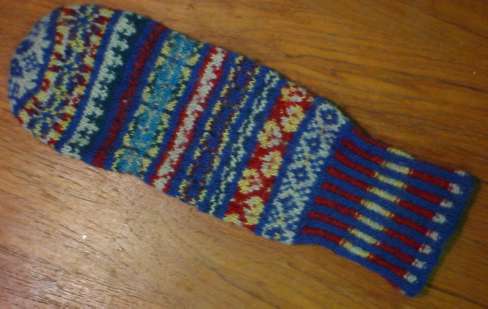
It’s a putter cover I made for The Resident Male. He took up serious golfing around the same time as I picked up serious knitting. No connection between the two pursuits other than this item.
There’s a social history lesson connected with this cover, too. I knit on this mostly at lunch hour at work, and on a couple of business trips because I wanted it to be a surprise gift. My boss at the time saw me knitting away on the thing in the airport, and upon our return to D.C., called me into his office.
He gave me a long lecture on why I should **never** let anyone who knew me in a professional capacity **ever** see me doing needlework. He went on to say that I should **never** wear or display my own products at work, because no one would take me seriously in the world of work if they connected me with domestic pursuits.
To be fair, even though it was the mid ’80s, I was working in a big-time construction/project management firm – in an extremely conservative industry largely devoid of women. But this particular workplace was backwards-thinking in the extreme. To illustrate the mindset there – I once got an employee recognition award given to me in public,with the introduction "And here’s the little lady who put the lie into the statement that you can’t have boobs and brains both."[shudder]
Back to knitting, I can report that I
- blissfully ignored his advice and kept knitting,
- moved on to another employer after it was explained to me that my promotion track as a fem was nil; and
- to this day, proudlywear and display my products everywhere I work.
For those of you born after the Carter administration, the attitude displayed by my former boss was common. Another oft-heard diatribe was that women shouldn’t do needlework, because all forms of needlework were artificesthat restricted women’s sphere of interest and creativity. This attitude was more hurtful, as it largely came from other women. (If you think I’m kidding about this, look into the book The Subversive Stitch by Rozsika Parker.) For a long time this attitude wasin part responsible for the decline in interest in knitting and stitching among younger women.
I am delighted today that things are on the upswing. I can be an aging grrlnerd, and have interests and accomplishments as diverse as fine embroidery, lace knitting, computer gaming,and SCA heavy list fighting, and no one will think the less of me for doing or having done any of them in particular. Now if only I could do something about that "aging" part, as it is having a real drag effect on employability…
PROJECT – MANOS COAT
I was doing some more pre-move packing, and I came upon my Manos del Uruguay coat:
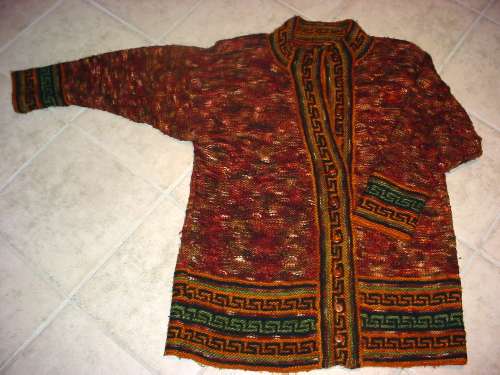
I made it in ’96, as a reward for landing a goodjob after moving from Maryland to Boston. But the project started ten years earlier when I bought some rosewood buttons at a crafts fair in Virginia. It took a long time before I found the right yarn/project to sit behind them.
I started with a pattern in the Manos Book #10, but made quite a few changes along the way:
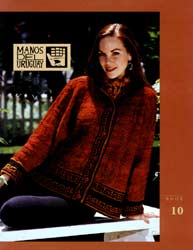
Aside from the trivial change of color (brick/topaz/black/cherryto canyon/topaz/olive/black), I did some redrafting. As you can see from this thumbnail, the original was a cropped jacket, reaching to the bottom of the beltline. Being tall andcurved rather than linear, I wanted something longer.
To add length though posed two problems. The first was that the body of the piece isn’t done in plain old stockinette. It’s worked in a very large non-repeating design of freeform swirls and elongated paisley spots, done in knit/purl texture. The second was that the proportions of the sleeves and edgings would look out of place on a larger piece.
My solution was to draw up an extension of the pattern’s swirly texture. I did that on graph paper, replicating the last ten or so rows of the chart in the leaflet, then going on to add another 75 or so rows. I also redrafted the sleeves and armholes, adding a bit more depth. Finally I extended the slip-stitch motif bands at the button band, lower hem and cuff by adding a few more plain rows of garter stitch between the Greek key design panels, also to help keep the piece in proportion.
I learned a few lessons along the way, the least of which is that wool in quantity is heavy. The original cropped jacket isn’t anywhere near as massive as my coat. In spite of my broad shoulders, I needed to add shoulder pads to make my coat hang properly. The second was about sleeve shape, and it didn’t become evident until a few years had passed. The deep sleeves were more current at the time the piece was knit, and as time goes on are making the fit of the thing look more and more dated. Had I done narrower sleeves I might have avoided this.
I also learned about hand-dyed yarns and skein-to-skein variation. Manos is beautiful stuff. Each skein is one of a kind. This is especially true of the multicolors, like the canyon color I used for the bulk of this piece. The canyon available at that point ranged from paprika through cocoa, with side trips to ecru and run-in-the-rain raccoon. Some skeins were heavy on the lighter colors, some on the darker ones. Before I began knitting, I laid out all my skeins and placed them where I thought the colors would balance. That means I paid the most attention to the right and left cardigan fronts, choosing skeins for eachthat had roughly equivalent amounts of each color. Then I picked complementing sleeve skeins. The remainder became the back.
Knitting purists will note that the swirly pattern I mentioned above isn’t visible in the photo because the yarn I chose for those areas is so variegated. I argue that while it isn’t immediately discernable, it is visible, as the patterning of the purl and knit stitches presents an interesting way to maximize the variations in the yarn. Yes, it’s not immediately evident that what I have there are swirls, but up close and personal, you can see that the piece is textured and the texture accentuates the colors.
While I’m pleased in general with this piece, I’m not 100% satisfied with it.Manos was not the best choice for a long coat. In addition to the weight/warmth issue, it does pill.I planned this cardigan as something to wear indoors at work, but I neglected to think about the abrasion a heavy jacket takes from the rough upholstery of most office chairs. The back of my coat is a mass of pills. (You can even see pills on the front and sleeves on the photo). Very disappointing, but entirely my fault.
I’ve still got someManos left over from my jacket. I’m thinking of using to to make a fulled bag. But that project will have to wait until we’re settled in the new house and I’ve reclaimed my stash.
WORKING REPORT – FULLED PILLOW II
Today I’ll keep it short. My mom found this blog and has told me that I go on so long it’s too much like work to be enjoyable reading.
I’ve finished the garter stitch tube destined to be The Small One’s pillow. I intend to full it as-is, then add some sort of buton or trim to fasten the ends. Although one can never be certain, based on previous experience with this yarn I’m anticipating 40% shrinkage in length and about 10-15% in width. It’s 26 x 14 inches (66 x 36 cm), so I should end up with somethingin the neighborhood of 15.5 x 12 inches (40 x 30 cm). That would let me use a 12-inch square pillow form, in a style similar to the Manos pillow.
Of course, I have to winkle her out of the thing first. She’s taken a liking to it as some sort of kid-specific cocoon:

Which makes me think that knitting up a cuddly tube to use as a nap-sack wouldn’t be a bad idea at all. Hmm….
WORKING REPORT – LACE SCARF; ANOTHER FULLED PILLOW
Having finished the poncho yesterday, I scuff around with what little yarn remains here in the house (my stash being stowed in the storage cubby pending our upcoming move.)
At theGore Place SheepshearingFestival last month I bought two skeins of hand-spunfine gaugeMerinofrom Greenwood Hill Farm. Each is around200 yards so I have about 400 yardstotal. In my opinion it’s more like a light fingering weight than a truelace weight. I bought them with a lacy scarf in mind. No pattern in particular. I thought I’d noodle out one on my own.
I’ve decided to make a piece with two fancy ends, a rather plain but coordinating lacy middle, andtrimmed all the way around with a killer edging.
I swatched on several size needles, and decided I liked the way that lacy stitches felt when knit on a US #6. (That’s an argument that this stuff is trulyfingering weight, because I like lace weight knit on #3s.) Gauge is hard to estimate because I haven’t decided on pattern stitches yet, but I’m not worried about making a scarf fit. The various lacypatterns I played with worked up at between 5.5 and 5 stitches per inch, so I know roughly how wide a pattern I should be looking for to make a scarf of around 5 inches in diameter.
To that end I started paging through some of my knitting books and stitch dictionaries today. I found several things that had elements I liked. First, I found a wide diamond band in Lewis’ Knitting Lace (pattern #42). Nice wide diamond frames, filled with a smaller diamond pattern in the center. It’s a 12-stitch repeat, with 2 stitches before and one stitch after the end repeats. That’s 15 total for one repeat. Narrow, but I’m planning on adding an edging.
To complement the diamond pattern, I’m looking at a couple of simple lace grounds. Right now the leading candidate is a mini leaf pattern from Walker 1 (p.215, #3 in the set), but I’m not sure it will work out. I’d like to use a divider to set this pattern off from the diamonds. I’ve always liked a plain row of YO, K2tog framed by garter stitch welts.
Finally we get to the killer edging. I’m looking at Heirloom Knitting by Miller, the Victorian Zigzag Edging on p. 125. That’s a WIDE piece as written – 20 stitches at cast-on, widening to 26. I might have to eliminate some of the openwork on the attachment side to slim it down some.
The next step is to swatch a bit with each of the given patterns. Before I do that however, I’m going to redraft them using a uniform symbol set and put all the patterns I intend to try out on one sheet of paper. It’s easy enough to adapt to each book’s ideosyncratic style of stitch representation, but it’s a pain to switch gears between systems and flop all those heavyvolumes around while I’m knitting.
I give no guarantee that this process will lead to an Actual Design. I begin two or three of these for every one that ends up as an on-the-needles project.
In the mean time just to have something mindless on the needles for last night’s and tonight’s weekend sofa movies, I took my other Sheepshearing Festival acquisition and cast on for another felted pillow similar to the one I did in Manos del Uruguaywool. This one is also done in the rustic Nick’s Meadow Farm yarn I’ve mentioned before. The pale blue, light moss green, and light butter yellow skeins together cost less than one skein of Manos.
The movies that accompany this excercise in autopilot garter stitch? Last night it was Master and Commander. Tonight it’s John Cleese in Shakespeare’s Taming of the Shrew. If you like either adventure stories or Jane Austin, you’ll enjoy the series of books from which the former was adapted. The movies skipped over the whole drawing-room/social manners side of O’Brian’s books, especially the rivalries in love that divide the two lead characters. As for the Shrew – it’s so non-PC it’s over the top, but it’s also one of my favorite plays. I’m really looking forward to seeing Cleese as Petruchio, and finding out how the actors cast as Katherine and Grumio stand up to him.
Back to knitting. Thumbing through my stitch books I lighted againupon Indian Cross Stitch (Walker I, p. 112), a variant on enlongated stitches. I used itinmy Suede T. It seems that in just the past three months, I’ve seen elongated stitches, including this oneand Seafoam (Walker II, p. 21 ) all over the place,including the latest Interweave Knits and Knitters, Berroco’s patterns, and Lana Grossa’s patterns. Given the long lead time of both magazine and yarn makers’ pattern development cycles, it’s always interesting to see the same idea hit multiple sources at the same time. Shadow knitting cropped up in parallel issues of IK and Knitters a while back. Lacy knitting featuring lily of the valley-inspired textures is another recurring theme (IK led the pack with Forest Path last summer).
About the only explanations for this parallelism I can come up withare that the designing knitting community is quite small; some things are natural fits (elongated stitches work well with ribbons, ribbons are hot right now); and many designers draw inspiration from the same fashion industry sources (deconstructed/slashed looks were big on the runways two seasons ago, and it takes a season or two for runway ideas to percolate into retailknitting patterns.)
So far most sources talk about doing the elongated stitches do them with the multiple wrap method. Can a revival of Condo Knittingbe far behind?
PROJECT – SAMPLER SOFA PILLOWS
There are lots of stitch patterns that look tempting in the various stitch dictionaries on my shelves. Some I’ve been able to place on garments, but others just haven’t worked out – mostly because they were too wide or presented composition problems if used over the topography of a person’s body.
About 8 years ago, right after we moved into the house we’re on the cusp of leaving, I decided to take some of these difficult-to-place patterns and do up two sofa pillows. Anticipating severe pillow-abuse that only homes with small children face, I decided not to spend a lot making them. I got three large skeins of Lion Fisherman Wool from a discount crafts store; and pulled out a pair of US #8 needles and some of my stitch treasuries. I started right in, not worrying much about absolute size.
I chose a bunch of patterns from the treasuries, planning out my pillows around an average gauge of 4.5 spi and a target size of around 15 inches, square. If I was off a bit I didn’t worry, knowing my knit pillow tops would stretch to compensate. Just for kicks, I decided to use different patterns for each side:


If you’re a texture pattern junkie like me, in the top picture you’ll recognize Rocking Cable (Walker 3, p. 130) and Medallions with Cherries (Walker 2, p. 141) framed by Bulky Double Cable (Walker 1, p. 243). The simple lacy edging is adapted from #57 in Classic Knitted Cotton Edgings by Hewitt and Daly (p. 44), but I narrowed it a bit by eliminating the openwork along the top edge.
On the other side of these pillows I used Wheat Sheaves (Walker 2, p. 138); and a combo of Patchwork Cable II (Walker 3, p. 93) and Grand Swinging Cable (Walker 3, p. 91). Note that the Patchwork Cable and Grand Swinging Cable match up exactly in row count. I was able to tuck them in together side by side in a playful combo I intend on using someday for a kid’s pullover. That pillow is also framed with #89 from Stanfield’s New Knitting Stitch Library (p. 59).
Once I had my four sides knit and blocked, assembly was easy – even considering that Iput a zipper in each so I could remove the covers for washing. In fact, if you’ve never sewn a zipper into a piece of hand-knitting pillows are excellent practice pieces. To make life easier, I sewed in my zippers first:

I laid the two squares side by side, and pinned the zipper between them. Then I hand-stitched the zipper to each square. Once the zipper was set, I folded the two squares along it, so that the wrong sides were sandwiched between. Then starting at the foot of the zipper, I worked either I-cord or an edging up along the outer edge of my two matched squares, effectively joining them together at the same time as the edging or I-cord was created and skipping the sew-up-the-pillow step. I went around the three open ends of the pillow, joining as I went. When I got to the zippered side, I worked the edging along only ONE of the squares taking care not to foul the path zipper pull with yarn. My (now camouflaged) zipper nestles along that side at the base of the edging. “Zip open, shove in store-bought pillow form, zip shut” were the final steps of assembly.
To fasten the pillow sides together I used the second of the two I-cord attachment methods I described yesterday. The I-cord edged pillow worked exactly the same way, but instead of picking up both legs of the stitches running down the length of the previous round of I-cord, I held the two sides together and picked up the innermost leg of the edge stitch from each one. This turned the outermost legs inside as a selvedge, and made a nice, neat join without gappy holes.
The pillow with the lacy edging was done in a similar manner. Unlike the I-cord however, I had wrong-side rows on the lace. I did my lace trim, using three plain knits on the straight side as my point of attachment. I ended every right-side row of the lace with SSK, pick up one stitch, just like the I-cord. Then I flipped my work over, slipped the first stitch purlwise, knit 1, and continued with rest of my wrong-side row.
Just like in joining the first round of I-cord to my poncho, for both the I-cord and lacy edgings I had to adjust the ratio of stitches picked up to rows or stitches on the piece’s body. I believe I used needles two or three sizes smaller for both the I-cord and lacy edgings. I also ended up working 4:3 on the sides of the piece and 2:3 along the top and bottom. Experimentation at the outset and a willingness to rip back a few rows and try again are both always required when you’re adding a knit-on edging.
I’m pleased with the way these turn out, and surprised at how well the inexpensive wool I used has held up. The pieces were a bit stiff and slightly real-wool itchy when first knit, but softened up quite nicely when washed and blocked. Sure, there’s some pilling, but these pillows have survived 8 years of slumber party pillow fights, general abuse and spills of all sorts. They’ve resisted stains, and freshen up quite well after a general pill-pluck and washing with Eucalan. My only cautions on the Lion Fisherman yarn are that even washed it isn’t Merino-soft; and that my gauge of 4.5 spi worked but is a bit loose for it in garments. I think it would look better knit a tad more firmly as a true worsted.
PROJECT – DOUBLE KNIT HAT GRAPH
Again apologies to those on the updates mailing list. I did a bit more maintenance, adding categories to all the existing posts so it’s easier to page through this ever-growing mound.
A couple of people have asked for the graph I used to knit the interlace shown on my overly warm teal and black alpaca hat. Here it is.
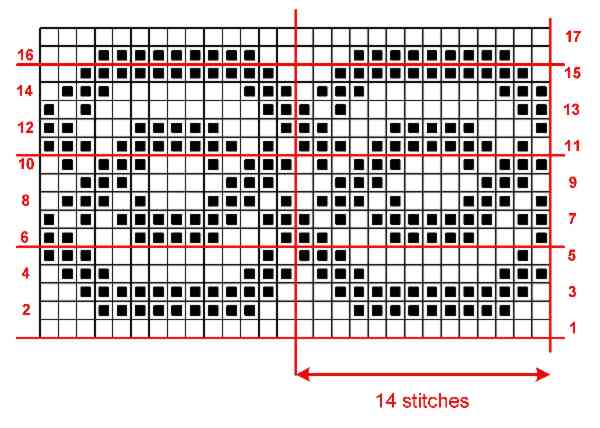
This one didn’t make the cut for my book because it’s one of the designs for which I lost my notes. A long time ago I had a miserable move between apartments. Several boxes were stolen off the back of my truck. Among the things that went missing was a notebook full of source notations for counted embroidery patterns. I had been researching them casually for more than ten years, and had hundreds compiled. The sketches for most of them had already been redone on my ancient Macintosh, but all associated notes remained solely on paper.
When I was composing The New Carolingian Modelbook I had to go back and confirm the exact origins for all the counted patterns I wanted to include. I managed to find the sources for about 200 of them, but a third as many more have eluded me. This particular interlace is from my collection of the lost. It is similar to designs by Matteo Pagano as published in his 1546 book Il Specio di Penfieri Dell Berlle et Virtuoise Donne, but I can’t swear that it came from that or one of his other works. Given the relatively clumsy, heavy spacing and short repeat it might even have been something I doodled up myself after a day of research.
Many of these early Modelbook designs got there by way of Islamic influences (especially patterns cribbed from woven carpets and embroidered textiles). Over the years the patterns drifted away from work worn by the elite to work worn by middle and then lower social classes, eventually ending up in folk embroidery where they never quite died out. Counted thread needlework styles were revived big-time among the fashionable in the mid 1800s. Researchers found and reproduced surviving older pattern books, and began collecting motifs from traditional regional costumes and house linen. Some of the later and folk uses of counted patterns include standard cross-stitch, Hedebo, Assisi-style voided ground stitching, and various types of pattern darning or straight stitch embroidery done on the count.
This pattern can be interpreted in many crafts. Historically accurate uses contemporary with first publication include cross stitch panels (the long-armed style of cross stitch is overwhelmingly represented in historical samples compared to the more familiar x-style cross stitch); weaving, or lacis and burato (types of darned needle lace).
Counted patterns are a natural for knitting. The first book of general purpose graphed designs that listed knitting as a specific use came out in 1676 in Nurnberg, Germany and was published by a woman: Rosina Helena Furst’s Model-Buchs Dritter Theil. (the title is actually much longer). There may be others that predate this book, but I haven’t seen mention of them, and I haven’t seen the Furst book in person. It’s in the Danske Kuntsindustrimuseum in Copenhagen, a tad far for a day trip from Boston, Massachusetts. The entire group of graphed designs displayed in the early Modelbooks shows a straight continuity with the geometric strip patterns found in modern northern European stranded knitting.
The short 14-stitch/17 row repeat of this graph does work well at knitting gauges. I’ve always meant to use this one again on socks -either as-is or stretching it a bit by repeating the centermost column so that it better fits my sock repeat, or doing eight full repeats at an absurdly tiny gauge. As is, you’d need a multiple of 14 stitches around. A standard 56-stitch sock could accommodate 4 full iterations of the design without adding any columns.
Some people have asked how to get a hold of my book. The answer is, aside from the used market where it is going for quite a premium, I haven’t a clue. Sadly all I can report is that the publishers absconded shortly after publication. I have no idea where they went, and have had no replies from them to any queries since 1996. I received only about a year of royalties on the first 100 or so copies, in spite of the fact that the book went through at least two printings with an estimated total run of 3,000. New copies continue to trickle onto the market even today (they’re sold as used but mint). The new-copy seller has rebuffed my attempts to find the ultimate source.
Moral of the story – don’t enter into publication contracts without a literary agent, and if the company has a name like “Outlaw Press” there’s probably a reason.
PROJECT – DOUBLE KNIT FULLED HAT
Not every project turns out perfectly. Some start out well, but end up beinga bitshy of the goal.
Some years back my husband requested an ultra-warm hat. I took him at his word, and settled ona watch capin alpaca. Now, alpaca ismuch warmer than woolto begin with – but I didn’t know that at the time. To make sure thehatwas wind-proof I decided to knit it large, then full it to size. Finally to make sure it was nice and snuggly (and to have an excuse to try out the technique) I decided to do a double-knit hat. That’s not "double knit" as in the yarn weight designation – a yarn that knits up at 22 st=4 inches or 10cm. That’s "double-knit" as in a special technique that produces a fabric of two thicknesses, both of whichdisplay their knit-sides to the world (the purl sides are sandwiched back to back inside, between the layers).Those of us who remember the Leisure Suit ’70s, can think polyester double-knit, but done at hand-knitting scale.
Double knitting is a strange beast. It’s related to the famous sock-inside-a-sock trick described in the book War and Peace. In it the stitches of the two layers alternate on the needle. The knitter either works each layer from its own ball, or uses one ball of yarn to accomplish each round in two passes – first knitting the odd numbered stitches and slipping the even ones, then going back and slipping the odd numbered stitches and purling the even ones. The two-ball method if employed carefully can produce the two separate layers of fabric needed to pull off the War and Peace trick. Using one ball of yarn, or using two colors, swapped back and forth between the layers makes a two-sided fabric that does not separate.
Always being up for a challenge, I decided to use a two color stranded pattern, worked in the round. My intent was to employ only two strands of yarn, trading them back and forth to meld the two layers together into one unit. The result would bethe same design showing up on both sides of the work, but in a positive/negative value trade. On one side Color A would be the foreground and Color B the background, but on the other side Color B would be the foreground and Color A would be the background. You can sort of see the difference between the hat body and its reverse side, shown on the flipped up cuff-style brim:

The knotwork design isan out-take from my book of graphed counted embroidery from pre 1600 sources. I havethis onein the notes I drew upon to compose the book, but my documentation of the exact source wasn’t good enough to include in The New Carolingian Modelbook. I used Indiecita Alpaca Worsted 4-Ply, a worsted weight 100% alpaca yarn imported by Plymouth, and knita bittightly at 5.5 spi. Experienced fullers/felters are beginning to shudder here.
I won’t say I truly enjoyed the knitting. Having to remember that two-stitch groups (one inside and one outside) equalled on box unit while following a complex graphmade the project perhaps a bit overly ambitious. Eventually I muddled through, finished the cap, and with much difficulty – fulled it.
What made the result a disappointment?Several things.
Remember how warm I said alpaca is? Double knitting means that the fabric is two layers thick. This watch-style cap with a folded brim has FOUR layers of fulled worsted-weight fabric in the ear-band area. Although I live in an area of the US known for cold, wet winters I will say that in the eight years I’ve been here there has been only one winter with a solid month of below -10F (-23C) weather, cold enoughto wearthis portablelittlehead-oven in comfort.
Fulling alpaca isn’t as easy as fulling wool. Also, I knit this piece much too tightly for something that was to be fulled. There just wasn’t enough room in the already-densely packedpiece for the stitches to pull together properly. It did shrink, but not as much as Iexpected – especially in width. The hat ended up being a bit too wide for the target head. Plus the two colors didn’t shrink at the same rate. It took many, many trips through the washer/dryer, plus a conserable amount of hand-bashing to even out the fast-shriking teal with the slow-shrinking black. It looks good now, but during the process I think I swore at it enough to provide an entire national navy with suitable vocabularly.
Fulling/felting something, a pattern with fine colorwork detail can be wasted effort. Especially if you’re using a rather hairy and soft yarn to start with. It’s tough to make out the detail of the knotwork patterning in my finished hat. In fact, it’s tough tomake outthat the flipped-up brim is displaying the same pattern in negative.
The upshot of all of this is that I learned some valuable lessons: 1. Save fancy patterns for after I understand the basics of a new technique. 2. Knit loosely if you expect to full a piece to shrink it. 3. Alpaca is extremely warm andmore difficult than woolto full. 4. Colorwork patterning is muddied in fulling. 5. My husband really DIDN’T want an ultra-warm hat. I wear this piece now and he’s much happier with his lightweight Ch’ullu, even on a -10F day.
