VINTAGE LACE SCARF; ATTACHING LACY EDGINGS
Where have I been? Well, first there was another spate of chaos deadlines at work. Then it was the beginning of Birthday Week here in the String household (they’re 7 years and four days apart, with mine shortly thereafter). And to no one’s surprise, I came down with a nasty flu. I’m not yet over that, but it was severe enough for me to stay home from work – something I’ve done only once or twice in the last decade.
For her birthday Smaller Daughter specified a volcano cake with a dragon on it. She’d seen something like this in a kiddie cookbook – a bundt with a lava-like frosting poured on, surmounted by some clever marzipan decorations. So we made it a group project. I provided the almond bundt with chocolate fudge filling and frosting; Older Daughter molded the marzipan dragon with dried apricot wings; and Smaller Daughter made the strange red prey creatures fleeing from the dragon:

We were hard pressed to find enough room for the obligatory birthday candles. The cake and decorations however were delicious.
I did manage to make some progress on the lace scarf over the last week. I’ve finished the center section, and am working on the edging. It looks like I’ll have to nip into my third skein of Prescott, so I’m thinking of pausing on the edging to go back and add some length to the center section before lapping all the way around that last end. I’m not doing anything fancy here – no mitered corners. I’m just working an extra repeat of the pattern into the cornermost stitch, and hoping that all blocks out evenly later.

UPDATE: THE LACY EDGING BELOW IS NOW AVAILABLE AS A SINGLE PATTERN DOWNLOAD UNDER THE KNITTING PATTERNS LINK, ABOVE.
I played with quite a few edging patterns for this piece, finally settling on the “Doris Edging” from Miller’s Heirloom Lace. It has framed diamonds that exactly complement the center strip. Along the way I noodled up another simple triangle-based edging. This is an out-take, and didn’t end up on the scarf. I won’t violate copyright by sharing Miller’s edging (which I used more or less verbatim), but I will share this one:


Knitting an edging onto a piece isn’t difficult. It helps if your base item was worked with a slip stitch selvage edge, but that’s not mandatory. I’ve knit edgings onto all sorts of things, including finished fulled/felted items, fabric, and leather (some caveats on this, below). The slip stitch selvage just makes it easier. Your chosen trim will have one edge intended to hang free. Most often that will be dagged, serrated, scalloped or otherwise fancified. It will also have one (more or less) straight edge. This straight edge is intended to be sewn or knit onto something else. I like to work in the orientation shown in the knit sample and pattern, above – with my straight edge on the right, and the fancy edge on the left. My right-side rows commence from my main piece outward, and my wrong-side rows return from the fancy edge back to the main piece.
Sometimes I use a provisional cast-on and start my lace rows immediately after it. Other times I use a half hitch cast on, then work one row back in knits before starting my lace patterns. There’s no real rhyme or reason here. It’s just what I felt like doing at the time. In this case, I cast on using half-hitch, and worked a row of knits back, working my first join on that “back from cast-on” non-repeated row. The join itself is quite simple. When I get to the last stitch of my wrong side row, I pick up one stitch in the edge of my established body piece. Then, for the first stitch of my right-side lace row, I either knit or purl that newly created stitch along with the next stitch after it on my needle.
If I knit those two together I end up with a neat column of stitches that makes a visual line between the lace edge and the main body. While this can be desirable in some cases, it does present a different appearance on the front and reverse of the work. Because the lace center of this piece is garter, and the edging is also presented in garter, I used a P2tog to make the join. The front and back of the work look less different from each other if I purl the join instead of knit it. Once the join is made, I work out the remainder of my right-side lacy row, and the return row. So long as I remember to pick up one stitch at the end of every wrong-side/return row, then work that stitch together with the next one as I begin the right side row, my edging will be firmly united with my main body.
Sometimes you don’t want to do a row-for-row join. Occasionally the stretch of the lace edging or the ratio of the edging rows to body rows isn’t 1:1. This might happen if you are working the edging on smaller needles; or if you are working the edging across a row of live stitches (or across the top or bottom cast-on or bound-off edge) rather than along the “long side” of the work, parallel to the main body’s knitting. In that case you may need to either work additional non-attached lace rows every so often, or pick up at the end of the wrong-side/return rows by knitting two body stitches together, again every so often. The former adds more length to the lace, the latter subtracts width from the body. Which method is used depends on the stretch of the body.
The biggest caveat in attaching knitting by knitting on rather than by seaming is that if you do so, the lace is no longer “portable.” Let’s say in a fit of Suzy Homemaker frenzy, you edged out a set of exquisite hand towels. It’s now some years later, and your children have stained those towels beyond recognition, but the edging still looked good. If you had knit the edging separately and seamed it on it would be very easy to remove and re-apply to new towels. But even if you had run a band of slip stitch crochet down the edge of the towel to provide an easy edge for attachment first, if you had knit that edging onto the towel, removing the fancy lace from the towel will be …problematic.
As far as knitting onto fabric, fulled material or leather – it CAN be done. If the edge can be pierced by a needle tip (or was conveniently punched beforehand), you can knit right onto the edge of anything. BUT the warning about not being able to take the lace off again or adjust it later is strongly in effect. If you want to attach a lace edging to any of these substrates, it’s worth it to work one row of slip stitch or single crochet along the item first, then knit (or seam) your knitted edging onto that crocheted foundation row. The foundation row of crochet gives you a stable, evenly placed line of stitches for the joins, and stabilizes the base item’s edge somewhat. It also (in the case of leather) makes working into previously punched holes easier (a crochet hook is much easier to thread through and grab a strand than is a knitting needle’s tip). Plus, if you think the item being trimmed might shrink, consider seaming rather than knitting on so you can make adjustments later.
So. If you plan on using a lace edging again on another item, or you think your base item might shrink – take the time to seam (collars, cuffs, bed or bath linens). If the edging will remain on that piece, living and dying with the item that bears it – consider knitting on instead (knit counterpanes, scarves). To illustrate this post I wish I still had the denim jacket I trimmed out in knitted lace, or the baseball jacket that used strips of recycled fur interposed with white Aran style heavy cables…
In any case, back to sniffling and a nice lie-down.
TAMING WILD SOCK YARNS AND USING UP LEFTOVERS
Self stripers, multi-ply color twist yarns, and hand-dyed yarns are lots of fun. There’s a ton of color there to enjoy. But sometimes a vast and unbroken expanse of color play can be boring or can produce some oddly pooled or cluttered results that look nowhere as nice as the yarn did in the skein. That’s why I like to fool around with multicolor yarns, trying to find a way that they play best, or are shown to better advantage. Sometimes it’s not easy (regular readers here know of at least two of my multicolor yarn experiments have landed in the limbo of my Chest of Knitting Horrorstm over the past couple years. But sometimes it is easy.
I finished up a pair of socks as a “chaser” after the vest was done. I used a stash-aged 50g ball of Stahl Wolle Socka Color, in a multistrand twist of maroon, pine, blue, and marigold – #9140, plus another well-aged 50g ball of Patons Kroy Socks in hunter green – #409. While the colors aren’t exact matches, they are close enough to complement each other. Both of these were found in last-ball sales, but several years and many miles apart. Since I need around 80-90g of most fingering weight sock yarns to make a pair, between the two bargain basement balls I had enough to finish and still have leftovers – provided I used more or less equal amounts of each.
My solution was to work heels, toes, and ribbing, plus about a little under a third of the sock’s body in my solid green, plus the remainder in the multicolor. I used very simple seven-row striping repeat, working five rows of multi, and then two rows of solid green (2/7 = about 28% of my sock’s body). I like how the multi is visually broken by the bands of solid green. The end result has at once more contrast and more subtlety than working the whole sock from multi alone, even if I still did contrasting color toes, heels and ribbing.

Of course the other advantage of working simple stripes on socks is to idiot-proof achieving two socks of identical size. It’s very easy to count five row units and two row units. When I had completed ten muticolored stripes, it was time to start the heel, which is much easier than having to count every row or trust in doing a measured or eyeballed estimation of foot length.
So. If you find yourself with odd lots of sock yarn, don’t despair. 100g of fingering weight sock yarn knitting is ample for most socks up to around men’s US shoe size 10.5 or so (slightly smaller if yarn-eating textures are used). You can either work color block style, using up one leftover and then another, or you can stripe. But how wide to make the stripes?
Heels, toes, and ribbing in my standard short-rowed heel sock consume about 25g (a conservative estimate). I have large and wide feet for a fem, so if you are knitting for yourself chances are that you use roughly what I do or less. Weigh it out and set it aside. Then weigh the rest of your leftovers. If you have (for example) 40g of blue, 20g of yellow and 20g of green, you’ve got a ratio of 2:1:1. If you worked a stripe repeat conforming to that ratio (let’s say two rows of blue, two rows of yellow, two rows of blue, two rows of green), you should have enough of each color to complete the pair.
Obviously, I had enough and did complete my pair. And I did have leftovers. As expected, I had a bit more of the multi left than I did the green, because my heels, toes, and narrow green stripes added up to about 60% of total yarn consumption.
MORE ON STRICKFINGERHUTS
Techknitting is posting an interesting series on stranding, and as part of it, mentioned the use of Strickfingerhuts (knitting yarn guides/knitting thimbles), linking back to my original post on the subject.
For those who are unfamiliar with them, they are those gizmos that sit on the end of the left hand index finger, that are used by Continental style knitters (pickers) to hold and separate two or more yarns while doing stranded colorwork.

Adding some more detail on the subject, I’d like to address a problem TK points out as being common among those who hold two yarns in one hand while stranding – differential feed.
If a row has more or less equal numbers of stitches of both colors, both yarn strands are consumed at the same rate. But if a row has lots of Color A, but very little Color B, A will be eaten at a much greater rate, eventually causing the knitter to readjust his or her grasp of the yarn to even things out.
Those of us who do use Strickfingerhuts find that the differential feed rate problem is greatly minimized compared to trying to hold both yarns in the left hand unassisted. Yes, eventually the difference in yarn consumption catches up with us and we have to yank the strands even, but no where near as often.
We do however find that over time we prefer to put the dominant color (the color most represented on a row) in either the left or right eyelet to minimize the feed problem. There’s no hard and fast rule to this, it’s a matter of personal preference.
In stockinette in the round, I prefer to have the dominant color in the right eyelet, and the less represented color in the left. This helps when I lock in my floats:

Although I usually work stranding in the round, occasionally I have to do it in the flat. If I’m knitting stockinette in the flat using a Strickfingerhut, and I’m on the purl side, I prefer to have the dominant color in the left hand eyelet.
For the record, I notice no difference in the appearance of the finished product if I mix eyelets – sometimes putting the dominant color in one, and sometimes in the other. I do however note that some other Strickfingerhut users do, and advocate always keeping the background color in the same eyelet regardless of its relative dominance on any one row. Again, experimentation is your friend.
APPLIED STRIP EDGING WITH MITERED CORNER
I’ve played around some with methods of producing and applying the edge finish to the khaki vest. First I tried the separately knit/sewn on band method, using a couple of different approaches to the seaming (fold band longitudinally, sew the band up, then apply it; sew on both sides in one pass; sew on the display side, then do a separate seam to affix the facing side). Of all of them, the last method worked best, but it was the most effort intensive of them all.
So I looked further. Plain I-Cord (knit on or applied) was too narrow to stabilize the edge, and two courses of it would have been too bulky. I didn’t like the way that picking up along the edge then knitting out looked – especially along the curve of the armhole.
Even more experiments ensued. Finally I landed on knitting-on a strip parallel to the edge, then going back and seaming down the free side on the inside of the piece. Doing that I could produce an edge of any desired width, go around curves and even plan on mitering the vest point corner. Here’s a swatch with a mitered corner. Note that I haven’t sewn down the facing on the inside yet, but natural stockinette curl is keeping it nice and neat. (For some, the inside seaming might be optional, but I plan on doing it on my finished piece).

To miter the corner of this 8-stitch strip, I used short rows. Here’s how I did it:
Applied 8-stitch Strip Facing with Mitered Corner
Start with the public side of the work facing you, holding it with the bulk of the piece on the left, so that you’re working up the right side of the thing (upside down from the picture above). Using straight needles, cast on 9 stitches, then pick up one stitch in the edge of the piece being finished. While the strip is 9 stitches wide, one is consumed during joining, so the part that protrudes is really only 8 stitches wide.
Row 1 (wrong side): P8, k1.
Row 2: S1, k6, ssk, pick up one stitch in edge of swatch
Row 3: S1, p7, k1
Repeat Rows 2 and 3 until you reach the corner, having just completed an odd number (wrong side row)
Row 4: S1, k6, wrap and turn.
Row 5: Slip the wrapped stitch, p6, wrap and turn
Row 6: Ignoring any previously wrapped stitches, S1, k5, wrap and turn
Row 7: Ignoring any previously wrapped stitches, Slip the wrapped stitch, p4, wrap and turn
Row 8: Ignoring any previously wrapped stitches, S1, k3, wrap and turn
Row 9: Ignoring any previously wrapped stitches, S1, p2, wrap and turn
Row 10: Ignoring any previously wrapped stitches, S1, k2, knit the next stitch along with the loop around its base, turn
Row 11: Ignoring any previously wrapped stitches, S the stitch you just knit, p2, purl the next stitch along with the loop around its base, turn
Row 12: Ignoring any previously wrapped stitches, S1, k3, knit the next stitch along with the loop around its base, turn
Row 13: Ignoring any previously wrapped stitches, Slip the stitch you just knit, p4, purl the next stitch along with the loop around its base, turn
Row 14: Ignoring any previously wrapped stitches, S1, k5, knit the next stitch along with the loop around its base, turn
Row 15: Ignoring any previously wrapped stitches, Slip the stitch you just knit, p6, purl the next stitch along with the loop around its base, turn
The corner is complete, return to repeating Rows 2 and 3. Optional finish – seam down the inside edge of this facing.
I’ve stated applying this same edging to the armholes of my vest (having previously seamed the shoulders).

I plan to do the bottom edge next, incorporating the mitered corner on the vest points. But I haven’t played with the buttonhole band treatments yet. Sadly, I have misplaced my copy of InkKNitters. It’s here. Somewhere… Weekend plans include tossing my knitting library to find it.
Oh. Unless a monsoon is upon us, weekend plans also include attending the annual Gore Place Sheepshearing Festival in Waltham, Massachusetts. Not a big festival as fiber fairs go, but very local and lots of fun. Look for me with both Elder and Smaller Daughter in tow.
INTARSIA IN THE ROUND
After yesterday’s post on my Galaga Hat, I’ve gotten a couple of questions about the method for working back and forth seamlessly to make a tube. In specific, some people wanted to see illustrated how I make the wrap and turn join. I try to oblige them (click on pix to see them larger):


I’ve shown just the knit-side round. The purl side round works in exactly the same way. Work to the marker, making sure to work the last stitch before the marker along with the loop around its base, shift the marker over, wrap the stitch after the marker, flip the piece over, return the marker to the right-hand needle, and continue with the rest of the round.
Why go through all this trouble?
I don’t have enough yarn to strand around the entire piece. Nor do my motifs span the entire circumference of my hat. I am in effect working spot Intarsia motifs (actually I’m stranding between them, but limiting that stranding to the spot motifs). Rather than cut the yarn at the end of each motif, or stretch it back to the beginning of the spot design on each row, I am working the equivalent of flat knitting – going back and forth, alternating rows of knit and rows of purl. When I purl or knit back to my spot motif, my contrasting color ends are on the correct side of the motif for the next round. But I hate sewing up, and want to make a hat without seams. Rather than knit this totally flat (a valid option), I’m using wrap and turn to make the join at the end of each round.
WORKING AT THE SAME TIME
I had started this post back when I was up to the shoulders of my ribbed leaf pullover, but life intervened and it languished. Also, the diagrams ended up taking more time than I thought they would. For the record, I write these entries mostly in the half-hour I steal in the morning after breakfast, while my kids are getting dressed for school. Some of the longer and more illustrated ones can take a couple of days to pull together. Yet another reason why my blogging rate has fallen back since leaving the world of consulting for full-time employment.
For the record, I’m now just a couple of rows away from completing the sleeves of the ribbed leaf pullover. I’ll use the piece to do some assembly and finishing posts later this week and next.
————————
Some deadlines have passed, others remain. I did have an hour or so of knitting time last night, which I used to excellent effect, both for some much needed relaxation, and to advance my leaf pullover. I am now finishing up the front, at the point where the centermost stitches are set aside and the shoulders are completed.
Now this stage of production is one that has inspired a huge number of wiseNeedle advice board questions. The directions to join in a second ball of yarn and knit both shoulders at the same time tend to confuse people who are new to knitting. Here’s the basic concept. My postulated directions say something like
Work across 25 in pattern, place center 20 on holder, attach second ball of yarn and work remaining stitches; continue in pattern and commencing on the next wrong-side row, working both sides at the same time, decreasing 3 stitches at each neck edge 2 times, then 1 stitch at neck edge three times. Continue until piece measures 20 inches from bottom and bind off.
Here you see a basic sweater front (or back), knit in green yarn bearing a big R in the center so we can keep track of the right (read public) side. You see all 70 stitches on one needle, ready to commence a right side row.

At this point, I’ve followed the direction to “Work across 25 in pattern, place center 20 on holder”. Note that the stitches on my right hand needle have been completed.

Now I’m beginning the part that confuses many beginners, “attach second ball of yarn and work remaining stitches.” It’s not difficult. We’re going to do the left and right shoulders simultaneously, mirroring all shaping so that they are symmetrical. The stitches on the holder form the bottom of the neck opening. Sometimes the pattern specifies that they be bound off, other times it asks that they be placed on a holder so that they can be used “live” to form the collar. In either case, they are now parked and won’t be touched again until the pattern revisits collar production and finishing.
Take another ball of the same yarn and starting with the stitches on the far side of the stitch holder, finish out the row. Leave enough tail at the neck edge for easy finishing later. This next diagram shows the work after I’ve completed the “work remaining stitches” bit. I’ve finished my right side row.

The diagram below shows the work flipped over to work back across the wrong side (the non-public side). I’ve got my two balls of yarn set up, one for each shoulder area, and I’ve indicated the spots where the decreases should happen.

We’re up to continue in pattern, working both sides at the same time, decreasing 3 stitches at each neck edge 2 times.” The pattern is now directing the shaping of the neckline. When a pattern calls for decreasing more than one stitch at an edge I usually bind off at the beginning of a row. Yes, that makes a stepwise decrease, but as you’ll see I minimize the jaggedness a bit. The only exception to this is if I’m working in a giant superbulky (3 stitches to the inch or fewer). In a yarn that big, the steps can be quite noticeable. But back to 99.99% of all knitting.
To accomplish my first set of bind offs I have to remember to work my rows in pairs beginning on a wrong-side row- two rows each with stitches bound off at the beginning yields symmetrical decreases at the right and left edge of the work. In the diagram above, I am poised to begin my initial shoulder decrease. I have worked back across the first bunch of shoulder stitches, ending at the neck edge. No bind-offs yet. But as I begin the second set of shoulder stitches I bind off the first three, then continue across the row. Then I flip the work over to begin my right-side row, work across the shoulder side I just decreased, and perform a similar decrease on the other shoulder

At the end of my second decrease row (in this case, a public side row) I finally have symmetrical decreases on either side of my neck edge, formed by binding off stitches at the commencement of two successive rows. My bind offs are a bit jagged and step like, but that can be diminished somewhat by slipping rather than working the first stitch bound off prior to ending it off.

I am ready to go on to the next direction in my instructions. It says to decrease “1 stitch at neck edge three times”. It doesn’t say to do this by binding off. I could do it that way, and many patterns say so. But I don’t like the jaggies formed by binding off. If I’ve got only one stitch to get rid of, I’ll use plain old K2tog and SSK decreases. Depending on the pattern, I might work them in the edgemost stitches, or in the next-to-edgemost stitches, allowing them to form some sort of decorative detail. Also unlike the bind-off style decrease, there’s no logical reason to separate these between two successive rows. I generally work them on the same row. Most of the time that’s a right-side (public side) row, but in my current project – a piece with heavy texture patterning – it’s easier to do them on the plain purl worked wrong side, using P2tog and P2tog through the back of the loop so as to produce the same effect on the public side as K2tog and SSK. In any case, I place them on either side of the neck edge, creating the curve that is the foundation for whatever collar treatment is specified by the pattern in hand.
An aside: It’s interesting to note that older patterns more commonly suggested completion of one shoulder and then the other rather than knitting them in parallel. Most often those pattens gave directions for the first shoulder, and then said something like “repeat for second shoulder, reversing shaping as necessary.” (A direction that caused me to blink in wide-eyed terror while knitting my very first sweater.) There’s no reason why patterns written in that style can’t be worked in the “at the same time” method. I prefer the two-together method because it’s how I idiot-proof my own knitting to ensure that my shoulders end up being exact cognates of each other. But not everyone likes working this way.
Reasons to stick with the older method might include the unavailability of a second ball (if for example you are working off one immense cone of yarn and don’t want to break it to create a second ball); or the need to concentrate on one set of shaping directions at a time. So long as the you take care to make sure that row counts are the same and that placement of the decreases is a parallel as possible, working one shoulder at a time is a perfectly legitimate way to go. There’s no shame in working the one at a time method, it’s just a matter of mental wiring and personal comfort.
TUBULAR CAST-ON; LEAF SWEATER PROGRESS
June over at Twosheep recently wrote about a tubular cast on. That sent me off looking up various ones. June recommends the one from Montse Stanley’s Readers’ Digest Knitters’ Handbook, although she notes that doing it in stockinette is not as stretchy as doing a ribbed tubular cast-on. She gives links to a couple of nicely photographed instructions at My Fashionable Life, and Little Purl of the Orient. I don’t have that particular Stanley book on my shelf, but I use an entirely different tubular cast on than the one described at those sites and in the book.
I learned an at once more fiddly and simpler method for a ribbed tubular cast-on during the second sweater I ever knit – Penny Straker’s Eye of the Partridge unisex raglan. Straker’s pattern format included a side bar with helpful advice or bonus illustrations of techniques and tricks. This one included instructions for the cast-on I did Partridge as a gift for one of my sisters. I knit it in Germantown worsted (very much like Cascade 220), in an dusty antique rose and a deeper, almost blood rose for the darker complementing color. It’s long gone now otherwise I’d put a photo here instead of the sample photo from the pattern, shamelessly lifted from a web-based retailer (the pattern itself is still available, and also comes in a kids’ version).

Straker’s method calls for using a provisional cast-on, and casting on half of the stitches called for in the pattern. If for example, the pattern asks for 100 stitches, I cast on 50. Then I knit in plain stockinette for four to ten rows (usually 6). At the completion of the last row, I unzip my provisional cast-on, and place all the newly freed stitches along the bottom edge onto a second needle. I often use a needle one size smaller than I used for the stockinette piece to make this easier.
I now have a long, skinny snake of knitting, suspended like a hammock between two active needles. I hold the needles so that the strip is folded in half, with the purl side on the inside. Then I take a third needle and alternately knit one stitch off the needle closer to me:

and purl one stitch from the needle that’s further away:

(Pictures courtesy of Younger Daughter, already at 8 as good a photographer as her mother will ever be)
When I’m done, I have a nice, neat, stretchy tubular edge in K1, P1 rib that can be made wide enough to accommodate a drawstring. I use this routinely for almost all of my hem edges – even for circular knitting. I’ve made the small divot at the join into a design feature on some pieces where I’ve started my cast-on at the neckline. On others, I’ve used the dangling tail to snick it up and make the starting point invisible.

In this case, I broke into twisted rib the row immediately following the cast-on row. How’s the leaf sweater coming? The front of it is starring in the cast-on photos, above. Here’s the back – blurry and hard to see, but proof that I’m done with it. Also proof that yes – a texture pattern that’s mostly stockinette will also curl.

For the record, here’s a bit of detail in which you can barely make out the texture pattern and the armhole decrease area (click on this for a close-up):

And because I’m still sniffing around for a small project to run in parallel with my leaf sweater, plus I’m having fun with my ancient Unger Britania– I’ll take another lead from June. It’s mittens next. The shape of a traditional Norwegian mitten looks pretty simple, yet with ample scope for fun. Hello Yarn offers a PDF of a blank mitten graph. I think I’ll take that idea and run with it – redrafting the template for a smaller gauge, and using some of the historical graphed charts from my book on embroidery. If nothing else, I’ll enjoy the doodle time.
STUPID I-CORD (AND EDGING) TRICKS, PART II
A quickie today.
There have been a few times when I’ve wanted to work I-cord (or a knit edging) onto the perimeter of something, completely encircling it, and ending up by grafting the final live stitches onto the original cast-on row with the hope of creating as near seamless a join as possible. Here’s an example:

To date when I’ve needed to do this, I’ve either knit several rows extra of the I-cord “free” prior to beginning to apply it to the edging, or I’ve used a provisional cast-on with waste yarn for wider knit trims. Working several rows of extra I-cord gives me a snip zone I can cut and then ravel back to produce the cast-on edge live loops I need for grafting. I suppose for narrow trims, I could do a similar thing – knitting several rows of plain garter or stockinette prior to beginning simultaneous application to the thing being trimmed and commencement of my trim pattern. A judicious snip and ravel back will reveal those live loops just as nicely as working sacrificial to-be-cut I-cord does.
But I had a “doh!” moment last night. Why not just cast those few first stitches directly onto a large safety pin or small stitch holder? Unclasp, transfer stitches onto a live needle, and go! To do this, I’d use the simplest of provisional cast-ons, starting out by holding my strand behind my stitch holder and picking one stitch up knitwise, then I’d shunt the yarn to the front of the holder and with my needle tip in back of it, pick up one stitch purlwise, and so on.
Here are seven stitches picked up on a stitch holder:

It looks kind of like the figure-8 cast-on I favor for toe-up socks:

EXCEPT that by picking up the stitches instead of winding the yarn around the needles I’ve managed to mount every other stitch with the leading leg in back. Not a problem. I’d work one corrective row of purls back before beginning my edging, and on that row, I’d purl into that back leading leg to eliminate any inadvertently twisted stitches. Or I could reverse the direction of the stitch holder and wind the yarn on exactly the same way as I do for my fig-8 cast-on, eliminating the problem entirely.
LEFT TWIST AND RIGHT TWIST
I got a note yesterday from someone who commiserated at the slow going doing a piece so full of left twist and right twist 1×1 cables, and who wanted to know if there were other ways to do them.
There are several ways to go about it. Some are documented in B. Walker’s stitch treasuries, others elsewhere. The first and most obvious is to do a plain old 1×1 cable, slipping the stitch that needs to go in back onto a cable needle or spare DPN, working the one that needs to land on top, then returning the slipped stitch to the active needle and working it, too. Nice and neat, but time consuming.
Some people have a knack for working these small cable crossings without using a cable needle or other aid to hold any stitches. This works best in a nice, cooperative and slightly sticky wool, but with practice can be employed in most other materials, too. Famous Wendy is especially good at it, and has a nice tutorial on no-needle cables on her website. Although it is employed there for a 3×3 cable, the same principle holds for a simple 1×1 twist. Grumperina also has an illustrated no-cable-needle tutorial. Her method is slightly different and works well, too.
But being a klutz and prone to dropping stitches, I prefer some of the other less adventurous methods. My irrational preference here is sort of like people who prefer to keep their fingers on the keyboard while using a word processing program, disdaining use of the mouse in favor of key command sequences.
Here are a couple of other ways to make 1×1 twists. B. Walker advocates the second method described below for each (the ones I attempted to illustrate). As with most cases in which there are several ways to accomplish the same thing, experimentation is always a good idea. Different methods will give different gauges and depending on the materials used, may have an effect on fabric drape and loft. If you’ve got a pattern that’s heavily dependent on LT and RT, take a moment to play with the various ways to accomplish them when you are swatching. You may find that one of the many ways to produce them works best for your project in hand.
Left Twist (LT) Methods – Rightmost stitch ends up on top
- Identify your two-stitch unit. Skip the first stitch and knit into the back of the second, then knit the skipped stitch through the back of the loop and slide the entire unit off your needle.
- Identify your two-stitch unit. Skip the first stitch and knit into the back of the second, then knit BOTH stitches together through the back of the loop and slide the entire unit off your needle
Knitting into the back of the second stitch
Knitting both together
Completed twist unit


Right Twist Methods – Leftmost stitch ends up on top
- Identify your two-stitch unit. Skip the first stitch and knit into the front of the second, then knit the skipped stitch and slide the entire unit off your needle.
- Identify your two-stitch unit. Knit both stitches together, but do not remove them from the left needle. Knit the first stitch again, and slide the entire unit off your needle.
Knitting both stitches together
Knitting the first stitch again
Both completed twists (placed a couple of rows apart, they make up the C shape in the center of the mini-swatch)


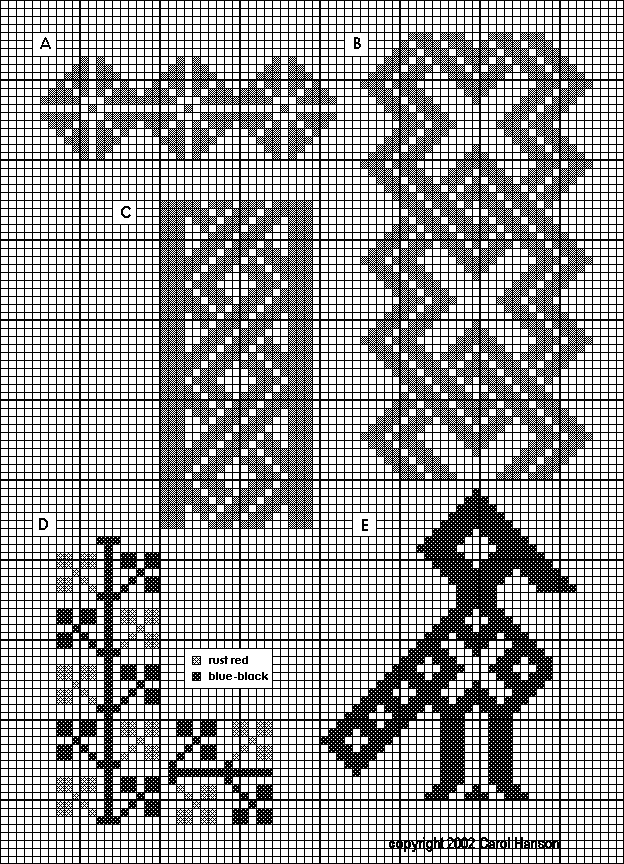
INTERESTING 18TH CENTURY CAP – ORNAMENTAL WRAPPING
A person posting on one of the historical knitting lists asked a question yesterday about this 18th century Spanish knitted cap. I’ve poked around the Victoria and Albert Museum’s on line photo collection, but I hadn’t taken the time to zoom in and look closely at this particular item.
At first glance the cap appears to be covered with knit-purl texture patterning, but if you zoom in (and especially if you have the ability to get an even closer look at the image) you’ll see that the texture isn’t formed by knits and purls. Instead, the design is made up of some sort of stranding that floats over a stockinette background. The question was about how this might have been done. Unfortunately, we can’t see the back of the work. So I got to thinking…
The most obvious way would be for someone to work up a plain stockinette cap, then hand-stitch the floats over counted stitches, to produce a diapered or pattern darned effect. This would certainly work, but lacks elegance. If I were making a hat like this, I’d much rather do the decoration at the same time as the base knitting, rather than going back later.
This leaves two methods – some sort of in-row wrapping, or slipping stitches with the yarn in front of the work.
Let’s look at slipping first. If you knit a row, then holding yarn in front, slip several stitches, and then resume knitting, you make a fabric that has a base row of normal height, then a distended area where stitches were slipped. If you continue to do this on subsequent rows without rows of intervening plain knit, you pull those stretched stitches up even further, creating a vertical column with a grossly distorted base structure. It doesn’t look like the knitter of this cap made the floats by slipping with yarn in front because if you zoom in and examine the long vertical bars of the ornamentation, a float seems to happens on every row, and there is no evidence of vertical distortion.
This leaves the wrap method. Wrapping stitches for ornamental effect isn’t widely practiced any more although it still survives almost as a curiosity in some cotton knitting. You can see an example of wrapped stitches in the cover pattern on the Lewis Knitting Counterpanes book published by Taunton Press. In this case the wrapping is pulled very tightly to magnify the gathered effect of the pattern. The wraps are peeking out beneath the bellies of the scallops:

I’ve also seen texture designs in European pattern collections that use wrapped stitches. There are a couple of the tight-wraps-as-gathers type at the end of Omas Strickgeheimnisse, a German-language knitting texture pattern dictionary. I thought there was at least one in the Bauerliches Stricken series (another 3-volume German stitch dictionary), but thumbing through, I can’t find it now. Some of the on-line Russian language stitch collections also show wrapped stitches I found these by searching for which may mean pattern or stitch in Russian. It also seems to transliterate to the letters “uzori or uzor” in Western alphabets, which are also good starting points for searches. (No I don’t speak or read Russian, I’ve stumbled across this bit of trivia while web-walking.) I don’t have time this morning to fish up the citations for these dimly remembered Russian texture patterns. I’ll have to leave that for tomorrow.
However, none of the contemporary sources for these wrapped stitches employ them in the way I envision that the Red Cap Knitter did.
I don’t think it would be difficult to do this, just a bit fiddly. I like fiddly. Remember that this is a thought experiment. I haven’t tried the method out yet. Perhaps over the weekend I’ll have time to do so. Here goes.
Let’s say you want to lay a ladder across four stitches. You knit the four as usual. Then you take your yarn and move it to the back of the work. You transfer four stitches from your right hand needle back to the left hand needle, then you move the yarn strand to the front of the work, laying it in the “ditch” between the first stitch to be wrapped and the ones that came before it. Then you slip those four stitches back to the right hand needle. You draw the yarn strand across the front of the work over the four, then return it to the back. You have now “lassoed” your four stitches. Give the thing a slight tug to maintain tension, and knit the next stitch as usual.
Now all you need is a suitable graph, and you’re set. (Credit: This particular graph has been researched by SCA pal Carol.)
