THE BEHINDER I GET
I can’t say I’m going any faster, but I’m in the swim of things with my gift knitting. I have to admit a tinge of guilt this year. In years past, I’d done a fair bit of it far in advance, sometimes using especially mindless gift knitting (like socks or scarves) as bliss-out-on-the-beach pieces during our summer vacation. Or I’ve doodled up little projects between larger ones, while I was waiting for my ideas to set. By this time I’ve usually got a basket of goodies ready for holiday giving. Unfortunately, this year nothing got done ahead of time, and I’ve been forced to do something I detest – knit to deadline.
I hate knitting to deadline because in my professional life, all I do is march to deadlines. I’m a proposal manager, and I’ve lived my career in 30-day increments. Other people will say things like, “Dear, remember ’91 – that was the year little Brunhilde was born,” or “Yeah, 91. Cousin Ildefonse was in Desert Storm.” I say, “Fall ’91. That was that big military IT/hardware support proposal, we had an extension that got eaten up by the sheer bulk of the revised reporting schedule requirements.” From this you can well deduce the heart-stopping excitement of my daily life.
Knitting has always been a blissful interlude, a no-deadline finish-it-whenever sort of pursuit. That’s one of the reasons why I’ve shied away from pursuing commercial publication for my patterns. Squeezing my knitting life into a tight deadline sucks all the joy out of it.
So here I am. Doing frantic knitting on a couple of Hannukah presents (it’s early this year, adding further complications). The Kombu scarf, four hats, and two pairs of socks are done. That leaves three scarves, two more pairs of socks, and possibly couple of kid’s size earwarmer bands to go.
Today I plan on casting on for a very simple scarf done in Sandnes Lime (a mostly cotton, very soft yarn) for a friend who is wool-sensitive. I’ve used and reviewed the stuff before and not been wildly pleased with it, but for a scarf it should work out fine. Although most of the detail will be obscured by the textured yarn, I’ll probably work it in this simple knit/purl pattern – just to give it a bit more interest:

I like this one for scarves because it adds a bit of loft and like all patterns with near equal amounts of knits and purls on each row – it lies nice and flat without curling.
WORKING REPORT – KOMBU SCARF
I’ll try to get a good shot of this one. It’s in a charcoal-grey alpaca, a notoriously difficult color to photograph.
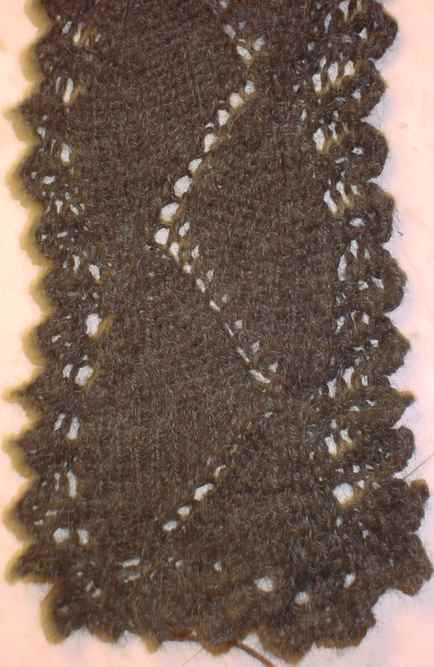
The stuff is sport weight. I mentioned before that I got it at a Maryland Sheep and Wool Show, circa ’95 or ’96. There was a big rainstorm that year, and many of the vendors in outdoor tents were soaked through and/or blown over. The Tess Designer Yarns booth was particularly hard hit. Sunday afternoon as the owner was packing there was still a large pile of sodden yarns laid out on a tarp that were being sold as-is. I bought this one-skein orphan, took it home and dried it out and wound it, and have been trying to figure out what to do with it ever since. There’s a ton of yardage on this 8 oz. ball. I’ve barely scratched the surface and could probably do another three or four scarves with what’s on there.
My gauge over my Kombu is K1, P1 rib is roughly 6spi , on US #4 needles. This gray scarf is about 6 inches wide, measured point to point. I’ve completed about three feet so far, averaging about eight inches per hour. Both the center pattern and lace edges are quick to memorize and knit. Alternate rows of the center are K1, P1 rib; alternate rows of the edgings are all knit. Because the scarf is based entirely on a combo of ribbing and garter stitch it lies absolutely flat, without curling.
I hate to brag, but I really like this pattern – even though it’s one of my own. It’s rare I go back and do another of anything I’ve finished. Even that Dreaded Second Sock can be agony, but this is the fourth Kombu I’ve done. Two were done in Little Lola (including the same photographed on the pattern website) at a slightly smaller gauge (befitting the slightly thinner yarn). The other was done on US #7s and a 4.5 spi in pink/turquoise/yellow/lime green Red Heart variegated, picked out by a (then) 4 year old. Both my eyes and fingers hurt doing that one, but the kidlet was delighted with the all too bright result after she decided that the yarn wasn’t so scratchy that she couldn’t wear it as an "outside the coat" type scarf.
REVIEW – YARN MANUFACTURER WEBSITES VI
First, a recap. I’ve covered these sites so far:
- YMW I – Berroco, Knitting Fever
- YMW II – Karabella, Adriafil
- YMW III – Rowan, Spinrite/Bernat
- YMW IV – Cascade, Classic Elite
- YMW V – Patons, Lion Brand
Today we hop over and look at websites maintained by Debbie Bliss Knitwear, and Estelle.
Debbie Bliss Knitwear
The Debbie Bliss website is divided into three main sections – patterns, yarns, and information. It also has a retail section for direct orders. Starting with the yarns page we find a complete listing of the yarn lines and colors available this season. However, yarn information is rudimentary at best – listing only fiber content. There is no gauge info, no wash info, no recommended needle size, no ball weight or yardage indicated. There are no photos of retail put-ups, labels or swatches, but color is shown by a small chip style photo of the yarn, so you can kind of see the texture of the yarn. Sort of, because the chips are small. In the yarn section are also listings of retail sources. Looking up US sources generates a bounce over to the Knitting Fever website, where there’s a proximity to zip code search function (difficult to spot, in the upper left of the page).
The patterns section is a bit better enabled. Each current book is displayed. Most but not all have a link to view selected contents. These detail pages show a few of the designs from the book. A few of them go on to list the size options, the yarn used and the number of balls needed for each size. Even on pages with additional info, not every item shown is completely detailed. There are no links between the pattern and yarn pages. The patterns section also offers up an errata page with corrections offered for Baby Knits and earlier books. There’s also a free pattern for a button-finished pillow.
The information section provides contact info is listed for the major overseas contributors, but there is no eMail or ground address provided for Debbie Bliss Knitwear itself. (There’s also the caution that DBK is unable to provide help with individual patterns over the Internet.) Other offerings under "information" are pretty cursory. The newsletter mentions a trade show that happened two months ago, and the workshops listing shows classes that were held back in September. I did not attempt a retail purchase.
Overall this site is easy to use, but is sorely lacking yarn info. My guess is that this is done on purpose – to ensure that people making DB patterns use DB yarns and only DB yarns. Still, not offering up so much as care guidance for the yarn lines is an oversight. Major points are taken away for lack of basic yarn info. Some are earned back by having easily found pattern corrections, and for the half-hearted attempt to provide yarn use specs for a minority of the designs in the various books. More points are taken away for lack of direct contact info (What happens if you bought yarn direct from the site, and it was defective? While this is uncommon it can happen. To whom do you then report the problem?) Debbie Bliss Knitwear’s site gets a C-, especially considering that it offers retail capability and as such should be of more help to customers. There’s no way I’d buy anything from it without more complete information.
Estelle Designs and Sales
Estelle is another of the omnibus importer/distributors like Knitting Fever. They’re Canadian, and handle Estelle, Lang, King Cole, GGH, Dale, Tivoli, and Scheepjeswol yarns, plus Rebecca Magazine. Registered and pre-approved retailers can place orders through the website, but I don’t believe that they sell directly to end-user consumers. The site is divided into sections for yarns, books, contact info, a shop finder, and free patterns. Yarn shops have their own section (Customer area).
The yarns section is divided by maker line. Under each maker is a list of current and about-to-be-current yarns. Clicking on items in each maker’s list will pull up a detail page. The data contained on the detail pages varies from yarn maker to yarn maker. Estelle’s include fiber content; yardage/weight; suggested needle size; and suggested stitch and row gauge. There’s a large close-up shot showing the yarn’s appearance, plus color chips of each color and (for some yarns) a close-up photo of a knitted swatch. Each page is dated (a nice touch that provides assurance that the colors listed are current). Wash info is not provided for Estelle yarns. King Cole and the Scheepjeswol pages list fiber content, yardage, suggested gauge/needle size and wash info. All have color chips, but only a few have yarn close-ups. No King Cole pages show swatches. Lang has fiber content, gauge/needle size, yarn close-up and color chips (some of these show link broken); plus wash info for some but not all yarns. Dale is similar, with fiber content, suggested gauge/needle size, wash info, yarn close-up, label graphics, and color cards. GGH’s list is the most cursory. There’s a long roster of names, fiber content, yardage, and suggested needle size. No photos of the yarn or available colors, gauge or wash info.
No yarns on the site are shown in retail put-up, nor is there info on historical products. Yarn info pages list that makers’ booklets for some but not all of the lines.
The Knitting Books section shows covers of the various leaflets and books distributed by Estelle. Except for photo lists for Estelle’s own line of patterns, no effort is made to show the contents of any other book or leaflet, pictured either here or under the individual manufacturer pages. The Estelle pattern lists show leaflet contents. Each design names the yarn used to make it. No info on sizes or yarn quantities is offered. No links are provided back to the yarns themselves. Amusingly, all the Estelle projects (including the blankets) are shown modeled by the same woman, and there don’t appear to be any patterns for children, babies, or men.
The contact page includes eMail, telephone and ground addresses. The free patterns page offers up mostly scarves, but has a smattering of other projects, too. Few of them however are illustrated. (Note: the presence/absence/quality of free patterns do not affect my grade of the site). There’s a shop finder that provides shop names, towns, phone numbers and (if available) web links, but not street addresses. There’s also a "what’s new" page that describes the latest additions to the website.
Estelle has clearly aimed its website at shop owners as its primary customers. End user knitters are given thought in the free patterns and shop finder areas, but those services are secondary. Points are awarded for the availability of current yarn info. Points are taken away for the unevenness and partial completeness of that info, lack of info about the patterns, lack of historical info, and lack of pattern errata. I’ll factor the shop-owner focus into the grading here, as the thing isn’t intended to be a retail site. Even so Estelle emerges with a C+. If the yarn pages were more uniform in info content and included wash instructions, and if a list of historical info was provided I’d bump it up to a B-.
HOLIDAY HANGOVER
The holiday has come and gone, and now only we remain. The good news is that I discovered that:
- Brussels sprouts taste surprisingly good if they’re tossed in olive oil and roasted briefly in a hot oven, then sprinkled with coarse salt.
- I can knit four giant gauge hats in one afternoon.
- If you’re under 10, wearing a princess costume and a rhinestone tiara to a regional theater matinee isn’t considered overdressing.
- This year’s Beaujolais Nouveau is lighter and less banana-riffic than last year’s and as such is more pleasant for afternoon sipping while the bird is being basted. But find something with more backbone to go with the dinner itself.
The bad news is:
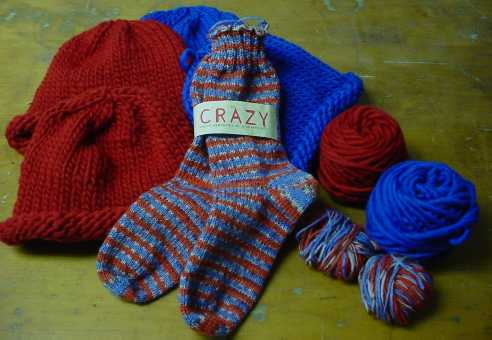
- I don’t like Idena Crazy (also and confusingly marked with the Asa Gjestal distributor name), a heavy sport/light DK weight yarn intended for socks. While it knit up fast into an attractive but rather pedestrian striping, it’s relatively scratchy for sock yarn, plus it had knots and uncomfortable sized slubs. Not one I’ll be buying again.
- If your roasting pan is too large and impedes the flow of hot air in your oven, your turkey ends up cooked with a dried out, hard integument instead of a deliciously toothsome skin, even if the meat is juicy perfect.
- There is nothing so kitschy on earth as a bad crafts fair.
The story behind it all. We had a lovely Thanksgiving holiday with my husband’s mother. In spite of the turkey disappointment dinner was quite nice.
Friday we went to a large crafts fair. I was expecting something like the ones I’d gone to in Northern Virginia – a mix of holiday stuff, trite crafty nonsense, but with a nice proportion of pieces displayed by artisans with talent.
Instead what we found was an indoor quarter acre of Polarfleece doll clothes; badly covered footstools tricked out with sports logo prints; cutesypoo faux rustic signs suitable for hanging in (some people’s) bathrooms, dried floral arrangements that looked more like what’s left over after the haystacks are neatened; fuzzy scarves worked up from Lion Fun Fur, marked at $30. each (since they weren’t selling, I’d say the fad has finally passed); cheap silver jewelry imported from China and India; and countrified things with ruffles but without purpose. No decent watercolorists, pewterers, silversmiths, potters, or printmakers. The kicker was one booth that was stocked entirely with beer cans into which someone had put clock hands and mechanism. One fellow had nicely turned wooden bowls. One person was showing not horrific pieced glass ornaments. One outfit had some interesting wooden puzzles and brain teasers. The only thing we ended up buying was a jar of respectably hot horseradish mustard, made in Vermont. Our amusement came mostly from pointing and laughing.
Saturday made up for Friday’s craft fair fiasco. We took the kids and MIL to a regional theater production of Beauty and the Beast. The cast was quite talented, much better than I expected, and there was something refreshing on seeing a play that relied on their talents rather than $10,000. costumes and intense special effects. If you’re local to the Boston metro area and want to bring kids to live theater without breaking the bank on big-production ticket costs, check out this production. It’s well worth it, even if you end up having to borrow the kids.
WHAT’S A 42-STITCH HAT?
Several people wrote to ask about the 42-stitch hats I mentioned yesterday. I attempt to answer.
The pattern (such as it is) is widely available. Cleckheaton has a version that they authorize yarn shops to give away with purchase of Gusto 10 that’s written to be specific to the yardage of that product. I’ve also seen very similar hats in several of the beginners’ books so popular now, distributed as shop patterns by LYSs, and posted other places on the Web. Basically, it’s a hat boiled down to its barest essentials – a very large gauge stockinette tube with a crown formed by simple decreases. The brim is formed by the natural tendency of stockinette to roll.
1. Find at least 55 yards of yarn that knits up to about 9 or 9.25 stitches = 4 inches. I got 9 with Cleckheaton Gusto, and 9.25 with Brown Sheep Bulky Spun. The Bulky Spun hats measure a bit under 18.5 inches around the lower edge, and stretch for a comfy fit on adults. The Gusto hats are just under 18.7 inches around the lower edge.
2. Cast on 42 stitches, and knit stockinette in the round. I used plain old half-hitch cast on to avoid a tight edge, and to conserve yarn. I did the whole thing on a set of four size US #13 DPNs, but if you hate double points you could do it on two circs, or start on one short circ, then move to DPNs.
3. Knit tube until it’s long enough to both cover your ears and reach just under the crest of your head. That’s about 7.5 to 8.5 inches, including the rolled brim (which should be flattened out to measure). If you’ve only got 55 yards of a superbulky, don’t make this part deeper than 8 inches.
4. Divide the stitches into 6 groups of 6. If you’re on DPNs, that means placing a marker (or remembering the spot) in between the two center most stitches of each DPN. Finish the hat by working six consecutive rows of knit with decreases, always working a decrease just before a marker or (if you’re on DPNs), the needle’s end – that’s six decrease points around the hat. You can work either K2tog or SSK, as you prefer, choose one and work it throughout the piece. If you pick K2tog, the decreases should stack up and spiral in counterclockwise to the center. If you pick SSK, the spiral should end up running clockwise. When you’ve got only six stitches left, thread break off the yarn and thread them up on the tail, drawing them up purse style. Darn in ends.
Note that you can make this hat larger or smaller by adding multiples of six stitches. A little kid size hat out of the same weight yarn would start out on 36 stitches.
If you pick a lighter-weight yarn, increase the cast on number by units of six, how many will depend on your yarn. For example, if you’re using a yarn that’s 10 to 10.5 stitches = 4 inches, 42 stitches would probably be a bit small, I’d aim for 48 stitches and hope that the fit wouldn’t be too large.
I wouldn’t attempt this hat with yarn that’s much lighter than 2.75 stitches per inch (11 stitches = 4 inches) for two reasons. First, much of the charm of this rustic-looking funky hat depends on the bulk and body of the yarn used. The silky firmness of dense Gusto is more satisfying than the less-dense Bulky Spun. Lighter weight yarns would be even more floppy. Plus I’d need to do more experimentation to satisfy myself that every-row ratio of crown decreases would work out as nicely as it does on the heavier-yarn hats.

Finally I have to note that I don’t like knitting yarns at these huge gauges. I can knit non-stop for hours on sock weight yarn, but this big stuff tires out my fingers. Also this is the first project I’ve ever worked on DPNs where if you look closely, you can pick out where my DPNS met. Feh.
GIFT STAMPEDE
Caught unawares by the early date for Hannukah, plus the realization that Christmas isn’t far behind, I take a detour into knitting small gifts for friends, family, and other deserving folks.
[Side brag] The Older Daughter just finished her second project – the classic Cleckheaton Gusto 10 42-stitch hat. She learned to knit on DPNs in the round, and I got a great hint for a flock of small presents.
Gusto 10 is a very dense superbulky yarn. It’s not very expensive, but at $9.00 US per hat (55 yards), it can add up quickly. I’m making several of the same hats, but instead I’m using Brown Sheep Burly Spun.? It’s just a tad less dense than the Gusto, but at $14.00 for 132 yards, I can get two hats from each skein with a bit left over. Last night I did the first two in about 45 minutes each. I’ve planned to make four – two deep red and two royal blue. I may get an extra skein in another crayon color and make three more – two more solids, plus one striped one from the leftovers of all three skeins. Or I might make a couple of earwarmer bands from the red and blue leftovers. All in all, not an exciting set of projects, but a satisfying and quick one.
Other gifts in the works – several pairs of socks, knit at sport gauge rather than my standard personal-consumption teeny gauge. (Again the time factor). Plus I think I’ll give the Spring Lightning Scarf as a gift.
On the kid’s knitting, she’s getting too quick to keep feeding her superbulky yarns and giant gauges. I won’t be able to afford both our knitting habits. [grin]? So I’ve started her on a set of wristlets, done in sock yarn in the round on US #2 DPNs. We’re adding purling to her skills set with this ribbed project. Those should keep her out of trouble for a while.
TOE-UP SOCKS, FROM HEEL TO TOE
Something must be in the air, because several people have written to me this week asking if toe-up socks are more difficult than standard cuff-down socks, or if I could venture an opinion on how they fit and wore compared to cuff-down socks. Perhaps this is a product of all the people hoping to knit up one last holiday present before the end of the year. In any case, I’ll try to answer.
Why Toe-Ups?
1. I detest doing that last boring slog from heel to toe, especially because I find all on-foot patterning to be uncomfortable inside my shoes, so my feet are always done in plain old stockinette. If I leave the feet for last I’ll NEVER finish the socks. So I do them first, get them over with, and then have the fun of the patterned ankle part.
2. I’m not particularly fond of grafting. I can do it, but it’s a pain. Toe-ups let me avoid that step.
3. I like being able to pause and slip the growing socks on to make sure the fit is perfect. That’s easy with toe-ups.
4. I like not having to worry about yarn consumption. If I’m using 50g skeins, I knit the ankle part until I run out of yarn. If I’m using a 100g skein, I knit to the same length as another pair of socks, or if I want to eke out every inch, I put Sock #1 aside without binding it off, then knit Sock #2 on another set of needles. Once both are the same length, I’ll finish off the ribbings side by side, one from either end of the ball, making sure that I use every scrap.
5. If I feel like using the two-circ method, my toe-ups with their short-rowed heels adapt with no fuss at all to that method.
Toe-Up Fit
Toe-ups with short rowed heels are narrower at the point where the ankle joins the foot than are standard heel flap/box heel socks. Some people, especially those with high insteps find them confining. I don’t, even though I have BIG feet for a fem (recently remeasured to Euro 42/US 10.5EEE). If you feel this might be a problem, look for a toe-up pattern with an inverted standard heel rather than a short-rowed heel.
Ease of Working
I don’t find toe-ups to be any more difficult than heel flap socks. In fact, I find them easier. Using the short-row heel and five needles, once I’m past the initial toe I ALWAYS have the same number of stitches on each needle – even during heel production. That makes it easy to put down and restart my socks. That’s a good thing because socks are usually my briefcase project and get done in tiny spurts.
Many people complain about my favorite cast-on for toe-ups – the no-sew figure-8 toe. (It’s Judy Gibson’s, I’m just one of her sock disciples). They say it’s too fiddly, or they can’t get it to work, or it’s too loose. To be fair, it IS fiddly, but it’s worth it. The secret is letting that first row be miserably ugly and loose, but taking care not to split the yarn as it is worked. Once a couple of rounds have been established, it’s very easy to go back and use a needle tip to snick up the looseness. A little care will work the looseness past the knot that forms at the base of the tail, and out from the sock to become part of the dangling end.
If you give up or just don’t want to bother with the no-sew figure-8 toe, there are tons of other toe-up sock patterns out there that use different starting methods. Wendy has one. Or you can start with a provisional cast on, then go back and Kitchener darn the toe up later.
Look of Short Rowed Heels
Knitzanknitzanknitz asked about how short-rowed heels in self stripers look. Here are a couple of mine:

With a little care and willingness to make the sock a row or two longer/shorter you can plan your heels to miter on the breaks between the striper’s color changes.
Sources for Toe Up Patterns
To be immodest – there are mine. wiseNeedle has toe up patterns for several gauges.
The toe-up pattern that started me off and running is by no-sew toe guru Judy Gibson. Wendy Johnson has a popular toe-up pattern, and there’s another at Needletrax. There’s a toe up tutorial at the Socknitters website, and Flor’s got one as well. One of the oldest toe up patterns on the web was done by Manny Olds. Google on "toe up socks" for zillions more.
WORKING REPORT – BIRDS EYE SHAWL
It’s growing on me. I like it more now that there is more of it done. I’m still not 100% pleased, but I’m no longer at the edge of the rip back and start all over mindset.
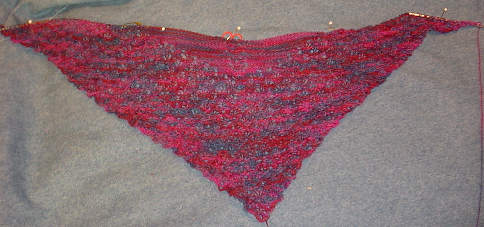
I think I made the right call by not continuing with the birds eye pattern uninterrupted for the entire piece. I’ve switched over to plain garter stitch for the center, ornamented with a coordinating band of eyelets marching up the spine.
For the record, I’ve made a slight change in the Birds Eye pattern that I think looks just a tad better. On the chart provided, on rows 3, 7, 11, 15, 19 (etc.) I work the ssk that forms the right hand corner of the big eyelet as a K2tog. This gives a slightly better definition to that corner of each ring.
I tried to abstract out just one column of eyelets from the main design for my spine, but I didn’t like the look. Because the original does that half-drop translation thing (staggered like brick walls are stacked), the eyelets ended up being spaced too far apart. Instead I used a similar design lifted from one of the edging patterns in Miller’s book. It’s from "Ring Shawl Lace Edging with Spider Insertion." I’m using just the Spider insertion strip. It complements the all-over Birds Eye pattern in that it’s also ring based, but it’s slightly different. Spider is one row shorter than the Birds Eye, and the eyelets stack directly one on top of each other. In BE, the slightly embossed eyelet rings all appear on the same side of the piece. In Spider, they alternate front and back. It’s still good looking and being airy, matches nicely, but the ring units ARE different.
Now I’m looking at my shawl and I’m beginning to think that with this growing plain garter stitch area something interesting floating in it might be quite effective. Or maybe not (that variegated yarn color problem again.) Hmmm…..
OOP BOOK REVIEWS – CREATING & KNITTING YOUR OWN DESIGNS…
Back at station. There’s a giant hole in the world today where a dear friend of mine used to be. "Kinsmen die, cattle die. Every man is mortal, but one thing never dies: the?good name of one who has earned it." Havamal, 75.
My heart aches for his wife, son, family, and household.
As promised, here is the second review of the set – Montse Stanley’s Creating & Knitting Your Own Designs for a Perfect Fit, New York,?Harper and Row, 1982.

In the days before knitting software, books like this one, personal apprenticeship, or trial and error were the ways one learned how to draft out one’s own patterns. Not knowing anyone who was doing designs to ask for help, I relied exclusively on the "books plus making lots of mistakes" scenario for most of what I knit. A couple of books in particular were worth their weight in gold. This was one. The pictures and projects illustrated in C&K are now a bit late ’70s funk/frumpy looking, but the basics of this book are as good as ever.
This book is so good in fact that I have used it in training classes for budding technical and professional writers, to illustrate how a complex set of technical concepts can be conveyed to an audience that includes both the experienced and novices without losing either of those readerships. The blurb says Stanley was an architect. I believe it, and would love to find out what sort of things she designed because the clarity of her thought processes rings from her pages.
It’s a survey course in knit design and technique, packaged up in an amazingly brief 175 pages – including index and custom graph paper. Like Perfect Fit, this book covers taking measurements and turning them into dimensioned schematics. Like PF, it skips over making a sloper – but unlike that book it translates the measurements directly to specific vectors on the garments, rather than to an abstract and idealized shape. Therefore short waisted people end up with garments that start out being custom-fit to that figure type, rather than taking a standard shape and altering it to meet their needs. Stanley goes further, taking the brilliant step of introducing ratio-based graph paper into the garment design. You knit up a swatch, figure out your stitch:row ratio, and select the graph paper that matches the closest. You can then lay out your collar shapings or other details "in real time."? Need a 40-degree angle?? Slap a protractor on the graph paper and draw your line. The graph boxes under it each represent a real stitch, and the rate of increase or decrease needed to achieve that angle are easily seen and counted. The book includes about ten pages of ratio graph paper for photocopying. I don’t know if anyone else wrote a knitting book that advocated the use of ratio-based graph paper before Stanley, but nothing else I’ve found has so clearly explained how to use it.
Stanley didn’t just publish a graph paper book, she includes an extensive section on knitting technique, including finishing, grafting, short rows (darts),? mitering, picking up, and types of increases and decreases. She’s got a stitch dictionary section? (all prose, none graphed); sections on materials and suitability, color, composition, and garment shapes – including a huge array of body, sleeve, closure, neckline, collar, and pocket options. Each garment shape is illustrated with a little line drawing, and has a brief prose description – usually enough to get one started drafting out that option on one’s own. The placement of critical measurements on these little drawings enables seeing how the garment works in relation to body shape/size.
There’s a section on moving beyond combos of these garment shape units; how color, knit direction, motif/texture placement and trim can greatly alter the look of a basic garment. Again this is illustrated with little line drawings, some woefully ’70s in feel. Even though some are out of date, the wealth of them can start the reader’s thought processes ticking.
The book closes out with a section on troubleshooting – what to do to correct styles (too long/short, narrow/wide), miscalculations (messed up texture or colorwork patterns), misplaced openings or buttonholes and the like. Add on some basic size charts, growth allowances charts for kids’ clothing, ease allowance charts, a few other quick calculation look-up charts, some color photos of finished items and discussions of them (but not whole patterns) and you’ve got this book.
I admit that a book like this is less valuable today than it used to be. Knitting design software has enabled a much wider audience to do basic pattern drafting without resorting to calculators, graph paper and pencil. But this book will still be very useful for anyone who wants to move beyond? the "black box" mystery mechanism use of that software. For example, you can start off with a knitting software-generated simple cardigan, then get inspired by this book to turn it into a jacket with an asymmetrical closure slanting from hip to shoulder. Stanley won’t tell you the exact stitch count or formula for that translation, but you will emerge from reading the her brief on that style with enough knowledge to make the change on your own. I suspect that everyone who has written a knitting design software package has?C&K on her or his shelf.
Montse Stanley’s work (in combo with?that of a couple of other authors) has made a tremendous difference in the way I knit, the way I look at and use patterns, and the scope of what I feel is within my own limited competence.One warning – this book IS?hard to come by, and sells used at a premium above cover price. But if you can find it and afford it, and?want the inspiration and enabling it contains, I strongly recommend adding C&K to your library.
WORKING REPORT – BIRDS EYE SHAWL
Just knitting along on the Birds Eye shawl. I’m not entirely pleased with the way the color interferes with the eyelet patterning. Perhaps I should rip back and make something plainer.
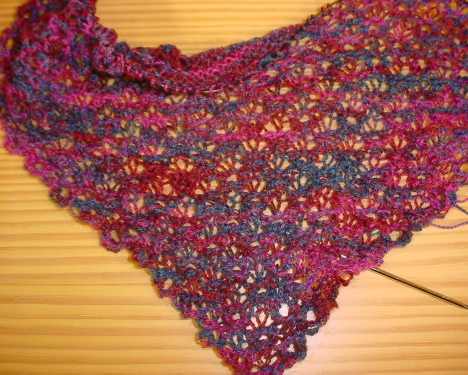
You can best make out the eyelets near the bottom point. For the record, I’m knitting on 2.5mm needles. Without the jumble of color, both th eneedles and the eyelets would be more visible. For all the complexity of the chart, the repeat is actually quite easy to? memorize. It’s 4 rows x 6 stitches, with a half-drop translation.
I’ve now worked into the spot where I’m modifying the pattern by inserting a region of plain garter. As soon as I have more of that done, I’ll take another photo to see if the difference in texture is worth the effort. Or perhaps I’ll throw in the towel and find or create another visually simpler pattern.
