NORTH TRURO COUNTERPANE LAYOUT
[Repost of material originally appearing on 3 August 2006]
First, here’s a picture showing one finished meta-unit, plus one that’s mid-assembly. You can see the swirl hex in the center, plus where the square and triangle units fit.

In the layout I’m using, these meta-units fit together with plain triangles inserted at the point where three meta-units meet.

I suppose I could have made just one big triangle for those spots instead of four smaller ones. That design variant will have to wait for a future blanket. In the next photo you can see how the concept above actually works:

Finally, here are some other arrangements for the same basic units. The swift will note that the one in the upper right is in fact the layout I am using:

In addition to these, the squares and triangles can also be used by themselves, or in combo. LATE UPDATE: The two layouts on the right are in fact different. While both employ entire meta-units, with plain triangles where they meet, the top one butts the meta-units up against each other by uniting the edges of the squares, the other unites the edges of the triangles. The differences are subtle, but the lines of the piece do look different if the lower right hand arrangement is made.
In terms of technique used and hints for seaming – the squares fit stitch for stitch along the edge of the hex. Due to decrease ratios, the triangles are in fact just a bit wide at the base. To eat up that extra width, I play with ease, plus I sew them in using mattress stitch. I take a slightly bigger “bite” out of the triangles’ sides than I do out of the edges of the squares to which I am sewing them. So far it has worked out well enough. Other spots where cast-on/bind-off edges meet are sewn together with whip stitch, picking up the innermost edges of the chains formed by the cast-on or bind off (or if no chain was formed, the equivalent edgemost stitch).
I do note that I’ve gone back and forth several times between working the hex, then sewing on the squares, or working the hex, then working the squares directly onto it’s live stitches. I had forgotten I had done this as I began this summer’s production, but looking at my finished blanket, I’m hard pressed to identfy the abberant sewn-on squares. I’ll go back to the knit-on method on the next meta-unit. In the mean time, I’ll just sit here in the heat and think about knitting, because at over 100-deg F indoors, it’s too hot to actually do anything more than sit in one spot and pant like a dog.
Now. Has anyone else tried the hex yet?
PATTERN – NORTH TRURO COUNTERPANE, PART 3
[Repost of material originally appearing on 2 August 2006]
As promised, here is the third unit needed to build my North Truro Counterpane. I won’t say the last, because I still intend on squaring out the sides and adding coordinated strip-knit coordinated trim. That will require some half-hexes, half-squares and the trim itself. But I’m not there yet.
Like the square, the triangle is knit flat and is quite straightforward. In addition to the patterned piece graphed below, I also make some plain triangles to fit in between the larger meta-motifs. In essence they are the triangle graph below, but without any patterning. To make them I cast on 31, then work entirely in stockinette, employing only the shaping directions shown at the ends of the right-side rows.

[Click on pix above for larger rendition]
I think that I might have done the patterned triangle a bit differently if I were to assay it again now. I might have eliminated the YOs and companion decreases down the center on rows 1-11. Or maybe not. I’d have to play with it to see if I liked the meta-unit (and how multiple metas fit together) after assembly without those radial spikes.
Tomorrow I’ll discuss again how these go together, and present some alternate arrangements.
PATTERN – NORTH TRURO COUNTERPANE, PART 2
[Repost of material originally appearing on 1 August 2006]
As promised, here is the square I use to build my North Truro Counterpane – the first of the companion units needed to build the thing along with yesterday’s hexes.
I could see someone making a blanket of only the squares, or only the triangles (tomorrow’s post), but I did design them to fit visually with the swirl counterpane to make up the larger star meta-motif. I like the contrast between the patterned, almost embossed central swirls and plain stockinette. The lines of the square extend and frame the swirl’s motion, spreading the design out beyond the borders of the hex itself.
The square is knit flat, back and forth on straights. I use two of my longer DPNs for all the smaller units. Since these are quick and almost never languish on the needles, don’t bother finding a pair of traditional straights with end buttons.

[Click on pix above for larger rendition]
Now, why did I go to all this trouble? For the classic reason. Why not?
I’m not a big fan of pieced quilting. I think it can be visually quite lovely, and value it as a medium for artistic expression, but I don’t enjoy manipulating all those little patches of cloth myself. I am however fascinated by simple geometry. Things like tessellations tickle my fancy. I can’t pass by a bit of interesting mosaic or brickwork without pausing to appreciate regular polyhedral tiling. Traditional Islamic non-figural ornamentation is a source of wonder to me. When I stumbled across Phillips Knitting Counterpanes I skidded to a halt and hung on every page.
Since then I’ve kept my eye open for more pieced counterpane style patterns of all levels of complexity. But I notice that very few are built on layouts beyond all squares, triangles, or hexes; or (at the most) on octagons plus small squares. I wanted to play with some of the more unusual layouts – to see if I could bend knitting around them. There are lots of ways to tile an area with simple regular polygons, and simple regular polygons are easy to knit. Why not mix squares and triangles? Or hexes, squares and triangles? Or (be still, my heart), dodecagons, hexes, and squares? North Truro is my first attempt.
I wonder what trouble i could get into if I departed the single plane, and ventured into the 3D world of polyhedra? Hmmm….
PATTERN – NORTH TRURO COUNTERPANE, PART 1
[Repost of material originally appearing on 31 July 2006]
O.K. Apparently I’m not the only crazed loon out there that’s interested in knitting something with ten thousand ends. So in response to requests, I share my North Truro Counterpane.
Please note that as a pattern, this is still in Beta stage. I have no yarn quantities, gauge estimates, or recommended needle sizes. There also may still be an error lurking in the upper right double moss area on rounds 35-43, after the centered leaf motif. I think I’ve corrected it on this version, but since I mostly work my motifs on autopilot at this point, I can’t swear that I’ve payed close enough attention to test-knitting this particular edition of my graph. If you run into oddness, remember that the double moss area on each side of the center leaf should mirror. If it looks like you’re developing a rib on row 37 or 39, invert the knits and purls after the center leaf and all will be well.
In terms of materials, I can say that I’m using a insanely inexpensive unnamed coned cotton flake yarn found in the back room at Webs. It’s soft, with some open and relaxed sections, rather than a tightly spun mercerized cotton. In terms of weight it’s probably closest to fingering, with occasional puffy bits making it hard to describe. I’m getting 16-17 wraps per inch.
For needles, I’m using 3mms. NOT US #2s, which tend to be 2.75 mm, but true European 3mm needles. I’ve got a mix of 10-inch and 8-inch long steel DPNs of that size, and am working my hexes on four, moving to seven when the number of stitches on the needles makes that more comfortable (one needle per side, plus one to knit with). Now not everyone is as DPN happy as I am, so if you prefer using one or two circs, try starting out with a set of 4 DPNs, (two hex sides per needle), and using them until the piece is large enough to make the transition practical – probably around round 23 or so.
Please remember to note the one-stitch transition on round 35. I shunt the beginning of the row one stitch to the left on that round. You should knit the first stitch of Round 35 onto the last needle of Round 34, then work around, doing that terminal K2tog on the last stitch of each repeat and the first stitch of the next one. If you’re using circs and markers, move the marker to after that K2tog. The final repeat of Round 35 will work out even – the last K2tog will combine the previous final stitch of that repeat plus that stitch you knitted and transferred at the beginning of the row.

[Click on pix above for larger rendition]
I will post the graphs for the companion square and the triangles tomorrow. The hex can be used alone or in combo with the other units. In fact, the geometry of the thing allows several possible assembly layouts I’ll write more about that later in the week.
Finally, there’s one more reason why this is just in Beta. I haven’t finished the total counterpane design yet. It is my intent to (eventually) draft out companion half hexes and half-squares, to finish the piece off as a rectangle, then trim the whole caboodle with a custom-designed edging that complements the design elements of the motifs.
Needless to say, I’m not there yet.
TRANSLATING BETWEEN KNITTING IN THE ROUND AND KNITTING FLAT – Part II
Before I was overtaken by creeping Deadline Disease, I promised three things – some general principles on translating flat knit patterns to kntting in the round; a list of increase and decrease stitch equivalents for right and wrong side rows; and why someone would want to knit either way. That’s a bit much for one day. Even for long-winded me. Let’s start with the most subjective – why one would choose one style over the other.
To start off with I’l make some bold statements that kntting historians are welcome to debate. Knitting garments in the round was far more prevalent during most of knitting’s history. Think of socks, hats, and traditional sweaters – most of them were worked that way. Seamed knitting (knitting in the flat) appears to have taken off around the time that knitting made the transition from traditonal garment to fashion wear – roughly about the same time when written patterns became more prevalent. I believe it did so in order to conform better to fashionable clothing’s styles, tailoring and fit, and to allow greater reproduceability of results among an audience already familiar with sewn garment methods.
Why knit in the round?
- Simple, quick garment construction
- Simple pattern writing for boxy shapes
- Minimizes purling on stockinette pieces
- Eliminates (or minimizes) seaming
- Takes advantage of knitting’s inherent elasticity for fit
- Easier production of stranded colorwork
- Easier production of texture and lace patterns that require increase/decrease manipulations on every row
- Ideology (there’s a strong lobby of knitting purists that advocate it as the most natural or historically-connected way to knit)
- Fewer pieces to lose or match in gauge
- Flashing (color stacking of space dyed yarns) works better
- Easier to ravel back and add length or replace worn sections.
- If using one circ, fewer needles to use than knitting in the flat
Why knit in the flat?
- More complex and tailored garment shapes can be achieved
- Pattern writing for complex shaping is simpler for designers trained in garment construction theory
- Easier to adjust tif you need to produce complex garments in multiple sizes
- Seams can add structure and strength to a piece
- Smaller individual units can be more convenient to produce
- Intarsia colorwork is easier to do
- Eliminates cast on row join challenge, especially on fine gauge garments that employ large stitch counts
- Eliminates the at-join color jog problem (to be specific it substitutes a match stripes at seam problem)
- Can be easier to measure garments in progress to determine compliance with required dimensions
- In flight modification for fit can be simpler because problems can be spotted after one piece is made, and the entire garment does not need to be ripped back to make adjustments
- Easier to add width while the garment is in progress
- No scary DPNs or circs needed. Fewer needles to loose compared to DPNs, no DPN juncture ladder problems
- Straight needles are less expensive than circs, and multiple lengths needn’t be purchased. No need to have multiple diameters of the same size needle on hand to accommodate tubes of various diameters (required unless many DPNs, a two-circ or the oversized circ method is used)
- Easier to block pieces before final finishing stage.
I’ve probably left the reason why you chose one method or the other off these lists. Feel free to add it in a comment.
Each method has its own strengths and shortcomings. Each has styles for which it is particularly suited. And each can be manipulated to do most of what the other style is better suited to do. You can make faux seams on something knitted in the round. You can do stranded colorwork on something knitted in the flat. You can add shaping to an in the round piece through planned and judicious use of increases and decreases to mimic the fabric manipulations of darts or tailored seaming.
n many cases there’s logic in the choice of one method over another. Dale’s Norwegian stranded pieces are perfectly suited for knitting in the round. They employ strategies like steeking to place shaped collars or introduce other construction features. I’m sure people have done it, but I wouldn’t want to translate one of them for knitting in the flat – there’s nothing to be gained by doing so. Complex tailoring like this from a discontinued Berroco pattern would be a headache to render in circular knitting. BUT logic doesn’t always prevail. I have seen commercial patterns for stranded sweaters that ARE knitted in the flat. I’d take a hard look at them to see if I could produce them in the round. Likewise, I’ve seen all sorts of contortions and cutting done to circular knit patterns in the name of making them less boxy. Again I’d have to take a closer look to see if using an alternate approach was better.
While you’re far more likely to see in-the-round direction today than you were 25 years ago when I started knitting, you’ll still find that many fashion oriented magazines and yarn manufacturers booklets offer up more patterns for knitting in the flat than they do the other method. I’m thinking pubs like Vogue Knitting, Adriafil’s Dritto& Rovescio and most of the modern European books, plus the old Phildar, Aarlan, and Pingouin books.
As in so many things, ideology does play a part. You can find books written in the 1940s through 1960s that sniff at knitting in the round, calling it "peasant work" or noting it in passing as the dreary ancestor of more modern applications. And you can find books written by knitting revivalists that excoriate the torture of imposing tailored seamed construction on a medium that has so many virtues in its most simple form. I’m dogma-agnostic. I use whichever method is best for me to produce the project at hand. Which brings me to the real reason why I think patterns are written one way or the other:
- It’s what the pattern’s author/designer is most comfortable with
Overall though, the motivation to change something from flat to circular knitting is far more common than yesterday’s case. Anything with a rectangular construction and minimal shaping is a natural – especially sweaters with drop shoulders. The exceptions might be sweaters in yarns that are prone to biasing or stretching, or ones in particularly flimsy yarns or knit in very open textures. In those cases the structural integrity imposed by firm seams might be crucial to garment drape and longevity. I’ll look at this in more detail in the next overly long post.
APOLOGY
Life in the form of work has attacked. Today’s post postponed due to total chaos. Apologies if you’ve checked back because of my promise to post more yesterday.
TRANSLATING BETWEEN KNITTING IN THE ROUND AND KNITTING FLAT – Part I
HolidayInnEloise saw yesterday’s post and sent in a question via eMail. She’s not a fan of knitting in the round and wants to know if the Cabin Fever pattern I am using can be worked flat back and forth on two needles. She’s a bit confused by how to change a top down in the round sweater into a more standard format. I’ll try to answer.
First, while there are exceptions, most things that are knit in the round can be parsed to knit in the flat either in part or in their entirety. Many but not all things that are knit flat can be knit in the round. Like with everything in knitting, knowing the logic behind the design can help you make the transition.
To go from round to flat, there are two big things to take into consideration – the garment shape and the knitting texture or colorwork pattern used. In order to transform a seamless thing into a knit-flat thing, seams must be introduced. Sometimes figuring out where to put them can be a challenge. The sweater I’m working on now is of very simple construction, but even it presents a challenge.
Following the original pattern, I started by making a tube for the collar. After that there was a row of increases to add a bit more scope for the next step – symmetrical increases on either side of four diagonal lines from collar to armpit (the raglan lines). The piece proceeded more or less like a poncho or capelet until the depth of the raglan increase lines accommodates a loose shoulder toarmpit fit (along the way one is directed to stop making increases otherwise the piece would grow too wide, but that’s a minor quibble). After the capelet type shoulder yoke was done, the sleeve stitches were slipped off onto holders, and with the addition of a few extra stitches under each arm, the remaining stitches for front and back were worked as a big tube. After the body tube was completed, the sleeve stitches were retrieved from their holders and worked out to the cuff, with some decreases at the bottom center to remove bulk.
Thinking through the logic top down we’ve got a challenge right off the bat. To me, the turtleneck collar is a lost cause. No one wants seams on the inside of an already bulky turtleneck. That feature will probably need to be knitted in the round on DPNs. After that we’ve got the capelet yoke area, formed by the faux raglan style increases. The most obvious choice to flat-ify this part is to turn the unibody capelet back into four pieces – a front, a back and two sleeves – to be seamed together along the raglan lines as real raglans are.
To do this, I’d probably take the stitch count from the after-collar increase row just before the faux-raglan feature starts, and deconstruct it back into those four pieces. For example, I’d take the recommended stitch count for the front and add two selvedge stitches. These will be eated up as seam allowance when the garment is sewn together. Then I’d follow the instructions for the front area, working my increases as directed, but doing them TWO stitches in from the edge (one stitch to make the decorative line, plus the selvedge stitch for sewing up later). At the post-raglan point where the piece is long enough according to the original pattern, (when the sleeve stitches were slipped onto holders), I’d cast on one quarter of the total stitches that are to be added at the left edge of my piece and half at the right, then continue knitting to the specified total length. (Remember the original just gives one number to be added between what is the front and back. I need to divide that by four and put one quarter at each edge of my front. The remaining stitches would be added to the back.) I’d end up with an object shaped like a house with a Mansard roof. The other pieces would be made the same way. The back would be identical to the front. The sleeves would be similar but predicated on a smaller initial cast-on. I’d assemble the thing by first sewing the raglan seams, then the seam from lower hem to cuff. Finally I’d pick up my provisional stitches at the neck and add the collar.
But I’m not bound to do this piece top-down. I could also knit it in the flat bottom-up. I could divide the ending body stitch count in half (adding a selvedge stitch at either side to make up for a seam allowance) and working on half the stitches – knit the front and back flat up to the undearm. At that point, I’d cast off the stitches that were added in the original just after the sleeves were slipped off, removing one quarter at each edge. Then I’d start the raglan shaping. But in a bottom-up piece, that shaping will be formed by decreases rather than increases. To preserve the simple yarn over detail of the original I’d need to do a bit of playing. First I’d work an inch or two plain (in the original the raglan area ended before the piece was long enough to reach the underarm). Then I’d work the left edge of my piece K1, SSK, YO, SSK; and the right edge K2tog, YO, K2tog, K1. The K1s are the selvedge stitches. The [decrease] YO [decrease} unit adds up to a net loss of one stitch, with one of the decreases making up for the decorative YO. This won’t be exactly analagous to the original because the stitches framing the YOs will be heavier, but it will be close enough to preseve the general appearance. When I had the requisite number of YOs and my stitch count was equal to the post-collar neckline count (plus two for the selvedge stitches), I’d slip everything onto a holder and begin the next piece. The back would be made the same way.
The sleeves would start off with the final stitch count for the cuff, and along the way add a stitch at either edge right or left (I’d probably do M1 increases two stitches in from the edge at the ends of a row just to keep things neat when I seamed). I’d knit the same length below the raglan line that I did on the front and back, then plunge into the same logic to make the decorative raglan line itself. Once there were the same number of YOs in the raglan line of the sleeve I would guess that the sleeve’s upper dimension matched that of the front and back exactly (the open holes are more than decorative, they make the thing easier to count and measure). I’d slip the remaining stitches onto a holder and seam all the raglan lines. After that I’d sew the side seams and pick up and knit the collar in the round on DPNs.
Another alternate method would be a hybrid between flat and circular knitting. I’d work the front and back up to the point where the extra stitches are cast off, and the sleeves until they met the body to cuff measurement. Then I’d arrange them all on a circular needle, and finish out the couple inches of plain work followed by the raglan capelet yoke part in one big knit in the round piece. I’d still have seams to sew under the arms and from the armpit to the hem, but that would be it. (To do this, I’d eliminate the selvedge stitch that I added to the raglan edges in my first all flat knit alternative.
The second factor that might affect the transition from round to flat knitting is texture. In this particular sweater it’s not an issue. I’ve got miles of stockinette, a couple of rows of purl welting, and some K2, P2 rib. That’s it. In the round stockinette is "never stop knitting." Flat stockinette is alternate rows of knit and purl. No big translation problem there. However, if I had a texture pattern and the original was knit in the round I’d need to do the mental shuffle, turning knits to purls and vice versa for the odd numbered wrong-side rows. Having a texture pattern in chart format makes the right-side/wrong-side translation easier. I might even need to adjust the row on which the pattern starts so that the bulk of my increases and decreases end up on an easy-to-manipulate right side (knit) row. Yes, they can be done on a wrong side (purl) row, but then the problem of which increase or decrease when done on the purl side mimics standard right side row stitches intrudes. All exist, but many are puppy awkward to do (more on this tomorrow).
Colorwork in the original can also present a challenge. Many people find stranding easier in the round. You always have a right-side row facing you, and it’s very simple to see the design build as you knit. Stranding can be worked flat too, with every other row a purl row. It’s harder to see the pattern on the purl side, and some folks don’t enjoy manipulating multiple strands while making purls.
So there you have it. The first thing to do is to examine the original in the round pattern and see where seams would go. The second is to look at the texture or color pattern used to see if it can be comfortably translated. Once the individual pieces are determined, the cast on numbers can be derived from the original pattern (half for the front, half for the back, plus an optional selvedge stitch). Then it’s just a matter of knitting and seaming.
Tomorrow I’ll look at going in the other direction, what the equivalents of standard increases/decreases are if you do them on the wrong side, translating flat knitting into circular knitting and why one might want to work in one style or the other.
CATCHING UP
With great joy I announce the end of my most recent death-march deadline at work. The one that has eaten up nearly every day since Halloween (including weekends). I spent this past weekend catching up on a belated birthday celebration, exhuming some parts of my house from clutter, and returning at last to knitting.
One half of the birthday was a memorable dinner with The Resident Male at Blue Ginger restaurant in Wellsley, MA. Not being as eloquent on the subject as Chocolate and Zucchini (one of my favorite reads) I won’t bore you with a dissection of the meal beyond saying it was a leisurely evening of fine food and wine. The company wasn’t bad, either.
The other half of my celebration was a day of personal indulgence, including a visit to the local yarn shop to take advantage of their semi-annual clearance sale. I bought some Encore and a pattern (see below), a couple skeins of sock yarn, a kit to make Dovetail Design’s Rainbow Hat and Scarf (with a full spectrum of Frog Tree alpaca) and two full bags of Jaeger Matchmaker DK in an intense charcoal gray heather. The Matchmaker is destined to become the Sarah James Ribbed Leaf pullover.

On the knitting front, I’ve started winding the tie-dyed cotton. I made the mistake of washing and drying it in the machine. While in concept doing so wasn’t particularly wrong, I could have used more ties to secure the yarn. I ended up with quite a tangle which I am slowly deconstructing back into a ball. It’s not difficult or knotted, but it is tedious. I’m very pleased however with the result. Knitting it however will have to wait for another time, as I am wildly behind on other projects and need to finish them first.
On that Encore – I’ve got a pal at work who has two little girls, with a third on the way. Everyone always knits for the new baby, so I decided to do something different. I’m making two "Big Sister" sweaters in the girls’ two favorite colors for the older two. Since there will be ample laundry in that household, I’ve chosen an easy-care acrylic wool blend. The two sweaters will be identical except for color. One is kid’s size 6 in screaming pink, the other is a size 4 in eggplant purple.
As I mentioned before, I’m woefully behind in knitting so I am using the short-cut of a purchased pattern. A quick to knit, ultra-simple purchased pattern. I’m working Cabin Fever’s 1,2,3, Top Down (#609). It’s a unisex simple knitting pullover, worked top down. The pattern covers kids’ sizes 4-8, and is worked in standard worsted. As you can see, having started on Saturday, I’ve gotten about a quarter of the way through the larger size. I’m past the point where the sleeves split off, and am now well into the body tube. The pattern itself is quite simple and easy to follow. I’d recommend this as being a design that a newer knitter would enjoy. So far the skills needed to accomplish it have been casting on, knitting in the round, and yarn overs. A small bit of purling is introduced in the ribbing and (optional) welt at the base of the collar.

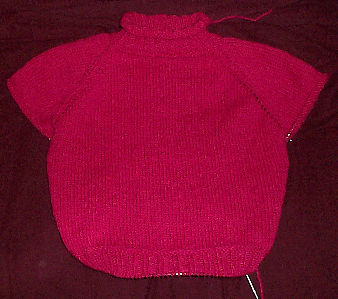
BIG SISTERS’ SWEATERS
As you can see, the first of the two sweaters I’m making for my friend’s kids is more than half-way done. I’ve got only a couple more rows of the body ribbing to go before doing the rolled lower edge, then I get to do the sleeves.
Of course, anything in a kids’ size 6 knitted at 5 stitches per inch goes quickly, especially when it’s just miles of stockinette. There’s just two more skills needed in this pattern – k2tog, and casting off. I’d rate this a solid beginner’s hit.
Now, about those sleeves…
My bugbear of the knit-in-the-round genre has always been making the sleeves even. I am a lazy knitter. I hate counting rows. Being the largest idiot in my universe, I try to idiot-proof my knitting whenever possible. I am not a big fan of two-circ technique for things like socks (I’m much faster on DPNs), but I think for these sleeves, I’ll give that method I try. I’ll use a pair of longish ones, and work both sleeves side by side, each from its own ball of yarn. I’ve discussed both alternate circular needle methods and side-by-side knitting of two items before. More on this tomorrow after I’ve gotten enough done to photograph.
In other blather, I’m annoyed with Knitters Magazine. This isn’t an unusual occurrence, but it does have other root causes. Most recently I’ve been annoyed because of their overall lackluster patterns – the sad, baggy, unflattering things; the unnecessarily tarted up,overembellished items; the ill fitting pieces in flash-in-the-pan novelty yarns that look stupid even on the svelte; and the parade of useless accessories that look more like hand-knitted fungus than anything else. Then there’s magazine format, use of ill considered yarn description standards, and the treasure hunt to determine the basic info needed to actually work the patterns. To be sure, the latest issue has its share of those, but it also has one item that looks to be worth knitting – the first one I’ve been tempted to make from Knitters in about five years. It’s the lace stole on the cover. I’d show you the thing, but as usual the Knitters site is throwing errors.
Why am I annoyed when the rag has finally presented something other than rags?
Because the issue appears to be in yarn shops and book stores, but not in my mailbox. My issue has either gone astray, or is lurking somewhere in the post office. I know several other subscribers here in Massachusetts. Their issues are also late. I suspect the magazine’s excellent standard of professionalism is to blame. The same one that is responsible for the buggy website, poor subscription management/customer service, lousy pattern choices, and severely flawed published instructions.
DYEING FOR ANSWERS
Some questions fell out of yesterday’s post:
Which dye kit did you buy?
This one. It’s by Jacquard (aka Rupert, Gibbon and Spider). It retails for around $19.00 and is widely available on the Web and in crafts stores. There are probably more cost effective ways to get the materials it contained, but I was paying for convenience and (being an idiot working with kids) idiot-proofed directions. Remember, I bought the thing primarily to dye shirts as a birthday party activity for 8-year olds. Dyeing my yarn was a lagniappe.

What kind of dyes did you use?
The kit comes stocked with pre-measured Procion MX dyes in squeeze bottles. They’re cold water dyes, and quite vivid. I know very little about dyes and dyeing, but it appears from a cursory web search that these are ideal for cotton.
Why did you use cotton and not wool?
See above. Also, I have to admit that the sacrificial aspect of experimentation played a key part. The cotton yarn I used was very inexpensive and has been stash-aging long enough to qualifty as being "almost free."
At present, my stash includes two sweater sized lots of undyed wool. One is a very special thing – hand-spun Churro wool, a gift from a friend in New Mexico. It’s waiting for the **perfect** thing to do with it, and is not to be wasted on an experiment that might go wrong. The other is a more modest yarn, but is a small producer local product, blooming with lanolin. I was unsure of whether or not the dyes would be as suitable for a protein fiber as they are for cellulose fiber, and I didn’t know how the presence of lanolin would affect the process. The kit was designed for cotton garments, so cotton yarn was my chosen target.
Did you measure out your skein diameter for optimal flashing?
No. I thought about doing that, but doing so would require that I knit up some swatches and do gauge calculations, then do some test-knitting to determine the final flash diameter. (Yes, I’m still progressing with my flash camo tee). Instead I decided to wing it. I extended my swift to its maximum diameter and just used that. My skein is about 1.5 yards in circumference. Give or take.
Have you rinsed the yarn yet?
No. Not yet. The kit specifies letting the dyes sit for a while, preferably overnight, to make sure they are firmly fixed. The picture I showed yesterday is of dye-damp unrinsed yarn.
What the heck is soda ash?
I didn’t know, so I looked it up. Google is my friend.
