CHARTING 104 – THINGS THAT MAKE LIFE DIFFICULT
In a perfect world there would be an intuitive set of graphing symbols
that would be quick and easy to understand. They’d cover all possible
maneuvers in knitting, and would be useful in every circumstance. This
is however, a total pipe dream. Knitting is near infinite, and
knitters are fiendishly clever in the variant ways they have found to
produce their desired results. There are a number of knitting
techniques and stitches that pose special problems to charting:
Large numbers of stitches increased or decreased at the same time
When you see instructions like “make 5 in next stitch” you’ll need to invent
a symbol to handle it. I’ve seen German and Japanese charts that use a
variant on something like this:

Decreasing a large number into one stitch would generate need for something
similar, perhaps with the V upside down, and the number of stitches to
be eaten indicated between its open toes.
Also unless you’re dealing with an edging, it will probably be impossible to graph up a
pattern containing massive group increases or decreases without using the
no-stitch boxes we discussed yesterday. Still, these problems fall into
the “inconvenient but not insurmountable” camp.
Bobble and bell-shaped semi-detached units
Some bobble and bell units are produced by knitting back and forth over a
small number of stitches, to make a blister-like addition that’s
attached to the main work at top and bottom. Most chart authors treat
this type of unit as a separate sub-process. The main chart may have a
single box with a specified symbol in it, indicating where the unit is
to be placed. The unit itself will be described either in prose, or in
a “mini-chart” accompanying the main chart as a sidebar. Another
“inconvenient but not fatal” challenge.
Patterns containing stitches either slipped from or knit into the row below
These can pose real charting problems, especially in linen stitch family
textures where large numbers of stitches are worked “out of row.” I’ve
seen large V-shapes superimposed on the graph that are supposed to
represent these distended stitches, but they are visually difficult to
deal with. If there are lots of them, the clutter can be overwhelming,
and some linen stitch or slip-stitch based patterns may be impossible
to graph at all.
It is interesting to note that B. Walker used a special charting notation for her slip-stitch based mosaic colorwork. In that format each row of the chart represented two rows of knitting
instead of the more conventional one row worked = one row charted
ratio. She didn’t try to show stitch deformation by the use of a symbol
set, instead she stuck to two-color mosaic patterns that swapped colors
every two rows. The squares on her charts indicate whether one is to
form the next stitch by working with the current strand, or slipping
the color of the previous two-row set up onto the needle.
Threaded stitches or stitches with right-side floats, or decorative wraps spanning one or more stitches
There are some patterns that form colorwork or texture patterning by using
separate strands that are threaded back and forth through live stitches
during knitting. Other patterns use as decorative elements floats or
wraps of one or more stitches, deliberately formed on the right side of
the work. These are both very difficult to represent in charts. I’d
probably go with some sort of notation in the main chart that Effect #1
happens here, and accompany the chart with a separate detail write-up.
Novelty stitches
Some popular novelty stitches are near impossible to chart. Loop Stitch is a
good example. That’s the stitch used to make a surface completely
covered in shag-rug style loops. The manipulations required to make the
loops don’t lend themselves to graphing, and beyond noting which
stitches carry the loops in a piece that uses both adorned and
unadorned areas for contrast, indicating their presence is of little
value.
In spite of these exceptions, if a pattern contains just knits, purls, cables, simple increases and decreases – even twisted stitches – it can probably be graphed. The graph may be massive, but it can be done.
I’ve got only one nomination for a particularly vexing pattern to use in tomorrow’s object lesson. If you’re got one to suggest, please send me an eMail (replace the “AT” in the address with the standard @ sign).
CHARTING 103 – THE STITCH THAT ISN’T THERE
We’ve covered basic charting, and charting variable width edgings. Now
for panels and insertions. Those are patterns that can be used as
accents in the main body of your piece. Sometimes they show up as
single strip scarves, sometimes several repeats of the design are
combined across to make an all-over design (occasionally fitted
together with half-drop variations), sometimes a single panel is
repeated to make a long stripe in combo with a stockinette ground,
sometimes just one vertical repeat of the design is used as a spot
accent, sometimes panels of different patterns show up side by side.
What makes them different from edging patterns is that they can be
embedded in the center of a piece, and that piece can be knit in the
round.
These insertion style patterns can have either stable or variable stitch
counts from row to row. One with a stable count (either no
increases/decreases or an equal number of increases to decreases on
every row where they occur) are graphed more or less the same way as
the pattern in Charting 101. The ones with changing stitch counts do
pose special problems.
Let’s consider this simple variable count
insertion. It’s my own write up of a simple embossed leaf inside a
framing K2, P2 rib:
Cast on 9
Row 1 (wrong side): P2, K5, P2
Row 2: K2, P2, (K,P,K in one stitch), P1, K2
Row 3: P2, K2, P3, K2, P2
Row 4: K2, P2, (K1, YO)2x, K1, P2, K2
Row 5: P2, K2, P5, K2, P2
Row 6: K2, P2, K2, YO, K1, YO, K2, P2, K2
Row 7: P2, K2, P7, K2, P2
Row 8: K2, P2, K3, YO, K1, YO, K3, P2, K2
Row 9: P2, K2, P9, K2, P2
Row 10: K2, P2, SSK, K5, K2tog, P2, K2
Row 11: P2, K2, P7, K2, P2
Row 12: K2, P2, SSK, K3, K2tog, P2, K2
Row 13: P2, K2, P5, K2, P2
Row 14: K2, P2, SSK, K1, K2tog, P2, K2
Row 15: P2, K2, P3, K2, P2
Row 16: K2, P2, K3tog, P2, K2
As you can see, the thing starts out being nine stitches across, but grows on row 9 to 17 stitches across.
How to chart? The symbol set is pretty straightforward. Each
individual row poses no problems. For example, here’s row 8:

If we normed one edge like we did with the edging patterns, we’d end up with this:

While all the info is there and this chart could be worked from, it’s
deceptive in that it looks like an edging. Plus one of charting’s prime
directives – representing knitting in a format that’s visually akin to
the finished product – has been fouled.
So. Let’s look closer at this pattern, looking for obvious points of internal symmetry or
reference. We quickly see that the thing IS symmetrical. There’s a
center stitch in every row. Let’s stack our rows on the center stitch:

That’s closer. You can begin to see the leaf shape in the center,
but the wiggly edges are still a bit confusing. Here’s another
cut at the same basic concept. This time however, I’ve lined up
not only the center stitch, but also the knit ribs that frame it:

Those gray areas? They don’t exist. Flat out aren’t
there. They’re the equivalent of the stage attendants dressed in
all black who move props around in full view of the audience during a
drama or puppet performance. You’re not supposed to see them, even
though they’re in plain sight.
The grayed out areas are spacing mechanisms introduced for the sake of
visual clarity in the rest of the pattern. They have no
correlation to stitches in the actual knitted piece. Working from
this chart, I’d skip right over the gray background. My first row would
be P2, K5, P2, just as in the written directions. Now different
authors represent non-charted “no stitch” or null spaces
differently. I chose to use a general background shading, with no
boxes marking individual stitches. Other people don’t bother
removing the box notation from the no-stitch spaces. On their
charts the no-stitch boxes can be a bit harder to interpret.
How to know when to use mystery no-stitch boxes? Although it’s a
matter of personal preference, sometimes they’re absolutely necessary
because there just isn’t room to graph out your piece unless they’re in
the mix. I could graph out my embossed leaf without the
no-stitch areas, but if this leaf was part of a larger graph covering a
wider area, the distortion introduced by the width of the longest row
might ripple out and perturb the representation of design elements to
either side. In that case, using the no-stitch boxes would keep
my two edges parallel and let the leaf panel sit more comfortably in
the total project chart. That in turn would help the
knitter keep his or her place on the wider graph.
Tomorrow I’ll look at patterns that are extremely hard (if not
impossible) to chart out. The final piece in this series I’ll
build one chart for a lacy or complex cabled design that has presented
a special challenge. Nominations for the final object lesson will
be accepted. Please contact me off-list before Thursday night if you know of a prose texture pattern you’d like to suggest for group edification.
CHARTING 102 – VARIABLE STITCH COUNTS
I’m delighted that people found yesterday’s post useful. The most asked
question though was TexAnne’s original one – what does one do when
stitch counts change from row to row?
The guiding principle here is clarity of illustration. You want your chart
to reflect as closely as possible the visual appearance of the finished
knitting. That might mean that you handle the problem differently
depending on the general situation. An edging for example might be
graphed up differently than a panel insertion.
Let’s start with the basics – some different types of increases and decreases. They are
after all the Evil Agents that perturb stitch count across rows.
Increases come in two flavors – visible and invisible. A visible increase is
something like a yarn over. It’s an increase that leaves an intentional
eyelet hole in the piece. Invisible increases come in all sorts of
flavors – some more invisible than others. Often an invisible increase
is called a make one. Some people favor raised bar style increases,
others do the knit into a stitch of the row below, and others go for
the less invisible knit/purl into the same stitch (or k1 front, k1 back
into the same stitch). Which method of invisible increase is used is up
to the knitter, although the designer may suggest one that works
particularly well for the project in hand. In general though, the two
types of increase have different notations in charting. I favor a boxed
circle for a visible increase and a boxed M for an invisible increase.
I even go so far as to slap a bar across the M if I want to
specifically call for an invisible increase that forms a purl stitch.
Here are the symbols I use for some of the more common increases and
decreases:

Apologies for the size of the illustrations today. I’m having an argument
with the picture upload facility, and this is the best resolution that
I can get working this morning. Although my symbols were inspired
by B. Walker’s and L. Stanfeld’s two, apparently I stuck to industry
standard practice, doing whatever the heck I felt like doing and coming
up with my own set.
Now. How do you use these?
Let’s start with a simple edging. Edgings generally have one straight edge
where they attach to the thing being trimmed, and one that’s dagged,
pointed, crenelated, scalloped, picoted or otherwise fancified in some
way. The fancy bits (I’ll call them all points for simplicity of
reference), are formed by increases and decreases. In some the
decreases come as partially bound off rows. Here’s a good example. This
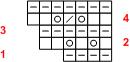
one is the edging I used on my Kombu scarf:
Cast on 4
Row 1, 3, 5 (wrong side) Knit
Row 2: K1, YO, K1, YO, K2
Row 4: K2, YO, K2tog, YO, K2
Row 6: K3, YO, K2tog, YO, K2
Row 7: Bind off 4, K3 (4 stitches remain)
Repeat rows 2-7
First off – assume that all edgings knit side to side are knit in the flat.
The ‘wrong side’ notation confirms this. Row 7 starts with binding off
and is a wrong side row. That means that if you hold the piece with the
RIGHT side facing you, the straight edge will be on your right, and the
ziggy-zaggy one will be on your left. Row 1 is not repeated, and
appears to be just a foundation row. Armed with this orientation info,
we begin charting rows 1 and 2.

Row one is a wrong-side row, so even though the directions say “knit” the
stitches are plotted as purls (that chart = right side view
thing). On row two we’ve got two yarn overs. They increase
the total stitch count by two. We know that this is an
edging. We know that the jagged edge will be on the left when
viewed from the right side. Therefore I have chosen to make the
stitches line up along the right hand edge. Here’s a proofing
trick. There are no decreases in this row, therefore number of
stitches in this row EXCLUSIVE of the yarn overs should be equal to the
number of stitches in the row below. 4=4, we’re o.k. Let’s
continue:
Row 4 contains two yarn overs, but the total stitch count is
increased by only one block. That’s because it also contains a
K2tog (stitch count +2yos -1k2tog = stitch count +1, not +2.) Row
5 is just another all knit row. Proofing stitch counts vis
a vis the previous row can be done by counting the number of plain
knits, plus two for every K2tog or SSK decrease. In this case
we’ve got 6=6. It works.
Row 6 and 7 get interesting. There is no uniformly acknowledged
(or obvious) symbol for binding off, therefore charts that contain
bound off stitches often use a text notation to indicate what’s going
on. Also remember if you bind off stitches you end up with one
remaining loop on the needle:
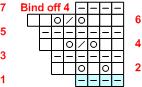
Again Row 6 increases total stitch count by only one (two steps
forward, one step back covers the YOs and the decrease). Row 7
includes the instruction to bind off four stitches, BUT there’s a
visual discrepancy between the chart and the written directions.
The chart says BO4, K3. The chart shows four stitches.
That’s because one of those is the loop that remains after you’ve bound
off the four stitches at the beginning of Row 7. You have that
loop on the needle, then you knit the remaining three stitches, for a
total of four stitches on the needle. I’ve also shaded out Row
#1. Just like the edge stitches in yesterday’s illustration, this
indicates that Row 1 is not part of the regular repeat. It’s a
foundation row worked at the start of the edging strip, and not
repeated thereafter.
As you can see, simple edgings are relatively easy bits of lace to
graph. Stitch counts do vary from row to row, but because they
have a stable edge, those extra stitches have someplace to go,
visually. Having built this foundation of basic concepts,
tomorrow we’ll do a panel pattern that doesn’t have the luxury of
a free edge, and introduce The Stitch That Isn’t There bugbear.
