I’m delighted that people found yesterday’s post useful. The most asked
question though was TexAnne’s original one – what does one do when
stitch counts change from row to row?
The guiding principle here is clarity of illustration. You want your chart
to reflect as closely as possible the visual appearance of the finished
knitting. That might mean that you handle the problem differently
depending on the general situation. An edging for example might be
graphed up differently than a panel insertion.
Let’s start with the basics – some different types of increases and decreases. They are
after all the Evil Agents that perturb stitch count across rows.
Increases come in two flavors – visible and invisible. A visible increase is
something like a yarn over. It’s an increase that leaves an intentional
eyelet hole in the piece. Invisible increases come in all sorts of
flavors – some more invisible than others. Often an invisible increase
is called a make one. Some people favor raised bar style increases,
others do the knit into a stitch of the row below, and others go for
the less invisible knit/purl into the same stitch (or k1 front, k1 back
into the same stitch). Which method of invisible increase is used is up
to the knitter, although the designer may suggest one that works
particularly well for the project in hand. In general though, the two
types of increase have different notations in charting. I favor a boxed
circle for a visible increase and a boxed M for an invisible increase.
I even go so far as to slap a bar across the M if I want to
specifically call for an invisible increase that forms a purl stitch.
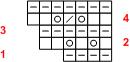
Here are the symbols I use for some of the more common increases and
decreases:

Apologies for the size of the illustrations today. I’m having an argument
with the picture upload facility, and this is the best resolution that
I can get working this morning. Although my symbols were inspired
by B. Walker’s and L. Stanfeld’s two, apparently I stuck to industry
standard practice, doing whatever the heck I felt like doing and coming
up with my own set.
Now. How do you use these?
Let’s start with a simple edging. Edgings generally have one straight edge
where they attach to the thing being trimmed, and one that’s dagged,
pointed, crenelated, scalloped, picoted or otherwise fancified in some
way. The fancy bits (I’ll call them all points for simplicity of
reference), are formed by increases and decreases. In some the
decreases come as partially bound off rows. Here’s a good example. This
one is the edging I used on my Kombu scarf:
Cast on 4
Row 1, 3, 5 (wrong side) Knit
Row 2: K1, YO, K1, YO, K2
Row 4: K2, YO, K2tog, YO, K2
Row 6: K3, YO, K2tog, YO, K2
Row 7: Bind off 4, K3 (4 stitches remain)
Repeat rows 2-7
First off – assume that all edgings knit side to side are knit in the flat.
The ‘wrong side’ notation confirms this. Row 7 starts with binding off
and is a wrong side row. That means that if you hold the piece with the
RIGHT side facing you, the straight edge will be on your right, and the
ziggy-zaggy one will be on your left. Row 1 is not repeated, and
appears to be just a foundation row. Armed with this orientation info,
we begin charting rows 1 and 2.

Row one is a wrong-side row, so even though the directions say “knit” the
stitches are plotted as purls (that chart = right side view
thing). On row two we’ve got two yarn overs. They increase
the total stitch count by two. We know that this is an
edging. We know that the jagged edge will be on the left when
viewed from the right side. Therefore I have chosen to make the
stitches line up along the right hand edge. Here’s a proofing
trick. There are no decreases in this row, therefore number of
stitches in this row EXCLUSIVE of the yarn overs should be equal to the
number of stitches in the row below. 4=4, we’re o.k. Let’s
continue:
Row 4 contains two yarn overs, but the total stitch count is
increased by only one block. That’s because it also contains a
K2tog (stitch count +2yos -1k2tog = stitch count +1, not +2.) Row
5 is just another all knit row. Proofing stitch counts vis
a vis the previous row can be done by counting the number of plain
knits, plus two for every K2tog or SSK decrease. In this case
we’ve got 6=6. It works.
Row 6 and 7 get interesting. There is no uniformly acknowledged
(or obvious) symbol for binding off, therefore charts that contain
bound off stitches often use a text notation to indicate what’s going
on. Also remember if you bind off stitches you end up with one
remaining loop on the needle:
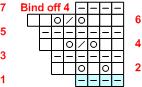
Again Row 6 increases total stitch count by only one (two steps
forward, one step back covers the YOs and the decrease). Row 7
includes the instruction to bind off four stitches, BUT there’s a
visual discrepancy between the chart and the written directions.
The chart says BO4, K3. The chart shows four stitches.
That’s because one of those is the loop that remains after you’ve bound
off the four stitches at the beginning of Row 7. You have that
loop on the needle, then you knit the remaining three stitches, for a
total of four stitches on the needle. I’ve also shaded out Row
#1. Just like the edge stitches in yesterday’s illustration, this
indicates that Row 1 is not part of the regular repeat. It’s a
foundation row worked at the start of the edging strip, and not
repeated thereafter.
As you can see, simple edgings are relatively easy bits of lace to
graph. Stitch counts do vary from row to row, but because they
have a stable edge, those extra stitches have someplace to go,
visually. Having built this foundation of basic concepts,
tomorrow we’ll do a panel pattern that doesn’t have the luxury of
a free edge, and introduce The Stitch That Isn’t There bugbear.
