And so the stitching on the Italian multicolor piece is complete!

The sprigs are done. I will do a final patrol over the thing to see if I might have forgotten to fill a spot, or left out a curlicue, but unless something surfaces, there is no more double running, Montenegrin, or two-sided Italian cross stitch to work.
What I am up to now is the narrow rolled hem. I want to thank long-distance friend Rhaeya for posting a how-to photo of her method of hand-working a narrow rolled hem on linen. It’s far more efficient and easier than the method I learned from my Grandmother. Granted – the family method was predicated for use on chiffon and it came in handy for a wedding I attended decades ago, which required a bridesmaid’s dress with ruffled tiers of that stuff in light blue. But it didn’t work quite as elegantly as Rhaeya’s does for this heavier linen.
You can see I’ve done the bottom edge, and have begun the side on the left. The remaining hem will probably take another two or three days to do with absolute precision. After that comes a layer of decorative stitching around the edge. The inspiration for that is this photo of the museum original:
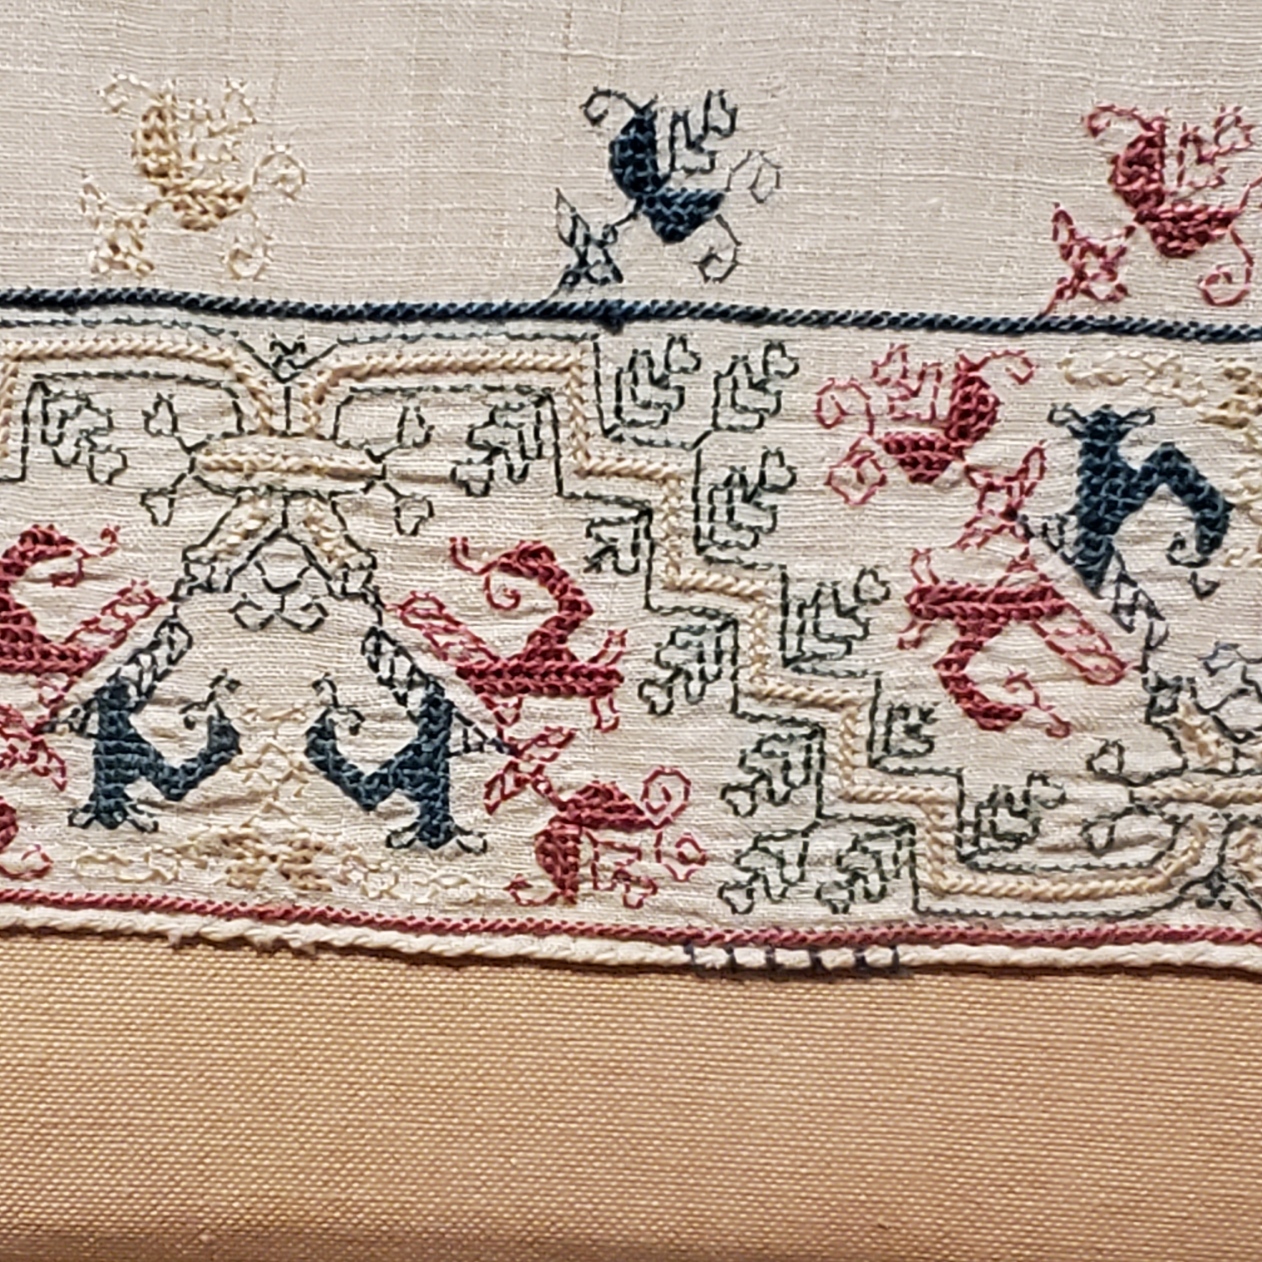
See the green verticals? After staring at the thing and doing lots of thought experiments, I have decided to not work them as simple blanket stitch or buttonhole stitch. There’s no real evidence for the “spine” of color those stitches would create along the edge. Nor are these stitches whipped at at angle. A bit of experimentation might be in order, but I do think that some sort of open chain stitch or looping/knotting logic was used here, one that left verticals on both sides, but with a line of horizontals on only the reverse, linking the verticals at the base adjacent to the red border.
I have no pix of the back of the work to confirm my guess, but I do think that it is logical. The only other option would be to take invisible stitches between each rising green line through the body of the hem, with no horizontal stitches seen on the surface front or back. A possibility, but too fussy. The more I look at this, the more I consider the labor that went into my small quotation of the whole, and the more I think on how the larger piece might have been made, the more I believe it was a workshop product. Done as quickly as possible, by a team of stitchers. Discontinuities in corners, very slight differences in the design as stitched on the different sides, and the size of the piece are the main drivers of my thoughts.
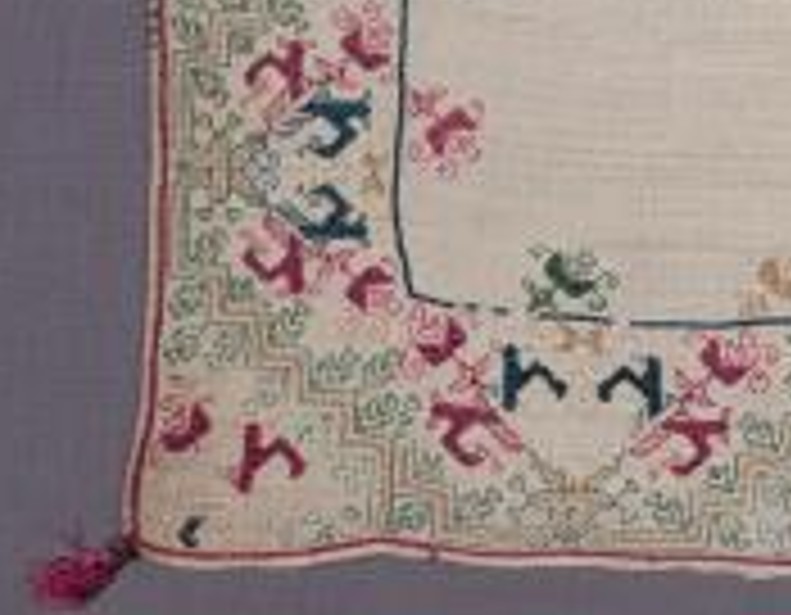
So the simpler I can do it, the better. Done as quickly and efficiently as I can, in the spirit of my posited long-ago workshop. And when that stage is done – probably another four to six days, I will cap it all off with my initials and date hidden someplace in the piece, plus little red tassels on each corner, again in homage to the original, as seen below.
UPDATE:
Folk have asked me for more details on the rolled hem methods I mentioned. I have gone back to my friend and received permission to publish the info and photo below.
First is my Grandmother’s method. She showed it to me way back when I was a kid, no older than about 12. She was mending the frilly collar of my Great Aunt’s best blouse, which had snagged on something. The collar was a froth of chiffon ruffles. To fix the bit of blown-out rolled hem, she teased out a bit of the hem on either side of the snag, then took a toothpick or darning needle and rolled the exposed material tightly around the end of it, making sure that the raw edge was inside the roll. Then she took a very fine needle and sewing silk (not fat cotton thread she used for machine sewing), and with tiny stitches, stitched from the edge of the roll catching just a tiny nip of the fabric – fixing the rolled hem in place. She did a few stitches, then advanced the toothpick or darning needle, rerolled as needed, and continued on. The result was nearly invisible. Hard to tell that where the snag had been. The hem “dipped in” just a bit; but the mended bit was uniform with the diameter of the rolled hem north and south of the former damage.
But rolling that way around a core isn’t practical for the 40 count linen I’m using. Too bulky. So I was dreading having to finish. Then my friend, professionally known as Rhaeya Mars, Costume Designer M.F.A, posted this photo of a work in progress in her Facebook feed:
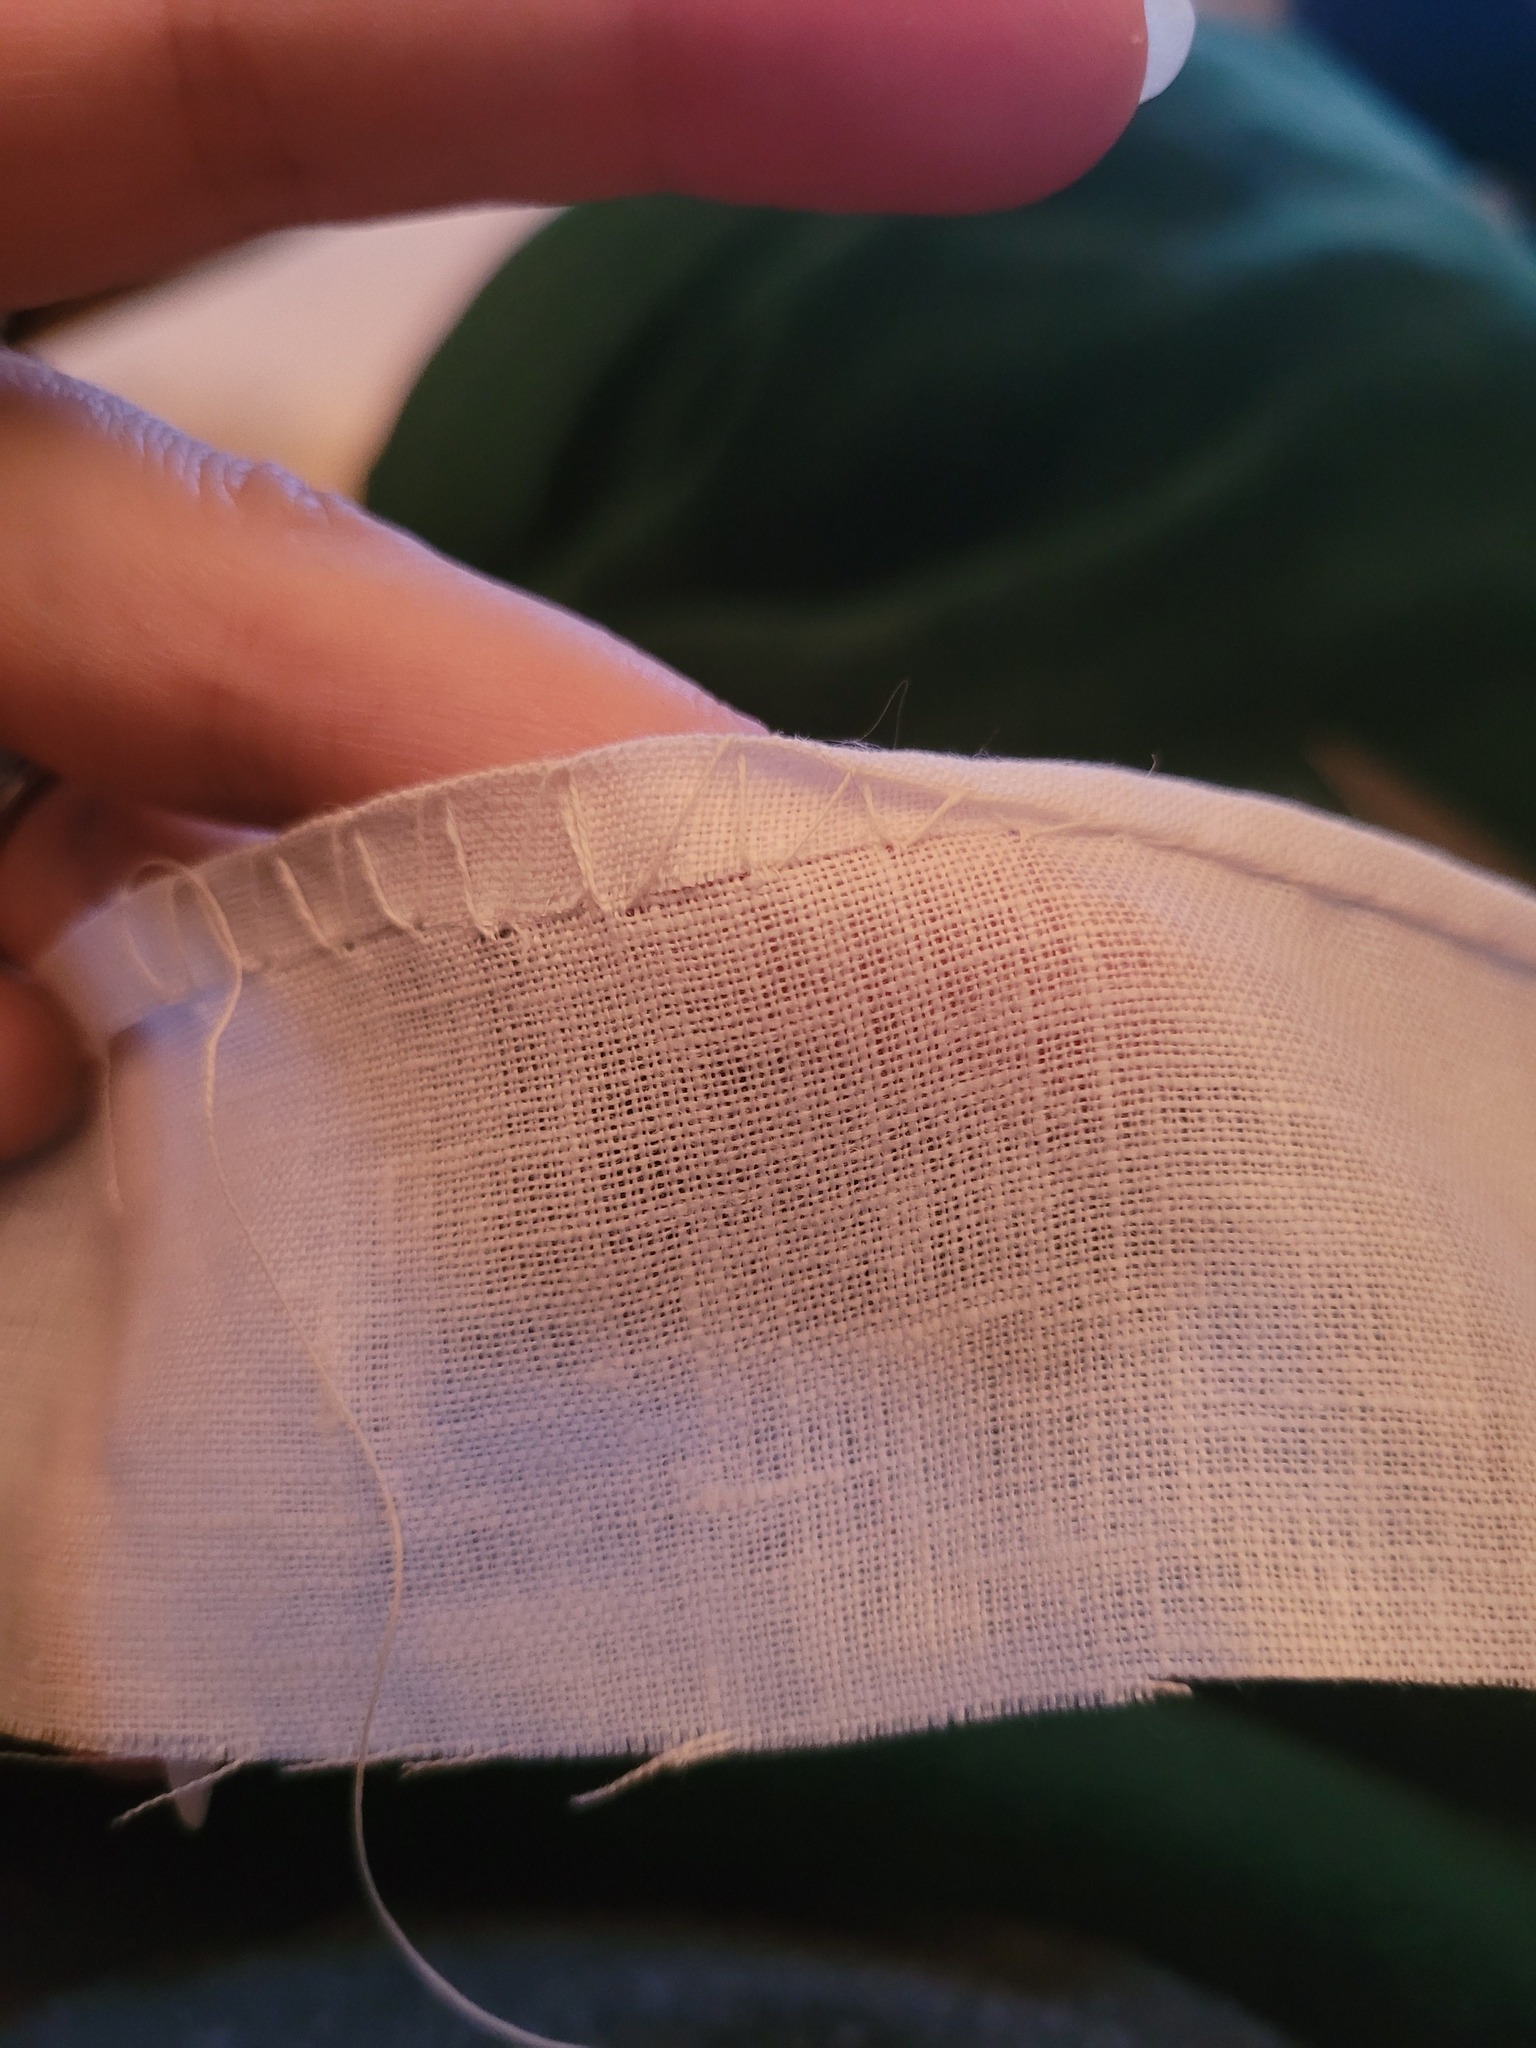
Now this method of folding, nip-stitching, and drawing up to encase the edge may be old hat to many of you, but to me it was Dawn Over Marblehead. I could do that! I could do it on the count to ensure an even width! I could hide the nips along the edge of my established border row of red Montenegrin stitch.
And so I am.
Thank you again Rhaeya! You saved me from endless fumbling, and ensured a clean finish for my project. Oh, and for the record she is the same talent who SINGLEHANDEDLY made her own Elizabethan embroidered jacket – the whole thing, from drafting and testing the garment pattern, to drawing the stitching design, working it in historically accurate methods and materials, and then assembling, trimming out and wearing the thing, to spectacular effect. Just to dazzle you, here is a display of it in modern context (minus the rest of the complimenting outfit).

Stunningly beautiful. Don’t suppose Rhaeya would do a guest post on her hem technique?
I will ask if I can echo her photo. It is probably standard technique and old hat to everyone except me. The trick my grandmother showed me involved a toothpick or tapestry needle. Not what is needed here.
I haven’t ever tried a rolled hem because I’ve been too afraid of it fraying and sprouting threads in all directions. Did find some instructions online. I should just pull out some scrap fabric and give it a go – something that won’t matter if I make a mess of it.
Oh, that’s beautiful!
I, too, would be interested in your friend’s hemming technique …
Main post has been updated with the hemming info.