LEFTOVERS FOR LUNCH
I’m not quite sure why – maybe it’s spring doldrums, but I continue to be rather uninspired by knitting. Since I wrote last, I’ve finished two more pairs of socks and am half-way through the third. One of those pairs has already been given away, so no pix are possible but here’s the second rather boring pair:

About the only thing I can say about recent sock production is that I’m trying to use up leftovers and odd skeins. The turquoise in the pair above is old Kroy 4-ply (pre Kroy Sock). The multicolor is a Schachenmayer sock yarn, a ragg blend of spring pastels, mint, turquoise, yellow and pink leftover from a baby project. I had only one 50g skein of each.
The sock on needles below is a more ambitious adventure in leftover exploitation. I save every little bit of sock yarn. You never know when you’ll need as little as a row or two to work a contrasting color stripe. Along the way, larger bits get used up to make baby booties in my favorite pattern –Jane’s Booties by Ann Krekel. But I tend to use mostly the brighter colors and primary colors for the booties. This means that the tangled mass at the bottom of my sock yarn box is disproportionately a large number of tiny balls in browns, greens, and muddy mixes (the in-between parts of self stripers). Since there’s more than enough of those leftovers to do a couple of pairs of socks, and I wanted to reclaim my storage space, I decided to work them up.
Even though I need to use lots of little bits, I don’t like lots of darned ends in the foot part of my sock, so I decided to use some of the larger quantities for the feet. The ankle part however is fair game. The foot is rather humdrum, toe and heel in the same brown, and 6×2 stripes of green and brown. Rather than tons of skinny stripes I opted to do my ankles in entrelac:

I’ve got bits of my brown and speckled green in the ankle, plus odds and ends of three self stripers and a couple of raggs and other prints. Lord knows what yarn labels these were in specific, but likely suspects include Regia Ringel, Schoeller Stahl Fantasia and Opal, all chosen because somewhere in their repeats they included green and/or brown. The second sock will begin similarly with a very plain foot part. Then it will explode into a similar bit of entrelac, although I won’t be using the exact same mix of leftovers. I do have just enough of the first set (most notably the orange and brown) to unite the look of both socks so they end up being fraternal twins.
As for what pattern I’m using – I’m not. These are toe-up socks with Figure-8 toes, worked on 72 stitches around (rather large gauge for me, and quick to knit), with a short-rowed heel. I worked about three rows beyond the heel in the speckled green before blasting out into the entrelac. To keep the ankle a manageable width, I had to do some decreases. Each foundation triangle “eats” 8 stitches of my circumference (k2tog, k1, k2tog, k1, k2tog) to produce patches that are 5 stitches wide. That’s 9 five-stitch foundation triangles in total around the ankle. Then I continued in normal entrelac manner until the sock was long enough. On the last row of half-triangles, I reintroduced the stitches I trimmed out before to restore the piece to 72 stitches. I’m now working my standard 20 rows of plain old k2, p2 ribbing at the top.
One more note. To keep from going nuts, I worked the entrelac patches using “backwards knitting.” I used my usual yarn in left hand Continental method for what are normally the knit side rows, but instead of flipping the work over to purl back on each 5 stitch patch, still holding the yarn in my left hand I used a throwing variant to knit back from left to right. Much more efficient than flipping back and forth a zillion times.
So I guess the moral of the story is that frugality pays. If you save all those small bits you can look forward to some interesting adventures in sock knitting.
ONCE A SMART ASS, ALWAYS A SMART ASS
More nostalgia. I was digging through an old trunk the other day and I came upon a stack of my old embroideries, mostly unfinished. The majority of my finished work got given away as gifts. The completed pieces I still have I’ve posted here on String already, so this stash is in fact my “Chest of Embroidery Horrors,” a precursor to my “Chest of Knitting Horrors.” The first item in my stack was this odd little object, about 4 inches wide by 7 inches tall.

I doodled it up one weekend while I was in 7th grade (age 12 or so), obviously to hang in my middle school locker, picots and all. There was quite a fad for locker interior decorating among the other girls at Teaneck, NJ’s Benjamin Franklin JHS at the time. They did up elaborate confections of varying degrees of utility using contact paper, ruffles, shelf liner, sweet little color-coordinated pouches and shelves, magnetic mirrors, beads, decorative buttons and the like, trying to out-cheery or out-trendy each other. Many did whole themes in the school’s colors, or paeans to favorite bands or actors. Others copied design tips from hot teen magazines. I suppose it’s not shock to see that this same generation grew up to worship at the shrine of Martha Stewart.
I stitched my sad little sampler partly for fun, and partly to poke fun at the overly elaborate, overly girly, just plain over done lockers of my peers. I don’t remember if the other girls thought much of my embroidered commentary, but I do remember a couple of teachers coming by and asking to see the thing, then convulsing with laughter. And seeing it each day jump-started my mornings with much-needed sarcasm. Subversive stitching in 1968 from a sardonic pre-teen.
As to the various animals and plants on the sampler, there’s no deeper symbolism behind them, except for the cats and the budgie at the bottom. When I was a kid we had a couple of cats. The white one with the black tail was named Pixie. The Manx was Cola, from his rain-soaked tabby color and the Spanish for “tail” – an attribute he lacked. The other tabby and the bird belonged to friends. It happens that my severe allergies disappeared when I went off to college, away from home and the cats. I still miss their antics, but I’ll never live with a cat again. Breathing is much more fun.
I’ll post pix of some of the other pieces. At least one of them also qualifies for the subversive label.
DOUBLE DIAMOND EYELET INSERTION PANELS
UPDATE: THESE CHARTS ARE NOW AVAILABLE AS AN EASY TO PRINT PDF, UNDER THE KNITTING PATTERNS LINK, ABOVE.
As promised, and thanks to the Tofutsies sock recipient, here are pix of that pair. She’s a far better photographer than I’ll ever be, so for once shots on String have an element of clarity:


Thanks, Merlyn! You can actually make out the diamonds of eyelets. And thanks again to Kathryn for the Tofutsies yarn. (I feel especially enabled today.)
To make life easier for future reference, here’s the chart for the ankle pattern. It’s repeated four times around the sock, a convenient one panel per needle if you’re knitting with four needles holding 18 stitches each, or two circs with 36 each (a sock circumference of 72 stitches, the count for the largest gauge I knit for myself). This can also be worked as side by side panels of 16 stitches by eliminating columns 1 and 18 (a sock circumference of a more usual 64 stitches). The astute will be able to pick out from the excellent photo that I followed the pattern as presented in Duchrow, but my chart below offers up several modifications to the original:

Or if you’re adventurous, here’s my own riff on the same idea to make an argyle-like diamond studded all-over repeat – this time requiring a fixed multiple of 18 stitches (It can also be worked as a single panel of 18):

This adaptation is so blindingly obvious that it must be presented in other stitch sources. For example, without running to my library I am pretty sure that Walker presents a diamond of double YO eyelets in her second Treasury. Which is another way of saying that there’s little new in knitting, and most invention is more of a process of rediscovery than virgin creation.
BRAIN CRAMP OUTSIDE OF BOSTON
UPDATE: THIS TEXTURE DESIGN IS NOW AVAILABLE AS AN EASY TO PRINT PDF UNDER THE KNITTING PATTERNS LINK, ABOVE.
Here I am. Remember me?
As occasional readers here have noted before, extended periods between posts usually mean that my professional life has up and swallowed my personal life, and that I’m hard pressed by work-related deadlines. The past couple of months has been no exception. I will say that even though I get swamped, I do try to grab a little relaxation time, but when I do I usually stick to autopilot rather than challenging knitting.
Which is all a round about excuse for why nothing has been done on my Sempre pullover of late. I haven’t had time to sit down and draft out the fulll size mockup. I’ll get around to it, but not until after I decompress. In the mean time I’ve been sticking to nice, boring sock knitting.
Long Time Needlework Pal Kathryn surprised me with a nifty gift – two skeins of lively, variegated pink SWTC Tofutsies, a wool/cottom/soy silk/crab shell chitin fingering weight yarn. I was pleasantly surprised by the Tofutsies. I’m not a fan of cotton sock yarns, and usually stick to all wool or wool/nylon. To me cotton is unstretchy to knit, and both clammy and pebbly underfoot. Not so the Tofutsies. It knits up nice and soft, not pebbly at all. It is however not as stretchy as wool – sort of somewhere in between wool and cotton in total stretch. Because I favor toe-ups with short row heels which rely heavily on total stretch for their ankle to instep fit, I was hesitant to use the Tofutsies for my standard issue sock. Instead I adapted Wendy’s toe up gusset heel for my stitch count. It worked perfectly, making a sock with more than enough depth and with for comfortable fit, even with the un-stretchy yarn. For the decorative ankle part, I adapted yet another one of the simplest double yarn over eyelet insertion strips from Duchrow, Vol. 1. This one featured diamonds of eyelets, embedded in an 18 stitch repeat. I wish I had pix, but I gave the pair to a pal who was thirsty for warm socks in a sprightly, spring pink. She has promised to take some snaps though which I will eventually post.
And for those who are dying to ask, no. This yarn does not smell like crab shells. If anything, it smells like cotton yarn, not wool yarn, even though it has twice as much wool in it as it does cotton.
My Tofutsies pair was a super-quick knit, so I started a second pair of socks out of another sock yarn new to my stash. This time it was Berroco Sox, in color #1425 (called John Moores on the B. website, and from the grouping named after the UK entrepreneur or Liverpool-based university, not the US baseball team owner), working my standard toe-up with short-rowed heel. I like this yarn. Although I did find one knot in the skein, the rest of the thing was comparable in feel and gauge to Regia or Fortissima. Very nice, indeed. Especially considering that it was slightly less expensive than those Euro-labels. (The yarn itself is imported.)
The color run repeated roughly twice between toe and heel for me, and with each stripe being very shallow and the color patterning being hard to discern in skein, was fun to watch build. You can’t really see it in the standard issue lousy String pix below, but I knit the feet smooth and introduced an ultra simple diagonal lacy detail on the ankle:

It’s a simple double yarn over diagonal, done on an 8 stitch repeat (my socks are usually 72 or 80 stitches around). The idea was to leave enough solid to let the color repeat play, but keep me from dying of boredom knitting miles of plain stockinette. Here’s left and right hand varinants of the thing, just in case you want to make a pair of complementary socks, too:

HAPPY ADA LOVELACE DAY!
O.k., so it’s not knitting. But String today celebrates Ada Lovelace Day, and takes part in a meta-project to honor women in technology, science and engineering worldwide on Tuesday 24 March. Although I’m non-of-the-above myself, I supposed if I had more support in advanced math, I’d have made it. But I didn’t and ended up a proposal writer – interpreting between the worlds of the engineer and the decision maker. So it goes.
It happens that the very first proposal I worked on was a series of grants for New York Institute of Technology to establish a pipeline program, providing tutors and other assistance to girls and minority students starting in fifth grade, with the goal of piquing then maintaining their interest and abiltiy in math and science. After completion of the program those students were pre-admitted to NYIT. I have no idea how many kids that program helped, but by my estimate the first group of them should be ten or so years out of college by now (fewer if they went on to grad school). Perhaps they’re fueling a quiet revolution in biotechnology or advanced computing somewhere.
In any case, on to the point.
A good place to start is the Smithsonian’s Women in Science gallery. Sure, it’s got pix of Marie Curie, of whom everyone has heard. But it also has pix of many women engineers, scientists, and science educators who are not as well known, but who should be.
I choose to honor Annie Jump Canon (1863-1941), luminary in astronomical research and stellar classification. Although living in a time deeply ambivalent (if not hostile) to advanced education for women, and suffering from profound hearing impairment after a teenage bout with scarlet fever Annie graduated from Wellsely College in 1884 with a degree in physics. She returned there for graduate studies in physics and astronomy, eventually gaining an MA in 1907. During her time at Wellsley she was hired by the Harvard College Observatory, and along with several other women, paid a pittance (less than a Harvard secretary) to assist Edward Pickering to compile the Draper Catalog, a massive, annotated atlas of all the stars in the sky.
While she was part of this project (itsef funded by Anna Draper, a wealthy widow of an amateur astronomer), Annie was instrumental in defining the spectral classification system, which defines the star classes O, B, F, G, K, and M – a system based on stellar temperature that along with later enhancements is still used today. Annie’s personal work included extensive cataloging of variable stars, including 300 for which she is credited as discoverer, and classifying over 230,000 stellar bodies, the most anyone has defined to this day.
You can read more about Annie and her work at a dedicated memorial at Wellesley’s website. There are other pages about her here, and on Wikipedia.
I close with a quotation from her:
“In our troubled days it is good to have something outside our planet, something fine and distant for comfort.”
Annie, shine on!
STRIP KNITTING LOGIC – TRANSFORMING A SCHEMATIC
My strip knit Sempre pullover continues to grow. A couple of people have asked about how I’m taking the generic pattern for set-in sleeves and transforming it for working in strips. It’s pretty simple. Here’s the basic logic (click on the image to see it larger):

I used Sweater Wizard to produce a simple pattern for a flat knit saddle shoulder V-n`eck pullover. The directions include a schematic, and describe a front and back each worked separately. I divided my total stitch count into 8 equal “slices” for the back and 8 equal slices for the front.
I started with strip #1 at the rightmost side of the back, using waste yarn and a provisional crochet-on cast-on I cast on my designated slice aliquot (plus one for the raised, visible seam ridge), and began working it from bottom to top using my Sempre yarn. I followed my pattern’s directions when I got to the armhole shaping, casting off the specified number of stitches to form the bottom of the armhole, then proceeding with the armhole shaping decreases. Since my strip is slightly narrower than my armhole, I didn’t get to finish my armhole decreases in strip #1. But that was o.k. I wrote down where I was in the decrease progression so I wouldn’t forget, and let the strip end most of the way through those decreases.
After I finished strip #1, I did another little bit of provisional cast-on for strip #2. I worked it at full width until I was at the spot even with the last stitch of strip #1. Then I began working the remaining armhole decreases as directed by the pattern. When they were done, I continued working #2 until I had reached the length specified at which the shoulder shaping was to commence. Just like the armhole shaping in strip #1, I worked it as written, letting strip #2 end when all its stitches were used up, and writing down how many decreases were “left over” and would need to be done in the next strip.
Strip #3 was more of the same – working until even with strip #2, then working the remaining shoulder decreases. Strips #4 and #5 were easy – there was no shaping required on either one.
Strip #6 is the mirror image of strip #3. Knowing how many “left over” decreases I did on strip #3, I knit strip #6 until I got to the same point where I began the strip #3 decreases, then working the same number of decreases but on the reverse (purl) side of my strip, made my mirror image. Strips #7 and #8 were done in the same way – working them even to their counterparts, then performing the decreases on each strip’s reverse.
I could have set aside the piece after strip #8, but I chose to keep going and to eliminate the side seam. The front begins with #9. It and strip #10 are duplicates of #1 and #2 on the back. No problems with either one.
#11 and #12 however present a challenge. I’ve got a V-neck. While it’s easy to center the V on the seam between strips #12 and #13, half of the V opening is wider than one strip. That means that strip #11 will have to bear some of the neckline decreases. But where to start them? I suppose I could have done the math and figured out on exactly which row to begin, and how many decreases to work, but I was lazy. Instead I cheated. I worked #11 until it was the length of the area below the V-neck opening (a dimension marked on my original pattern). I put a safety pin into its edge to mark that point and knit on for about another inch. Then I put #11’s stitches on a spare needle, and using another ball of yarn, began strip #12. I knit along on #12 until I reached my safety pin, then began my V center decreases, which I worked on the reverse. Every few rows when it looked like I’d catch up to strip #11, I hopped back to that strip and worked a couple more rows. Eventually I finished as many of the neckline decreases as the width of strip #12 allowed. It was easy to accomplish the remainder on strip #11 and finish it off, too.
I’ve just finished strips #13 and #14. Both were easier than the #11/#12 pair. I decreased at the neck edge on the public (knit) side of my strip until I ran out of strip width, then made up the difference when I go to the same length point on strip #14. After this it’s a simple matter of finishing off my last two mirror image strips to complete my back/front unit.
My only remaining challenge on the body (besides chugging through to the end) will be to figure out how to make the least bulky visible ridge seam I can at the underarm join between #16 and #1. Right now I’m not sure if I will use an inside out mattress stitch variant to make that seam or if I will try to knit my piece into a tube using a pick up/ssk pair similar to one of the joining methods used when edgings are knit on.
Then it’s on to the saddle shoulder sleeves, where new difficulties in twisted logic await. In the mean time, here’s a blurrier than normal photo documenting my progress:

Better photos will have to wait for me to finish restoring all of my software (a major household hardware upgrade has left me both improved and degraded in capabilities. I’m thankful, but not quite all the way back at steady state yet).
AMBITIOUS FOR A MOTLEY COAT
My Sempre pullover is shaping up quite nicely. This traditionally blurry String or Nothing photo of the growing back really does not do it justice.
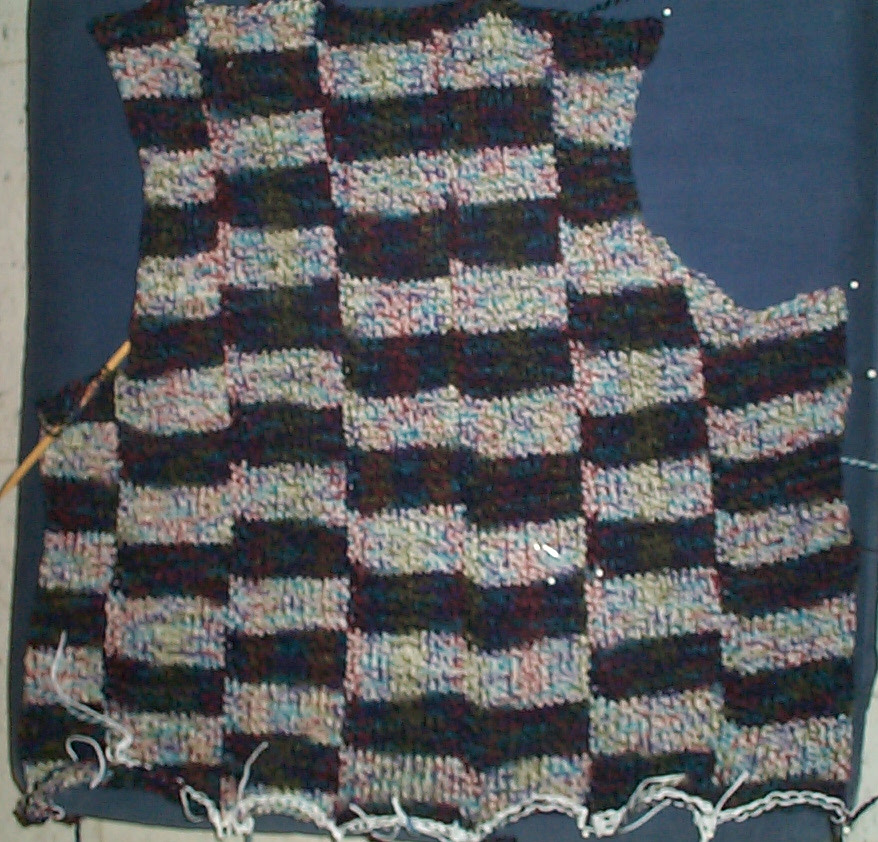
I like the haphazard arrangement of stripelets – that some almost align and others are flat mismatches with their neighbors. Working this yarn in strips is very quick. The fabric is quite nice, too – very light yet opaque. I’m on my third ball, and as you can see, am about 80% done with the back. At this rate I should have just enough yarn to finish the main pieces, although I may still need a contrasting yarn for the ribbings.
Working this has also been not as difficult as I feared. I’ve got my Sweater Wizard print out of the directions, including a nice thumbnail schematic. I’m working the strips to the schematic, using the program’s output to guide shaping. If you do this remember that the print out is for shaping a piece that’s knit horizon to horizon, and is symmetrical on both sides. If directions say something like “bind off 5 stitches at the end of the next 4 rows” know that working one strip at at time you’ll need to bind off 5 stitches at the beginning of the next two right side rows on the first strip (counted across the back, from right to left), and 5 stitches at the beginning of the next two WRONG side rows on the final strip. Sounds confusing, but taking it one strip at a time it has been relatively easy to get my tiny brain around the shaping.
I am planning on continuing around, joining the first strip of the front to the final strip of the back, producing a body tube that’s not joined at the shoulders. When I get to the shoulder strips (the saddle part of the saddle shoulders), I’ll work them back and forth as a strip that starts at the neck edge and continues to the cuff, starting out by ping-ponging between the upper edge of the front and back. Once that’s done I’ll work the rest of the arms off the sides of the now-established center strip. But the sleeves are a ways off yet. First I have to do the front and its deep V-neck.
SEMPRE STRIPE SADDLE PULLOVER
Now for something different. I suppose I should be going back and working on a previously started project but what the heck. Yarn is calling to me and it’s cold in my cubicle at the office. I’d like another sweater to add to my work wear collection. Luckily where I work a certain degree of sartorial eccentricity is accepted, so I can wear even my strangest sweaters without attracting approbation.
I picked up a discounted bag of Filatura di Crosa Sempre at Wild & Woolly‘s annual midwinter clearance sale. (My favorite time to shop at my favorite yarn store). 12 balls of a bulky weight self striper with good yardage. It’s a nice, soft and lofty wool, with a touch of nylon in a binding strand. 104 yards for 50g in a bulky is an excellent yield. I’m not petite, so 1248 yards for a pullover for me is going to be an iffy proposition. I’ll probably end up eking it out with coordinated color ribbings at cuff, waist and neck.
What to make from this demonstrative yarn? Swatching shows me that the thing veers between black and white background color segments, with each taking about 96 stitches before changing. That means that if I knit across my chosen diameter, each color stripe would last for about a row plus or minus. Interesting but too busy. And I don’t want pencil stripes around my entire perimeter. Instead I’m thinking of working on the principles I played with on the Modular Baby Blanket. Not in Log Cabin layout, but in narrow vertical strips, so that the colors stack into better defined segments. I also like the Kente Cloth like effect of narrow bands of un-aligned stripes next to each other. A possibility, indeed.
Now, how to squeeze this orange. Set in sleeves consume less yarn than do drop shoulder designs. Saddle shoulders even less. Although raglans are even more yarn-economical, I tend to avoid them for myself because they make me look like a strutting pigeon. While the differences among these styles aren’t huge, they can add up to about 50 yards – roughly half a ball of my chosen yarn. I like the way fitted saddle shoulders look on me, so I’ll go with them. Unfortunately, they present the most complex shaping challenge, complicated by this knit strip idea.
Having the right tools helps. I’ve got Sweater Wizard. I did up a gauge swatch and plugged in my values, fit, garment shape and size, and selected the saddle shoulder, V-neck knit sleeves from top options. It tells me that I’ll need 1196 yards with ribbing. VERY close indeed, I usually like to have a larger margin for error on a self-designed sweater. But I’ll go with it. As insurance, I’ll start on a provisional cast on and go back to add my ribbing later – in Sempre if I have enough left over, in that posited but as-yet-unpurchased coordinating solid if I don’t.
On to the strips. How to do them? I could work flat across the width of the entire piece, using 8 balls across and an Intarsia method to twist yarns around each other where the strips meet. That would work just fine. I’ve done that before on my Typeset Tee. That worked nicely. But I’m interested in introducing a vertical texture element on this project. I’m thinking of making the “seams” between the strips visible. In effect making the flaw of the visible join on the reverse of the Modular Baby Blanket, and making it into a design feature. To do that I’ll work in stockinette, but use the pulled loop method to knit each strip onto its neighbor.
Now for the fun part – with my instructions for how to knit the piece written (with software assistance) for a regular seam to seam working logic, but with a squirrelly knit method, how do I get there from here? Like usual. I’m going to wing it, aided mightily by the schematic, and guided by the pattern’s prose. I’ve got my stitch count set. I’ll mentally divide the schematic into strips and work each one starting with a provisional cast-on. I’ll do the required shaping as I encounter it. For example, if I start with the edge-most strip under the arm at the side seam, I’ll hit the armhole shaping. I’ll work those decreases as I come to them, and as true to the pattern as I can. Then I’ll break off the yarn, do another provisional cast on and work the next adjacent strip. In this quick-knit yarn the results shouldn’t take long to achieve. I’ve even played a bit with the idea a bit last night:

MINT MINI BABY BLANKET DONE – I-CORD EDGING
Taa daah! The finished mini-blanket:

Evie and Danielle ask about how I worked the corners of my I-cord edging. Rather than mitering them I use a little loop of free I-cord to accomplish the turn. It’s super simple. I’m working the I-cord rounds as K3, SSK, pick up one in main body edge. Then I push all the stitches back to the right of my needle, strand tightly across the back and repeat.
When I get to the corner, instead of picking up one in the main body edge, I work that last attachment round as K3, SSK but I don’t pick up one in the main body edge. I follow that round up by about 8 rounds of plain 4-stitch I-cord (K4, slide stitches to right, strand tightly across back, repeat). Once enough plain I-cord has been worked, I start back up with a joining round of K4, pick up one in the main body edge, followed by perpetual K3, SSK pick up one rounds. This makes a nice, thick corner loop – very handy for potholders, hot pads, mitten edges, or kiddie nap blankets, any of which might need to hang from hooks.
It’s obvious that fewer rounds of plain I-cord will make a smaller corner loop, but too few make an extremely tight and awkward corner. I’ve even knit a whole bunch more than I needed, then tied the resulting free “snake” in a simple overhand knot before going on to the rejoin step. This same principle can be used to make buttonhole loops in between I-cord edging and the main body, by deliberately skipping a bunch of attachment points and working a segment of free I-cord, rejoining after the buttonhole’s desired width is achieved. I’ve also used I-cord as a seaming technique, to unite separately knitted front and back panels into a pillow:

I included zippers in these two pattern sampler pillow covers to enable easy washing.
MINT BLANKET EDGE
O.k. Now everyone extend an incriminating finger towards their monitors, and repeat after me… “Ha, ha, ha!” What are you laughing at?
This:

Oops.
I stand by my yardage estimates and my advice to date. However I did neglect one tiny little thing. Checking to make sure that the quantity of yarn I had on hand was in fact correct. I had forgotten that I had already dipped into mint green for one of my fish hats. Had I not done so, I would have had enough of that yarn to finish out my planned triangle edging. But sadly, that was not to be. With about a quarter of the edging left to go, it was painfully clear that was going to come up short. What’s a knitter to do?
Improvise.
I could have done another narrower dagged or notched edging, but I had calculated out the one shown on my initial graph so that no corner mitering would be needed – it would be an even multiple of the blanket’s long sides, with each edge beginning and ending on the single stitch row, and close enough to an even multiple on the short ends so that a one or two stitch fudge would be of no consequence. The proportions and depth of that edging worked well with the piece as a whole. I could have invented something approximately half as deep, on half as many rows and that would have worked out nicely too. But I was afraid that such a shallow dag would just curl and look ragged and haphazard. Instead I’ve opted for something super simple that gives any edge a tailored look: knit on I-cord:
I’m a big fan of knit on I-cord. I used it on the kid’s poncho, and in lieu of other finishes on lots of projects. It gives the edge heft and substance, and helps avoid that “loving hands at home” look. Two rounds of I-cord can help defeat Dreaded Stockinette Curl. Here you see the same mini-blanket shown in the first shot, but with one round of knit on I-cord in place of the triangle edging:

How to do it? Very simple. I grabbed a pair of DPNS one size LARGER than the needles I used to work the body. In my case that means a US #9. Starting with the final loop left over after binding off the cast-off edge and NOT breaking the yarn, I cast on three new stitches using a half hitch cast-on. I now had four stitches on my needle, including the initial loop. I knit back across these four, to end up at the edge of my work. Then I picked up one stitch in the first selvage chain immediately to the left of that initial bind off loop, for a total of five stitches on my needle. That means I’ll be working counterclockwise around the edge of my blanket.
Following standard I-cord process, without flipping the work over, shoved the stitches back up to business end of my left hand needle, stranded tightly across the back and commenced knitting the same four stitches from the “away” edge again, working from there back towards the point of attachment. On this row I knit 3, then did a SSK and picked up one stitch in the next available selvage chain point.
I continued work in this manner on every row with one VERY IMPORTANT EXCEPTION. After every fourth row, I concluded row number 5 by picking up one stitch in the same edge chain as row number 4. Were I not to do this, my blanket would be gathered into an edging that was less elastic and with fewer stitches per inch than are in the body. Think old fashioned dirndl apron, with the full skirt gathered into a tight waist tie. While this would be a very useful effect on another project, it would not be an advantage on our blanket, which we would prefer to lie flat rather than be gathered around the edge like a rectangular mushroom cap. I’ll have more than enough yarn to finish out my last remaining side of I-cord. Problem avoided.
So the dual morals of my story are: 1) Trust but verify. Especially yardage; and 2) Be flexible. If you’re going to knit in the “flying blind” style I describe for this project, always have an fall back plan in reserve, just in case things don’t quite work out perfectly, and always be prepared to laugh at yourself (in my case, with an Internet chorus), rip back and re-knit.
In any case, for those wanting to work the original edging along with an adaptation of the insertion pattern I used, the graph for it is included on the main body graph. Again start with that last loop that remains when the cast off row is completed and don’t break the yarn. Beginning in the corner and working around counter-clockwise work the first row of the edging chart – in this case making a YO then picking up a stitch in the first available selvage chain along the blanket’s side:

Continue with the chart as presented. Each side should begin and end with row 1, if necessary fudge a stitch here or there, either skipping an edge chain or working two rows into the same chain to achieve that result. The best place for fudging is on row 1, so if you are getting close to the end, count out the remaining stitches and make any adjustments between triangles as you close in on the corner rather than waiting to the very end and trying to fix things in the last couple of stitches.
So there you have it. An off-the-cuff simple small basket-sized blanket. Complete with running out of yarn – the worst possible error such a project could entail, and a similarly improvised problem mitigation strategy.
You can stop laughing now. If you’ve got questions on any aspect of this project, please feel free to post them or send them to me. I’ll try to answer all in the next post.
